
Enabling Screen Sharing
Based on Android Platform
Tencent Cloud TRTC supports screen sharing on Android system, which will already be sharing the current system screen content to other users in the room via TRTC SDK. For this feature, there are two points to pay attention:
On mobile TRTC Android versions prior to 8.6, screen sharing does not support "substream sharing" like the desktop version. Therefore, when starting screen sharing, the camera collection must be stopped first to avoid conflicts. Versions 8.6 and later support "substream sharing" and do not require stopping the camera collection.
When a background App on Android system continuously uses CPU, it can easily be forcefully terminated by the system, and screen sharing itself inevitably consumes CPU. To address this apparent conflict, we need to display a pop-up floating window on Android system while starting screen sharing. Since Android does not terminate apps with foreground UI, this solution allows your App to continue screen sharing without being automatically recycled by the system. As shown below:
Starting Screen Sharing
To enable screen sharing on Android, just call the
TRTCCloud startScreenCapture() API. However, if you want stable and clear sharing, attention required for the issues:Adding an Activity
Paste the following activity in the manifest file (no need to add if it exists in the project code).
<activityandroid:name="com.tencent.rtmp.video.TXScreenCapture$TXScreenCaptureAssistantActivity"android:theme="@android:style/Theme.Translucent"/>
Setting Video Encoding Parameters
By setting the startScreenCapture() parameter
encParams, you can specify the screen sharing encoding quality. If you set encParams to null, the SDK will automatically use the earlier encoding parameters. We recommend the following parameter settings:Parameter Item | Parameter Name | Recommended Value | Teaching Scenario |
Resolution | videoResolution | 1280 × 720 | 1920 × 1080 |
Frame Rate | videoFps | 10 FPS | 8 FPS |
maximum bit rate | videoBitrate | 1600 kbps | 2000 kbps |
resolution adaptation | enableAdjustRes | NO | NO |
Notes:
Since screen sharing content does not change severely, setting a high FPS is not economical. 10 FPS is recommended.
If the screen content you want to share contains a large number of text, you can appropriately increase the resolution and bitrate settings.
The highest bitrate (videoBitrate) refers to the maximum output bitrate when the frame changes dramatically. If the screen content changes less, the actual encoding bitrate will be lower.
Based on IOS Platform
Can only share the current App's screen. This feature requires iOS 13 and above versions of the operating system. Since it cannot share screen content outside the current App, it is suitable for scenarios with high privacy protection requirements.
Based on Apple's Replaykit solution, it can share the entire system's screen content, but requires the current App to provide an additional Extension component, so the steps required to implement are more than in-App sharing.
Solution 1: In-App Sharing on IOS Platform
The in-app sharing solution is super simple. Just call the startScreenCapture API provided by the TRTC SDK and input the encoding parameter
TRTCVideoEncParam. The TRTCVideoEncParam parameter can be set to null, at which point the SDK will continue to use the previous encoding parameters before screen sharing started.We recommend the encoding parameters for iOS screen sharing:
Parameter Item | Parameter Name | Recommended Value | Teaching Scenario |
Resolution | videoResolution | 1280 × 720 | 1920 × 1080 |
Frame Rate | videoFps | 10 FPS | 8 FPS |
maximum bit rate | videoBitrate | 1600 kbps | 2000 kbps |
resolution adaptation | enableAdjustRes | NO | NO |
Notes:
Since screen sharing content does not change severely, setting a high FPS is not economical. 10 FPS is recommended.
If the screen content you want to share contains a large number of text, you can appropriately increase the resolution and bitrate settings.
The highest bitrate (videoBitrate) refers to the maximum output bitrate when the frame changes dramatically. If the screen content changes less, the actual encoding bitrate will be lower.
Solution 2: Cross-App Sharing on IOS Platform
Steps Required to Implement
Cross-application screen sharing on iOS requires adding an Extension screen recording process to cooperate with the main App process to start push. The Extension screen recording process is created by the system when screen recording is needed and is responsible for receiving screen images collected by the system. Therefore, it needs to:
1. Create an App Group and configure it in XCode (optional). The purpose of this step is to enable cross-process communication between the Extension screen recording process and the main App process.
2. In your project, create a new Broadcast Upload Extension Target, and add the TXLiteAVSDK_ReplayKitExt.framework customized for the Extension module in Github.
3. Integrate the receiving logic of the main App to make the main App wait for screen recording data from Broadcast Upload Extension.
4. Edit the
pubspec.yaml file to add the replay_kit_launcher plug-in, achieving an effect similar to the TRTC Demo Screen where clicking a button can start screen sharing (optional).# Import trtc sdk and replay_kit_launcherdependencies:tencent_rtc_sdk: ^12.5.4replay_kit_launcher: any
Notes:
**Warning**: If skipped Step 1, that is without configuring App Group (passing null in the API), the screen-sharing feature can still run, but stability will be compromised. Although many steps are involved, ensure App Group is configured correctly to maintain the stability of the screen-sharing feature.
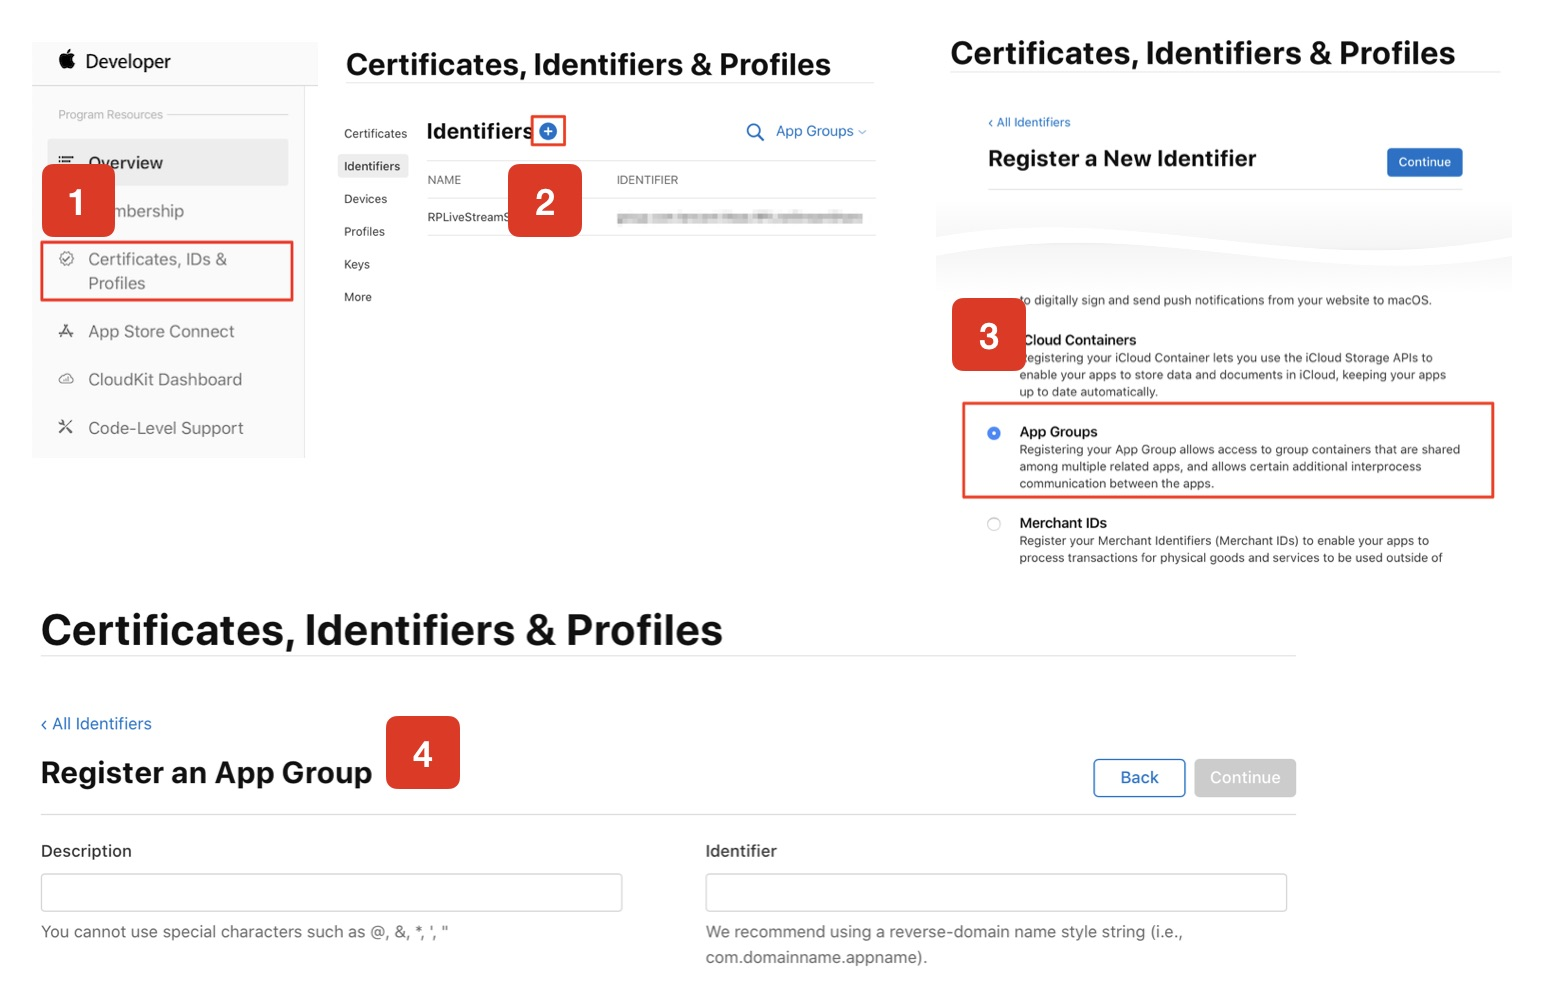
Step 1: Create App Group
Log in with your account at https://developer.apple.com/ and perform the following operations. Note that you need to re-download the corresponding Provisioning Profile after completion.
1. Click Certificates, IDs & Profiles.
2. Click the plus sign on the right interface.
3. Select App Groups, click Continue.
4. Fill in Description and Identifier in the pop-up form. Among them, Identifier requires the input of the corresponding AppGroup parameter in the API. Upon completion, click Continue.
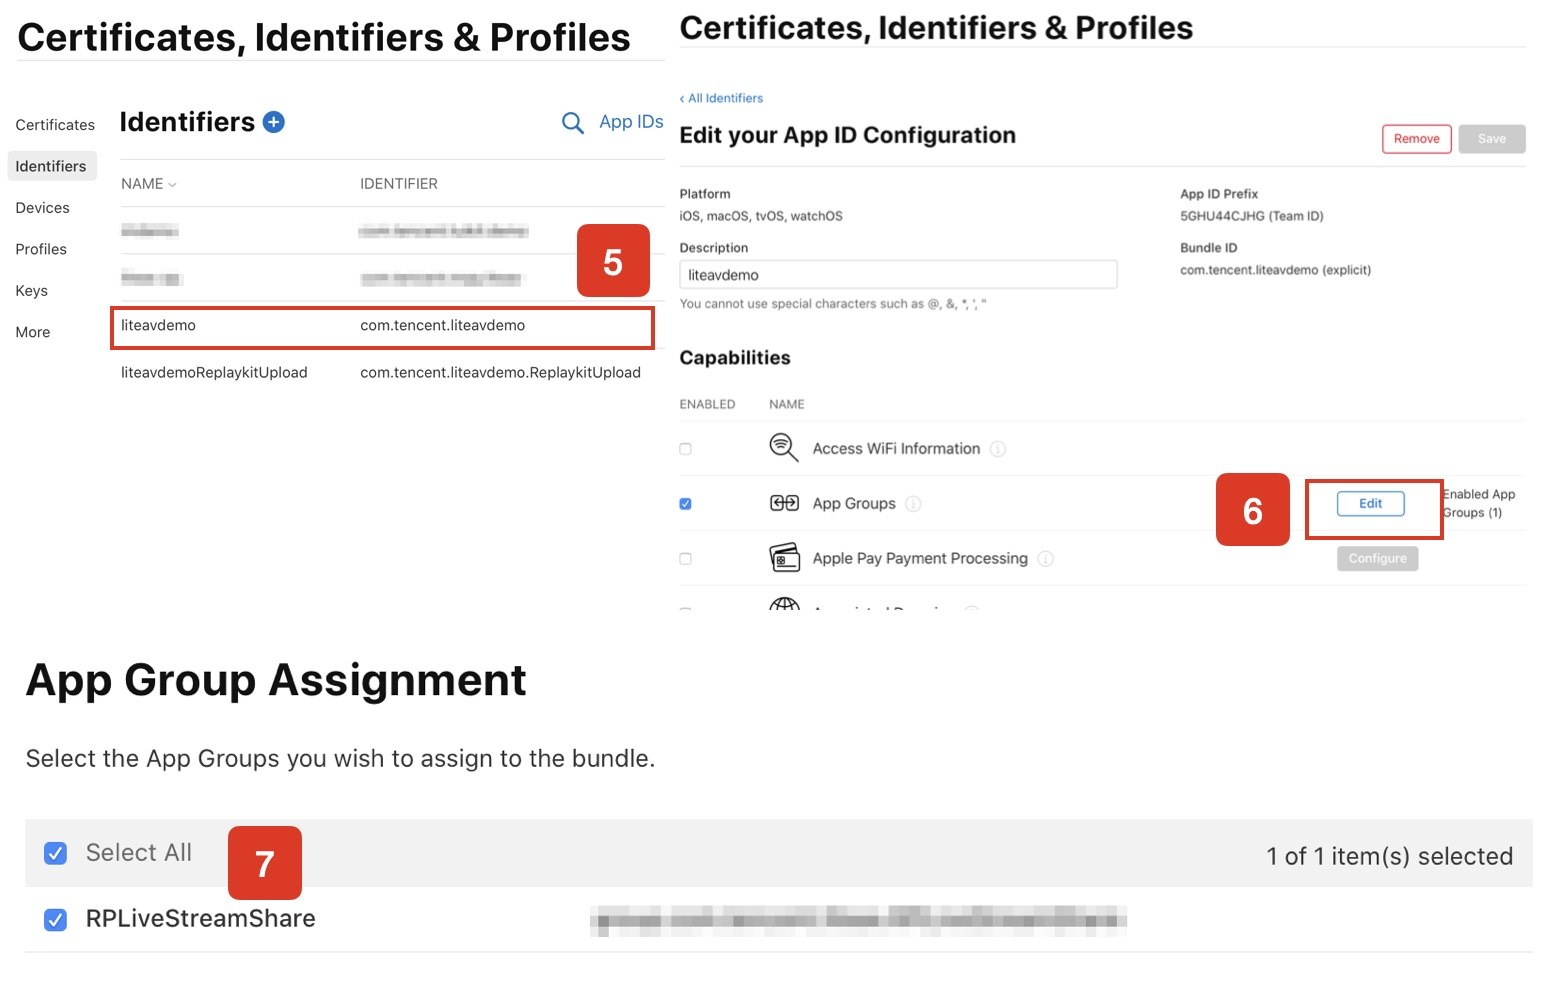
5. Return to the Identifier webpage, select App IDs from the menu above on the left, then click your App ID (the main App and Extension's AppID need the same configuration).
6. Select App Groups and click Edit.
7. Select the App Group you created earlier from the pop-up form, click Continue to return to the edit page, then click Save to save.
8. Re-download the Provisioning Profile and configure it in XCode.
Step 2: Create a Broadcast Upload Extension
1. In the Xcode menu, click sequentially File > New > Target..., then select Broadcast Upload Extension.
2. In the pop-up dialog box, fill in relevant information, do unused check Include UI Extension, then click Finish to complete the creation.
3. Drag the TXLiteAVSDK_ReplayKitExt.framework from the downloaded SDK compression package to the project, then select the newly created Target.
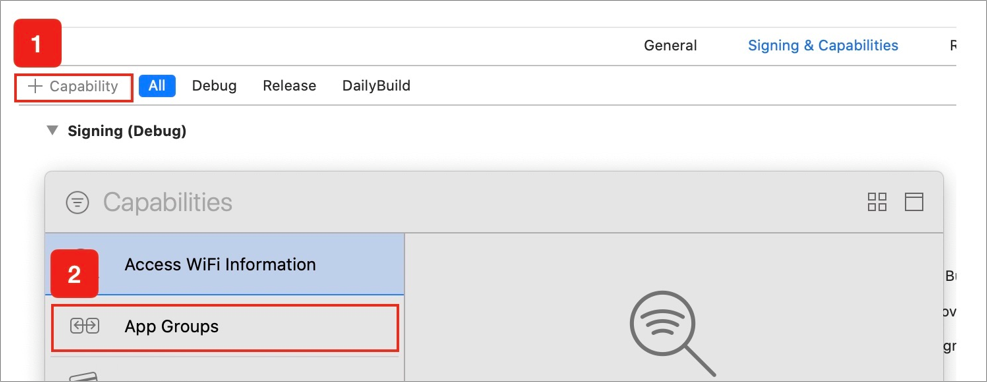
4. Select the newly added Target, click sequentially + Capability, double-click App Groups, as shown in the figure below:
5. After the operation is completed, a file named
Target.entitlements will be generated in the file list, as shown below. Select this file, click the + sign, and fill in the App Group from the above steps.
6. Select the main App's Target, and follow the same steps to process the main App's Target.
7. In the newly created Target, Xcode automatically creates a file named "SampleHandler.swift". Replace it with the following code. Change APPGROUP in the code to the created App Group Identifier mentioned above.
import ReplayKitimport TXLiteAVSDK_ReplayKitExtlet APPGROUP = "group.com.tencent.comm.trtc.demo"class SampleHandler: RPBroadcastSampleHandler, TXReplayKitExtDelegate {let recordScreenKey = Notification.Name.init("TRTCRecordScreenKey")override func broadcastStarted(withSetupInfo setupInfo: [String : NSObject]?) {// User has requested to start the broadcast. Setup info from the UI extension can be supplied but optional.TXReplayKitExt.sharedInstance().setup(withAppGroup: APPGROUP, delegate: self)}override func broadcastPaused() {// User has requested to pause the broadcast. Samples will stop being delivered.}override func broadcastResumed() {// User has requested to resume the broadcast. Samples delivery will resume.}override func broadcastFinished() {// User has requested to finish the broadcast.TXReplayKitExt.sharedInstance() .finishBroadcast()}func broadcastFinished(_ broadcast: TXReplayKitExt, reason: TXReplayKitExtReason) {var tip = ""switch reason {case TXReplayKitExtReason.requestedByMain:tip = "screen sharing has ended"breakcase TXReplayKitExtReason.disconnected:tip = "app disconnected"breakcase TXReplayKitExtReason.versionMismatch:tip = "integration error (SDK version mismatch)"breakdefault:break}let error = NSError(domain: NSStringFromClass(self.classForCoder), code: 0, userInfo: [NSLocalizedFailureReasonErrorKey:tip])finishBroadcastWithError(error)}override func processSampleBuffer(_ sampleBuffer: CMSampleBuffer, with sampleBufferType: RPSampleBufferType) {switch sampleBufferType {case RPSampleBufferType.video:// Handle video sample bufferTXReplayKitExt.sharedInstance() .sendVideoSampleBuffer(sampleBuffer)breakcase RPSampleBufferType.audioApp:// Handle audio sample buffer for app audiobreakcase RPSampleBufferType.audioMic:// Handle audio sample buffer for mic audiobreak@unknown default:// Handle other sample buffer typesfatalError("Unknown type of sample buffer")}}}
Step 3: Integrate the Receiving Logic of the Main App
Follow the steps below to integrate the receiving logic of the main App. Before the user triggers screen sharing, the main App must be in a "waiting" state so that it can receive screen recording data from the Broadcast Upload Extension process at any time.
1. Ensure TRTCCloud has already turned off camera capture. If not yet, call stopLocalPreview to stop camera capturing.
2. Call the startScreenCaptureByReplaykit method and input the AppGroup set in Step 1 to put the SDK in a "waiting" status.
3. Call the launchReplayKitBroadcast method provided by replay_kit_launcher.
4. Wait for the user to trigger screen sharing. If there is no proactive pop-up of the iOS screen recording prompt dialog box, users are advised to long-press the screen recording button in the iOS Control Center to trigger it. The operation steps are as shown in the figure.
5. Call the stopScreenCapture API to terminate screen sharing at any time.
_trtcCloud.startScreenCaptureByReplaykit(TRTCVideoStreamType.sub,TRTCVideoEncParam(videoFps: 15,videoResolution: TRTCVideoResolution.res_640_360,videoBitrate: 1600,minVideoBitrate: 0,enableAdjustRes: false,videoResolutionMode: TRTCVideoResolutionMode.landscape,), "your app group");ReplayKitLauncher.launchReplayKitBroadcast("screen capture");
Windows Platform Based
Screen sharing on Windows supports two solutions: primary stream sharing and substream sharing.
Substream sharing
In TRTC, we can enable a separate uplink video stream for screen sharing, called "substream (substream)". Substream sharing means the host simultaneously sends two streams: camera video and screen display. This is the usage scheme of Tencent Meeting. You can enable this mode by setting the
TRTCVideoStreamType parameter to sub when calling the startScreenCapture API.Primary stream sharing
In TRTC, we normally call the camera channel "main video stream (bigstream)". Primary stream sharing means using the camera channel to share the screen. In this mode, the host has only one uplink video stream, either sending camera feed or screen display, and the two are mutually exclusive. You can enable this mode by setting the
TRTCVideoStreamType parameter to big when calling the startScreenCapture API.Step 1: Obtain Sharing Target
getScreenCaptureSources can enumerate the shareable window list, which is returned via the output parameter sourceInfoList.
Notes:
The desktop screen in Windows is also a window called the desktop window (Desktop). With two monitors, each has one desktop window. Therefore, the window list returned by getScreenCaptureSources will also contain the Desktop window.
Based on the obtained window information, you can create a simple list page to display shareable targets for users to select.
Step Two: Select Sharing Target
After obtaining shareable screens and windows via getScreenCaptureSources, you can call the selectScreenCaptureTarget API to select the target screen or target window you expect to share.
Step Three: Start Screen Sharing
After selecting the sharing target, use the startScreenCapture API to start screen sharing.
During sharing, you can still replace the sharing target by calling selectScreenCaptureTarget.
pauseScreenCapture differs from stopScreenCapture in that pause stops screen content collection and uses the last frame as a placeholder, so the far end keeps seeing the last frame until resume.
Setting Video Encoding Parameters
By setting the first parameter
encParams in startScreenCapture(), you can specify the screen sharing encoding quality, including resolution, bitrate and frame rate. We provide the following recommended reference values:Clarity Level | Resolution | Frame Rate | Bitrate |
UHD (HD+) | 1920 × 1080 | 10 | 800kbps |
HD | 1280 × 720 | 10 | 600kbps |
SD | 960 × 720 | 10 | 400kbps |
If you specify
encParams as null, the SDK will automatically use the encoding parameters set earlier.Viewing Screen Sharing
View Screen Sharing
When a user performs screen sharing via the mainstream, other users in the room will receive this notification through the onUserVideoAvailable event in TRTCCloudListener.
Users who hope to view screen sharing can use the startRemoteView API to start rendering the remote user's mainstream picture.
FAQs
Can Multiple Screen Sharing Streams Exist in One Room Simultaneously
Currently, only one screen sharing stream is allowed in a TRTC audio and video room.

