
Step 1: Install Chat SDK
This document describes how to quickly integrate the Tencent Cloud Chat SDK into your React Native project.
Note:
1. Integrating @tencentcloud/chat into your React Native project requires downloading version 3.4.3 or later.
2. Integrating tim-upload-plugin into your React Native project requires downloading version 1.4.0 or later.
Environment Requirements
Platform | Version |
React Native | v0.75.0 or later. |
Android | Android Studio 3.5 or later. The app requires Android 4.1 or later devices. |
iOS | Xcode 11.0 or later. For testing with a real device, make sure that your project has a valid developer signature. |
Node | Version 18.0 or later. |
Configuring the development environment
If this is your first time developing a React Native project, refer to the React Native official steps set-up-your-environment to configure the development environment.
If you encounter environment problems when creating or compiling the project, you can run
npx react-native doctor for environment diagnostics.Create a project (can be skipped if you already have one)
npx react-native@latest init chatExample
npm react-native creates projects with Android gradle version 8.8. If your Android gradle version is lower than 8.8, please open Android Studio to sync the gradle version.Integrate Chat SDK
Integrate the Chat SDK into your React Native project using npm.
You can integrate the upload plugin tim-upload-plugin for faster and safer upload of rich text message resources.
Enhance the user experience in a poor network environment or during network switching by integrating @react-native-community/netinfo.
Install the Chat SDK dependencies in your React Native project.
npm install @tencentcloud/chat tim-upload-plugin @react-native-community/netinfo --save
Initialization
You must have the correct SDKAppID to proceed with the initialization.
SDKAppID is the unique identifier Tencent Cloud IM uses to distinguish customer accounts. We recommend applying for a new SDKAppID for each independent app. Messages between different SDKAppIDs are inherently isolated and cannot be interoperated.
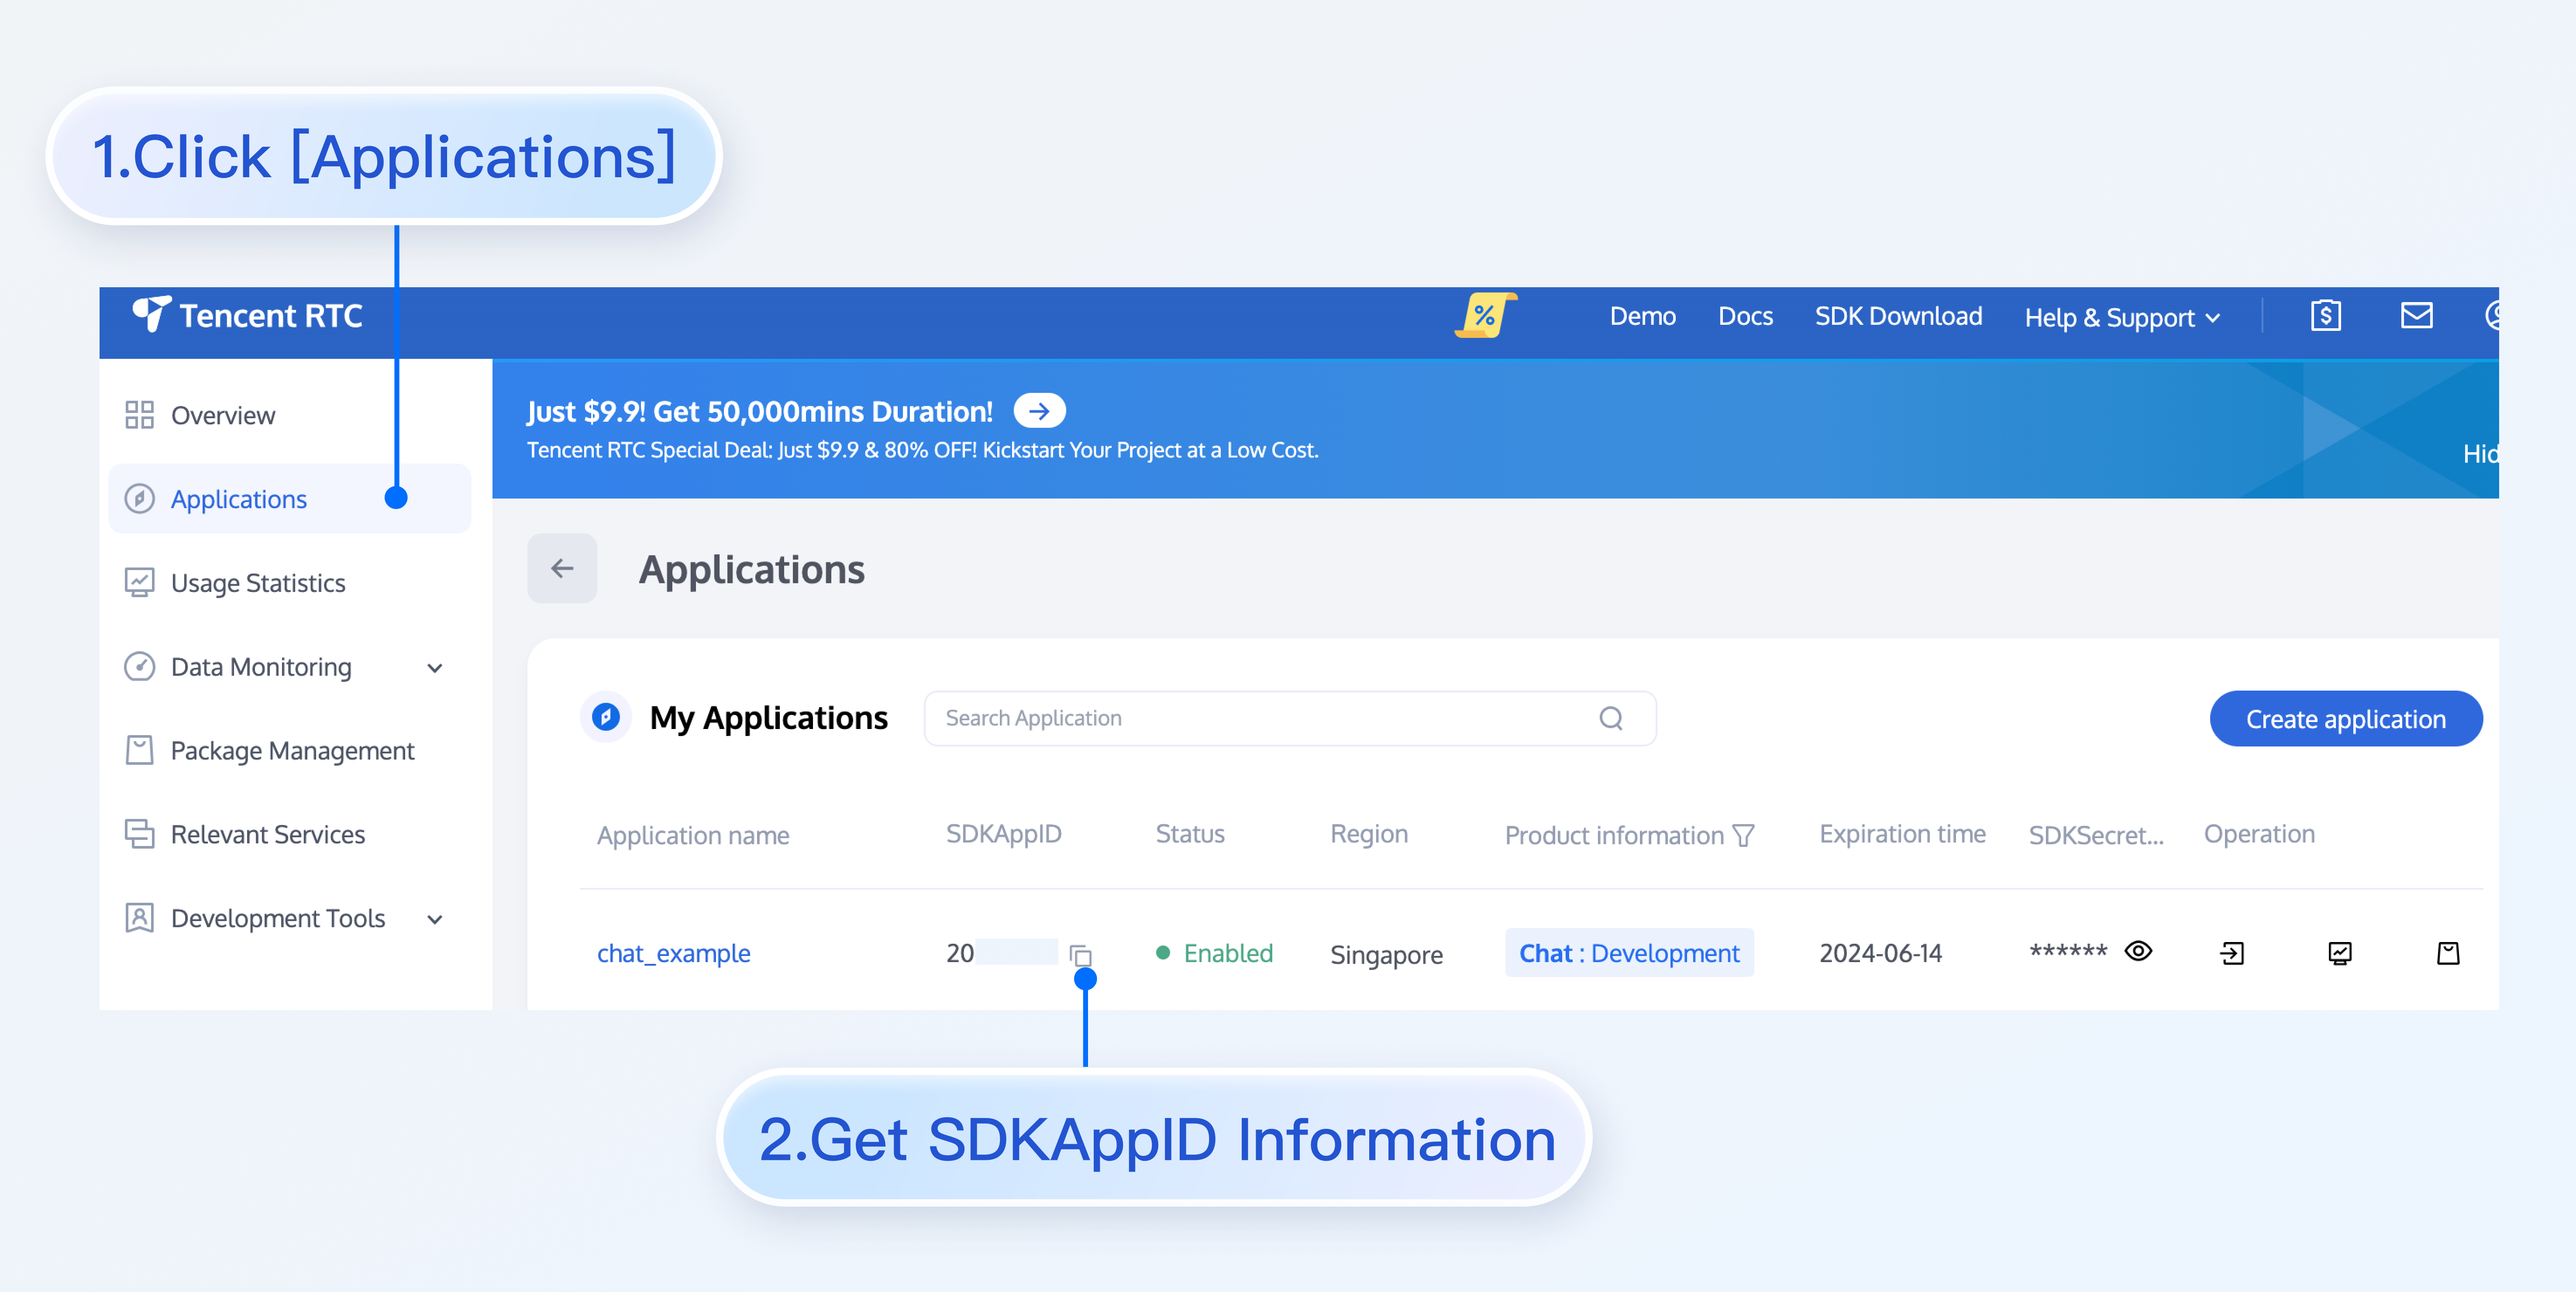
You can view all SDKAppIDs in the Chat console. Click Create application to create a new SDKAppID.
Import the Chat SDK and initialize it in your project's App.tsx.
import TencentCloudChat from '@tencentcloud/chat';import TIMUploadPlugin from 'tim-upload-plugin';import NetInfo from '@react-native-community/netinfo';let options = {SDKAppID: 0 // Replace 0 with the SDKAppID of your Chat application when connecting};// Create an SDK instance. The `TencentCloudChat.create()` method returns the same instance for the same `SDKAppID`let chat = TencentCloudChat.create(options); // The SDK instance is usually referred to as chatchat.setLogLevel(0); // Normal level, with a lot of logs; it's recommended for integration// Register the Tencent Cloud Instant Messaging rich media resource upload pluginchat.registerPlugin({'tim-upload-plugin': TIMUploadPlugin});// Register the network monitoring pluginchat.registerPlugin({'chat-network-monitor': NetInfo});
Listening on events
SDK_READY
This is triggered when the SDK enters the ready state. After the accessing side listens to this event, it can call SDK APIs to send messages or use other SDK features.
let onSdkReady = function(event) {// After listening to the SDK ready event, you can make API calls};chat.on(TencentCloudChat.EVENT.SDK_READY, onSdkReady);
SDK_NOT_READY
This is triggered when the SDK enters the not-ready state. At this time, the accessing side will not be able to use features like sending messages via the SDK. To resume usage, the accessing side needs to call the login interface and drive the SDK to enter the ready state.
let onSdkNotReady = function(event) {// chat.login({userID: 'your userID', userSig: 'your userSig'});};chat.on(TencentCloudChat.EVENT.SDK_NOT_READY, onSdkNotReady);
MESSAGE_RECEIVED
When the SDK receives new messages from one-on-one chat, group chat, group prompts, or group system notifications, the accessing side can traverse event.data to obtain the message list data and render it to the UI.
let onMessageReceived = function(event) {// event.data - An array that stores `Message` objects - [Message]};chat.on(TencentCloudChat.EVENT.MESSAGE_RECEIVED, onMessageReceived);
CONVERSATION_LIST_UPDATED
The conversation list is updated. event.data is an array containing Conversation objects.
let onConversationListUpdated = function(event) {console.log(event.data); // Array that stores Conversation instances};chat.on(TencentCloudChat.EVENT.CONVERSATION_LIST_UPDATED, onConversationListUpdated);
Note:
Deinitialization
Terminate the SDK instance. The SDK will log out, disconnect the WebSocket persistent connection, and then release resources.
chat.destroy();
Login
Log in requires providing information such as userID and userSig. Please log in to the Chat console to obtain them.
userID
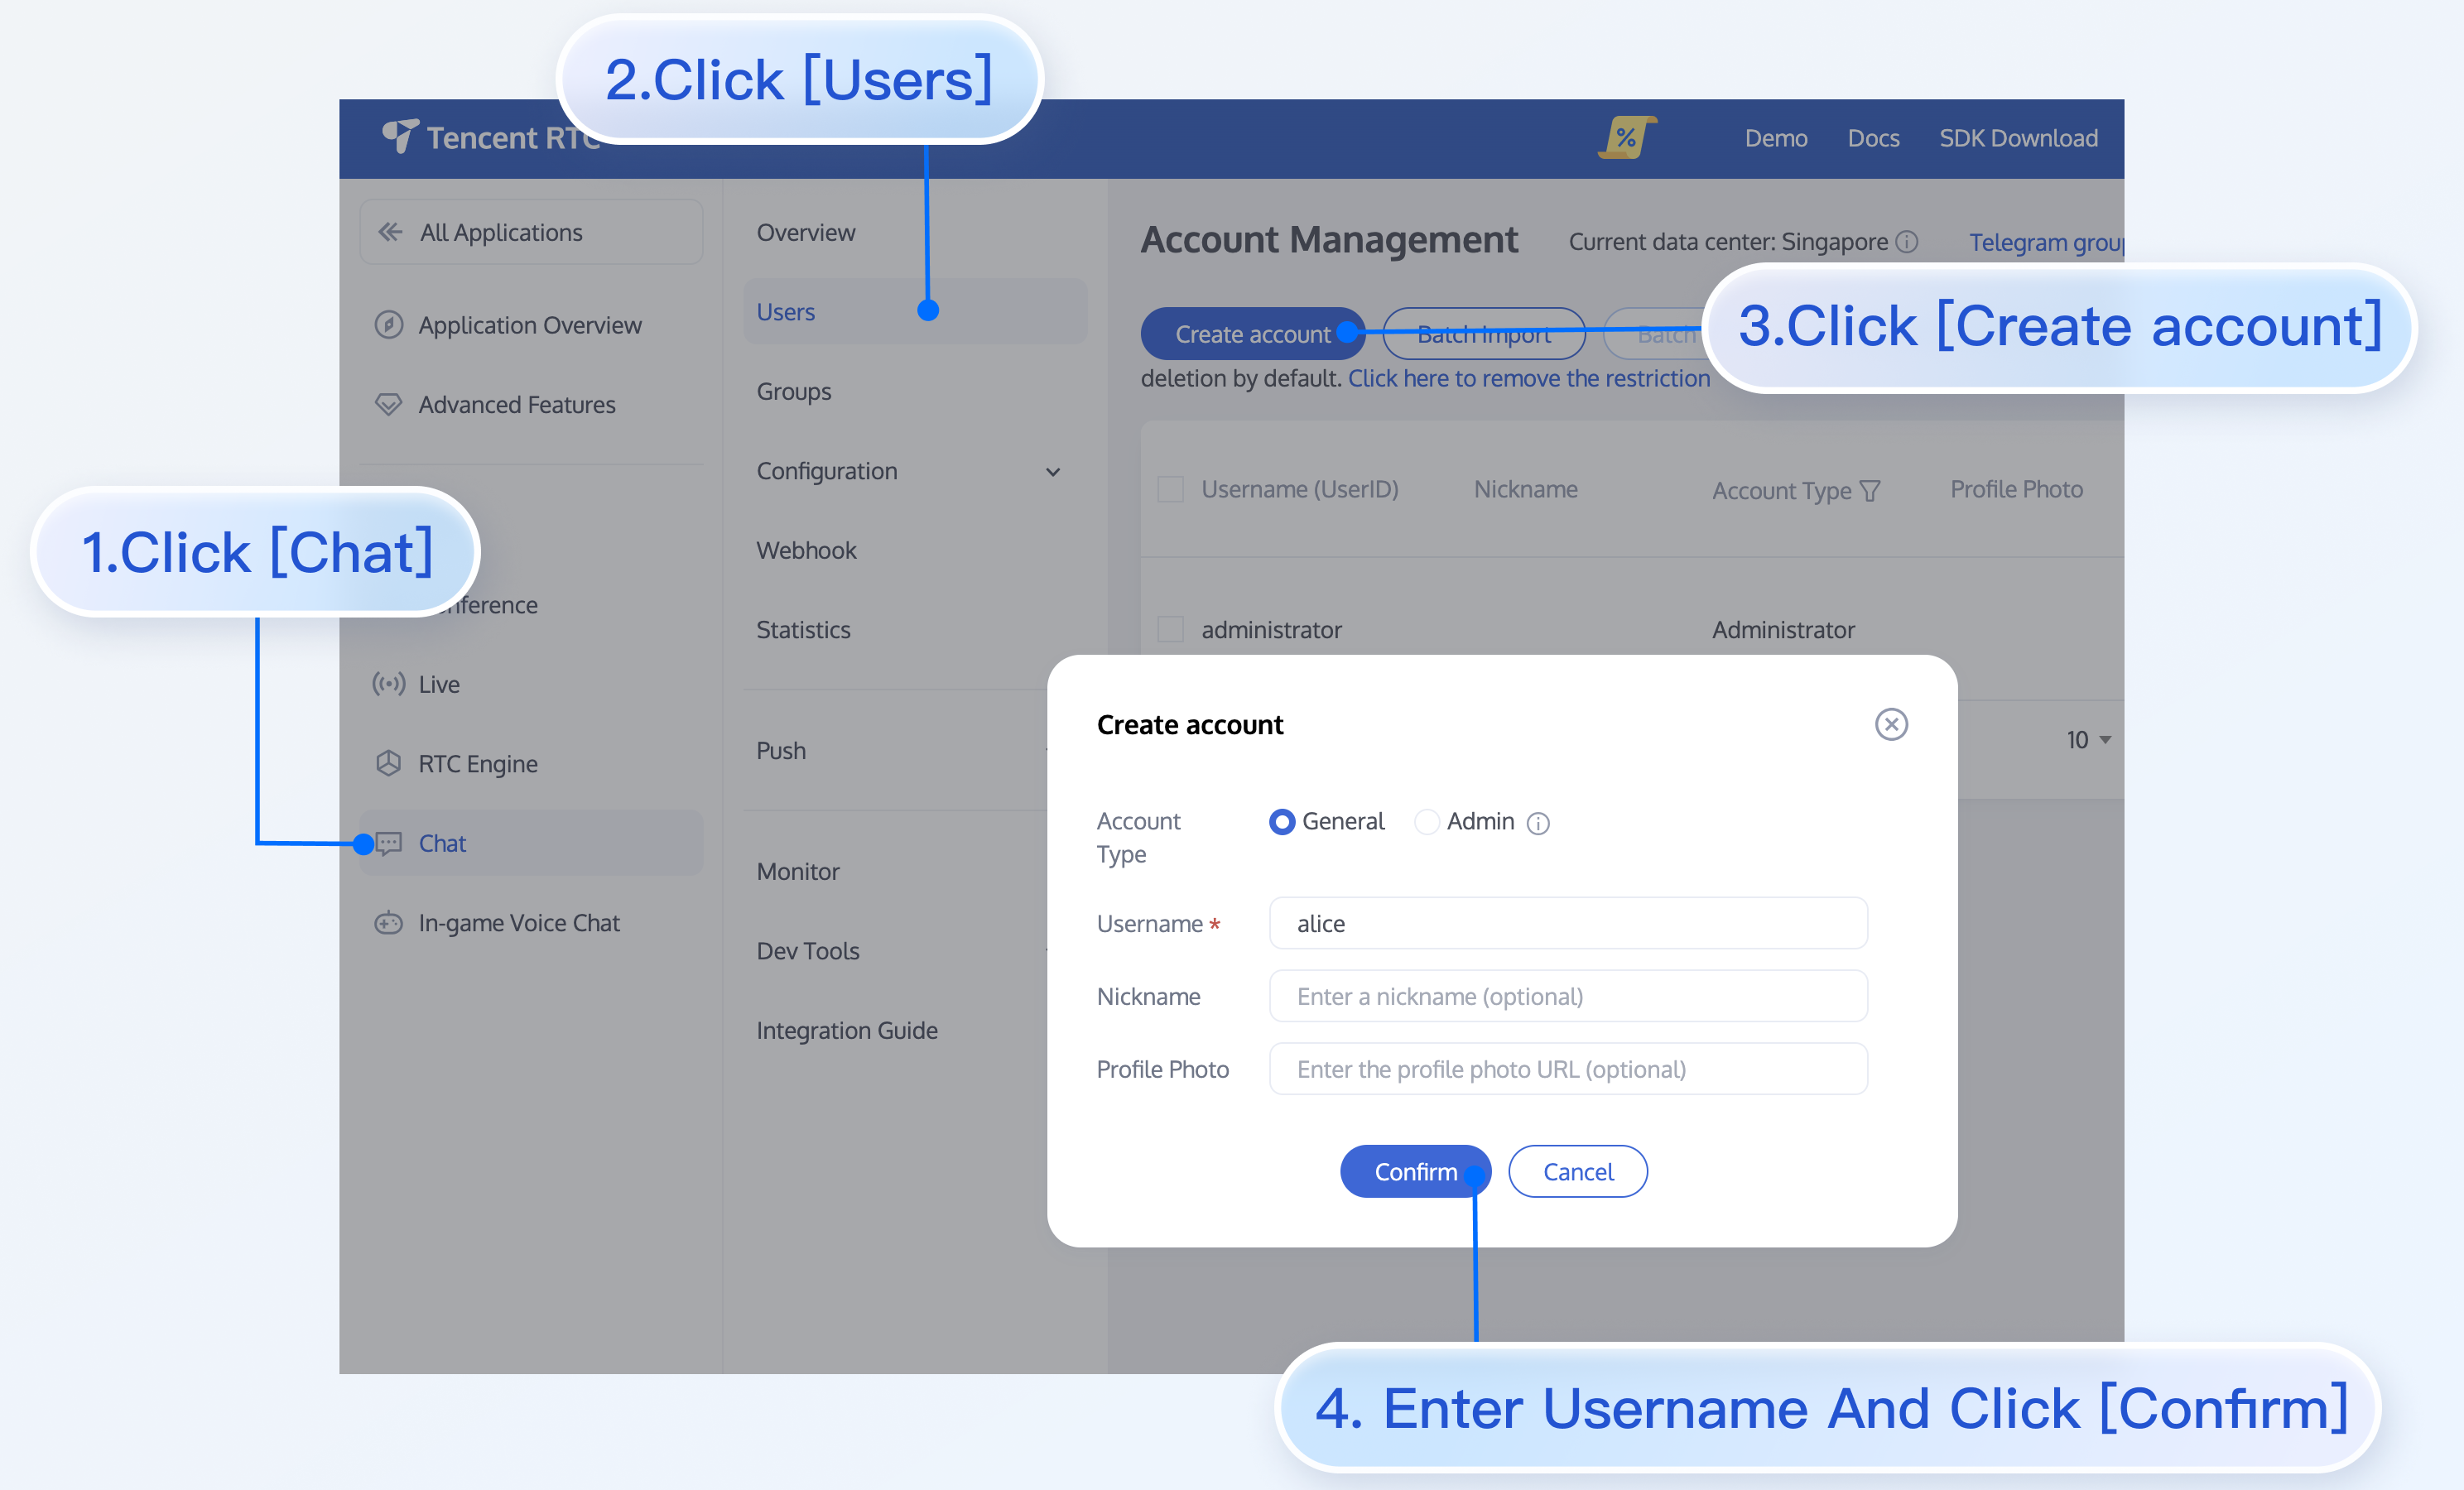
Click to enter the Application you created, and you will see the Chat Product entry in the left sidebar. Click to enter.
After entering the Chat Product subpage, click Users to enter the user management page.
Click Create account to open the account information form. If it is for a regular member, we recommend choosing the General type.
To enhance your experience with message sending and receiving features, we recommend creating two userIDs.
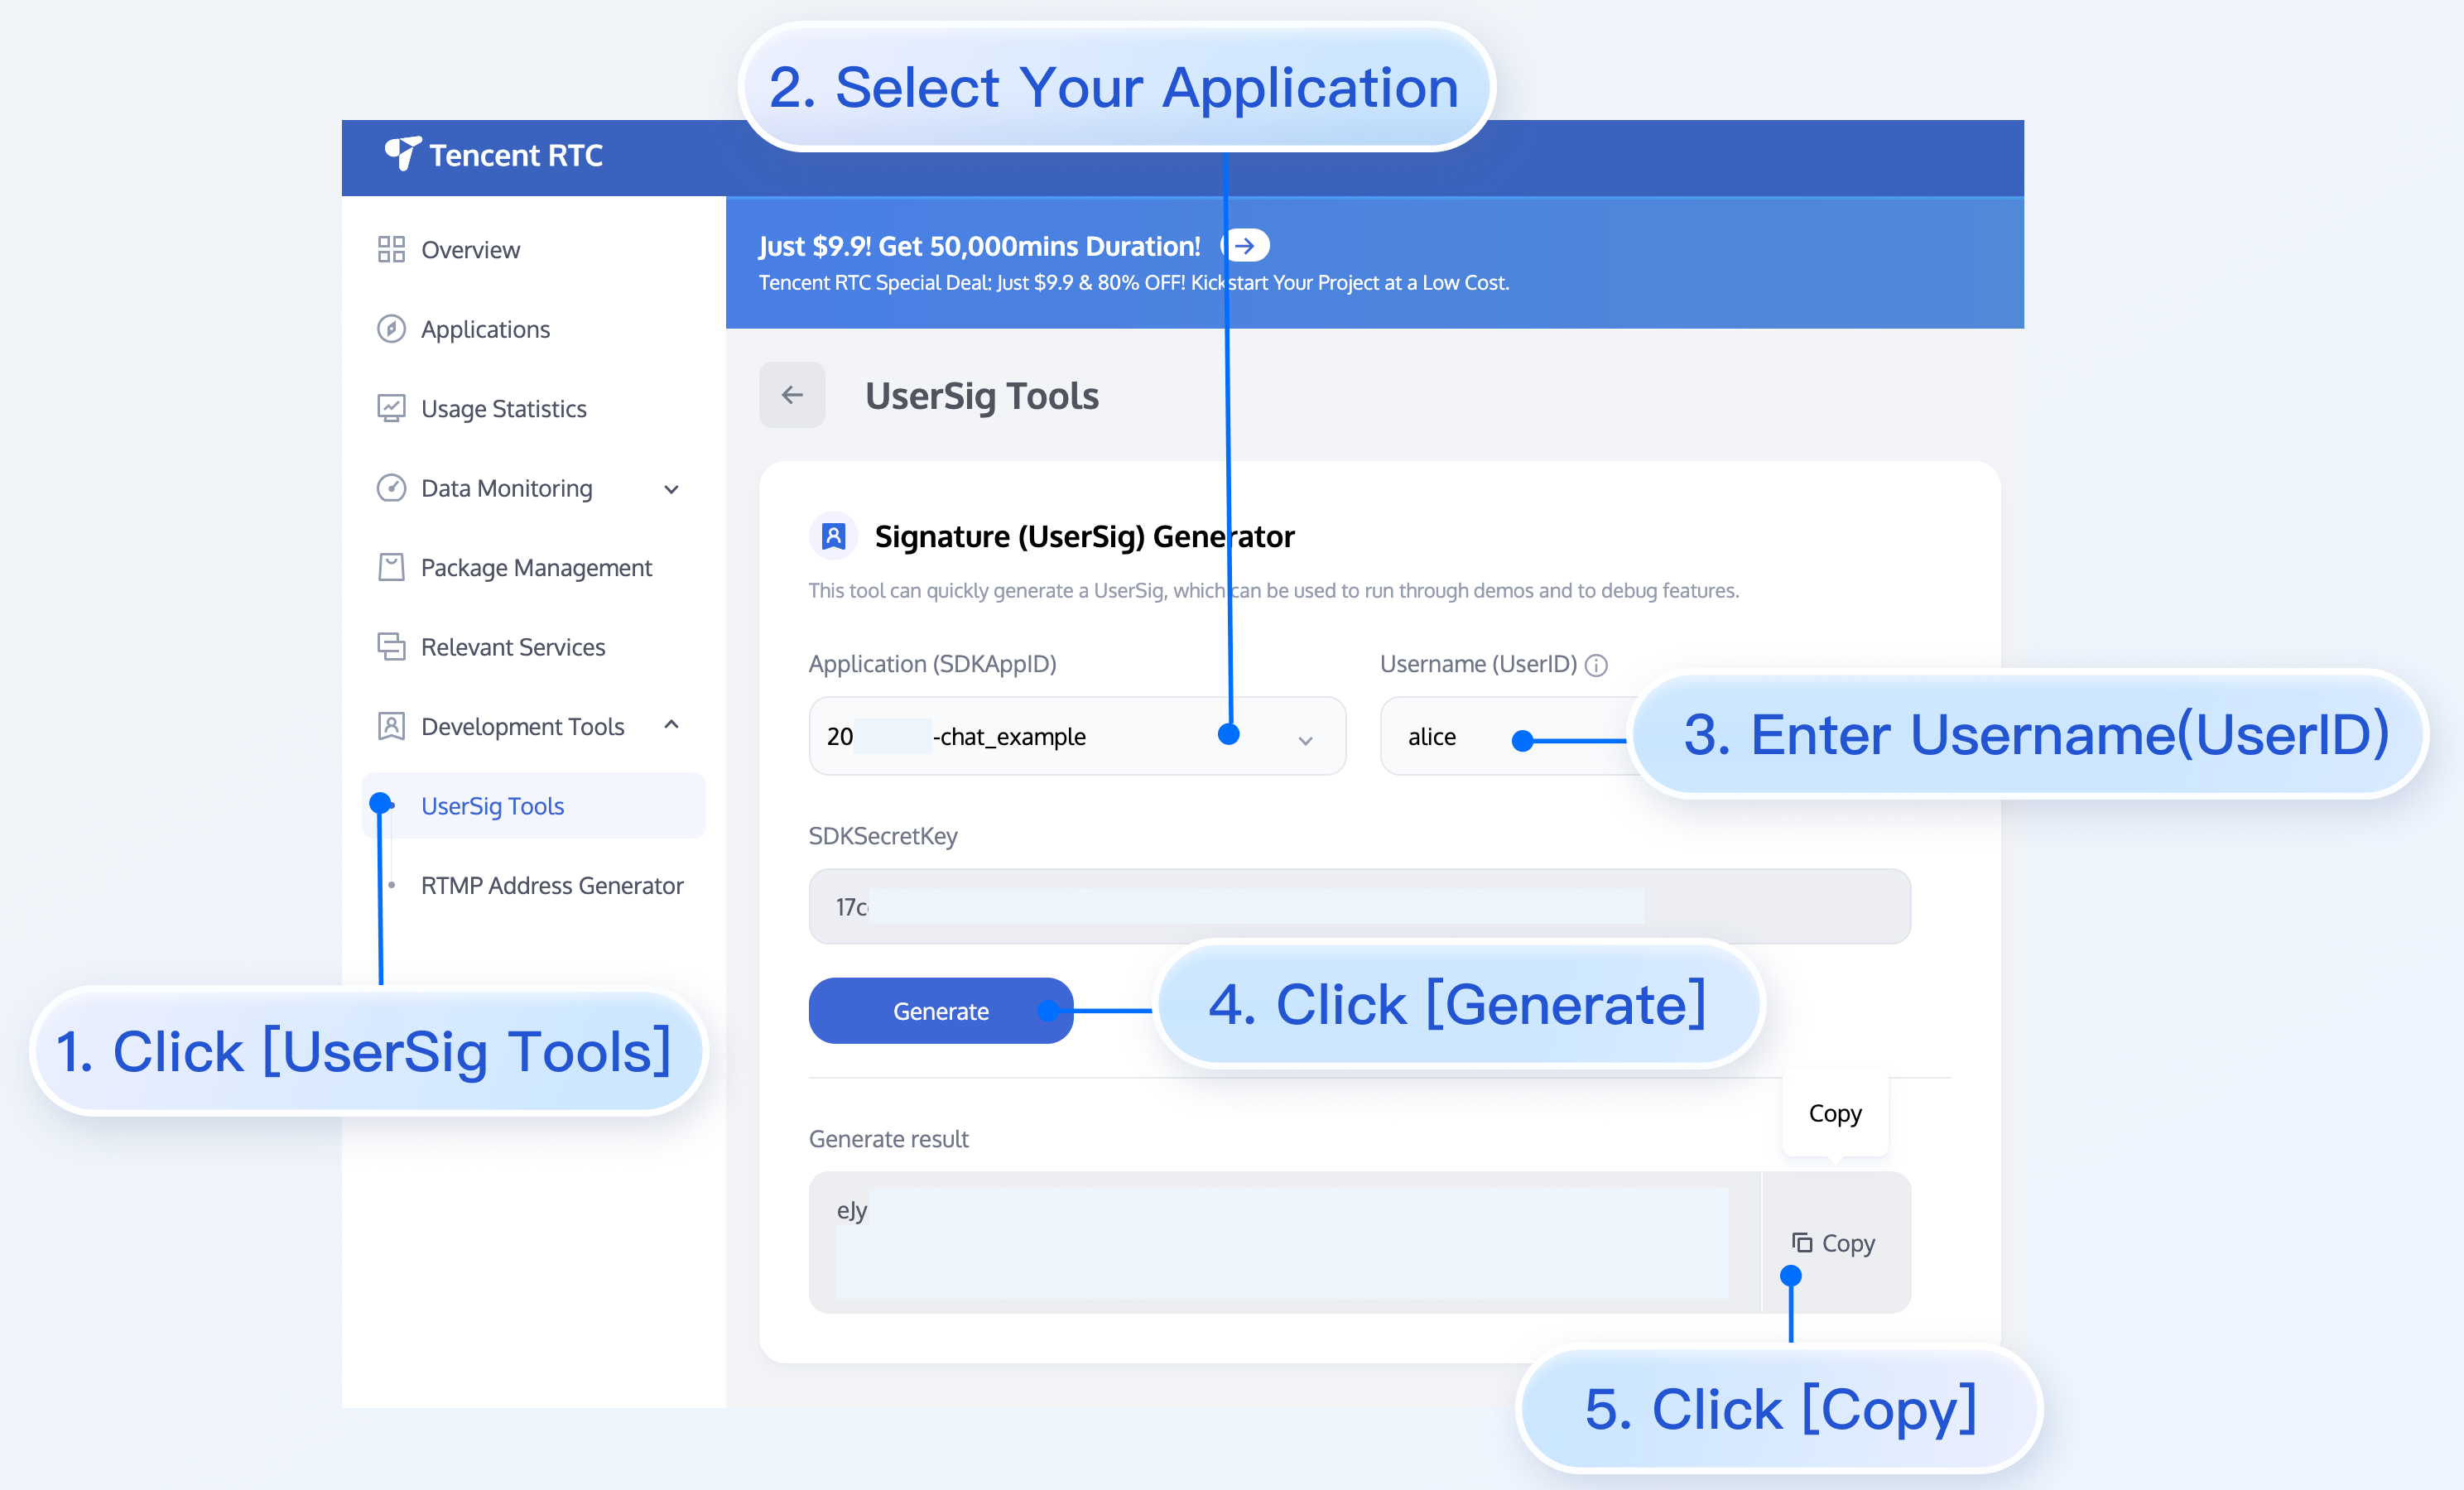
userSig can be generated in real-time using the development tools provided by the console. Please click Chat Console > Development Tools > UserSig Tools > Signature (UserSig) Generator.
let promise = chat.login({userID: 'your userID',userSig: 'your userSig',});promise.then(function(imResponse) {if (imResponse.data.repeatLogin === true) {// This indicates that the account is already logged in. This login attempt is a duplicate login.console.log(imResponse.data.errorInfo);}}).catch(function(imError) {// Information related to login failureconsole.warn('login error:', imError);});
Compile and run the React Native application
To compile and run the project, you need to use a real device or an emulator.A real device is recommended. You can refer to the React Native official website running-on-device to connect a real device for debugging.
1. Enable Developer Mode on your phone, and turn on theUSB Debugging switch.
2. Connect your phone via USB. It's recommended to select the Transfer files option, do not choose the Charging only option.
3. After confirming the successful connection of your phone, execute
npm run android to compile and run the project.npm run android
1. Connect your mobile phone with a USB cable, and open the ios directory of the project using Xcode.
2. Configure the signing information according to the React Native official website running-on-device.
3. Go to the ios directory and install dependencies.
cd iospod install
4. Go back to the root directory and execute
npm run ios to compile and run the project.cd ../npm run ios
Integrate third-party module
If you need to implement features like sendingImages, Videos, Files, Voice, it is recommended to use the third-party modules provided below.
Select Images and Videos, Take Photo, Shoot Video, you need to integrate react-native-image-picker.
npm install react-native-image-picker --save
import {launchImageLibrary} from 'react-native-image-picker';// 1. Select an ImagelaunchImageLibrary({mediaType: 'photo',selectionLimit: 1,}).then((result) => {const file = result.assets[0];// 2. Create a message instance. The instance returned by the interface can be displayed on the screenlet message = chat.createImageMessage({to: 'user1',conversationType: TencentCloudChat.TYPES.CONV_C2C,payload: { file: file },// React Native does not support upload progress callback// onProgress: function(event) { console.log('file uploading:', event) }});// 3. Send Imagelet promise = chat.sendMessage(message);promise.then(function(imResponse) {// The message was successfully sentconsole.log(imResponse);}).catch(function(imError) {// The message failed to be sentconsole.warn('sendMessage error:', imError);});});
import {launchCamera} from 'react-native-image-picker';// 1. Take PhotolaunchCamera({mediaType: 'photo',cameraType: 'back',}).then((result) => {const file = result.assets[0];// 2. Create a message instance. The instance returned by the interface can be displayed on the screenlet message = chat.createImageMessage({to: 'user1',conversationType: TencentCloudChat.TYPES.CONV_C2C,payload: { file: file },// React Native does not support upload progress callback// onProgress: function(event) { console.log('file uploading:', event) }});// 3. Send Imagelet promise = chat.sendMessage(message);promise.then(function(imResponse) {// The message was successfully sentconsole.log(imResponse);}).catch(function(imError) {// The message failed to be sentconsole.warn('sendMessage error:', imError);});});
import {launchImageLibrary} from 'react-native-image-picker';// 1. Select a VideolaunchImageLibrary({mediaType: 'video',selectionLimit: 1,}).then((result) => {const file = result.assets[0];// 2. Create a message instance. The instance returned by the interface can be displayed on the screenlet message = chat.createVideoMessage({to: 'user1',conversationType: TencentCloudChat.TYPES.CONV_C2C,payload: { file: file },// React Native does not support upload progress callback// onProgress: function(event) { console.log('file uploading:', event) }});// 3. Send Videolet promise = chat.sendMessage(message);promise.then(function(imResponse) {// The message was successfully sentconsole.log(imResponse);}).catch(function(imError) {// The message failed to be sentconsole.warn('sendMessage error:', imError);});});
import {launchCamera} from 'react-native-image-picker';// 1. Record VideolaunchCamera({mediaType: 'video',cameraType: 'back',}).then((result) => {const file = result.assets[0];// 2. Create a message instance. The instance returned by the interface can be displayed on the screenlet message = chat.createVideoMessage({to: 'user1',conversationType: TencentCloudChat.TYPES.CONV_C2C,payload: { file: file },// React Native does not support upload progress callback// onProgress: function(event) { console.log('file uploading:', event) }});// 3. Send Videolet promise = chat.sendMessage(message);promise.then(function(imResponse) {// The message was successfully sentconsole.log(imResponse);}).catch(function(imError) {// The message failed to be sentconsole.warn('sendMessage error:', imError);});});
Select Files, you need to integrate react-native-document-picker.
npm install react-native-document-picker --save
import DocumentPicker from 'react-native-document-picker';// 1. Select FileDocumentPicker.pick({type: [DocumentPicker.types.allFiles],}).then((result) => {const file = result[0];// 2. Create a message instance. The instance returned by the interface can be displayed on the screenlet message = chat.createFileMessage({to: 'user1',conversationType: TencentCloudChat.TYPES.CONV_C2C,payload: { file: file },// React Native does not support upload progress callback// onProgress: function(event) { console.log('file uploading:', event) }});// 3. Send Filelet promise = chat.sendMessage(message);promise.then(function(imResponse) {// The message was successfully sentconsole.log(imResponse);}).catch(function(imError) {// The message failed to be sentconsole.warn('sendMessage error:', imError);});});
Record voice, you need to integrate react-native-audio-recorder-player.
npm install react-native-audio-recorder-player --save
import AudioRecorderPlayer, {AVEncodingOption} from 'react-native-audio-recorder-player';// Record recording durationlet duration = 0;// Record recording file pathlet uri = '';// 1. Start recordingconst onStartRecord = async () => {await audioRecorderPlayer.startRecorder('test.aac',{VFormatIDKeyIOS: AVEncodingOption.aac,});audioRecorderPlayer.addRecordBackListener((e: any) => {duration = e.currentPosition;});};// 2. Stop recordingconst onStopRecord = async () => {uri = await audioRecorderPlayer.stopRecorder();audioRecorderPlayer.removeRecordBackListener();};// 3. Send voiceconst file = {uri: uri,duration: duration,};let message = chat.createAudioMessage({to: 'user1',conversationType: 'C2C',payload: {file: file,},// React Native does not support upload progress callback// onProgress: function(event) { console.log('file uploading:', event) }});let promise = chat.sendMessage(message);promise.then(function(imResponse) {// The message was successfully sentconsole.log(imResponse);}).catch(function(imError) {// The message failed to be sentconsole.warn('sendMessage error:', imError);});
Note:
To enable
VoiceMessage to play across all platforms, packaging the iOS app requires specifying VFormatIDKeyIOS as AVEncodingOption.aac for voice recording.To use the album, camera, and microphone, you need to configure the corresponding permissions. After configuring, you need to recompile and run the project to ensure effectiveness.
In the android directory, find app/src/main/AndroidManifest.xml and add the following permissions:
<uses-permission android:name="android.permission.WRITE_EXTERNAL_STORAGE" /><uses-permission android:name="android.permission.READ_EXTERNAL_STORAGE" /><uses-permission android:name="android.permission.RECORD_AUDIO" />
In the ios directory, find Info.plist and add the following permissions:
<key>NSCameraUsageDescription</key><string>We need access to your camera to take photos</string><key>NSPhotoLibraryUsageDescription</key><string>We need access to your album to select photos</string><key>NSMicrophoneUsageDescription</key><string>We need access to your microphone to record audio</string>
Custom Definition Rich Media Message file Structure
If you choose other third-party plugins to select pictures, videos, files, and record voice, please assemble the file according to the following structure:
uri,fileName,type,width,height is required, fileSize is optional if not available.
const file = {uri: 'xxx',fileName: 'xxx',fileSize: 1,type: 'xxx',width: 1,height: 1,};
uri,fileName,type are required, and the type format must be **/*. fileSize and duration are optional if not available.
const file = {uri: 'xxx',fileName: 'xxx',fileSize: 1,type: 'xxx',duration: 0,};
uri,size,name are required, and size must be greater than 0.
const file = {uri: 'xxx',name: 'xxx',size: 1,};
uri,fileName,duration are required. duration is measured in milliseconds (ms). fileSize is optional if not available.
const file = {uri: 'xxx',fileName: 'xxx',fileSize: 1,duration: 0,};
FAQs
1. When running npm run android and an error occurs as shown in the image, please reset the environment variables in the project root directory.

export ANDROID_HOME=$HOME/Library/Android/sdk
export PATH=$PATH:$ANDROID_HOME/emulator
export PATH=$PATH:$ANDROID_HOME/platform-tools
2. If executing the Build command in Xcode prompts an issue with the node environment variables, please proceed as follows:

cd iosecho export NODE_BINARY=$(command -v node) > .xcode.env
Documentation
For more information on Chat SDK APIs, please refer to the Client API.

