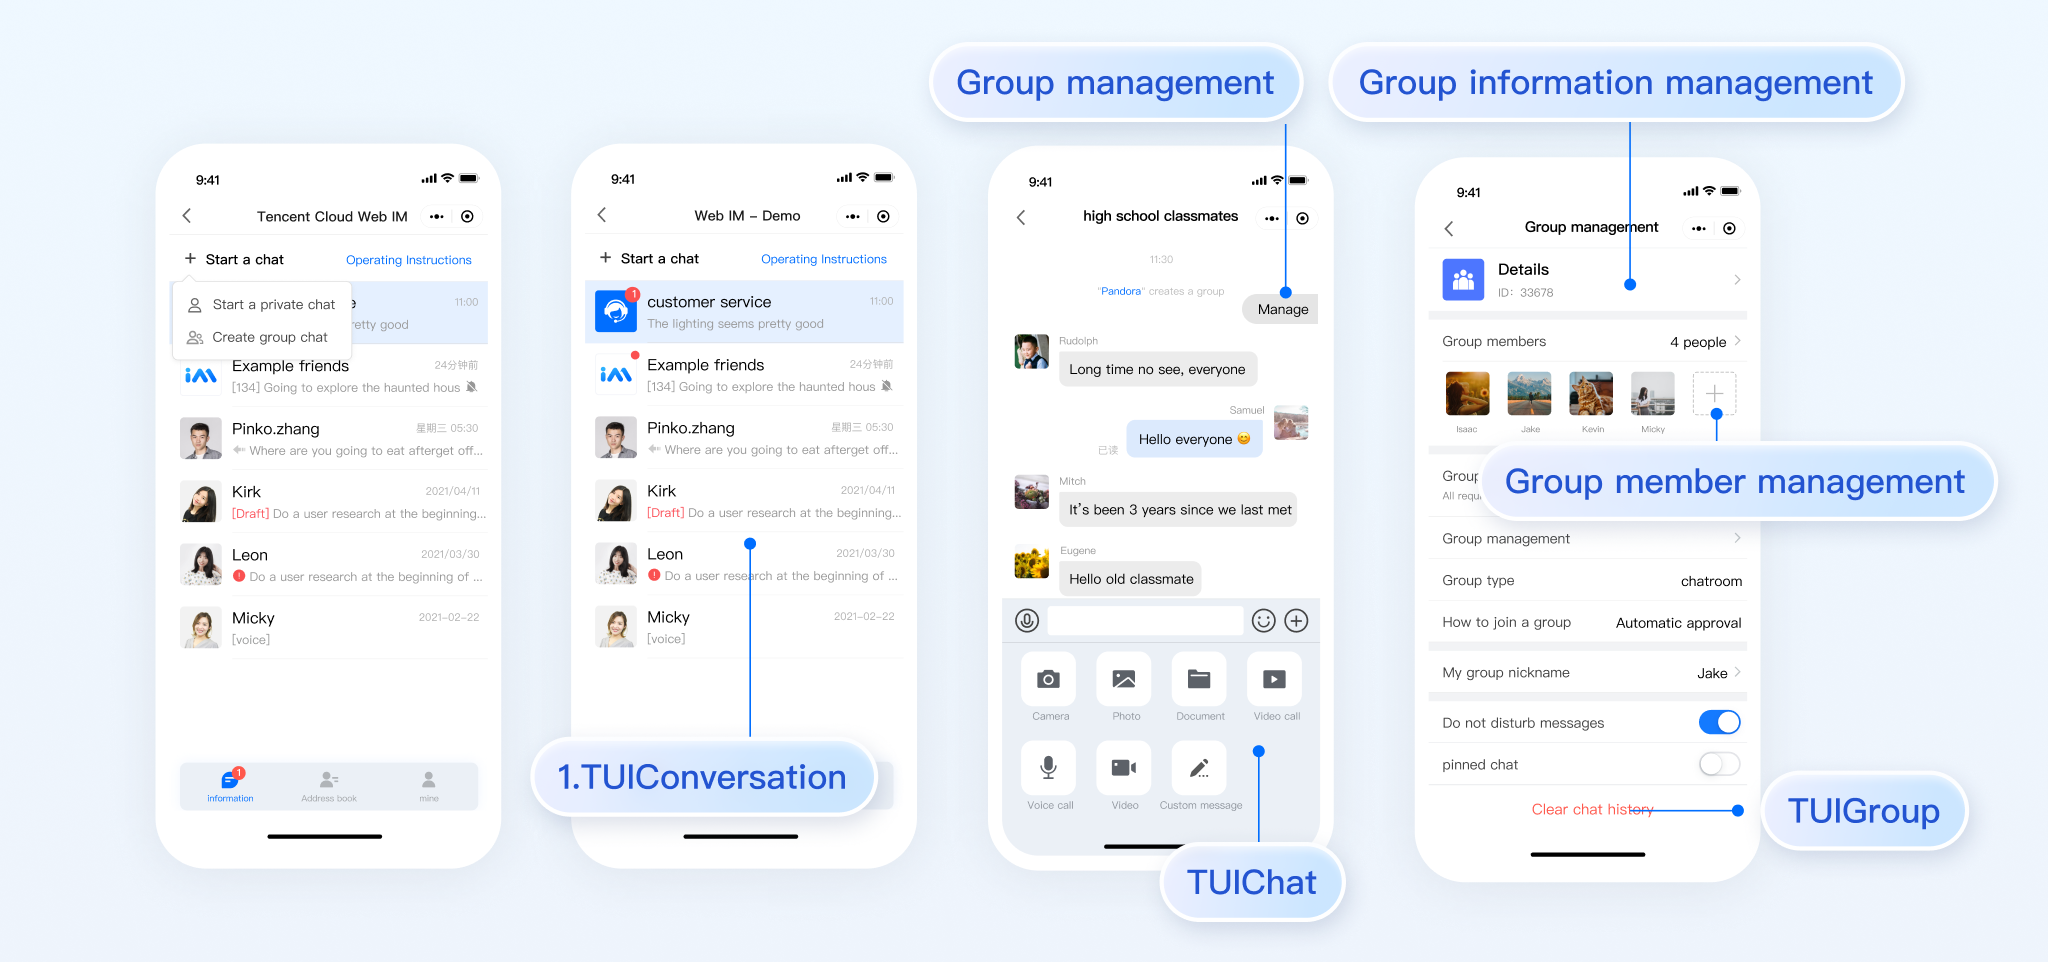
chat-uikit-uniapp (vue2 /vue3) is a uniapp UI component library based on Tencent Cloud Chat SDK. It provides universally used UI components that include Conversation, Chat, and Group components. Leveraging these meticulously crafted UI components, you can quickly construct an elegant, reliable, and scalable Chat application. The interface of chat-uikit-uniapp is as demonstrated in the image below:
Supported Platform
Android
iOS
WeChat Mini Program
H5
Environment Requirements
HBuilderX (HBuilderX Version >= 3.8.4.20230531) or upgrade to the newest version
Vue2 / Vue3
Sass (sass-loader version ≤ 10.1.1)
Node (12.13.0 ≤ node version ≤ 17.0.0. The official LTS version 16.17.0 of Node.js is recommended.)
npm (use a version that matches the Node version in use)
TUIKit Source Code Integration
Follow the steps below to send your inaugural message.
Step 1: create a project (ignore this step if already has project)
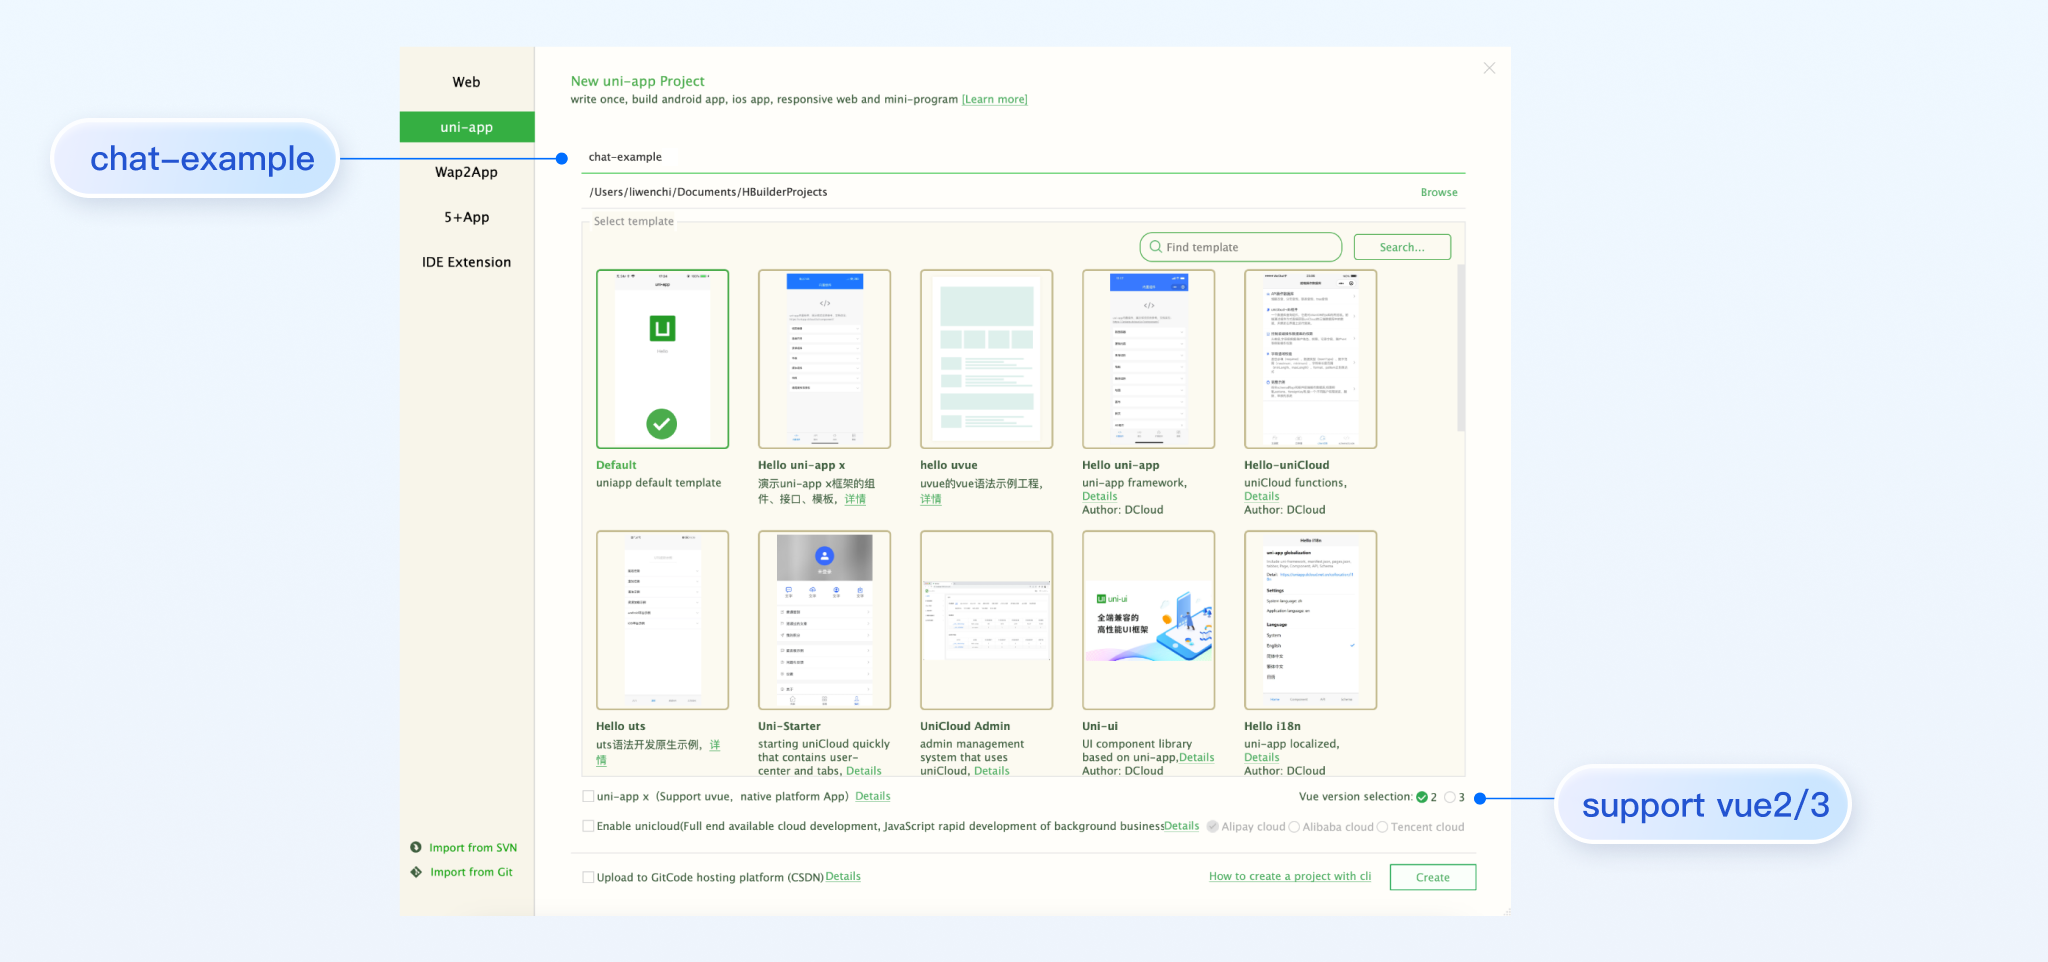
Launch HBuilderX, select "File-New-Project" in the menu bar, and create a uni-app project named chat-example.
Step 2. Download the TUIKit component
Since HBuilderX does not create package.json files by default, you need to proactively create one. Execute the following command in the root directory of the project:
npm init -y
Download TUIKit and copy it to the source code:
macOS
Windows
Download the TUIKit component using the npm method:
npm i @tencentcloud/chat-uikit-uniapp unplugin-vue2-script-setup
For ease of subsequent extensions, we propose that you replicate the TUIKit component to the pages directory within your project. Please conduct the following command in the root directory of your own project:
// disable type check and let `vue-tsc` handles it
config.plugins.delete('fork-ts-checker');
},
};
Activate the split package configuration in the source code view of the manifest.json file
{
"mp-weixin":{
"appid":"",
"optimization":{
"subPackages":true
}
},
"h5":{
"optimization":{
"treeShaking":{
"enable":false
}
}
}
}
2. Merge TUIKit
Note:
Pursue the integration stringently in Four Steps. If you wish to package a Mini Program, please do not bypass the configuration of the "Home page of Mini Program Sub-package".
main.js file
pages.json file
App.vue file
Mini Program Sub-package Home Page
Pay heed, under Vue2 environment, make use of Vue.use(VueCompositionAPI) , to prevent inability to use environment variables such as isPC.
// A UserSig is a cipher for users to sign in to Instant Messaging - it is essentially the ciphertext resulting from encrypting information such as UserID.
// This method is only suitable for running demos locally and debugging features. For more details, please refer to https://cloud.tencent.com/document/product/269/32688
userSig: uni.$chat_userSig,
// Should you require to transmit imagery, audio, video, files, and other forms of multimedia messages, please set `Setting` as `true`
useUploadPlugin:true,
// Local audit can identify and handle unsuitable and unsafe content to effectively ensure a pleasant product experience and business security
// This feature is an added service, please refer to: https://cloud.tencent.com/document/product/269/79139
// If you've purchased the content review service, please enable this feature by setting it to `true`
useProfanityFilterPlugin:false,
framework:`vue${vueVersion}`// Current development framework in use: vue2 / vue3
});
// #endif
},
onShow:function(){
console.log('App Show')
},
onHide:function(){
console.log('App Hide')
}
};
</script>
<style>
/*Common CSS for each page*/
uni-page-body,
html,
body,
page {
width:100%!important;
height:100%!important;
overflow: hidden;
}
</style>
Note:
The mini program integrates by default in a subpackage. The login must be completed on the TUIKit startup page.
If you do not require the packaging of mini-programs (for instance, building H5 only), you can disregard the configuration content of "Mini Program Split Package Homepage".
Example: The TUIKit sub-package first screen launch page is the TUIConversation page
Step 1: Create a subPackage-init.ts file under the TUIKit/components/TUIConversation directory
// UserSig is the cipher for users to sign in to Instant Messaging, essentially being the ciphertext obtained from encrypting information such as UserID.
// This method is only suitable for running Demo locally and debugging functions. For details, please refer to https://cloud.tencent.com/document/product/269/32688
userSig: uni.$chat_userSig,
// Should you require to send image, voice, video, file and other rich media messages, please set `Setting` to `true`
useUploadPlugin:true,
// Local review can successfully identify and handle inappropriate and unsafe content, thereby ensuring the safety and enhancing the user experience of your products
// This functionality is a value-added service, please refer to: https://cloud.tencent.com/document/product/269/79139
// If you have purchased the content review service, to activate this feature please set it to `true`
useProfanityFilterPlugin:false,
framework:`vue${vueVersion}`// Current development uses framework vue2 / vue3
}).then(()=>{
uni.showToast({
title:"login success"
});
});
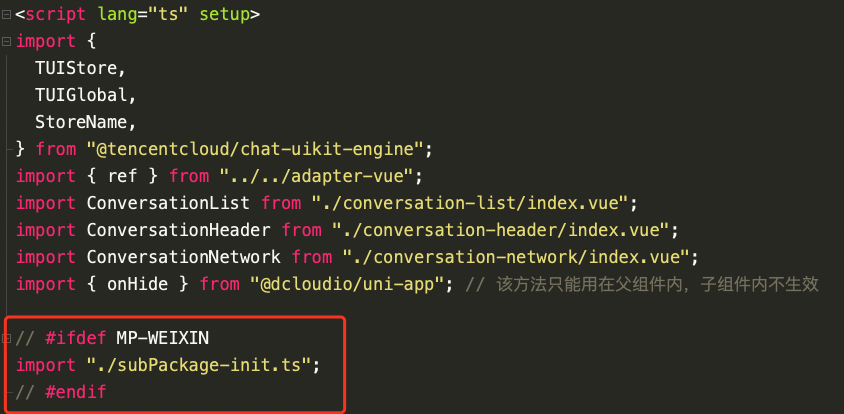
Step 2: Import within TUIKit/components/TUIConversation/index.vue
// #ifdef MP-WEIXIN
import"./subPackage-init.ts";
// #endif
See the following figure:
3. Configuring the entry points of TUIConversation and TUIContact on the main package homepage of the project
Create an index.vue file under the pages/index folder
Step 4: Gain access to SDKAppID, secretKey, and userID
Within the App.vue file in the root directory of configuration, find config object's SDKAppID, secretKey, and userID. The SDKAppID and secretKey can be accessed through the Instant Messaging Console, and the userID can be accessed when creating an account in the Instant Messaging Console.
// Mandatory information
const config ={
userID:"test-user1",// Login User ID
SDKAppID:0,// Your SDKAppID
secretKey:"",// Your secretKey
};
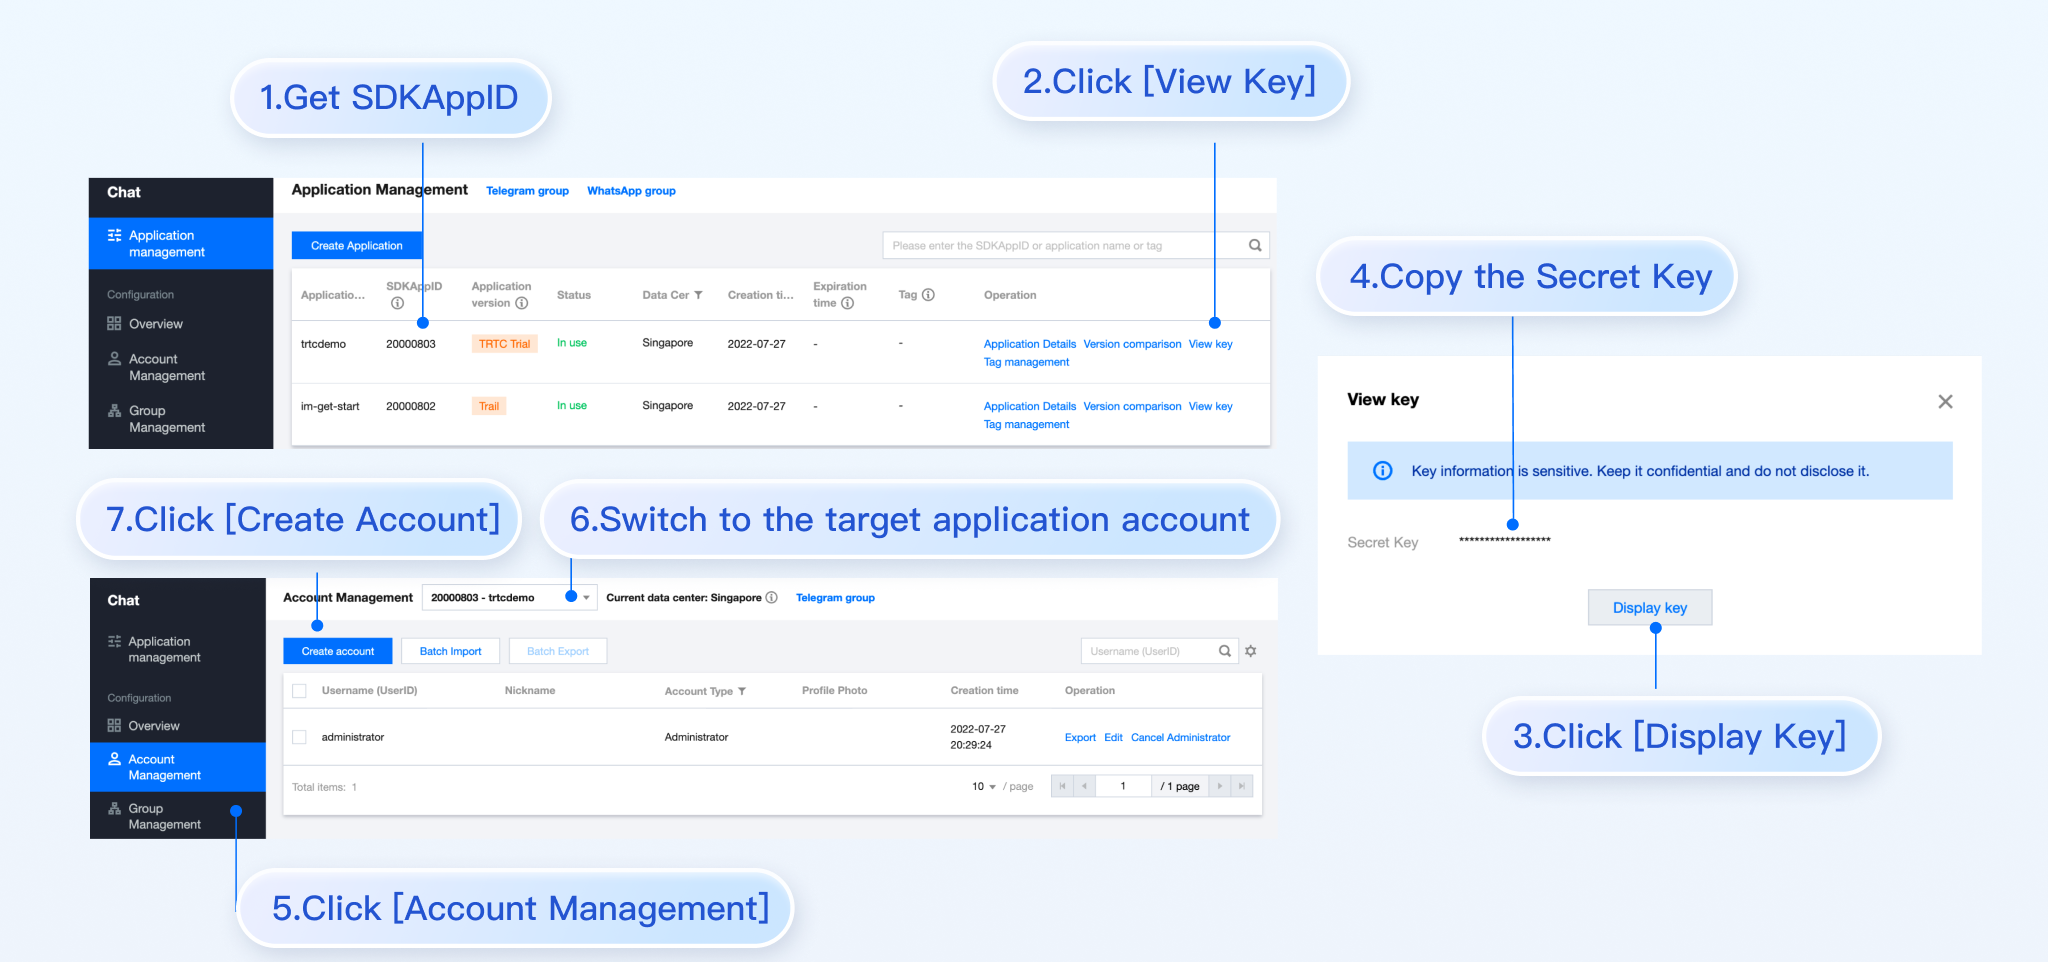
access SDKAppID,secretKey
In the Instant Messaging Console under the application management page, you can see the applications you have created. The SDKAppID is in the second column. Then click on the peekKey in the operation options. A dialogue box will appear on the website for the peekKey, and by clicking on the Show Key, the peekKey will be revealed.
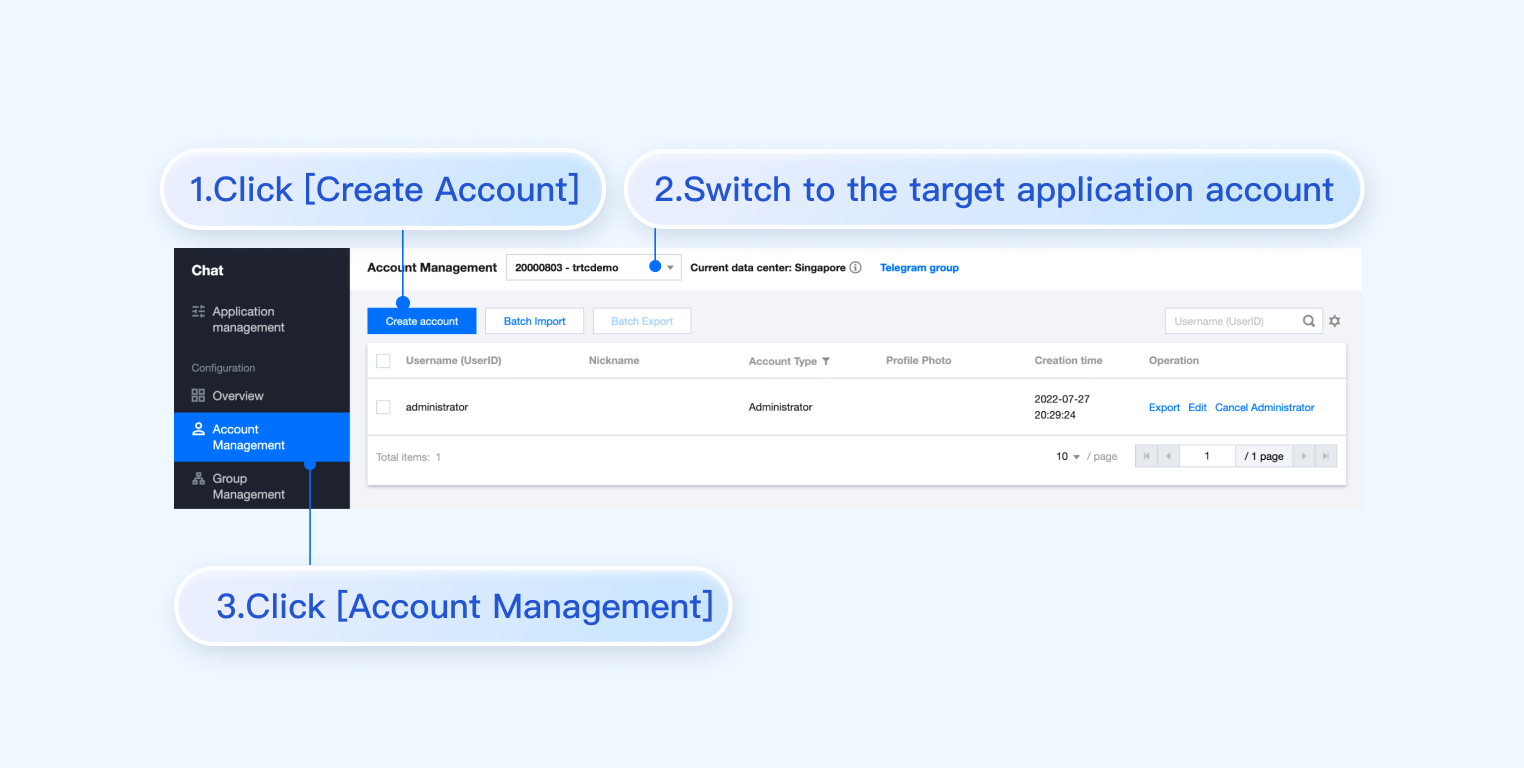
Create an account with `userID` as `test-user1`
Click on Account Management on the left side of the console. If you have multiple applications, ensure to switch to your current application. Then, under the current application, click Create new account to create an account with a userID of test-user1.
Note:
The step of creating an account can be circumvented as TUIKit will auto-generate an account during the sign in process if the configuration's userID does not exist. This only demonstrates how to access the userID.
Step 5. Launch the project
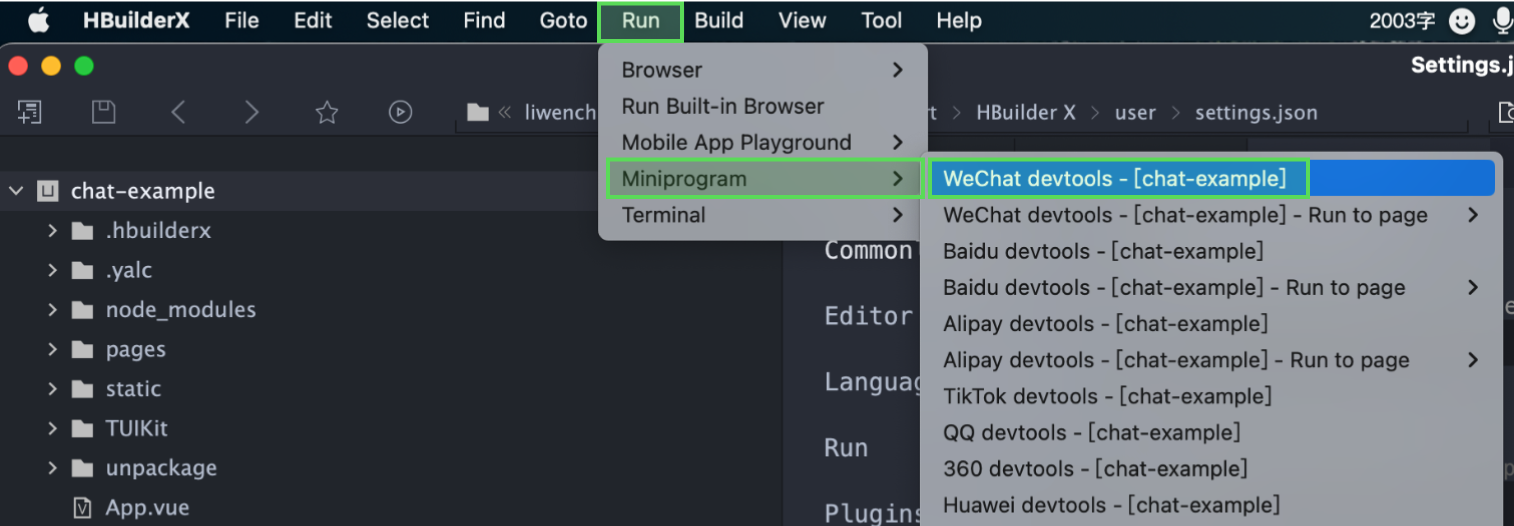
1. Launch the project using HBuilderX, then click on "Run - Run to Mini Program Simulator - WeChat Developer Tools".
2. Should HBuilderX fail to automatically activate the WeChat Developer Toolkit, kindly use the toolkit to manually open the compiled project.
Open the unpackage/dist/dev/mp-weixin under the project root directory using the WeChat Developer Tools.
3. After opening the project, check the "Do not verify valid domain, web-view (business domain), TLS version, and HTTPS certificate" in "Details-Local Setting" of WeChat Developer Tools.
Navigate to the Account Management page from the left sidebar, and click on New Account to create a regular account with userID:test-user2.
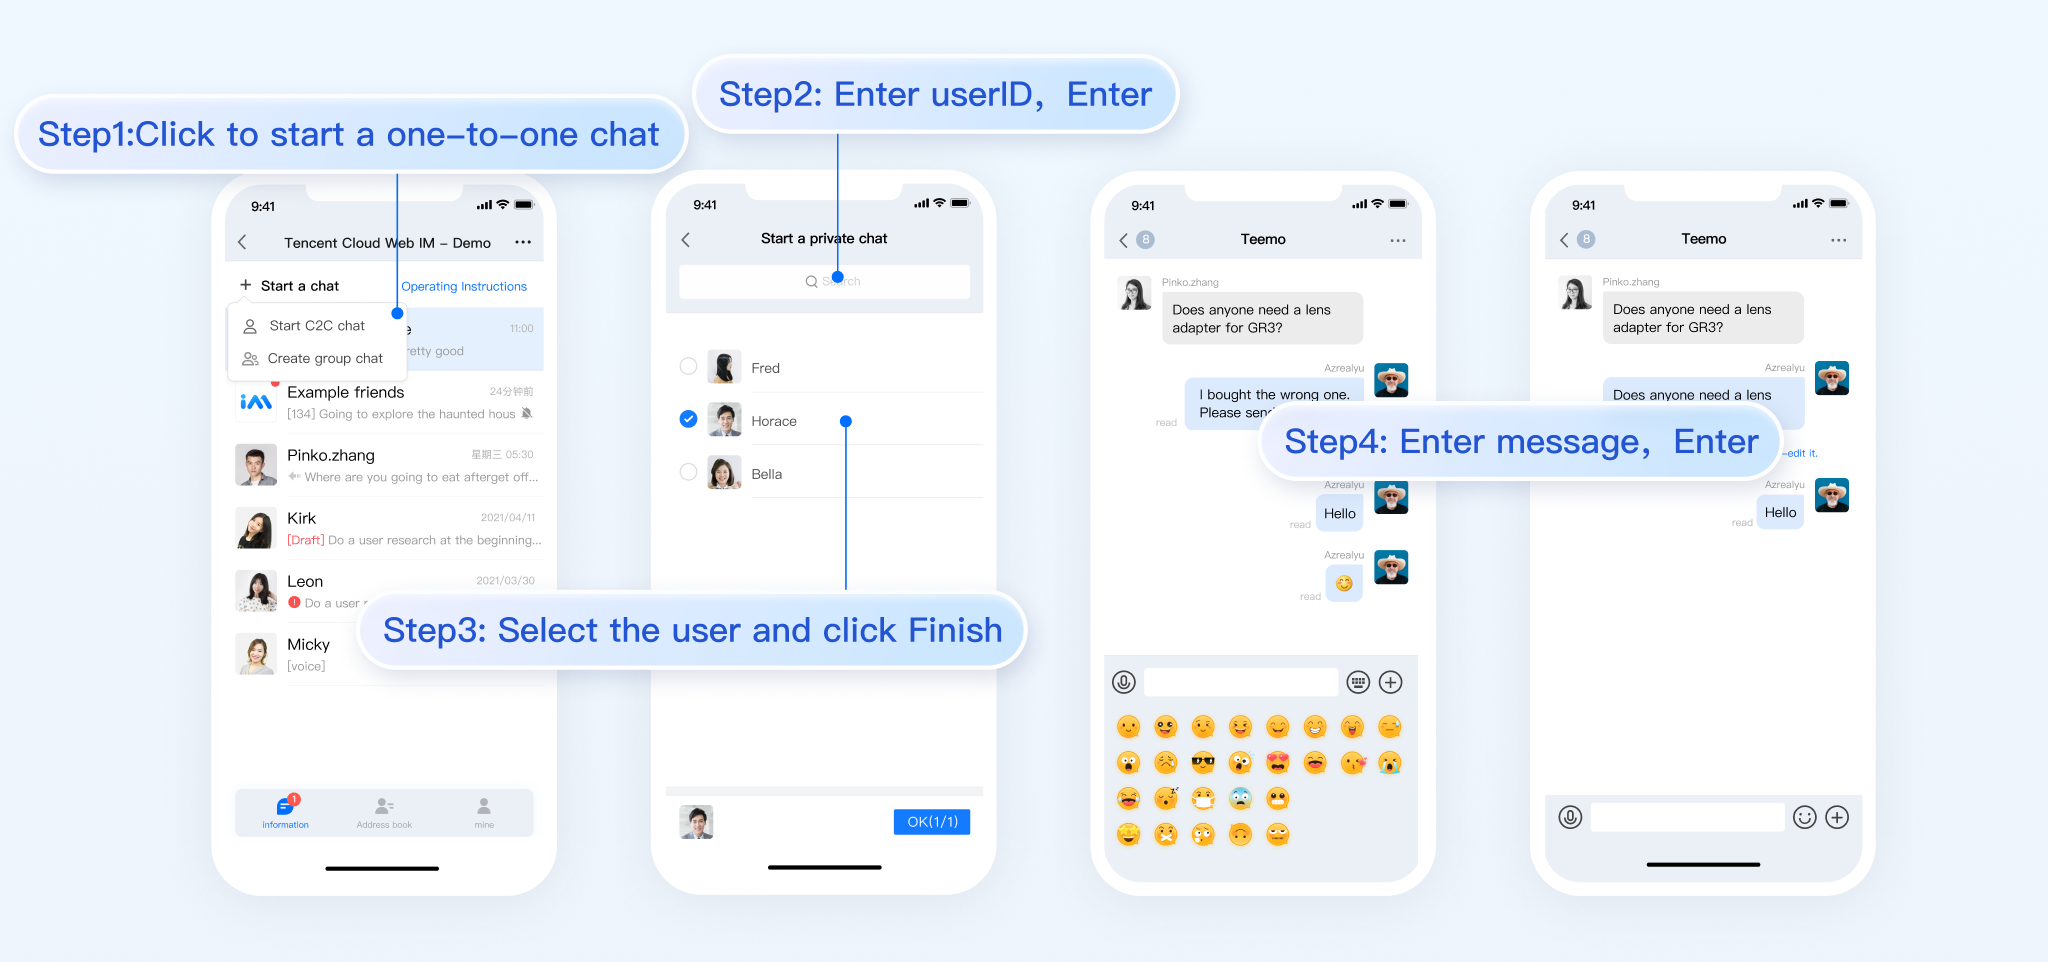
2. Run project and create conversation.
Click to open TUIKit conversation , search for user userID:test-user2, and send your first message.
Additional Advanced Features
Audio-Visual Communication TUICallKit Plugin
Note:
The TUICallKit audio/video component is not integrated by default in TUIKit,TUICallKit primarily handles voice and video calls.
Should you need to integrate call functionalities, kindly refer to the following documents for guidelines.
For packaging into APP, refer to: Audio/Video Calling (Client)
For packaging to Miniprogram, please refer to: Video Calls(Miniprogram)
For packaging into HTML5, please refer to the official documentation: Audio and Video Calls (HTML5)
Please stay tuned.
TIMPush Offline Push Plugin
Indication
By default, TUIKit does not integrate the TIMPush offline push plugin.TIMPush is Tencent Cloud's Instant Messaging Push Plugin. Currently, offline push supports Android and iOS platforms, and devices include: Huawei, Xiaomi, OPPO, Vivo, Meizu, and Apple phones.
Should you require the integration of offline push capabilities within your APP, kindly refer to the implementation of uni-app offline push.
Please stay tuned.
Individually integrate TUIChat component
Consider Independent Integration of TUIChat Component as a Solution
FAQs
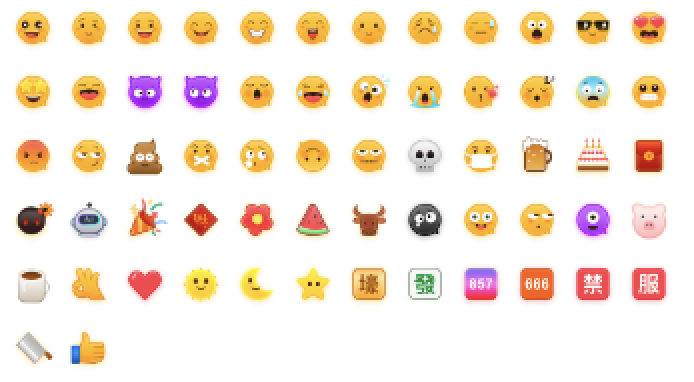
Using Emoji Packs
To respect the copyright of emoji designs, the Chat Demo/TUIKit project does not include cutouts of large emoji elements. Please replace them with your own designs or other emoji packs for which you hold the copyright before officially launching for commercial use. The default smiley face emoji pack shown below is copyrighted by Tencent RTC, you can upgrade to Chat Pro Plus Edition and Enterprise Edition to use it for free.
For additional inquiries, please refer to uni-app FAQ.