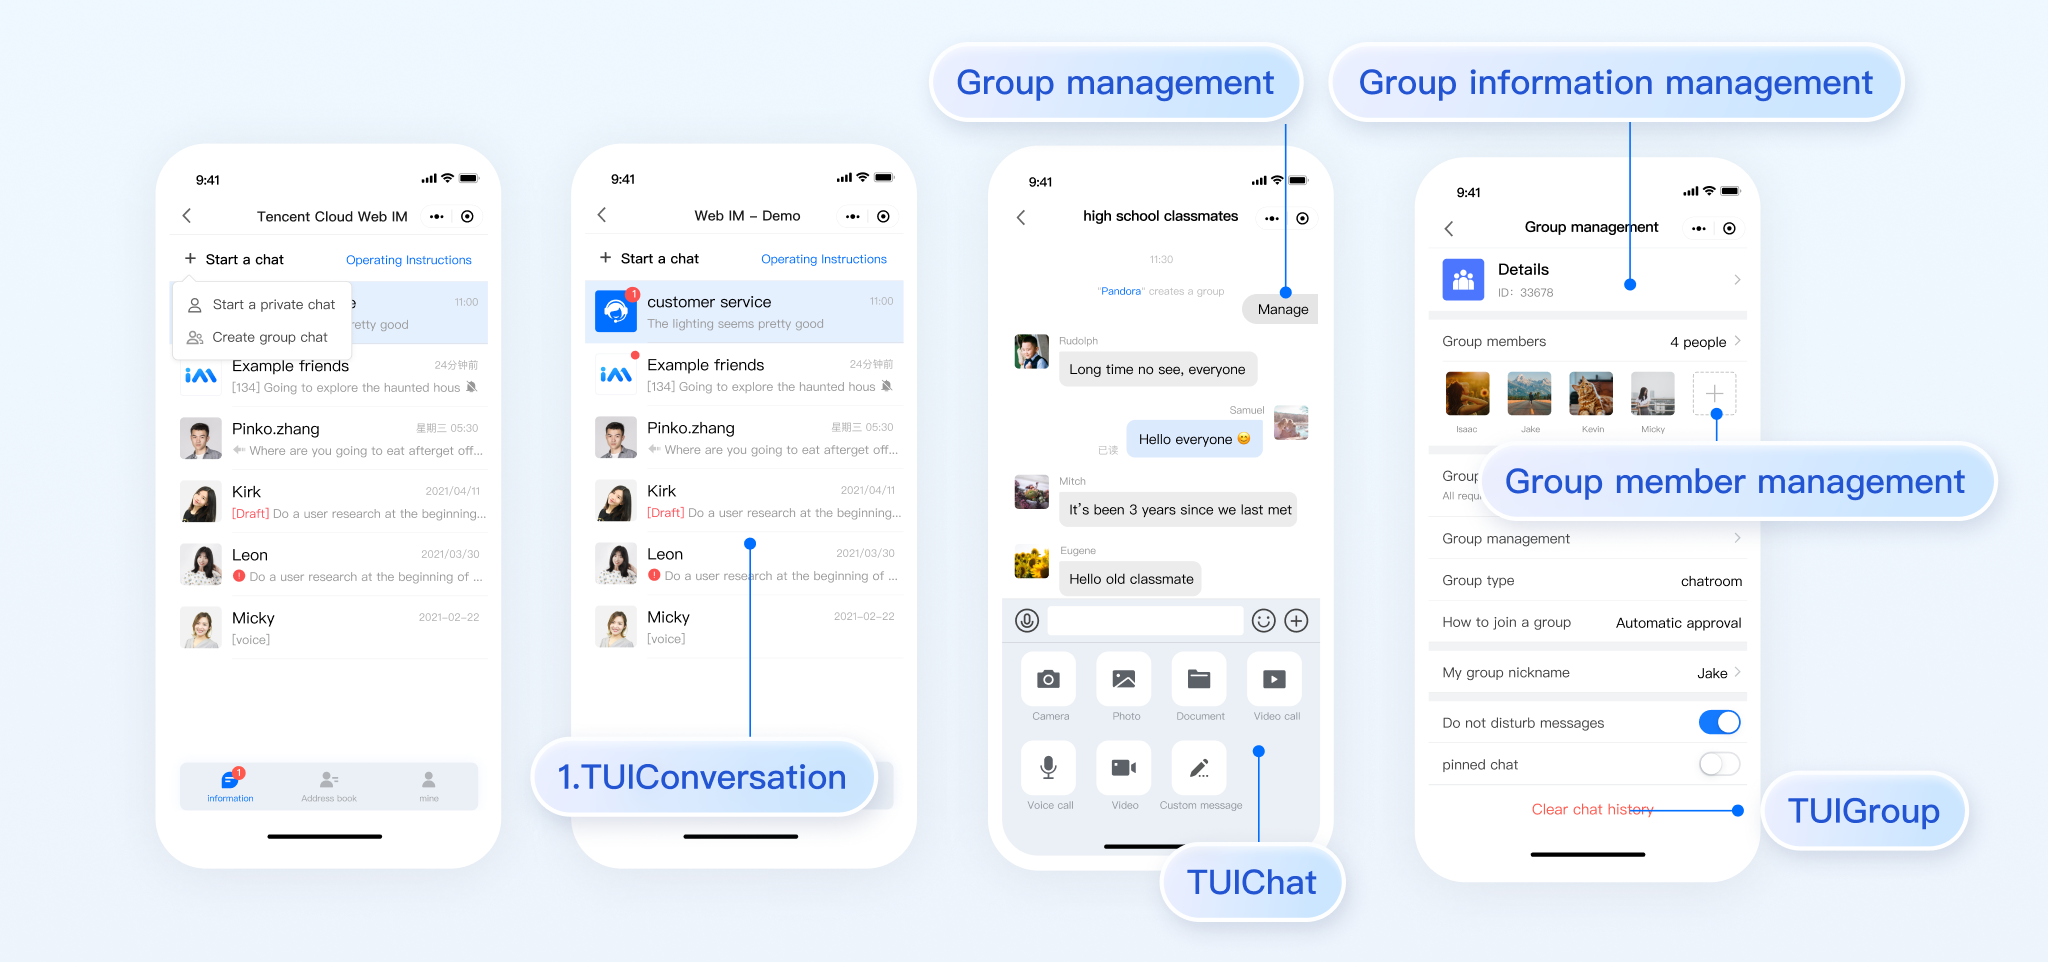
chat-uikit-uniapp (vue2/vue3) is a uniapp UI component library based on Tencent Cloud Chat SDK, providing some common UI components including session, chat, group and other features. Based on these well-designed UI components, you can quickly build elegant, reliable and scalable chat applications. The UI effect of chat-uikit-uniapp is as shown below:
Prerequisites
Preparing the Environment
HBuilderX must upgrade to the latest version
TypeScript / JavaScript (TUIKit is developed in TypeScript and supports integration in both JavaScript and TypeScript projects)
Vue2 / Vue3
sass (sass-loader version ≤ 10.1.1)
Node.js v12 or higher
npm (version must match node version
Download and Import Component
Follow the steps below to send your inaugural message.
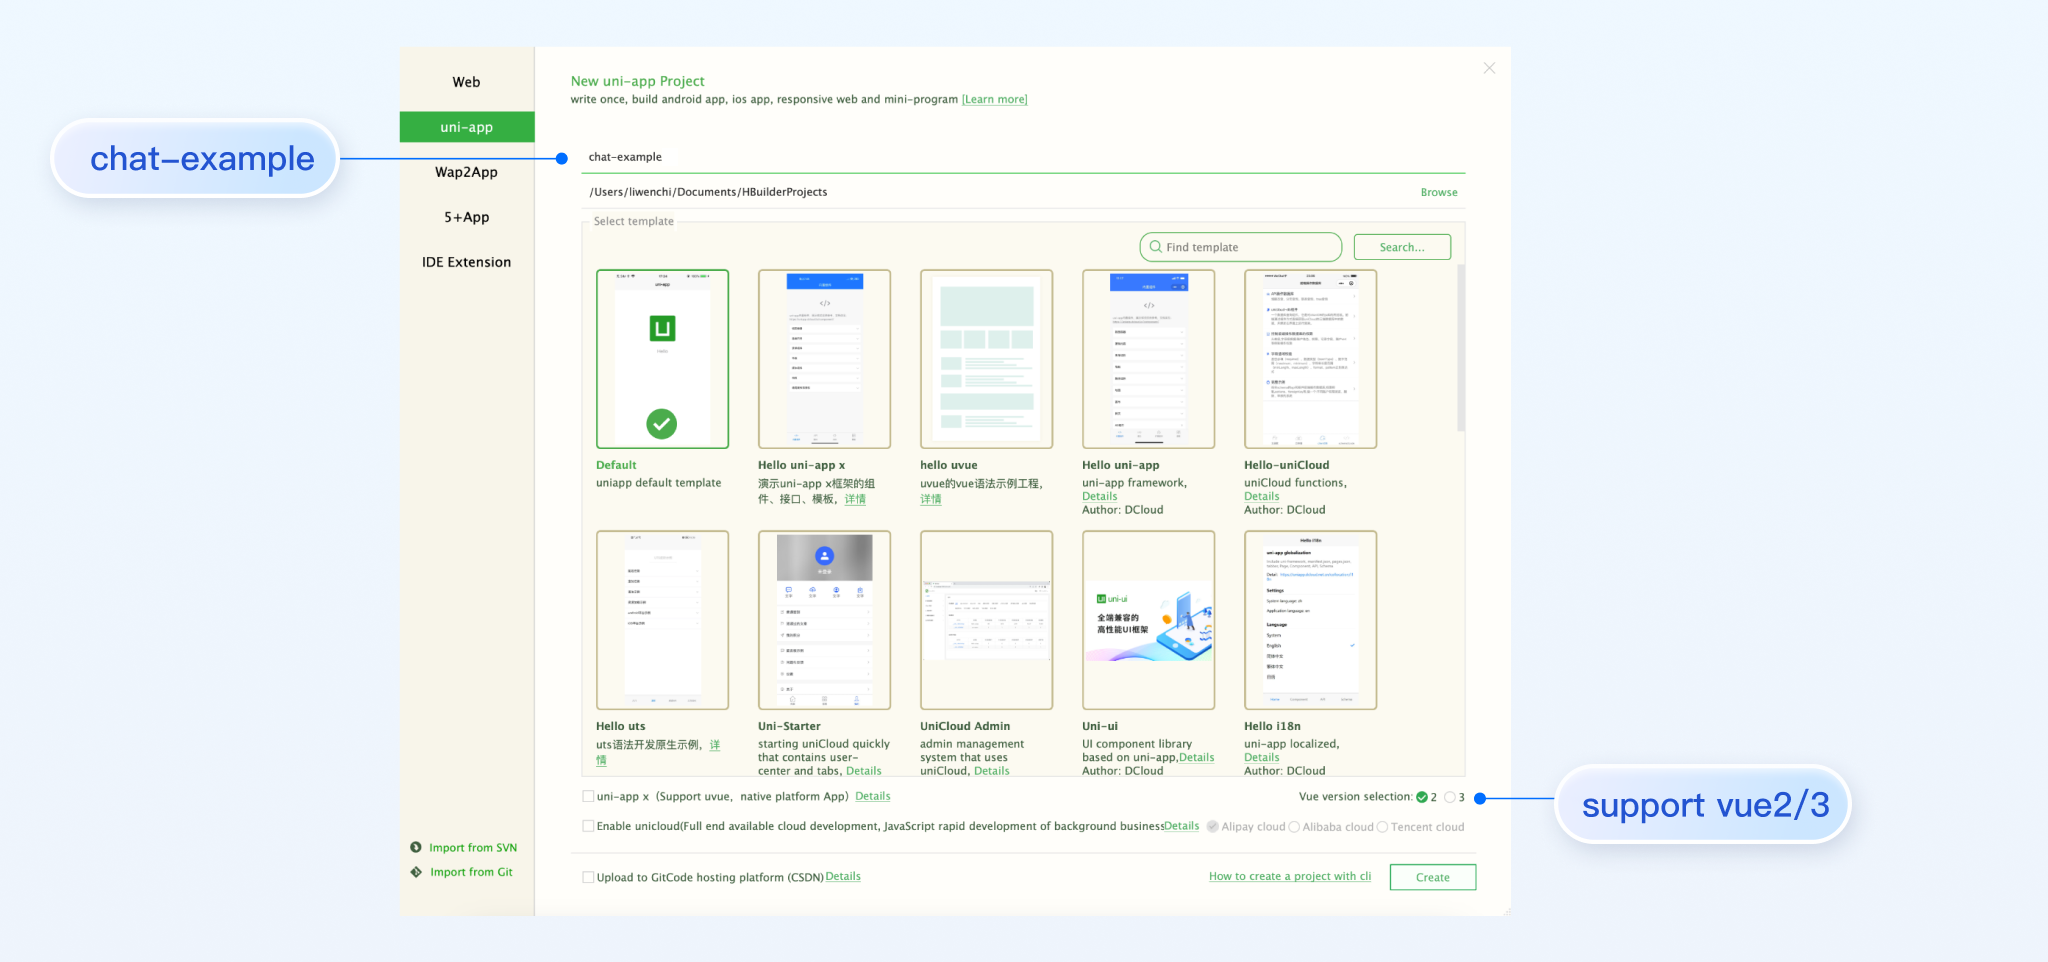
Step 1: create a project (ignore this step if you already has project)
Launch HBuilderX, select "File-New-Project" in the menu bar, and create a uni-app project named chat-example.
Step 2: Download the TUIKit component
Since HBuilderX does not create package.json files by default, you need to proactively create one. Execute the following command in the root directory of the project:
npm init -y
Download TUIKit and copy it to the source code:
macOS
Windows
Download the TUIKit component using the npm method:
npm i @tencentcloud/chat-uikit-uniapp unplugin-vue2-script-setup
For ease of subsequent extensions, we propose that you replicate the TUIKit component to the pages directory within your project. Please conduct the following command in the root directory of your own project:
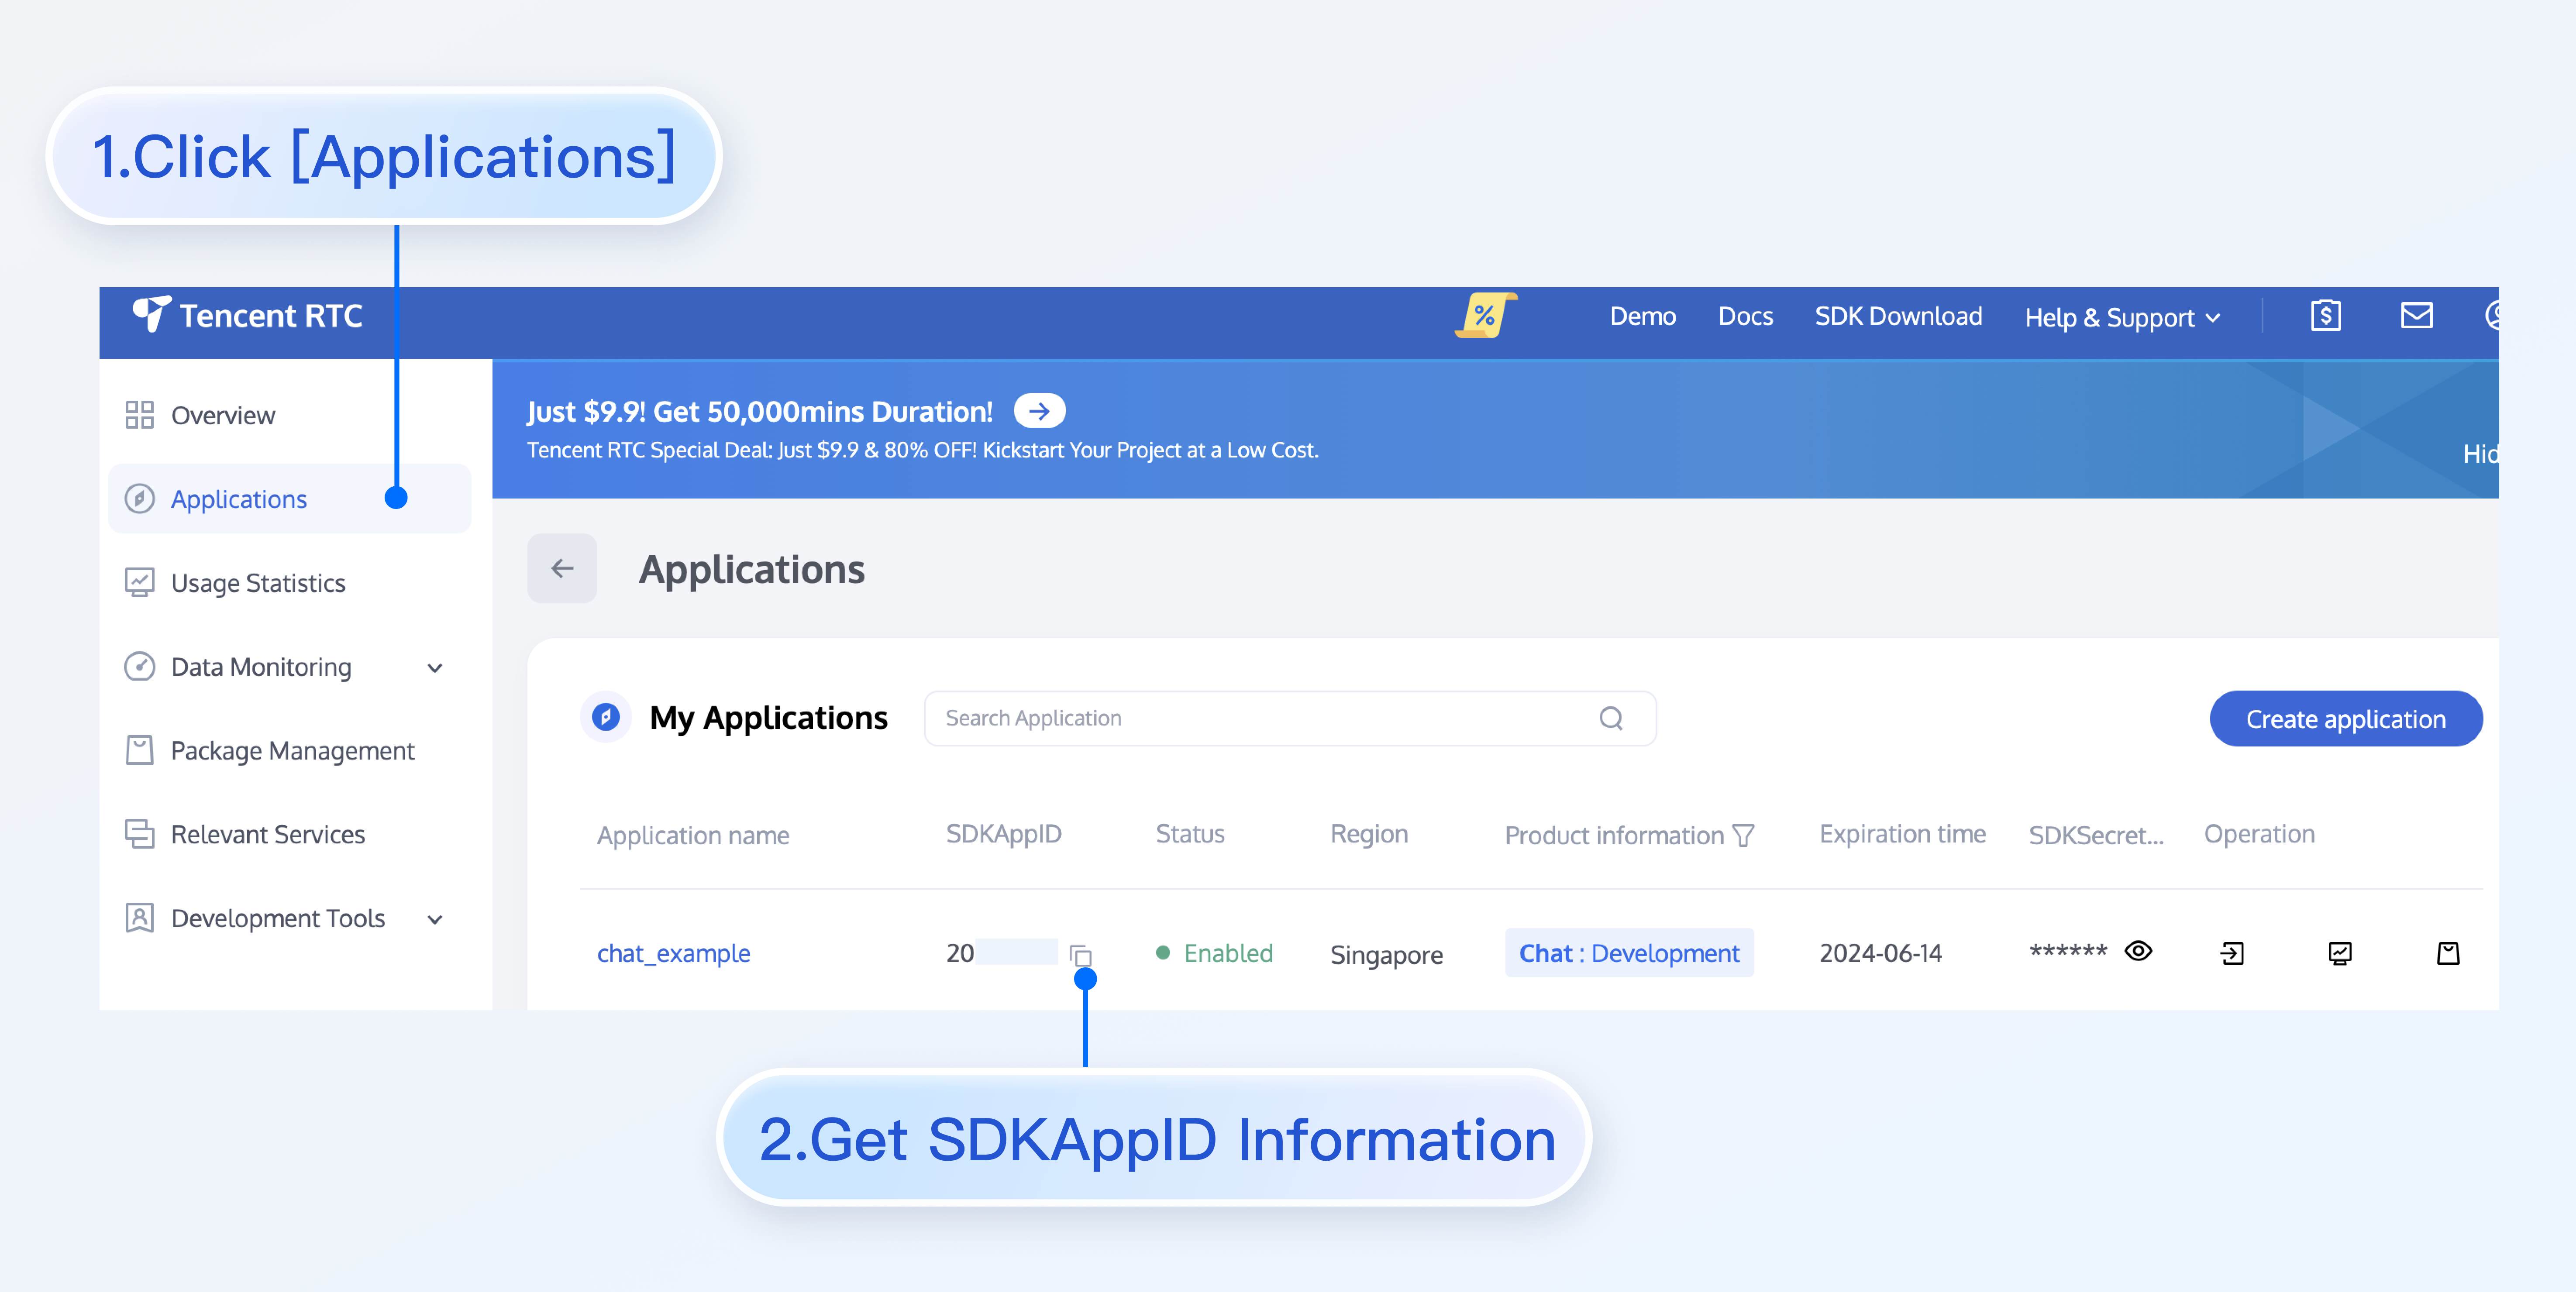
Step 4: Gain access to SDKAppID, secretKey, and userID
After obtaining the SDKAppID, userID, and userSig, fill them into the corresponding fields in App.vue.
uni.$SDKAppID =0;// Your SDKAppID
uni.$userID ='';// Your userID
uni.$userSig ='';// Your userSig
SDKAppID information can be obtained from the Chat Console:
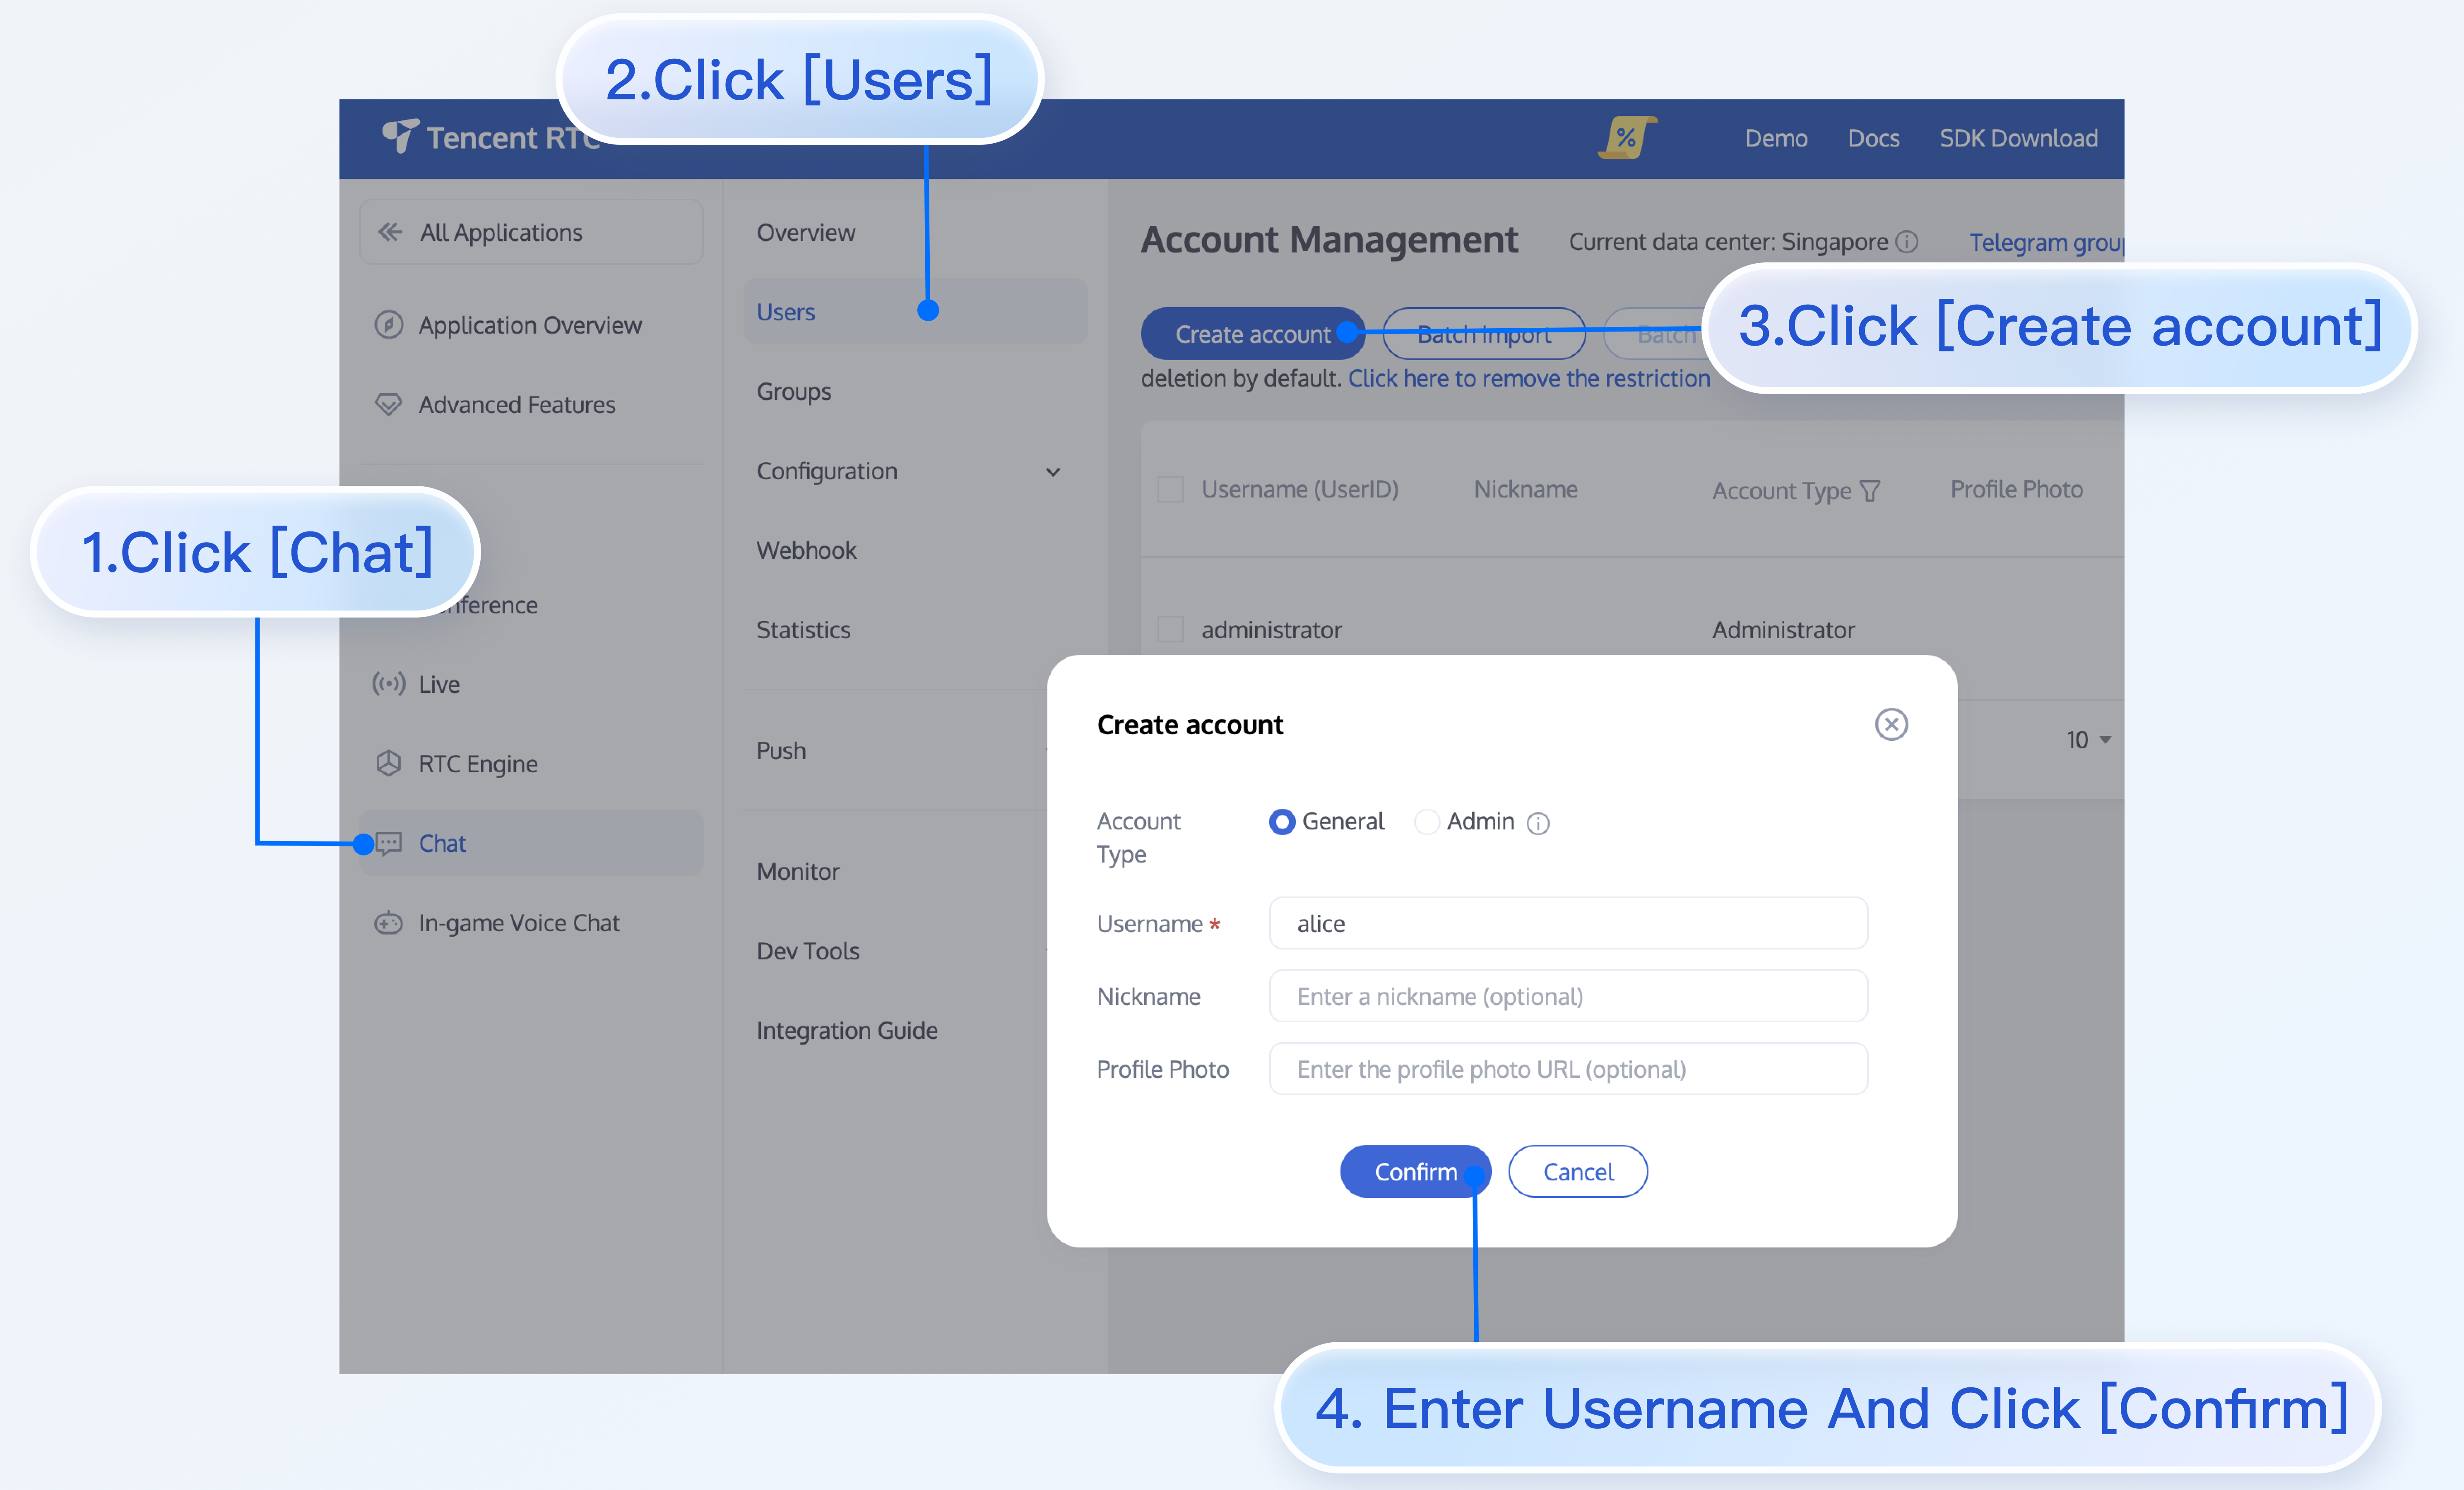
userID information. Click Application name of the target Application to enter the account management page and create 2–3 userIDs for future reference to experience the chat feature.
1. Using HBuilderX to start the project, click "Run > Run to Mini Program Simulator > WeChat Developer Tools".
2. If HBuilderX does not automatically start WeChat Developer Tools, please use WeChat Developer Tools to manually open the compiled project.
Use WeChat Developer Tools to open the unpackage/dist/dev/mp-weixin in the project root directory.
3. After opening the project, in WeChat Developer Tools Details > Local Settings, check Do not verify legal domain names, web-view (business domain), TLS version, and HTTPS certificate.
Step 2: Sending Your First Message
Click the Open Session List button, enter the userID created in Step 4 in the search box, then click [Done] once selected to send your first message.
Step 3: Preparation before Publishing & WeChat Mini Program Size Optimization
Delete Debug Script before Publishing
For both size and security reasons, please delete the /TUIKit/debug folder in the project directory before release. During development, for convenience, the project provides a script to generate UserSig locally, stored in the TUIKit/debug folder. However, this is not secure as the secretKey in this method can be easily decompiled and reverse engineered. Once your key is leaked, attackers can steal your Tencent Cloud traffic. This method is only suitable for running the Demo locally and debugging features. Therefore, please delete the debug script before project release and use the backend to generate UserSig. For specific reasons and operation steps, refer to the documentation: Generate UserSig.
WeChat Mini Program Size Optimization
The official WeChat mini program has a size limit for the package upon release.
The entire mini program's package size must not exceed 20M (30M for mobile games with virtual payment enabled).
The size of each subpackage/main package must not exceed 2M
Therefore, combining with business code may cause the mini program volume to exceed the limit, leading to failed release.
Option 1: Delete Local Debug Script
Delete the /TUIKit/debug folder under the project directory before release, use the backend to generate UserSig. For reason and operation steps, refer to the documentation: generate UserSig.
Option 2: Using Subcontracting Strategy to Split Mini Program
Use the subcontracting strategy to split the program. Refer to the official WeChat mini program subcontracting documentation. It should be noted that this document adopts the subcontracting strategy by default. During integration, subcontracting is already completed. The main package includes the chat SDK and TUICore, while subpackages contain chat-uikit-engine and all components of TUIKit. For specific subcontracting details, refer to the pages.json file in procedure 3.
Solution Three: Pack Using HBuilderX Release Function before Mini Program Release
Before mini program release, use HBuilderX's release function to pack. Packing in release mode removes information such as Source Map from the code, resulting in the minimum package size. In HBuilderX's toolbar, click sequentially Release > Mini Program - WeChat (applicable only to uni-app).
Then click Release, and the WeChat Mini Program Source Code will be generated in the unpackage/dist/build/mp-weixin folder of the project directory. Just open the folder using WeChat Developer Tools.
More Advanced Features
Audio-Visual Communication TUICallKit Plugin
Note:
The TUICallKit audio/video component is not integrated by default in TUIKit,TUICallKit primarily handles voice and video calls.
Should you need to integrate call functionalities, kindly refer to the following documents for guidelines.
For packaging into APP, refer to: Audio/Video Calling (Client)
For packaging to Miniprogram, please refer to: Video Calls(Miniprogram)
For packaging into HTML5, please refer to the official documentation: Audio and Video Calls (HTML5)
Please stay tuned.
TIMPush Offline Push Plugin
Indication
By default, TUIKit does not integrate the TIMPush offline push plugin.TIMPush is Tencent Cloud's Instant Messaging Push Plugin. Currently, offline push supports Android and iOS platforms, and devices include: Huawei, Xiaomi, OPPO, Vivo, Meizu, and Apple phones.
Should you require the integration of offline push capabilities within your APP, kindly refer to the implementation of uni-app offline push.
Please stay tuned.
Individually integrate TUIChat component
Consider Independent Integration of TUIChat Component as a Solution
FAQs
For additional inquiries, please refer to Uniapp FAQ.