please select
Call
  • Web
    • Overview
      • Product Introduction
      • Activate the Service
      • Pricing
        • Free Minutes
        • Call Monthly Packages
        • Billing Explanation for Subscription Package Duration
    • Get Started
      • Run Sample Code
      • Integration (React)
      • Integration (Vue3)
      • Secure authentication with userSig
    • Basic Features
      • UI Customization
      • Configuring Nickname and Avatar
      • GroupCall
      • Floating Window
      • Custom Ringtone
      • Configure Resolution and Fill Mode
      • Monitoring Call Status
      • Language Settings
    • Advanced Features
      • Virtual Background
      • AI Noise Suppression
      • On-Cloud Recording
    • Client APIs
      • UIKit APIs
        • API Overview
        • TUICallKit
      • Engine APIs
        • TUICallEngine
        • TUICallEvent
    • Server APIs
      • Call Status Callback
        • Call Status Callback
        • Call Event Callback
        • Callback Configuration
          • API List for Callback Configuration
          • Establishing Callback Configuration
          • Retrieving Callback Configuration
          • Update Callback Configuration
          • Remove Callback Configuration
      • REST API
        • Introduction to REST API
        • Retrieve records via callId
        • Retrieve Records Based on Conditions
    • FAQs
      • All Platfroms
      • Web
      • ErrorCode
      • Release Notes
  • Android
    • Overview
      • Product Introduction
      • Activate the Service
      • Pricing
        • Free Minutes
        • Call Monthly Packages
        • Billing Explanation for Subscription Package Duration
    • Get Started
      • Run Sample Code
      • Integration
      • Secure authentication with userSig
    • Basic Features
      • UI Customization
      • Offline Call Push
      • Configuring Nicknames and Avatars
      • Group Call
      • Floating Window
      • Custom Ringtone
      • Monitoring Call Status
    • Advanced Features
      • Virtual Background
      • AI Noise Suppression
      • On-Cloud Recording
    • Client APIs
      • UIKit APIs
        • API Overview
        • TUICallKit
        • TUICallObserver
        • Type Definition
      • Engine APIs
        • TUICallEngine
    • Server APIs
      • Call Status Callback
        • Call Status Callback
        • Call Event Callback
        • Callback Configuration
          • API List for Callback Configuration
          • Establishing Callback Configuration
          • Retrieving Callback Configuration
          • Update Callback Configuration
          • Remove Callback Configuration
      • REST API
        • Introduction to REST API
        • Retrieve records via callId
        • Retrieve Records Based on Conditions
    • FAQs
      • All Platforms
      • Android
      • ErrorCode
      • Release Notes
  • iOS
    • Overview
      • Product Introduction
      • Activate the Service
      • Pricing
        • Free Minutes
        • Call Monthly Packages
        • Billing Explanation for Subscription Package Duration
    • Get Started
      • Run Sample Code
      • Integration
      • Secure authentication with userSig
    • Basic Features
      • UI Customization
      • Offline Call Push
        • VoIP
        • APNs
      • Configuring Nicknames and Avatars
      • Group Call
      • Floating Window
      • Custom Ringtone
      • Monitoring Call Status
    • Advanced Features
      • Virtual Background
      • AI Noise Suppression
      • On-Cloud Recording
    • Client APIs
      • UIKit APIs
        • API Overview
        • TUICallKit
        • TUICallObserver
        • Type Definition
      • Engine APIs
        • TUICallEngine
    • Server APIs
      • Call Status Callback
        • Call Status Callback
        • Call Event Callback
        • Callback Configuration
          • API List for Callback Configuration
          • Establishing Callback Configuration
          • Retrieving Callback Configuration
          • Update Callback Configuration
          • Remove Callback Configuration
      • REST API
        • Introduction to REST API
        • Retrieve records via callId
        • Retrieve Records Based on Conditions
    • FQAs
      • All Platform
      • iOS
      • ErrorCode
      • Release Notes
  • Flutter
    • Overview
      • Product Introduction
      • Activate the Service
      • Pricing
        • Free Minutes
        • Call Monthly Packages
        • Billing Explanation for Subscription Package Duration
    • Get Started
      • Run Sample Code
      • Integration
      • Secure authentication with userSig
    • Basic Features
      • UI Customization
      • offline Call Push
        • Notification
        • VoIP (Optional)
      • Configuring Nicknames and Avatars
      • Group Call
      • Floating Window
      • Custom Ringtone
      • Monitoring Call Status
    • Advanced Features
      • Virtual Background
      • AI Noise Suppression
      • On-Cloud Recording
      • Beauty Effects
    • Client APIs
      • API Overview
      • TUICallKit
      • TUICallEngine
      • TUICallObserver
      • Type Definition
    • Server APIs
      • Call Status Callback
        • Call Status Callback
        • Call Event Callback
        • Callback Configuration
          • API List for Callback Configuration
          • Establishing Callback Configuration
          • Retrieving Callback Configuration
          • Update Callback Configuration
          • Remove Callback Configuration
      • REST API
        • Introduction to REST API
        • Retrieve records via callId
        • Retrieve Records Based on Conditions
    • FQAs
      • All Platform
      • Flutter
      • ErrorCode
      • Upgrading
      • Release Notes
Call

Beauty Effects

This document mainly introduces the method of integrating beauty effects in TUICallKit.
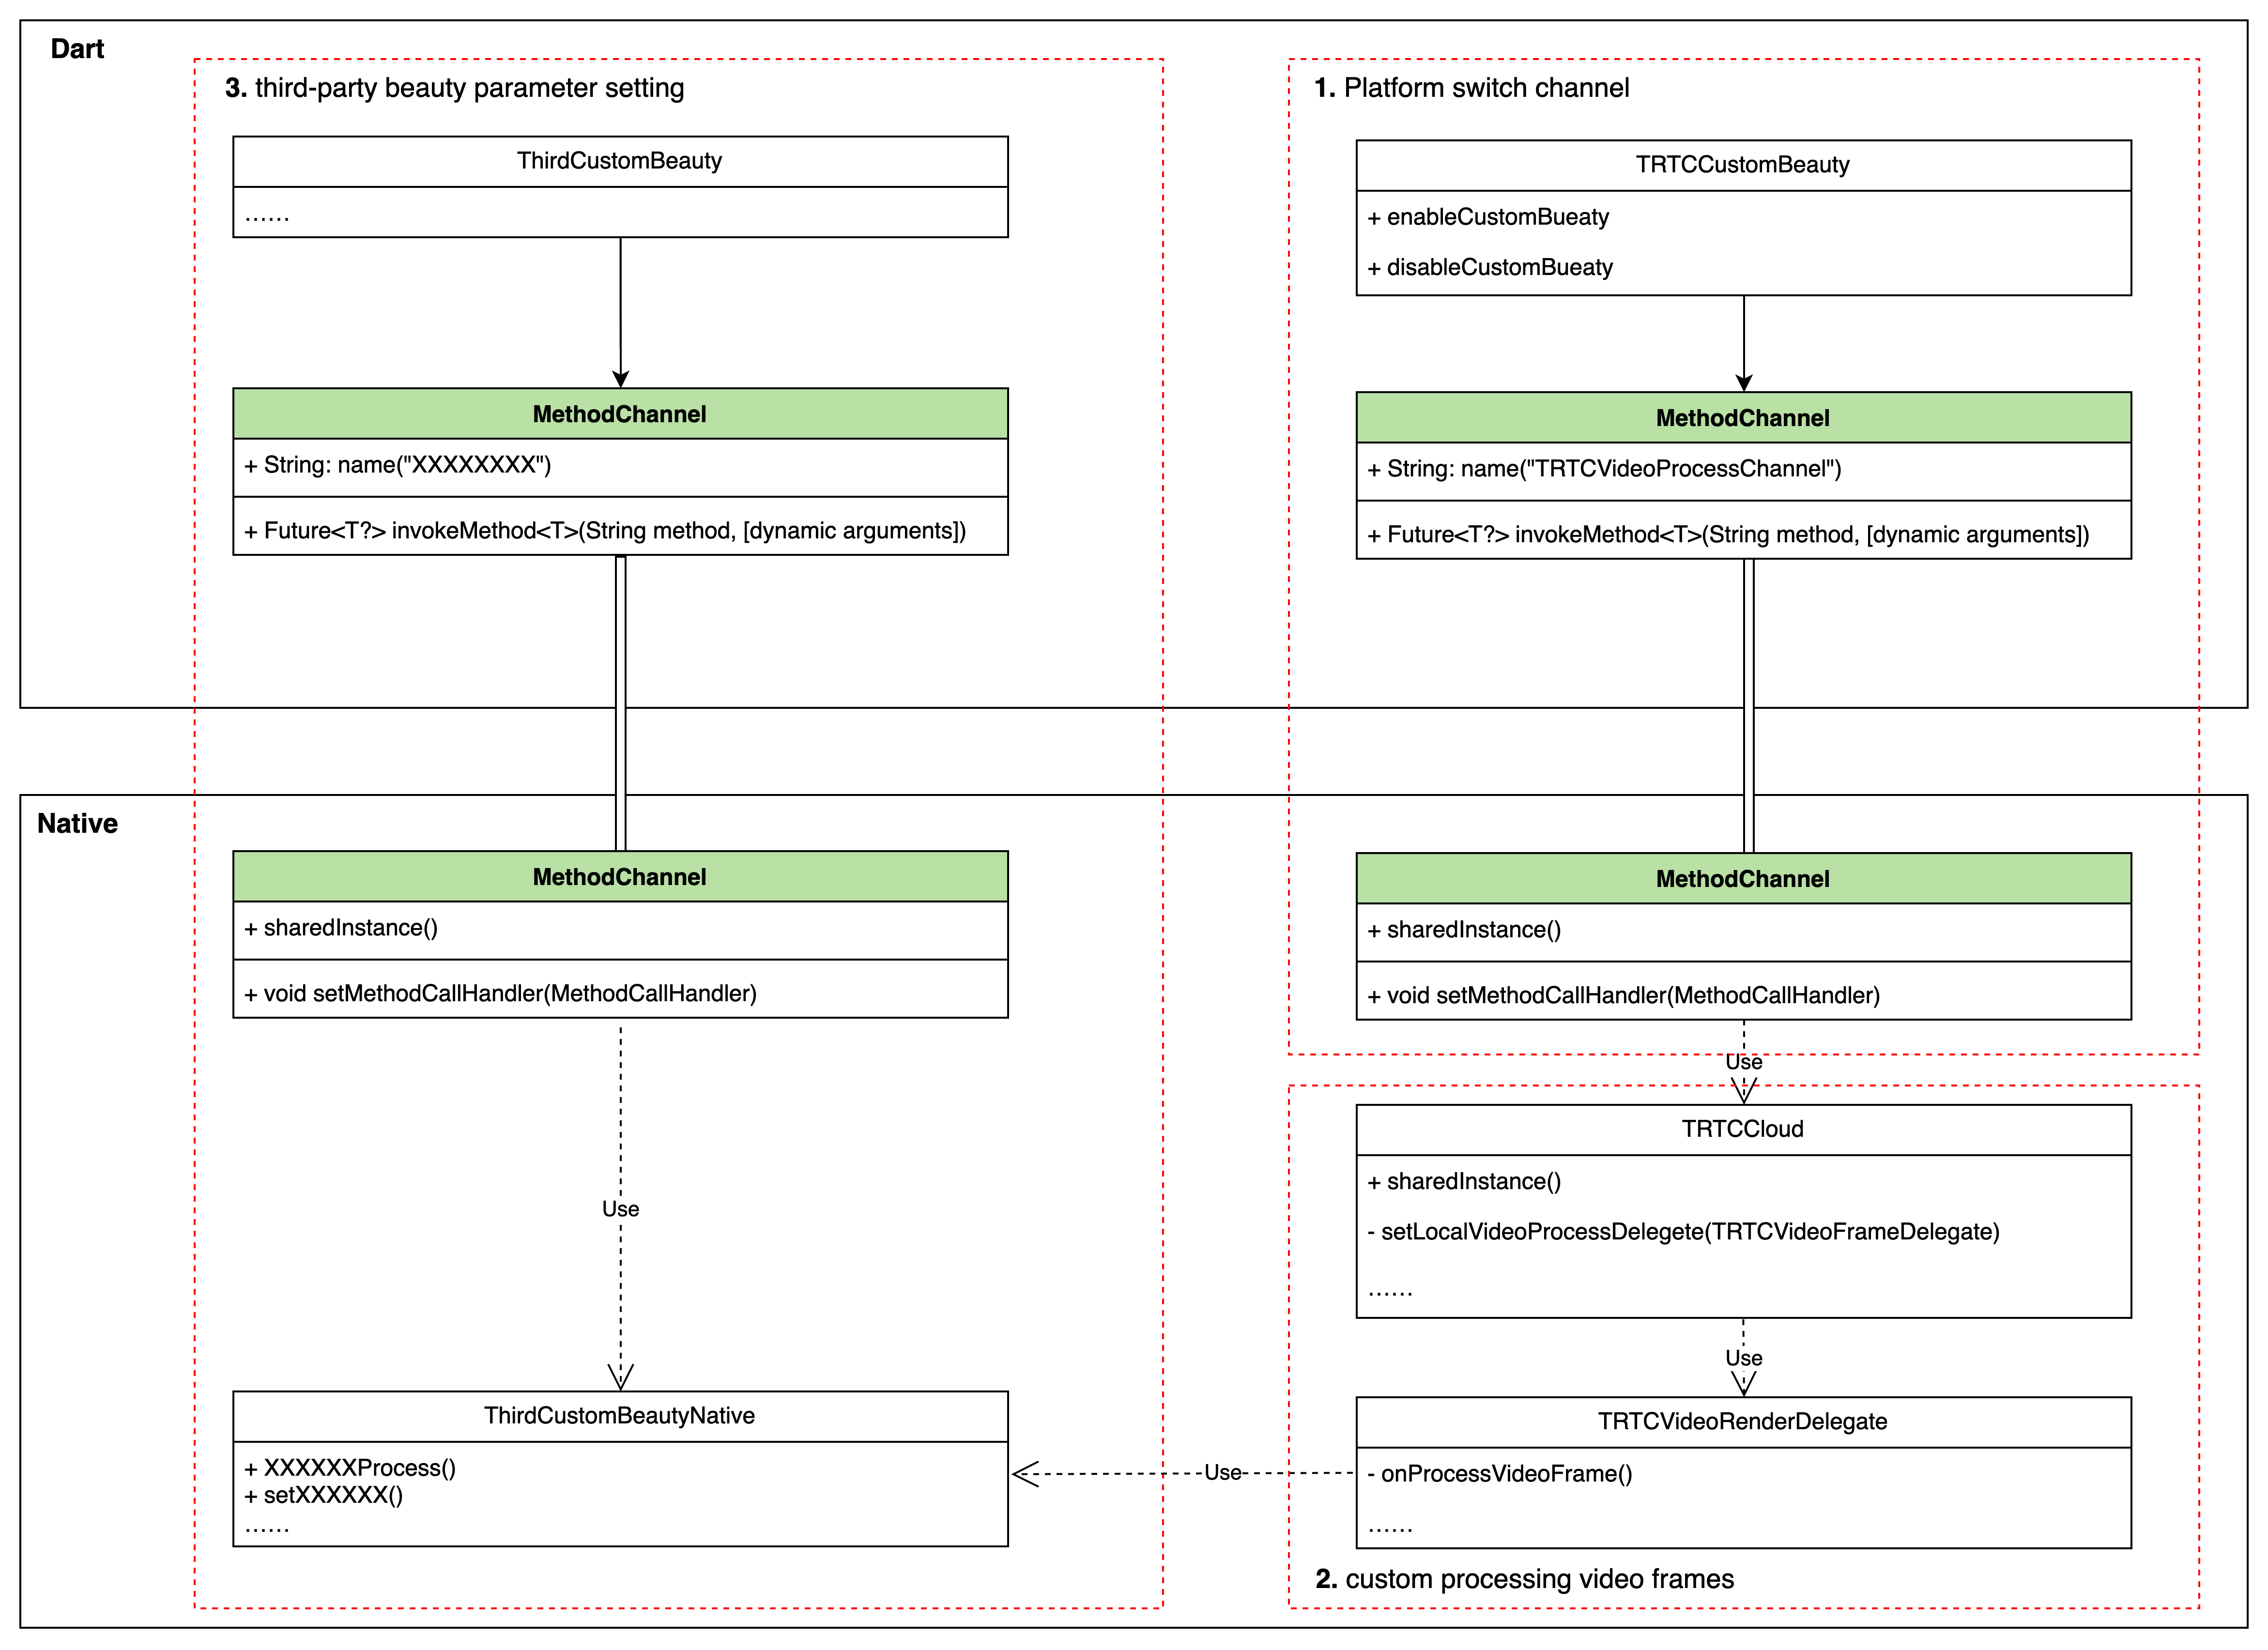
To complete custom beauty processing in Flutter, it needs to be done through TRTC custom video rendering. Due to Flutter's characteristics of not being good at handling a large amount of real-time data transmission, the part involving TRTC custom video rendering needs to be completed in the Native part. The specific plan is as follows:


The access plan is divided into 3 steps:
Step 1: Enable/disable TRTC custom rendering logic through the MethodChannel.
Step 2: Use the beauty processing module in TRTC's custom rendering processing logic onProcessVideoFrame() to process the original video frame.
Step 3: The customer's beauty processing module also needs to set the current beauty parameters through the interface in Dart. Customers can set beauty parameters through the MethodChannel method. This part can be customized by the customer according to their needs and the beauty they use.

Integrate third-party beauty effects

Step 1: Implement the start/end beauty control interface from Dart layer to Native

Implement Dart layer interface:
final channel = MethodChannel('TUICallKitCustomBeauty');
void enableTUICallKitCustomBeauty() async {
await channel.invokeMethod('enableTUICallKitCustomBeauty');
}

void disableTUICallKitCustomBeauty() async {
await channel.invokeMethod('disableTUICallKitCustomBeauty');
}
Implement the corresponding Native layer interface:
java
swift
public class MainActivity extends FlutterActivity {
private static final String channelName = "TUICallKitCustomBeauty";
private MethodChannel channel;
@Override
public void configureFlutterEngine(@NonNull FlutterEngine flutterEngine) {
super.configureFlutterEngine(flutterEngine);
channel = new MethodChannel(flutterEngine.getDartExecutor().getBinaryMessenger(), channelName);
channel.setMethodCallHandler(((call, result) -> {
switch (call.method) {
case "enableTUICallKitCustomBeauty":
enableTUICallKitCustomBeauty();
break;
case "disableTUICallKitCustomBeauty":
disableTUICallKitCustomBeauty();
break;
default:
break;
}
result.success("");
}));
}
public void enableTUICallKitCustomBeauty() {
}
public void disableTUICallKitCustomBeauty() {
}
}
@UIApplicationMain
@objc class AppDelegate: FlutterAppDelegate {
var channel: FlutterMethodChannel?
override func application(_ application: UIApplication,
didFinishLaunchingWithOptions launchOptions: [UIApplication.LaunchOptionsKey: Any]?) -> Bool {
GeneratedPluginRegistrant.register(with: self)
guard let controller = window?.rootViewController as? FlutterViewController else {
fatalError("Invalid root view controller")
}
channel = FlutterMethodChannel(name: "TUICallKitCustomBeauty", binaryMessenger: controller.binaryMessenger)
channel?.setMethodCallHandler({ [weak self] call, result in
guard let self = self else { return }
switch (call.method) {
case "enableTUICallKitCustomBeauty":
self.enableTUICallKitCustomBeauty()
break
case "disableTUICallKitCustomBeauty":
self.disableTUICallKitCustomBeauty()
break
default:
break
}
})
result(nil)
return super.application(application, didFinishLaunchingWithOptions: launchOptions)
}
func enableTUICallKitCustomBeauty() {
}
func disableTUICallKitCustomBeauty() {
}
}

Step 2: Complete beauty processing in Native TRTC custom rendering logic

Note:
Android needs to rely on LiteAVSDK_Professional first when accessing beauty. Add the following dependencies in the app/build.gradle of the Android project:
dependencies{ api "com.tencent.liteav:LiteAVSDK_Professional:latest.release" }
java
swift
void enableTUICallKitCustomBeauty() {
TRTCCloud.sharedInstance(getApplicationContext()).
setLocalVideoProcessListener(TRTC_VIDEO_PIXEL_FORMAT_Texture_2D,
TRTC_VIDEO_BUFFER_TYPE_TEXTURE, new VideoFrameListerer());

}

void disableTUICallKitCustomBeauty() {
TRTCCloud.sharedInstance(getApplicationContext()).
setLocalVideoProcessListener(TRTC_VIDEO_PIXEL_FORMAT_Texture_2D,
TRTC_VIDEO_BUFFER_TYPE_TEXTURE, null);
}

class VideoFrameListerer implements TRTCCloudListener.TRTCVideoFrameListener { private XXXBeautyModel mBeautyModel = XXXBeautyModel.sharedInstance();
@Override public int onProcessVideoFrame(TRTCCloudDef.TRTCVideoFrame trtcVideoFrame, TRTCCloudDef.TRTCVideoFrame trtcVideoFrame1) { // Beauty processing logic
mBeautyModel.process(trtcVideoFrame, trtcVideoFrame1);
……
return 0; } @Override public void onGLContextCreated() { } @Override public void onGLContextDestory() { } }
let videoFrameListener: TRTCVideoFrameListener = TRTCVideoFrameListener()

func enableTUICallKitCustomBeauty() {
TRTCCloud.sharedInstance().setLocalVideoProcessDelegete(videoFrameListener, pixelFormat: ._Texture_2D, bufferType: .texture)
}

func disableTUICallKitCustomBeauty() {
TRTCCloud.sharedInstance().setLocalVideoProcessDelegete(nil, pixelFormat: ._Texture_2D, bufferType: .texture)
}

class TRTCVideoFrameListener: NSObject, TRTCVideoFrameDelegate {
let bueutyModel = XXXXBeautyModel.shareIntance()
func onProcessVideoFrame(_ srcFrame: TRTCVideoFrame, dstFrame: TRTCVideoFrame) -> UInt32 {
// Beauty processing logic
bueutyModel.onProcessVideoFrame(srcFrame, dstFrame)
……
return 0
}
}

Step 3: Customer-defined third-party beauty parameter control logic

In this part, customers can set beauty parameters according to their needs and the specific beauty module they use, referring to the implementation in step 1. The specific implementation depends on the specific usage.

Integrating Tencent Beauty Effects

The integration method of Tencent Beauty Effects also follows the above method. Now, taking Tencent Beauty Effects as an example, we will introduce the integration method in detail:

Step 1: Beauty resource download and integration

1. Download the SDK according to the package you purchased.
2. Add files to your project:
Android
iOS
1. Find the build.gradle file under the app module and add the maven reference address for your corresponding package. For example, if you choose the S1-04 package, add the following:
dependencies {
implementation 'com.tencent.mediacloud:TencentEffect_S1-04:latest.release'
}
For the maven addresses corresponding to each package, please refer to the documentation.
2. Find the src/main/assets folder under the app module. If it doesn't exist, create it. Check if there is a MotionRes folder in the downloaded SDK package. If so, copy this folder to the ../src/main/assets directory.
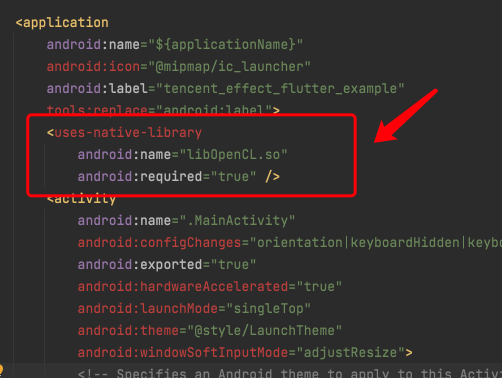
3. Find the AndroidManifest.xml file under the app module and add the following tag in the application form
<uses-native-library
android:name="libOpenCL.so"
android:required="true" />
//The "true" here means that if this library is not present, the application will not run properly. The system does not allow the installation of applications on devices without this library.
// "false" means that the application can use this library (if it exists) but is specifically designed to run without it (if necessary). The system allows the installation of applications even if this library does not exist. If you use "false", you need to take responsibility for properly handling the absence of the library.
Add as shown in the following figure:


4. Obfuscation configuration
If you enable compile optimization when building a release package (set minifyEnabled to true), some code that is not called in the java layer will be cut off, and this code may be called by the native layer, causing a no xxx method exception.
If you enable such compile optimization, you need to add these keep rules to prevent xmagic code from being cut off:
-keep class com.tencent.xmagic.** { *;}
-keep class org.light.** { *;}
-keep class org.libpag.** { *;}
-keep class org.extra.** { *;}
-keep class com.gyailib.**{ *;}
-keep class com.tencent.cloud.iai.lib.** { *;}
-keep class com.tencent.beacon.** { *;}
-keep class com.tencent.qimei.** { *;}
-keep class androidx.exifinterface.** { *;}
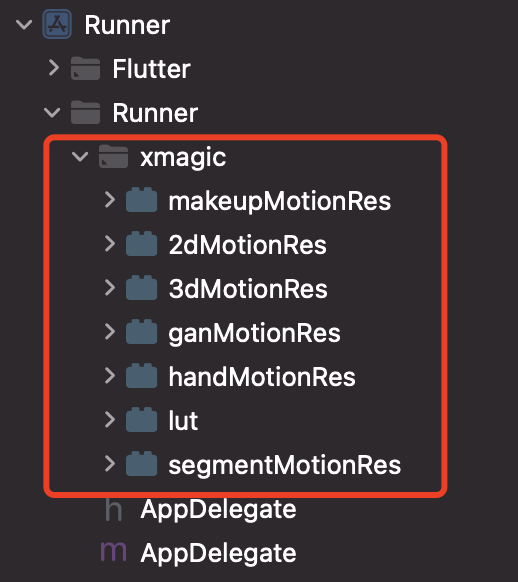
1. Add beauty resources to your project. After adding, it will be shown as in the following figure (the types of resources you have may not be exactly the same as in the figure):


2. In the demo, copy the 4 classes in demo/lib/producer: BeautyDataManager, BeautyPropertyProducer, BeautyPropertyProducerAndroid, and BeautyPropertyProducerIOS to your own Flutter project. These 4 classes are used to configure beauty resources and display beauty types on the beauty panel.

Step 2: Reference the Flutter version SDK

GitHub reference: Add the following reference to the project's pubspec.yaml file:
tencent_effect_flutter:
git:
url: https://github.com/TencentCloud/tencenteffect-sdk-flutter
Local reference: Download the latest version of tencent_effect_flutter from tencent_effect_flutter, and then add the folders android, ios, lib, and the files pubspec.yaml, tencent_effect_flutter.iml to the project directory. Then, add the following reference to the project's pubspec.yaml file (refer to the demo):
tencent_effect_flutter:
path: ../
tencent_effect_flutter provides only a bridge, and the default version of the internally dependent XMagic is the latest. The real beauty effect is achieved by XMagic.
If you want to use the latest version of the beauty SDK, you can upgrade the SDK through the following steps:
Android
iOS
Execute the command flutter pub upgrade in the project directory, or click "Pub upgrade" in the upper right corner of the subspec.yaml page.
Execute the command flutter pub upgrade in the project directory, and then execute the command pod update in the iOS directory.

Step 3: Implement the Dart layer to Native beauty control interface start/end

This section can refer to Accessing third-party beauty effects/Step 1, and is not repeated here.

Step 4: Complete the beauty processing in the TRTC custom rendering logic of Native

Android
iOS
Android needs to rely on LiteAVSDK_Professional first when accessing beauty. Add the following dependencies in the app/build.gradle of the Android project:
dependencies{ api "com.tencent.liteav:LiteAVSDK_Professional:latest.release" }
void enableTUICallKitCustomBeauty() {
TRTCCloud.sharedInstance(getApplicationContext()).
setLocalVideoProcessListener(TRTC_VIDEO_PIXEL_FORMAT_Texture_2D,
TRTC_VIDEO_BUFFER_TYPE_TEXTURE, new VideoFrameListerer());

}

void disableTUICallKitCustomBeauty() {
TRTCCloud.sharedInstance(getApplicationContext()).
setLocalVideoProcessListener(TRTC_VIDEO_PIXEL_FORMAT_Texture_2D,
TRTC_VIDEO_BUFFER_TYPE_TEXTURE, null);
}

class VideoFrameListerer implements TRTCCloudListener.TRTCVideoFrameListener {
private XXXBeautyModel mBeautyModel = XXXBeautyModel.sharedInstance();
@Override
public int onProcessVideoFrame(TRTCCloudDef.TRTCVideoFrame trtcVideoFrame,
TRTCCloudDef.TRTCVideoFrame trtcVideoFrame1) {
trtcVideoFrame1.texture.textureId = XmagicApiManager.getInstance() .process(trtcVideoFrame.texture.textureId, trtcVideoFrame.width, trtcVideoFrame.height);
return 0;
}

@Override
public void onGLContextCreated() {
}

@Override
public void onGLContextDestory() {
}
}
import TXLiteAVSDK_Professional
import tencent_effect_flutter

let videoFrameListener: TRTCVideoFrameListener = TRTCVideoFrameListener()

func enableTUICallKitCustomBeauty() {
TRTCCloud.sharedInstance().setLocalVideoProcessDelegete(videoFrameListener, pixelFormat: ._Texture_2D, bufferType: .texture)
}

func disableTUICallKitCustomBeauty() {
TRTCCloud.sharedInstance().setLocalVideoProcessDelegete(nil, pixelFormat: ._Texture_2D, bufferType: .texture)
}

class TRTCVideoFrameListener: NSObject, TRTCVideoFrameDelegate {
func onProcessVideoFrame(_ srcFrame: TRTCVideoFrame, dstFrame: TRTCVideoFrame) -> UInt32 {
dstFrame.textureId = GLuint(XmagicApiManager.shareSingleton().getTextureId(ConvertBeautyFrame.convertTRTCVideoFrame(trtcVideoFrame: srcFrame)))
return 0
}
}


public class ConvertBeautyFrame: NSObject {
public static func convertToTRTCPixelFormat(beautyPixelFormat: ITXCustomBeautyPixelFormat) -> TRTCVideoPixelFormat {
switch beautyPixelFormat {
case .Unknown:
return ._Unknown
case .I420:
return ._I420
case .Texture2D:
return ._Texture_2D
case .BGRA:
return ._32BGRA
case .NV12:
return ._NV12
}
}

public static func convertTRTCVideoFrame(trtcVideoFrame: TRTCVideoFrame) -> ITXCustomBeautyVideoFrame {
let beautyVideoFrame = ITXCustomBeautyVideoFrame()
beautyVideoFrame.data = trtcVideoFrame.data
beautyVideoFrame.pixelBuffer = trtcVideoFrame.pixelBuffer
beautyVideoFrame.width = UInt(trtcVideoFrame.width)
beautyVideoFrame.height = UInt(trtcVideoFrame.height)
beautyVideoFrame.textureId = trtcVideoFrame.textureId
switch trtcVideoFrame.rotation {
case ._0:
beautyVideoFrame.rotation = .rotation_0
case ._90:
beautyVideoFrame.rotation = .rotation_90
case ._180:
beautyVideoFrame.rotation = .rotation_180
case ._270:
beautyVideoFrame.rotation = .rotation_270
default:
beautyVideoFrame.rotation = .rotation_0
}
switch trtcVideoFrame.pixelFormat {
case ._Unknown:
beautyVideoFrame.pixelFormat = .Unknown
case ._I420:
beautyVideoFrame.pixelFormat = .I420
case ._Texture_2D:
beautyVideoFrame.pixelFormat = .Texture2D
case ._32BGRA:
beautyVideoFrame.pixelFormat = .BGRA
case ._NV12:
beautyVideoFrame.pixelFormat = .NV12
default:
beautyVideoFrame.pixelFormat = .Unknown
}
beautyVideoFrame.bufferType = ITXCustomBeautyBufferType(rawValue: trtcVideoFrame.bufferType.rawValue) ?? .Unknown
beautyVideoFrame.timestamp = trtcVideoFrame.timestamp
return beautyVideoFrame
}
}


Step 5: Enable beauty and set beauty parameters

After completing the above configuration, you can enable/disable beauty through enableTUICallKitCustomBeauty()/disableTUICallKitCustomBeauty(). You can set beauty parameters through the Tencent beauty effects Flutter interface.