Effect Issue Troubleshooting

1. What to do if noise appears in the image?

If you are in a low-light environment and noise appears in the image, you can enable the noise reduction attribute.

2. What to do if the segmentation effect is not very good?

When the background segmentation effect is used, it is recommended not to have a too complex background. The background color and clothing color should not be too similar. Otherwise, the segmentation effect will be reduced.

3. What is the relationship between beauty makeup materials and beauty filter?


4. What to do if using a certain beauty filter has no effect?

This could be a license permission issue or a parameter issue (for example, the path issue with filters and animation effects). It is recommended to check the property parameters.

5. What to do if the edges of the screen are blurry after the beauty filter is applied?


This situation occurs because the face slimming effect is on (face slimming effect leads to the stretching of pixels around the face). If the face is too close to the edge of the screen, there's more stretching at the edge. This can be handled by cropping the edge of the screen. For the cropping method, refer to the demo.

6. What to do if the face has no effect in horizontal screen mode?

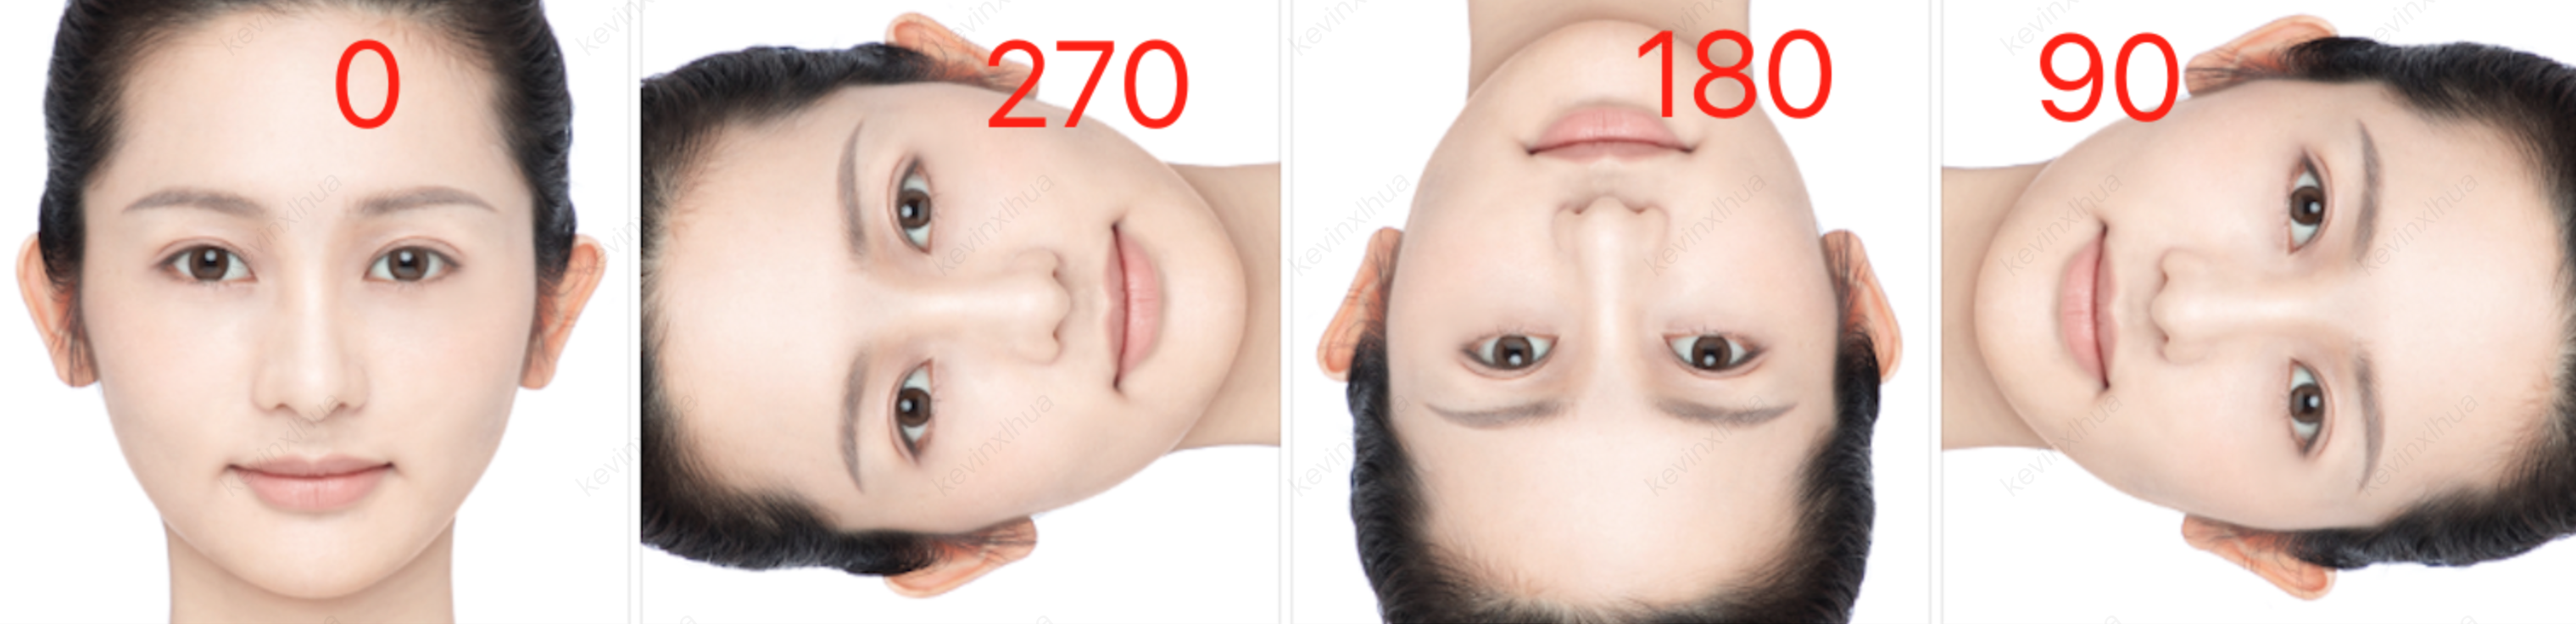
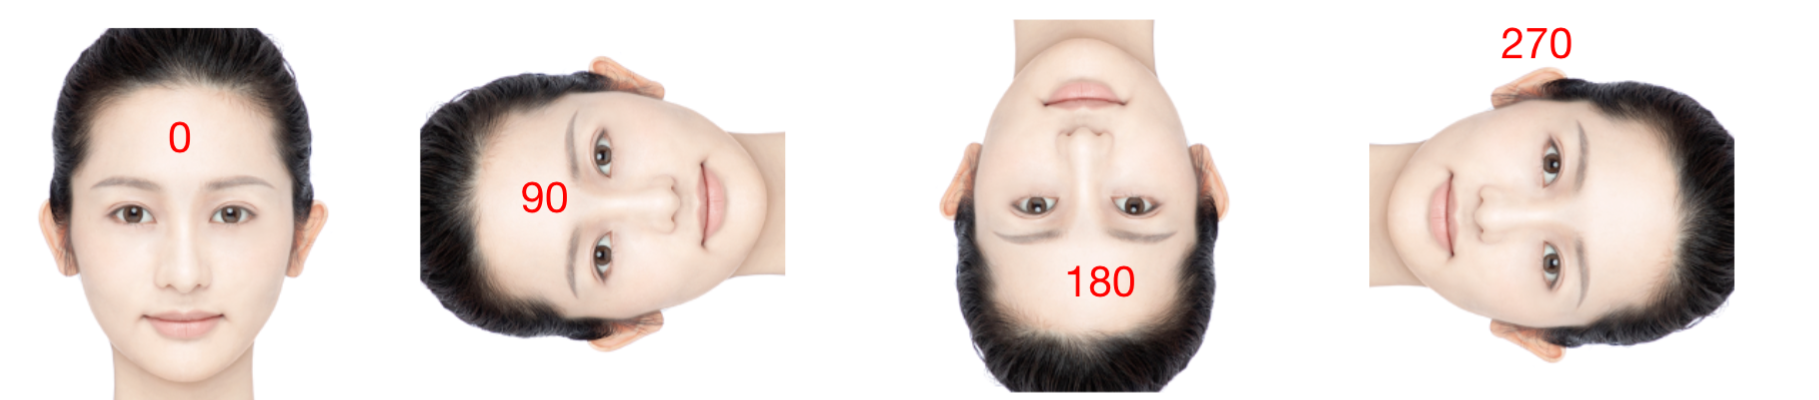
Check the direction of the face in the screen and set the corresponding offset angle.
Android
iOS
1. In Android, you can use the readTexture method to retrieve the current screen, check the direction of the face, and set the corresponding angle according to the picture below.
public static Bitmap readTexture(int texture, int width, int height) { int[] frame = new int[1]; GLES20.glGenFramebuffers(1, frame, 0); GLES20.glBindFramebuffer(GLES20.GL_FRAMEBUFFER, frame[0]); GLES20.glFramebufferTexture2D(GLES20.GL_FRAMEBUFFER, GLES20.GL_COLOR_ATTACHMENT0, GLES20.GL_TEXTURE_2D, texture, 0); byte[] data = new byte[width * height * 4]; ByteBuffer buffer = ByteBuffer.wrap(data); GLES20.glPixelStorei(GLES20.GL_PACK_ALIGNMENT, GLES20.GL_TRUE); GLES20.glReadPixels(0, 0, width, height, GLES20.GL_RGBA, GLES20.GL_UNSIGNED_BYTE, buffer); Bitmap bitmap = Bitmap.createBitmap(width, height, Bitmap.Config.ARGB_8888); bitmap.copyPixelsFromBuffer(buffer); GLES20.glBindFramebuffer(GLES20.GL_FRAMEBUFFER, 0); GLES20.glDeleteFramebuffers(1, frame, 0); return bitmap; }
2. Call the setImageOrientation method in Android.


1. In iOS, you can use the readTexture method to retrieve the current screen, check the direction of the face, and set the corresponding angle according to the picture below.
#import <OpenGLES/ES2/gl.h>
-(void)readTexture:(int)textureId width:(int)width height:(int)height{
glBindTexture(GL_TEXTURE_2D, textureId);
GLuint framebuffer;
glGenFramebuffers(1, &framebuffer);
glBindFramebuffer(GL_FRAMEBUFFER, framebuffer);
glFramebufferTexture2D(GL_FRAMEBUFFER, GL_COLOR_ATTACHMENT0, GL_TEXTURE_2D, textureId, 0);
GLenum status = glCheckFramebufferStatus(GL_FRAMEBUFFER);
if (status != GL_FRAMEBUFFER_COMPLETE) {
NSLog(@"Framebuffer is not complete.");
}
GLubyte *pixels = (GLubyte *)malloc(width * height * 4 * sizeof(GLubyte));
glReadPixels(0, 0, width, height, GL_RGBA, GL_UNSIGNED_BYTE, pixels);
glBindFramebuffer(GL_FRAMEBUFFER, 0);
glDeleteFramebuffers(1, &framebuffer);
CVPixelBufferRef pixelBuffer = NULL;
CVPixelBufferCreateWithBytes(NULL, width, height, kCVPixelFormatType_32BGRA, pixels, width * 4, NULL, NULL, NULL, &pixelBuffer);
free(pixels);
CVPixelBufferRelease(pixelBuffer);
}
2. Call the setImageOrientation method in iOS.