
Run Sample Demo
This guide walks you through getting started with the
TUILiveKit Flutter Demo in just 10 minutes. Experience a fully featured UI for video live streaming and voice chat room scenarios.Prerequisites
Activate the Service
Refer to Activate the Service to obtain a TUILiveKit trial version. Then, go to the Console for application management, and get the following:
SDKAppID: Application identifier (required). Tencent Cloud uses SDKAppId for billing and details.SDKSecretKey: Application secret key, used to initialize the configuration file with secret information.Environment Preparation
Ensure your development environment meets the following requirements before running the demo:
Platform | Description |
Flutter | Flutter: Version 3.29.3 or later Dart: Version 3.7.2 or later |
Android | Android Studio: Version 3.5 or later Android OS: Devices running Android 5.0 or later Java Version: JDK 17 required |
iOS | Xcode: Version 15 or later iOS: Devices running iOS 13.0 or later CocoaPods: CocoaPods environment installed. If not installed, see the CocoaPods Official Installation Guide. |
IDE Environment Configuration
For efficient Flutter development, we recommend using Visual Studio Code as your IDE, as suggested in the Flutter documentation. See Visual Studio Code for setup instructions.
Instructions
Get the Demo
1. Download the Source Code: Download the TUIKit_Flutter source code from GitHub, or run the following command in your terminal:
git clone https://github.com/Tencent-RTC/TUIKit_Flutter.git
2. Install Dependencies: Use the terminal to navigate to the directory containing the
pubspec.yaml file for the example project, then run flutter pub get to install dependencies:# The pubspec.yaml file for the example project is located at TUIKit_Flutter/applicationcd TUIKit_Flutter/application# Install dependenciesflutter pub get
3. Install iOS Dependencies (iOS Only): Use the Terminal to navigate to the directory containing your
Podfile, then run the following command to install the required dependencies:# The Podfile for your iOS project is located in the application/ios directory.cd application/ios# Install dependenciespod install --repo-update
4. Clean Gradle global configuration (Android only): If you have ~/.gradle/init.gradle locally, run:
rm -f ~/.gradle/init.gradle
Note:
If you have a global
Gradle configuration file at ~/.gradle/init.gradle on your local machine that includes allprojects.repositories, follow these steps:Option 1 (Recommended): Remove any configuration related to
allprojects.repositories from the file.Option 2: Delete the
~/.gradle/init.gradle file entirely.Reason: This configuration is incompatible with the
RepositoriesMode.FAIL_ON_PROJECT_REPOS setting in newer versions of Gradle, and will result in runtime errors.5. Configure JDK 17 (Android only): In
gradle.properties under application/android, add org.gradle.java.home and set it to your JDK 17 path:# Replace with your actual JDK 17 pathorg.gradle.java.home=xx/Java/JavaVirtualMachines/jdk-17.0.6.jdk/Contents/Home
6. After completing these steps, open the
TUIKit_Flutter/application directory in Visual Studio Code.Setup
1. Configure
sdkAppId and secretKey: In the livekit project, enter your sdkAppId and secretKey in the application/lib/debug/generate_test_user_sig.dart file:
Note:
In this demo, authentication is handled by configuring the
secretKey in the client code. The secretKey can be decompiled and compromised. If leaked, attackers can steal your Tencent Cloud traffic. This approach is only suitable for local demo runs and feature debugging.For production, generate the
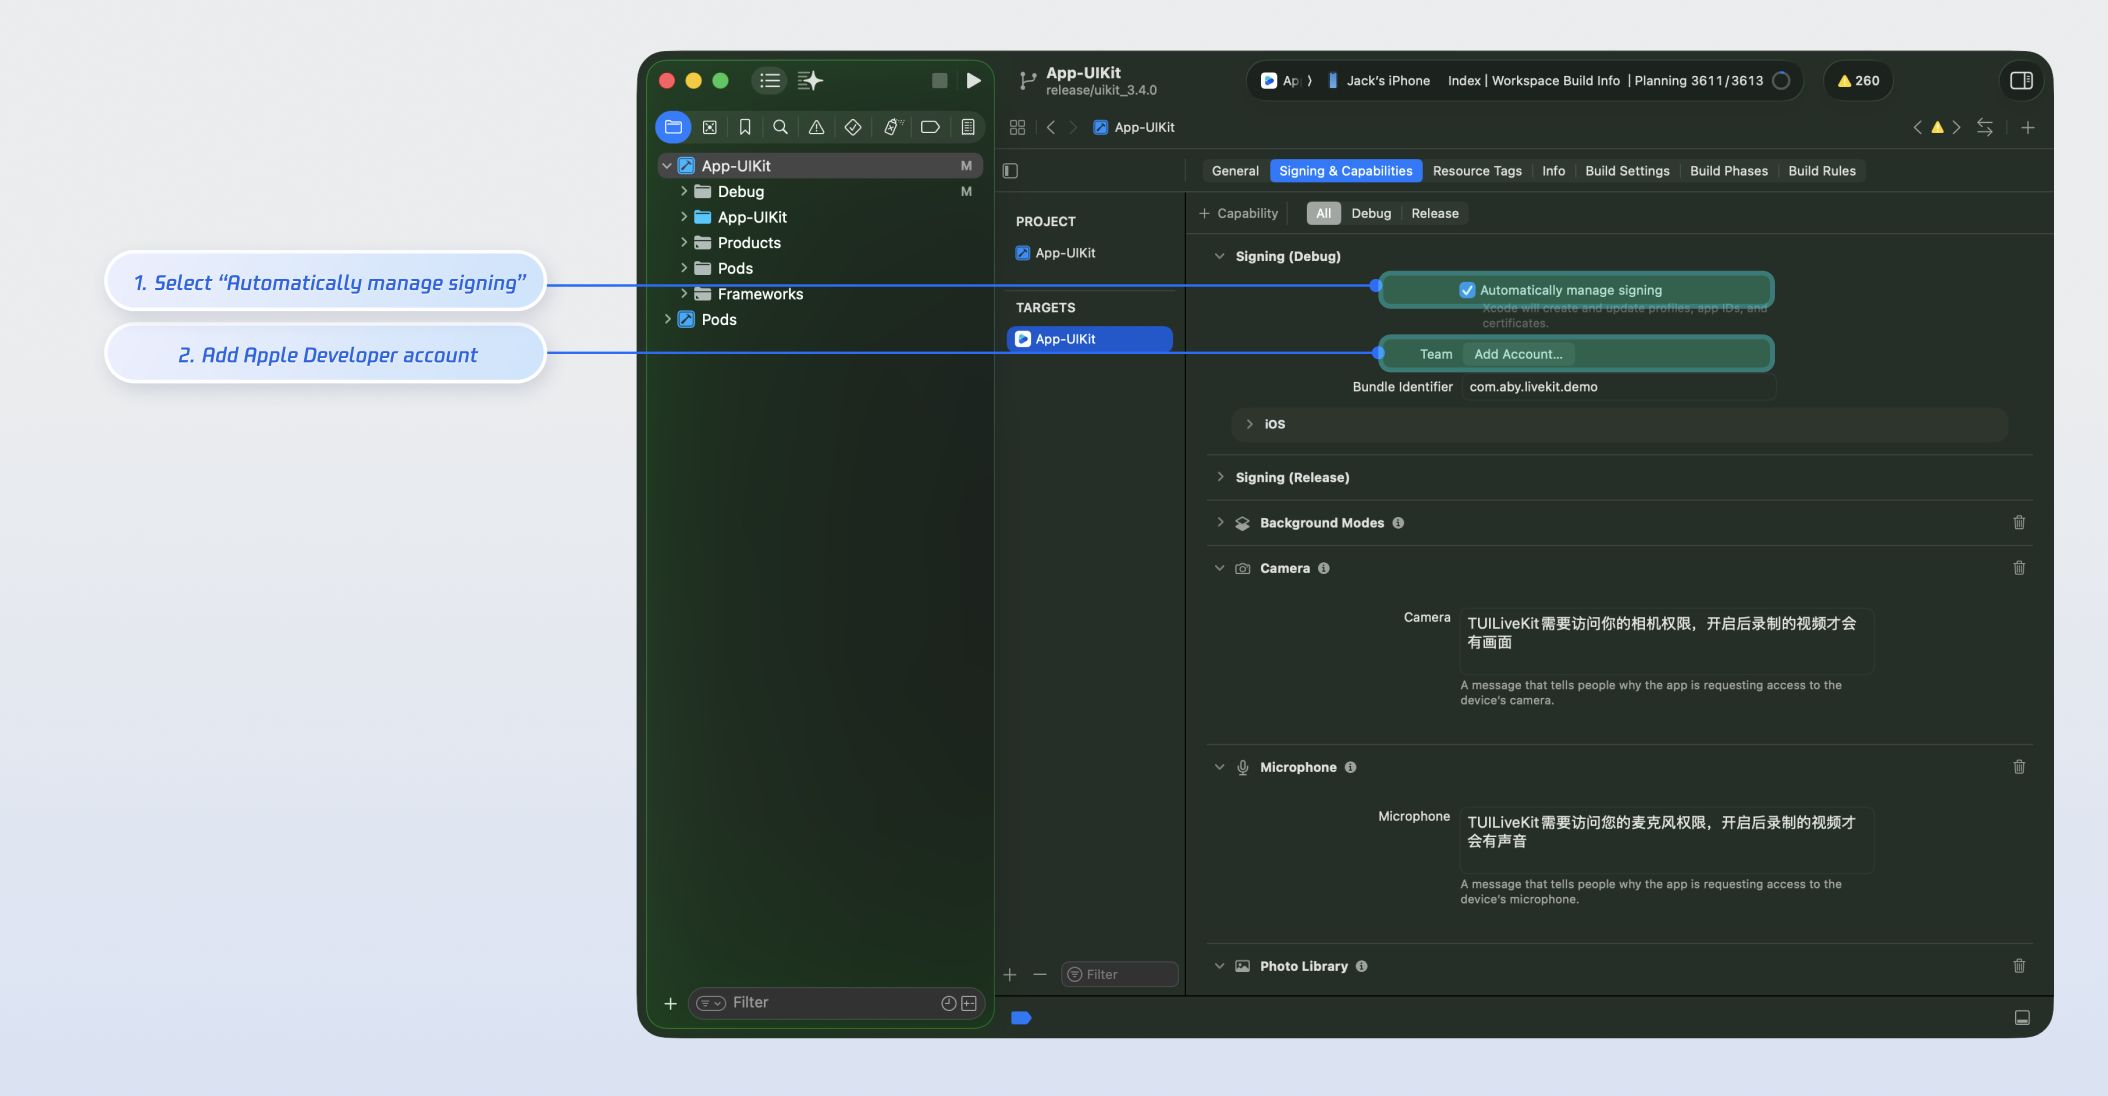
UserSig on your server. When a UserSig is required, your app should request a dynamic UserSig from your backend for authentication. See Generating UserSig on the Server for details.2. Configure Apple Developer Signing(iOS Only): In the project's TARGETS under the Signing & Capabilities tab, select Automatically manage signing and configure your Apple Developer account and Bundle Identifier:
Build and Run the Demo
Live streaming requires camera and microphone access. We recommend running and debugging the demo on a physical device.
If you encounter the runtime error
'Error resolving plugin [id: 'dev.flutter.flutter-plugin-loader', version: '1.0.0']', please refer to the runtime error troubleshooting guide and try again.Select Target Device
When you open a Flutter project in VS Code, the status bar displays Flutter-specific items, including the Flutter SDK version and device name (or "No Devices" if none are detected):

Note:
If you do not see the Flutter version or device information, your project may not be recognized as a Flutter project. Ensure the VS Code Workspace Folder contains a pubspec.yaml file.
If the status bar shows No Devices, Flutter has not detected any connected iOS or Android devices or emulators. Connect a device or launch an emulator.
The Flutter extension automatically selects the last connected device. If you have multiple devices or emulators connected, click the device name in the status bar to select your preferred device for running or debugging.
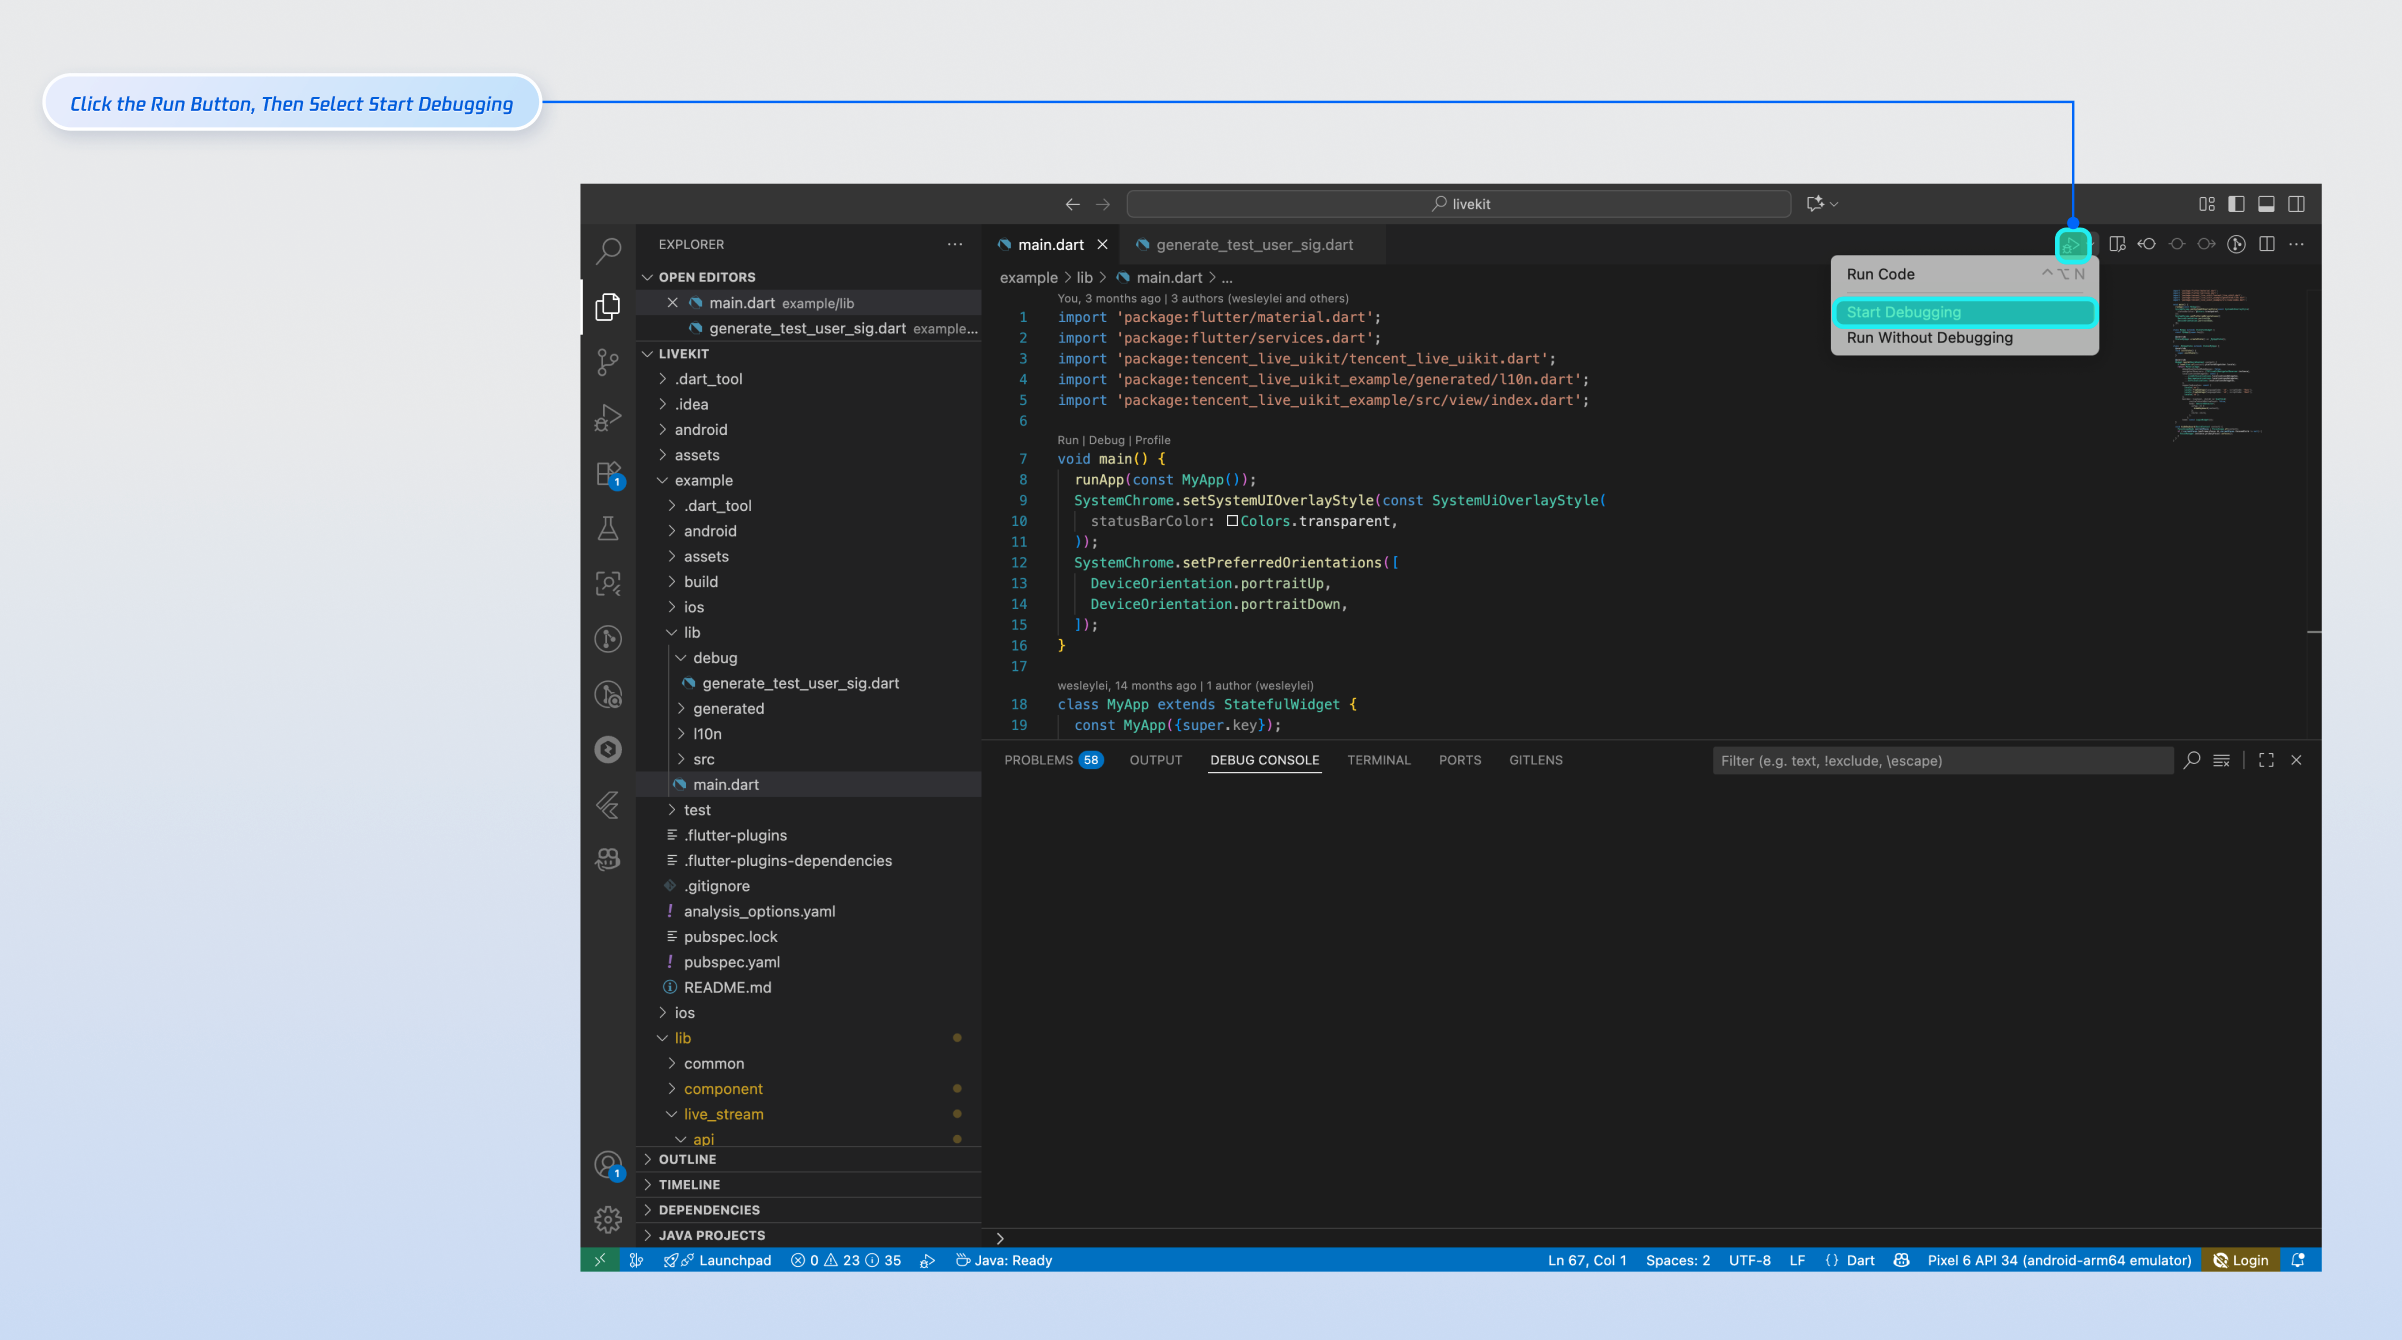
Run
Note:
For a complete live streaming experience, run the demo on two devices and log in with two different users (for example, one as the host and one as the audience).
Experience the Basic Features
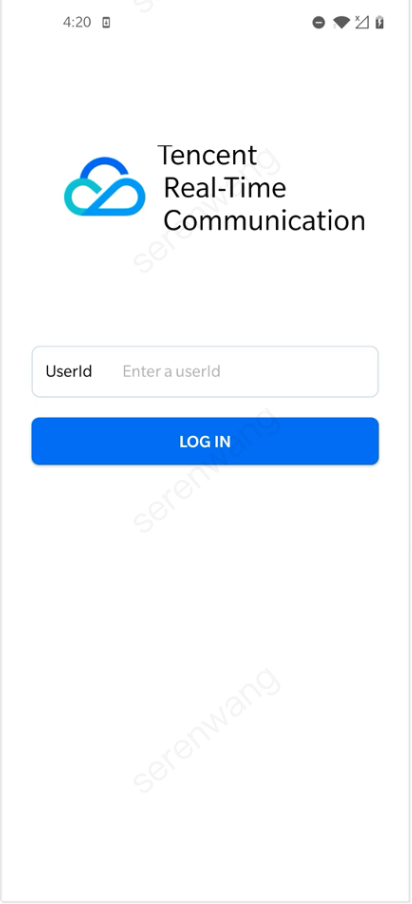
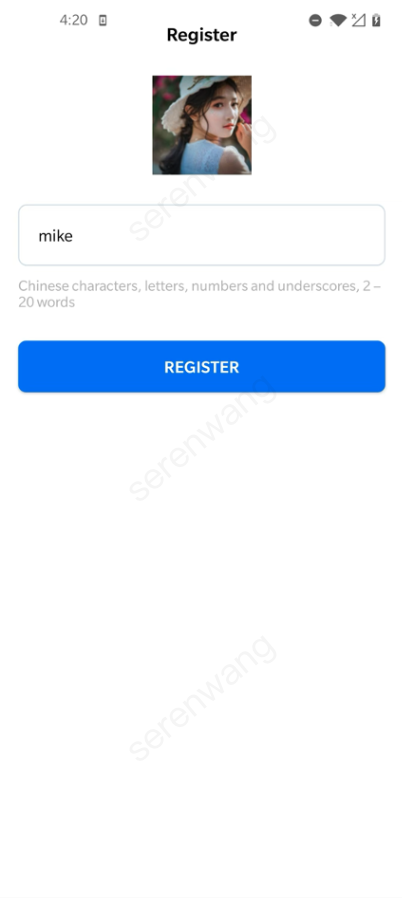
1. Login & Registration
Enter your
ID in the UserID field. If the UserID has not been used before, you’ll be redirected to the registration page to set your avatar and nickname.Anchor(mike) | | Audience(vince) | |
 |  |  | 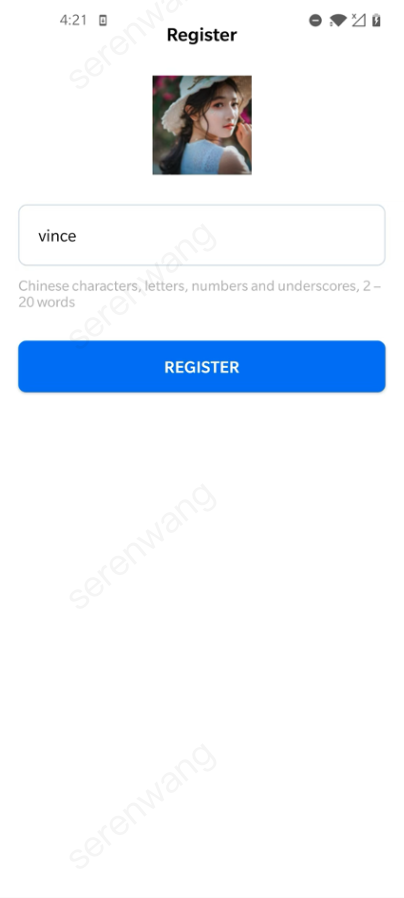 |
Note:
Do not use simple UserIDs such as "1", "123", or "111".
TRTC does not support multi-end login for the same UserID, and these simple UserIDs are likely to be used by others during collaborative development, which can cause login failures. Use distinctive UserIDs during debugging.
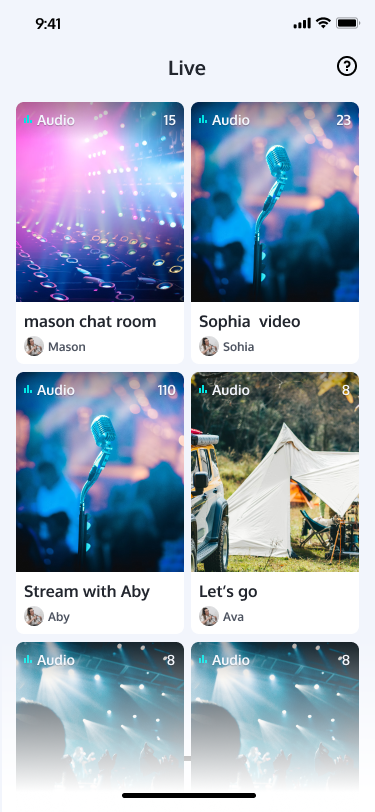
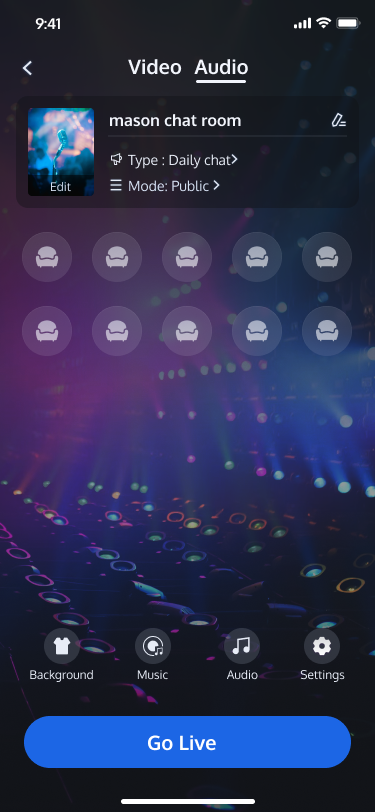
2. Video Live Streaming
Click
Live > Video Live to start a video live streaming session.Live Streaming List | Host Preview Before Going Live | Host Starts Video Live Streaming | Audience Watches Live Stream |
 | 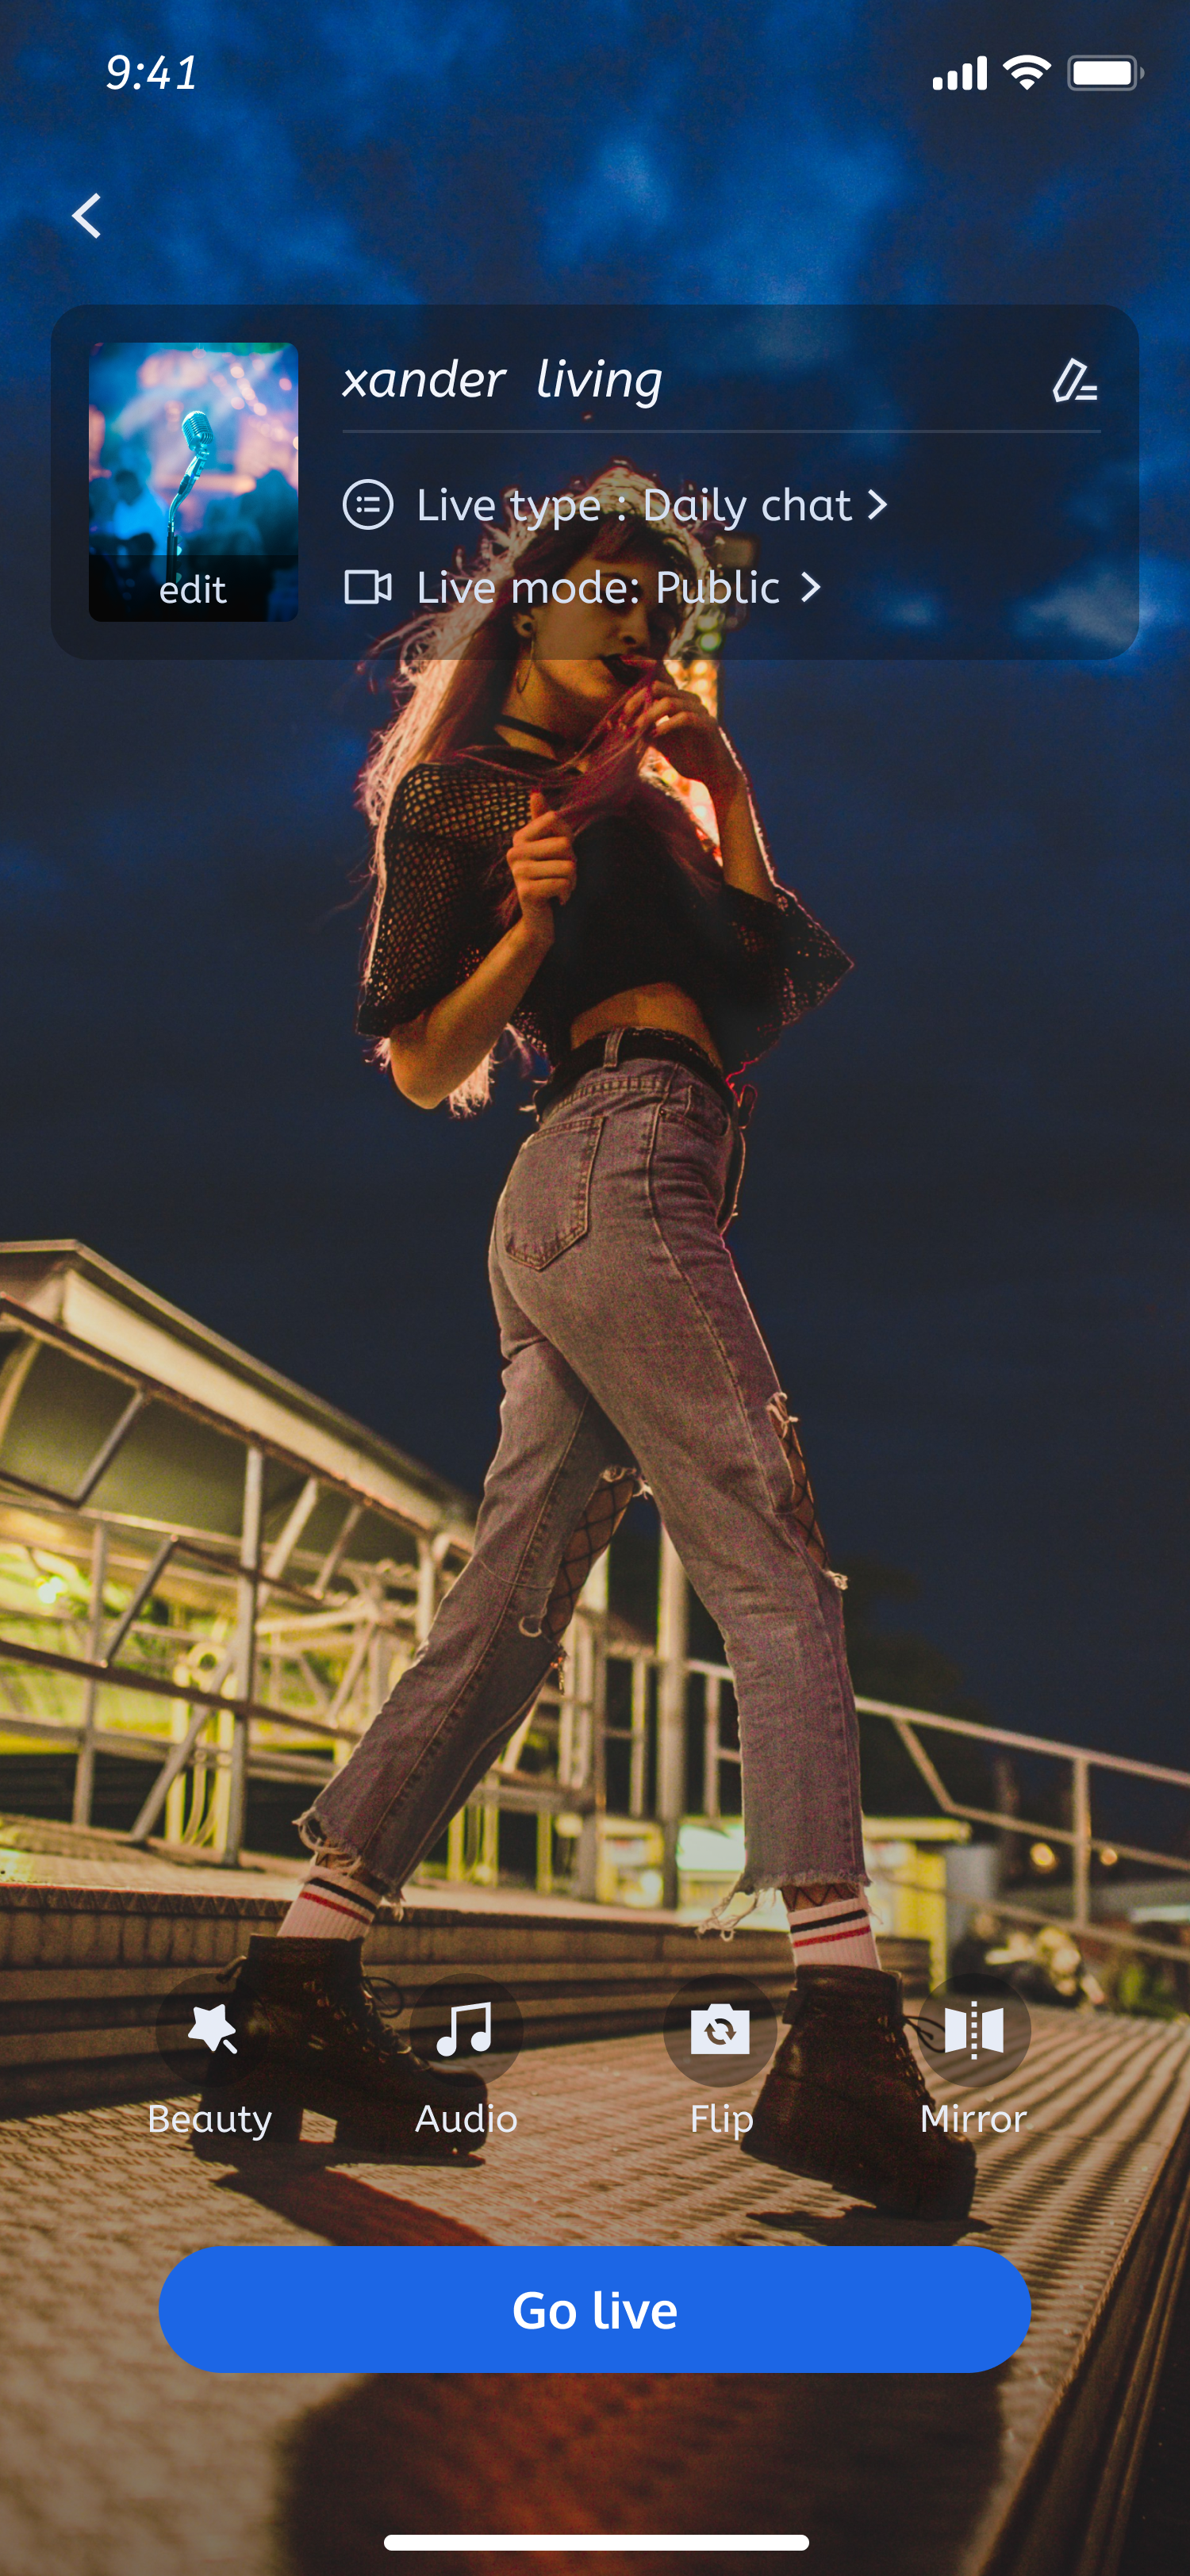 | 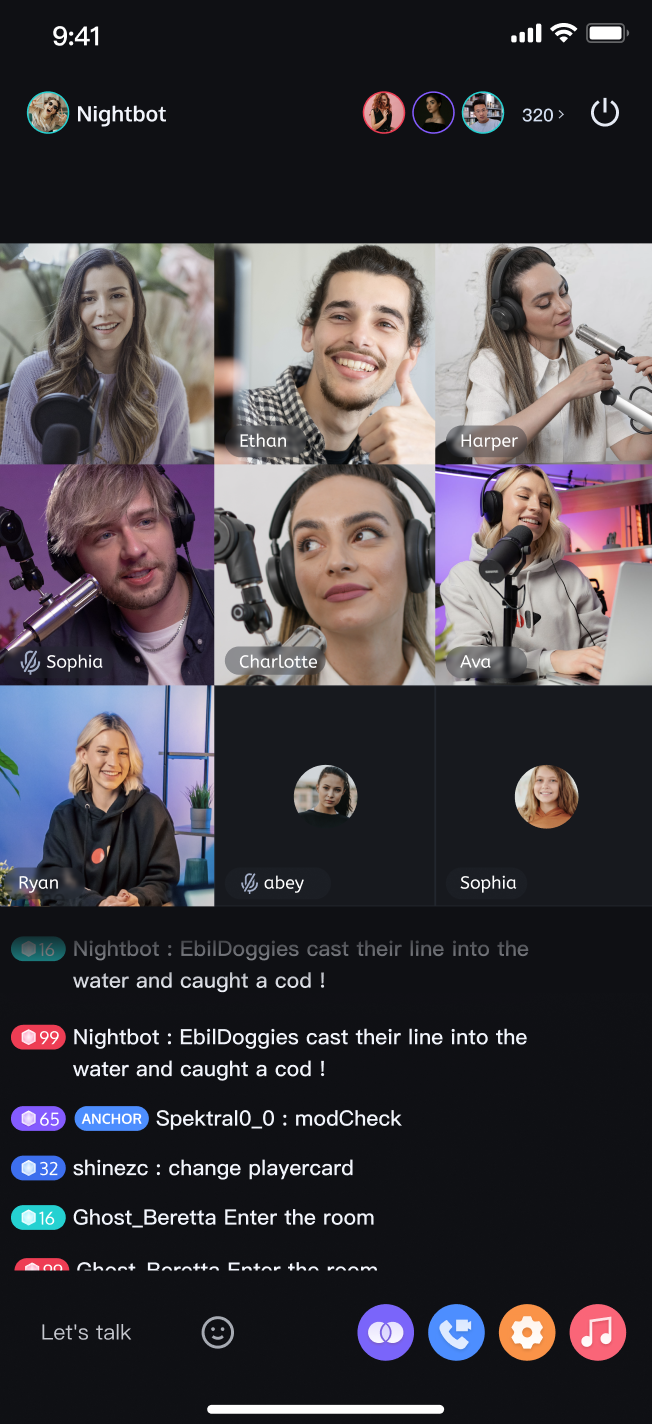 | 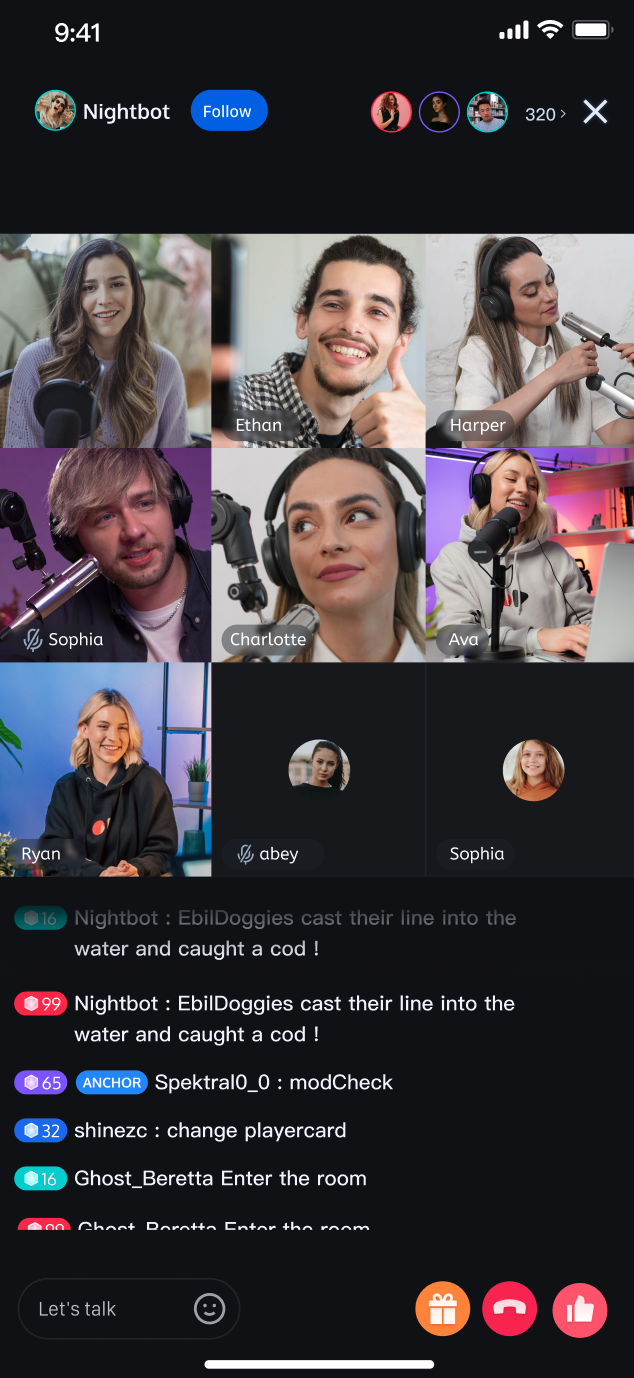 |
3. Voice Chat Room
Click
Live > Voice Room to start a voice chat session.Live Streaming List | Host Preview Before Going Live | Host Starts Voice Chat Live | Audience Joins Voice Chat Room |
 |  | 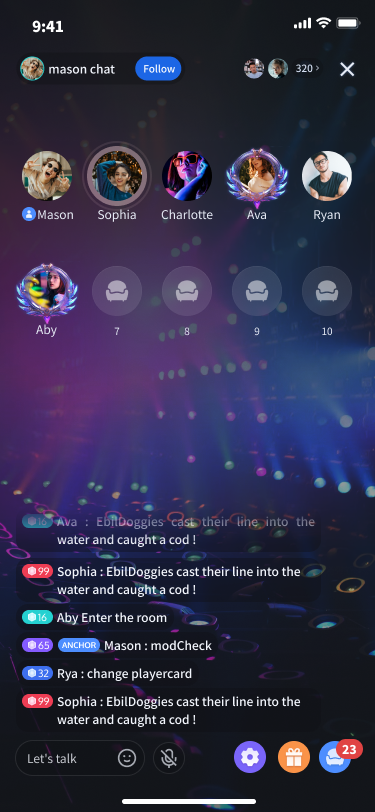 | 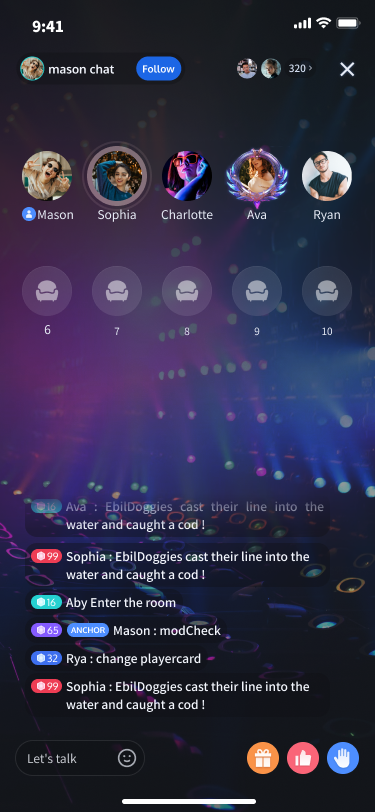 |
Next Steps
After running the Demo, refer to the following integration guides to add these features to your own project:
Feature | Description | Integration Guide |
Video Live Streaming | Supports ultra-low latency HD streaming, multi-user co-hosting/PK, real-time beauty filters, bullet comments, and gift interactions—enabling you to build interactive video live streaming scenarios. | |
Voice Chat Room | Delivers ultra-clear audio quality, supports multi-user co-hosting, seat management, and real-time text chat—ideal for KTV, social, or gaming-themed rooms. |
FAQs
CocoaPods Installation Method?
Install CocoaPods using gem: Run sudo gem install cocoapods in your terminal.
Tip:
During sudo gem install cocoapods, you may be prompted for your computer password. Enter your administrator password as instructed.
Real Device Debugging?
Enable developer mode to run on a real device.
iOS: Connect your device to your computer, then go to
Settings > Privacy & Security > Developer Mode and enable developer mode.Android: Enable developer mode by tapping the build number multiple times in settings. If you cannot find it, refer to your device's official website or search online for instructions.
Get a signature error or login failure when running the demo?
Verify that the
sdkAppId and secretKey entered in application/lib/debug/generate_test_user_sig.dart are correct and match the values from the Tencent RTC Console > Application Management page.Runtime error: Error resolving plugin [id: 'dev.flutter.flutter-plugin-loader', version: '1.0.0']
If you encounter the following error message during runtime:
* What went wrong:Error resolving plugin [id: 'dev.flutter.flutter-plugin-loader', version: '1.0.0']> Build was configured to prefer settings repositories over project repositories but repository 'xxx' was added by settings file 'settings.gradle'
Encounter error code "9519" or "9523" with the message "The request packets timed out while waiting to be sent..." during login?
Please first try changing your current network environment and attempt to log in again.
If the issue persists even after changing your network environment, contact us for support.
Encounter error code "-3301" with the message "Services are not available in your region" after entering the room?
Contact Us
If you have questions or need support during integration or usage, join the Telegram Technical Group, or contact us.

