
VoIP (Apple LiveCommunicationKit)
TUICallKit component supports VoIP push functionality through the TUIVoIPExtension/LiveCommunicationKit push plugin. TUICallKit provides you with two integration methods: TUIVoIPExtension/LiveCommunicationKit plugin (paid) and self-integrated push (free). We recommend using the TUIVoIPExtension/LiveCommunicationKit push plugin to implement offline push. The TUIVoIPExtension/LiveCommunicationKit push plugin has the following advantages:
Short integration cycle, expected full vendor integration takes only 30 minutes.
Supports data statistics and link tracking, making it convenient for you to view various metrics such as push reach rate, click rate, and conversion rate.
Better audio/video call notification effects, improving call reach rate.
Supports cross-platform frameworks such as Flutter.
Note:
TUIVoIPExtension is a sub-module of TIMPush. Due to the special nature of VoIP push, TUIVoIPExtension is released independently. To use the TUIVoIPExtension plugin, you first need to activate TIMPush service.
Description:
TUIVoIPExtension/LiveCommunicationKit plugin needs to be used on iOS 17.4 and above systems.
VoIP Push cannot reuse APNs regular push certificates and requires a separate VoIP Push certificate application on the Apple Developer website.
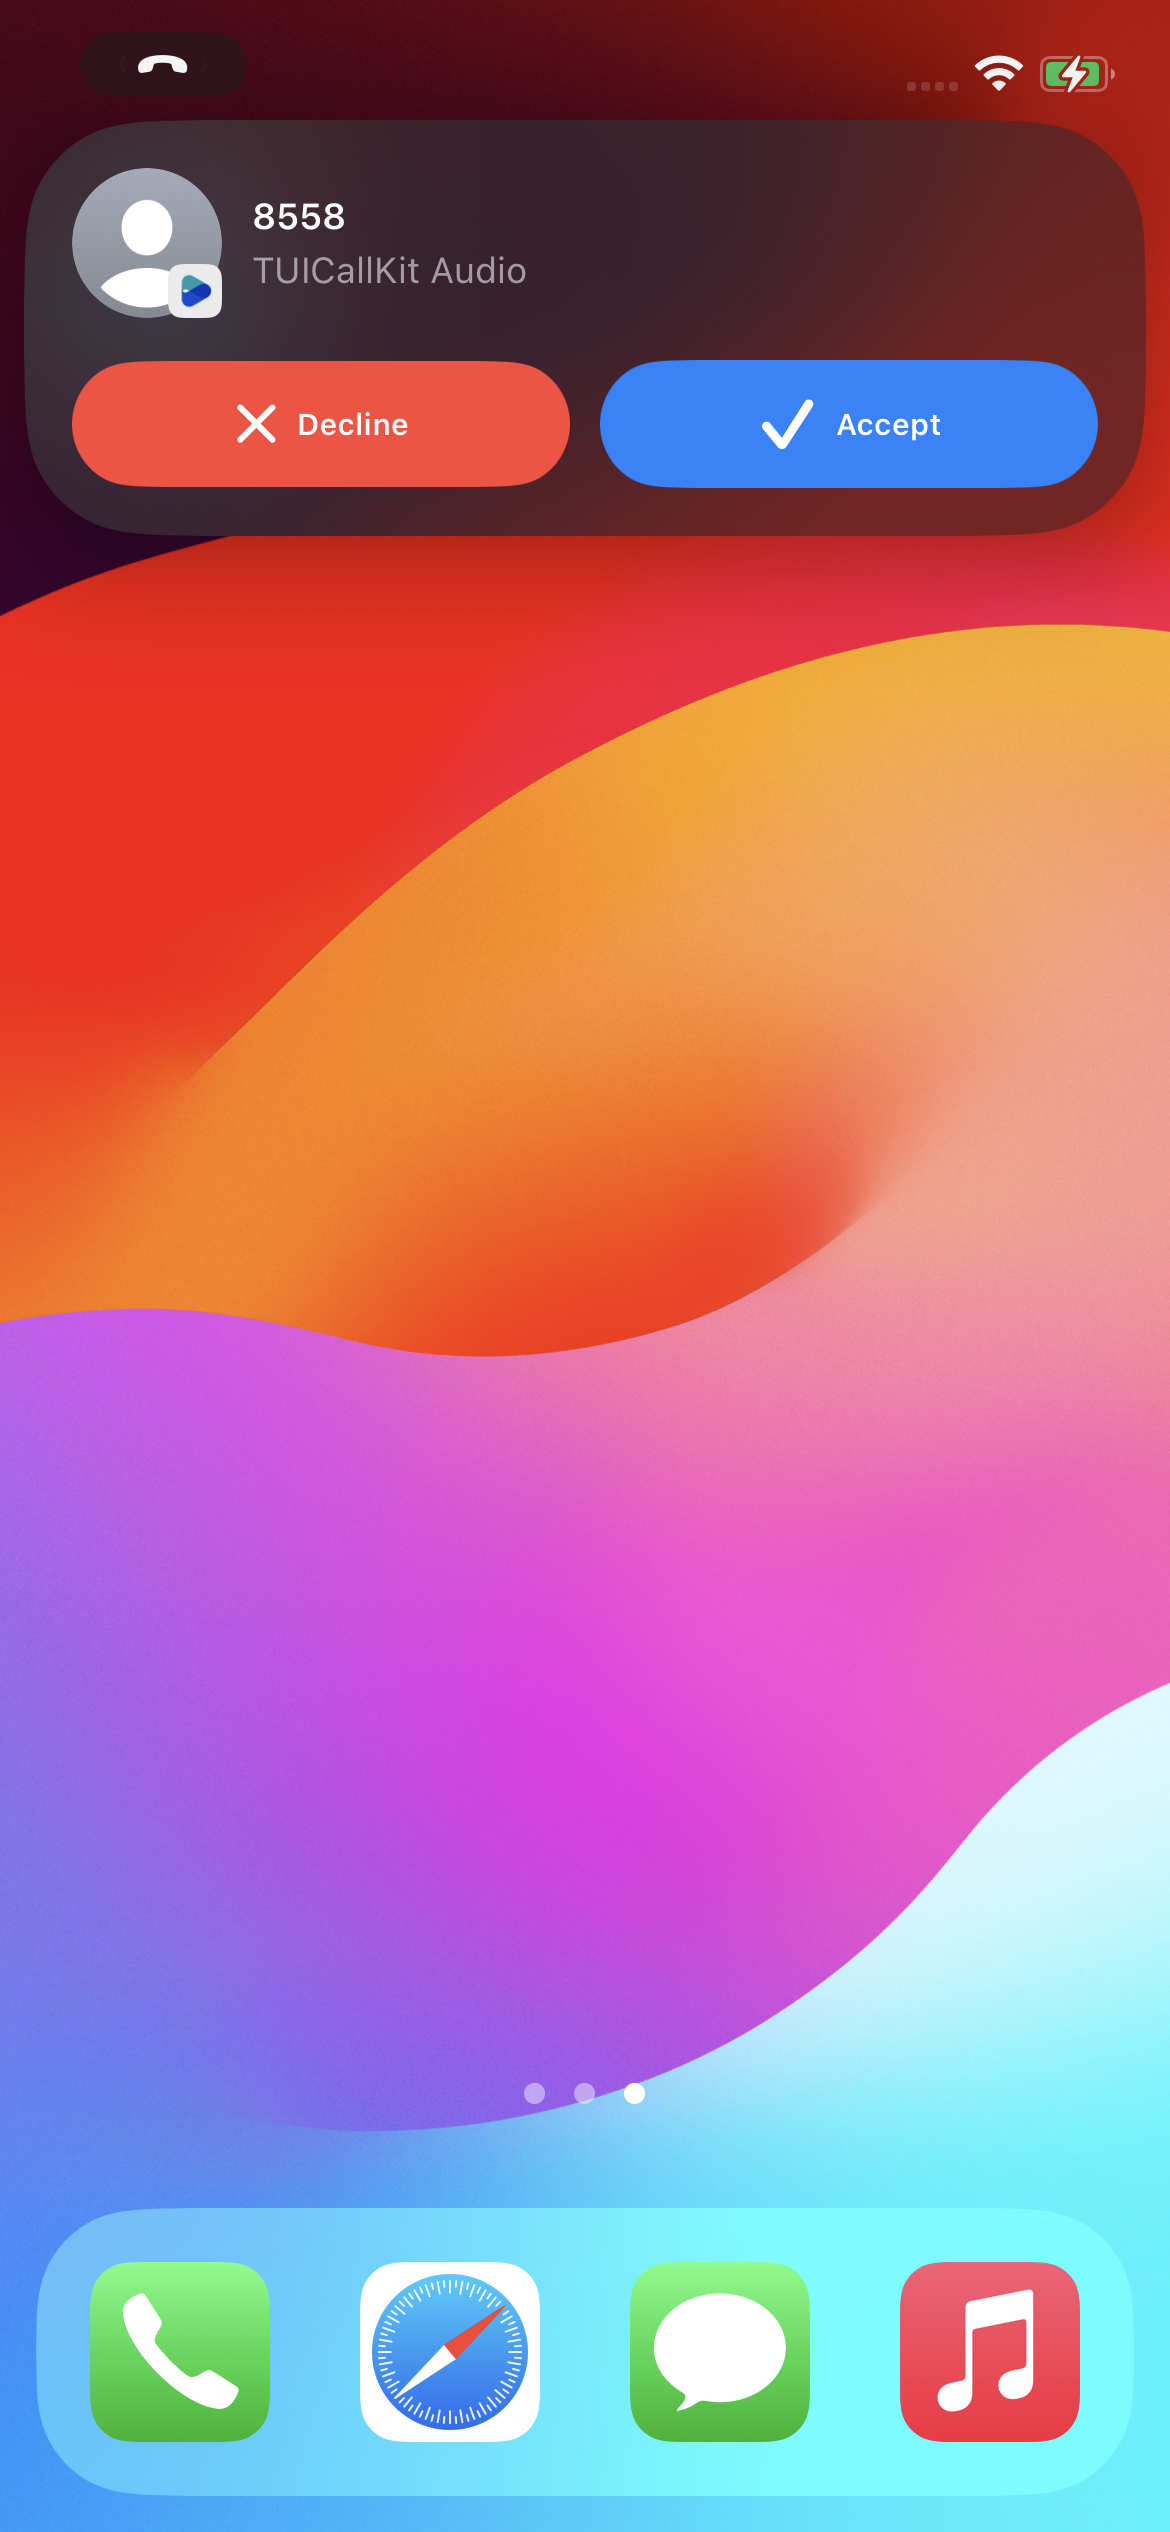
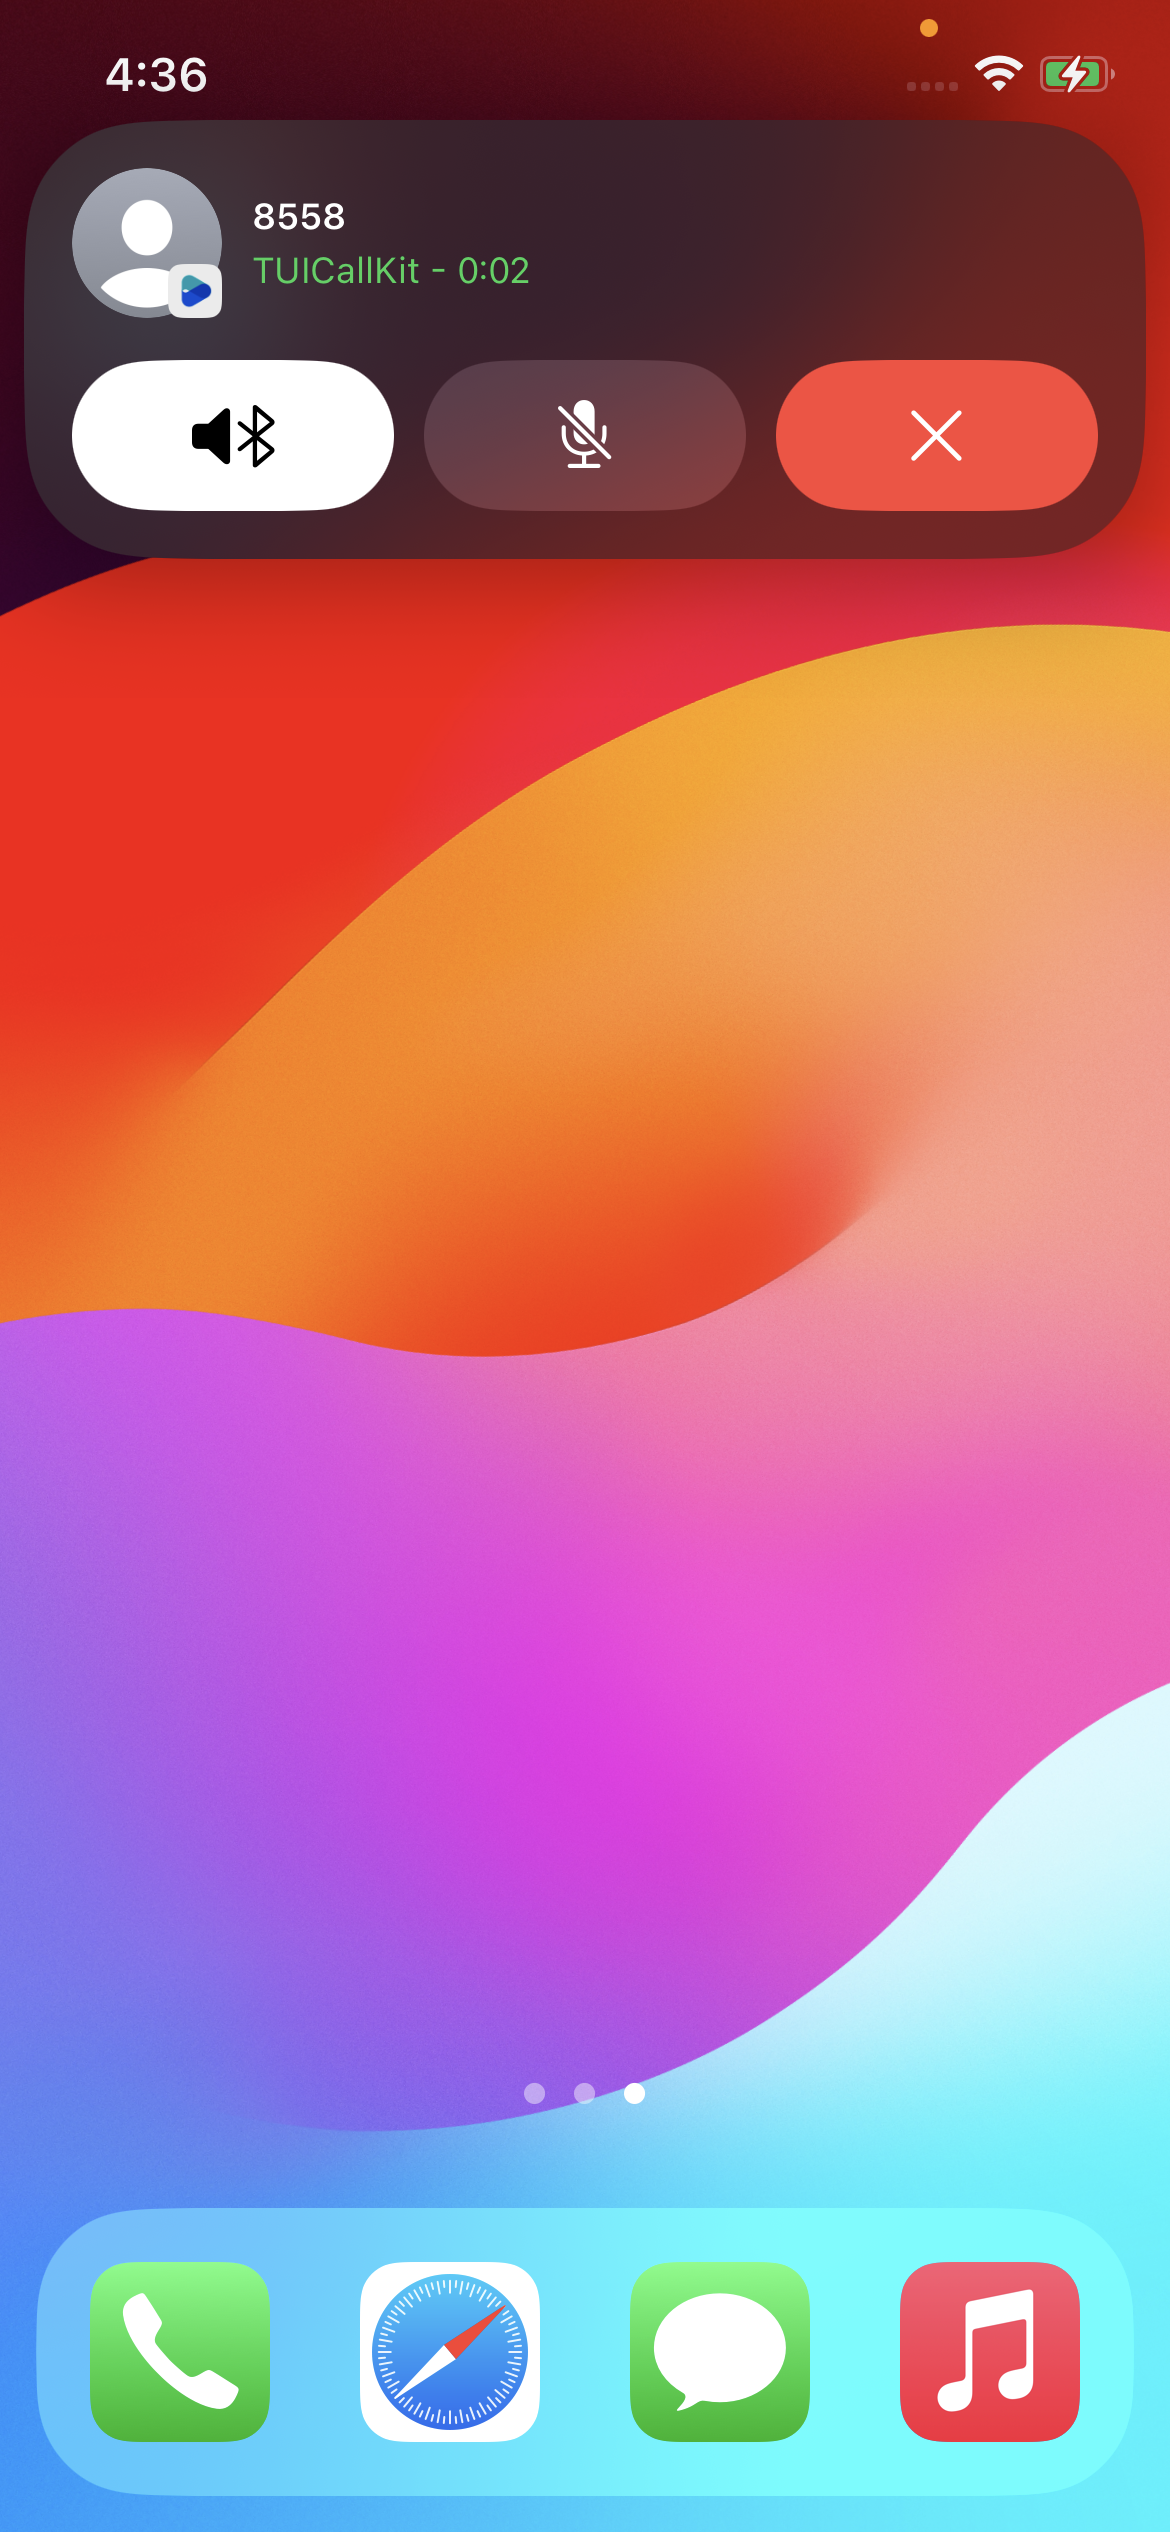
Integration Effect
Before Answering Effect | After Answering Effect |
 |  |
Prerequisites
1. Activate Service
Go to IM Console > Plugin Market, click Buy Now or Free Trial (each application can have one free trial, valid for 7 days).

Note:
2. Vendor Configuration
Step 1: Apply for VoIP Push Certificate
Before applying for a VoIP Push certificate, please first log in to the Apple Developer Center website and enable remote push functionality for your App. After your AppID has Push Notification capability, follow these steps to apply for and configure the VoIP Push certificate:
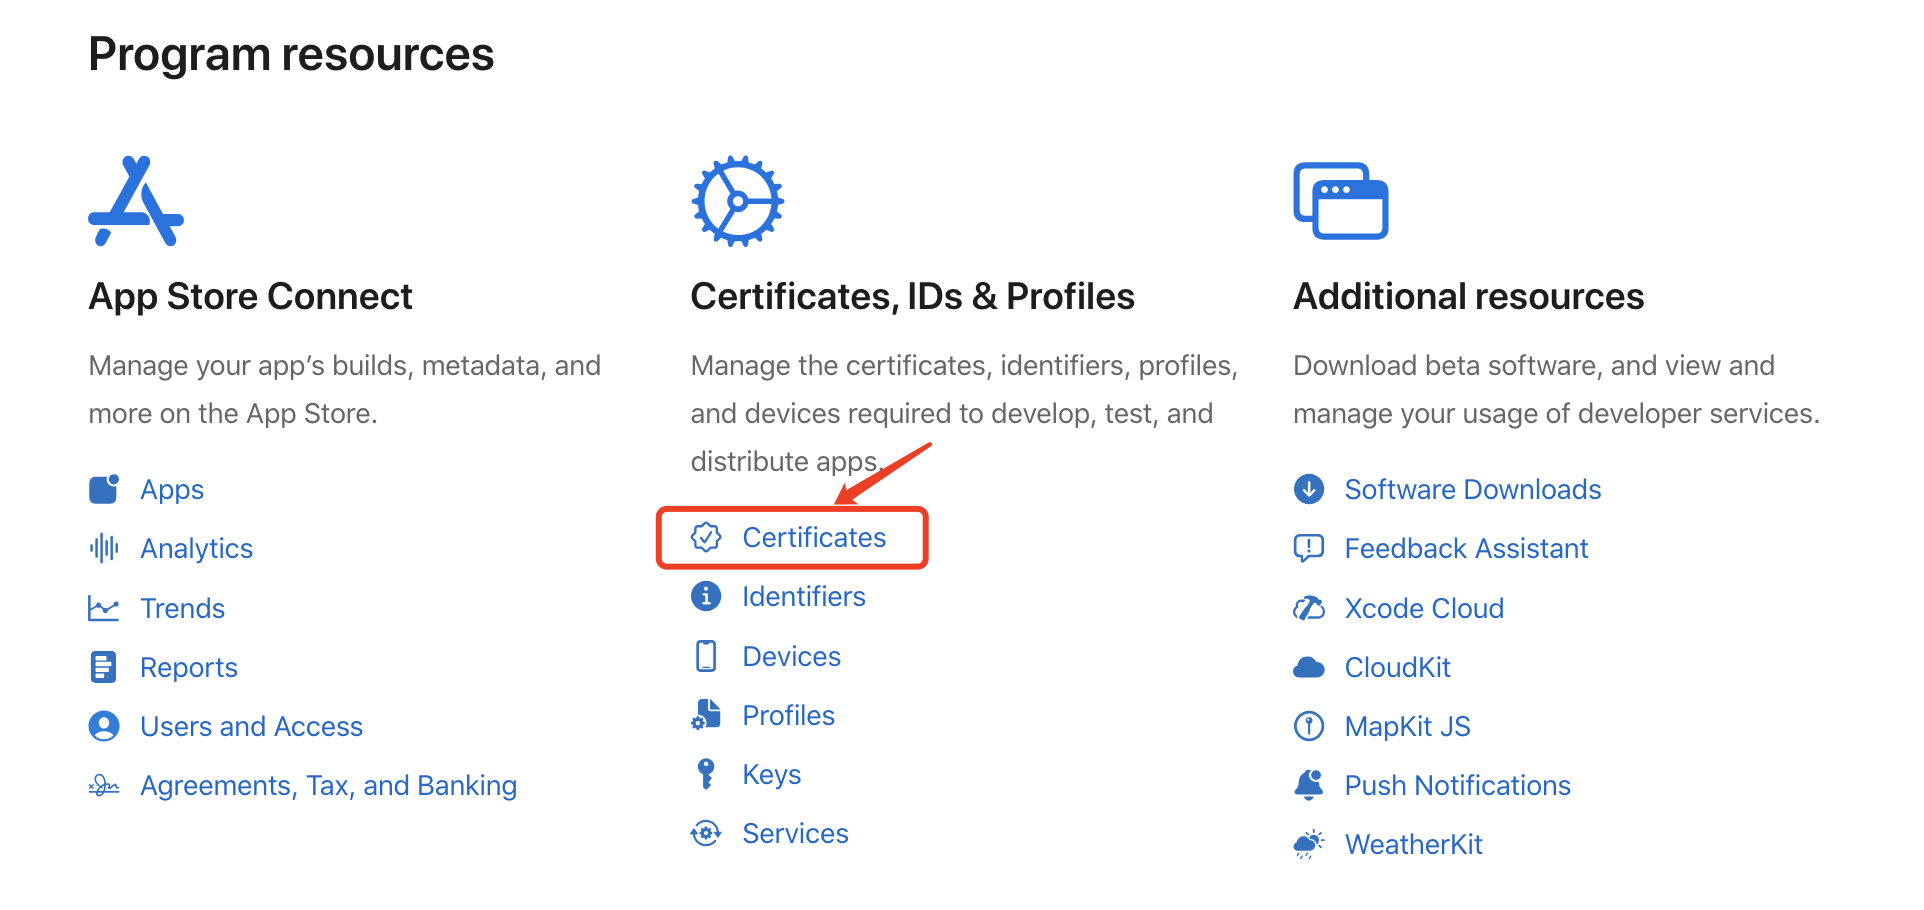
1. Log in to the Apple Developer Center website, click Certificates, IDs & Profiles tab, then Certificates, to enter the Certificates, Identifiers & Profiles page.
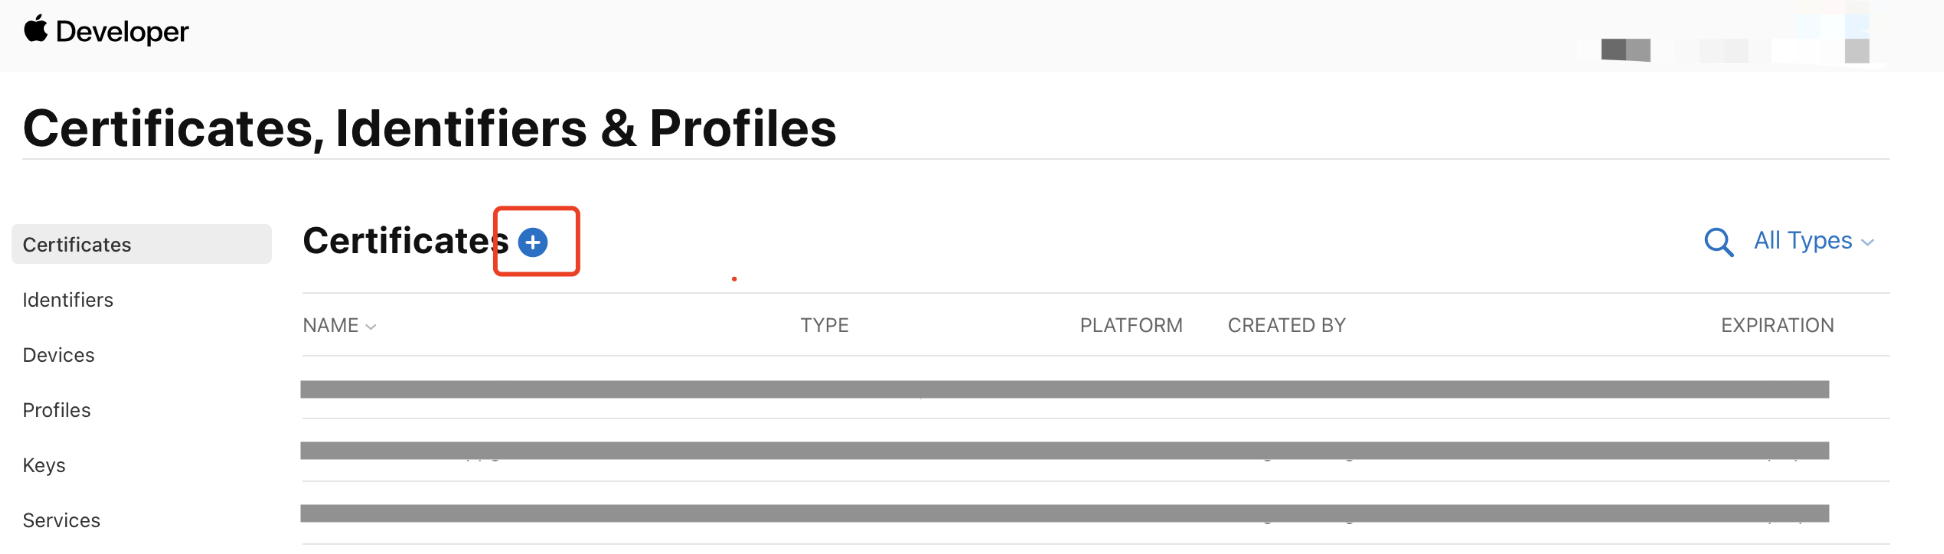
2. Click the + next to Certificates.
3. In the Create a New Certificate tab, select VoIP Services Certificate, and click Continue.
4. In the Select an App ID for your VoIP Service Certificate tab, select your current App's BundleID, and click Continue.
5. Next, the system prompts that we need a Certificate Signing Request (CSR).
6. We will create a CSR file next. First, open Keychain Access on Mac, select Keychain Access > Certificate Assistant > Request a Certificate From a Certificate Authority from the menu (
Keychain Access - Certificate Assistant - Request a Certificate From a Certificate Authority).
7. Enter your email address, common name (your name or company name), select Save to disk, click continue, and the system will generate a
*.certSigningRequest file.Return to the Apple Developer website page from Step 5 above, click Choose File to upload the generated
*.certSigningRequest file.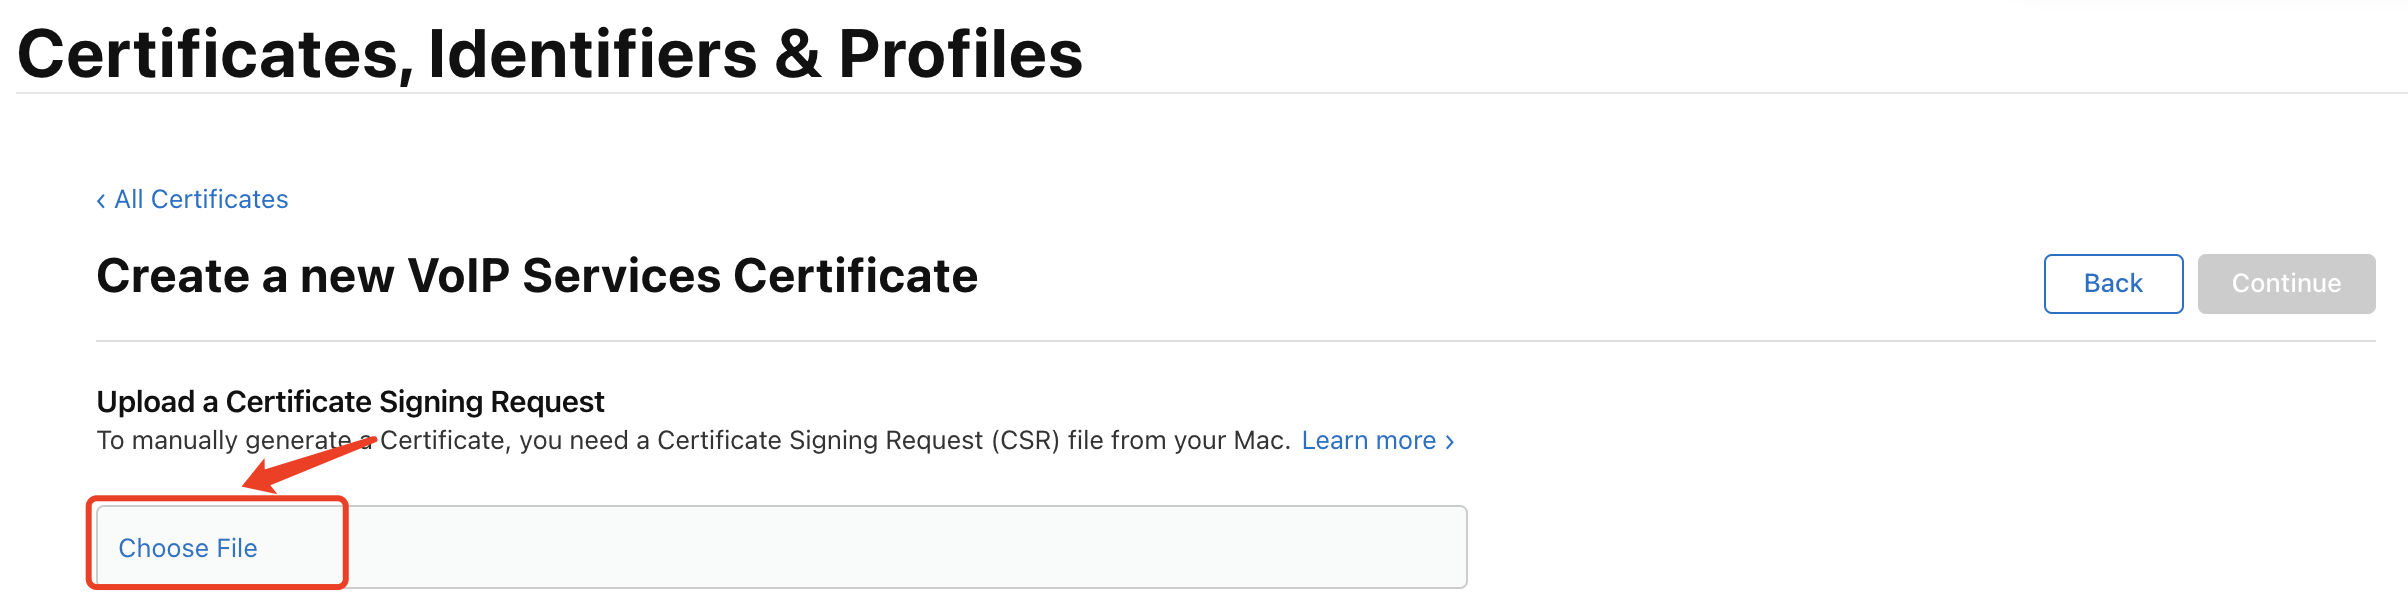
8. Click Continue to generate the certificate, then click Download to download the corresponding certificate to your local machine.
9. Double-click to open the downloaded
voip_services.cer, and the system will import it into the keychain.10. Open the Keychain application, go to Login > My Certificates, right-click to export the newly created VoIP Services
P12 file.Description:
When saving the
P12 file, please make sure to set a password for it.Step 2: Upload Certificate to IM Console
Open IM Console, select your created IM application, and follow these steps to upload the certificate:
1. Select your IM application, go to the Access Settings page of Push.
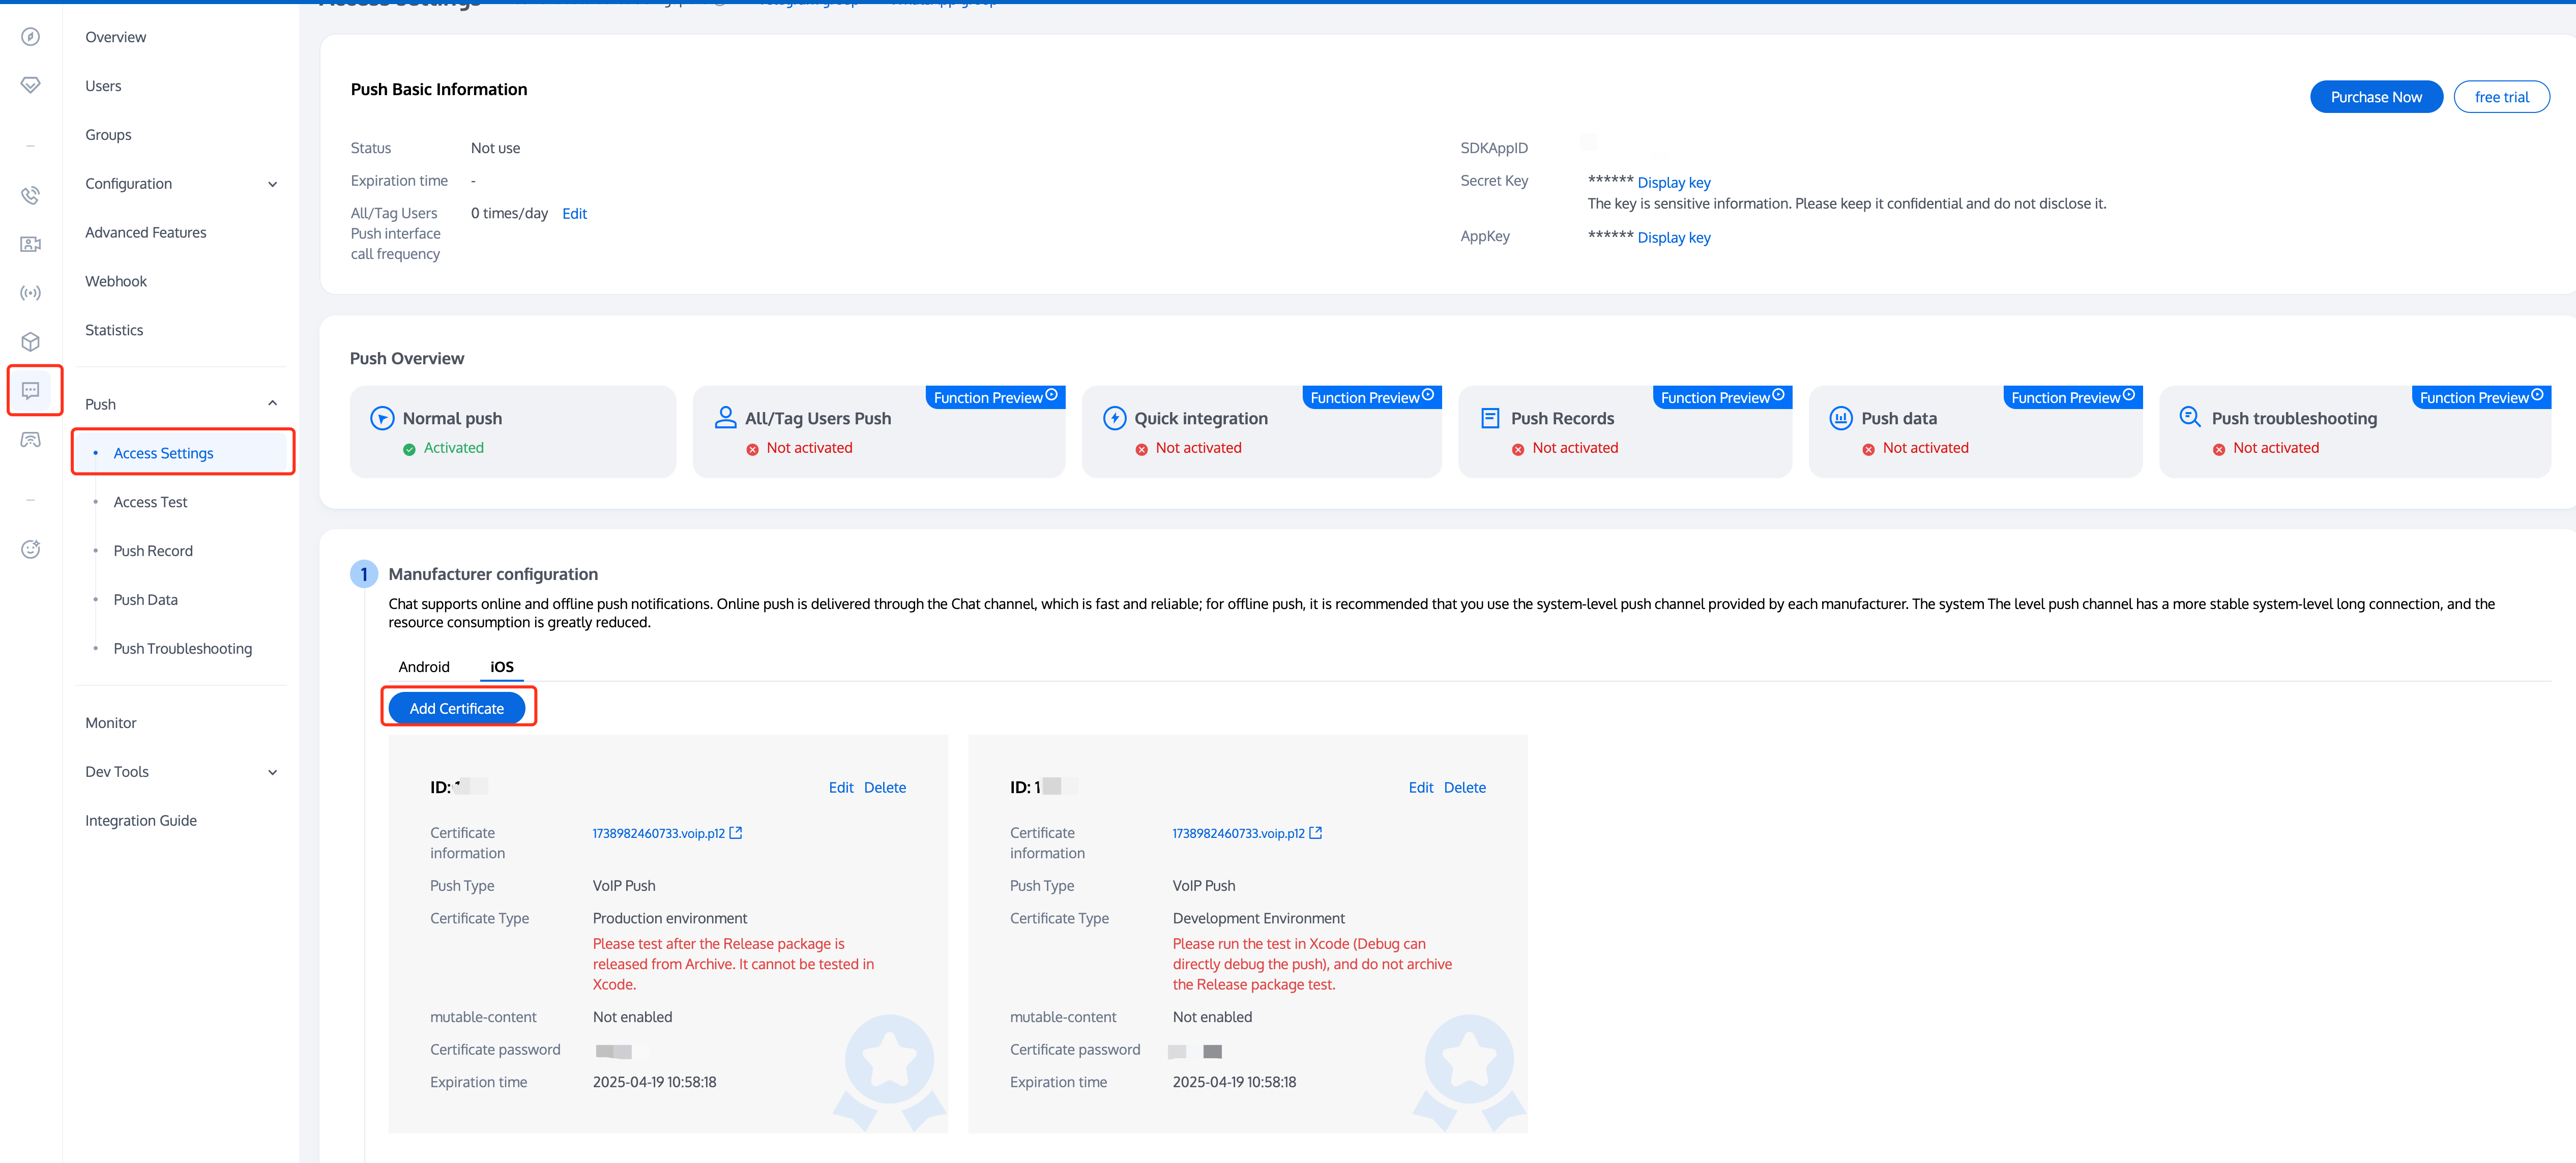
2. In Vendor Configuration, switch to iOS, click the Add Certificate button, then select the certificate type in the floating page, upload the iOS certificate (p.12), set the certificate password, and click Confirm.
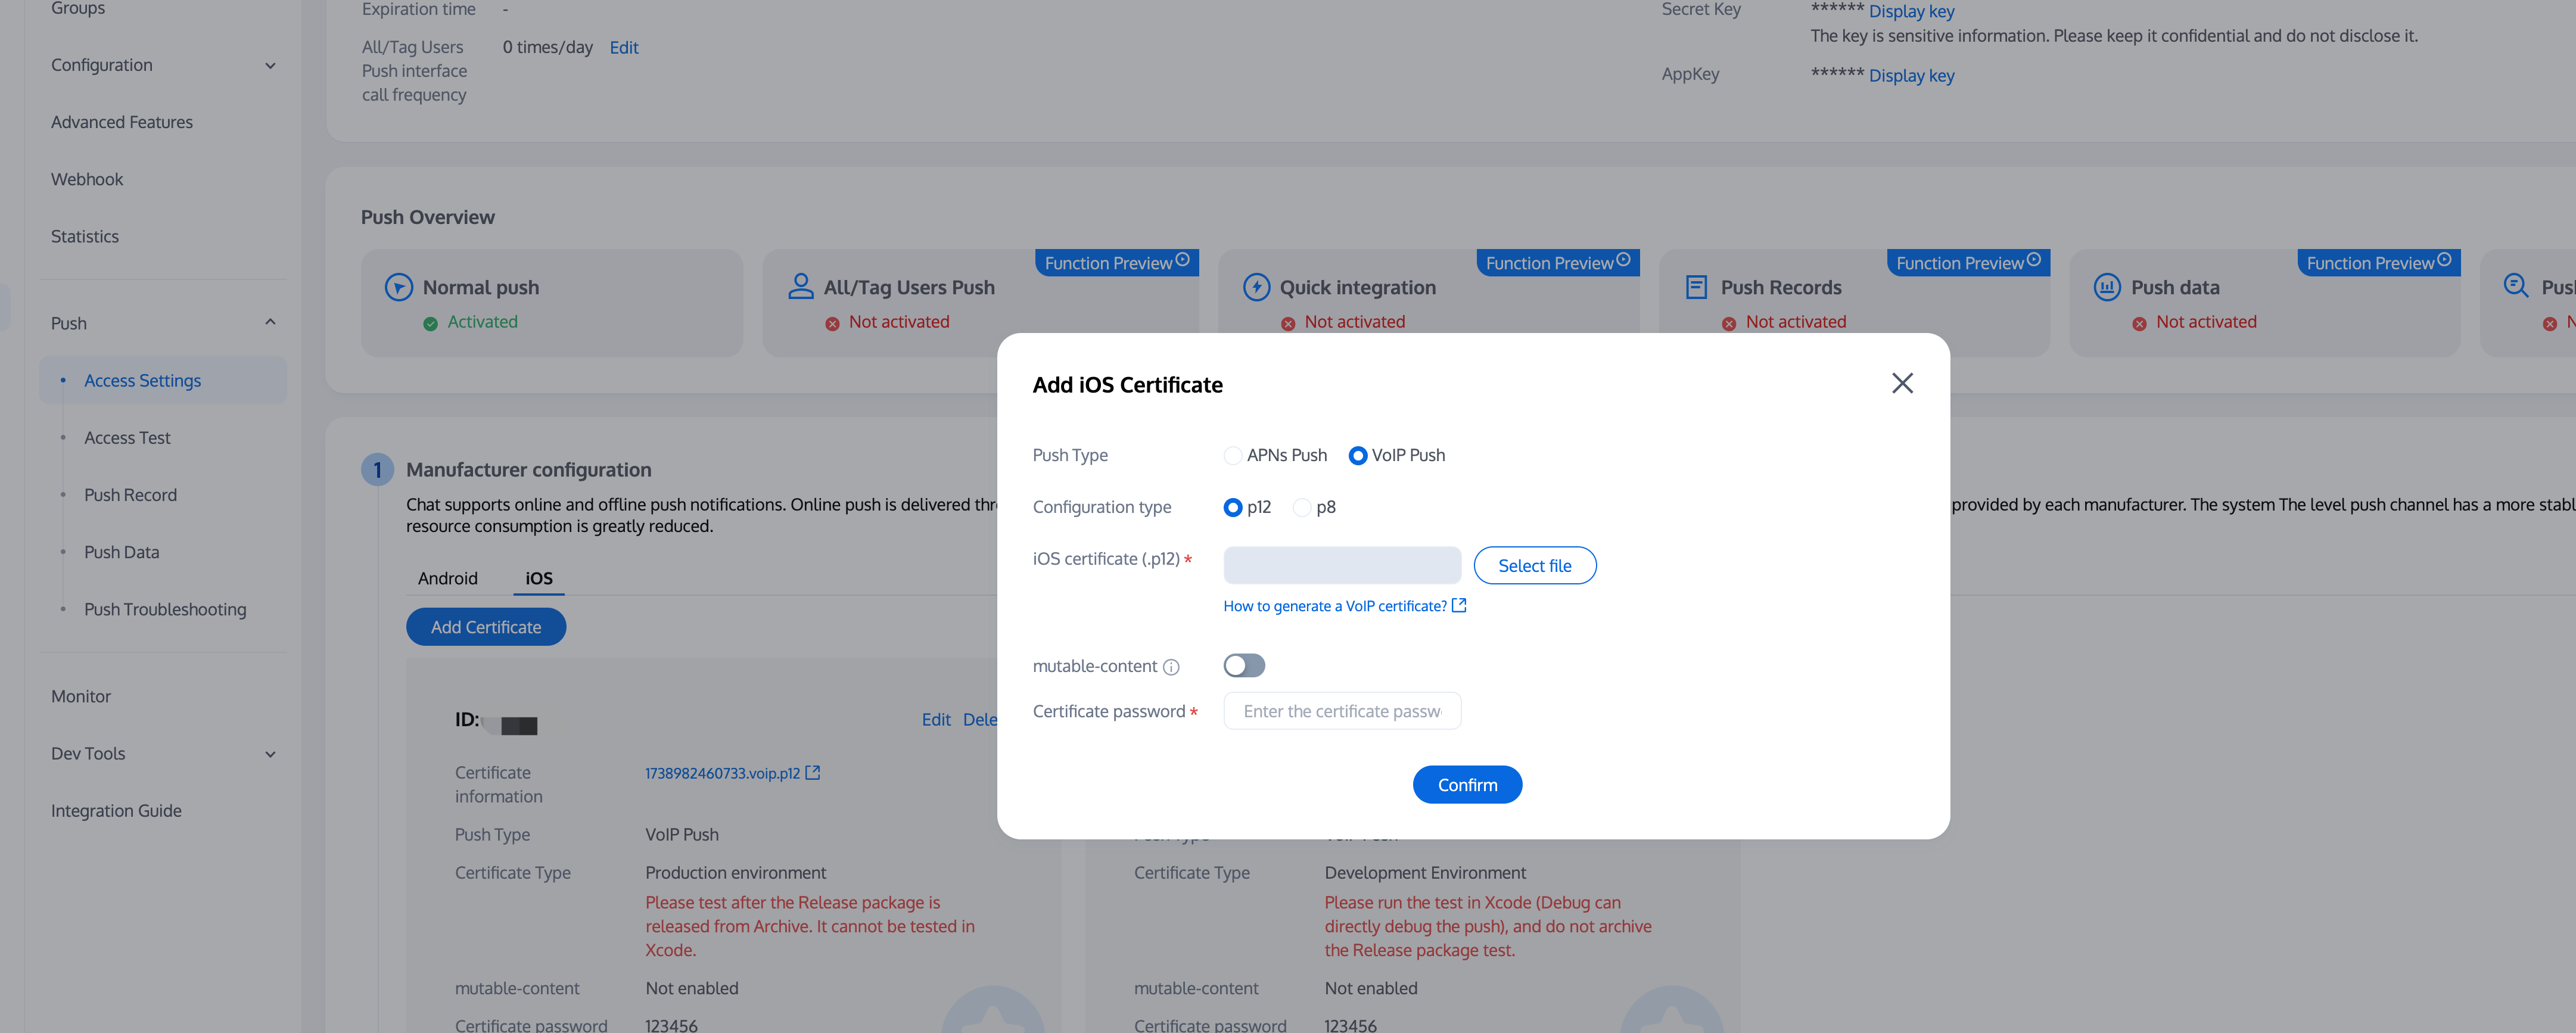
Description:
When adding certificates, the push type defaults to APNS, which does not affect the upload and use of VoIP certificates.
VoIP Push certificates themselves do not distinguish between production and testing environments. Production and development environments use the same VoIP Push certificate, please upload separately.
Certificate names uploaded should preferably use all English (especially avoid special characters like parentheses).
Uploaded certificates need to set a password, otherwise push notifications cannot be received.
Certificates for App Store release need to be set to production environment, otherwise push notifications cannot be received.
The uploaded p12 certificate must be a real and valid certificate you applied for yourself.
3. After upload is complete, record the certificate IDs for different environments.

Description:
Certificate IDs for development and production environments must be strictly distinguished, please fill in according to the actual environment.
Feature Integration
1. Complete Project Configuration
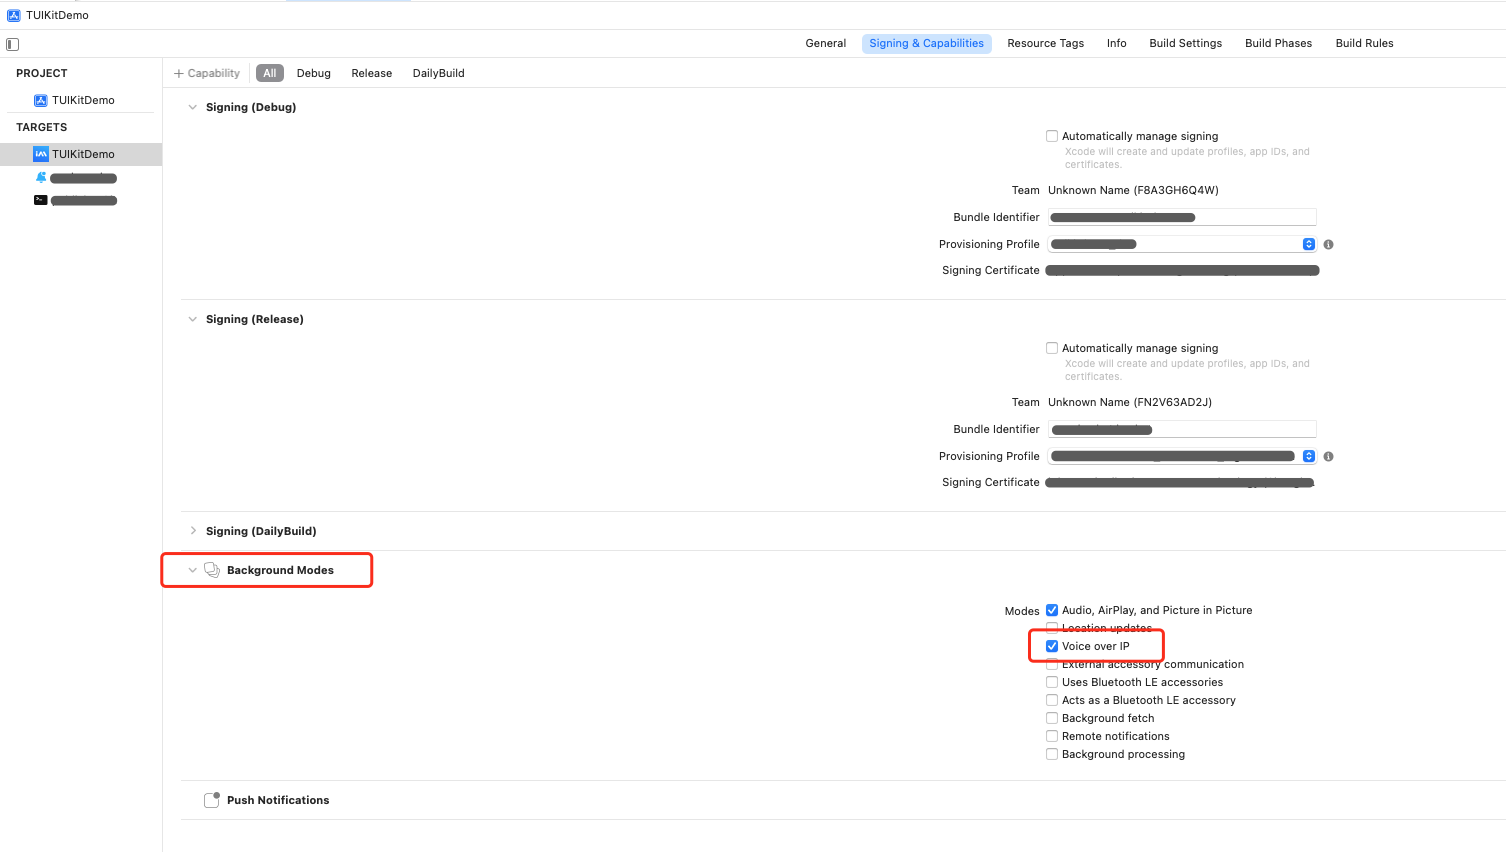
1. As shown in the figure below, confirm whether your project's Capability has added Push Notification capability.
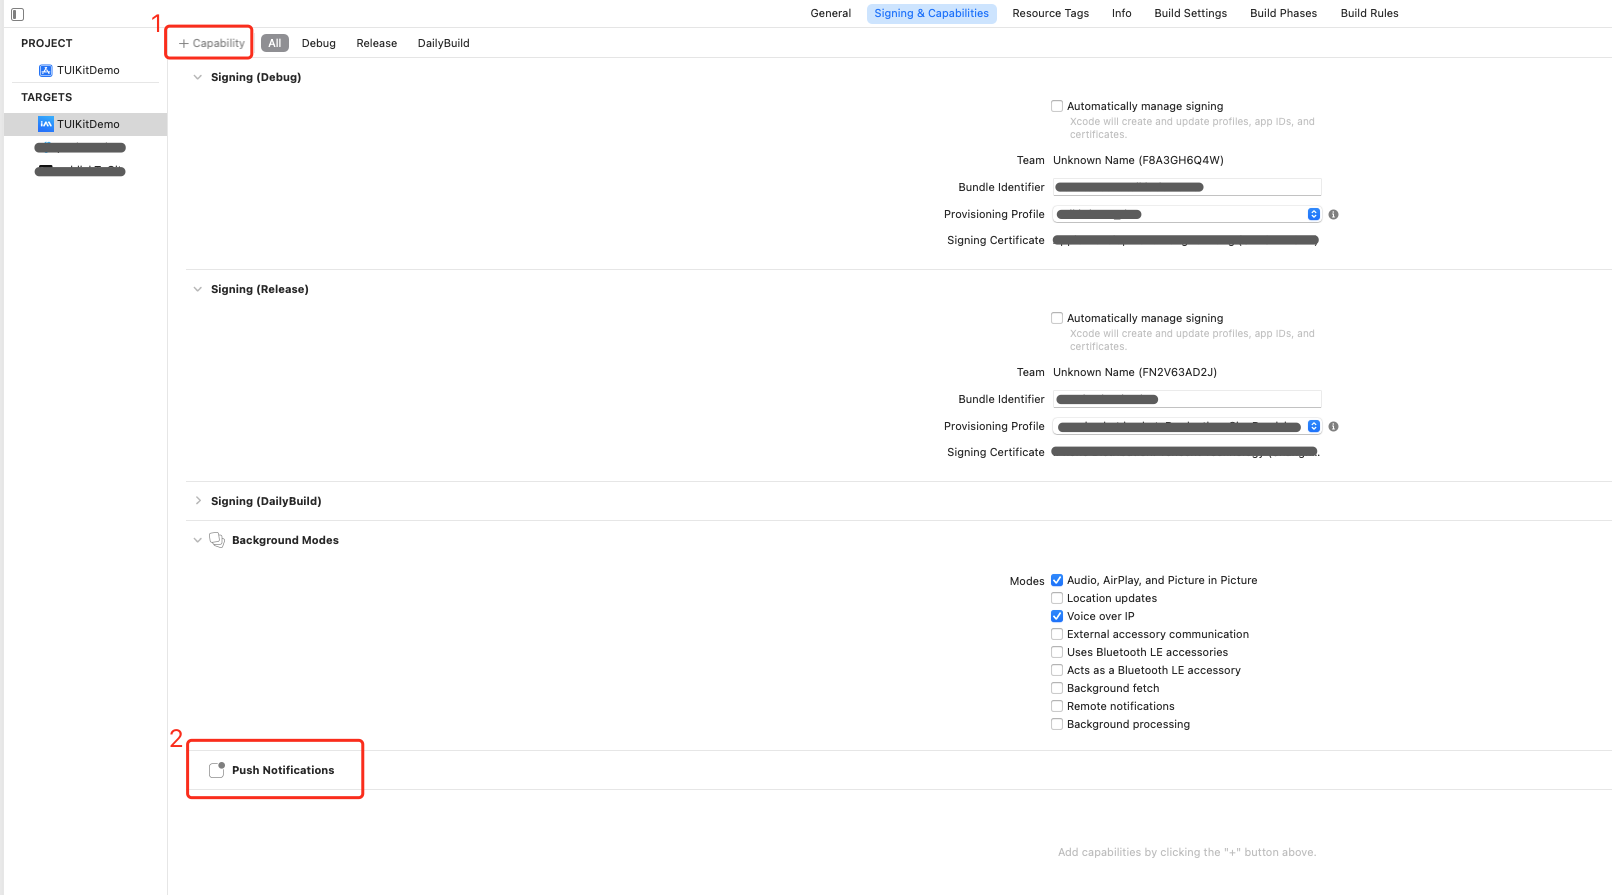
2. As shown in the figure below, please check whether the Voice over IP option is enabled in your project's Capability Background Modes.
2. Integrate TUIVoIPExtension Component
Use CocoaPods to import the component, follow these specific steps:
1. Add the following dependency to your
Podfile file.pod 'TUIVoIPExtension/LiveCommunicationKit'
2. Execute the following command to install the component.
pod update
3. Report the console certificate ID.
import TUIVoIPExtensionfunc application(_ application: UIApplication, didFinishLaunchingWithOptions launchOptions: [UIApplication.LaunchOptionsKey: Any]?) -> Bool {// Report certificate IDTUIVoIPExtension.setCertificateID(1234)return true}
#import <TUIVoIPExtension/TUIVoIPExtension.h>- (BOOL)application:(UIApplication *)application didFinishLaunchingWithOptions:(NSDictionary *)launchOptions {//Report certificate ID[TUIVoIPExtension setCertificateID:1234];return YES;}
Make VoIP Calls
If you need to make VoIP calls, you need to set the iOSPushType field in OfflinePushInfo to TUICallIOSOfflinePushTypeVoIP when calling calls, the default is TUICallIOSOfflinePushTypeAPNs.
import TUICallKit_Swiftimport TUICallEnginelet pushInfo: TUIOfflinePushInfo = TUIOfflinePushInfo()pushInfo.title = ""pushInfo.desc = "You have a new call"pushInfo.iOSPushType = .voippushInfo.ignoreIOSBadge = falsepushInfo.iOSSound = "phone_ringing.mp3"pushInfo.androidSound = "phone_ringing"// OPPO must set a ChannelID to receive push messages. This channelID needs to be the same as the console.pushInfo.androidOPPOChannelID = "tuikit"// FCM channel ID, you need change PrivateConstants.java and set "fcmPushChannelId"pushInfo.androidFCMChannelID = "fcm_push_channel"// VIVO message type: 0-push message, 1-System message(have a higher delivery rate)pushInfo.androidVIVOClassification = 1// HuaWei message type: https://developer.huawei.com/consumer/cn/doc/development/HMSCore-Guides/message-classification-0000001149358835pushInfo.androidHuaWeiCategory = "IM"let params = TUICallParams()params.userData = "User Data"params.timeout = 30params.offlinePushInfo = pushInfoTUICallKit.createInstance().calls(userIdList: ["123456"], callMediaType: .audio, params: params) {} fail: { code, message in}
TUICallDefine.OfflinePushInfo offlinePushInfo = new TUICallDefine.OfflinePushInfo();offlinePushInfo.setTitle("");offlinePushInfo.setDesc("You have receive a new call");// For OPPO, you must set the `ChannelID` to receive push messages. The `ChannelID` must be identical with that in the console.// OPPO must set a ChannelID to receive push messages. This channelID needs to be the same as the console.offlinePushInfo.setAndroidOPPOChannelID("tuikit");offlinePushInfo.setIgnoreIOSBadge(false);offlinePushInfo.setIOSSound("phone_ringing.mp3");offlinePushInfo.setAndroidSound("phone_ringing"); //Note:don't add suffix//VIVO message type: 0-push message, 1-System message(have a higher delivery rate)offlinePushInfo.setAndroidVIVOClassification(1);//FCM channel ID, you need change PrivateConstants.java and set "fcmPushChannelId"offlinePushInfo.setAndroidFCMChannelID("fcm_push_channel");//Huawei message typeofflinePushInfo.setAndroidHuaWeiCategory("IM");//IOS push type: if you want user VoIP, please modify type to TUICallDefine.IOSOfflinePushType.VoIPofflinePushInfo.setIOSPushType(TUICallDefine.IOSOfflinePushType.VoIP);TUICallDefine.CallParams params = new TUICallDefine.CallParams();params.offlinePushInfo = offlinePushInfo;List<String> list = new ArrayList<>();list.add("mike")TUICallKit.createInstance(context).calls(list, TUICallDefine.MediaType.Video, params, null);
TUIOfflinePushInfo offlinePushInfo = TUIOfflinePushInfo();offlinePushInfo.title = "Flutter TUICallKit";offlinePushInfo.desc = "This is an incoming call from Flutter TUICallkit";offlinePushInfo.ignoreIOSBadge = false;offlinePushInfo.iOSSound = "phone_ringing.mp3";offlinePushInfo.androidSound = "phone_ringing";offlinePushInfo.androidOPPOChannelID = "Flutter TUICallKit";offlinePushInfo.androidVIVOClassification = 1;offlinePushInfo.androidFCMChannelID = "fcm_push_channel";offlinePushInfo.androidHuaWeiCategory = "Flutter TUICallKit";offlinePushInfo.iOSPushType = TUICallIOSOfflinePushType.VoIP;TUICallParams params = TUICallParams(offlinePushInfo: offlinePushInfo);TUICallKit.instance.calls(['vince'], TUICallMediaType.audio, params);
#import <TUICallKit_Swift/TUICallKit_Swift-Swift.h>#import <RTCRoomEngine/TUICallEngine.h>- (TUICallParams *)getCallParams {TUIOfflinePushInfo *offlinePushInfo = [self createOfflinePushInfo];TUICallParams *callParams = [TUICallParams new];callParams.offlinePushInfo = offlinePushInfo;callParams.timeout = 30;return callParams;}- (TUIOfflinePushInfo *)createOfflinePushInfo {TUIOfflinePushInfo *pushInfo = [TUIOfflinePushInfo new];pushInfo.title = @"";pushInfo.desc = @"You have a new call";pushInfo.iOSPushType = TUICallIOSOfflinePushTypeVoIP;pushInfo.ignoreIOSBadge = NO;pushInfo.iOSSound = @"phone_ringing.mp3";pushInfo.AndroidSound = @"phone_ringing";// For OPPO, you must set the `ChannelID` to receive push messages. The `ChannelID` must be identical with that in the console.// OPPO must set a ChannelID to receive push messages. This channelID needs to be the same as the console.pushInfo.AndroidOPPOChannelID = @"tuikit";// FCM channel ID, you need change PrivateConstants.java and set "fcmPushChannelId"pushInfo.AndroidFCMChannelID = @"fcm_push_channel";// VIVO message type: 0-push message, 1-System message(have a higher delivery rate)pushInfo.AndroidVIVOClassification = 1;// HuaWei message type: https://developer.huawei.com/consumer/cn/doc/development/HMSCore-Guides/message-classification-0000001149358835pushInfo.AndroidHuaWeiCategory = @"IM";return pushInfo;}[[TUICallKit createInstance] calls:@[@"123456"]callMediaType:TUICallMediaTypeAudioparams:[self getCallParams] succ:^{} fail:^(int code, NSString * _Nullable errMsg) {}];Objective-C
Common Issues
1. Cannot get VoIP Push, how to handle?
1. First check whether the App's running environment and certificate environment are consistent, and whether the certificate ID matches. If they are inconsistent, push notifications cannot be received.
2. Please confirm whether the current logged-in account is in offline status: press home key to switch to background, or actively kill the process after login. VoIP Push currently only supports push notifications in offline status.
3. Check whether Complete Project Configuration is correct.
4. Try restarting the test phone to clear system cache and memory (very important).
2. How to Self-Integrate VoIP Push Functionality
We also support you to integrate VoIP push capabilities yourself through SDK methods. The overall solution design is as follows:
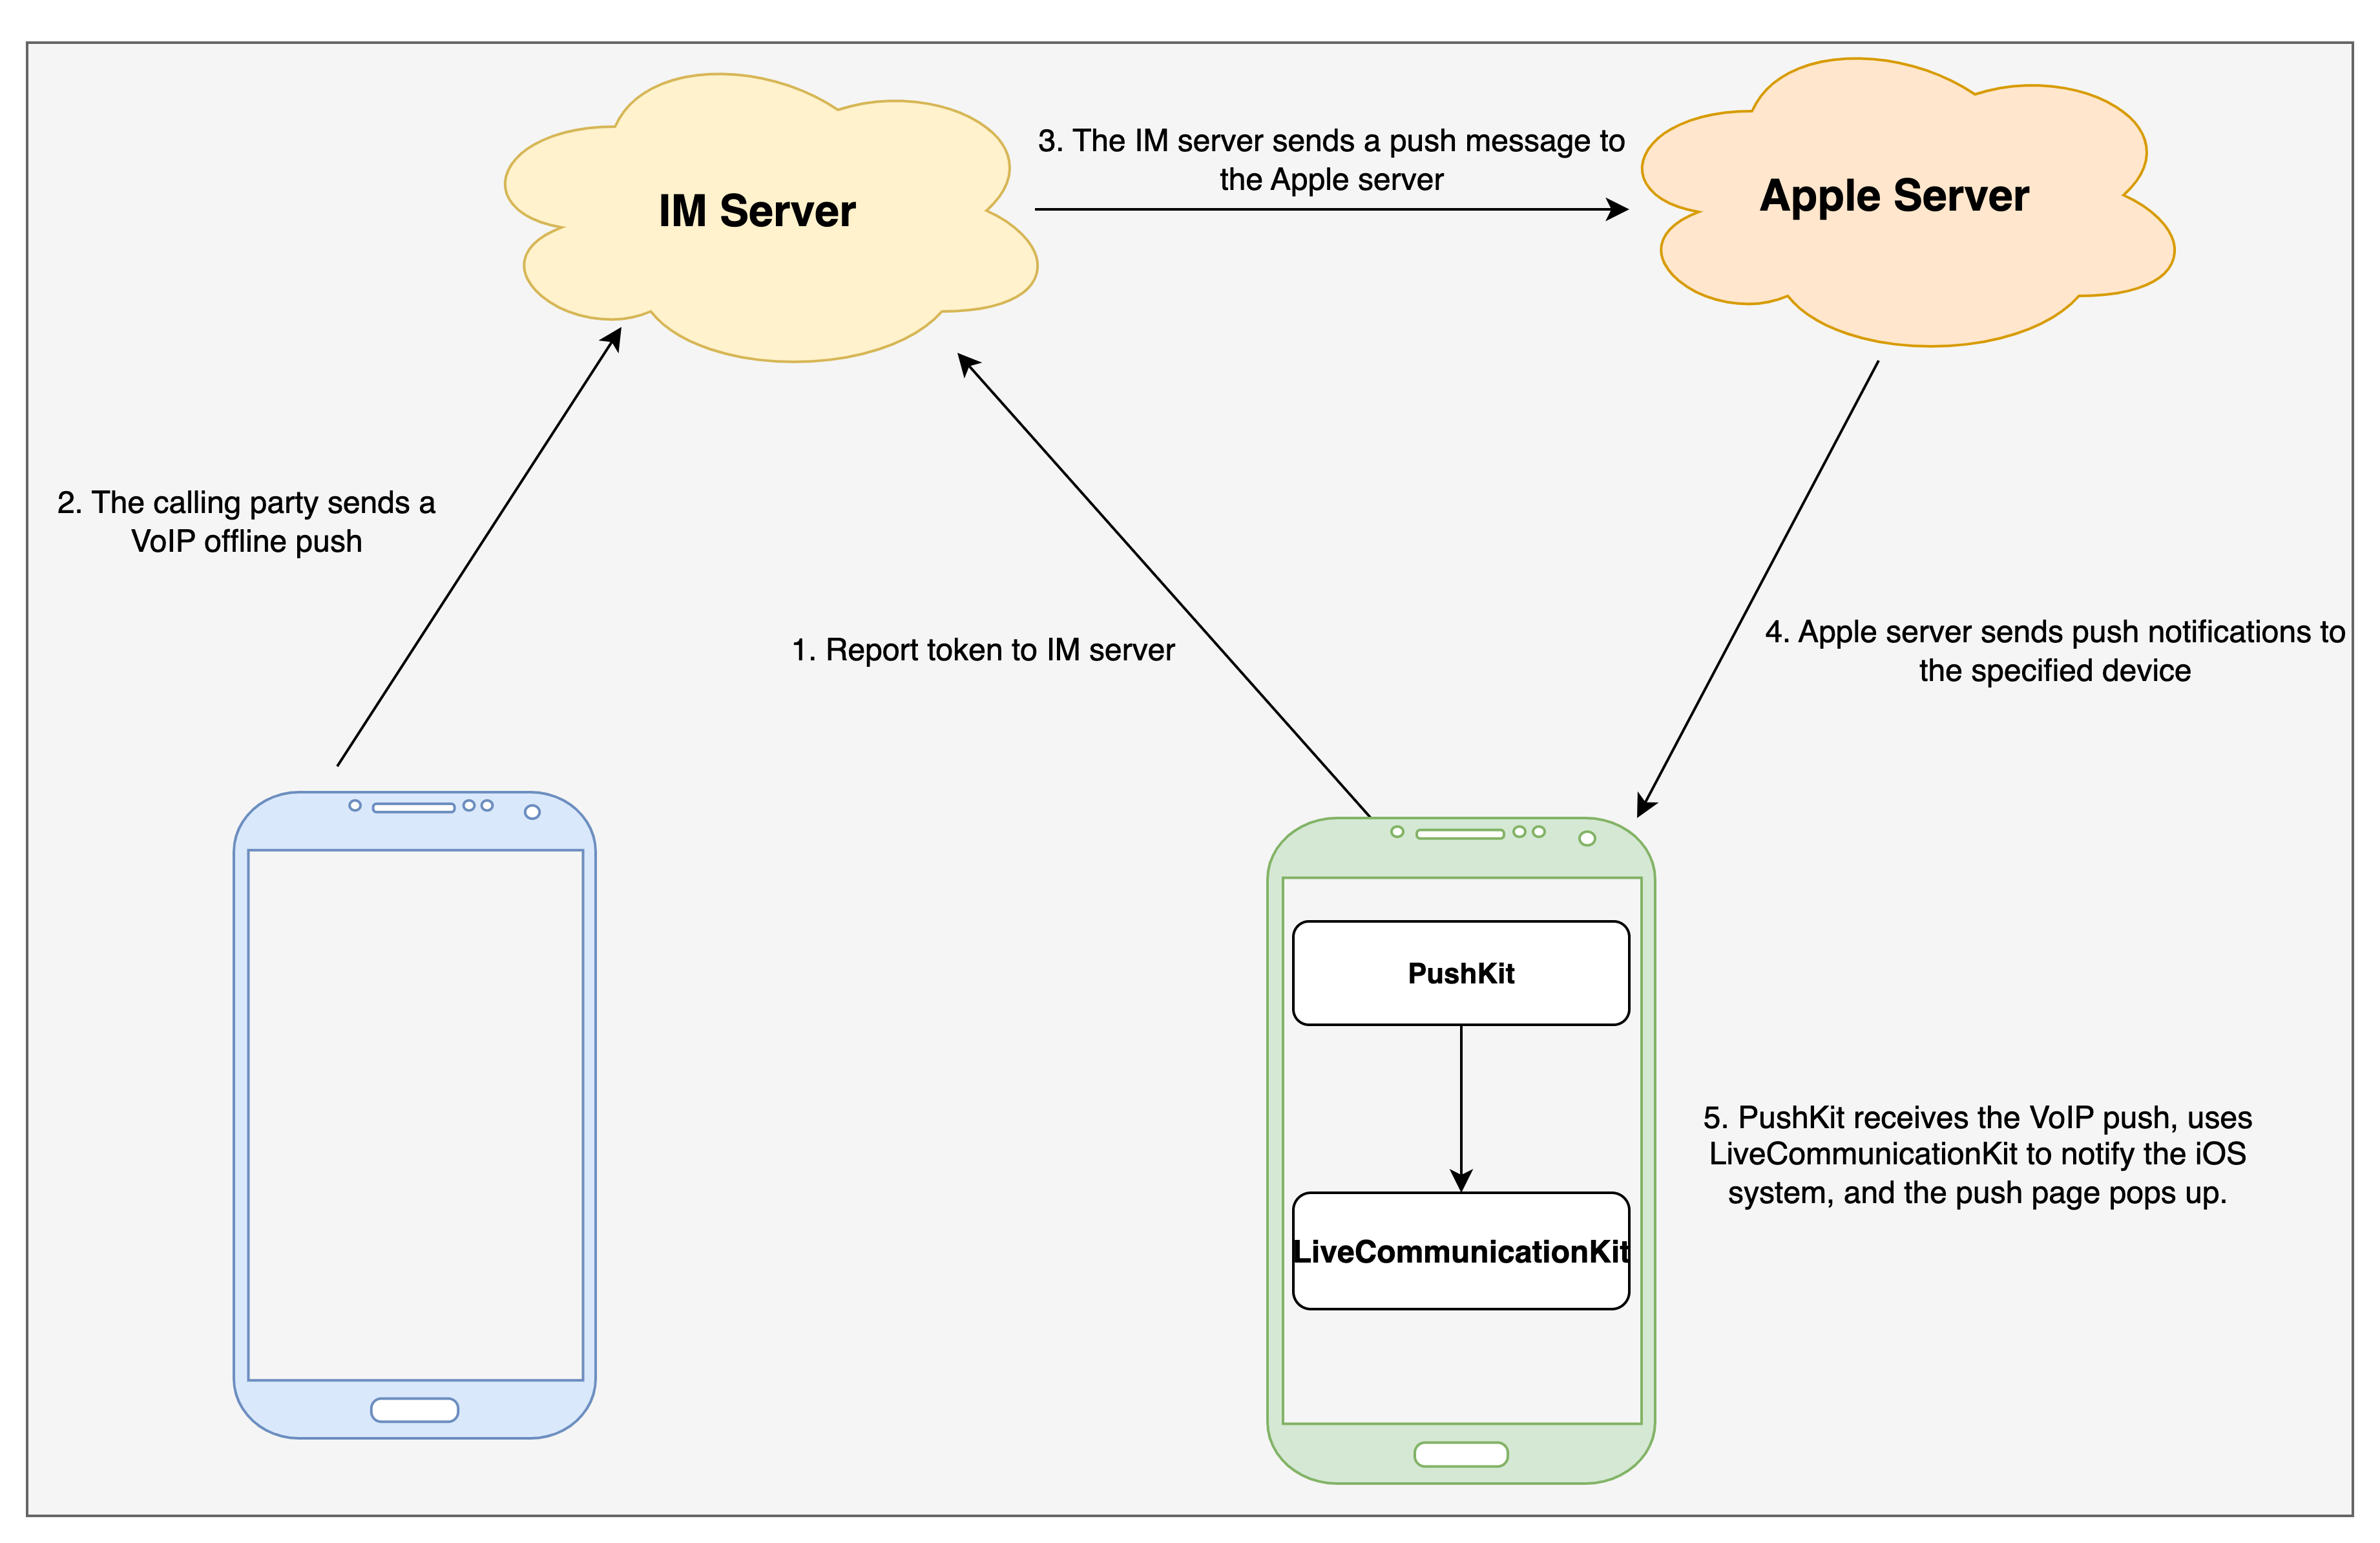
Related process description:
1. Refer to Vendor Configuration to apply for VoIP push certificates, and upload certificates on IM console to get certificate ID.
2. Refer to Apple PushKit to use and get device token.
3. Use IMSDK's setVOIP interface to report device token to IM server.
4. Refer to Apple LiveCommunicationKit to use and display push popup.
5. Refer to TUICallKit interface usage to initiate VoIP calls.

