It is recommended to use CocoaPods for automatic loading when integrating the Chat SDK.
1. Install CocoaPods by entering the following command in the terminal window (ensure that the Ruby environment is pre-installed on your Mac):
sudo gem install cocoapods
2. Create a Podfile. Navigate to the project directory and enter the following command. A Podfile will then be generated in the project directory.
pod init
3. Edit the Podfile. Configure the Podfile as follows:
platform :ios, '8.0'
source'https://github.com/CocoaPods/Specs.git'
target 'App'do
# Integrate the full version of the Chat SDK. The version number should be greater than '8.1.6129'.
pod 'TXIMSDK_Plus_iOS','8.1.6129'
# Alternatively, integrate the trimmed version of the Chat SDK (only includes AI signaling-related capabilities). The version number should be greater than '8.2.6361'.
pod 'TXIMSDK_Plus_SignalingSDK','8.2.6361'
end
4. Update and install the SDK.
In the terminal window, enter the following command to update the local repository files and install the Chat SDK.
pod install
Or run this command to update the local repository:
There are two ways to use the SDK in your project code:
In Xcode > Build Settings > Header Search Paths, set the path to the SDK header files. Then, in the project files where the SDK APIs are needed, include the specific header files.
#import "ImSDK_Plus.h"
In the project files where the SDK APIs are needed, include the specific header files.
#import <ImSDK_Plus/ImSDK_Plus.h>
Integrating SDK (AAR)
It is recommended to use Gradle for automatic loading when integrating the Chat SDK.
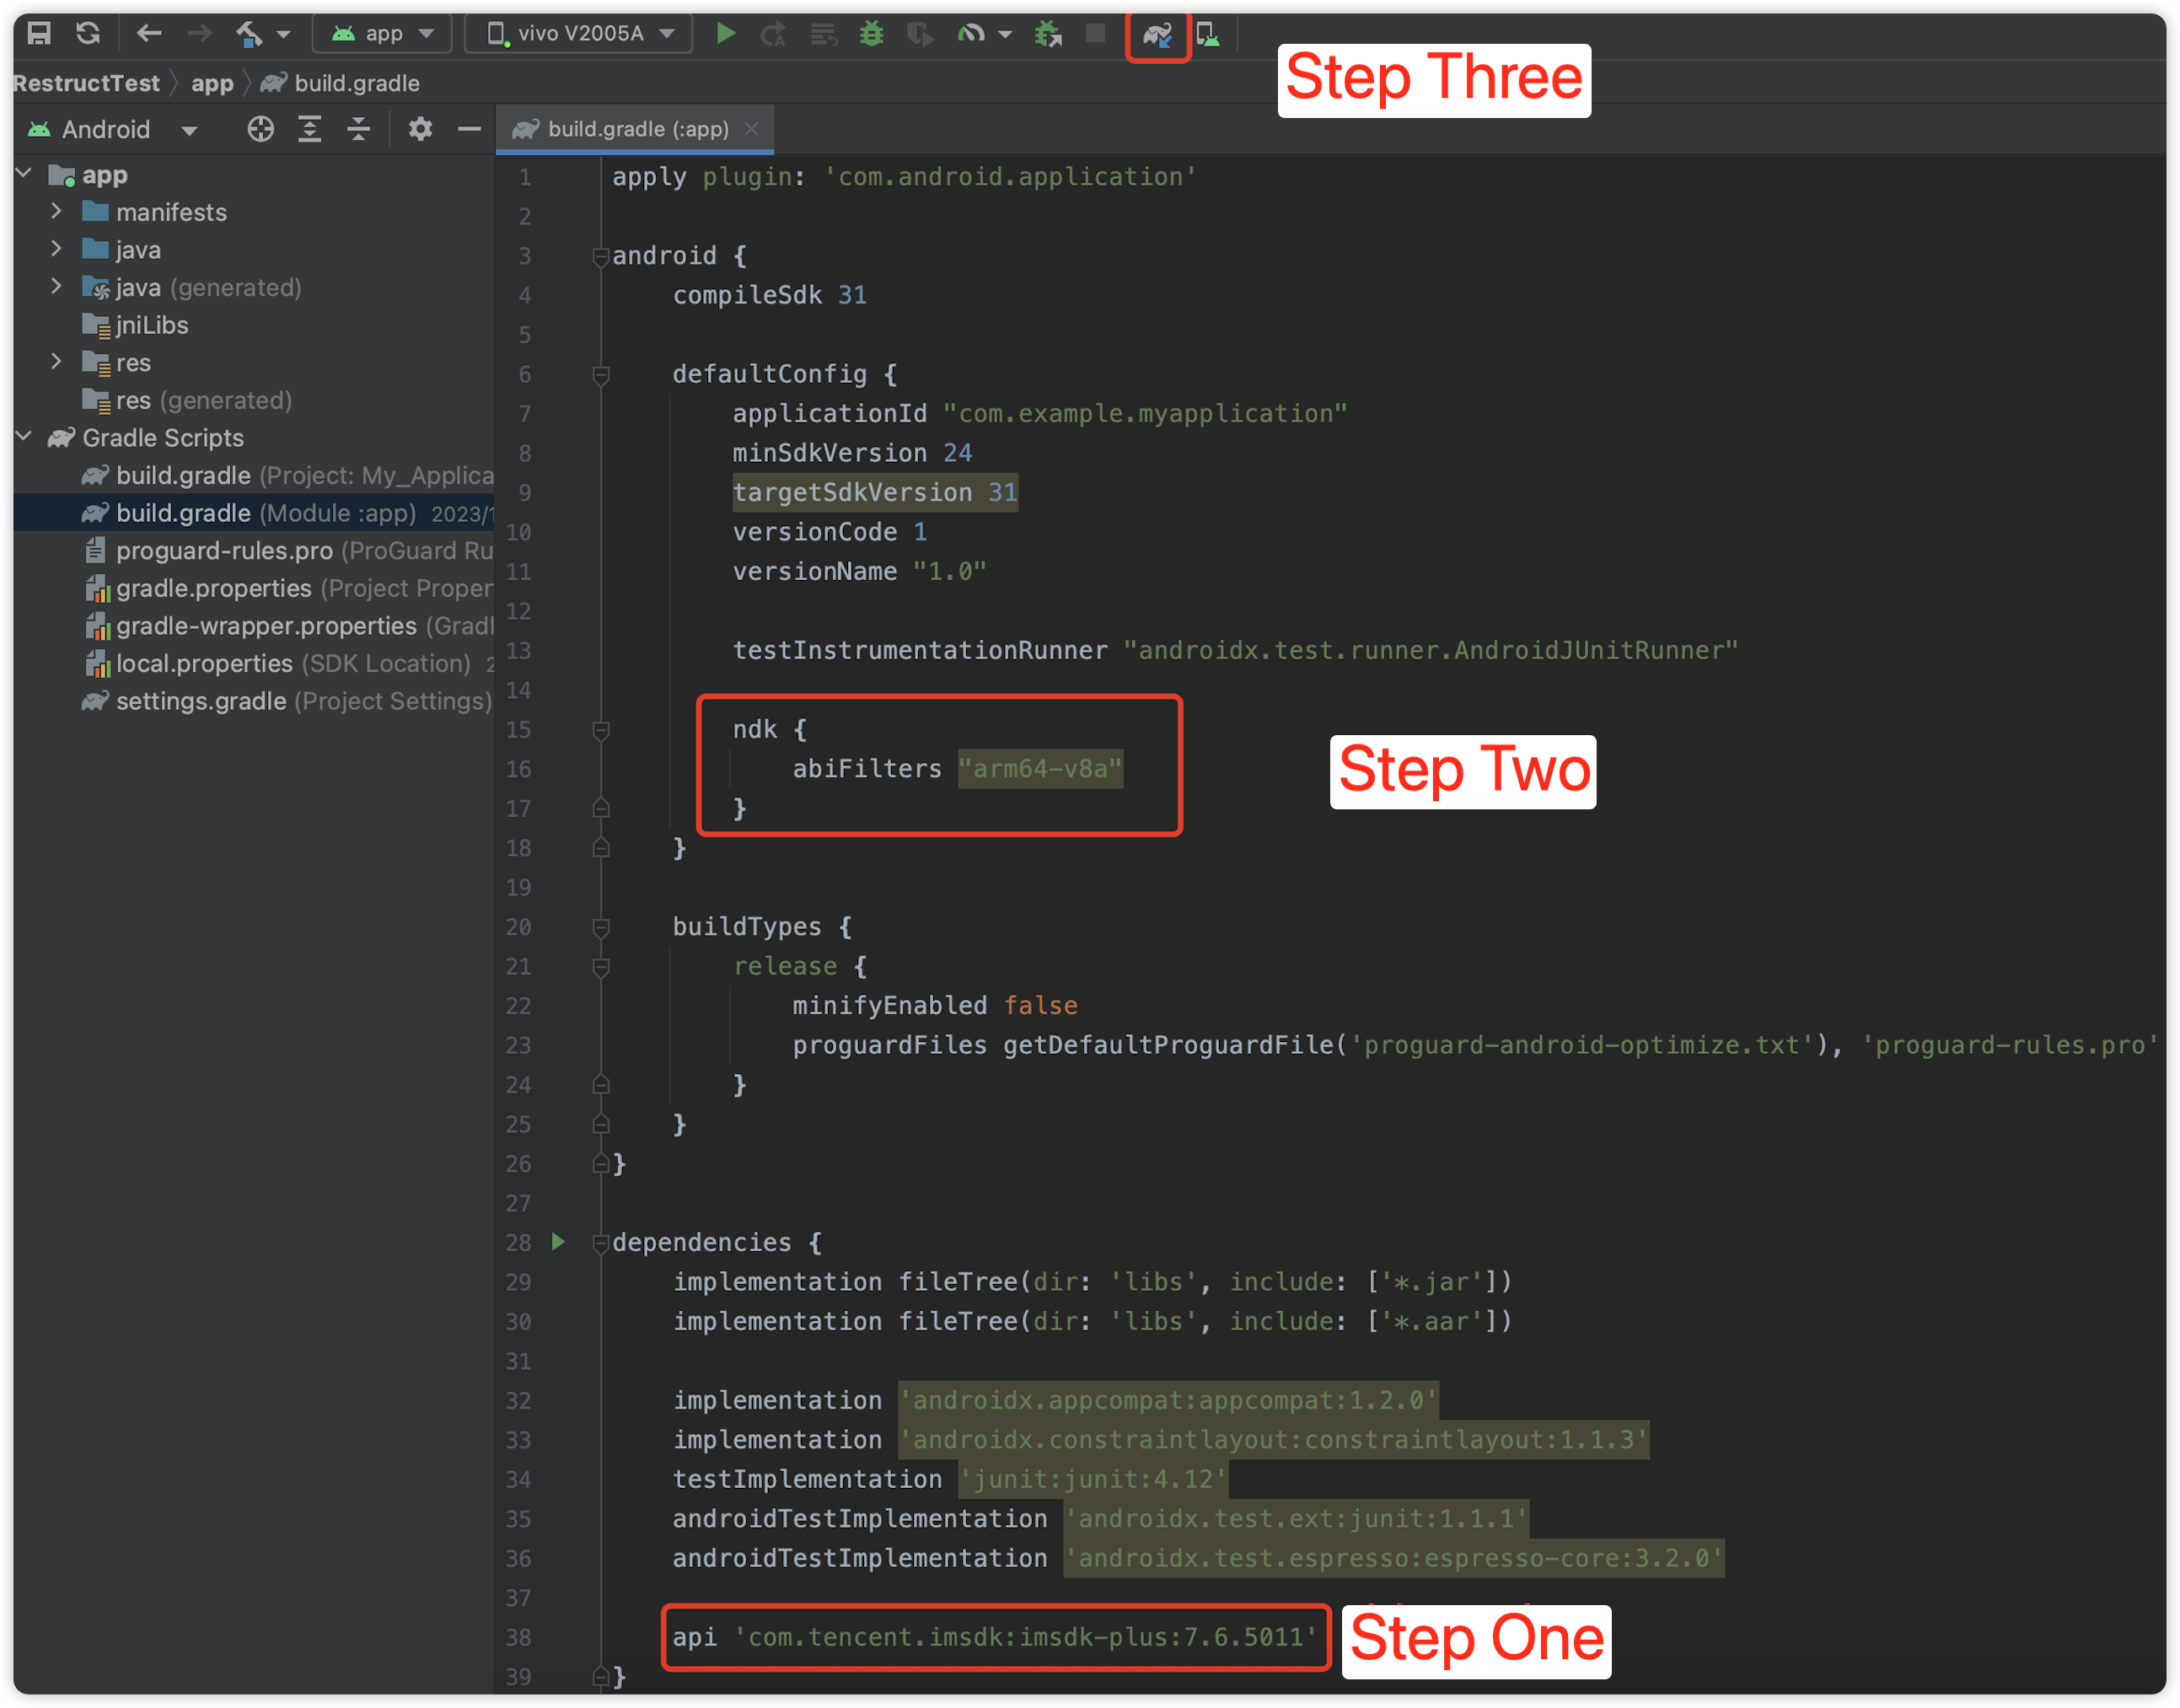
1. Add SDK dependencies.
1.1 Locate the app’s build.gradle file and add the mavenCentral() dependency under the repositories.
repositories {
google()
// Add the mavenCentral repository.
mavenCentral()
}
1.2 Then, add the Chat SDK dependency to the dependencies.
dependencies {
// Integrate the full version of the Chat SDK. The version number should be greater than '8.1.6129'.
api 'com.tencent.imsdk:imsdk-plus:8.1.6129'
// Alternatively, integrate the trimmed version of the Chat SDK (only includes AI signaling-related capabilities). The version number should be greater than '8.2.6361'.
api 'com.tencent.imsdk:signalingsdk:8.2.6361'
}
2. Specify the CPU architecture used by the App in defaultConfig. (Chat SDK version 4.3.118 and later support armeabi-v7a, arm64-v8a, x86, and x86_64.)
defaultConfig {
ndk {
abiFilters "arm64-v8a"
}
}
3. Sync the SDK. Ensure your network is connected to Maven, then click Sync to automatically download and integrate the SDK into your project.
Configuring App Permissions
To configure App permissions in AndroidManifest.xml. the Chat SDK requires the following permissions:
// 4. Add the event listener for V2TIMSDKListener. The self is an implementation of id<V2TIMSDKListener>. If you do not need to listen to IM SDK events, this step can be skipped.
// 4. Add the event listener for V2TIMSDKListener. The sdkListener is an implementation of V2TIMSDKListener. If you do not need to listen to IM SDK events, this step can be skipped.
SDKAppID:0// Replace 0 with the SDKAppID of your Chat application during access.
};
// Create an SDK instance. The `TencentCloudChat.create()` method will return the same instance for the same `SDKAppID`.
let chat = TencentCloudChat.create(options);// The SDK instance is typically represented as chat.
chat.setLogLevel(0);// Standard level with extensive volume of logs; recommended for access.
// chat.setLogLevel(1); // Release level, where the SDK outputs critical information; recommended for production environments.
2. Log in.
let promise = chat.login({userID:'your userID', userSig:'your userSig'});
promise.then(function(imResponse){
console.log(imResponse.data);// Login successful.
if(imResponse.data.repeatLogin ===true){
// Indicates that the account is already logged in, and this login operation is a duplicate login.
console.log(imResponse.data.errorInfo);
}
}).catch(function(imError){
console.warn('login error:', imError);// Information related to login failure.
});
Note:
The sdkAppId and secretKey for TRTC and Chat should be identical.
The recipient’s Chat should be successfully logged in and online to receive messages.
The recipient’s TRTC account and Chat account should share the same userId, meaning they should use the same userId for entering the TRTC room and logging in to Chat .
Receiving Server Downstream Messages
Receive one-on-one custom messages via the Chat SDK (iOS & Android / Web & Mini Programs) by listening to callbacks on the client to receive real-time subtitles and AI status data.
Type
Description
10000
Real-time subtitles and translation delivery
10001
AI conversation real-time status delivery
10010
Large model message passthrough
Receiving Real-Time Subtitles
{
"type":10000,// 10000 indicates the delivery of real-time subtitles.
"sender":"user_a",// The user ID of the speaker.
"receiver":[],// List of receiver user IDs. This message is actually broadcast within the room.
"payload":{
"text":"",// The text recognized by Automatic Speech Recognition (ASR).
"translation_text":"",// The translated text.
"start_time":"00:00:01",// The start time of this sentence.
"end_time":"00:00:02",// The end time of this sentence.
"roundid":"xxxxx"// A unique identifier for a single conversation round.
"end":true// If true, it indicates this is a complete sentence.
}
}
Receiving Chatbot Status
{
"type":10001,// Chatbot status.
"sender":"user_a",// The user ID of the sender, which represents the chatbot's ID in this case.
"receiver":[],// List of receiver user IDs. This message is actually broadcast within the room.
"payload":{
"roundid":"xxx",// A unique identifier for a single conversation round.
By default, real-time subtitles and AI status data are received via one-on-one custom messages. If one-on-one messaging does not meet your needs and you require a group chat custom message channel, contact us.
Sending Upstream Signaling from Client
You can send custom signaling to skip the ASR process and communicate directly with AI using text, send interruption signaling to perform an interruption, or directly send passthrough information to the large model.
Type
Description
20000
ai_conversation_chat: Send AI conversation text.
20001
ai_conversation_interrupt: Manually interrupt.
20010
Send passthrough information to the large model.
Sending Upstream Signaling to Skip the ASR Process and Communicate Directly with AI Using Text
{
"type":20000,
"sender":"user_a",// The user ID of the sender. The server will validate if this user ID is valid.
"receiver":["user_bot"],// List of receiver userIDs. Only the chatbot user ID needs to be specified. The server will validate if this user ID is valid.
"payload":{
"id":"uuid",// Message ID, can use UUID; used for troubleshooting.
"message":"xxx",// Message content.
"timestamp":123,// Timestamp, used for troubleshooting.
"taskid":"v2_20240920_xxxxx",
}
}
Sending Interruption Signaling for Interruption
{
"type":20001,
"sender":"userid",// The user ID of the sender. The server will check if this userID is valid.
"receiver":["user_bot"],// List of receiver userIDs. Only the chatbot user ID needs to be specified.
"payload":{
"id":"uuid",// Message ID, can use UUID; used for troubleshooting.
"timestamp":123// Timestamp, used for troubleshooting.
"taskid":"v2_20240920_xxxxx",
}
}
Send Passthrough Information to the Large Model
{
"type":20010,
"sender":"userid",
"receiver":[
"robotid"
],
"payload":{
"id":"uuid",
"taskid":"v2_20240920_xxxxx",
"timestamp":1234,
"data":{
"key":"value"// Custom JSON format defined by business.
}
}
}
Sample Code
iOS
Android
Web & Mini Programs
@IBAction func interruptAi(_ sender: UIButton){
let timestamp =Int(Date().timeIntervalSince1970 *1000)
let payload =[
"id": userId +"_\(roomId)"+"_\(timestamp)",// Message ID, can use UUID; used for troubleshooting.
"timestamp": timestamp,// Timestamp, used for troubleshooting.
"taskid": aiTaskId,
] as [String : Any]
let content =[
"type":20001,
"sender": userId,
"receiver":[botId],
"payload": payload
] as [String : Any]
let contentData = try! JSONSerialization.data(withJSONObject: content, options:[])
let contentString =String(data: contentData, encoding:.utf8)!