
Video Live Streaming
This document guides you through building a basic live streaming app with host broadcasting and audience viewing capabilities using the core component LiveCoreView from the AtomicXCore SDK.
Core Features
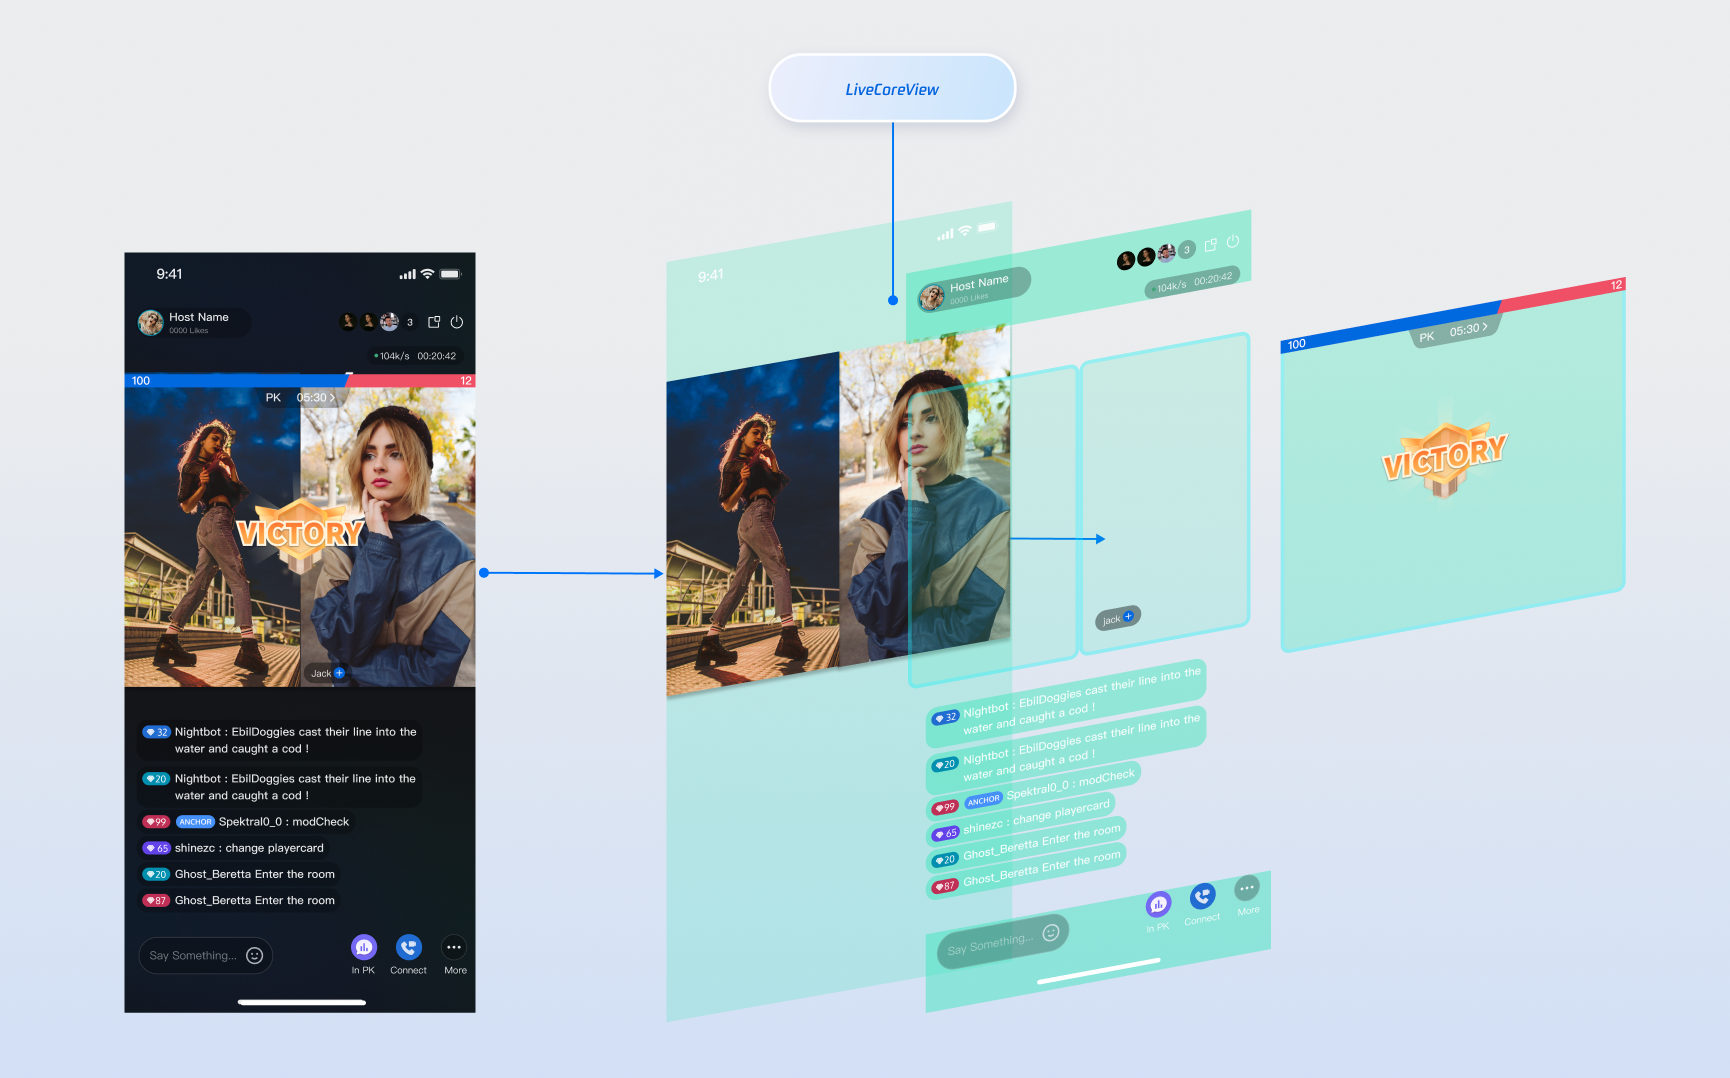
LiveCoreView is a lightweight View component purpose-built for live streaming scenarios. It serves as the foundation of your live streaming implementation, encapsulating all complex streaming technologies—including stream publishing and playback, co-hosting, and audio/video rendering. Use LiveCoreView as the "canvas" for your live video, enabling you to focus on developing your custom UI and interactions.
The following view hierarchy diagram illustrates the position and role of LiveCoreView within the live streaming interface:
Core Concepts
Core Concept | Core Responsibility | Key API / Property |
LiveCoreView | Handles publishing, playing, and rendering audio/video streams. Provides adapter interfaces for integrating custom UI components (e.g., user info, PK progress bar). | viewType:CoreViewType.PUSH_VIEW (host publishing view)CoreViewType.PLAY_VIEW (audience playback view)setLiveId(): Binds the live room ID for this view.setVideoViewAdapter(): Adapter for custom video display UI slots. |
LiveListStore | Manages the complete live room lifecycle (create, join, leave), synchronizes state, and listens for passive events (e.g., live ended, kicked out). | createLive(): Start live stream as host.endLive(): End live stream as host.joinLive(): Audience joins live room.leaveLive(): Leave live room. |
LiveInfo | Defines room parameters before going live, such as room ID, seat layout mode, max co-hosts, etc. | liveID: Unique room identifier.seatTemplate: Layout template. |
Preparation
Step 1: Activate the Service
See Activate Service to obtain either the trial or paid version of the SDK.Then, go to the Console for application management, and get the following:
SDKAppID: Application identifier (required). Tencent Cloud uses SDKAppId for billing and details.SDKSecretKey: Application secret key, used to initialize the configuration file with secret information.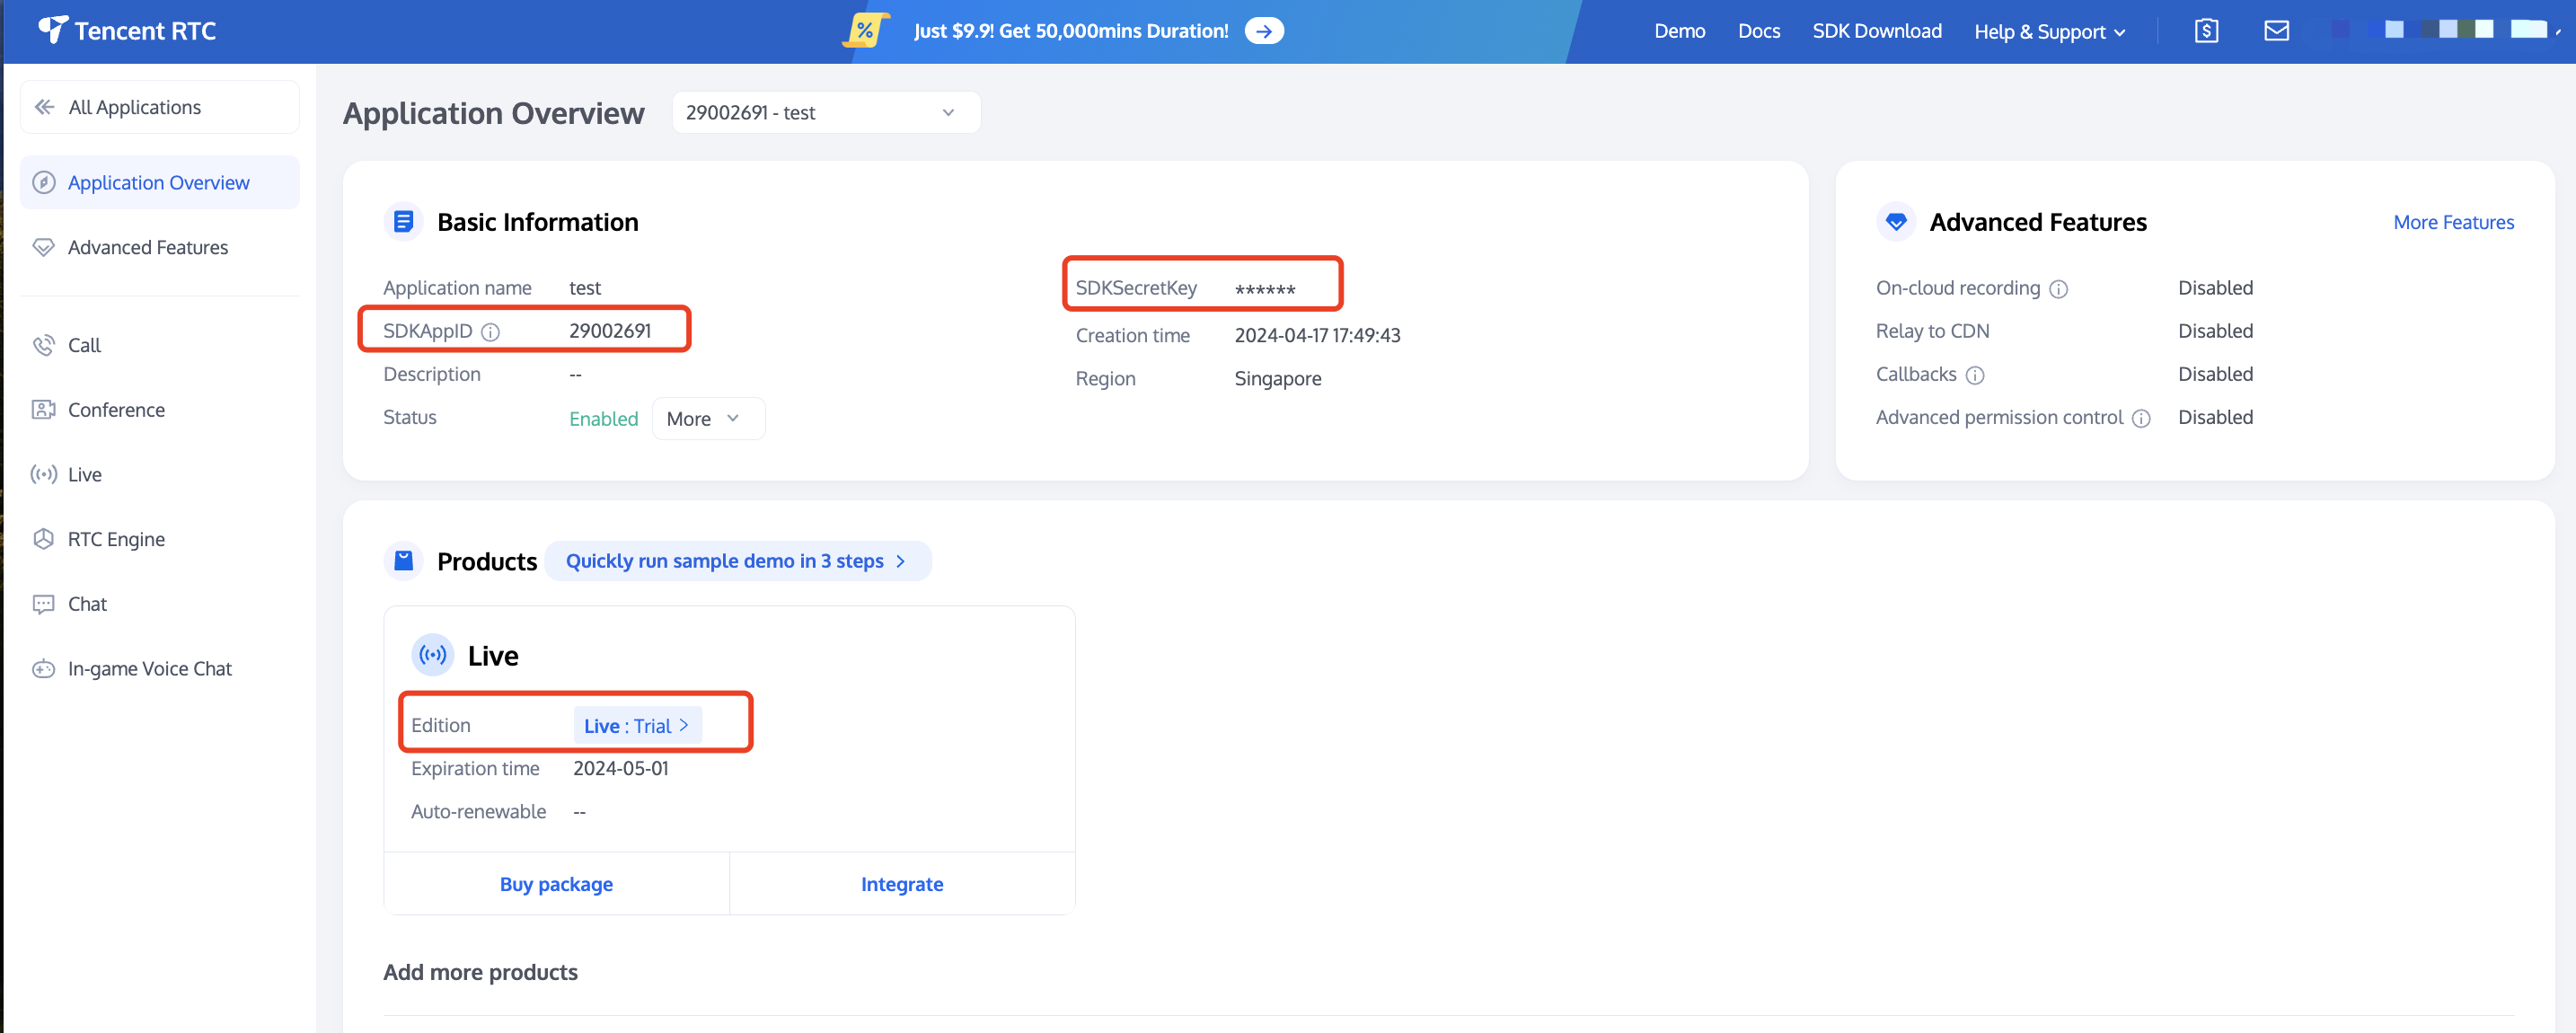
Step 2: Import AtomicXCore into Your Project
Install the component: Add the dependency
implementation 'com.tencent.atomicx:atomicxcore:latest' to your build.gradle file, then perform a Gradle Sync.implementation("io.trtc.uikit:atomicx-core:4.0.0.110")api("com.tencent.imsdk:imsdk-plus:8.9.7511")
implementation 'io.trtc.uikit:atomicx-core:4.0.0.110'api "com.tencent.imsdk:imsdk-plus:8.9.7511"
Step 3: Implement Login Logic
Call
LoginStore.shared.login in your project to complete login. This is required before you can use any functionality in AtomicXCore.Note:
We recommend calling
LoginStore.shared.login after your app's own user authentication is successful to ensure clear and consistent login logic.import android.os.Bundleimport androidx.appcompat.app.AppCompatActivityimport io.trtc.tuikit.atomicxcore.api.login.LoginStoreimport io.trtc.tuikit.atomicxcore.api.CompletionHandlerimport android.util.Logclass MainActivity : AppCompatActivity() {override fun onCreate(savedInstanceState: Bundle?) {super.onCreate(savedInstanceState)LoginStore.shared.login(this, // context1400000001, // Replace with your SDKAppID"test_001", // Replace with your UserID"xxxxxxxxxxx", // Replace with your UserSigobject : CompletionHandler {override fun onSuccess() {// Handle login successLog.d("Login", "login success")}override fun onFailure(code: Int, desc: String) {// Handle login failureLog.e("Login", "login failed, code: $code, error: $desc")}})}}
Login API Parameter Description
Parameter | Type | Description |
SDKAppID | Int | |
UserID | String | The unique ID for the current user. Must contain only English letters, numbers, hyphens, and underscores. |
userSig | String | A ticket for Tencent Cloud authentication. Please note: Development Environment: You can use the local GenerateTestUserSig.genTestSig function to generate a UserSig or generate a temporary UserSig via the UserSig Generation Tool.Production Environment: To prevent key leakage, you must use a server-side method to generate UserSig. For details, see Generating UserSig on the Server. For more information, see How to Calculate and Use UserSig. |
Building a Basic Live Room
Step 1: Implement Host Video Streaming
Follow these steps to quickly set up host video streaming:
Note:
For a complete implementation, refer to VideoLiveAnchorActivity.kt in the open-source TUILiveKit project.
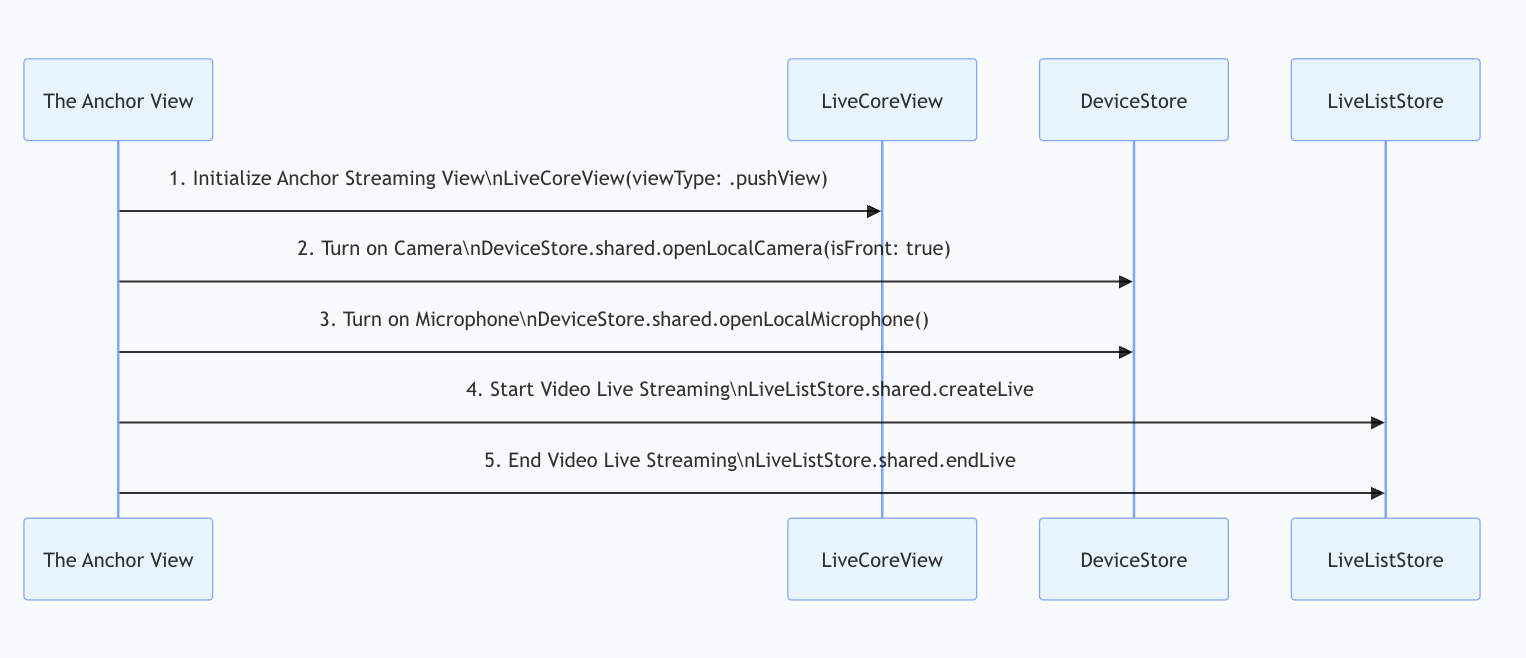
1. Initialize the Broadcaster Streaming View
In your host
Activity, create a LiveCoreView instance and set viewType to PUSH_VIEW (publishing view).import io.trtc.tuikit.atomicxcore.api.view.CoreViewTypeimport io.trtc.tuikit.atomicxcore.api.view.LiveCoreViewimport android.os.Bundleimport androidx.appcompat.app.AppCompatActivityimport androidx.constraintlayout.widget.ConstraintLayoutclass YourAnchorActivity : AppCompatActivity() {private lateinit var coreView: LiveCoreViewoverride fun onCreate(savedInstanceState: Bundle?) {super.onCreate(savedInstanceState)coreView = LiveCoreView(this, viewType = CoreViewType.PUSH_VIEW)coreView.setLiveID("test_live_001")setupUI()}private fun setupUI() {setContentView(R.layout.activity_anchor)val container = findViewById<ConstraintLayout>(R.id.container)container.addView(coreView)val params = ConstraintLayout.LayoutParams(ConstraintLayout.LayoutParams.MATCH_PARENT,ConstraintLayout.LayoutParams.MATCH_PARENT)params.topMargin = 36params.bottomMargin = 96coreView.layoutParams = params}}
2. Open Camera and Microphone
Call the
openLocalCamera and openLocalMicrophone methods of DeviceStore to enable the camera and microphone. No additional action is required—LiveCoreView will automatically preview the current camera video stream.import androidx.appcompat.app.AppCompatActivityimport android.os.Bundleimport io.trtc.tuikit.atomicxcore.api.device.DeviceStoreclass YourAnchorActivity : AppCompatActivity() {// ... other code ...override fun onCreate(savedInstanceState: Bundle?) {super.onCreate(savedInstanceState)setupUI()openDevices()}private fun openDevices() {DeviceStore.shared().openLocalCamera(true, completion = null)DeviceStore.shared().openLocalMicrophone(completion = null)}}
3. Start Live Streaming
Start the live stream by calling
createLive on LiveListStore.import android.util.Logimport androidx.appcompat.app.AppCompatActivityimport io.trtc.tuikit.atomicxcore.api.live.LiveInfoimport io.trtc.tuikit.atomicxcore.api.live.LiveInfoCompletionHandlerimport io.trtc.tuikit.atomicxcore.api.live.LiveListStoreclass YourAnchorActivity : AppCompatActivity() {// ... other code ...private fun startLive() {val liveInfo = LiveInfo().apply {liveID = "test_live_001"liveName = "test live"seatTemplate = SeatLayoutTemplate.VideoDynamicGrid9Seats // Default: dynamic grid layout}LiveListStore.shared().createLive(liveInfo, object: LiveInfoCompletionHandler {override fun onFailure(code: Int, desc: String) {Log.e("Live", "startLive error: $desc")}override fun onSuccess(liveInfo: LiveInfo) {Log.d("Live", "startLive success")}})}}
LiveInfo Parameter Description:Parameter Name | Type | Required | Description |
liveID | String | Yes | Unique identifier for the live room. |
liveName | String | No | Title of the live room. |
notice | String | No | Announcement message for the live room. |
isMessageDisable | Boolean | No | Disable chat (true = yes, false = no). |
isPublicVisible | Boolean | No | Room is publicly visible (true = yes, false = no). |
seatMode | No | Seat mode (FREE: free to take seat, APPLY: apply to take seat). | |
seatTemplate | Yes | Seat layout template. | |
coverURL | String | No | Cover image URL for the live room. |
backgroundURL | String | No | Background image URL for the live room. |
categoryList | List | No | List of category tags for the live room. |
activityStatus | Int | No | Live activity status. |
isGiftEnabled | Boolean | No | Whether to enable gift functionality (true: yes, false: no). |
4. End Live Streaming
When the live stream ends, call the
endLive method of LiveListStore. The SDK will handle stopping the stream and destroying the room.import android.util.Logimport androidx.appcompat.app.AppCompatActivityimport com.tencent.cloud.tuikit.engine.extension.TUILiveListManagerimport io.trtc.tuikit.atomicxcore.api.device.DeviceStoreimport io.trtc.tuikit.atomicxcore.api.live.LiveListStoreimport io.trtc.tuikit.atomicxcore.api.live.StopLiveCompletionHandlerclass YourAnchorActivity : AppCompatActivity() {// ... other code ...private fun stopLive() {LiveListStore.shared().endLive(object : StopLiveCompletionHandler {override fun onSuccess(statisticsData: TUILiveListManager.LiveStatisticsData) {Log.d("Live", "endLive success, duration: ${statisticsData.liveDuration}, totalViewers: ${statisticsData.totalViewers}")}override fun onFailure(code: Int, desc: String) {Log.e("Live", "endLive error: $desc")}})}override fun onDestroy() {super.onDestroy()stopLive()DeviceStore.shared().closeLocalCamera()DeviceStore.shared().closeLocalMicrophone()Log.d("Live", "YourAnchorActivity onDestroy")}}
Step 2: Implement Audience Join and Watch
Follow these steps to enable audience viewing:
Note:
For a complete reference implementation of audience viewing logic, see VideoLiveAudienceActivity.kt in the open-source TUILiveKit project.
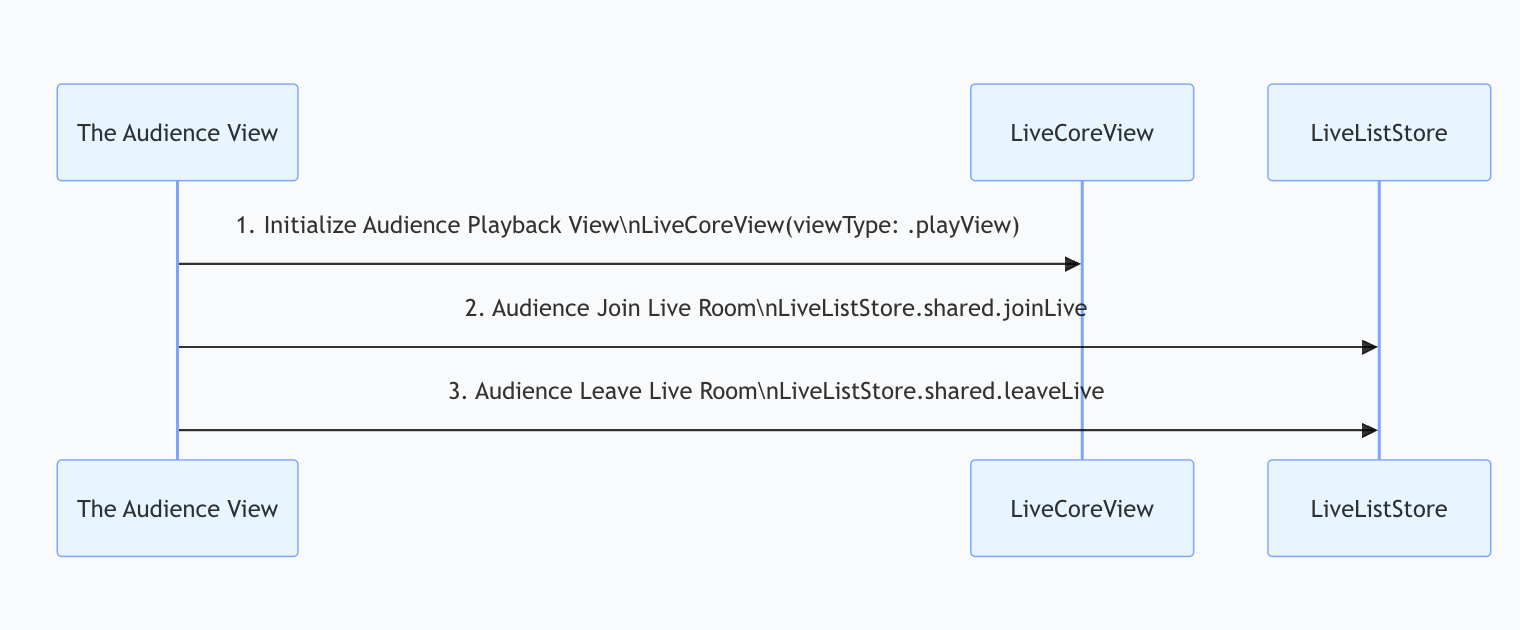
1. Add Audience Playback View
In your audience
Activity, create a LiveCoreView instance and set viewType to PLAY_VIEW (playback view).import io.trtc.tuikit.atomicxcore.api.view.CoreViewTypeimport io.trtc.tuikit.atomicxcore.api.view.LiveCoreViewimport android.os.Bundleimport androidx.appcompat.app.AppCompatActivityimport androidx.constraintlayout.widget.ConstraintLayout// YourAudienceActivity represents your audience viewing Activityclass YourAudienceActivity : AppCompatActivity() {// 1. Initialize the audience playback viewprivate lateinit var coreView: LiveCoreViewoverride fun onCreate(savedInstanceState: Bundle?) {super.onCreate(savedInstanceState)// 2. Initialize the viewcoreView = LiveCoreView(this, viewType = CoreViewType.PLAY_VIEW)coreView.setLiveId("test_live_001")// UI layoutsetupUI()}private fun setupUI() {setContentView(R.layout.activity_audience)// 3. Add the playback view to your layoutval container = findViewById<ConstraintLayout>(R.id.container)container.addView(coreView)// Set layout parametersval params = ConstraintLayout.LayoutParams(ConstraintLayout.LayoutParams.MATCH_PARENT,ConstraintLayout.LayoutParams.MATCH_PARENT)params.topMargin = 36params.bottomMargin = 96coreView.layoutParams = params}}
2. Join the Live Room
Call the
joinLive method of LiveListStore to join the live stream. No additional setup is required—LiveCoreView will automatically play the video stream.import io.trtc.tuikit.atomicxcore.api.live.LiveInfoimport io.trtc.tuikit.atomicxcore.api.live.LiveInfoCompletionHandlerimport io.trtc.tuikit.atomicxcore.api.live.LiveListStoreimport android.os.Bundleimport androidx.appcompat.app.AppCompatActivityimport android.util.Log// YourAudienceActivity represents your audience viewing Activityclass YourAudienceActivity : AppCompatActivity() {// ... other code ...override fun onCreate(savedInstanceState: Bundle?) {super.onCreate(savedInstanceState)setupUI()// 1. Join the live room (liveID must match the host's)LiveListStore.shared().joinLive(liveID, object : LiveInfoCompletionHandler {override fun onFailure(code: Int, desc: String) {Log.e("Live", "joinLive error: $desc")}override fun onSuccess(liveInfo: LiveInfo) {Log.d("Live", "joinLive success")}})}}
3. Exit the Live Room
When the audience leaves, call the
leaveLive method of LiveListStore. The SDK will automatically stop playback and exit the room.import io.trtc.tuikit.atomicxcore.api.live.LiveListStoreimport io.trtc.tuikit.atomicxcore.api.CompletionHandlerimport androidx.appcompat.app.AppCompatActivityimport android.util.Log// YourAudienceActivity represents your audience viewing Activityclass YourAudienceActivity : AppCompatActivity() {// ... other code ...// Exit the live roomprivate fun leaveLive() {LiveListStore.shared().leaveLive(object : CompletionHandler {override fun onSuccess() {Log.d("Live", "leaveLive success")}override fun onFailure(code: Int, desc: String) {Log.e("Live", "leaveLive error: $desc")}})}// Always call leaveLive when Activity is destroyedoverride fun onDestroy() {super.onDestroy()leaveLive()Log.d("Live", "YourAudienceActivity onDestroy")}}
Step 3: Listen for Live Events
After joining a live room, you should handle passive events such as the host ending the stream or the audience being removed for violations. If you do not listen for these events, the audience UI may remain in an invalid state, impacting user experience.
Implement the
LiveListListener interface and register it with LiveListStore:import io.trtc.tuikit.atomicxcore.api.live.LiveEndedReasonimport io.trtc.tuikit.atomicxcore.api.live.LiveKickedOutReasonimport io.trtc.tuikit.atomicxcore.api.live.LiveListListenerimport io.trtc.tuikit.atomicxcore.api.live.LiveListStoreimport android.os.Bundleimport androidx.appcompat.app.AppCompatActivityimport android.util.Log// YourAudienceActivity represents your audience viewing Activityclass YourAudienceActivity : AppCompatActivity() {// ... (coreView, liveId, setupUI, joinLive, leaveLive, etc.) ...// 2. Define a LiveListListener instanceprivate val liveListListener = object : LiveListListener() {override fun onLiveEnded(liveID: String, reason: LiveEndedReason, message: String) {// Listen for live stream endLog.d("Live", "Live ended. liveID: $liveID, reason: $reason, message: $message")// Handle exit logic, e.g., finish()// finish()}override fun onKickedOutOfLive(liveID: String, reason: LiveKickedOutReason, message: String) {// Listen for being kicked out of the live roomLog.d("Live", "Kicked out of live. liveID: $liveID, reason: $reason, message: $message")// Handle exit logic// finish()}}override fun onCreate(savedInstanceState: Bundle?) {super.onCreate(savedInstanceState)setupUI()// 3. Register the listenerLiveListStore.shared().addLiveListListener(liveListListener)// 4. Join the live roomjoinLive()}// ... joinLive() and leaveLive() methods ...override fun onDestroy() {super.onDestroy()// 5. Remove the listener to prevent memory leaksLiveListStore.shared().removeLiveListListener(liveListListener)leaveLive()Log.d("Live", "YourAudienceActivity onDestroy")}}
Run and Test
After integrating
LiveCoreView, you will have a pure video rendering view with full live streaming capabilities, but without any interactive UI. To add interactive features, see Enriching the Live Streaming Scene. | Dynamic Grid Layout | Floating Window Layout | Fixed Grid Layout | Fixed Window Layout |
Template | VideoDynamicGrid9Seats | VideoDynamicFloat7Seats | VideoFixedGrid9Seats | VideoFixedFloat7Seats |
Description | Default layout; grid size adjusts dynamically based on number of co-hosts. | Co-hosts are displayed as floating windows. | Fixed number of co-hosts; each occupies a fixed grid. | Fixed number of co-hosts; guests are displayed as fixed windows. |
Example |  |  |  |  |
Advanced Features
Synchronizing Custom State in Live Streaming Room
In Live Streaming Room, hosts may need to synchronize custom information with all participants, such as the current room topic or background music. The
metaData feature of LiveListStore supports this use case.Implementation
On the host side, set custom information using the
updateLiveMetaData API. AtomicXCore synchronizes these changes in real time to all participants. On the audience side, subscribe to LiveListState.currentLive and listen for changes in metaData. When a relevant key is updated, parse its value and update your business logic.Example Code
import io.trtc.tuikit.atomicxcore.api.LiveListStoreimport io.trtc.tuikit.atomicxcore.api.CompletionHandlerimport com.google.gson.Gsonimport io.trtc.tuikit.atomicxcore.api.MetaDataCompletionHandlerimport io.trtc.tuikit.atomicxcore.api.LiveListStore// 1. Define a background music model (using data class)data class MusicModel(val musicId: String,val musicName: String)// 2. Host side: Add a method to push background music in your Host business logicfun updateBackgroundMusic(music: MusicModel) {val gson = Gson()val jsonString = gson.toJson(music) ?: ""// The metaData to be updatedval metaData = hashMapOf("music_info" to jsonString)// Update metaDataLiveListStore.shared().updateLiveMetaData(metaData,object : CompletionHandler {override fun onSuccess() {print("Background music ${music.musicName} pushed successfully")}override fun onFailure(code: Int, desc: String) {print("Failed to push background music: $desc")}})}// 3. Audience side: Add a method to listen for background music changes in your Audience business logicprivate fun subscribeToDataUpdates() {CoroutineScope(Dispatchers.Main).launch {LiveListStore.shared().liveState.currentLive.map { it.metaData }.collect {val musicInfo = it["music_info"]// Refresh business state, e.g., play new background music}}}
Enriching the Live Streaming Scene
Once the basic live streaming functionality is in place, refer to the following guides to add interactive features to your live stream:
Feature | Description | Store | Implementation Guide |
Enable Audience Audio/Video Co-hosting | Audience can apply to join the host on stage for real-time video interaction. | ||
Enable Host Cross-room PK | Hosts from different rooms can connect for interaction or PK. | ||
Add Bullet Chat Feature | Audience can send and receive real-time text messages in the live room. | ||
Build a Gift Giving System | Audience can send virtual gifts to the host, increasing engagement and fun. |
API Documentation
Store/Component | Description | API Reference |
LiveCoreView | Core view component for displaying and interacting with live video streams. Handles video rendering and view widgets, supports host streaming, audience co-hosting, host connections, and more. | |
LiveListStore | Manages the full lifecycle of live rooms: create/join/leave/destroy rooms, query room list, modify live info (name, announcement, etc.), and listen to live status events (e.g., kicked out, ended). | |
DeviceStore | Controls audio/video devices: microphone (on/off, volume), camera (on/off, switch, quality), screen sharing, and real-time device status monitoring. | |
CoGuestStore | Manages audience co-hosting: apply/invite/accept/reject co-host requests, member permission control (microphone/camera), and status synchronization. | |
CoHostStore | Handles host cross-room connections: supports multiple layout templates (dynamic grid, etc.), initiates/accepts/rejects connections, and manages co-host interactions. | |
BattleStore | Manages host PK battles: initiate PK (set duration/opponent), manage PK status (start/end), synchronize scores, and listen for battle results. | |
GiftStore | Handles gift interactions: get gift list, send/receive gifts, and listen for gift events (including sender and gift details). | |
BarrageStore | Supports live chat: send text/custom danmaku, maintain danmaku list, and monitor danmaku status in real time. | |
LikeStore | Handles like interactions: send likes, listen for like events, and synchronize total like count. | |
LiveAudienceStore | Manages audience: get real-time audience list (ID/name/avatar), count audience, and listen for join/leave events. | |
AudioEffectStore | Audio effects: voice change (child/male), reverb (KTV, etc.), ear return adjustment, and real-time effect switching. | |
BaseBeautyStore | Basic beauty filters: adjust smoothing/whitening/rosiness (0-9), reset beauty status, and synchronize effect parameters. |
FAQs
Why is the screen black with no video after the host calls createLive or the audience calls joinLive?
Check setLiveID: Ensure you have set the correct liveID for the LiveCoreView instance before calling start or join methods.
Check device permissions: Ensure the app has system permissions for camera and microphone usage.
Check the host side: Has the host called
DeviceStore.shared().openLocalCamera(true)to enable the camera?Check the network: Ensure the device has a stable network connection.
After the host enables the camera, why is there a local video preview after starting the stream, but a black screen before starting?
Check the host side: Make sure the host streaming view (LiveCoreView) has its
viewType set to PUSH_VIEW.Check the audience side: Make sure the audience playback view (LiveCoreView) has its
viewType set to PLAY_VIEW.What restrictions and rules apply to updateLiveMetaData?
To maintain system stability and efficiency, metaData usage follows these rules:
Permissions: Only hosts and administrators can call
updateLiveMetaData. Regular audience members cannot.Quantity and Size Limits:
Each room supports up to 10 keys.
Each key can be up to 50 bytes; each value up to 2KB.
The total size of all values in a room cannot exceed 16KB.
Conflict Resolution: The update mechanism is "last write wins". If multiple administrators modify the same key in quick succession, the last change takes effect. Avoid concurrent modifications to the same key in your business logic.

