
Guest Connection
AtomicXCore provided the CoGuestStore module, specialized to manage the complete business process of audience mic connection. Developers do not need to handle complex state synchronization or signaling interactions; by simply calling a few straightforward methods, you can add powerful audience-host audio and video interaction capabilities to your live streaming experience.
Core Scenarios
CoGuestStore supports the two most common guest interaction scenarios:Audience requests to join as a guest: The audience member actively initiates a request to join. The host receives the request and can choose to accept or reject it.
Host invites audience to join as a guest: The host can proactively invite any audience member in the live room to join as a guest.
Implementation Steps
Step 1: Integrate the Component
Once integration is complete, proceed to implement the guest interaction feature.
Step 2: Implement Audience Request to Join as Guest
Audience Side Implementation
As an audience member, your core task is to initiate application, receive results and become a listener.
1. Initiate a guest request
When the user clicks the Request to Join button in the UI, call the
applyForSeat method.import 'package:atomic_x_core/atomicxcore.dart';final String liveId = "room ID";final CoGuestStore guestStore = CoGuestStore.create(liveId);// User clicks "apply for mic connection"void requestToConnect() async {// seatIndex: The microphone slot index, value range is -1 (auto select an empty slot) and [0, maximum number of microphone slots in the current room -1], timeout: request timeout period (seconds)final result = await guestStore.applyForSeat(seatIndex: 0,timeout: 30,extraInfo: null,);if (result.isSuccess) {print("Mic connection request sent, wait for anchor processing...");} else {print("Failed to send request: ${result.errorMessage}");}}
2. Listen for host response
Add a listener using
addGuestListener to receive the host’s response.late GuestListener _guestListener;// Subscribe to events when your Widget is initializedvoid subscribeGuestEvents() {_guestListener = GuestListener(onApplicationAccepted: (hostUser) {print("Anchor ${hostUser.userName} agreed to your request, preparing to connect mic");// 1. Turn on the camera, microphoneDeviceStore.shared.openLocalCamera(isFront: true);DeviceStore.shared.openLocalMicrophone();// 2. Update the UI here, such as disabling the apply button and displaying the mic connection state},onApplicationRejected: (hostUser) {print("Anchor ${hostUser.userName} refused your request");// Pop-up prompts user that the request was rejected},onInvitationReceived: (hostUser) {print("Received mic connection invitation from Anchor ${hostUser.userName}");// Pop up a dialog box herein for users to choose "Accept" or "Reject"_showInvitationDialog(hostUser);},onKickedOffSeat: () {print("You have been kicked off the mic by Anchor");// Update UI, turn off the camera and microphone},);guestStore.addGuestListener(_guestListener);}@overridevoid dispose() {guestStore.removeGuestListener(_guestListener);super.dispose();}
3. Leave the guest seat
When a guest wants to end the interaction, call the
disconnect method to return to the regular audience state.// User clicks "leave mic" buttonvoid leaveSeat() async {final result = await guestStore.disconnect();if (result.isSuccess) {print("Left mic successfully");} else {print("Failed to leave mic: ${result.errorMessage}");}}
4. (Optional) Cancel the request
If the audience wants to withdraw the request before the host processes it, call
cancelApplication.// While waiting, the user clicks "Cancel Application"void cancelRequest() async {final result = await guestStore.cancelApplication();if (result.isSuccess) {print("Application canceled");} else {print("Failed to cancel request: ${result.errorMessage}");}}
Host Side Implementation
As a host, your core tasks are to receive requests, display the request list, and process requests.
1. Listen for new guest requests
By adding a listener through
addHostListener, you can receive immediate notification when a new audience applies and get prompted.import 'package:atomic_x_core/atomicxcore.dart';final String liveId = "room ID";final CoGuestStore guestStore = CoGuestStore.create(liveId);late HostListener _hostListener;late final VoidCallback _applicantsChangedListener = _onApplicantsChanged;// Subscribe to anchor eventvoid subscribeHostEvents() {_hostListener = HostListener(onApplicationReceived: (guestUser) {print("Received join microphone application from audience ${guestUser.userName}");// Update UI herein, for example display a red dot on the "application list" button},onInvitationAccepted: (guestUser) {print("Audience ${guestUser.userName} accepted your invitation");},onInvitationRejected: (guestUser) {print("Audience ${guestUser.userName} refused your invite");},);guestStore.addHostListener(_hostListener);}@overridevoid dispose() {guestStore.removeHostListener(_hostListener);super.dispose();}
2. Display the request list
The
coGuestState in CoGuestStore maintains the current list of applicants in real time. You can listen to it to update your UI.// Subscription status updatevoid subscribeApplicants() {guestStore.coGuestState.applicants.addListener(_applicantsChangedListener);}void _onApplicantsChanged() {final applicants = guestStore.coGuestState.applicants.value;print("Current number of applicants: ${applicants.length}");// Refresh your "applicant list" UI hereinsetState(() {_applicantList = applicants;});}@overridevoid dispose() {guestStore.coGuestState.applicants.removeListener(_applicantsChangedListener);super.dispose();}
3. Process guest requests
When you select an audience from the list and click "Grant" or "Reject", call the appropriate method.
// Anchor clicks the "Grant" button and imports the applicant's userIDvoid accept(String userId) async {final result = await guestStore.acceptApplication(userId);if (result.isSuccess) {print("Approved $userId's request, the other party is connecting mic");}}// Anchor clicked the "Reject" buttonvoid reject(String userId) async {final result = await guestStore.rejectApplication(userId);if (result.isSuccess) {print("Denied $userId's request");}}
Step 3: Host Invites Audience to Join as Guest
Host Side Implementation
1. Invite an audience member
When the host selects someone from the audience list and clicks “Invite to Join”, call the
inviteToSeat method.// Anchor selects audience and initiates invitationvoid invite(String userId) async {// inviteeID: The invitee ID, seatIndex: The microphone slot index, value range is -1 (auto select an empty slot) and [0, maximum number of microphone slots in the current room -1]// timeout: invitation timeout durationfinal result = await guestStore.inviteToSeat(inviteeID: userId,seatIndex: 0,timeout: 30,extraInfo: null,);if (result.isSuccess) {print("Invitation sent to $userId, waiting for peer response...");}}
2. Listen for audience response
Use
HostListener to listen for invitation response events.// Callback configured in HostListener_hostListener = HostListener(onInvitationAccepted: (guestUser) {print("Audience ${guestUser.userName} accepted your invitation");},onInvitationRejected: (guestUser) {print("Audience ${guestUser.userName} refused your invite");},);
Audience Side Implementation
1. Receive host invitation
Listen for the invitation events via
GuestListener.// Callback configured in GuestListener_guestListener = GuestListener(onInvitationReceived: (hostUser) {print("Received mic connection invitation from Anchor ${hostUser.userName}");// Pop up a dialog box herein for users to choose "Accept" or "Reject"_showInvitationDialog(hostUser);},);
2. Respond to invitation
When the user makes a selection in the pop-up dialog box, call the appropriate method.
String inviterId = "Anchor ID initiating invitation"; // Obtain from onInvitationReceived callback// User click "Accept"void acceptInvitation() async {final result = await guestStore.acceptInvitation(inviterId);if (result.isSuccess) {// Turn on the camera, microphoneDeviceStore.shared.openLocalCamera(isFront: true);DeviceStore.shared.openLocalMicrophone();}}// User click "Reject"void rejectInvitation() async {await guestStore.rejectInvitation(inviterId);}
Feature Demo
After integrating the above functionality, test guest interaction using two audience members and a host. Audience A turns on both camera and microphone, while audience B only turns on the microphone. The resulting effect is shown below. You can refer to the next section to further customize your UI logic.

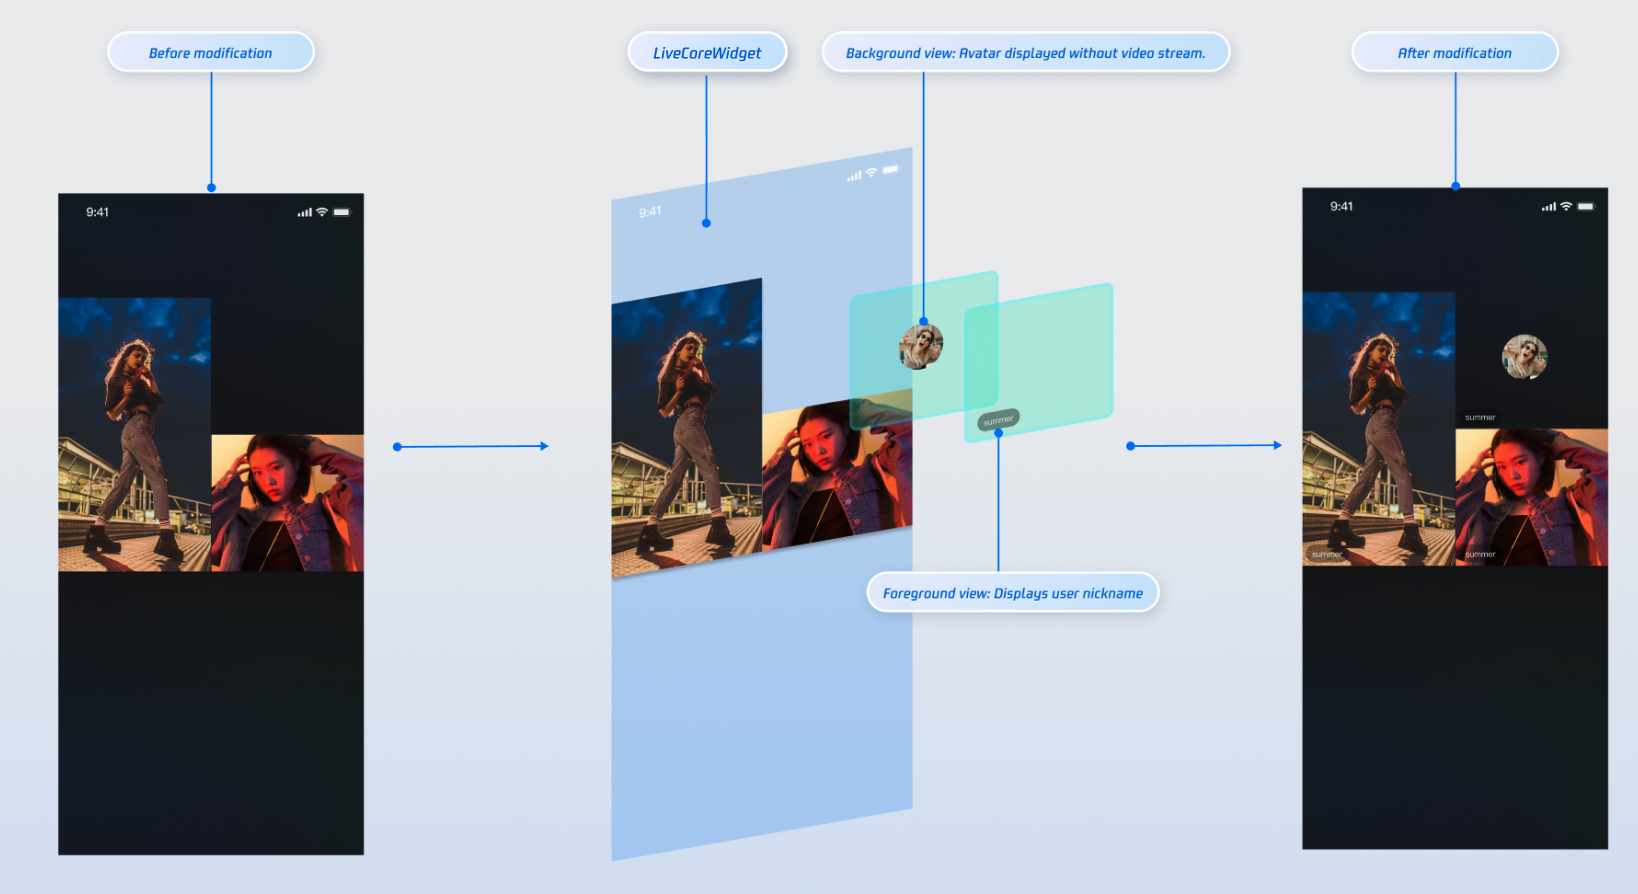
Refine UI Details
You can leverage the slot capability provided by the
VideoWidgetBuilder parameter of LiveCoreWidget to add custom views on top of the guest video streams. This allows you to display nicknames, avatars, and other information, or provide placeholder images when the camera is off, enhancing the overall visual experience.Displaying Nicknames on Video Streams
Demo Effect
Implementation Steps
Step 1: Create a foreground view (CustomSeatForegroundView) used for displaying user information above the video stream.
import 'package:flutter/material.dart';import 'package:rtc_room_engine/rtc_room_engine.dart';/// Custom user information floating view (foreground)class CustomSeatForegroundView extends StatelessWidget {final SeatFullInfo seatInfo;const CustomSeatForegroundView({Key? key,required this.seatInfo,}) : super(key: key);@overrideWidget build(BuildContext context) {return Container(color: Colors.transparent,child: Align(alignment: Alignment.bottomLeft,child: Container(margin: const EdgeInsets.all(5),padding: const EdgeInsets.symmetric(horizontal: 8, vertical: 4),decoration: BoxDecoration(color: Colors.black.withOpacity(0.5),borderRadius: BorderRadius.circular(12),),child: Text(seatInfo.userInfo.userName,style: const TextStyle(color: Colors.white,fontSize: 14,),),),),);}}
Step 2: Create a background view (CustomSeatBackgroundView) used as a placeholder image when the user has no video stream.
import 'package:flutter/material.dart';import 'package:rtc_room_engine/rtc_room_engine.dart';/// Custom avatar placeholder view (background)class CustomSeatBackgroundView extends StatelessWidget {final SeatFullInfo seatInfo;const CustomSeatBackgroundView({Key? key,required this.seatInfo,}) : super(key: key);@overrideWidget build(BuildContext context) {final avatarUrl = seatInfo.userInfo.avatarUrl;return Container(decoration: BoxDecoration(color: Colors.grey[800],),child: Center(child: Column(mainAxisSize: MainAxisSize.min,children: [ClipOval(child: avatarUrl.isNotEmpty? Image.network(avatarUrl,width: 60,height: 60,fit: BoxFit.cover,errorBuilder: (context, error, stackTrace) {return _buildDefaultAvatar();},): _buildDefaultAvatar(),),const SizedBox(height: 8),Text(seatInfo.userInfo.userName,style: const TextStyle(color: Colors.white,fontSize: 12,),),],),),);}Widget _buildDefaultAvatar() {return Container(width: 60,height: 60,color: Colors.grey,child: const Icon(Icons.person, size: 40, color: Colors.white),);}}
Step 3: Build a custom view through the
VideoWidgetBuilder's coGuestWidgetBuilder callback, and return the corresponding view based on the viewLayer value.import 'package:flutter/material.dart';import 'package:atomic_x_core/atomicxcore.dart';import 'package:rtc_room_engine/rtc_room_engine.dart';/// Live streaming page with custom connection viewclass CustomCoGuestLiveWidget extends StatefulWidget {final String liveId;const CustomCoGuestLiveWidget({Key? key,required this.liveId,}) : super(key: key);@overrideState<CustomCoGuestLiveWidget> createState() => _CustomCoGuestLiveWidgetState();}class _CustomCoGuestLiveWidgetState extends State<CustomCoGuestLiveWidget> {late LiveCoreController _controller;@overridevoid initState() {super.initState();_controller = LiveCoreController.create();_controller.setLiveID(widget.liveId);}@overridevoid dispose() {_controller.dispose();super.dispose();}/// Build a custom view for the mic-connecting audienceWidget _buildCoGuestWidget(BuildContext context,SeatFullInfo seatFullInfo,ViewLayer viewLayer,) {if (viewLayer == ViewLayer.foreground) {// Foreground layer: Always display on top of the video image, used for Nickname, information, etc.return CustomSeatForegroundView(seatInfo: seatFullInfo);} else {// Background layer: Displayed only when the corresponding user has no video stream, used for displaying avatar placeholder imagesreturn CustomSeatBackgroundView(seatInfo: seatFullInfo);}}@overrideWidget build(BuildContext context) {return Scaffold(body: LiveCoreWidget(controller: _controller,videoWidgetBuilder: VideoWidgetBuilder(coGuestWidgetBuilder: _buildCoGuestWidget,),),);}}
Parameter description:
Parameter | Type | Note |
seatFullInfo | SeatFullInfo | Seat information object, containing the Anchor's detailed information. |
seatFullInfo.userInfo.userId | String | Anchor's user ID. |
seatFullInfo.userInfo.userName | String | On-mic user's nickname. |
seatFullInfo.userInfo.avatarUrl | String | On-mic user's profile photo URL. |
viewLayer | ViewLayer | View layer enumeration: ViewLayer.foreground represents the pendant view, always displayed on top of the video image.ViewLayer.background means the background widget, below the foreground layer, only displayed when the user has no video stream (e.g., camera is off), usually used to show the user’s default avatar or placeholder image. |
API Documentation
For details about all public interfaces, properties, and methods of CoGuestStore and its related classes, see the official API documentation of the AtomicXCore framework. The related Stores used in this guide are as follows:
Store/Component | Feature Description | API Documentation |
LiveCoreWidget | Core view component for live video stream display and interaction: responsible for video rendering and widget handling, supports host streaming, guest interaction, host connection, and other scenarios. | |
LiveCoreController | Controller for LiveCoreWidget: used to set the live ID, control preview, and other operations. | |
VideoWidgetBuilder | Video view adapter: used to customize video stream widgets for guest interaction, host connection, PK, and other scenarios. | |
DeviceStore | Audio/video device control: microphone (on/off / volume), camera (on/off / switch / quality), screen sharing, real-time device status monitoring. | |
CoGuestStore | Guest interaction management: guest request/invite/accept/reject, guest member permissions (microphone/camera), state synchronization. |
FAQs
How do I manage the lifecycle and events of custom views added via VideoWidgetBuilder?
LiveCoreWidget will automatically manage the addition and removal of views returned by the
coGuestWidgetBuilder callback, so you don't need to handle them manually. If necessary to process user interaction (such as click events) in a custom view, just add corresponding event handling when creating the view.What is the purpose of the ViewLayer parameter?
ViewLayer is used to distinguish between foreground and background widgets.ViewLayer.foreground: The foreground layer, always displayed on top of the video image.ViewLayer.background: The background layer, displayed only when the corresponding user has no video stream (for example, when the camera is not turned on), usually used for displaying the default avatar or placeholder image of the user.Why Is My Custom View Not Displayed?
Check VideoWidgetBuilder settings: Please confirm the
LiveCoreWidget's videoWidgetBuilder parameter is correctly set.Check callback implementation: Please check if the
coGuestWidgetBuilder callback function is correctly implemented.Check the return value: Ensure your callback function returns an effective
Widget instance.

