
Channels Configuration Guide
Overview
This system supports integration with major email service providers through Email Forwarding, enabling rapid synchronization of email channels. It is currently compatible with Gmail, Outlook, Zoho, and other email services that support forwarding functions. This feature is available to all users and requires no additional complex configuration to get started.
Through the email forwarding mechanism, the system can receive and process customer email inquiries in real-time, ensuring continuous and timely communication. The configuration process is intuitive and typically takes only 3-5 minutes to complete.
Configuration Steps for Major Email Providers
2.1 Gmail Configuration
As one of the most widely used email services globally, Gmail's configuration process is as follows:
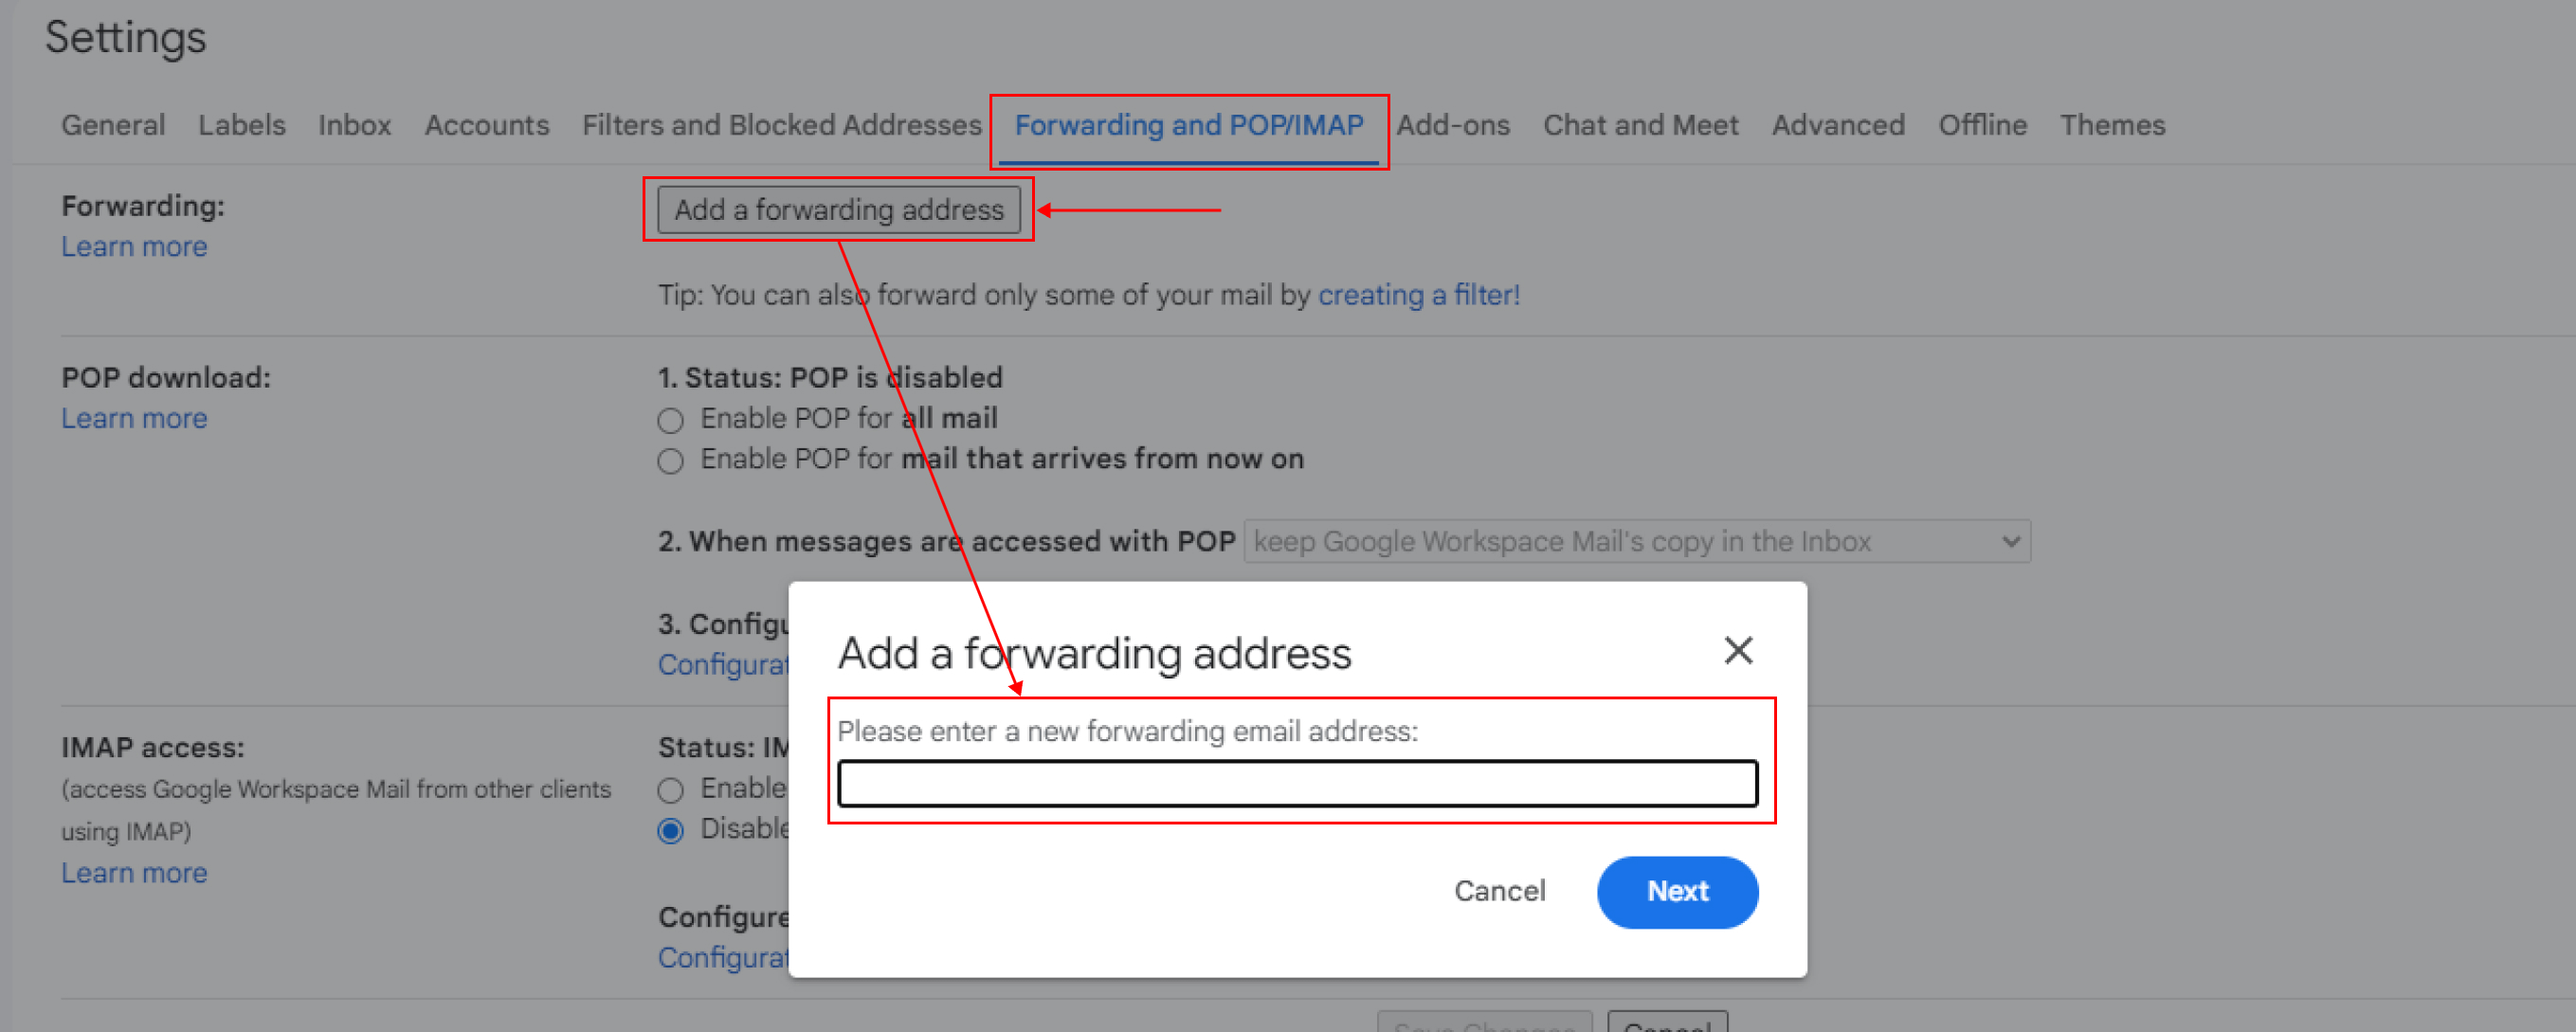
Step 1: Access Forwarding Settings Log in to your Gmail account, click the gear icon in the top right corner to enter "Settings" and select "See all settings" to expand the full configuration options.

Step 2: Add a Forwarding Address In the settings page, navigate to the "Forwarding and POP/IMAP" tab and click the "Add a forwarding address" button. Copy and paste the dedicated forwarding email address provided by this system into the input box, click "Next," and confirm the operation in the pop-up dialog.
Step 3: Complete Verification In the configuration guide interface of this system, click the "Get Verification Link" button. The system will automatically open a new page; click the "Confirm" button on that page to complete the verification.

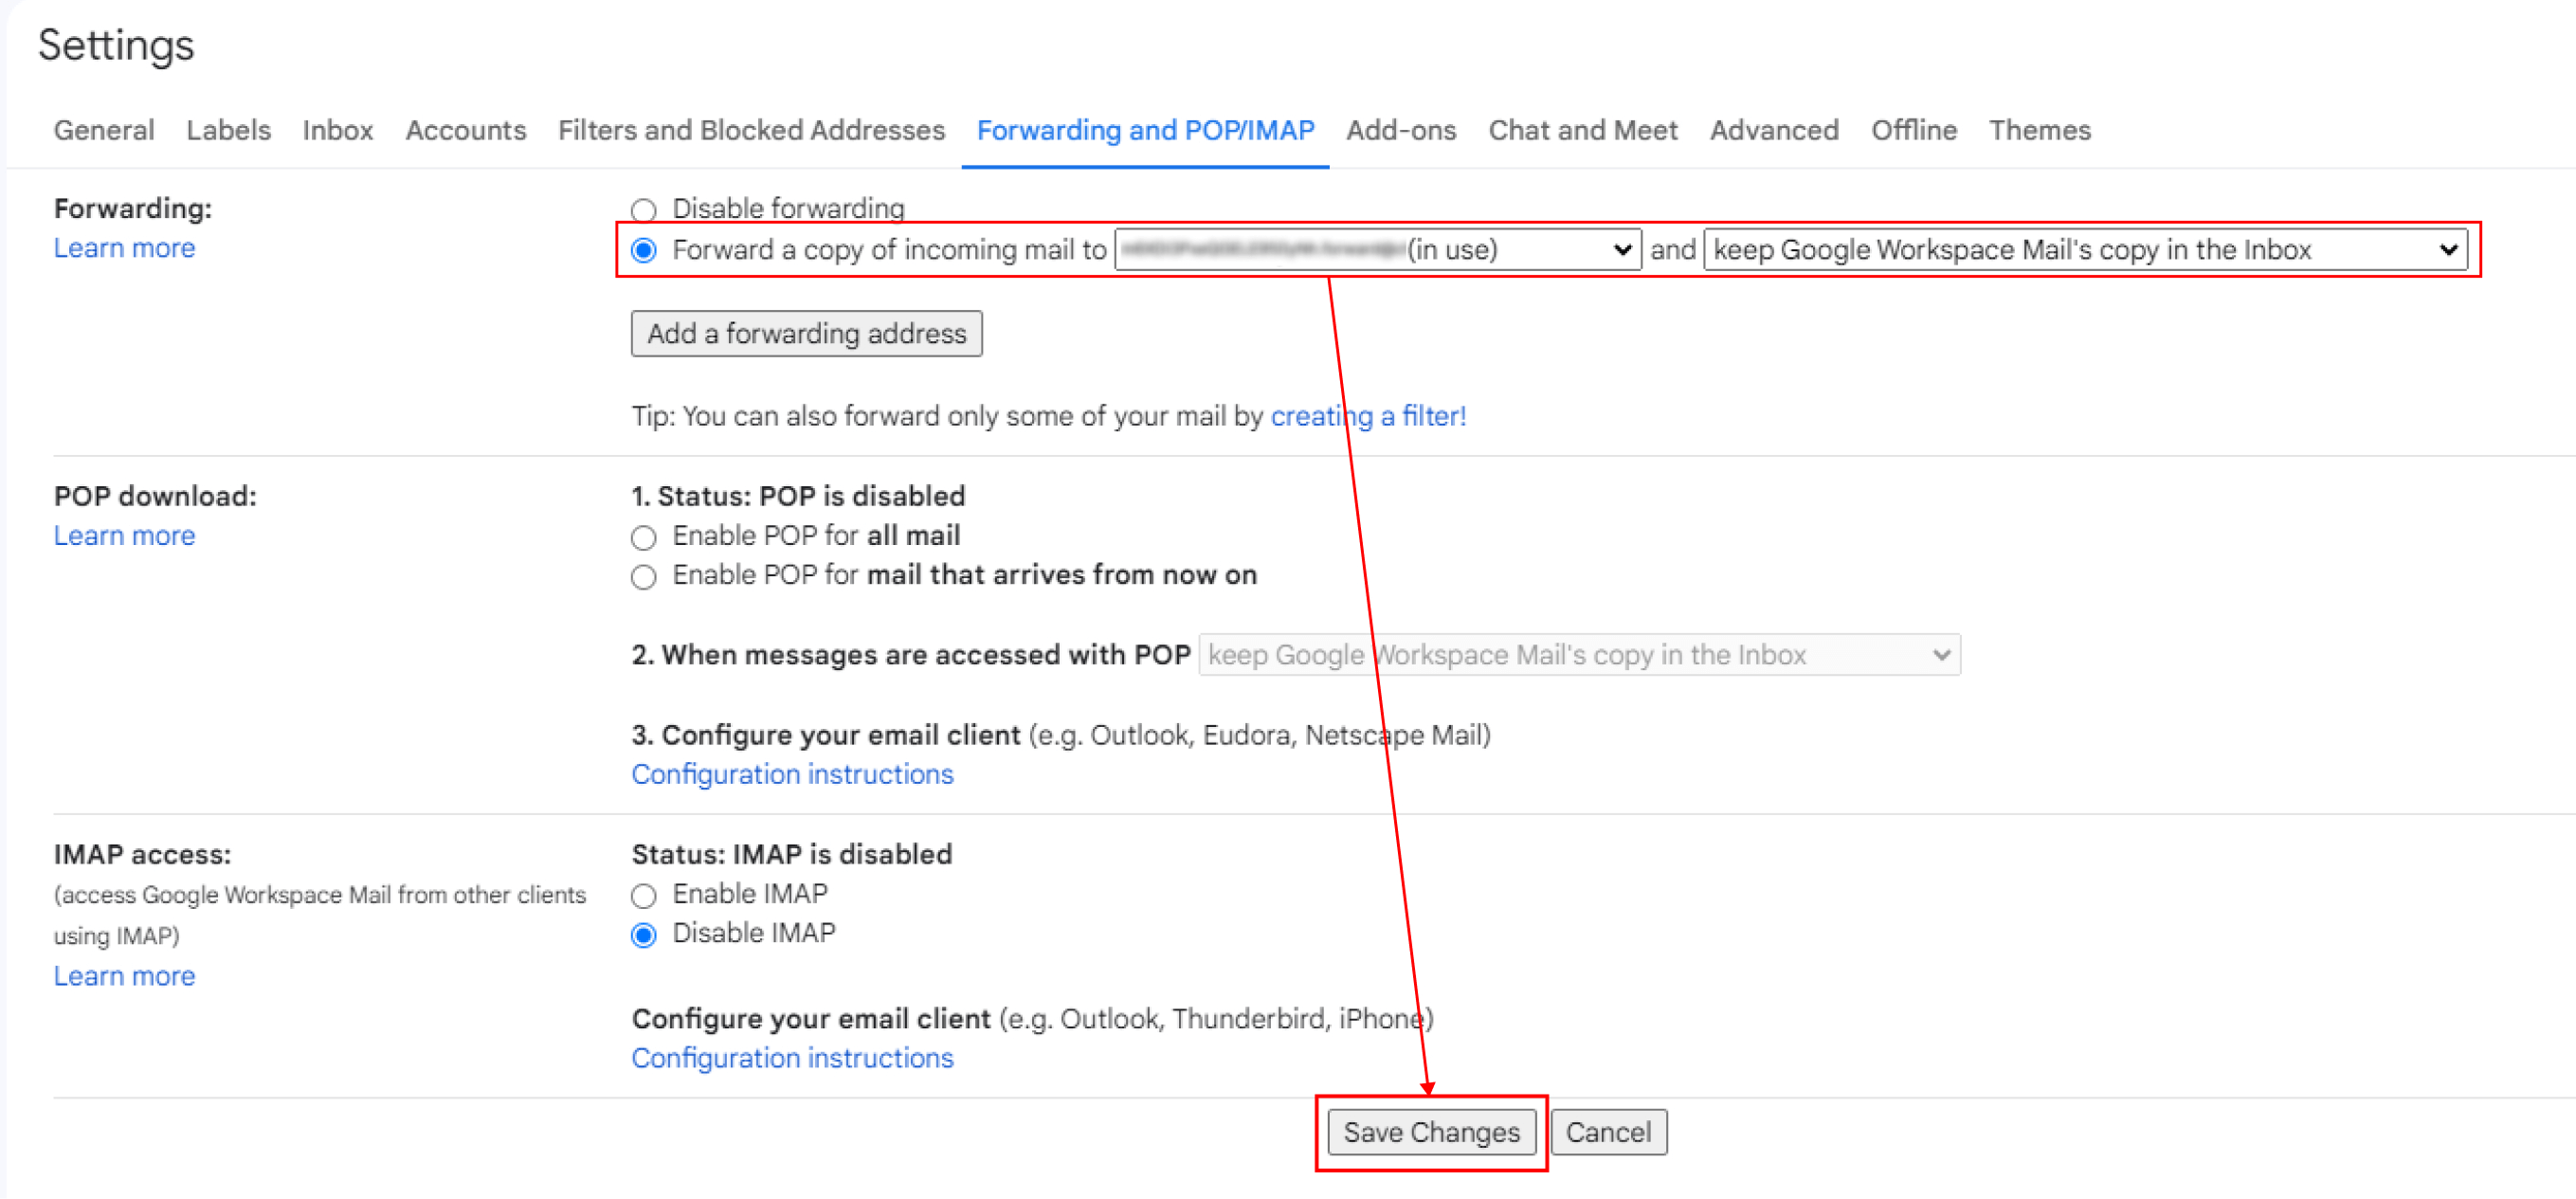
Step 4: Enable Forwarding Return to the Gmail settings page. In the forwarding section, select "Forward a copy of incoming mail to" and choose the newly added forwarding address from the dropdown menu. Click the "Save Changes" button at the bottom of the page.
Step 5: System Validation Return to this system's configuration interface and click the "Send Verification Email" button. The system will automatically detect the configuration status and complete the final validation.

2.2 Outlook Configuration
The configuration steps for Outlook (including Hotmail and Live mail) are slightly different:
Step 1: Access Web Version Settings Log in to the Outlook web version (https://outlook.live.com or https://outlook.office.com). If you are using the desktop application, you must navigate to the web version via "File" → "Account Settings" for configuration.
Step 2: Configure Forwarding Rules In the web interface, click the settings icon in the top right corner and select "Mail" → "Forwarding and IMAP."
Step 3: Enable Forwarding Switch on the "Enable forwarding" toggle, paste the forwarding address provided by this system into the designated input box, and click "Save."
Step 4: Confirm Configuration Click "Send Verification Email" in this system's interface. The system will automatically detect and confirm the configuration status.
Troubleshooting: If you see a message stating "Your organization doesn't allow forwarding to external addresses," it is due to external forwarding restrictions set by your enterprise administrator. You will need to contact your IT or system administrator to request external email forwarding permissions for your account.
2.3 Zoho Mail Configuration
Zoho Mail offers a relatively concise configuration process:
Step 1: Access Forwarding Settings Log in to the Zoho Mail console, click the settings icon in the top right corner, and select "Mail Accounts" → "Forwarding."
Step 2: Add Forwarding Address Paste the forwarding address provided by this system into the input box and click "Add." Zoho will send a verification email containing a confirmation code to that address.
Step 3: Enter Confirmation Code Click the "Get Confirmation Code" button in this system's configuration interface. The system will automatically extract the code from the email sent by Zoho. Enter this code into the input box in this system and click confirm.
Step 4: Final Verification Click the "Send Verification Email" button, and the system will automatically complete the final verification process.
Email Alias Configuration
An email alias is an additional email address created under a primary email account, where multiple aliases share the same inbox. This system supports rapid integration for email aliases with a simplified configuration process.
3.1 How It Works
When you configure forwarding for an alias, email providers typically send the verification link to the primary email address rather than the alias itself. Therefore, the verification process for an alias must first be completed through the primary mailbox.
3.2 Configuration Steps
Step 1: Verify Primary Email Follow the standard process for your specific email provider (as described above) to complete the verification and configuration of the primary email address.
Step 2: Add Email Alias In the "Channel Management" page of this system, select "Add Email Channel" and enter your email alias address.
Step 3: Skip Verification Step In the configuration wizard, when prompted for verification, select "Skip verification step" or navigate directly to the final step.
Step 4: Complete Integration Click the "Verify" button to complete the alias integration without needing to check the inbox or click a verification link again.
Other Email Service Providers
4.1 General Configuration Method
If your email provider is not listed above, you can try the following general method:
1. Log in to your email account management console.
2. Search for keywords such as "Forwarding," "Email Forwarding," or "Redirect" in the settings.
3. Once the forwarding feature is located, add the forwarding address provided by this system.
4. Complete the verification process as prompted by your email provider.
5. Click "Send Verification Email" in this system to complete final confirmation.
4.2 Compatibility Notes
This system supports the vast majority of mainstream email providers, including but not limited to:
Enterprise Email (based on Exchange, Google Workspace, Microsoft 365, etc.)
Custom Domain Email (requires forwarding support from the provider)
Other international providers (Yahoo Mail, AOL Mail, ProtonMail, etc.)
As long as your email service supports forwarding, it can theoretically be integrated with this system. If you encounter issues, please consult your provider's official documentation or contact our technical support team.
4.3 Important Considerations
Security: This system only receives forwarded email content and does not store or access your email login credentials.
Latency: Email forwarding typically involves a delay of a few seconds to several minutes, which is a normal mechanism of email providers.
Filtering Rules: If your email has strict filtering or spam blocking rules, it may affect forwarding. Ensure the forwarding address is not blacklisted.
Quota Limits: Some providers limit the volume or frequency of forwarded emails; please ensure your account meets the requirements.

