
Guest Connection
AtomicXCore provides the CoGuestStore module, purpose-built to manage the complete audience co-hosting workflow. You do not need to handle complex state synchronization or signaling logic—simply call a few intuitive methods to add robust audio and video interaction between viewers and hosts in your live stream.
Core Features
CoGuestStore supports the two most common co-hosting scenarios:Audience Request to Join: An audience member initiates a co-hosting request, and the host can accept or reject it.
Host Invites to Join: The host can invite any audience member in the live room to co-host.
Core Concepts
Core Concept | Core Responsibilities | Key APIs / Properties |
CoGuestStore | Manages the entire signaling workflow for viewer-host interaction (Apply, Invite, Accept, Reject, Disconnect) and provides Combine publishers for event handling. | state: A StatePublisher containing connected, applicants, and invitees lists.applyForSeat(): Viewer applies to become a co-guest.inviteToSeat(): Host invites a viewer to take a seat.acceptApplication(): Host accepts a link mic application.disConnect(): Terminates the connection. |
CoGuestState | Stores all user lists related to link mic, driving UI updates (e.g., notification badges, video window display). | connected: List of users currently co-hosting.applicants: List of viewers currently applying.invitees: List of viewers currently being invited. |
HostEvent / GuestEvent | Defines the signaling events received by the host and audience respectively, emitted via Publishers in the Store. | hostEventPublisher: Publishes host-side events (e.g., onGuestApplicationReceived).guestEventPublisher: Publishes audience-side events (e.g., onHostInvitationReceived). |
Implementation
Step 1: Component Integration
Step 2: Implement Audience Request to Join
Audience-Side Implementation
As an audience member, your primary tasks are to initiate a request, handle the host's response, and leave the seat when desired.
1. Initiate a Co-hosting Request
When the user taps the "Request to Join" button, call the
applyForSeat method.import AtomicXCorelet liveId = "Room ID"let guestStore = CoGuestStore.create(liveID: liveId)// User taps "Request to Co-host"func requestToConnect() {// timeout: Request timeout duration, e.g., 30 secondsguestStore.applyForSeat(timeout: 30.0, extraInfo: nil) { result inswitch result {case .success():print("Co-hosting request sent, waiting for host response...")case .failure(let error):print("Failed to send request: \(error.message)")}}}
2. Listen for Host Response
Subscribe to
guestEventPublisher to receive the host's response.// Subscribe to events during your view controller's initializationfunc subscribeGuestEvents() {guestStore.guestEventPublisher.sink { [weak self] event inif case let .onGuestApplicationResponded(isAccept, hostUser) = event {if isAccept {print("Host \(hostUser.userName) accepted your request, preparing to go live")// 1. Enable camera and microphoneDeviceStore.shared.openLocalCamera(isFront: true, completion: nil)DeviceStore.shared.openLocalMicrophone(completion: nil)// 2. Update UI, e.g., disable the request button and show co-hosting status} else {print("Host \(hostUser.userName) rejected your request")// Show a popup to notify the user that the request was rejected}}}.store(in: &cancellables) // Manage subscription lifecycle}
3. Leave the Seat
When a co-hosting audience member wants to end the interaction, call the
disConnect method to return to audience status.// User taps "Leave Mic" buttonfunc leaveSeat() {guestStore.disConnect { result inswitch result {case .success():print("Successfully left the mic")case .failure(let error):print("Failed to leave the mic: \(error.message)")}}}
4. (Optional) Cancel Request
If the audience member wants to withdraw the request before the host responds, call
cancelApplication.// User taps "Cancel Request" while waitingfunc cancelRequest() {guestStore.cancelApplication { result inswitch result {case .success():print("Request cancelled")case .failure(let error):print("Failed to cancel request: \(error.message)")}}}
Host-Side Implementation
As a host, your main responsibilities are to receive requests, display the applicant list, and process requests.
1. Listen for New Co-hosting Requests
Subscribe to
hostEventPublisher to be notified when a new audience member requests to co-host.import AtomicXCorelet liveId = "Room ID"let guestStore = CoGuestStore.create(liveID: liveId)// Subscribe to host eventsguestStore.hostEventPublisher.sink { [weak self] event inif case let .onGuestApplicationReceived(guestUser) = event {print("Received co-hosting request from audience member \(guestUser.userName)")// Update UI, e.g., show a red dot on the "Request List" button}}.store(in: &cancellables)
2. Display Request List
CoGuestStore maintains the current list of applicants in real time. Subscribe to this list to update your UI.// Subscribe to state changesguestStore.state.subscribe(StatePublisherSelector(keyPath: \CoGuestState.applicants)) // Only observe changes to the applicant list.removeDuplicates().sink { applicants inprint("Current number of applicants: \(applicants.count)")// Refresh your "Applicant List" UI here// self.applicantListView.update(with: applicants)}.store(in: &cancellables)
3. Process Co-hosting Requests
When you select an audience member and choose "Accept" or "Reject", call the corresponding method.
// Host taps "Accept" button, passing in the applicant's userIDfunc accept(userId: String) {guestStore.acceptApplication(userID: userId) { result inif case .success = result {print("Accepted \(userId)'s request, they are joining as a co-host")}}}// Host taps "Reject" buttonfunc reject(userId: String) {guestStore.rejectApplication(userID: userId) { result inif case .success = result {print("Rejected \(userId)'s request")}}}
Step 3: Implement Host Inviting Audience to Join the Stage
Host-Side Implementation
1. Send Invitation to Audience
When the host selects an audience member and taps "Invite to Co-host", call the
inviteToSeat method.// Host selects an audience member and sends an invitefunc invite(userId: String) {// timeout: Invitation timeout durationguestStore.inviteToSeat(userID: userId, timeout: 30.0, extraInfo: nil) { result inif case .success = result {print("Invitation sent to \(userId), waiting for their response...")}}}
2. Listen for Audience Response
Listen for the
onHostInvitationResponded event via hostEventPublisher.// Add this in the hostEventPublisher subscriptionif case let .onHostInvitationResponded(isAccept, guestUser) = event {if isAccept {print("Audience member \(guestUser.userName) accepted your invitation")} else {print("Audience member \(guestUser.userName) rejected your invitation")}}
Audience-Side Implementation
1. Receive Host Invitation
Listen for the
onHostInvitationReceived event via guestEventPublisher.// Add this in the guestEventPublisher subscriptionif case let .onHostInvitationReceived(hostUser) = event {print("Received co-hosting invitation from host \(hostUser.userName)")// Show a dialog to let the user choose "Accept" or "Reject"// self.showInvitationDialog(from: hostUser)}
2. Respond to Invitation
After the user makes a selection, call the corresponding method.
let inviterId = "Inviting host's ID" // Obtain from the onHostInvitationReceived event// User taps "Accept"func accept() {guestStore.acceptInvitation(inviterID: inviterId) { result inif case .success = result {// Enable camera and microphoneDeviceStore.shared.openLocalCamera(isFront: true, completion: nil)DeviceStore.shared.openLocalMicrophone(completion: nil)}}}// User taps "Reject"func reject() {guestStore.rejectInvitation(inviterID: inviterId) { result in// ...}}
Run and Test
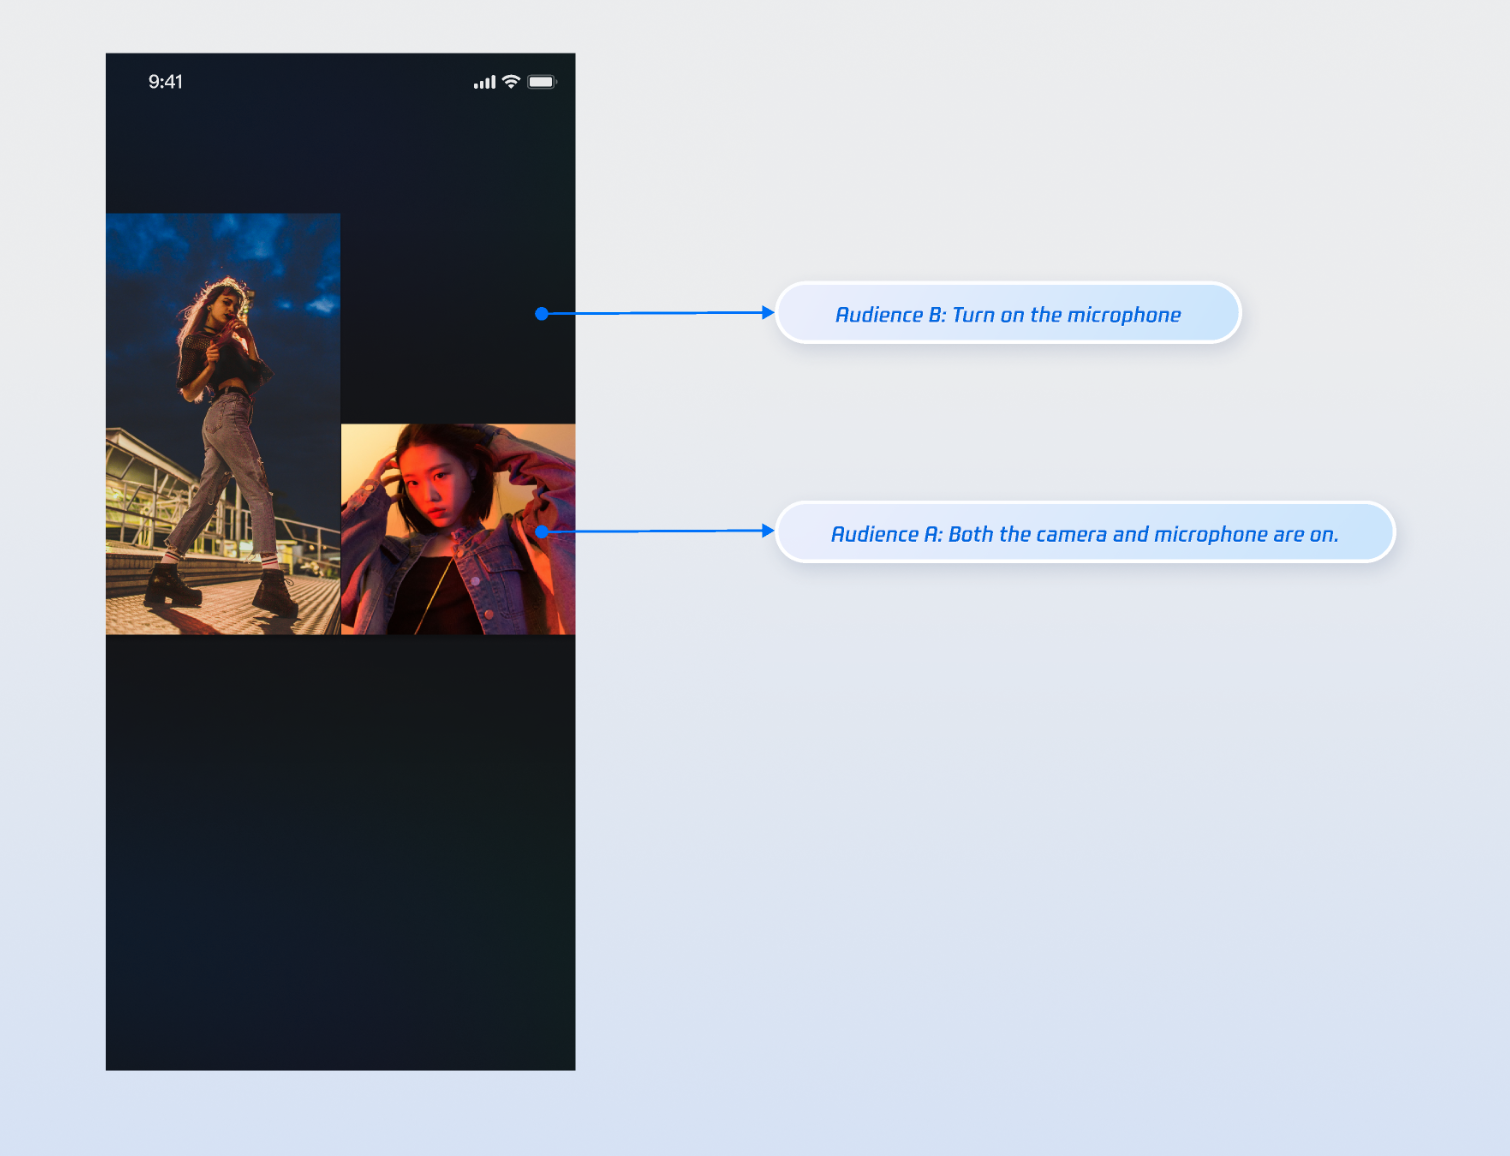
After integrating the above features, use two audience members and a host to test co-hosting. For example, Audience A enables both camera and microphone, while Audience B enables only the microphone. The result is shown below. For UI customization, see Refining UI Details.
Refining UI Details
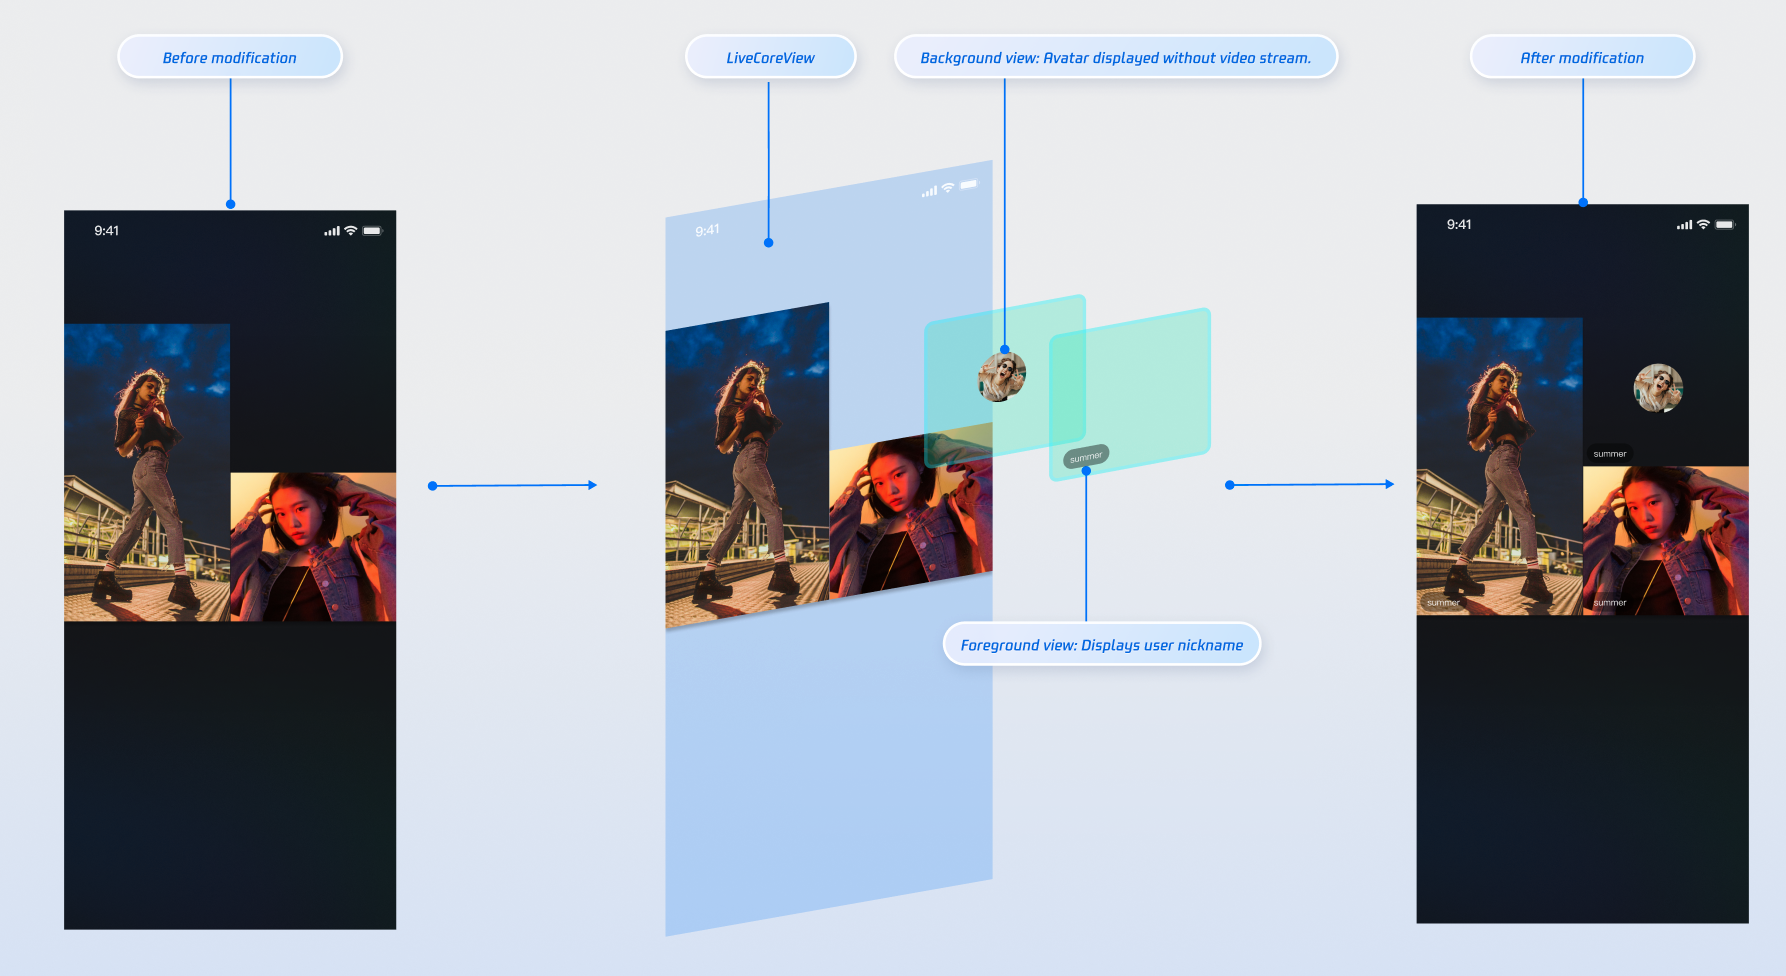
Use the "slot" capability provided by the
LiveCoreView.VideoViewDelegate protocol to add custom views on top of the co-host video stream. For example, display the user's nickname, avatar, or a placeholder image when the camera is off to enhance the visual experience.Displaying Nicknames on Video Streams
Implementation Example
Implementation Steps
Note:
For complete implementation details, refer to the open-source TUILiveKit project files AnchorCoGuestView.swift and AnchorEmptySeatView.swift.
Step 1: Create the foreground view
CustomSeatView to display user info above the video stream.import UIKit// Custom floating user info view (foreground)class CustomSeatView: UIView {lazy var nameLabel: UILabel = {let label = UILabel()label.textColor = .whitelabel.font = .systemFont(ofSize: 14)return label}()override init(frame: CGRect) {super.init(frame: frame)backgroundColor = UIColor.black.withAlphaComponent(0.5)addSubview(nameLabel)nameLabel.snp.makeConstraints { make inmake.bottom.equalToSuperview().offset(-5)make.leading.equalToSuperview().offset(5)}}}
Step 2: Create the background view
CustomAvatarView to serve as a placeholder when the user has no video stream.import UIKit// Custom avatar placeholder view (background)class CustomAvatarView: UIView {lazy var avatarImageView: UIImageView = {let imageView = UIImageView()imageView.tintColor = .grayreturn imageView}()override init(frame: CGRect) {super.init(frame: frame)backgroundColor = .clearlayer.cornerRadius = 30addSubview(avatarImageView)avatarImageView.snp.makeConstraints { make inmake.center.equalToSuperview()make.width.height.equalTo(60)}}}
Step 3: Implement the
VideoViewDelegate.createCoGuestView protocol method, returning the appropriate view based on the viewLayer value.import AtomicXCore// 1. In your view controller, conform to the VideoViewDelegate protocolclass YourViewController: UIViewController, VideoViewDelegate {// ... other code ...// 2. Implement the protocol method to handle both viewLayer typesfunc createCoGuestView(seatInfo: TUISeatFullInfo, viewLayer: ViewLayer) -> UIView? {guard let userId = seatInfo.userID, !userId.isEmpty else {return nil}if viewLayer == .foreground {// When the user's camera is on, display the foreground viewlet seatView = CustomSeatView()seatView.nameLabel.text = seatInfo.userNamereturn seatView} else { // viewLayer == .background// When the user's camera is off, display the background viewlet avatarView = CustomAvatarView()// Load the user's avatar here using seatInfo.userAvatar if availablereturn avatarView}}}
Parameter Description:
Parameter | Type | Description |
seatInfo | SeatFullInfo? | Seat information object, containing detailed information about the user on the seat |
seatInfo.userId | String | ID of the user on the seat |
seatInfo.userName | String | Nickname of the user on the seat |
seatInfo.userAvatar | String | Avatar URL of the user on the seat |
seatInfo.userMicrophoneStatus | DeviceStatus | Microphone status of the user on the seat |
seatInfo.userCameraStatus | DeviceStatus | Camera status of the user on the seat |
viewLayer | ViewLayer | View layer enum: - .foreground: Foreground widget view, always displayed on top of the video- .background: Background widget view, displayed below the foreground view, only shown when the user has no video stream (e.g., camera is off); typically used for the user's avatar or a placeholder image |
API Documentation
For detailed information on all public interfaces, properties, and methods of CoGuestStore and related classes, refer to the official API documentation included with the AtomicXCore framework. The relevant stores used in this guide include:
Store/Component | Function Description | API Documentation |
LiveCoreView | Core view component for live video stream display and interaction. Handles video rendering and widget management, supporting host streaming, audience co-hosting, host connections, and more. | |
DeviceStore | Audio and video device control: microphone (on/off, volume), camera (on/off, switch, quality), screen sharing, real-time device status monitoring. | |
CoGuestStore | Audience co-hosting management: request/invite/accept/reject co-hosting, permission control (microphone/camera), state synchronization. |
FAQs
How do I manage the lifecycle and events of custom views added via VideoViewDelegate?
LiveCoreView automatically manages the addition and removal of views returned by your adapter methods. You do not need to handle this manually. To support user interactions (such as click events) in your custom view, add the appropriate event listeners when creating the view.What is the purpose of the viewLayer parameter in VideoViewAdapter?
The viewLayer parameter distinguishes between foreground and background widgets:
.foreground: Foreground layer, always displayed on top of the video..background: Background layer, displayed only when the user has no video stream (e.g., camera is off); typically used to show the user's avatar or a placeholder image.Why is my custom view not showing up?
Check adapter settings: Ensure you have called
coreView.videoViewDelegate = self and set the adapter successfully.Check implementation method: Confirm that you have correctly implemented the relevant adapter method (such as
createCoGuestView).Check return value: Make sure your adapter method returns a valid
UIView instance at the appropriate time, not null. Add logs in the adapter method for debugging if needed.
