This guide walks you through implementing the "Make a Call" feature with the AtomicXCore SDK. You'll use three core building blocks—DeviceStore, CallStore, and the main UI component CallCoreView—to build a complete calling experience.
Core Features
AtomicXCore offers three essential modules for building multi-party Audio/Video Call scenarios:
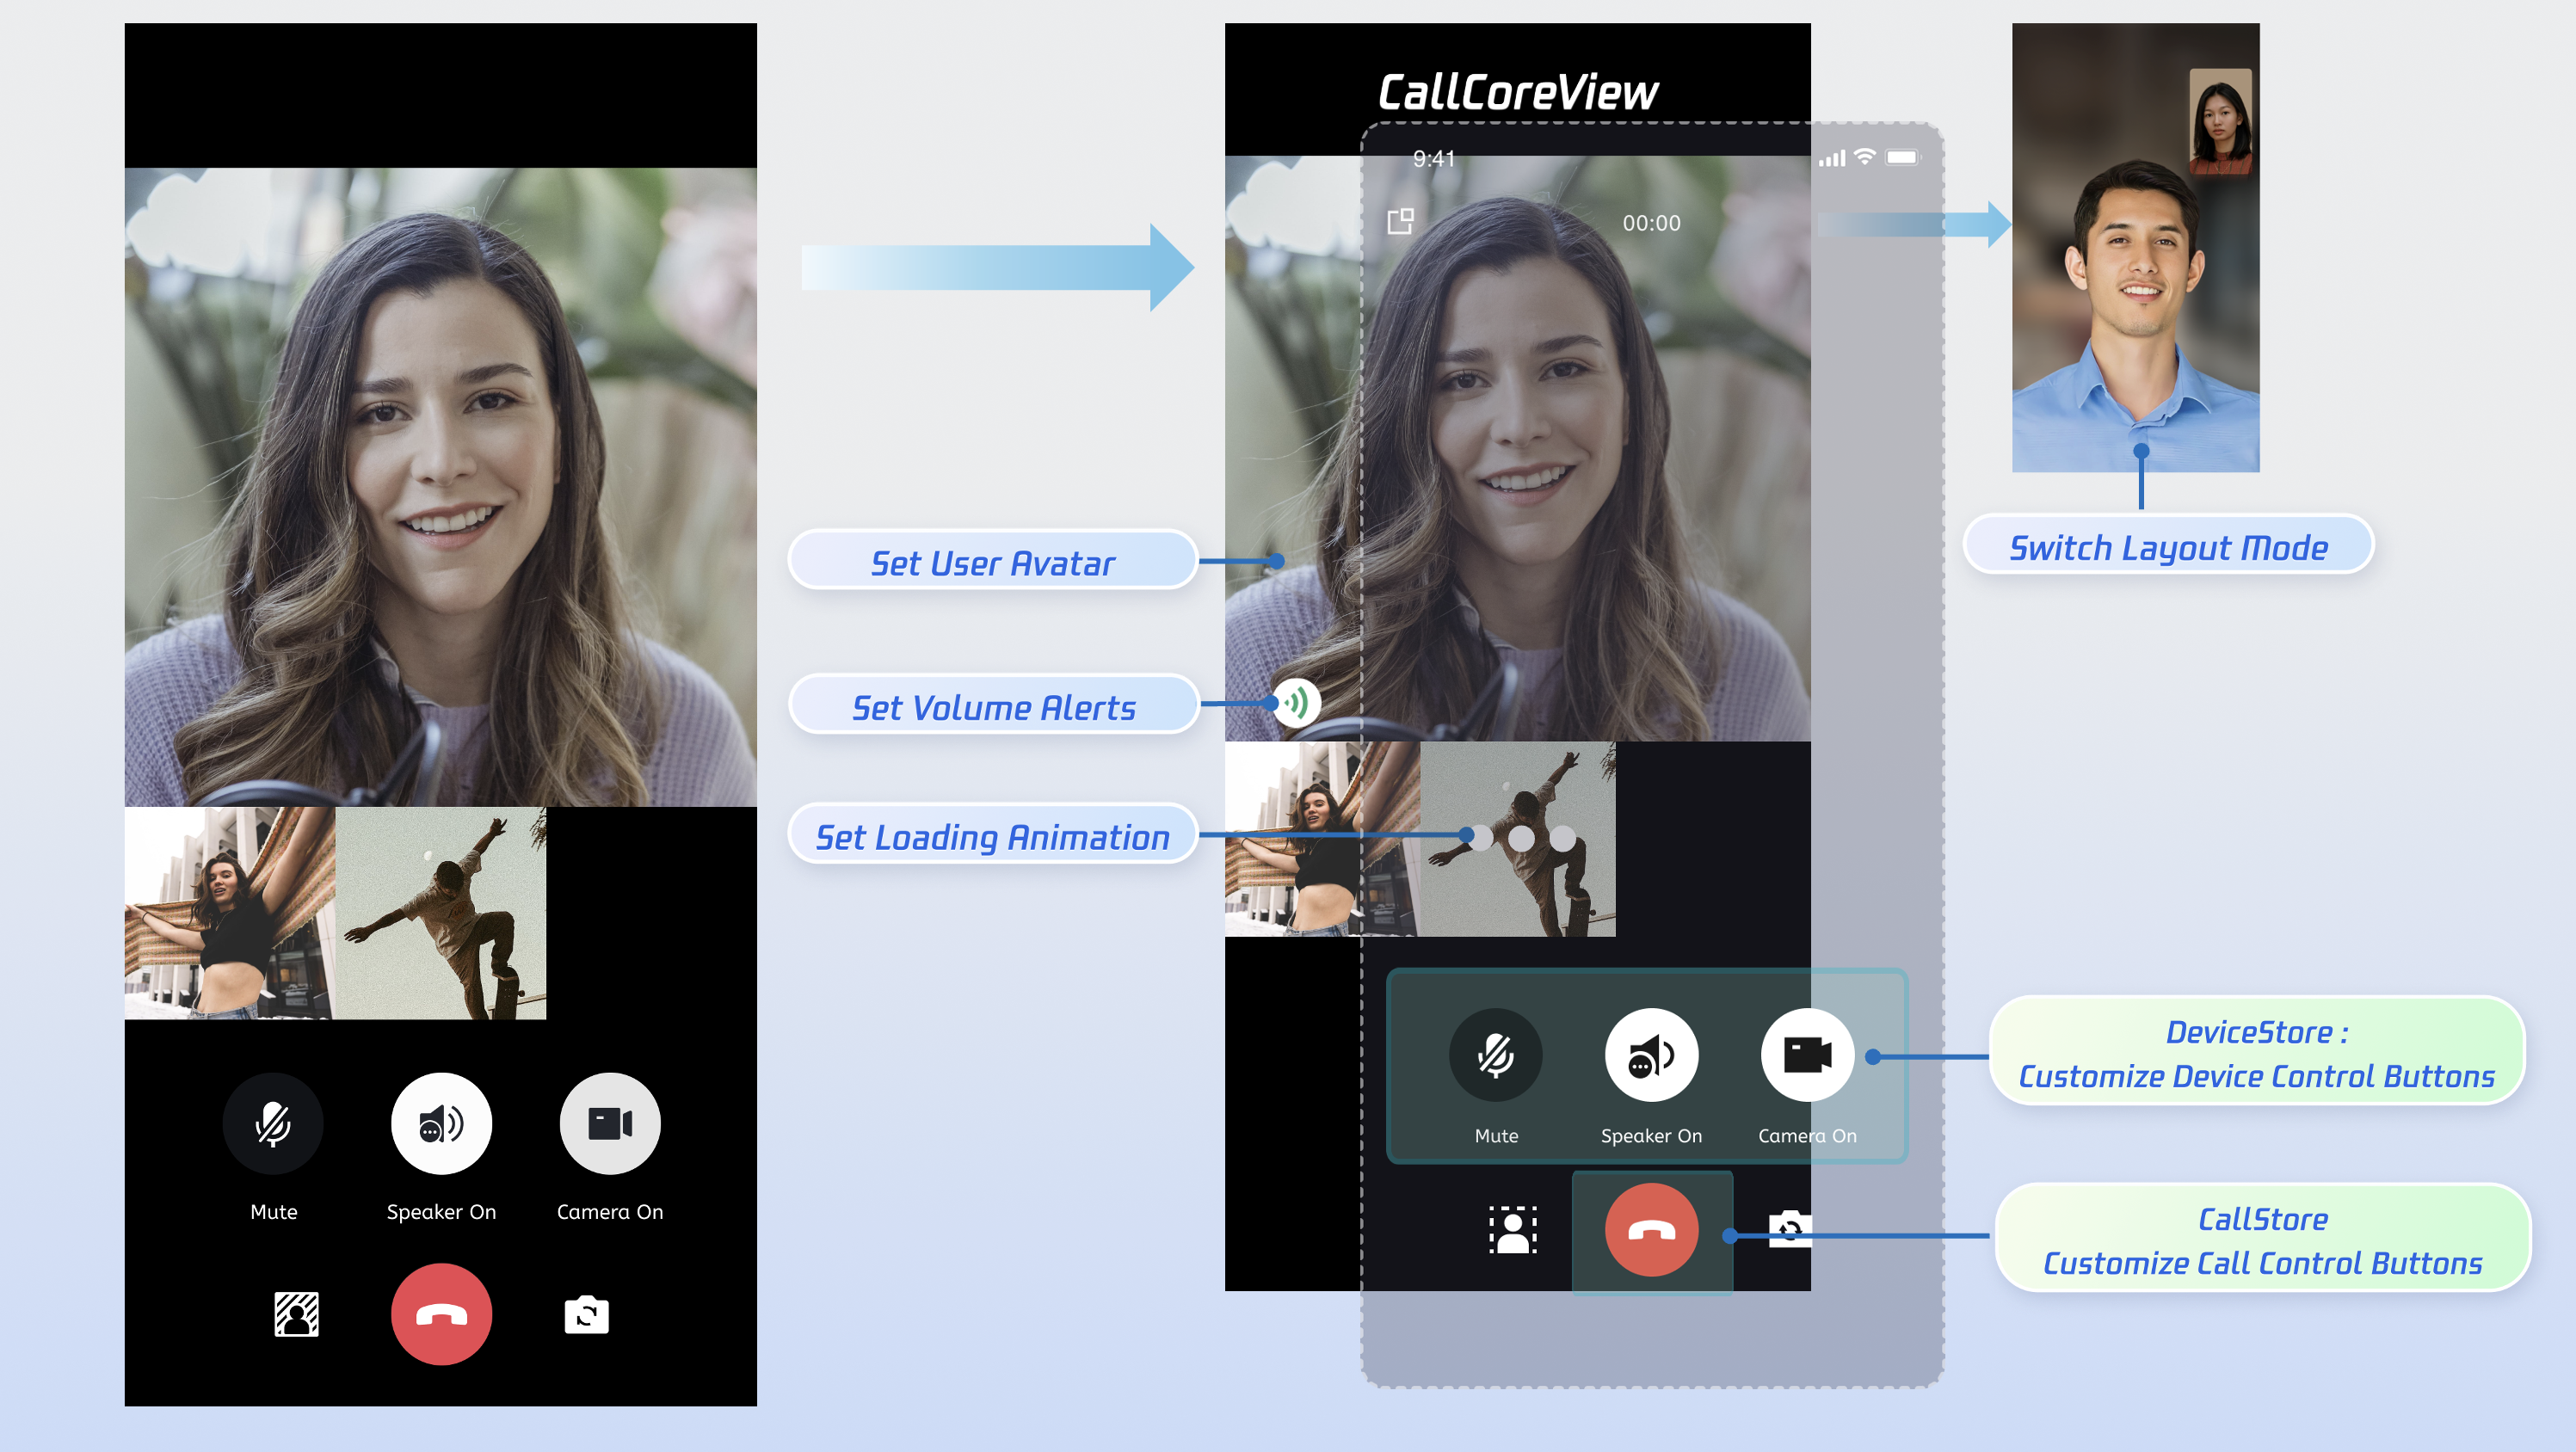
The main call UI component. It observes CallStore data and handles video rendering automatically, and supports customization of layout, avatars, and icons.
Manages the call lifecycle (place a call, answer, reject, hang up) and exposes real-time participant audio/video status, call duration, call logs, and more.
Controls audio/video devices: microphone (toggle/volume), camera (toggle/switch/quality), screen sharing, and real-time device status monitoring.
Preparation
Step 1: Activate the Service
Follow the instructions in Activate the service to obtain either a trial or paid edition of the SDK.
Step 2: Integrate the SDK
Add dependencies: Include api "io.trtc.uikit:atomicx-core:latest.release" and api "com.tencent.imsdk:imsdk-plus:8.7.7201" in your build.gradle file, then run Gradle Sync.
dependencies {
api "io.trtc.uikit:atomicx-core:latest.release"
api "com.tencent.imsdk:imsdk-plus:8.7.7201"
// Other dependencies...
}
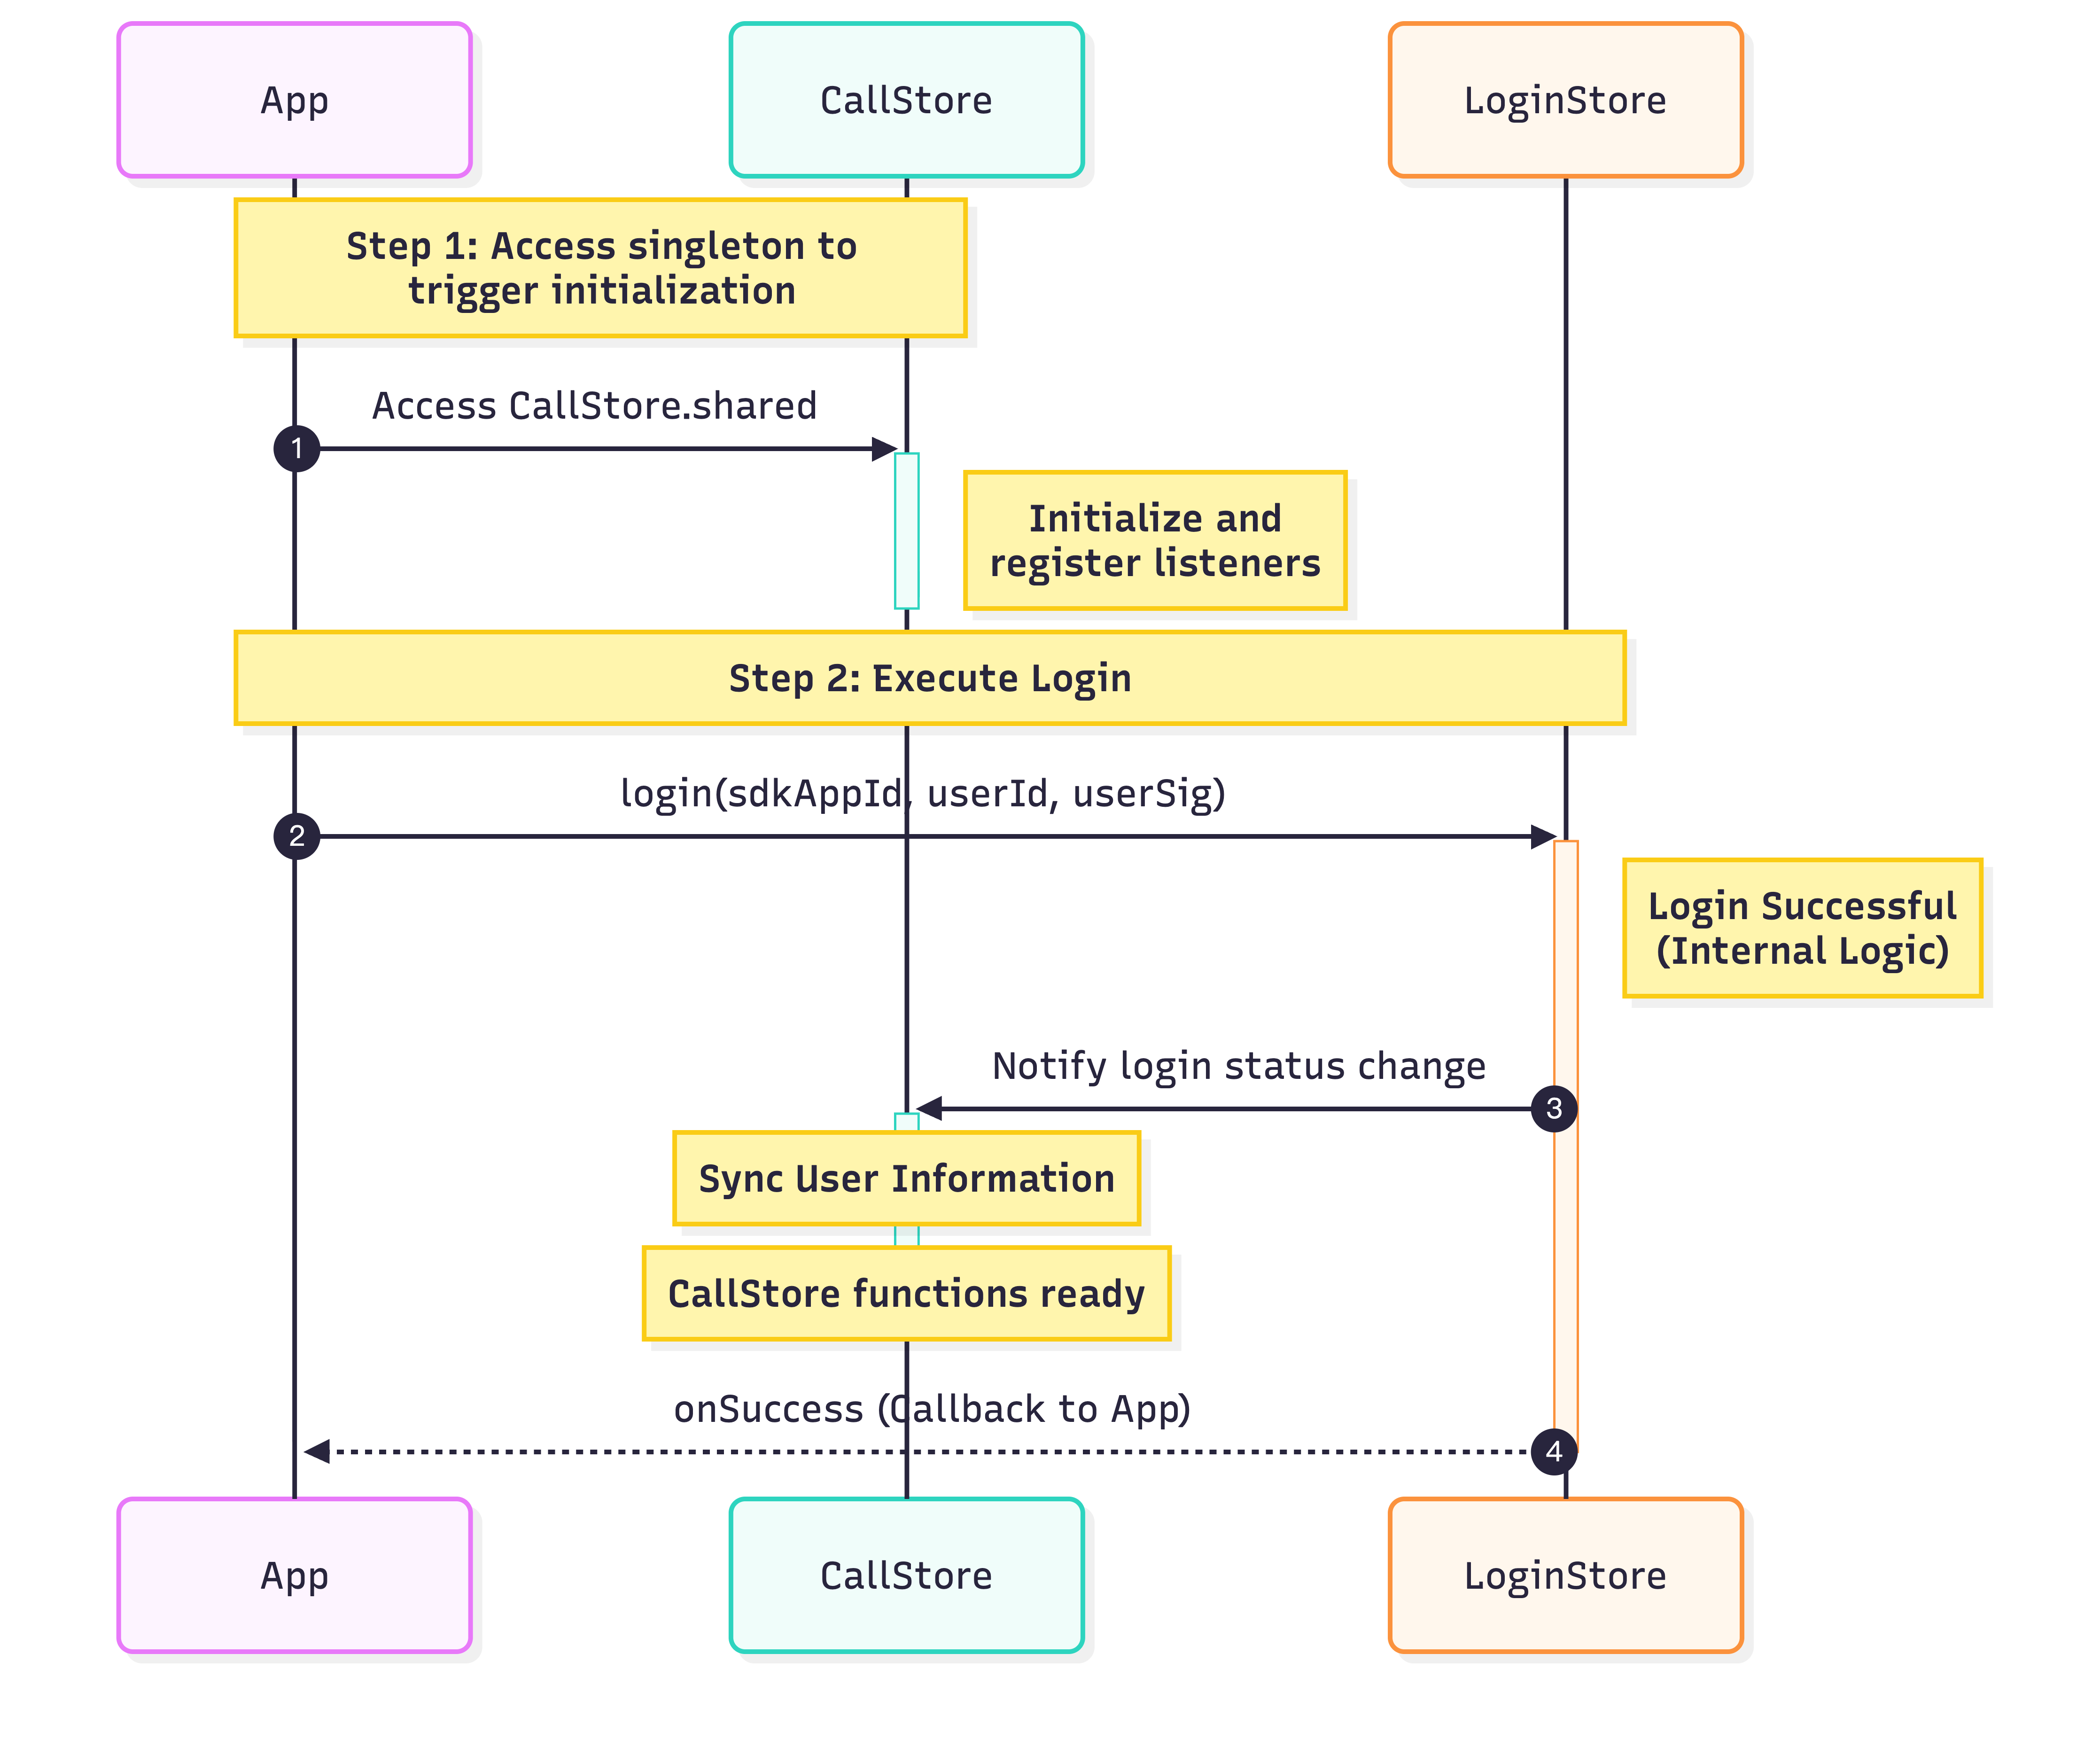
Step 3: Initialize and Log In
To enable calling features, first initialize CallStore, then log in the user. CallStore syncs user info by listening for login success and then enters the ready state. See the flowchart and sample code below:
classMainActivity:ComponentActivity(){
override fun onCreate(savedInstanceState:Bundle?){
super.onCreate(savedInstanceState)
// Initialize CallStore
CallStore.shared
val sdkAppId =1400000001// Replace with your SDKAppID
val userId ="test_001"// Replace with your UserID
val userSig ="xxxxxxxxxxx"// Replace with your UserSig
Unique identifier for the current user. Only letters, numbers, hyphens, and underscores are allowed. Avoid simple IDs like 1 or 123 to prevent multi-device login conflicts.
sdkAppId
int
Obtain from the console; typically a 10-digit integer starting with 140 or 160.
You must log in before making a call. The following steps show how to make a call.
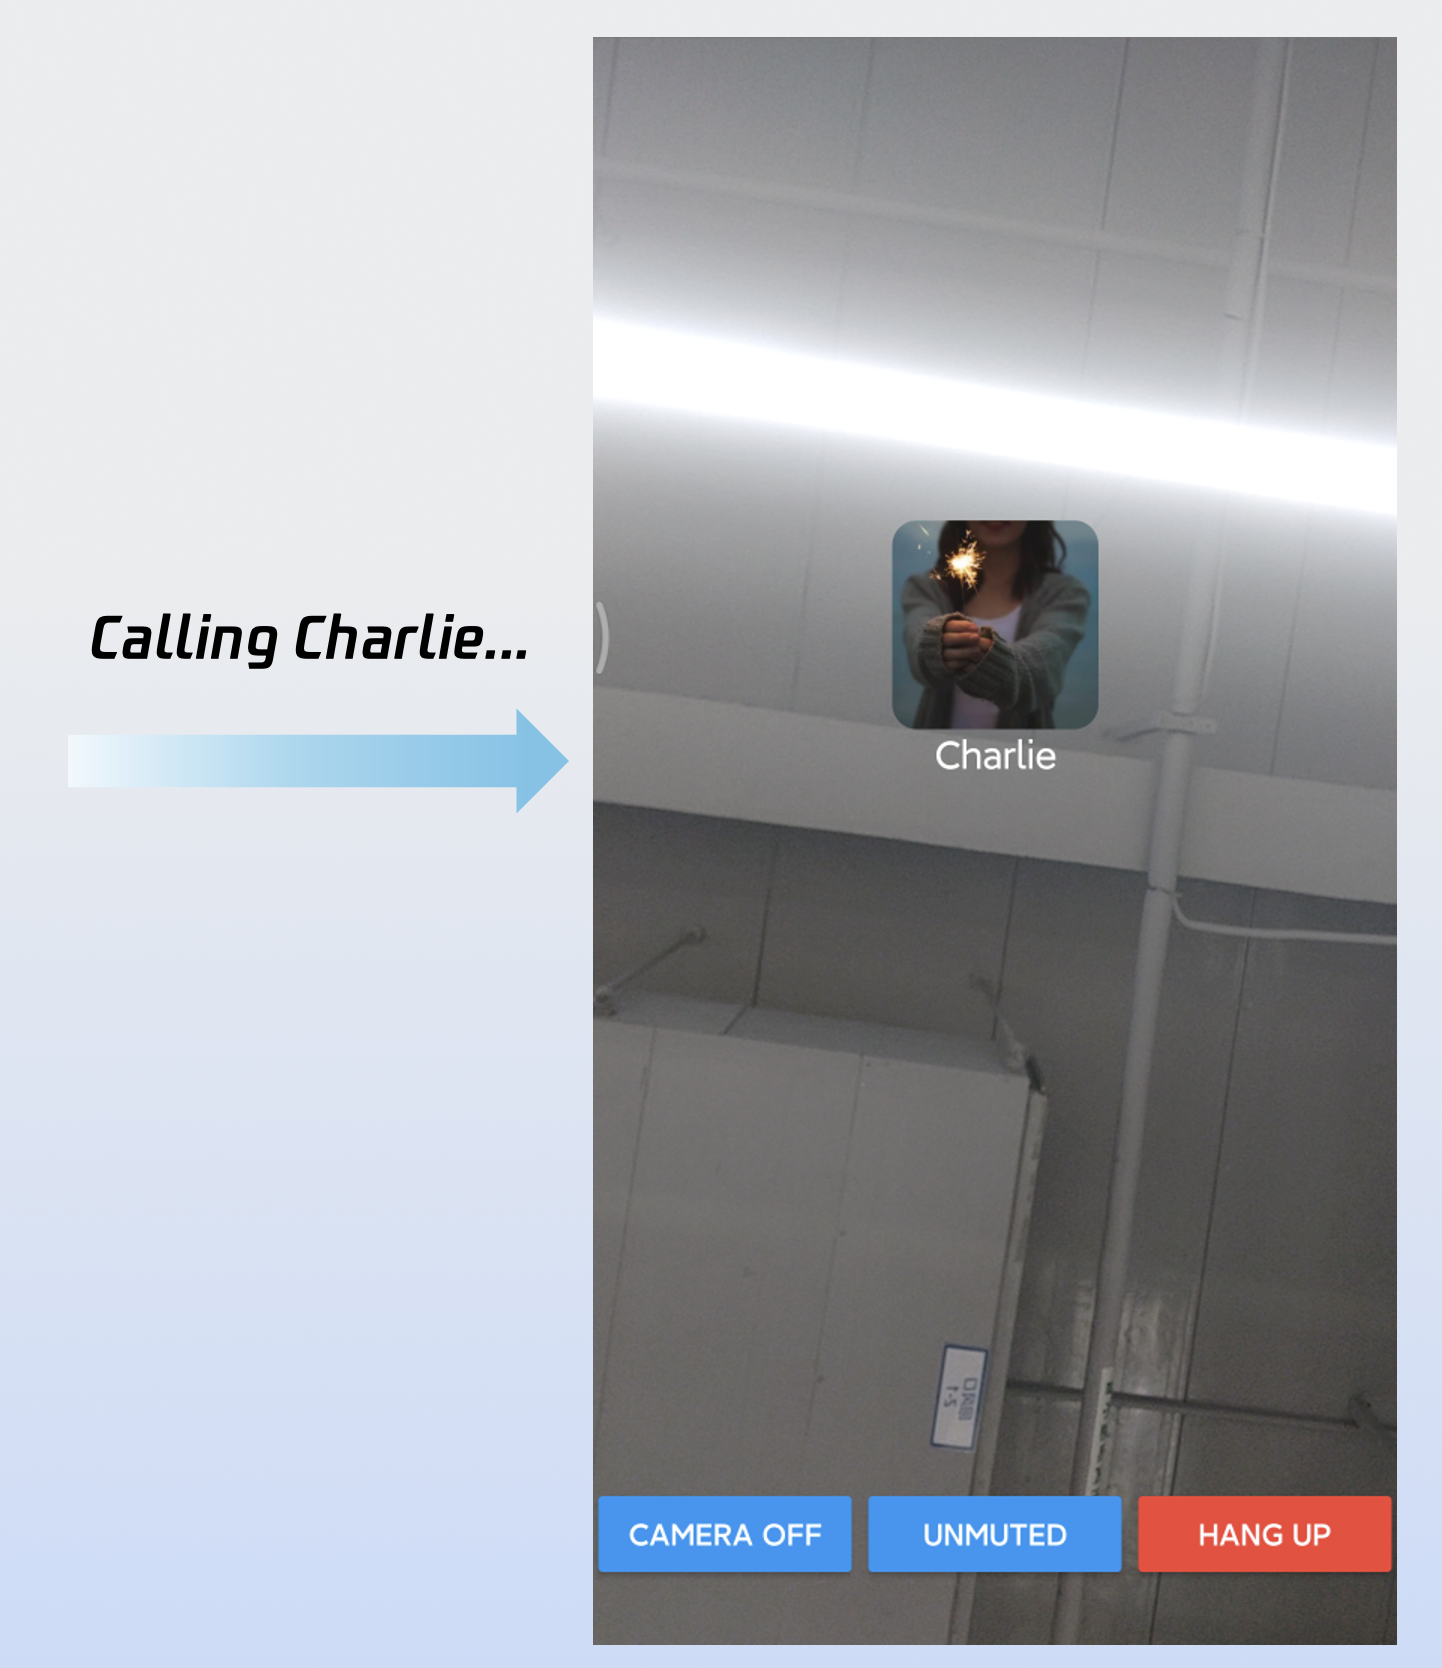
Step 1: Create Call Interface
Set up a dedicated call screen that appears when a call is initiated:
1. Create the call screen: Implement a new Activity to host the call UI and handle navigation when a call is received.
2. Attach CallCoreView: This core view component observes CallStore data and renders the call UI. It supports layout switching, avatar, and icon customization.
classCallActivity:AppCompatActivity(){
privatevar callCoreView:CallCoreView?=null
// 1. Create call page container
override fun onCreate(savedInstanceState:Bundle?){
super.onCreate(savedInstanceState)
// 2. Attach CallCoreView to the call screen
callCoreView =CallCoreView(this)
setContentView(callCoreView)
}
}
CallCoreView Component Features:
Feature
Description
Reference
Set Layout Mode
Switch between different layout modes. If not specified, layout adapts automatically based on participant count.
Switch Layout Mode
Set Avatar
Customize avatars for specific users via resource path.
Customize Default Avatar
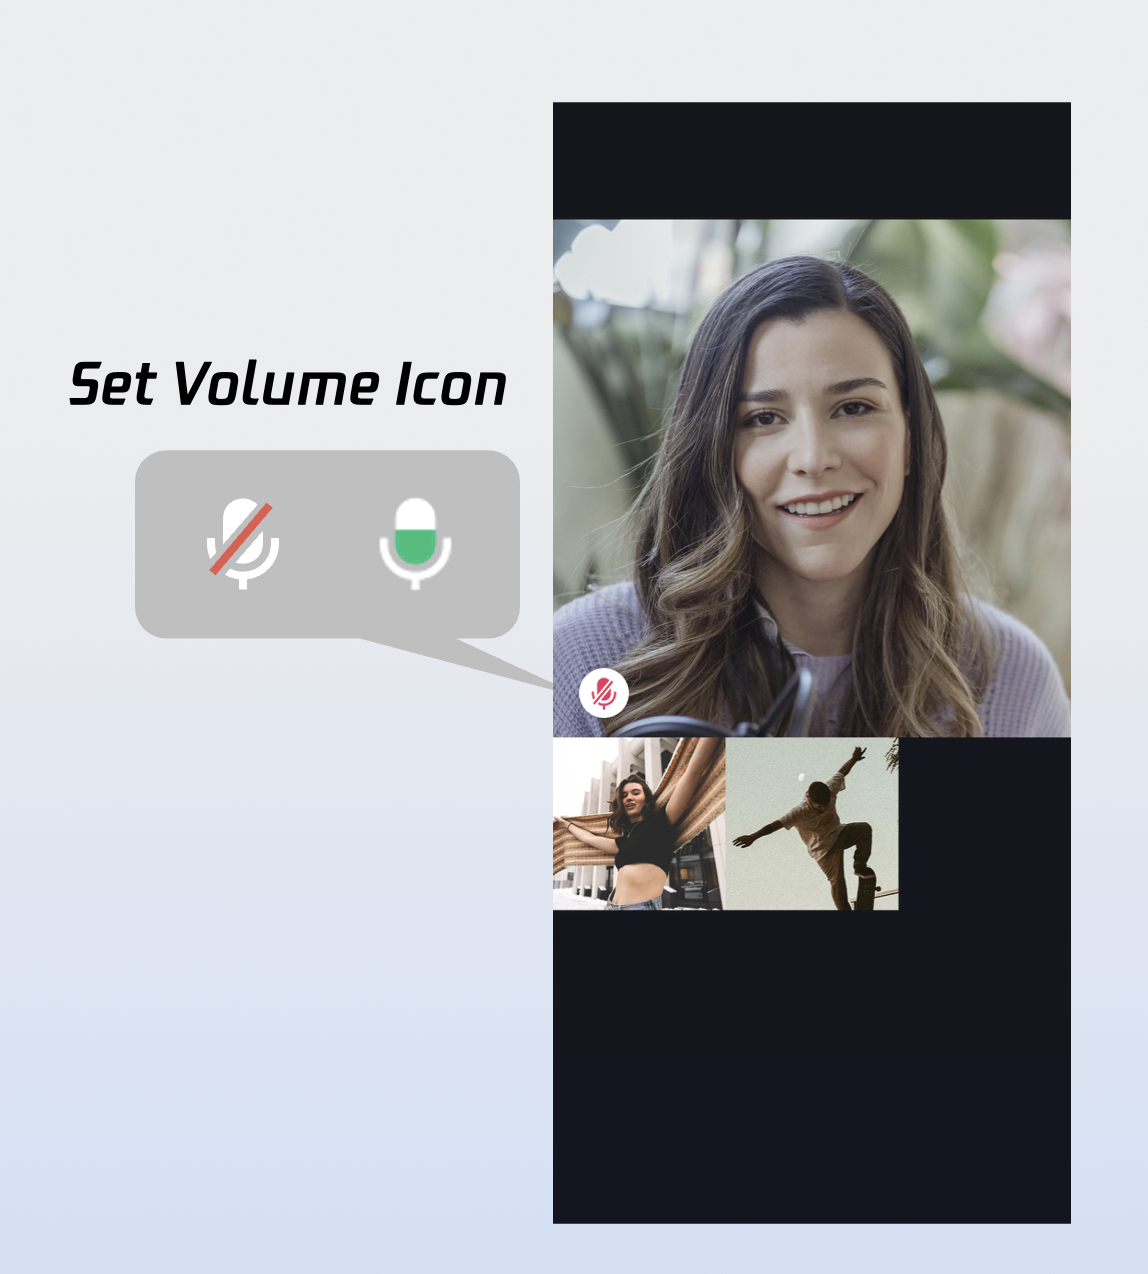
Set Volume Indicator Icon
Personalize volume indicator icons for different volume levels.
Customize Volume Indicator Icon
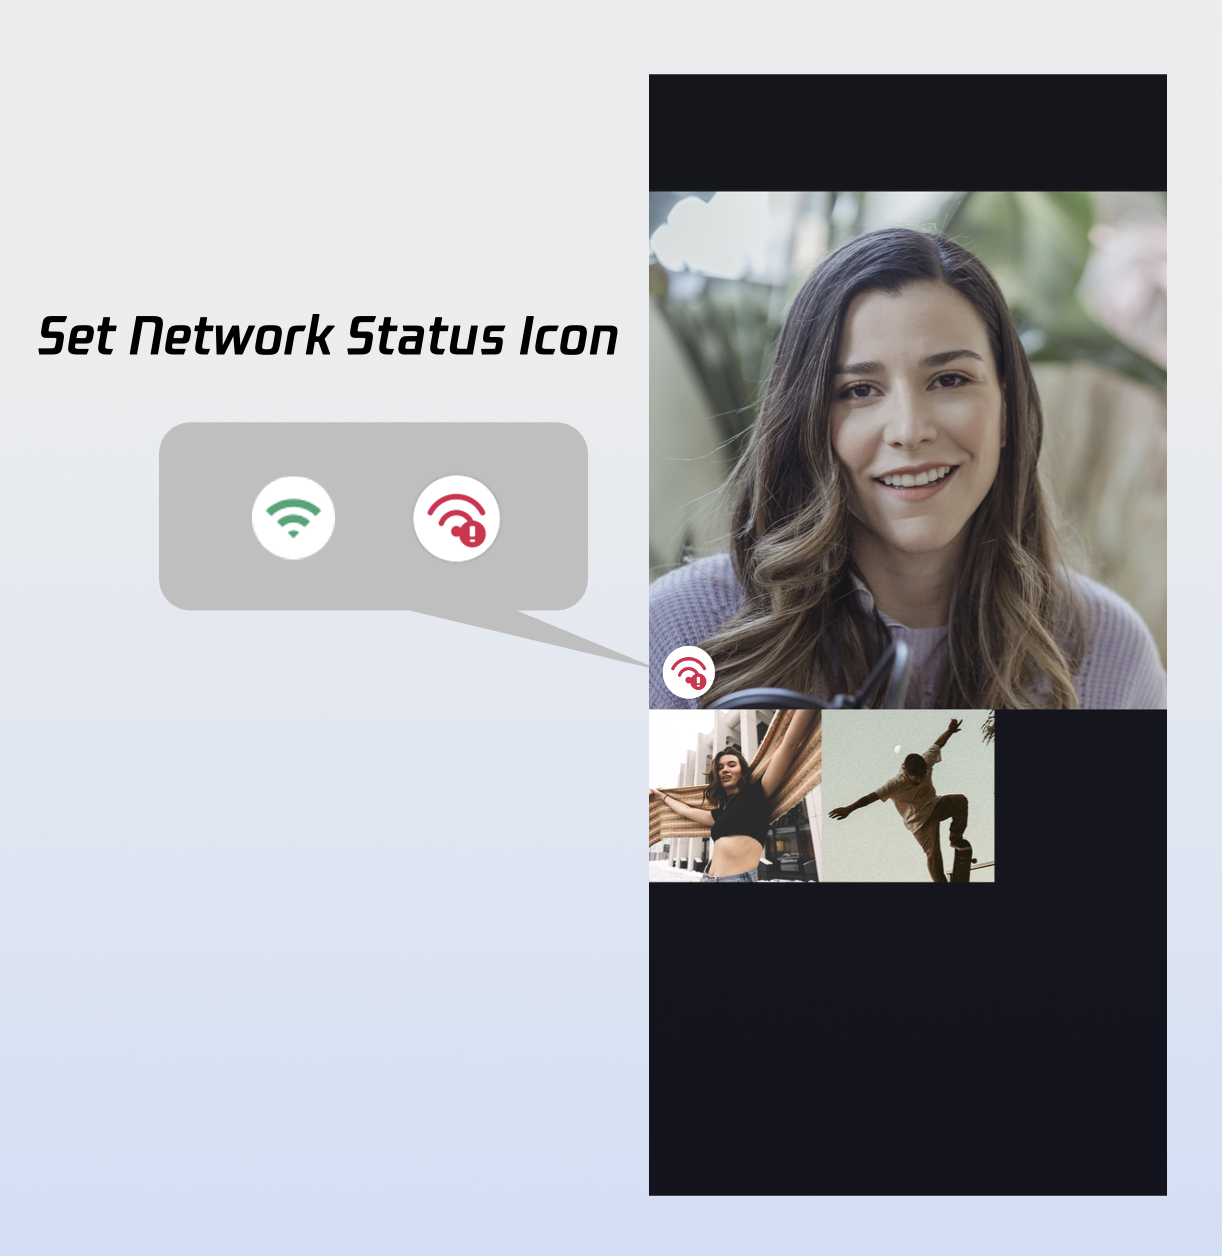
Set Network Indicator Icon
Show network quality status with real-time indicator icons.
Customize Network Indicator Icon
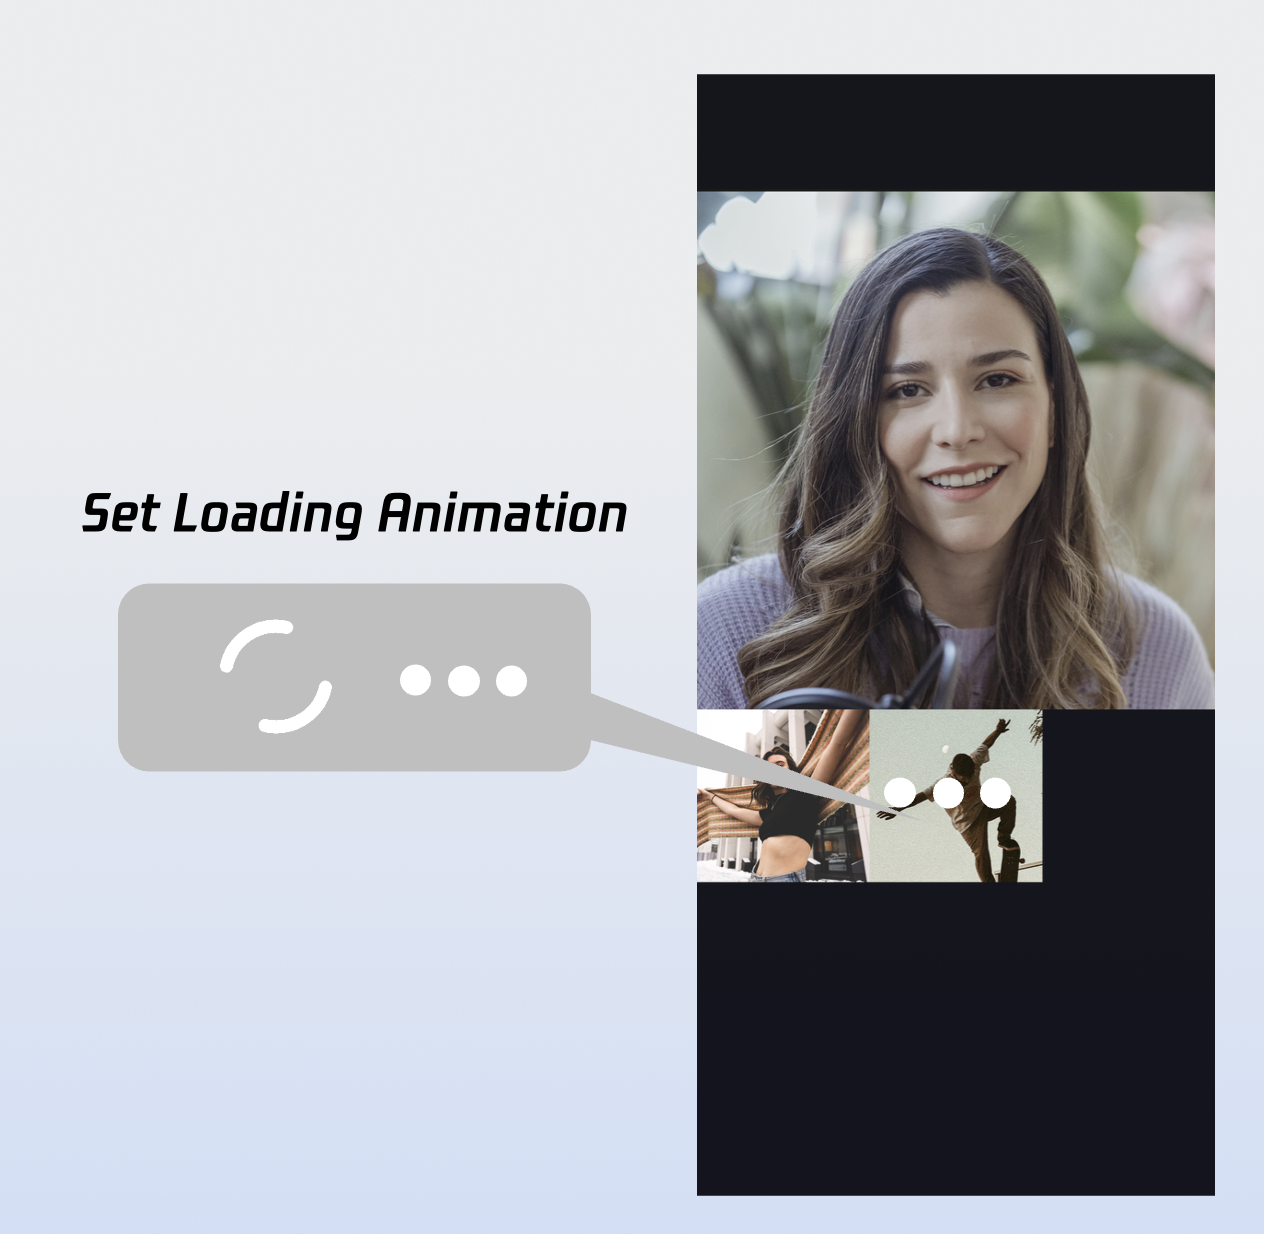
Set Waiting Animation for Users
Display GIF animations for users in the waiting state during multi-party calls.
Customize Loading Animation
Step 2: Add Call Controls
Use the APIs from DeviceStore and CallStore to add and customize call control buttons:
DeviceStore: Microphone (toggle and volume), camera (toggle, switch, quality), and screen sharing. Wire these APIs to your buttons and observe device state to update the UI in real time.
CallStore: Call actions (answer, hang up, reject). Wire these to button clicks and show/hide or enable/disable buttons based on call status.
Icons: You can download button icons from GitHub. They are designed for TUICallKit and free for use.
After the calls API succeeds, navigate to the call screen. For a better experience, enable the microphone (and camera for video calls) automatically based on the media type.
1. Initiate the call: Use the calls API to start a call.
2. Enable media devices: Once the call is initiated, turn on the microphone; for video calls, also enable the camera.
3. Open the call screen: On successful call initiation, launch the call Activity.
Optional call parameters, such as room ID, call invitation timeout, etc.
roomId (String): Room ID, optional. If not specified, the server assigns one.
timeout (Int): Call timeout (seconds).
userData (String): Custom user data.
chatGroupId (String): Chat group ID for group calls.
isEphemeralCall (Boolean): If true, the call is encrypted and not logged.
Step 5: End the Call
Whether the local user hangs up via hangup or the remote party ends the call, the onCallEnded callback is fired. Subscribe to it and finish the call Activity when the call ends.
1. Listen for call end events: Subscribe to the onCallEnded event.
2. Close the call screen: When onCallEnded is triggered, finish the Activity.
OtherDeviceAccepted: Call answered on another device.
OtherDeviceReject: Call rejected on another device.
EndByServer: Call ended by server.
userId
String
ID of the user who triggered the end event.
Result
Once you complete these five steps, your app will look like this:
Customization
CallCoreView supports rich UI customization, including avatars and volume indicators. You can download ready-to-use icons from GitHub to speed up integration; they are designed for TUICallKit and free for commercial use.
Custom Volume Indicator Icons
Use the setVolumeLevelIcons method to assign custom icons for each volume level.
setVolumeLevelIcons Example:
private fun setIconResourcePath(){
val volumeLevelIcons =mapOf(VolumeLevel.Muteto"path/to/icon/resource")
Use setParticipantAvatars to assign avatars to users. We recommend observing the data streams of allParticipants: display custom avatars when available, and fall back to the default avatar if not set or if loading fails.
setParticipantAvatars Example:
private fun setParticipantAvatars(){
val avatars:MutableMap<String, String>=mutableMapOf()
val userId =""// User ID
val avatarPath =""// Path to user's default avatar resource
avatars[userId]= avatarPath
val callCoreView =CallCoreView(context)
callCoreView.setParticipantAvatars(avatars)
}
setParticipantAvatars API Parameters:
Parameter
Type
Required
Description
icons
Map
Yes
Maps user IDs to avatar resources.
Key: User's userID.
Value: Absolute path to the user's avatar resource.
Default Avatar Resource:
Icon
Description
Download Link
Default avatar. Use when a user's avatar is not set or fails to load.
Use setLayoutTemplate to switch between layout modes. If not set, CallCoreView adapts automatically: 1v1 calls use Float mode by default, while multi-party calls use Grid mode. Layout mode descriptions:
Float Mode
Grid Mode
PIP Mode
Layout: Full screen self-view while waiting; after connecting, full screen remote view with self-view as a floating window.
Interaction: Floating window supports drag and click-to-swap with the main view.
Layout: Grid layout for all participants, suitable for 2+ users. Supports click-to-enlarge.
Interaction: Click any participant's view to enlarge.
Layout: 1v1 shows fixed remote view; multi-party uses active speaker strategy with full screen for the current speaker.
Interaction: Waiting state shows self-view; after connecting, call duration is displayed.
Return from PiP: When returning from PiP (full screen), onResume is triggered. Reset the layout based on participant count: use Float for 1v1, Grid for multi-party.
val callCoreView =CallCoreView(context)
override fun onResume(){
super.onResume()
val allParticipants =CallStore.shared.observerState.allParticipants.value
1. Configure permissions and service (AndroidManifest.xml): Starting with Android 9.0 (API 28), you must declare foreground service permissions. Android 14 (API 34) requires explicit service types (microphone and camera).
val manager =getSystemService(NotificationManager::class.java)
manager.createNotificationChannel(channel)
}
}
}
Next Steps
Congratulations! You've completed the "Make a Call" feature. Next, you can implement the Answer the First Call feature. See the table below for details:
Feature
Description
Integration Guide
Answer the First Call
Step-by-step guide to integrating the answer flow, including launching the call UI, and implementing answer and reject controls.
Why does the UI show incorrectly when I open other activities after entering Picture-in-Picture?
Reason: Android's PiP mode is based on the task stack. By default, all Activities share the same task stack. If you launch a new Activity during PiP, it may appear in the PiP window, causing UI issues.
Solution: Declare the call Activity as a separate task stack in AndroidManifest.xml.
<activity
android:name=".view.CallActivity" <!-- Your call interface -->
android:launchMode="singleTask"
android:taskAffinity="${applicationId}.call" />
If the callee comes online before the call invitation times out, do they get the incoming call?
For single calls, if the callee comes online within the timeout, they will receive an incoming call invitation. For group calls, up to 20 unhandled group messages are pulled when coming online within the timeout; if a call invitation exists, the incoming call event is triggered.
Contact Us
If you have any questions or suggestions during the integration or usage process, feel free to join our Telegram technical group or contact us for support.