
Watch Page (Web Desktop Browser)
This article provides a detailed introduction to the watch page in TUILiveKit Demo. You can directly refer to this document to integrate the watch page we developed in your existing project, or you can deeply customize the page style, layout, and functional items according to your needs according to the content in the document.
Function Overview
Functional classification | Specific capabilities |
Live video playback | HD and smooth live streaming experience |
Barrage Interaction | Real-time Barrage chat |
Viewer List | View online viewer information |
Follow Streamer | Follow your favorite streamers with one click |
Full Screen Play | Immersive viewing experience |
Function Display
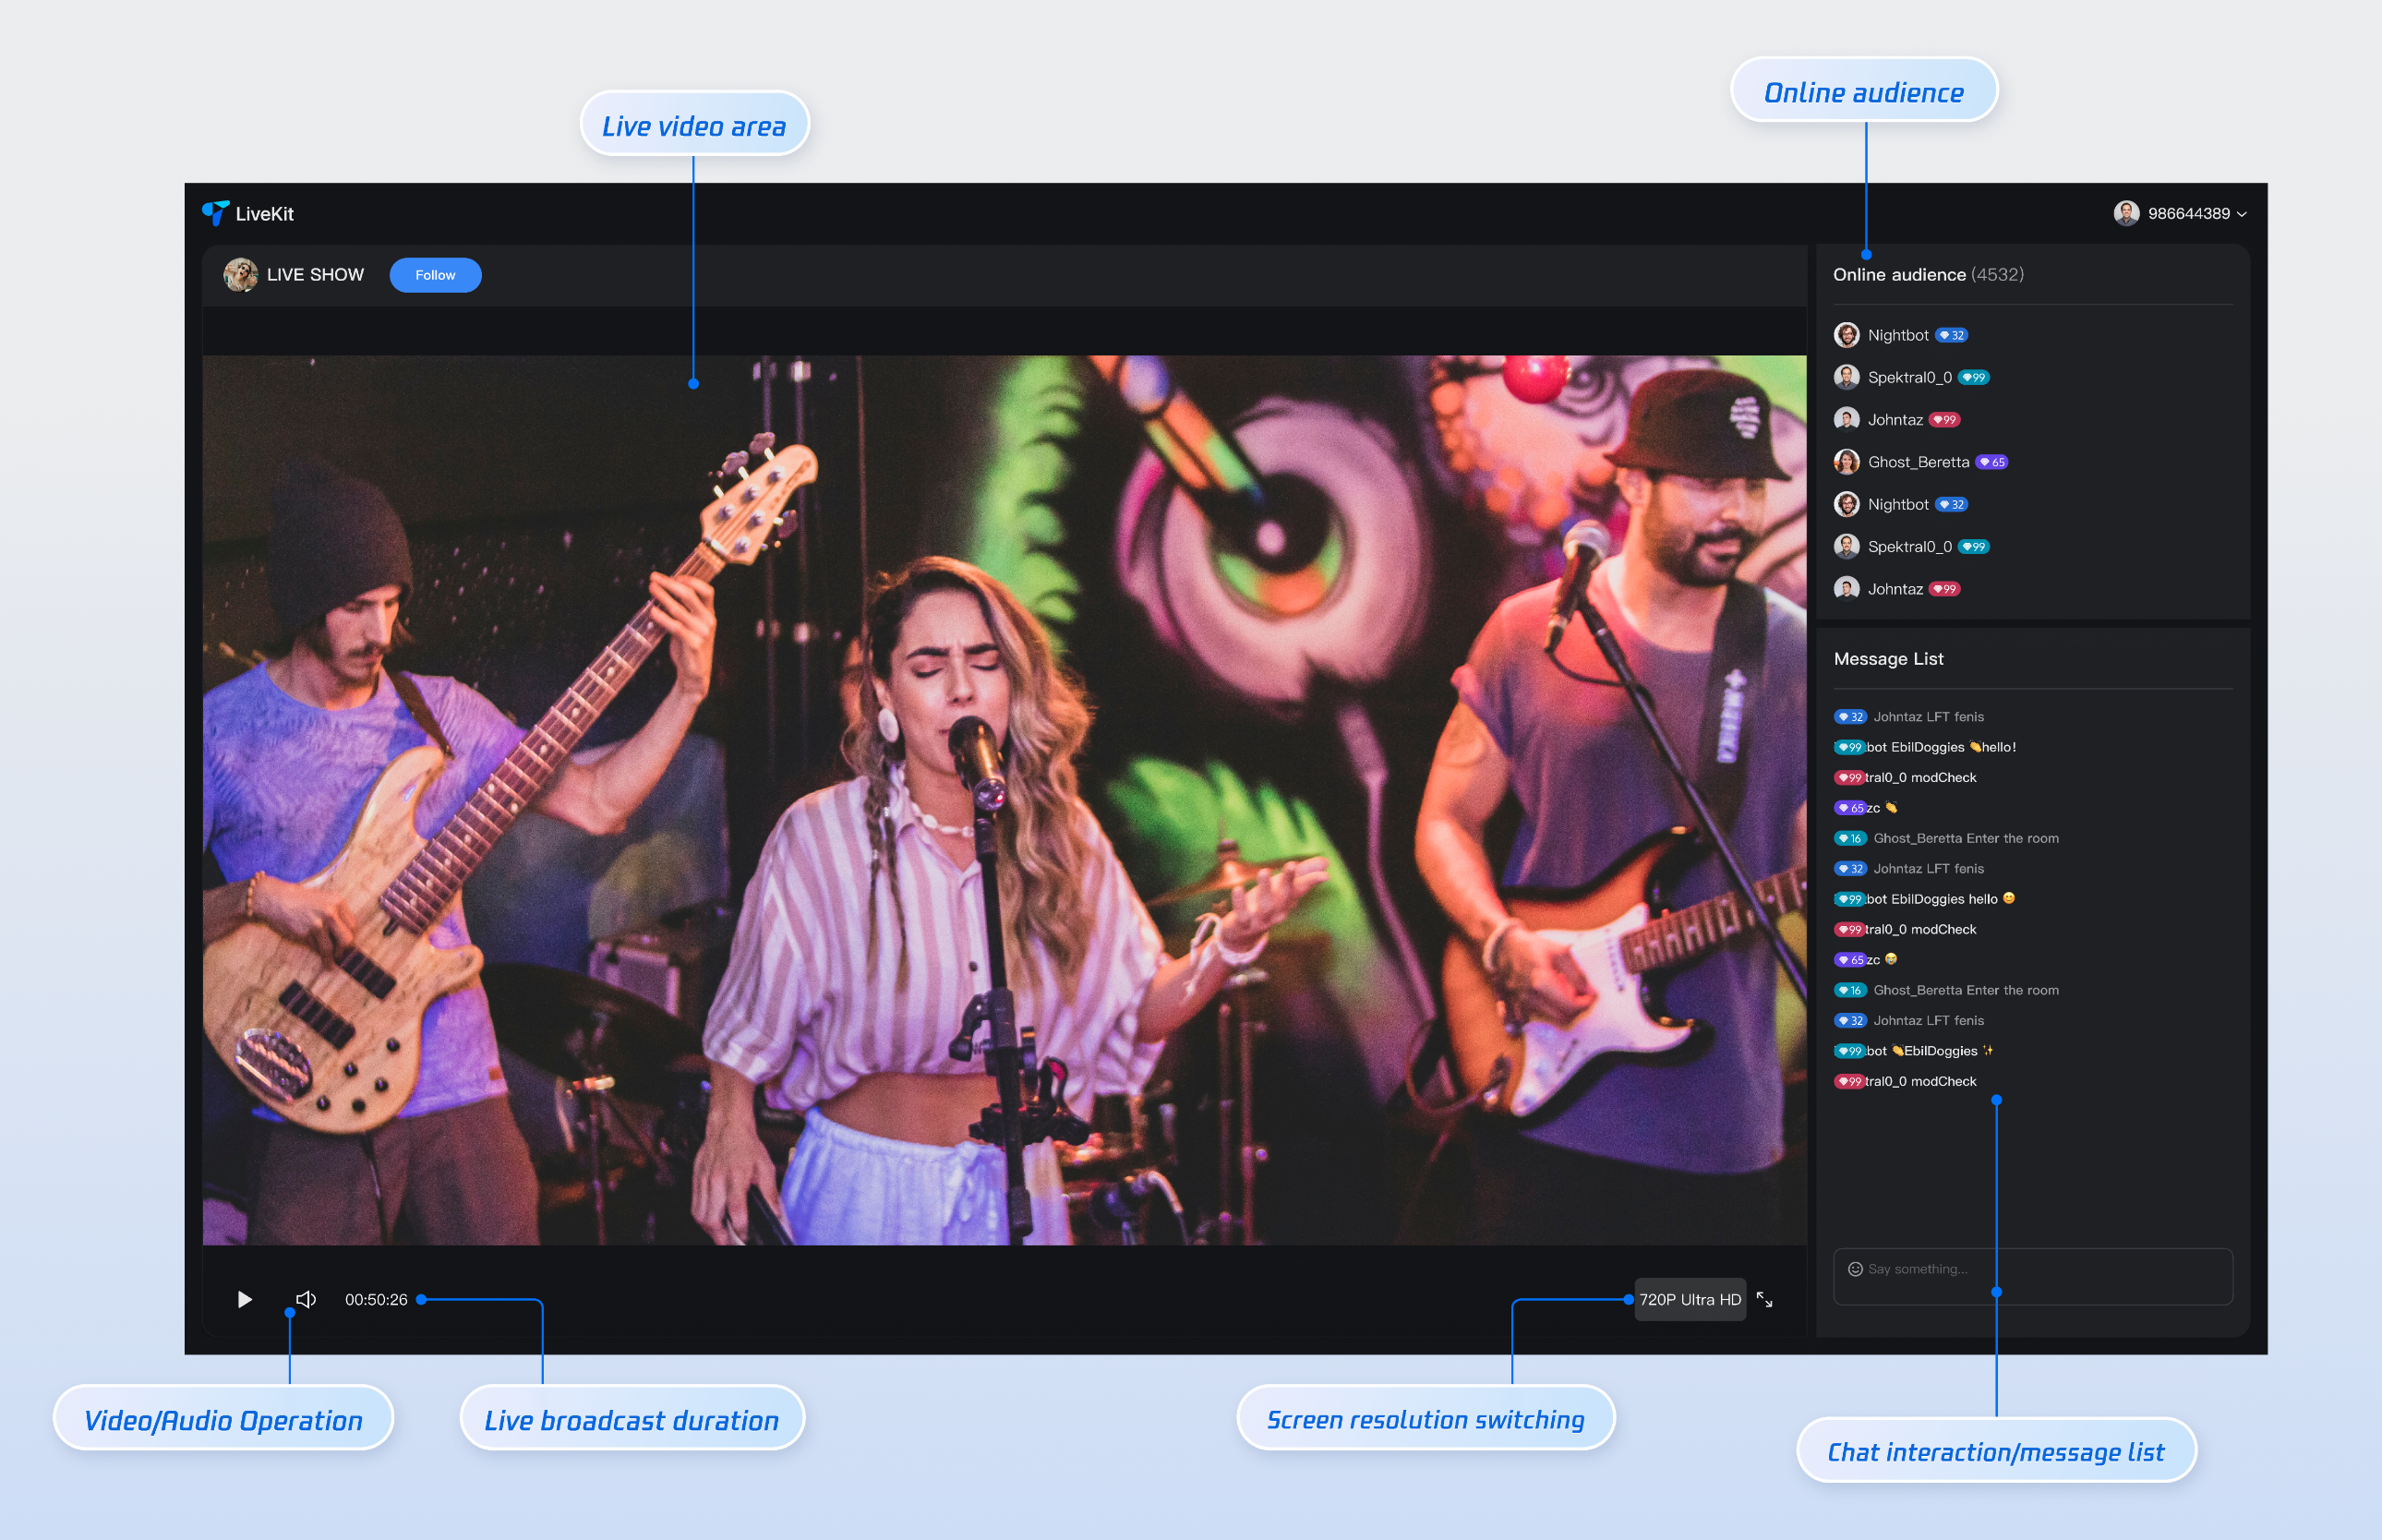
The watch page provides default behavior and style, but if the default behavior and style don't fully meet your needs, you can also customize the UI. The numbers shown in the figure correspond to categories in the specific function list. These mainly include live broadcast information display, video broadcast area, online audience, audio and video operation, live broadcast duration, screen resolution switching, full screen function, chat interaction, message list, etc.
Quick Access
Step 1: Environment Configuration and Service Activation
Before using Quick Access, you need to refer to Preparations configuration requirements and activate the corresponding services.
npm install tuikit-atomicx-vue3 @tencentcloud/uikit-base-component-vue3 --save
pnpm add tuikit-atomicx-vue3 @tencentcloud/uikit-base-component-vue3
yarn add tuikit-atomicx-vue3 @tencentcloud/uikit-base-component-vue3
Step 2: Access the viewing page
Create a live-player.vue file in your project and copy the following code to integrate the watch page into your project.
<template><UIKitProvider language="zh-CN"><div class="container"><!-- Live core area --><section class="live"><header class="header"><IconArrowStrokeBack class="back-btn" size="20" /><Avatar :src="currentLive?.liveOwner.avatarUrl" :size="32" class="avatar" /><span class="user-name">{{ currentLive?.liveOwner.userName || currentLive?.liveOwner.userId }}</span></header><LiveCoreView class="player" /></section><div class="sidebar"><!-- Online viewers list --><section class="audience"><header class="section-header"><h3> online viewers <span>({{ audienceList.length }})</span></h3></header><LiveAudienceList class="list" /></section><!-- Message List & Message List --><section class="barrage"><header class="section-header"><h3>MessageList</h3></header><BarrageList class="list" /><BarrageInput class="input" height="48px" /></section></div></div></UIKitProvider></template><script setup lang="ts">import { LiveAudienceList, BarrageList, BarrageInput, useLiveAudienceState, LiveCoreView, useLiveState, Avatar, useLoginState } from 'tuikit-atomicx-vue3';import { UIKitProvider, IconArrowStrokeBack } from '@tencentcloud/uikit-base-component-vue3';const { audienceList } = useLiveAudienceState();const { currentLive } = useLiveState();const { login } = useLoginState();async function initLogin() {try {await login({sdkAppId: 0, // SDKAppId, refer to step 1 to obtainuserId: '', // UserID, refer to step 1 to obtainuserSig: '', // userSig, refer to step 1 to obtain});} catch (error) {console.error('Login Failed:', error);}}onMounted(async () => {await initLogin();});</script><style>:global(body){height:100vh;width:100vw;margin:0;padding:0;overflow:hidden;font-size:15px;line-height:1.6;text-rendering:optimizeLegibility;}:global(*),:global(*::before),:global(*::after){box-sizing:border-box;margin:0;}.container{display:grid;grid-template-columns:70% 30%;height:100vh;width:100vw;gap:16px;padding:16px;background:var(--bg-color-default);box-sizing:border-box;overflow:hidden;}.live{display:flex;flex-direction:column;background:var(--bg-color-operate);border-radius:12px;overflow:hidden;box-shadow:0 2px 8px var(--shadow-color);}.header{display:flex;align-items:center;gap:12px;padding:16px;border-bottom:1px solid var(--stroke-color-primary);}.back-btn{cursor:pointer;color:var(--text-color-tertiary);transition:color 0.2s;}.back-btn:hover{color:var(--text-color-link-hover);}.avatar{border:1px solid var(--uikit-color-white-7);}.user-name{color:var(--text-color-primary);font-weight:500;}.player{flex:1;background:var(--uikit-color-black-1);}.sidebar{display:flex;flex-direction:column;gap:16px;height:100%;overflow:hidden;}.audience{display:flex;flex-direction:column;background:var(--bg-color-operate);border-radius:12px;overflow:hidden;box-shadow:0 2px 8px var(--shadow-color);flex:1;min-height:0;}.barrage{display:flex;flex-direction:column;background:var(--bg-color-operate);border-radius:12px;overflow:hidden;box-shadow:0 2px 8px var(--shadow-color);flex:1;min-height:0;}.section-header{padding:16px;border-bottom:1px solid var(--stroke-color-primary);background:var(--bg-color-operate);}.section-header h3{margin:0;font-size:16px;font-weight:600;color:var(--text-color-primary);}.section-header span{font-weight:400;color:var(--text-color-secondary);font-size:14px;}.list{flex:1;min-height:0;overflow-y:auto;}.input{border-top:1px solid var(--stroke-color-primary);flex-shrink:0;height:48px;}@media (max-width:1200px){.container{grid-template-columns:1fr;grid-template-rows:60% 20% 20%;gap:12px;}.sidebar{gap:12px;}.audience,.barrage{min-height:200px;}}@media (max-width:768px){.container{padding:8px;gap:8px;grid-template-rows:50% 25% 25%;}.header,.section-header{padding:12px;}.sidebar{gap:8px;}}</style>
Step 3: Start the project
npm run dev
Customizable
As shown in the functional diagram above, we also support customizing the UI of the watch page based on your project needs. The following table lists the main customizable features.
Category | Function | Description |
Live information display | Customize the display of the watch page information area | Supports: Show/hide the logo, replace it with your desired logo UI customization, show/hide the follow button, and replace it with your desired button style |
Online viewers | Customize audience information display | Supports: Show/hide audience level Customize audience information font and color UI Replace icon style with your desired style |
MessageList | Custom message barrage area display | Supports: Show/hide chat input area Supports UI customization for chat bubble style, audience level, etc. |
Playing a Live Stream
Method 1: Playing by Specifying a LiveId
If you need to specify a LiveId for playback, you need to add the following code based on the code in step 3 of the Quick Access section above. The reference method is as follows:
//live-player.vueimport { onMounted } from 'vue';import { useLiveState } from 'tuikit-atomicx-vue3';const { joinLive } = useLiveState();onMounted(async () => {// Enter liveId to join the live broadcast room. For the specific meaning of the parameters,// please refer to the preparation work in step 1.await joinLive({ liveId: 'xxx' });});
Method 2: Routing Configuration
Because of the logic involved in redirecting from the live stream list (or homepage) to the live stream room, you'll need to configure Vue Router. Create a new router folder in the project's src directory and create an index.ts file. Then, import and use the router in your main file (e.g., main.ts or index.ts). See the GitHub code examples for more information. For a live stream list, see the Live Stream List documentation.
//src/router/index.tsimport { createRouter, createWebHistory } from 'vue-router';const routes = [{path: '/live-player',component: () => import('../views/live-player.vue'),},// If you need the live broadcast list function, you can add the following route// {// path: '/live-list',// component: () => import('../views/live-list.vue'),// },];const router = createRouter({history: createWebHistory(),routes,});export default router;// src/main.tsimport { createApp } from 'vue';import App from './App.vue';import router from './router';const app = createApp(App);app.use(router);app.mount('#app');
Next Steps
Congratulations! You've successfully integrated the watch page. Next, you can implement content such as the anchor's start page and live broadcast list page. Please refer to the table below:
Function | Description | Integration Guide |
Host Streaming | The complete workflow for a host to start a stream, including pre-stream setup and various in-stream interactions. | |
Live Stream List | Display the live broadcast list interface and functions, including live broadcast list and room information display function |

