
Live Stream List
Feature Preview
This document provides a detailed introduction to the Live Stream List Page in TUILiveKit. You can directly integrate our pre-built live stream list page into your existing project, or deeply customize the page style, layout, and features according to your specific needs.
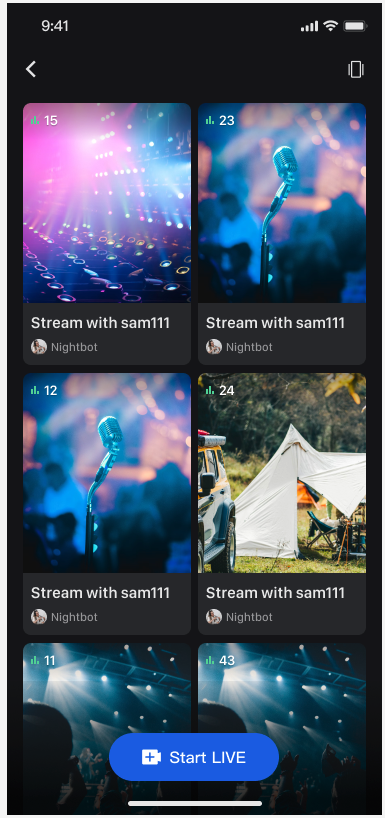
Double-Column Waterfall Flow: Default view, simultaneously displaying previews for 2 live rooms.
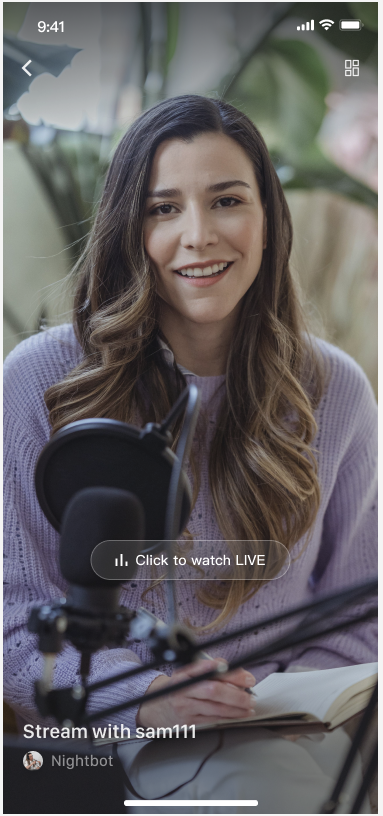
Single-Column Waterfall Flow: Default view, simultaneously displaying a preview for 1 live room.
Double-Column Waterfall Flow | Single-Column Waterfall Flow |
 |
 |
Note:
When previewing live room screens, the preview duration is counted into the viewer's audio/video duration. For detailed billing information, please refer to Pricing.
Quick Start
Step 1. Activate the Service
Step 2. Code Integration
Step 3. Add the Live Stream List Page
The LiveListView component is a dedicated view for displaying the live stream list. It automatically pulls the live room list, supports different display styles (single-column and double-column).
import android.content.Contextimport android.os.Bundleimport androidx.appcompat.app.AppCompatActivityimport com.trtc.uikit.livekit.features.livelist.LiveListViewimport com.trtc.uikit.livekit.features.livelist.Styleclass YourActivity : AppCompatActivity() {override fun onCreate(savedInstanceState: Bundle?) {super.onCreate(savedInstanceState)// 1. Create and initialize waterfall layout viewval view = createLiveListView(this)// 2. Add the created LiveListView to your Activity or FragmentsetContentView(view)}fun createLiveListView(context: Context): LiveListView {val liveListView = LiveListView(context)// This code is a two-column waterfall layout initialization example. If you need to use a single column waterfall layout, change the initialization code to liveListView.init(this, Style.SINGLE_COLUMN)liveListView.init(this, Style.DOUBLE_COLUMN)return liveListView}}
import android.content.Context;import android.os.Bundle;import androidx.appcompat.app.AppCompatActivity;import com.trtc.uikit.livekit.features.livelist.LiveListView;import com.trtc.uikit.livekit.features.livelist.Style;public class YourActivity extends AppCompatActivity {@Overrideprotected void onCreate(Bundle savedInstanceState) {super.onCreate(savedInstanceState);// 1. Create and initialize waterfall layout viewLiveListView view = createLiveListView(this);// 2. Add the created LiveListView to your Activity or FragmentsetContentView(view);}private LiveListView createLiveListView(Context context) {LiveListView liveListView = new LiveListView(context);// This code is a two-column waterfall layout initialization example. If you need to use a single column waterfall layout, change the initialization code to liveListView.init(this, Style.SINGLE_COLUMN, null, null);liveListView.init(this, Style.DOUBLE_COLUMN, null, null);return liveListView;}}
Step 4. Navigate to the Audience Viewing Page
You can customize the page navigation by setting a click listener. For audience viewing page implementation, see Audience Viewing:

Example Code:
fun createLiveListView(context: Context): LiveListView {val liveListView = LiveListView(context)// This code is a two-column waterfall layout initialization example. If you need to use a single column waterfall layout, change the initialization code to liveListView.init(this, Style.SINGLE_COLUMN)liveListView.init(this, Style.DOUBLE_COLUMN)liveListView.setOnItemClickListener { view, liveInfo ->click live list item to redirect to audience viewing pageval intent = Intent(context, YourAudienceActivity::class.java)intent.putExtra("liveId", liveInfo.roomId)context.startActivity(intent)}return liveListView}
private LiveListView createLiveListView(Context context) {LiveListView liveListView = new LiveListView(context);// This code is a two-column waterfall layout initialization example. If you need to use a single column waterfall layout, change the initialization code to liveListView.init(this, Style.SINGLE_COLUMN, null, null);liveListView.init(this, Style.DOUBLE_COLUMN, null, null);liveListView.setOnItemClickListener((view, liveInfo) -> {click live list item to redirect to audience viewing pageIntent intent = new Intent(context, YourAudienceActivity.class);intent.putExtra("liveId", liveInfo.roomId);context.startActivity(intent);});return liveListView;}
Customize Your UI Layout
TUILiveKit provides flexible interfaces to customize the live list waterfall component. You can customize the data source and list item styles according to your business needs.
Customize Data Source
If your backend has a separate live list data, you can customize the data source by implementing the
LiveListDataSource interface instead of using the component's default list data.// 1. Import dependencyimport com.trtc.uikit.livekit.features.livelist.LiveListDataSource;// 2. Customize the data source by implementing LiveListDataSourceval dataSource = object : LiveListDataSource {override fun fetchLiveList(param: FetchLiveListParam,callback: LiveListCallback) {// Connect to your own business backend and return data to the UI component in the following formatval liveInfoList = mutableListOf<TUILiveListManager.LiveInfo>()val liveInfo = TUILiveListManager.LiveInfo().apply {roomInfo = TUIRoomDefine.RoomInfo().apply {roomId = "live_123456"name = "live_123456"}}liveInfoList.add(liveInfo)val cursor = "aabbccdd"callback.onSuccess(cursor, liveInfoList)}}// 3. Import a custom dataSource during initializationliveListView.init(this, Style.DOUBLE_COLUMN, dataSource = dataSource)
// 1. Import dependencyimport com.trtc.uikit.livekit.features.livelist.LiveListDataSource;// 2. Customize the data source by implementing LiveListDataSourceLiveListDataSource dataSource = (param, callback) -> {// Connect to your own business backend and return data to the UI component in the following formatList<TUILiveListManager.LiveInfo> liveInfoList = new ArrayList<>();TUILiveListManager.LiveInfo liveInfo = new TUILiveListManager.LiveInfo();liveInfo.roomInfo = new TUIRoomDefine.RoomInfo();liveInfo.roomInfo.roomId = "live_123456";liveInfo.roomInfo.name = "live_123456";liveInfoList.add(liveInfo);String cursor = "aabbccdd";callback.onSuccess(cursor, liveInfoList);};// 3. Import a custom dataSource during initializationliveListView.init(this, Style.DOUBLE_COLUMN, null, dataSource);
Custom View
The bottom of the waterfall list items displays the video stream or live cover by default. If you need to customize the UI elements at the top of the list items (such as the host's avatar, live title, etc.), you can do so by implementing the
LiveListViewAdapter interface.// 1. Import dependencyimport com.trtc.uikit.livekit.features.livelist.LiveListViewAdapter;// 2. Implement LiveListViewAdapter to customize widgetsval liveListViewAdapter = object : LiveListViewAdapter {override fun createLiveInfoView(liveInfo: TUILiveListManager.LiveInfo): View {// Custom viewval widgetView = YourView(context)widgetView.init(liveInfo)return widgetView}override fun updateLiveInfoView(view: View, liveInfo: TUILiveListManager.LiveInfo) {// Refresh the bound data in the viewval widgetView = view as YourViewwidgetView.updateLiveInfoView(liveInfo)}}// 3. Import a custom liveListViewAdapter during initializationliveListView.init(this, Style.DOUBLE_COLUMN, adapter = liveListViewAdapter)
// 1. Import dependencyimport com.trtc.uikit.livekit.features.livelist.LiveListViewAdapter;// 2. Implement LiveListViewAdapter to customize widgetsLiveListViewAdapter liveListViewAdapter = new LiveListViewAdapter() {@Overridepublic View createLiveInfoView(TUILiveListManager.LiveInfo liveInfo) {// Custom viewCustomView widgetView = new CustomView(context);widgetView.init(liveInfo);return widgetView;}@Overridepublic void updateLiveInfoView(View view, TUILiveListManager.LiveInfo liveInfo) {// Refresh the bound data in the viewCustomView widgetView = (CustomView) view;widgetView.updateLiveInfoView(liveInfo);}};// 3. Import a custom liveListViewAdapter during initializationliveListView.init(this, Style.DOUBLE_COLUMN, liveListViewAdapter, null);
Next Steps
Congratulations! You have successfully integrated the Live Stream List feature. Next, you can implement features such as Host Live Streaming and Audience Viewing. Please refer to the table below:
Feature | Description | Integration Guide |
Host Streaming | The complete workflow for a host to start a stream, including pre-stream setup and various in-stream interactions. | |
Audience Viewing | Audience can watch live streaming after entering the anchor's live streaming room, with features like audience mic connection, live room information, online audience, and bullet screen display. |
FAQs
What should I do if the page shows no live streams after integrating the live list feature?
If you see a blank page, you need to check if you have completed the Complete Login. To test this feature, you can use two devices: one device to start a broadcast, and the other on the live list page to pull the list of ongoing live streams.
What is the difference between single-column and double-column waterfall flows?
A single-column waterfall flow previews one live room at a time, while a double-column waterfall flow previews two live rooms simultaneously. You can choose the appropriate layout based on your design requirements.
Is there a charge for previewing live streams?
Yes, the duration of previewing a live room is counted towards the audience's audio/video duration, which is a paid service. For detailed

