This guide walks you through implementing the "answer call" feature using the AtomicXCore SDK, leveraging its DeviceStore, CallStore, and the core UI component CallCoreView.
Core Features
To build multi-party audio/video call features with AtomicXCore, you’ll use the following core modules:
Core call view component. Automatically observes CallStore data and renders video, while supporting UI customization such as layout switching, avatar and icon configuration.
Manages the call lifecycle: initiate, answer, reject, hang up. Provides real-time access to participant audio/video status, call timer, call records, and more.
Controls audio/video devices: microphone (toggle/volume), camera (toggle/switch/quality), screen sharing, and real-time device status monitoring.
Getting Started
Step 1: Activate the Service
Go to Activate the Service to obtain either the trial or paid version of the SDK.
Step 2: Integrate the SDK
Install Components: Add api "io.trtc.uikit:atomicx-core:latest.release" and api "com.tencent.imsdk:imsdk-plus:8.7.7201" to your build.gradle file, then run Gradle Sync.
dependencies {
api 'io.trtc.uikit:atomicx-core:latest.release'
api "com.tencent.imsdk:imsdk-plus:8.7.7201"
// other dependencies...
}
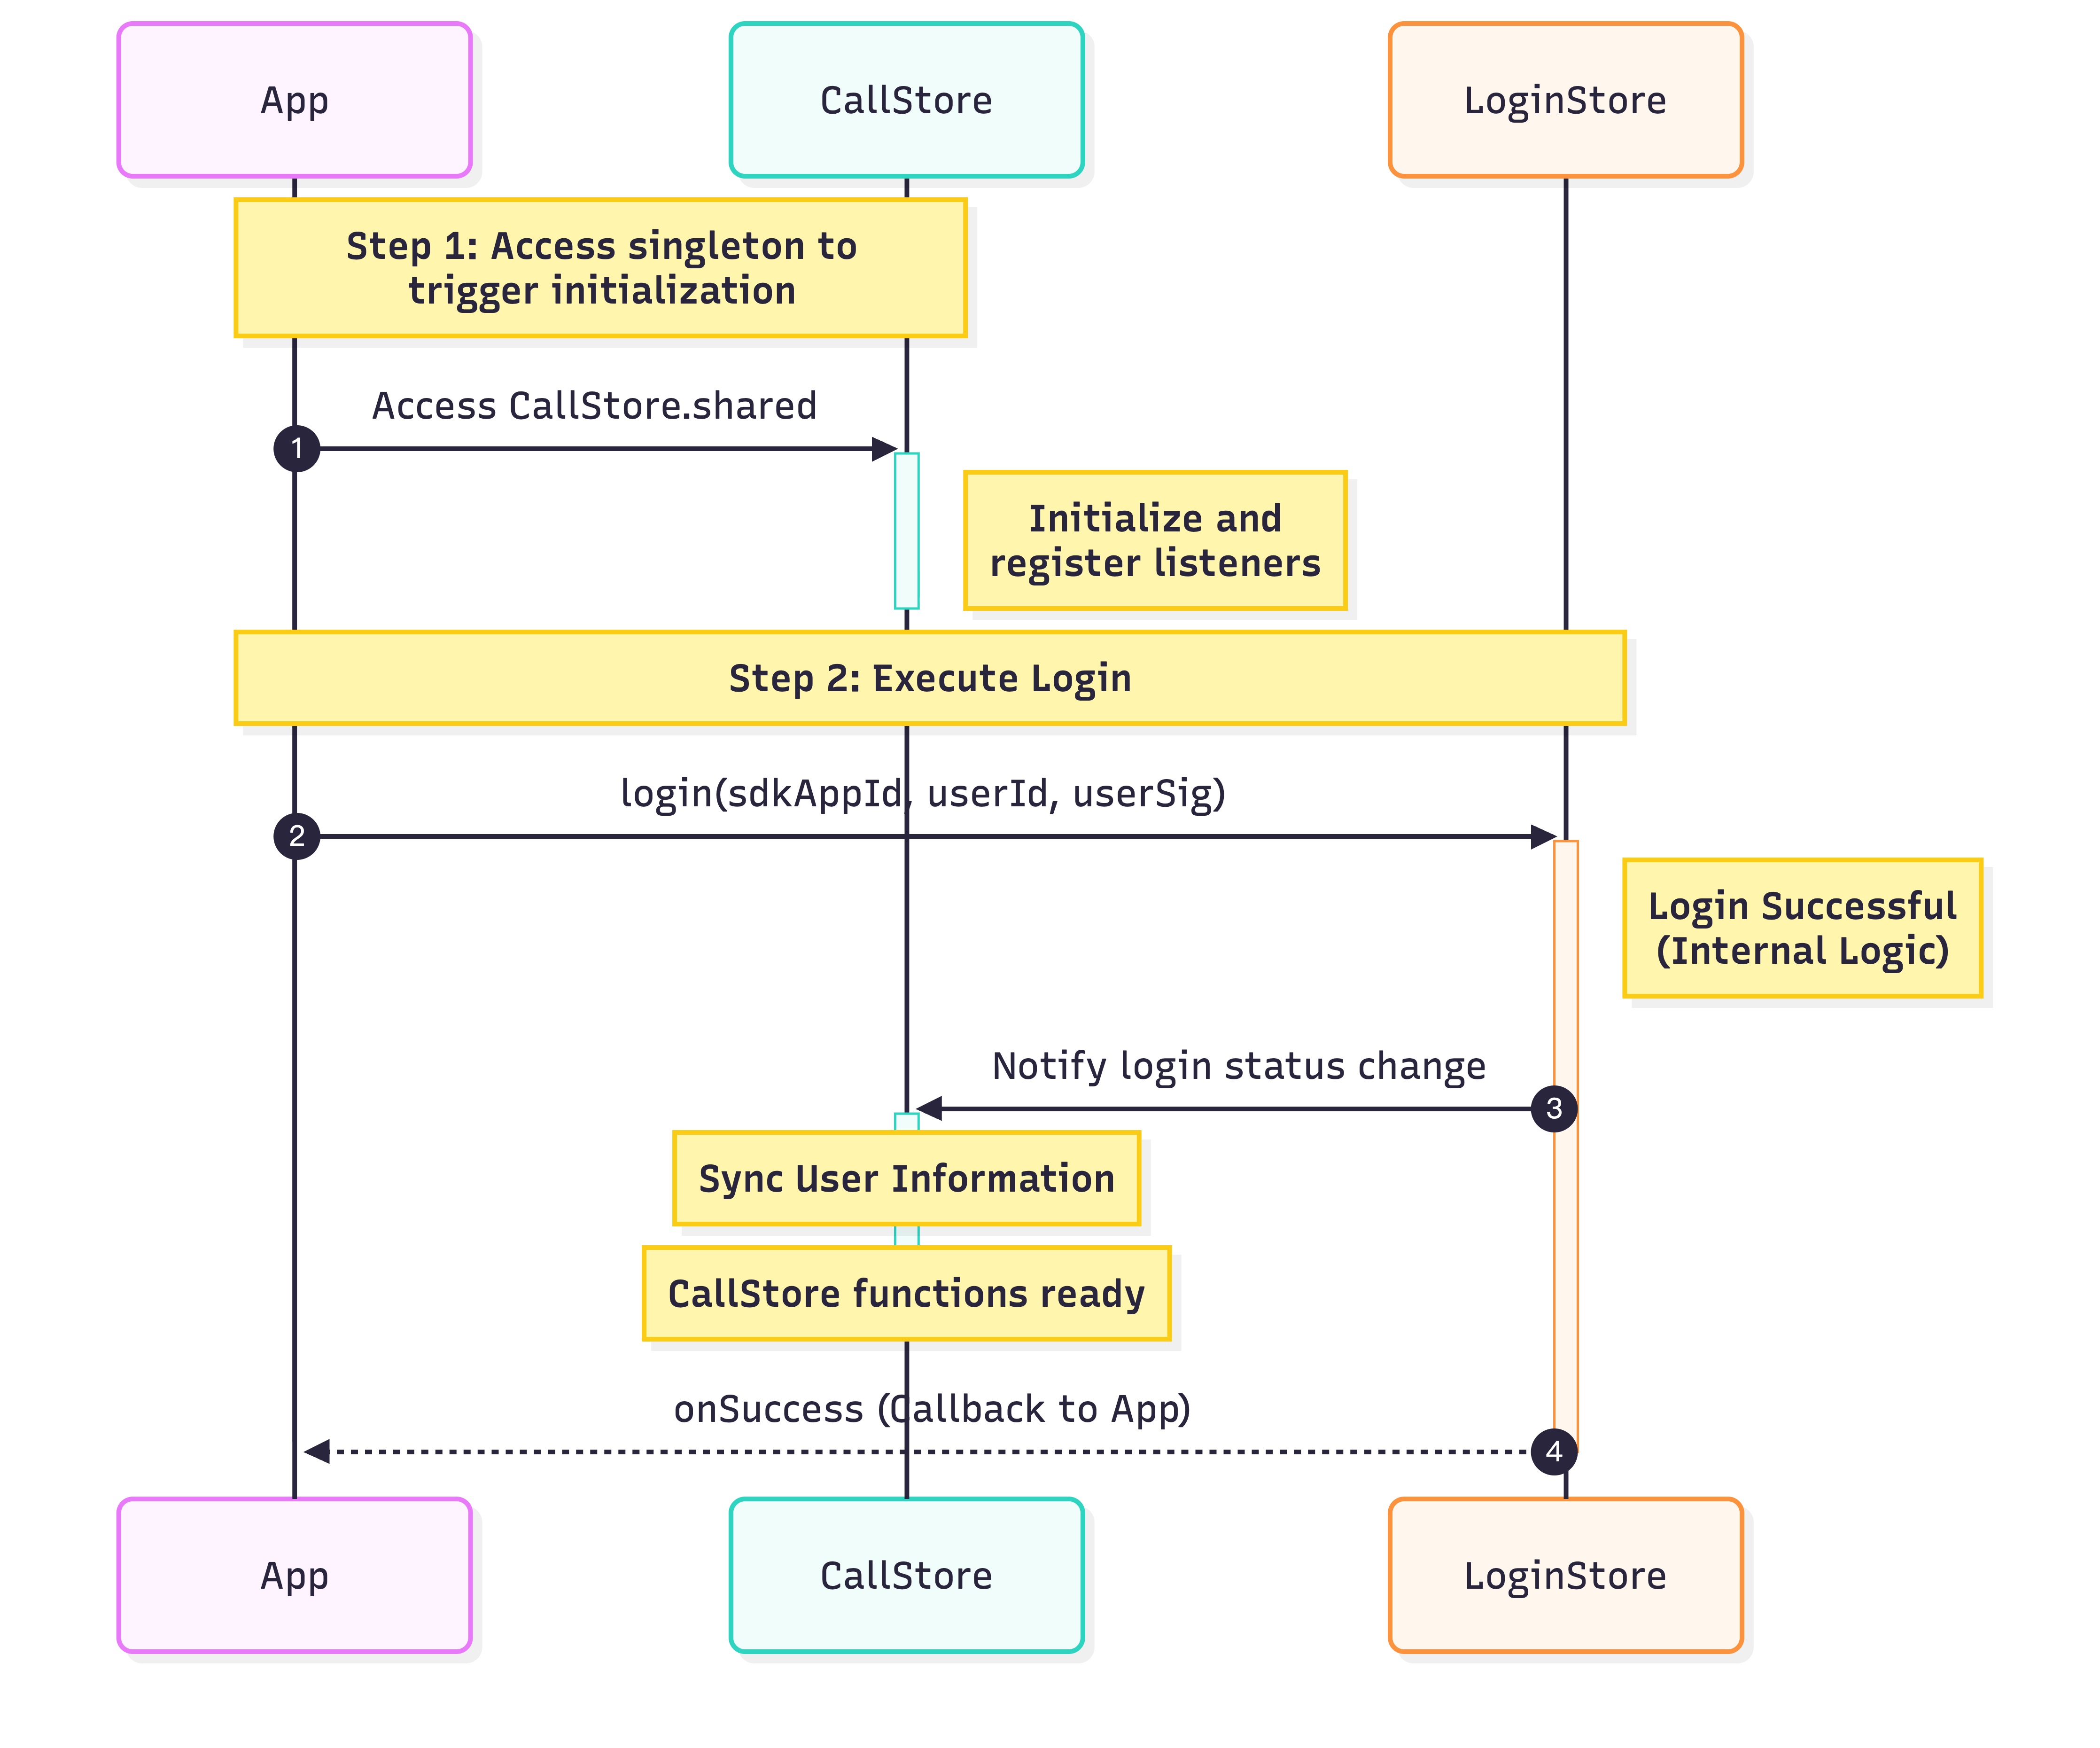
Step 3: Initialize and Log In
To enable the call service, initialize CallStore and log in the user in sequence. CallStore will automatically sync user information after a successful login, entering the ready state. See the flowchart and sample code below:
classMainActivity:ComponentActivity(){
override fun onCreate(savedInstanceState:Bundle?){
super.onCreate(savedInstanceState)
// Initialize CallStore
CallStore.shared
val sdkAppId =1400000001// Replace with your SDKAppID
val userId ="test_001"// Replace with your UserID
val userSig ="xxxxxxxxxxx"// Replace with your UserSig
Unique identifier for the current user. Only English letters, numbers, hyphens, and underscores are allowed. Avoid simple IDs (e.g., 1, 123) to prevent multi-device login conflicts.
Ensure the user is logged in before answering calls. Follow these 6 steps to answer incoming calls:
Step 1: Create Call Page
Create a call page that launches when an incoming call is received.
1. Create the call page: Implement a new Activity to serve as the call interface, triggered upon incoming call.
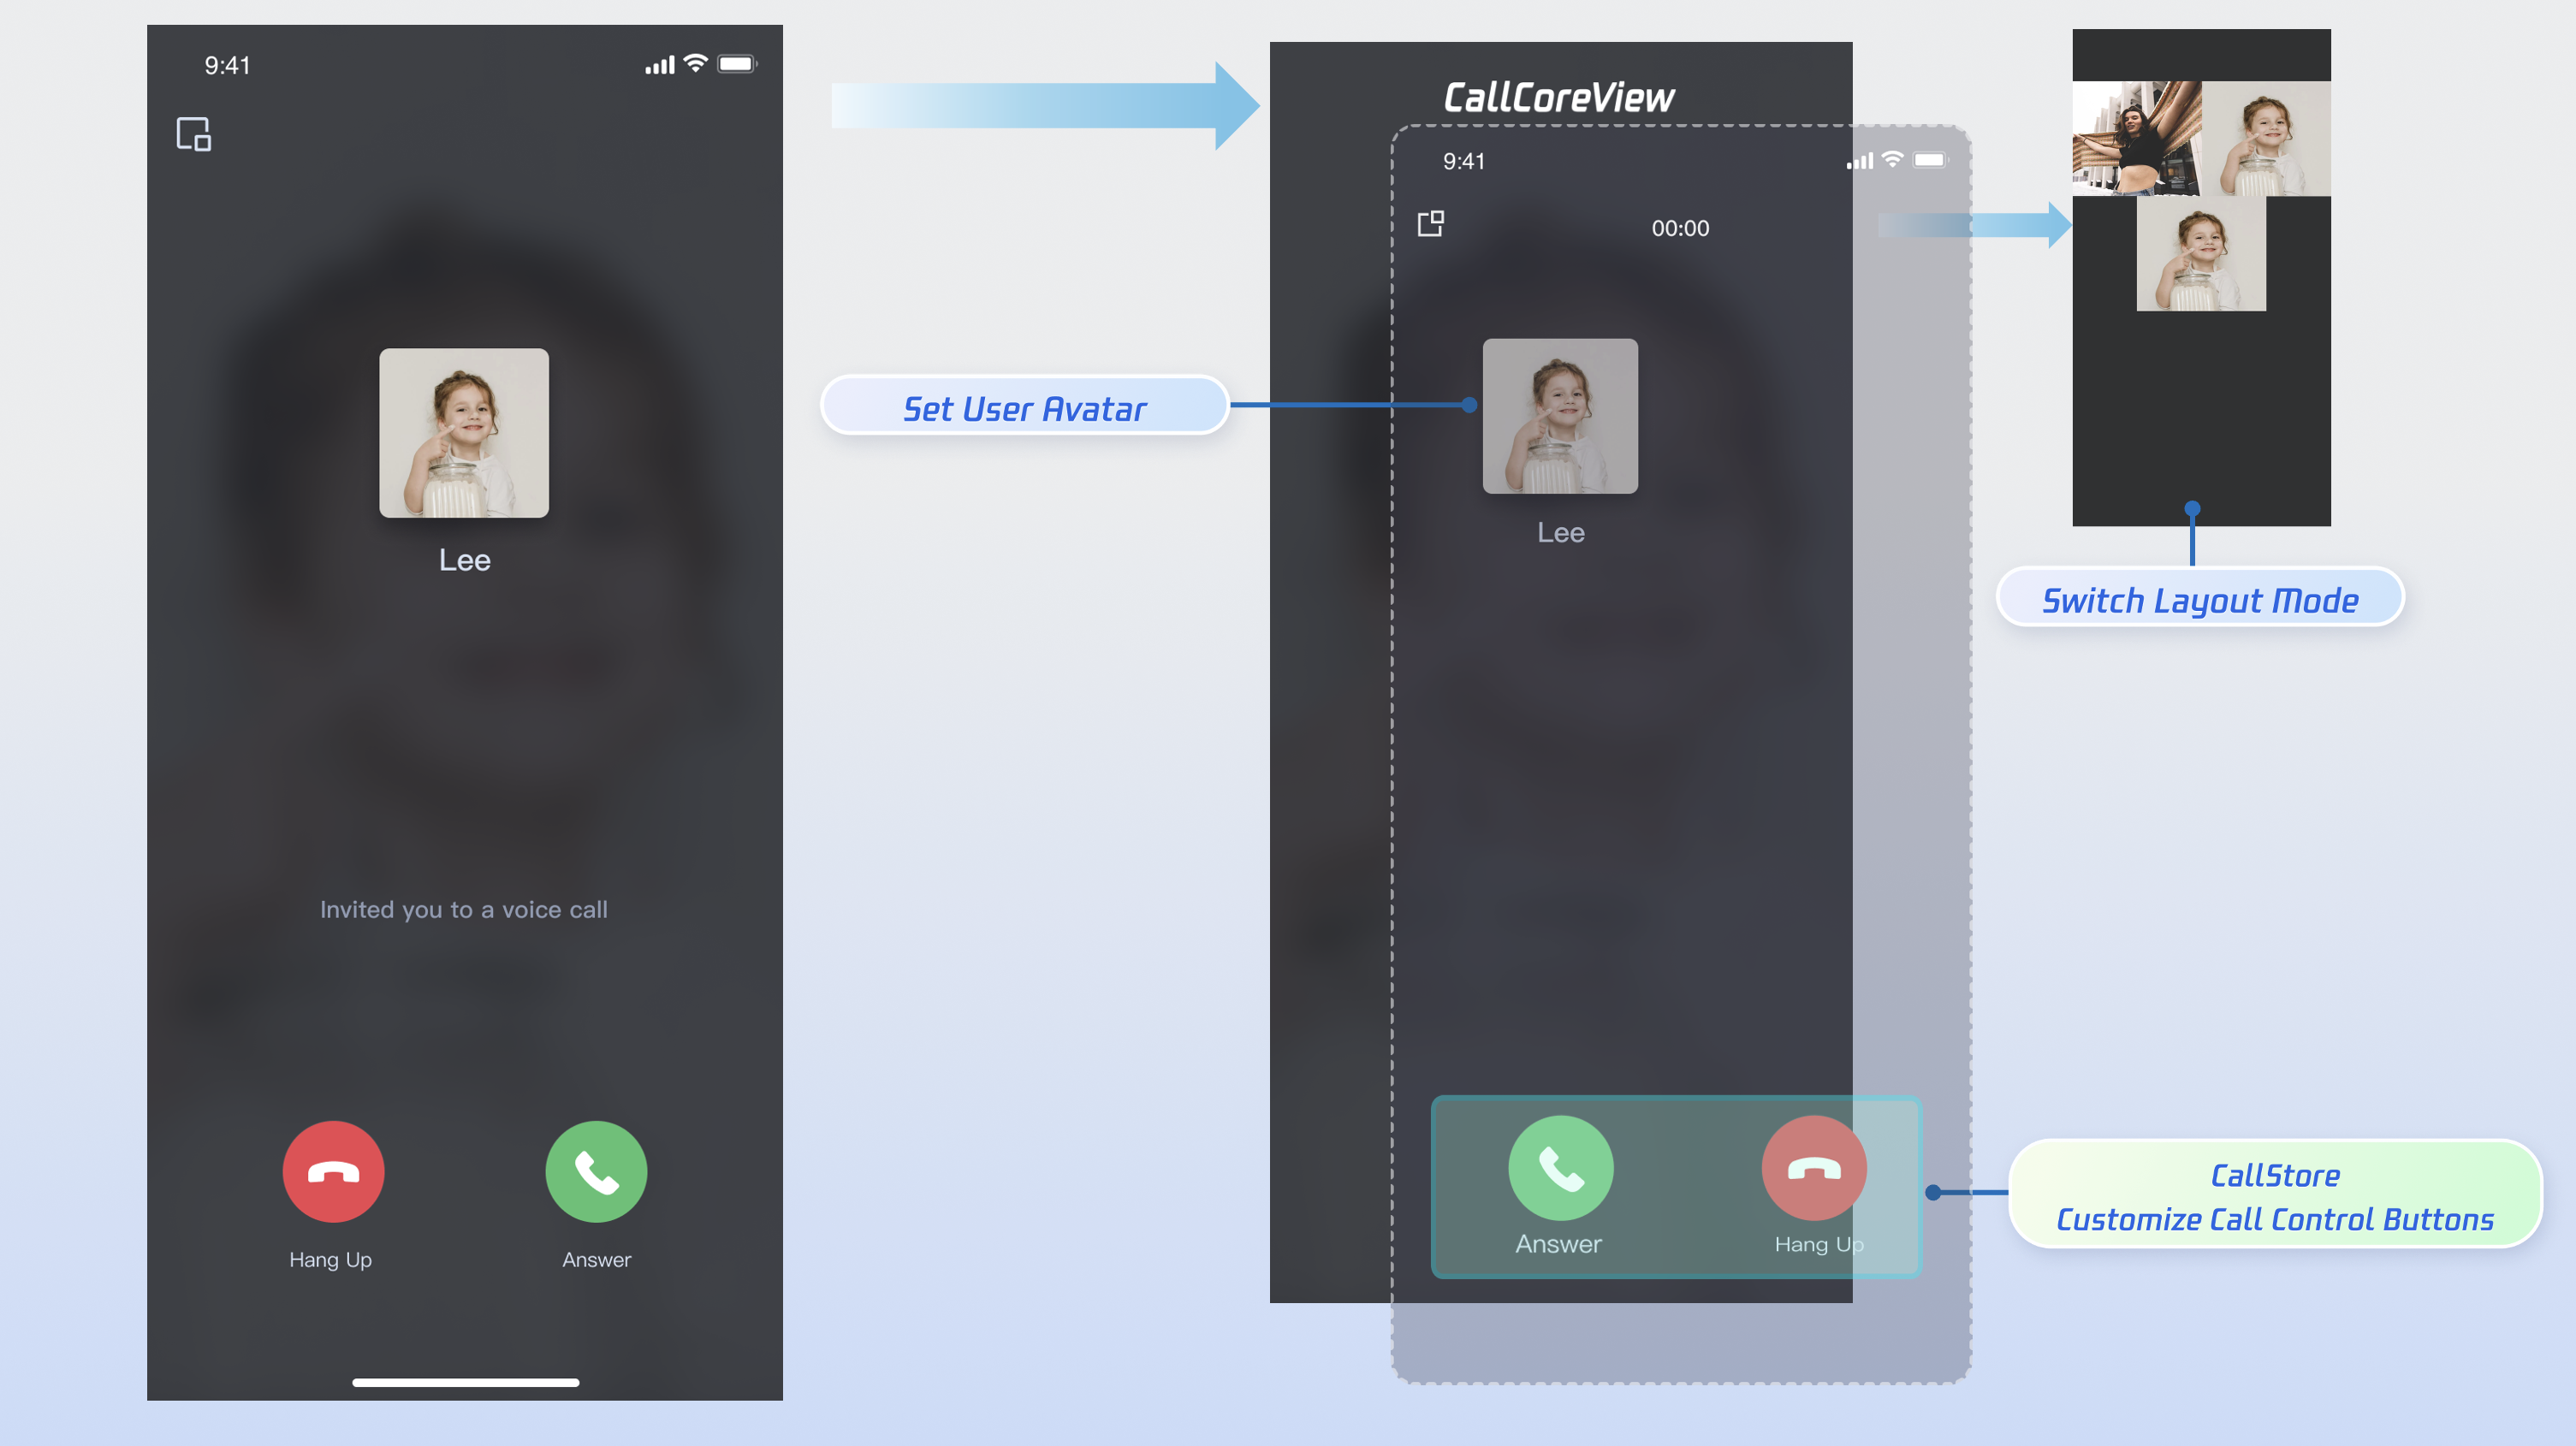
2. Bind the call page to CallCoreView: The CallCoreView component automatically observes CallStore data and renders video, supporting UI customization like layout switching, avatar, and icon configuration.
DeviceStore: Controls microphone (toggle/volume), camera (toggle/switch/quality), screen sharing, and monitors device status. Bind methods to button click events and update UI in real time by observing device status changes.
CallStore: Provides core call controls (answer, hang up, reject). Bind methods to button click events and observe call status to keep button visibility in sync with the call phase.
Icon Resources: Download button icons from GitHub. These icons are designed for TUICallKit and are copyright-free.
Implementation for adding "Answer" and "Reject" buttons:
1.1 Add Answer and Reject Buttons: Create a bottom button bar container and add "Answer" and "Reject" buttons, binding their click events to the accept and reject methods.
1.2 Destroy the interface when the caller cancels or you reject: If the caller cancels or the callee rejects, the onCallEnded event is triggered. Listen for this event to promptly close (destroy) the call interface when the call ends.
Reason for call ending. - Unknown: Unknown reason. - Hangup: User hung up. - Reject: Callee rejected. - NoResponse: Callee did not answer in time. - Offline: Other party offline. - LineBusy: Other party busy. - Canceled: Caller canceled before callee answered. - OtherDeviceAccepted: Answered on another device. - OtherDeviceReject: Rejected on another device. - EndByServer: Ended by server.
userId
String
User ID that triggered the end.
Step 3: Request Audio/Video Permissions
Check audio/video permissions before connecting the call. If permissions are missing, prompt the user to grant them dynamically.
1. Declare permissions: Add camera and microphone permissions in your AndroidManifest.xml.
Monitor the user's call status and play a ringtone or vibration when an incoming call arrives. Stop the notification after the call is answered or hung up.
1. Subscribe to data layer: Listen to CallStore.observerState.selfInfo for the current user's status.
2. Play/stop notification: If SelfInfo.Status is CallParticipantStatus.Waiting, play ringtone/vibration. If status is CallParticipantStatus.Accept, stop the notification.
importkotlinx.coroutines.CoroutineScope
importkotlinx.coroutines.Dispatchers
importkotlinx.coroutines.Job
importkotlinx.coroutines.launch
classMainActivity:AppCompatActivity(){
privatevar stateJob:Job?=null
override fun onCreate(savedInstanceState:Bundle?){
When an incoming call is received, use the onCallReceived event to determine the media type. For a better experience, pre-open the relevant devices when the call interface is triggered.
1. Listen for incoming call event: Subscribe to the onCallReceived event.
2. Open devices based on media type: For audio calls, open the microphone. For video calls, open both microphone and camera.
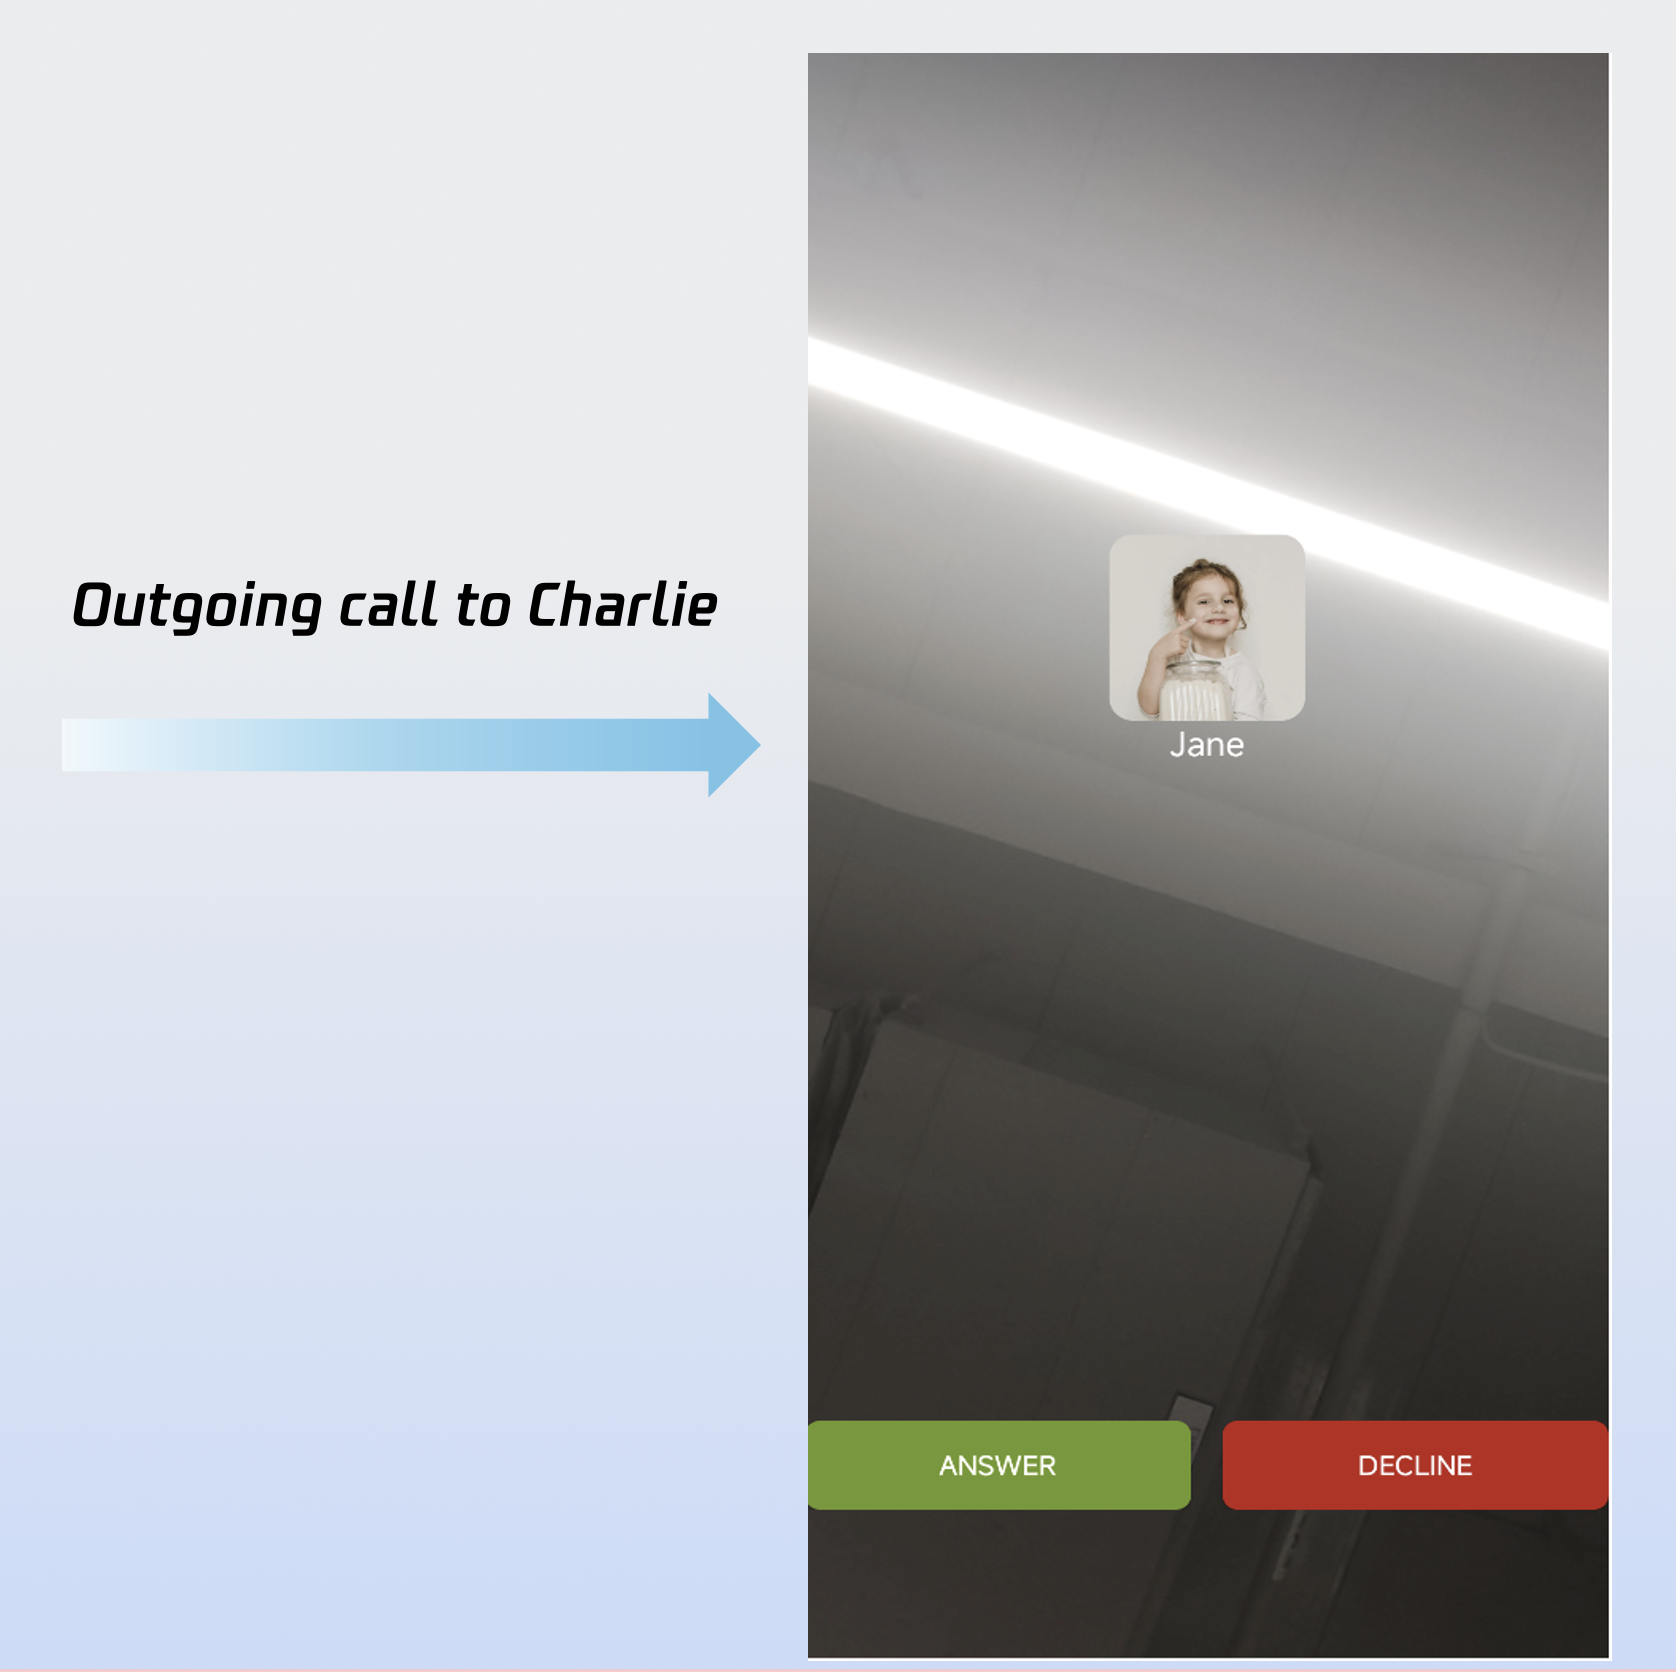
After completing the above 6 steps, your app may look like this:
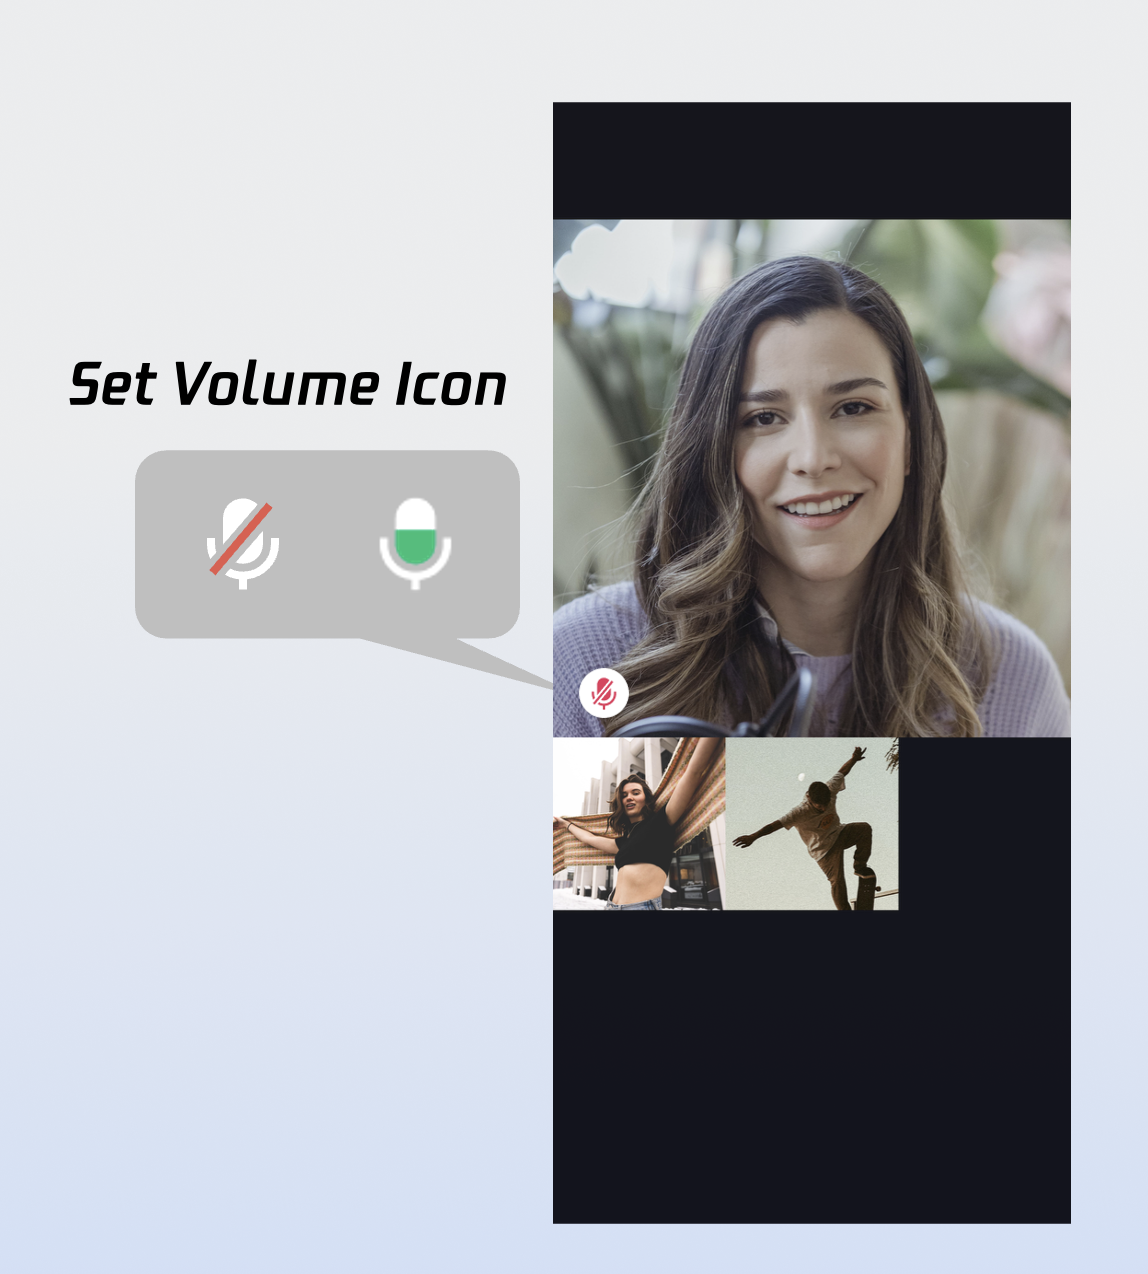
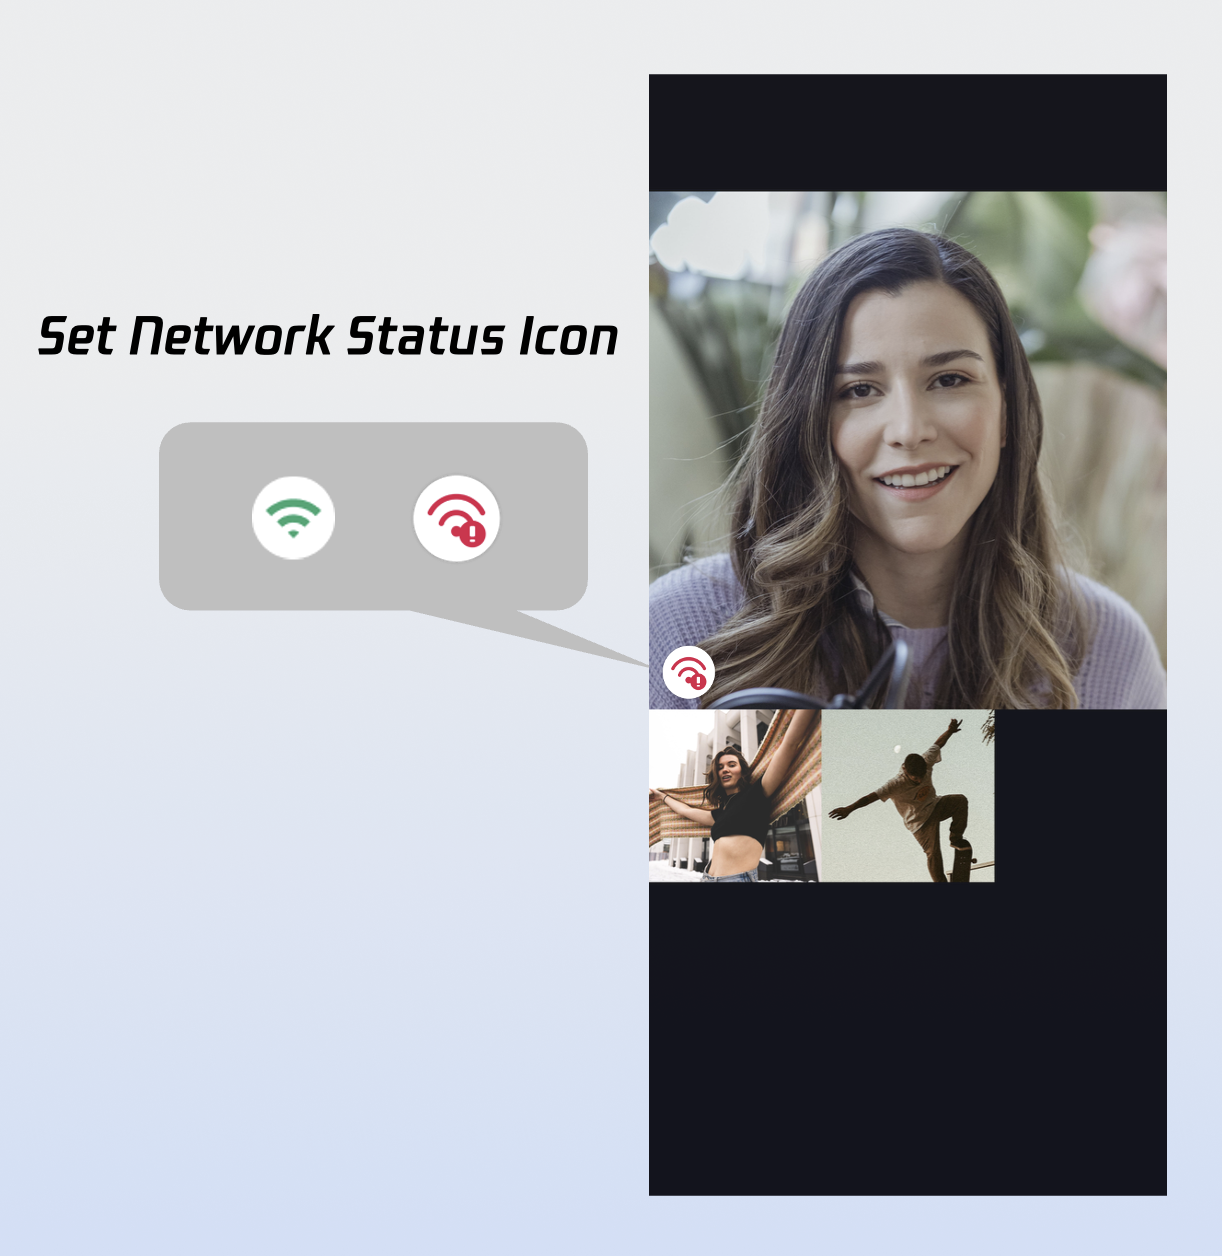
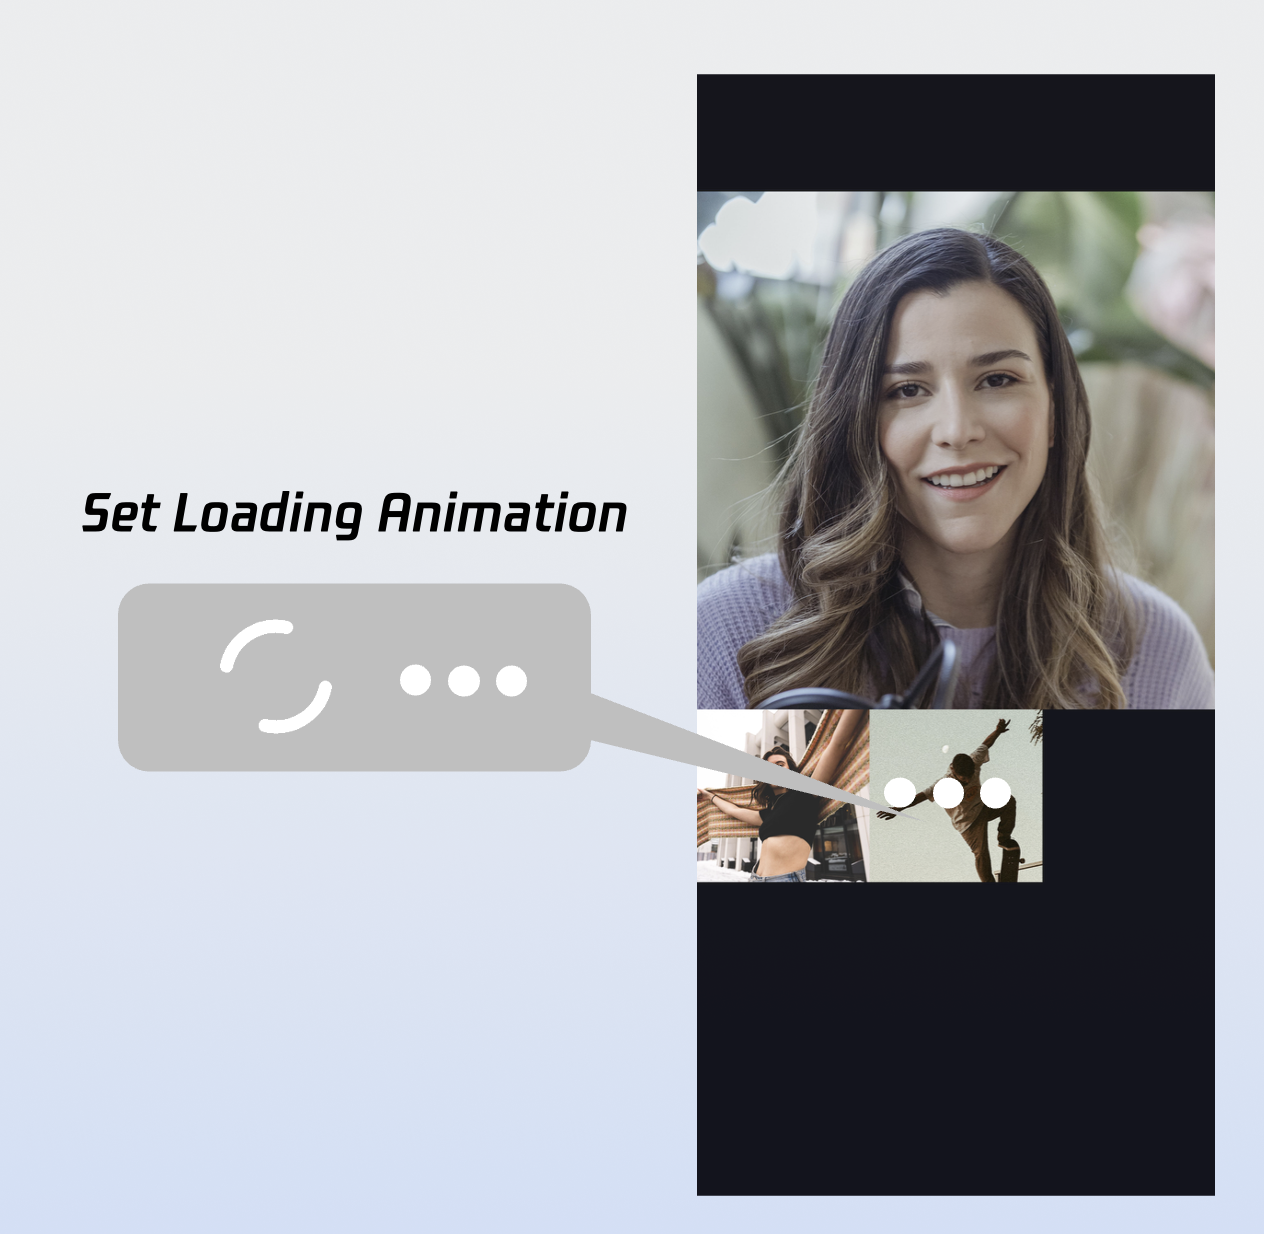
Customize Pages
CallCoreView supports extensive UI customization, including flexible avatar and volume indicator icon replacement. Download these icons directly from GitHub. All icons are designed for TUICallKit and are copyright-free.
Use the setParticipantAvatars method in CallCoreView to set user avatars. Listen to allParticipants in CallStore: set and display avatars when available; show the default avatar if unavailable or failed to load.
setParticipantAvatars Sample Code:
private fun setParticipantAvatars(){
val avatars:MutableMap<String, ParticipantAvatarInfo>=mutableMapOf()
val userId =""// User ID
val avatarPath =""// Default avatar resource path
avatars[userId]= avatarPath
val callCoreView =CallCoreView(context)
callCoreView.setParticipantAvatars(avatars)
}
setParticipantAvatars API Parameters:
Parameter
Type
Required
Description
icons
Map
Yes
Mapping of user IDs to avatar resource paths. - Key: userID. - Value: Absolute path to avatar resource.
Default Avatar Resource:
Icon
Description
Download Link
Default avatar. Recommended when user avatar is missing or fails to load.
nickname (String): User nickname. See UserProfile for more fields.
completion
CompletionHandler
No
Callback for operation result.
Switch Layout Modes
Use setLayoutTemplate to switch layout modes. If not set, CallCoreView adapts automatically: Float mode for 1v1 calls, Grid mode for multi-party calls.
Float Mode
Grid Mode
PIP Mode
Layout Logic: Full screen shows own video while waiting; after answering, full screen shows the other party's video, own video floats as a small window.
Interaction: Supports dragging and swapping windows.
Layout Logic: All participant videos are tiled in a grid. Suitable for 2+ participants; supports click-to-enlarge.
Interaction: Click to enlarge a participant's video.
Layout Logic: In 1v1, always shows the other party's video; in multi-party, uses active speaker strategy.
Interaction: Shows own video while waiting, displays call timer after answering.
Layout: While waiting, display your own video full screen. After answering, show the remote video full screen and your own video as a floating window.
Interaction: Drag the small window or tap to swap big/small video.
CallLayoutTemplate.grid :
Layout: All participant videos are tiled in a grid. Best for 2+ participants. Tap to enlarge a video.
Interaction: Tap a participant to enlarge their video.
CallLayoutTemplate.pip :
Layout: In 1v1, remote video is fixed; in multi-party, the active speaker is shown full screen.
Interaction: Shows your own video while waiting, displays call timer after answering.
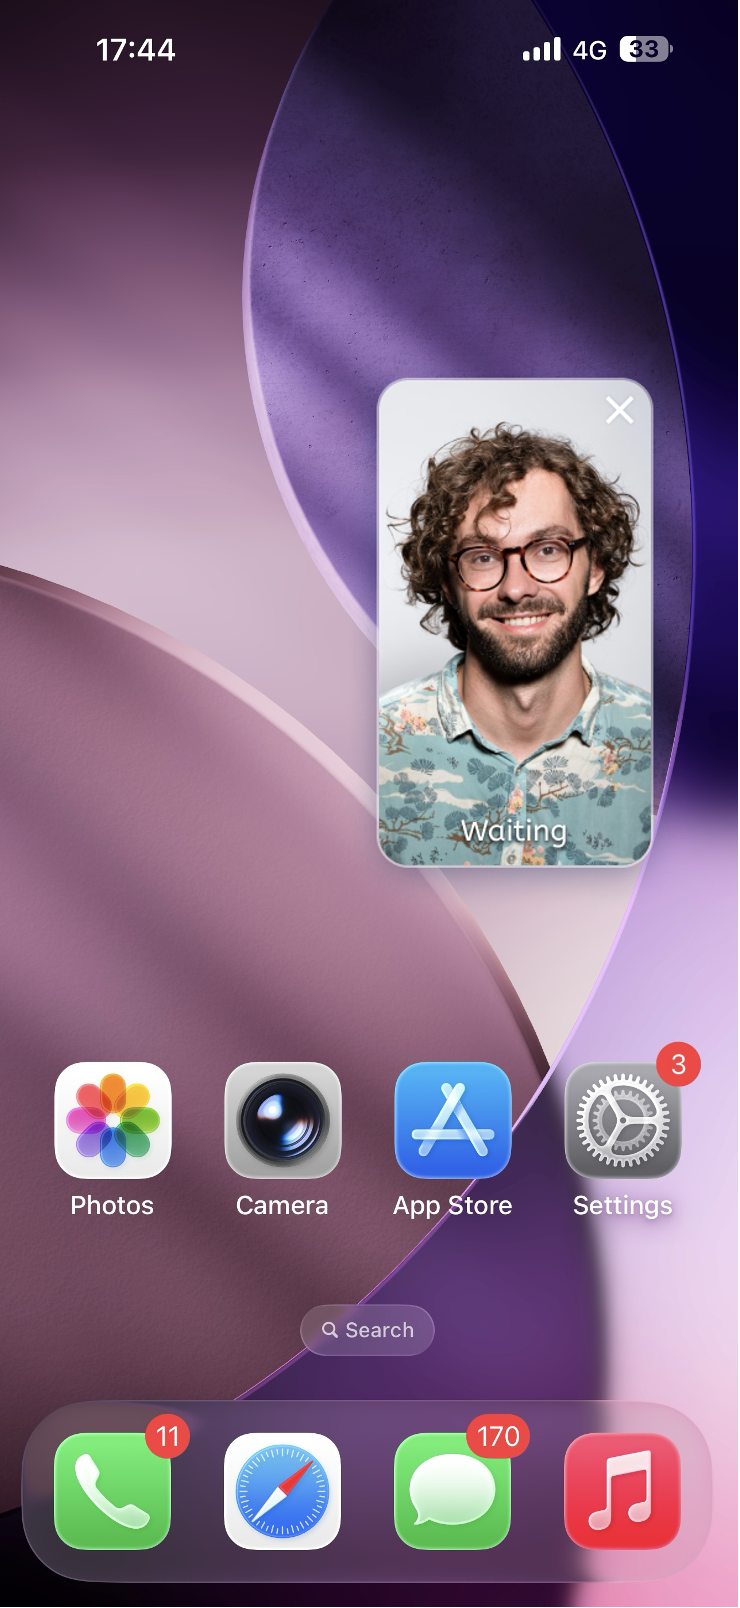
Entering Picture-in-Picture Mode
Implementing Picture-in-Picture (PiP) mode requires Android 8.0 (API level 26) or higher. For an optimal user experience, it is recommended to switch your layout to a PiP template when entering this mode.
Entering Picture-in-Picture Mode : To initiate PiP, call the system method enterPictureInPictureMode.
Handling the PiP Transition : When the system successfully enters PiP mode, the onPictureInPictureModeChanged callback is triggered. You must update the CallCoreView layout to CallLayoutTemplate.Pip at this stage.
val callCoreView =CallCoreView(context)
override fun onPictureInPictureModeChanged(isInPictureInPictureMode:Boolean){
Restoring Full-Screen Layout : When the user returns to the app from PiP (restoring full screen), the onResume callback will be triggered. You should reset the layout based on the current number of participants:
1 v 1 Calls: Use CallLayoutTemplate.Float.
Group Calls: Use CallLayoutTemplate.Grid.
val callCoreView =CallCoreView(context)
override fun onResume(){
super.onResume()
val allParticipants =CallStore.shared.observerState.allParticipants.value
Keeping the screen active during a call is a fundamental requirement for communication apps. The simplest and most recommended approach in Android is using the WindowManager.LayoutParams.FLAG_KEEP_SCREEN_ON flags.
classCallActivity:AppCompatActivity(){
override fun onCreate(savedInstanceState:Bundle?){
super.onCreate(savedInstanceState)
// Apply flags to handle screen behavior during calls
window.addFlags(
WindowManager.LayoutParams.FLAG_SHOW_WHEN_LOCKED or // Show activity over lock screen
WindowManager.LayoutParams.FLAG_DISMISS_KEYGUARD or // Dismiss non-secure keyguards
WindowManager.LayoutParams.FLAG_KEEP_SCREEN_ON or // Prevent the screen from sleeping
WindowManager.LayoutParams.FLAG_TURN_SCREEN_ON // Turn the screen on when activity starts
)
setContentView(R.layout.activity_call)
}
}
Enable Background Audio/Video Capture
To maintain audio and video capture when the app is in the background, you must implement a Foreground Service. Starting from Android 9.0 (API 28), foreground service permissions are required, and Android 14 (API 34) mandates declaring specific service types for the camera and microphone.
1. Configure Permissions and Service ( AndroidManifest.xml ) : Declare the necessary foreground service permissions and specify the service types within the <application> tag.
2. Create the Foreground Service Class ( CallForegroundService ) : The service ensures the system does not kill the app's process while it is in the background by displaying a persistent notification.
importandroid.app.Notification
importandroid.app.NotificationChannel
importandroid.app.NotificationManager
importandroid.app.Service
importandroid.content.Context
importandroid.content.Intent
importandroid.os.Build
importandroid.os.IBinder
importandroidx.core.app.NotificationCompat
classCallForegroundService:Service(){
companion object {
privateconst val NOTIFICATION_ID =1001
privateconst val CHANNEL_ID ="call_foreground_channel"
/**
* Start the foreground service to maintain call connectivity
*/
fun start(context:Context){
val intent =Intent(context,CallForegroundService::class.java)
val manager =getSystemService(NotificationManager::class.java)
manager?.createNotificationChannel(channel)
}
}
}
Next Steps
Congratulations! You have implemented the answer call feature. Next, see Make Your First Call to add call initiation to your app.
FAQs
Why does the UI appear distorted or show the wrong screen after navigating to another page while in PiP mode?
Cause : Android's Picture-in-Picture (PiP) mode operates based on the Task Stack. By default, all Activities in an app share the same task stack. If you launch a new Activity while the app is in PiP mode, that new page is pushed onto the current stack. Consequently, the new screen incorrectly attempts to render within the tiny PiP window, leading to UI anomalies.
Solution : Declare the Call Activity as a separate task with its own affinity in the AndroidManifest.xml. This ensures the call remains isolated in its own window regardless of other app navigation.
<activity
android:name=".view.CallActivity"
android:launchMode="singleTask"
android:taskAffinity="${applicationId}.call"/>
Can an invitee receive a call event if they go offline and then come back online within the call timeout period?
For one-on-one calls, if the callee comes online within the timeout, they will receive the incoming call invitation. For group calls, if the callee comes online within the timeout, up to 20 unprocessed group messages will be retrieved, and if there is a call invitation, the incoming call event will be triggered.
Contact Us
If you have any questions or suggestions during the integration or usage process, feel free to join our Telegram technical group or contact us for support.