This document will guide you through integrating the AtomicXCore SDK components: DeviceStore, CallStore, and the core widget CallCoreView to quickly implement call answering functionality.
Core Features
To build multi-party audio/video call scenarios with AtomicXCore, use these three core modules:
Manages the call lifecycle, including dialing, answering, rejecting, and hanging up. Provides real-time participant audio/video status, call duration, call history, and other data.
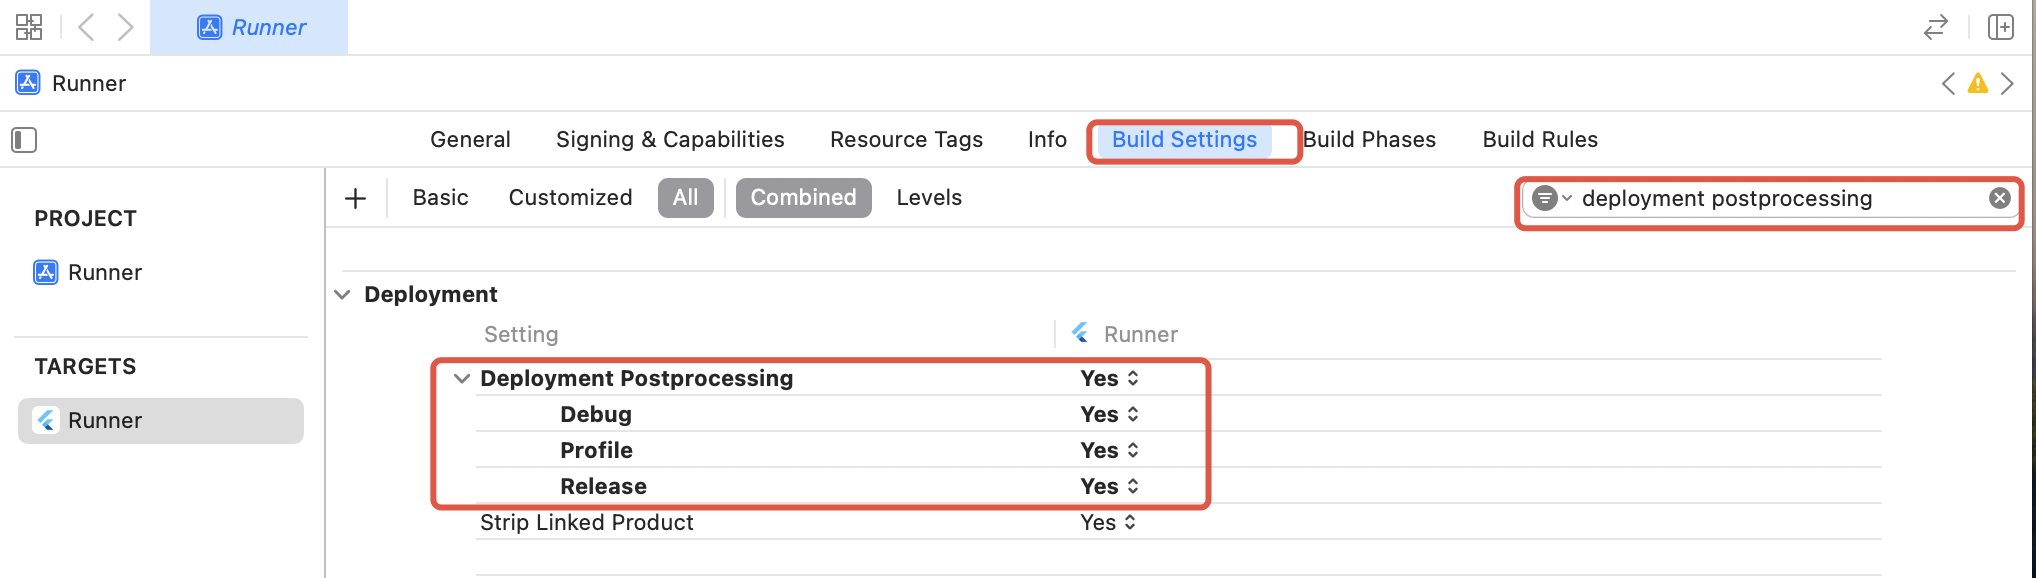
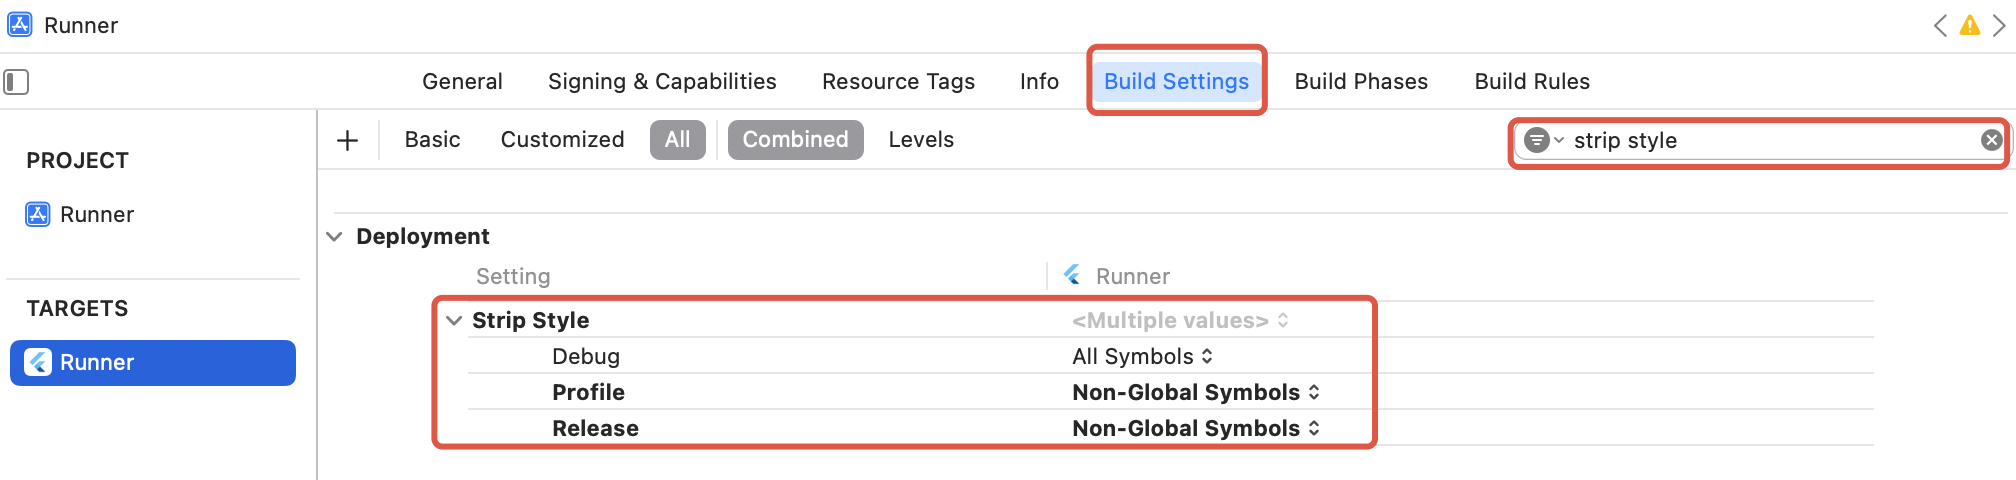
Since tencent_rtc_sdk uses Flutter FFI, Xcode's symbol stripping during Release builds may remove TRTC C symbols, causing symbol not found errors. To fix:
1. In Xcode Build Settings, set Deployment Postprocessing to Yes.
2. Set Strip Style for Release to Non-Global Symbols.
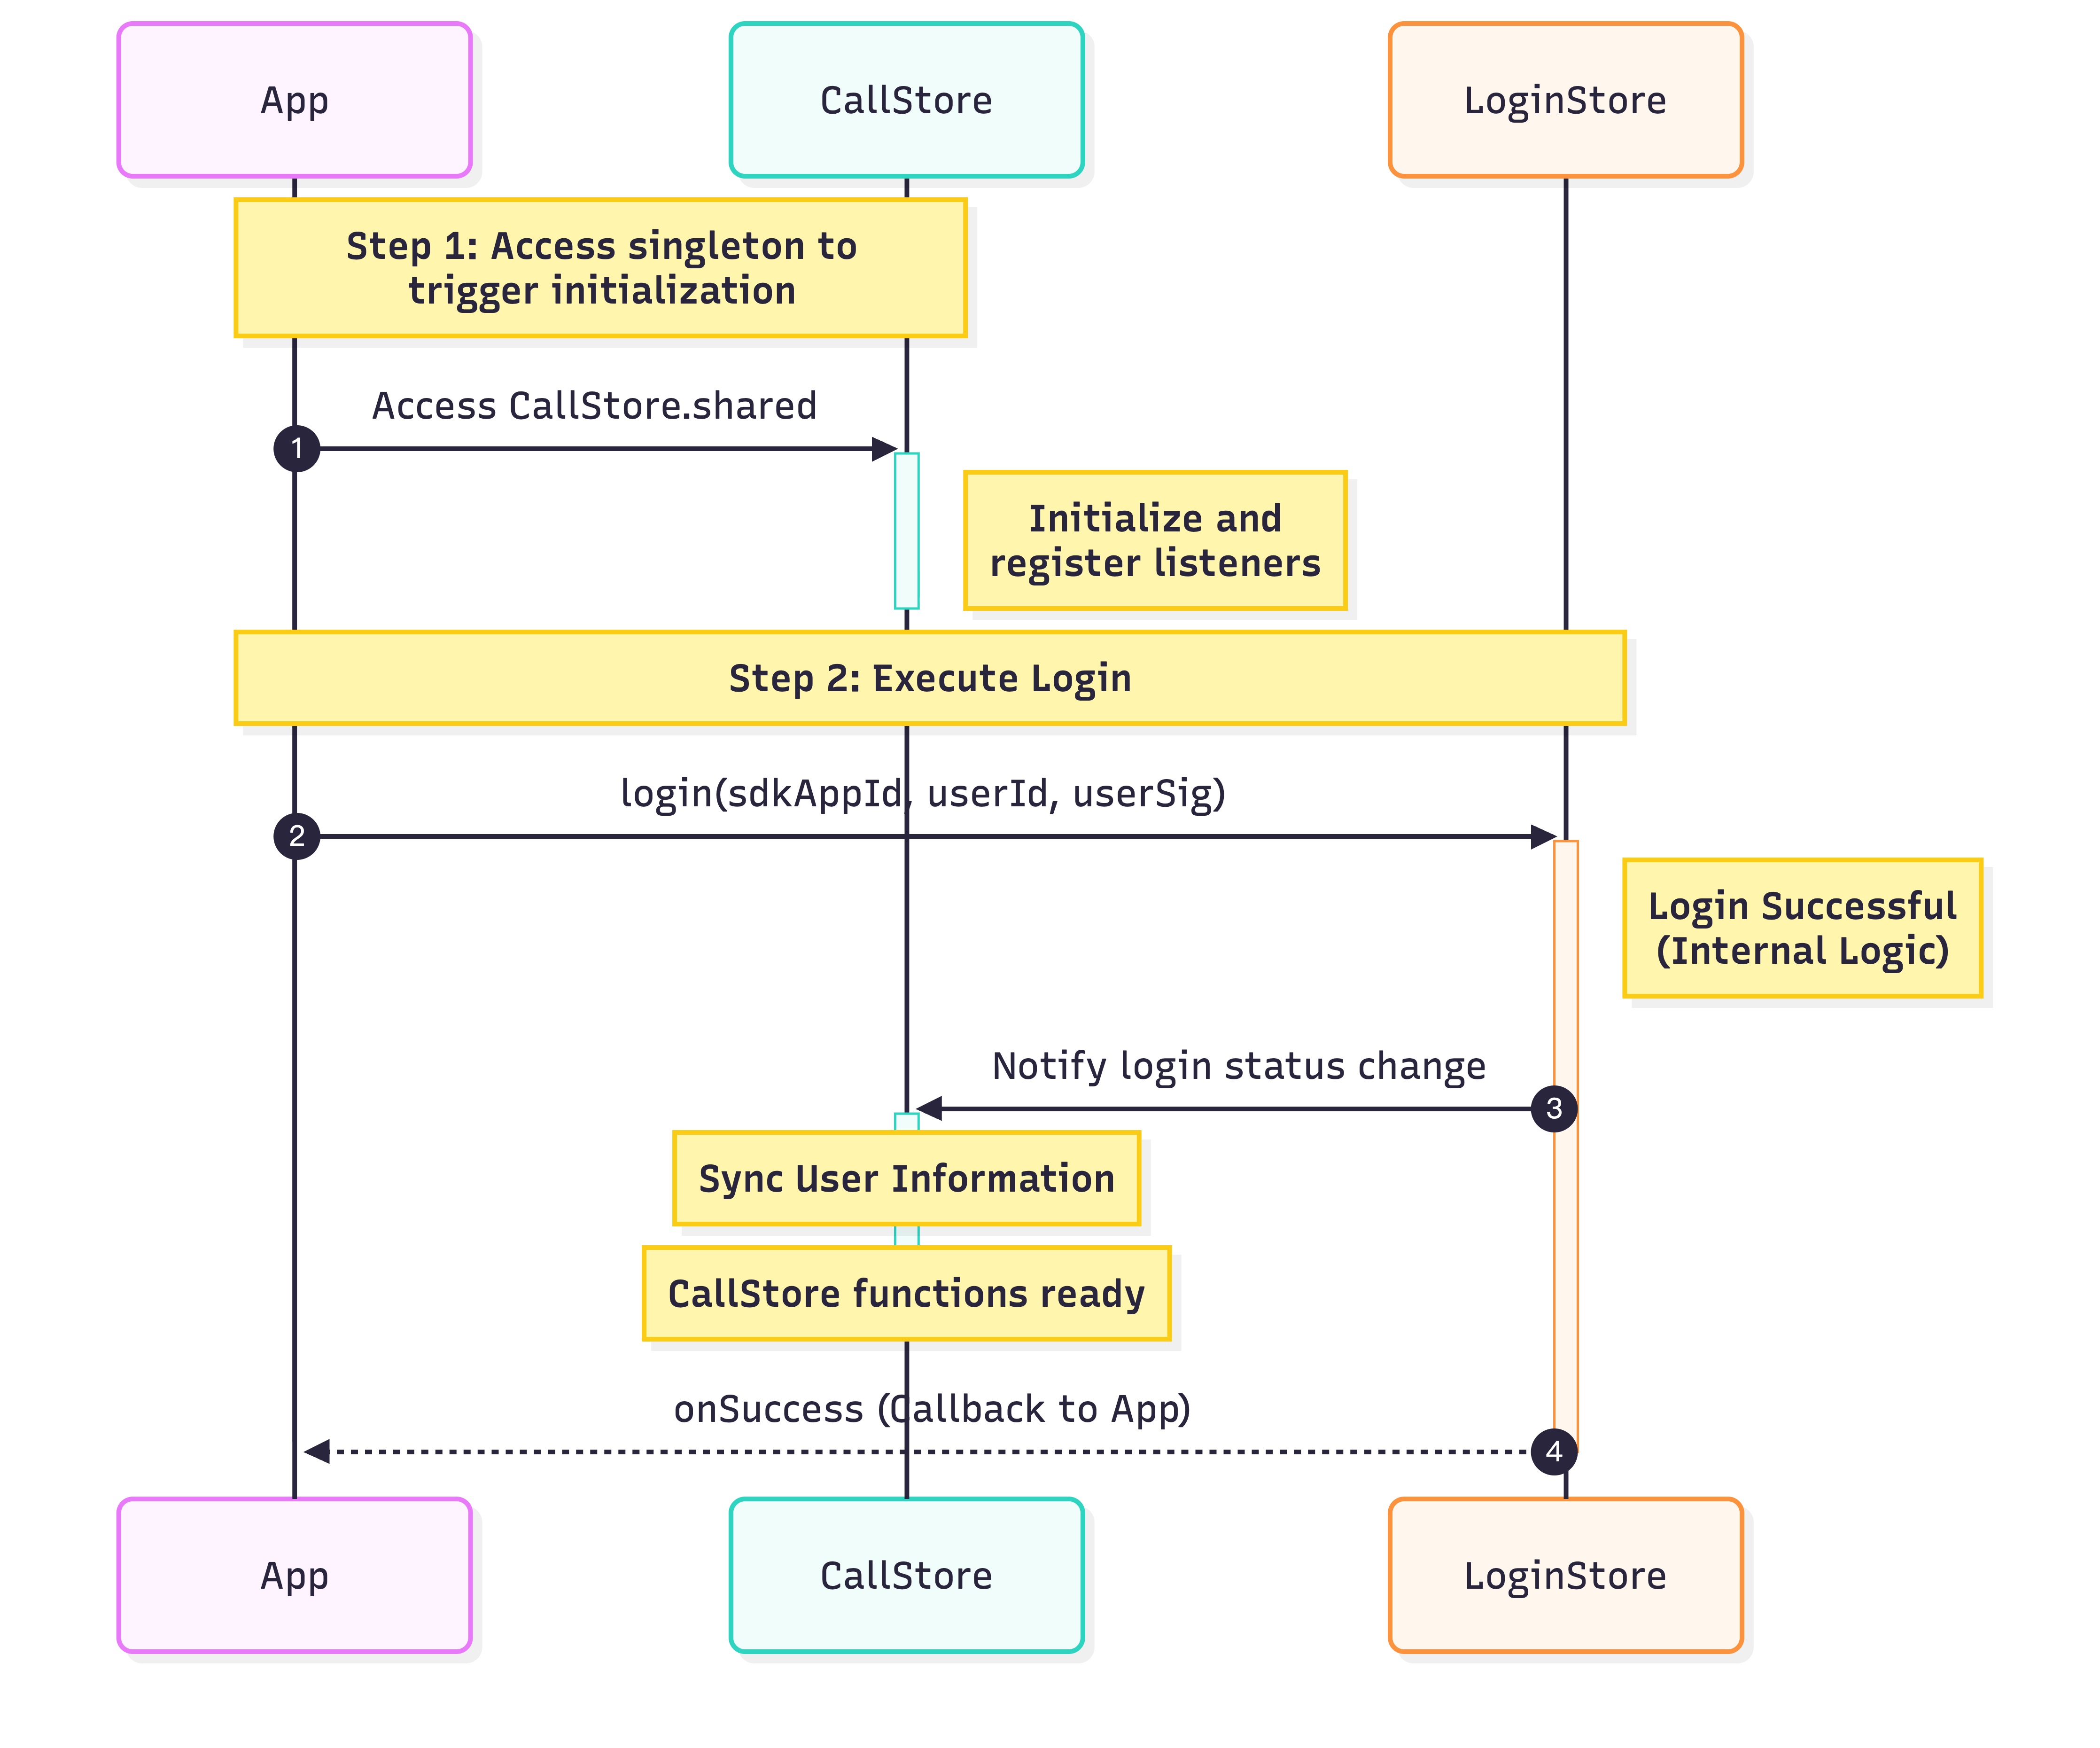
Initialize and Log in
To start the call service, initialize CallStore and log in the user. On successful login, CallStore will sync user info and enter the ready state. See the flowchart and sample code below:
Unique ID for the current user. Only letters, numbers, hyphens, and underscores are allowed. To prevent conflicts with multi-device login, avoid using simple IDs like 1 or 123.
sdkAppId
int
Obtain from the console. Usually a 10-digit integer starting with 140 or 160.
You must be logged in before you can answer a call. Follow these six steps to implement the call answering feature.
Step 1: Create the Call Page
Create a call page that is shown when an incoming call arrives.
1. Create the call page: Implement a StatefulWidget to host the call page and manage navigation for incoming calls.
2. Add CallCoreView widget to the call page: The core call UI requires a controller and automatically listens to CallStore data. It will render the UI and adapt layouts for both 1-on-1 and group calls.
import 'package:flutter/material.dart';
import 'package:atomic_x_core/atomicxcore.dart';
// 1. Create Call Page Widget
classCallPageextendsStatefulWidget{
constCallPage({super.key});
@override
State<CallPage>createState()=>_CallPageState();
}
class _CallPageState extendsState<CallPage>{
late CallCoreController controller;
@override
voidinitState(){
super.initState();
controller =CallCoreController.create();
}
@override
Widgetbuild(BuildContext context){
// 2. Add CallCoreView widget to Call Page
returnCallCoreView(controller: controller);
}
}
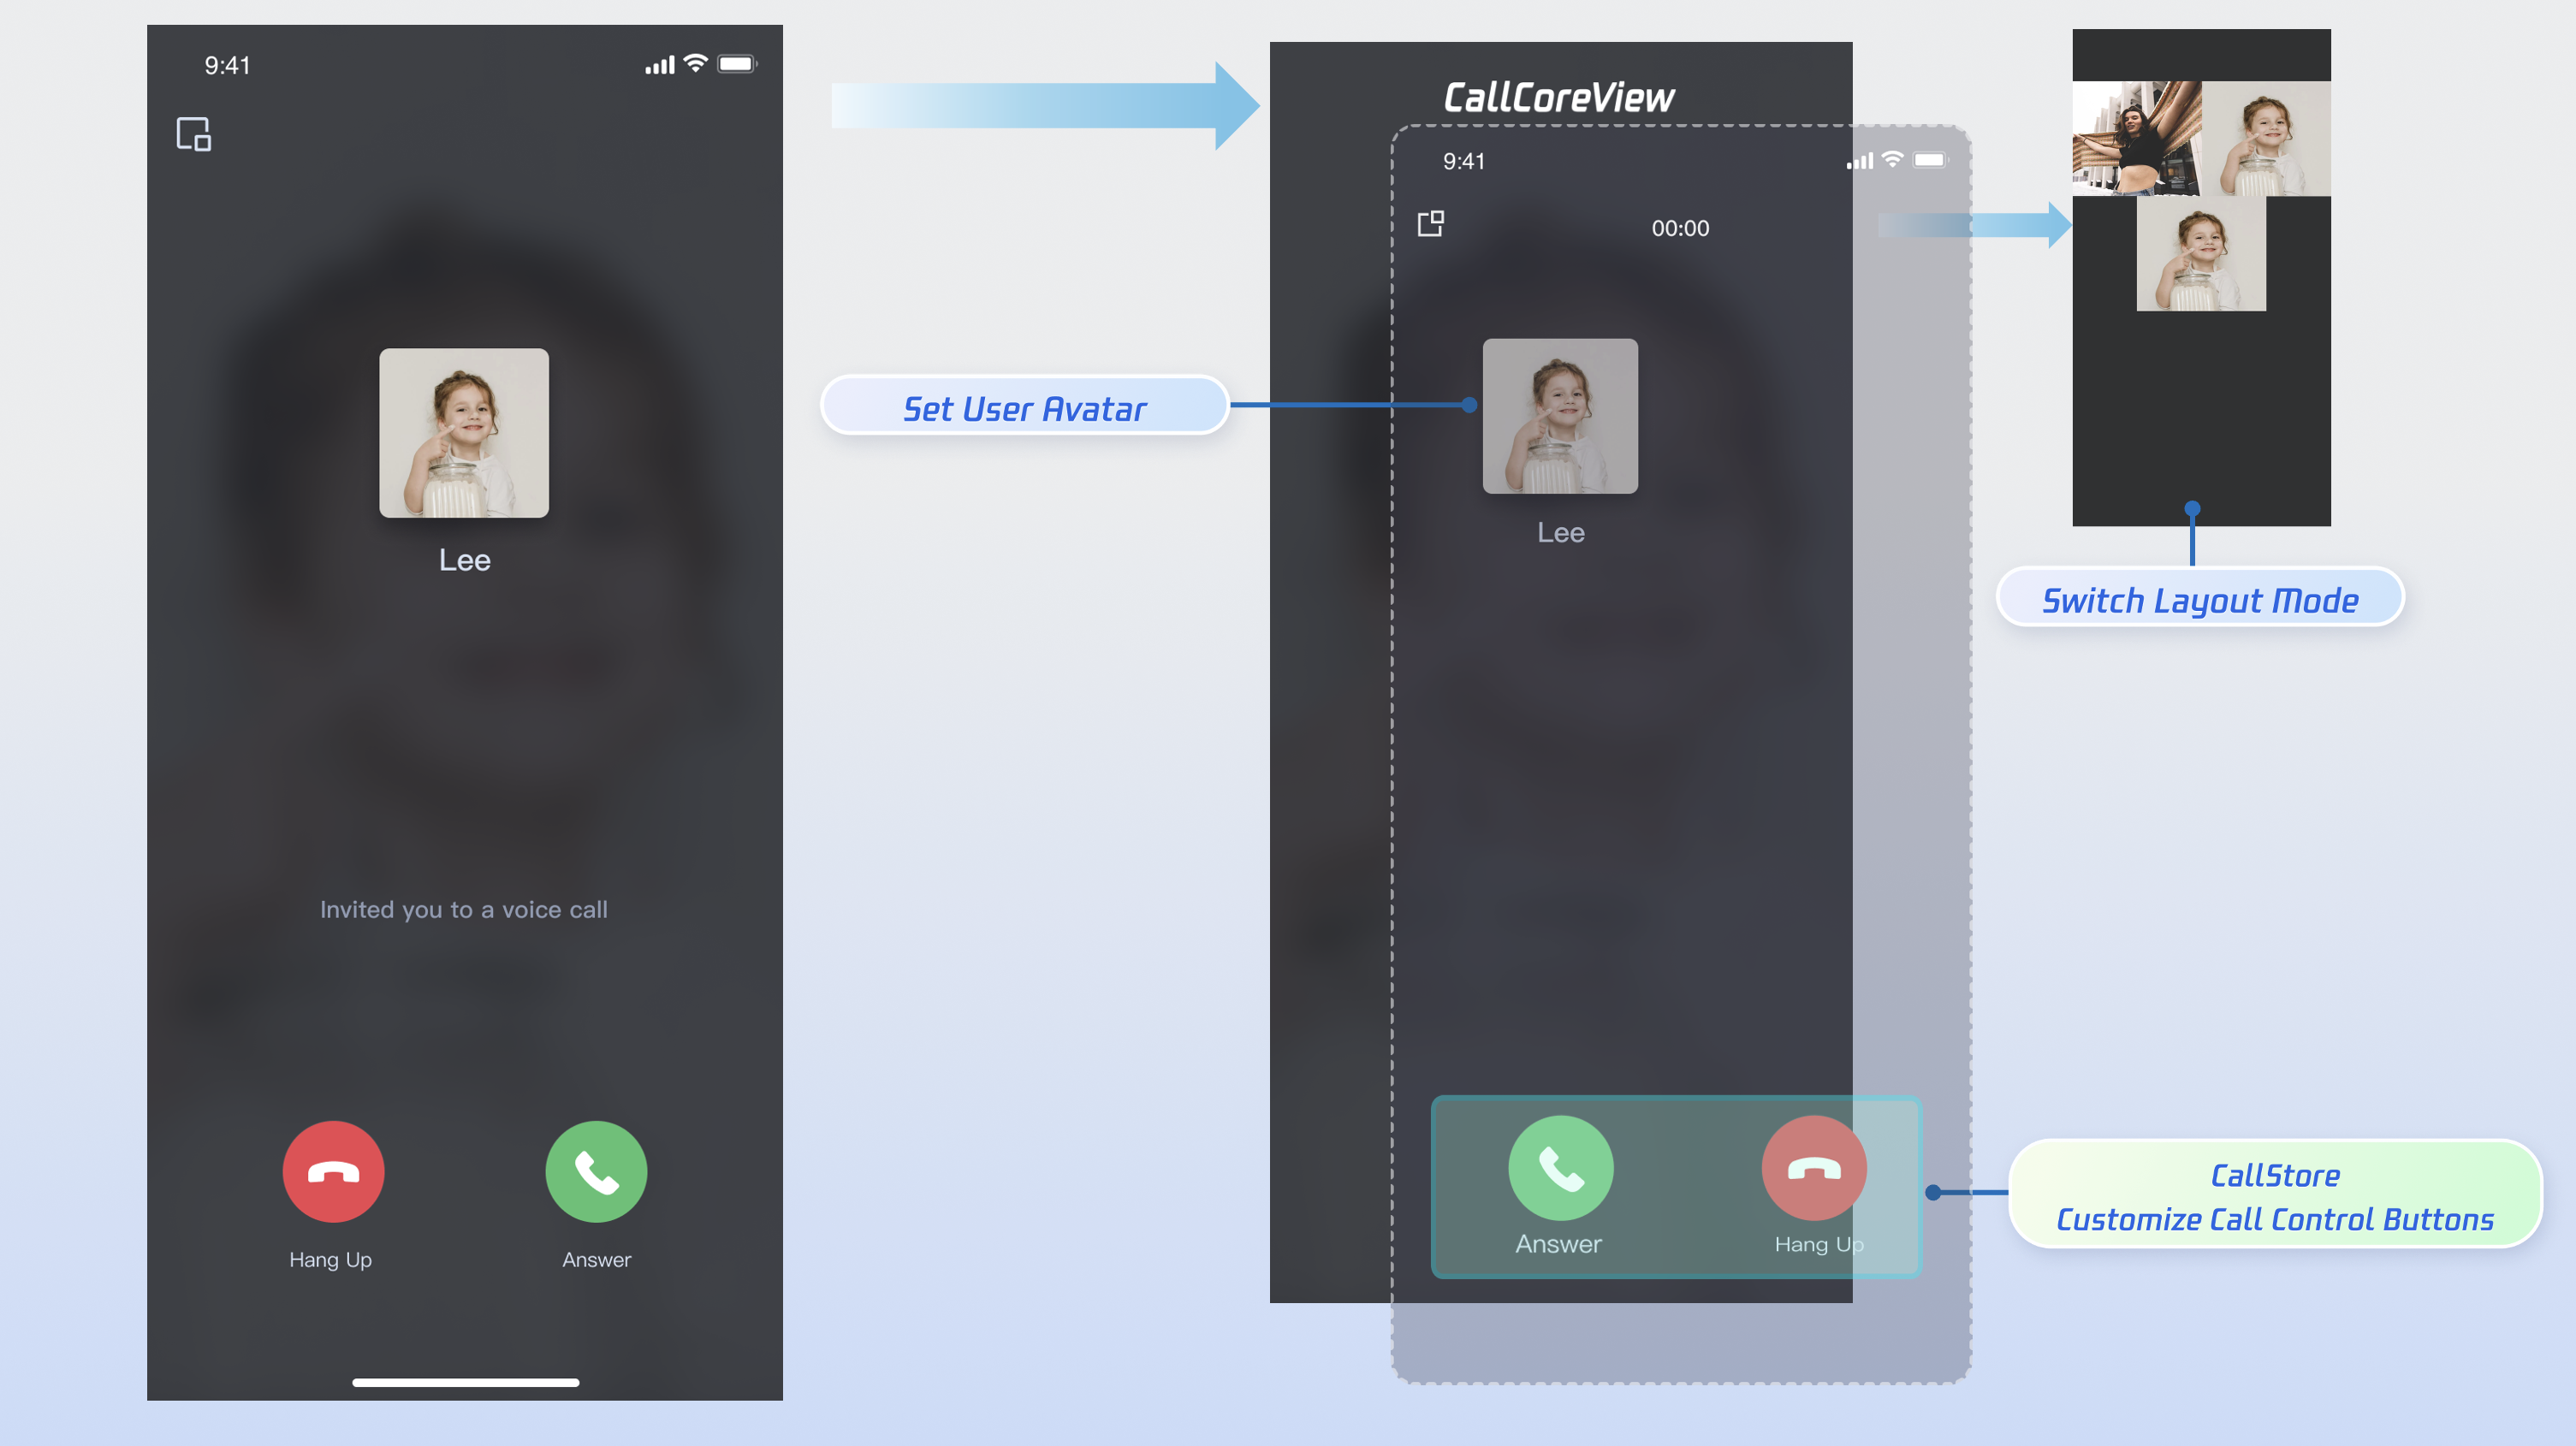
CallCoreView Widget Feature Overview:
Feature
Description
Reference Doc
Set Layout Mode
Supports flexible layout mode switching. If unset, layout automatically adapts based on participant count.
DeviceStore Overview: Microphone (toggle/volume), camera (toggle/switch/quality), screen sharing, and real-time device monitoring. Bind method calls to button taps and listen for device state changes to update button UI dynamically.
CallStore Overview: Core call controls (answer, hang up, reject). Bind method calls to button taps and listen for call state changes to sync button display with call status.
Icon Resource Download: Button icons are available on GitHub. These icons are custom-designed for TUICallKit and are free to use.
1. Add Answer and Reject Buttons: Create a button bar at the bottom and add "Answer" and "Reject" buttons. Bind their tap events to the accept and reject methods.
import 'package:flutter/material.dart';
import 'package:atomic_x_core/atomicxcore.dart';
// Answer and Reject Buttons Widget
classAcceptRejectButtonsextendsStatelessWidget{
constAcceptRejectButtons({super.key});
@override
Widgetbuild(BuildContext context){
returnRow(
children:[
// Answer Button
_buildAcceptButton(),
// Reject Button
_buildRejectButton(),
],
);
}
// Answer Button
Widget_buildAcceptButton(){
returnGestureDetector(
onTap:(){
// Call accept API to answer the call
CallStore.shared.accept();
},
child:Container(
width:60,
height:60,
decoration:constBoxDecoration(
color:Colors.green,
shape:BoxShape.circle,
),
child:constIcon(
Icons.call,
color:Colors.white,
size:30,
),
),
);
}
// Reject Button
Widget_buildRejectButton(){
returnGestureDetector(
onTap:(){
// Call reject API to reject the call
CallStore.shared.reject();
},
child:Container(
width:60,
height:60,
decoration:constBoxDecoration(
color:Colors.red,
shape:BoxShape.circle,
),
child:constIcon(
Icons.call_end,
color:Colors.white,
size:30,
),
),
);
}
}
2. Destroy the UI when the caller cancels or the callee rejects: When the caller cancels the call or the callee rejects, the onCallEnded event fires. Listen for this event and close the call UI when the call ends.
Listen to the current user's call status and play a ringtone or vibrate on incoming calls. Stop notifications after the call is answered or hung up.
1. Data Layer Subscription: Subscribe to CallStore.shared.state.selfInfo to reactively track the logged-in user's info.
2. Play or Stop Notifications: If selfInfo.status is CallParticipantStatus.waiting, play ringtone/vibration; if CallParticipantStatus.accept, stop the notification.
CallStore.shared.state.selfInfo.addListener((){
CallParticipantInfo info =CallStore.shared.state.selfInfo.value;
When an incoming call arrives, get the media type from onCallReceived. For a smoother experience, pre-open relevant media devices when showing the call UI.
1. Listen to Incoming Call Event: Subscribe to the onCallReceived event.
2. Open Devices According to Media Type: For audio calls, open only the microphone; for video calls, open both microphone and camera.
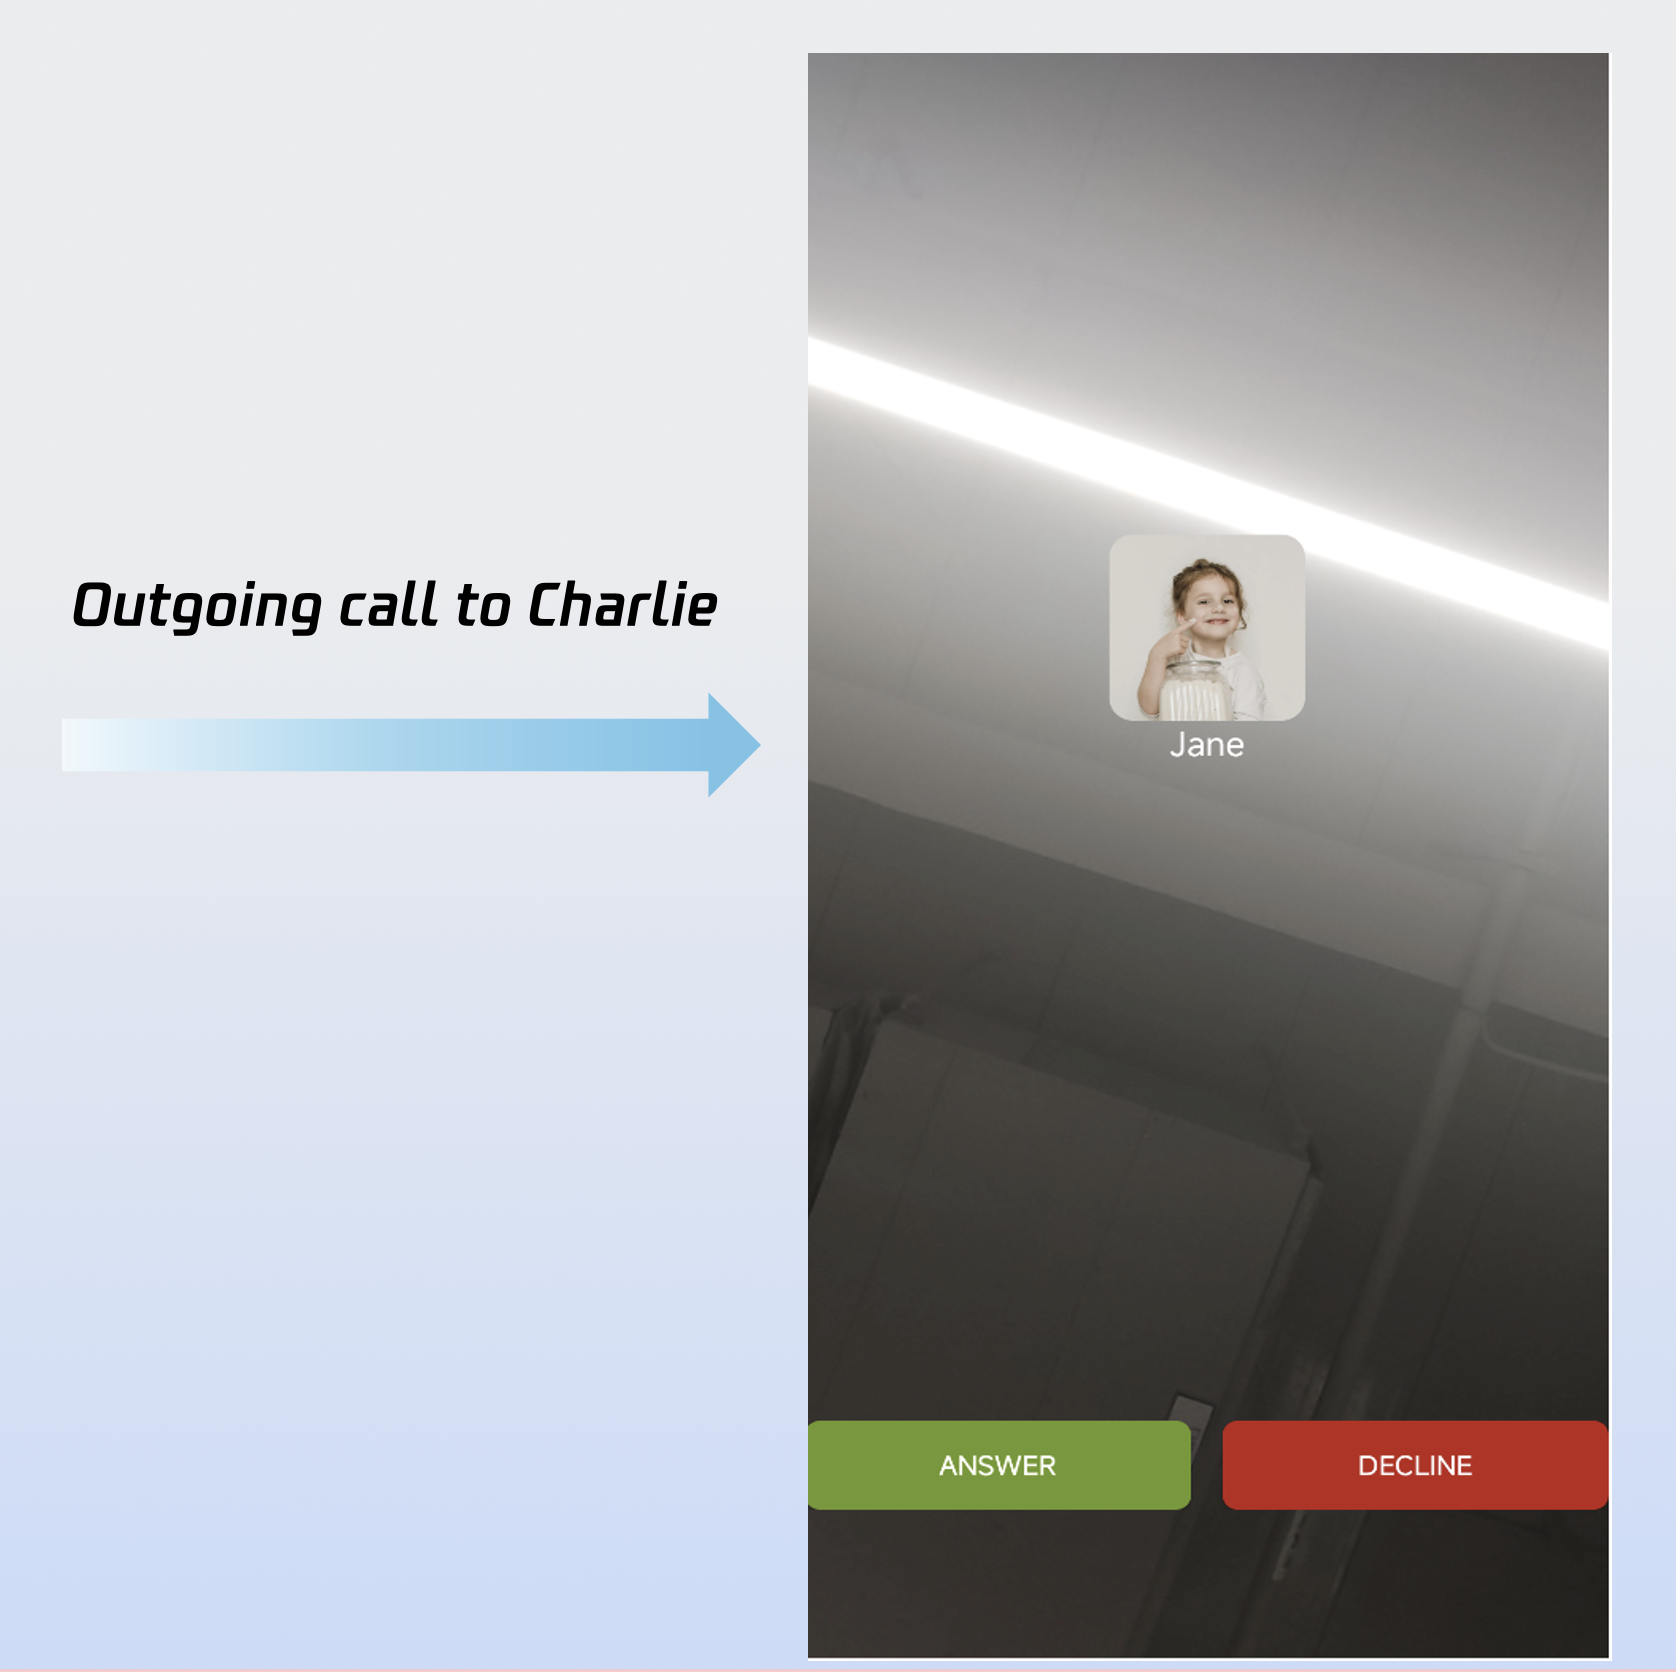
Once you complete these six steps, your "answer a call" feature will look like this:
Integrate Offline Push
To receive call invitations while offline, follow the instructions in Integrate Offline Push.
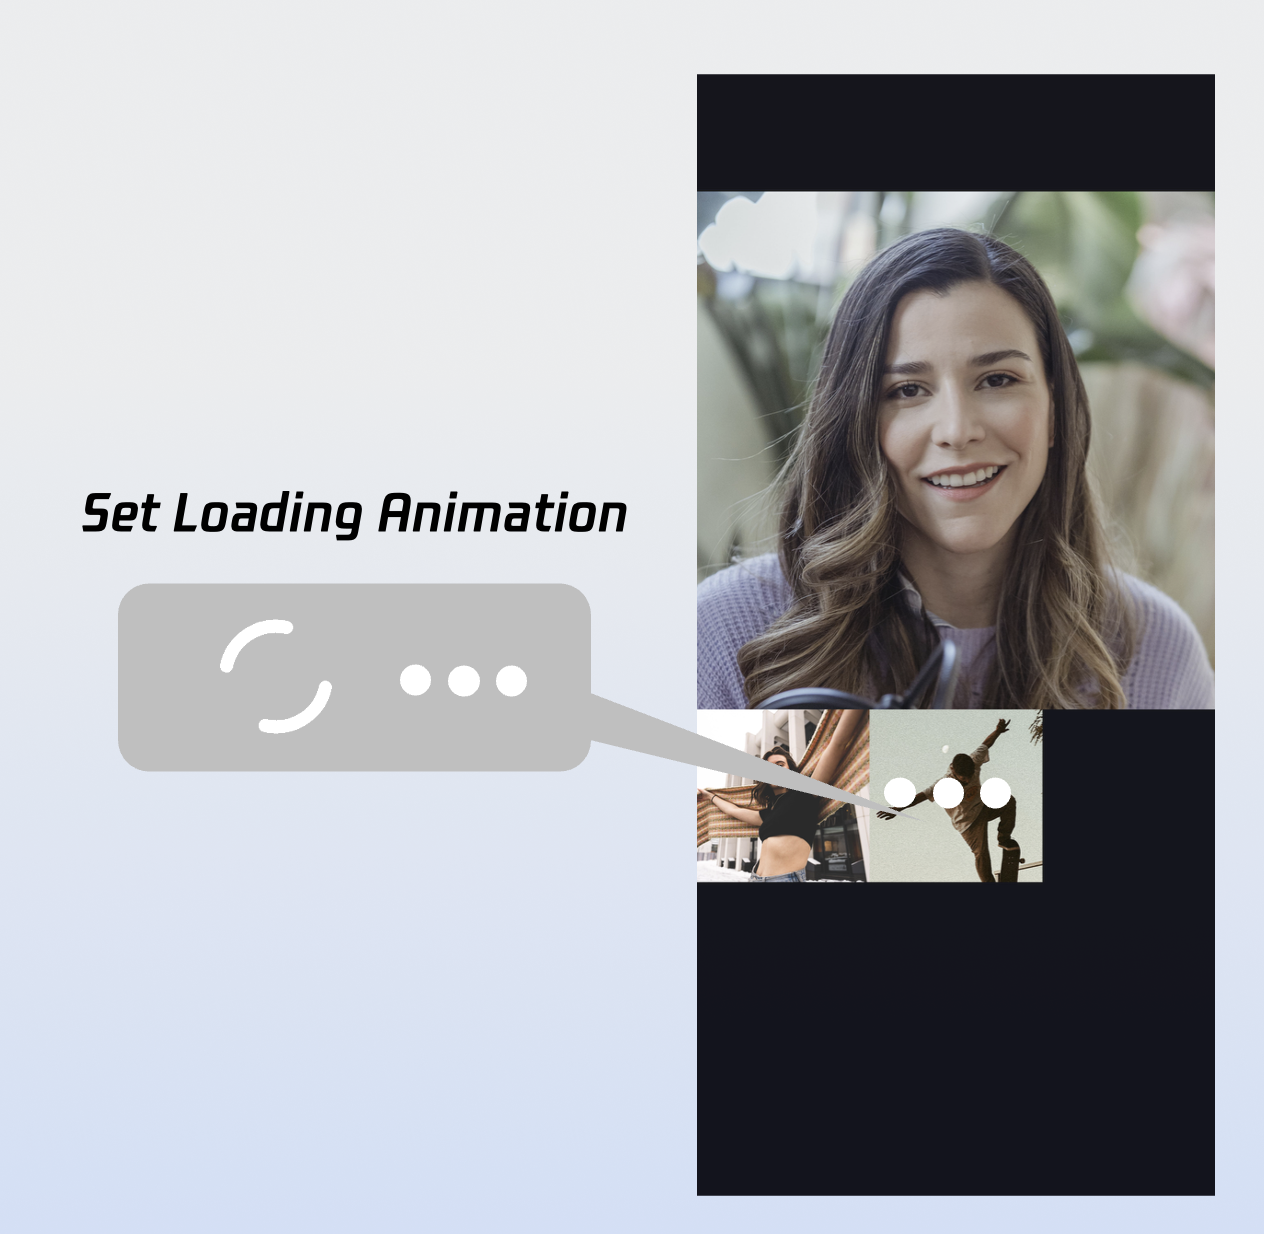
Customize the UI
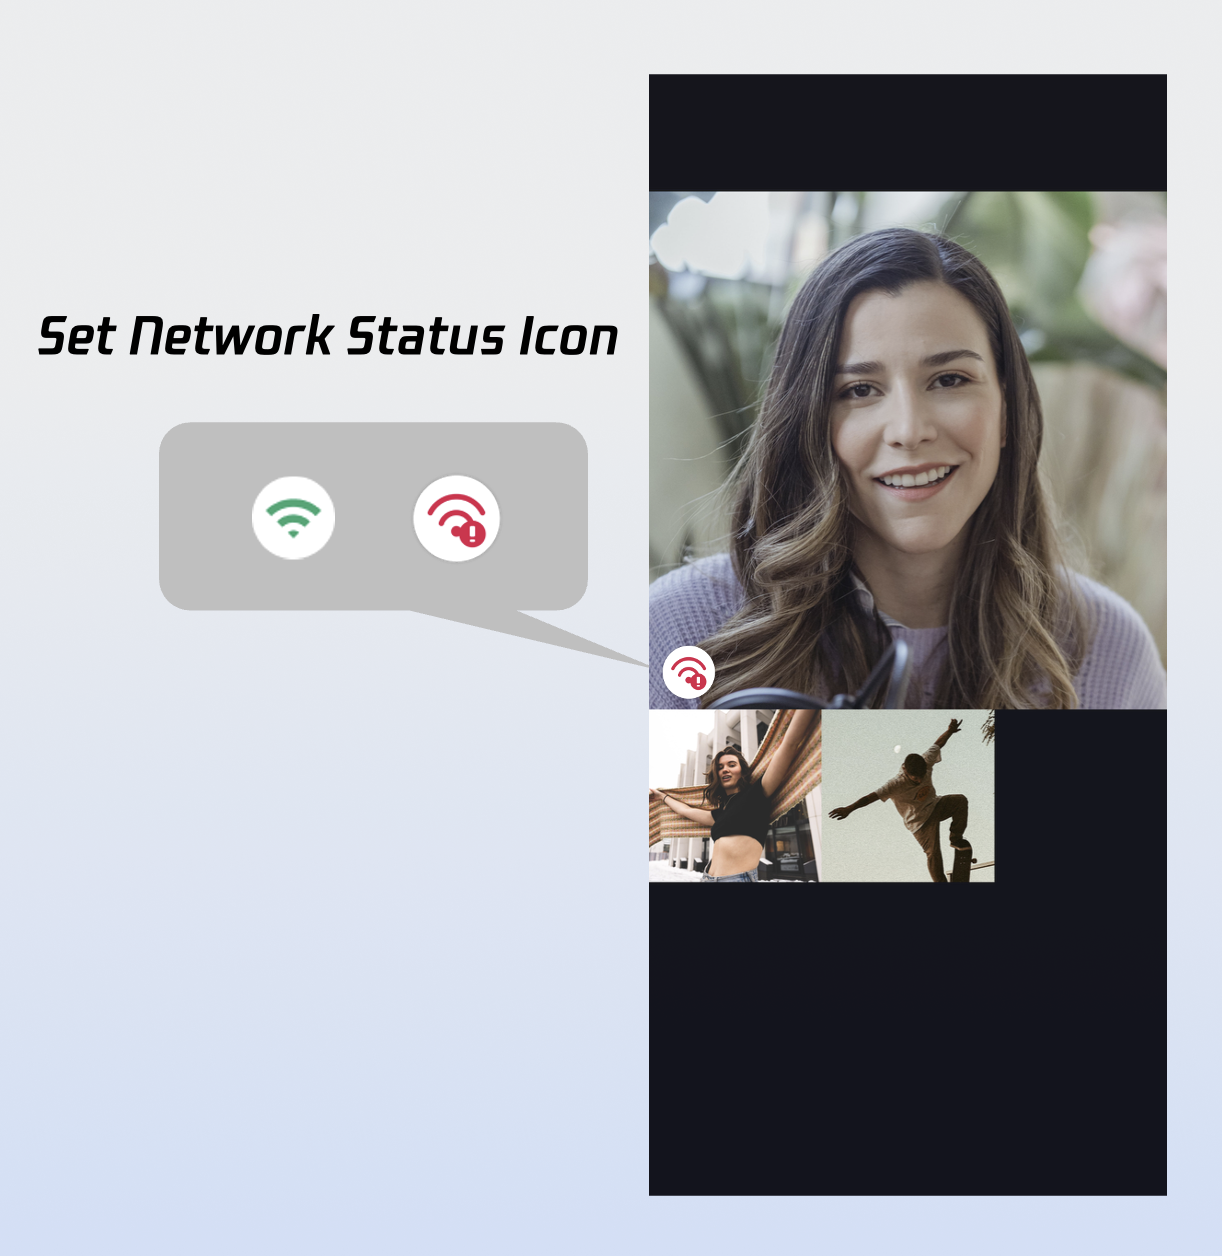
CallCoreView supports extensive UI customization. You can freely replace avatar and volume indicator icons. For fast integration, download these icons from GitHub. All icons are custom-designed for TUICallKit and are copyright-free.
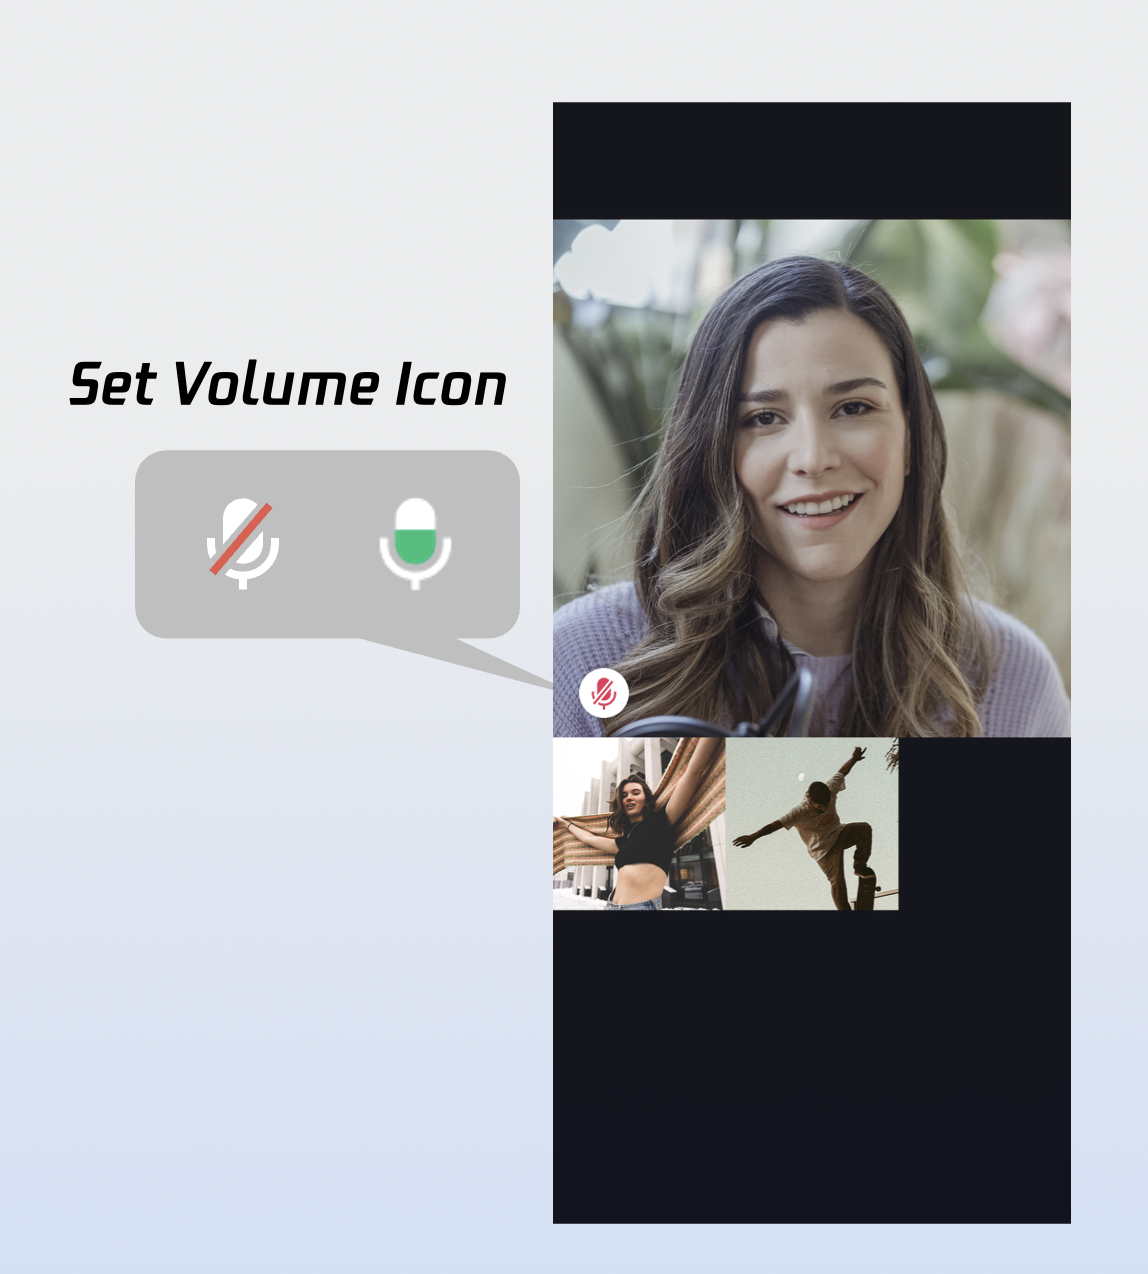
Custom Volume Indicator Icons
Use the volumeIcons parameter in CallCoreView to set icons for various volume levels.
Sample Code:
Widget_buildCallCoreView(){
Map<VolumeLevel, Image> volumeIcons ={
VolumeLevel.mute :Image.asset(''),// Icon for each volume level
};
returnCallCoreView(
controller:CallCoreController.create(),
volumeIcons: volumeIcons,
);
}
volumeIcons Parameter Details:
Parameter
Type
Required
Description
volumeIcons
Map
No
Maps volume levels to icon resources.
VolumeLevel keys:
VolumeLevel.mute: Microphone muted.
VolumeLevel.low: Volume (0-25]
VolumeLevel.medium: Volume (25-50]
VolumeLevel.high: Volume (50-75]
VolumeLevel.peak: Volume (75-100].
Image values: Icon for each level.
Volume Indicator Icons:
Icon
Description
Download Link
Volume indicator icon.Recommended for VolumeLevel.low or VolumeLevel.medium. Display when user volume exceeds this level.
Use the defaultAvatar parameter to set a default avatar for users. Listen to allParticipants for participant avatars. If unavailable or loading fails, show the default avatar.
Sample Code:
Widget_buildCallCoreView(){
Image defaultAvatarImage =Image.asset('');// Default user avatar image
returnCallCoreView(
controller:CallCoreController.create(),
defaultAvatar: defaultAvatarImage,
);
}
defaultAvatar Parameter Details:
Parameter
Type
Required
Description
defaultAvatar
Image
No
Default user avatar.
Default Avatar Resource:
Icon
Description
Download Link
Default avatar.Recommended when loading fails or no avatar is set.
Use setLayoutTemplate for flexible layout switching. If unset, CallCoreView adapts automatically: 1-on-1 calls use Float mode, group calls use Grid mode.
Float Mode
Grid Mode
PIP Mode
Layout: Full screen self-view while waiting; after connecting, full screen remote view with self-view as a floating window.
Interaction: Floating window supports drag and click-to-swap with the main view.
Layout: Grid layout for all participants, suitable for 2+ users. Supports click-to-enlarge.
Interaction: Click any participant's view to enlarge.
Layout: 1v1 shows fixed remote view; multi-party uses active speaker strategy with full screen for the current speaker.
Interaction: Waiting state shows self-view; after connecting, call duration is displayed.
roomId (String): Room ID (optional, auto-assigned if unset).
timeout (int): Call timeout in seconds.
userData (String): Custom data.
chatGroupId (String): Chat group ID for group calls.
isEphemeralCall (bool): Encrypted call (no call record).
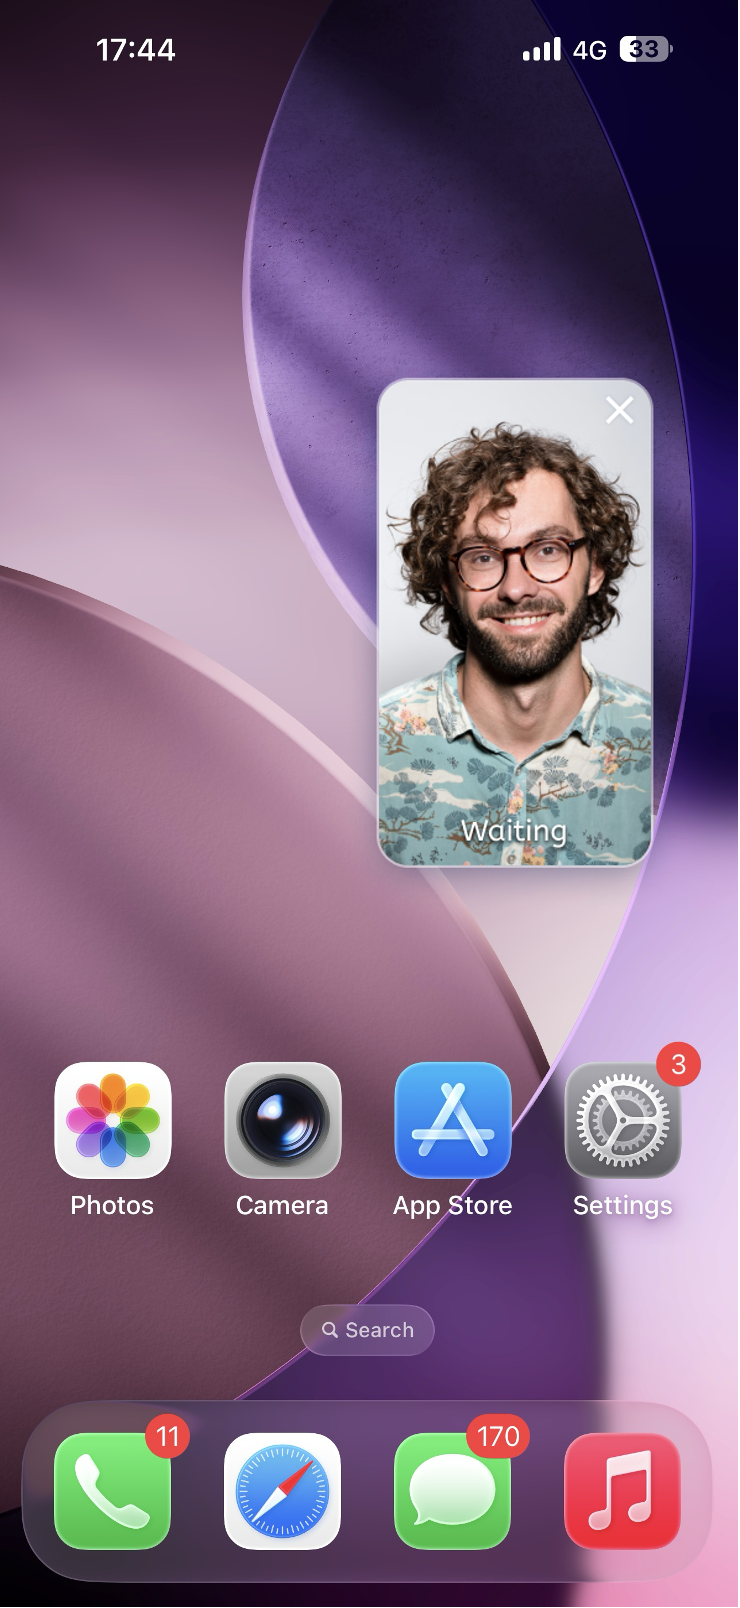
Implement In-App Floating Window
If the call UI is covered (e.g., user navigates away), create a draggable floating window in the app. This window should show key call status (such as duration and remote info) and allow users to quickly return to the full call UI, enhancing multitasking.
_buildPipWindowWidget(){
final pipWidth =MediaQuery.of(context).size.width;
final pipHeight =MediaQuery.of(context).size.height;
final result = await _channel.invokeMethod<bool>('enablePictureInPicture', {'enable': enable});
return result ??false;
}catch(e){
returnfalse;
}
}
/// Enter PiP mode immediately
staticFuture<bool>enterPictureInPicture() async {
try{
final result = await _channel.invokeMethod<bool>('enterPictureInPicture');
return result ??false;
}catch(e){
returnfalse;
}
}
}
Enable PiP before the call starts; disable PiP after the call ends.
Implement iOS Picture-in-Picture Outside App
iOS supports system PiP with the underlying TRTC engine. When the app goes to background, the call view floats above other apps as a PiP window, letting users multitask.
Note:
Add Background Modes in Xcode's Signing & Capabilities and check Audio, AirPlay, and Picture in Picture.
Requires iOS 15.0 or later.
1. Enable PiP
import 'package:tencent_rtc_sdk/trtc_cloud.dart';
TRTCCloud.sharedInstance().then((trtcCloud){
trtcCloud.callExperimentalAPI('''
{
"api":"configPictureInPicture",
"params":{
"enable":true,
"cameraBackgroundCapture":true,
"canvas":{
"width":720,
"height":1280,
"backgroundColor":"#111111"
},
"regions":[
{
"userId":"remoteUserId",
"userName":"",
"width":1.0,
"height":1.0,
"x":0.0,
"y":0.0,
"fillMode":0,
"streamType":"high",
"backgroundColor":"#111111",
"backgroundImage":"file:///path/to/avatar.png"
},
{
"userId":"localUserId",
"userName":"",
"width":0.333,
"height":0.333,
"x":0.65,
"y":0.05,
"fillMode":0,
"streamType":"high",
"backgroundColor":"#111111"
}
]
}
}
''');
});
2. Disable PiP
import 'package:tencent_rtc_sdk/trtc_cloud.dart';
TRTCCloud.sharedInstance().then((trtcCloud){
trtcCloud.callExperimentalAPI('''
{
"api":"configPictureInPicture",
"params":{
"enable":false
}
}
''');
});
Enable Background Audio/Video Capture
To ensure your app can capture audio/video while in the background (e.g., screen lock or app switch), configure Android and iOS as follows:
Android Configuration
1. Permissions and Service (AndroidManifest.xml): Android 9.0+ requires foreground service permissions; Android 14+ requires explicit service type for microphone/camera.
Call start() via MethodChannel at the appropriate time in your app to enable background keep-alive.
FAQ
iOS Release Build [symbol not found] Error?
Since tencent_rtc_sdk uses Flutter FFI, Xcode's symbol stripping during Release builds may remove TRTC C symbols and cause symbol not found errors. To resolve:
1. In Build Settings, set Deployment Postprocessing to Yes.
2. Set Strip Style for Release to Non-Global Symbols.
If the callee goes offline and then comes online within the call invitation timeout, will they receive the incoming call event?
For single calls, if the callee comes online within the timeout, they will receive the call invitation. For group calls, if the callee comes online within the timeout, up to 20 unprocessed group messages will be pulled; if there is a call invitation, the incoming call event is triggered.
Contact Us
If you have questions or suggestions during integration or usage, join our Telegram technical group or Contact Us for support.