VoIP (Apple CallKit)
TUICallKit 组件支持通过接入 TUIVoIPExtension/CallKit 推送插件实现 VoIP 推送的功能。 TUICallKit 为您提供了两种集成方式:TUIVoIPExtension/CallKit 插件(付费)和 自集成推送(免费),我们更推荐您使用 TUIVoIPExtension/CallKit 推送插件来实现离线推送,TUIVoIPExtension/CallKit 推送插件有以下优势:
接入周期短,预计全厂商接入仅需要 30 分钟。
支持数据统计和链路追踪,方便您查看推送触达率、点击率和转化率等各类指标。
可以实现系统级的通话效果,提高通话触达率。
支持 Flutter 等跨平台框架。
注意:
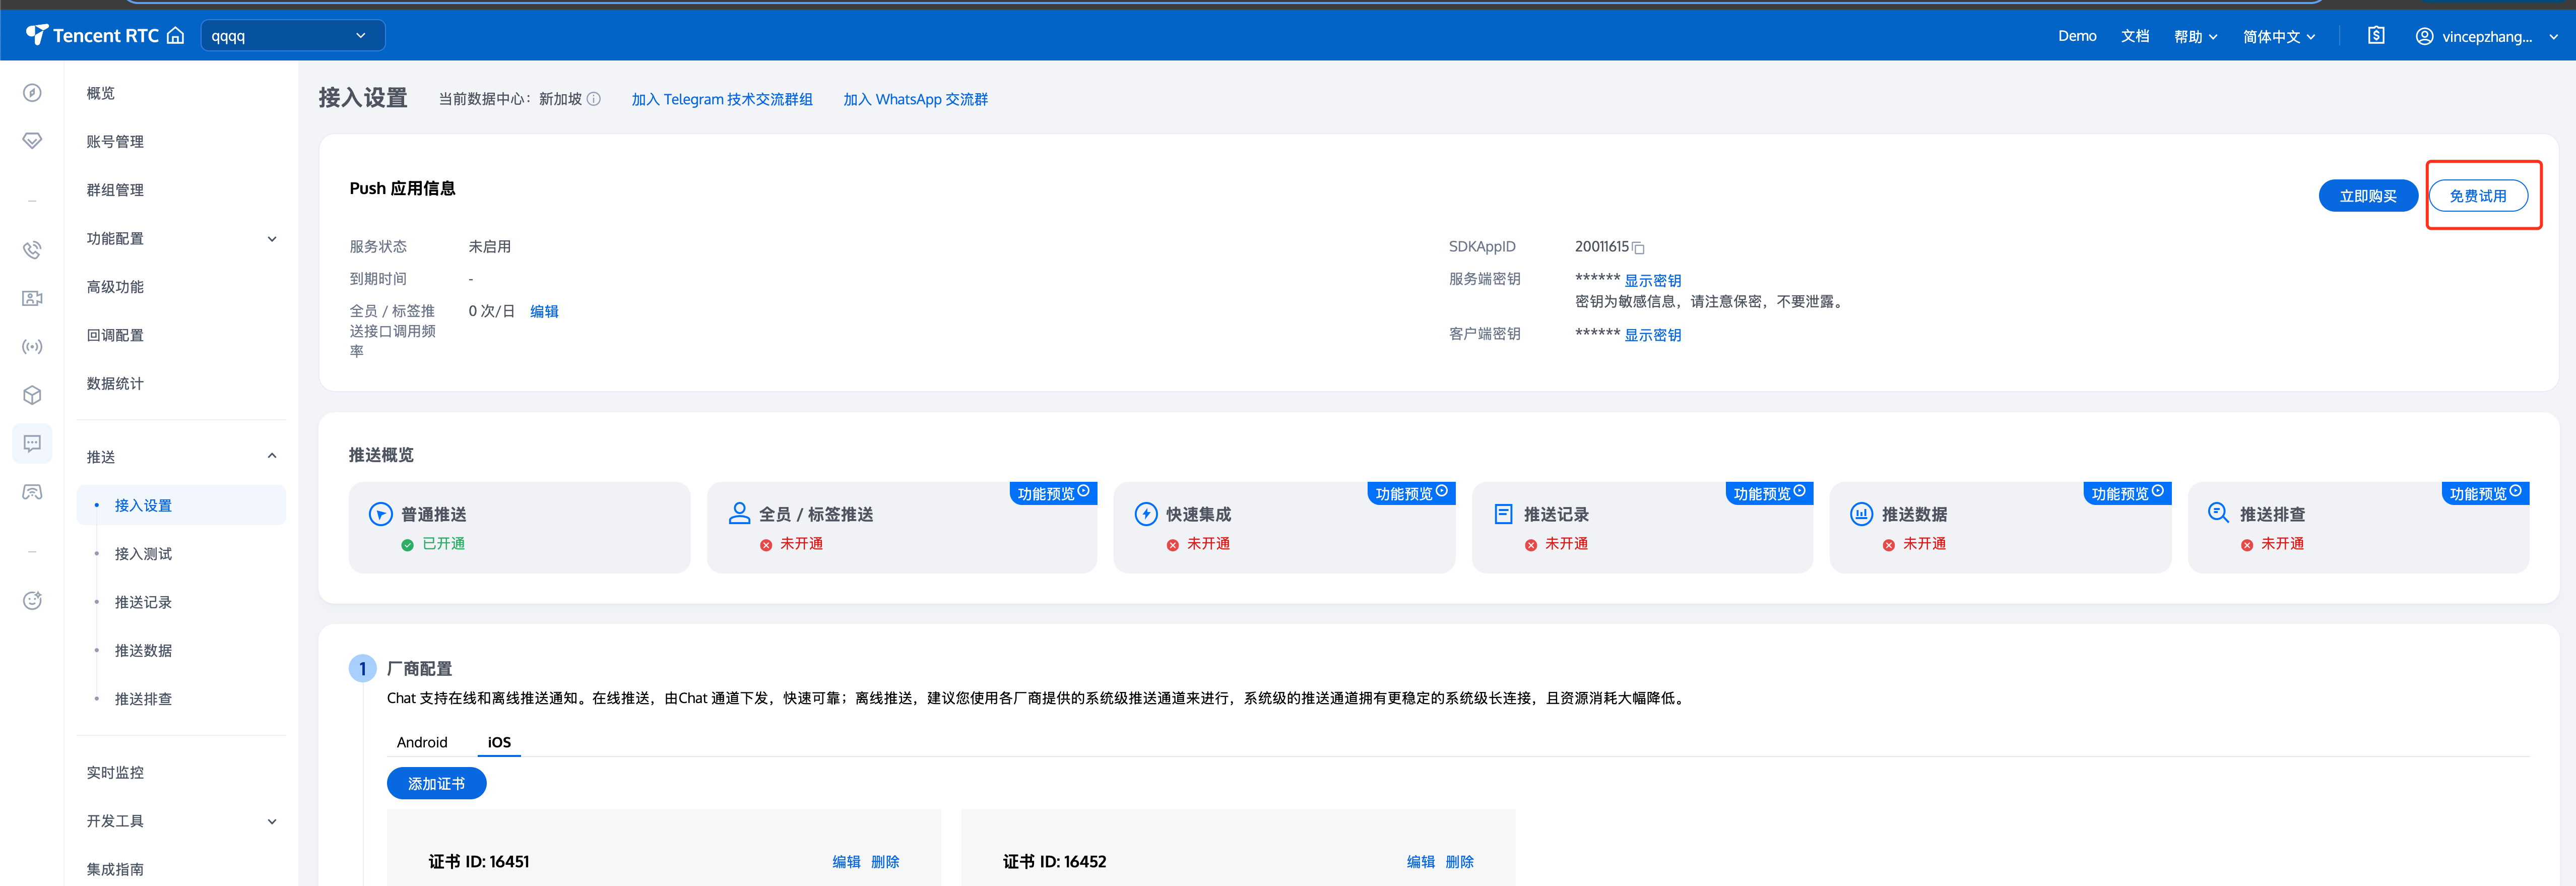
TUIVoIPExtension 是 TIMPush 的一个子模块,由于 VoIP 推送的特殊性, TUIVoIPExtension 是独立发布的。 使用 TUIVoIPExtension 插件首先需要开通 TIMPush 服务。
说明:
TUIVoIPExtension/CallKit 插件需要在 iOS 13.0 及以上系统中使用。
VoIP Push 无法复用 APNs 普通推送证书,需要单独在苹果开发者网站上 申请 VoIP Push 证书。
禁止:
由于 TUIVoIPExtension/CallKit 插件使用了 Apple CallKit,无法在 App Store 的中国大陆地区上架!
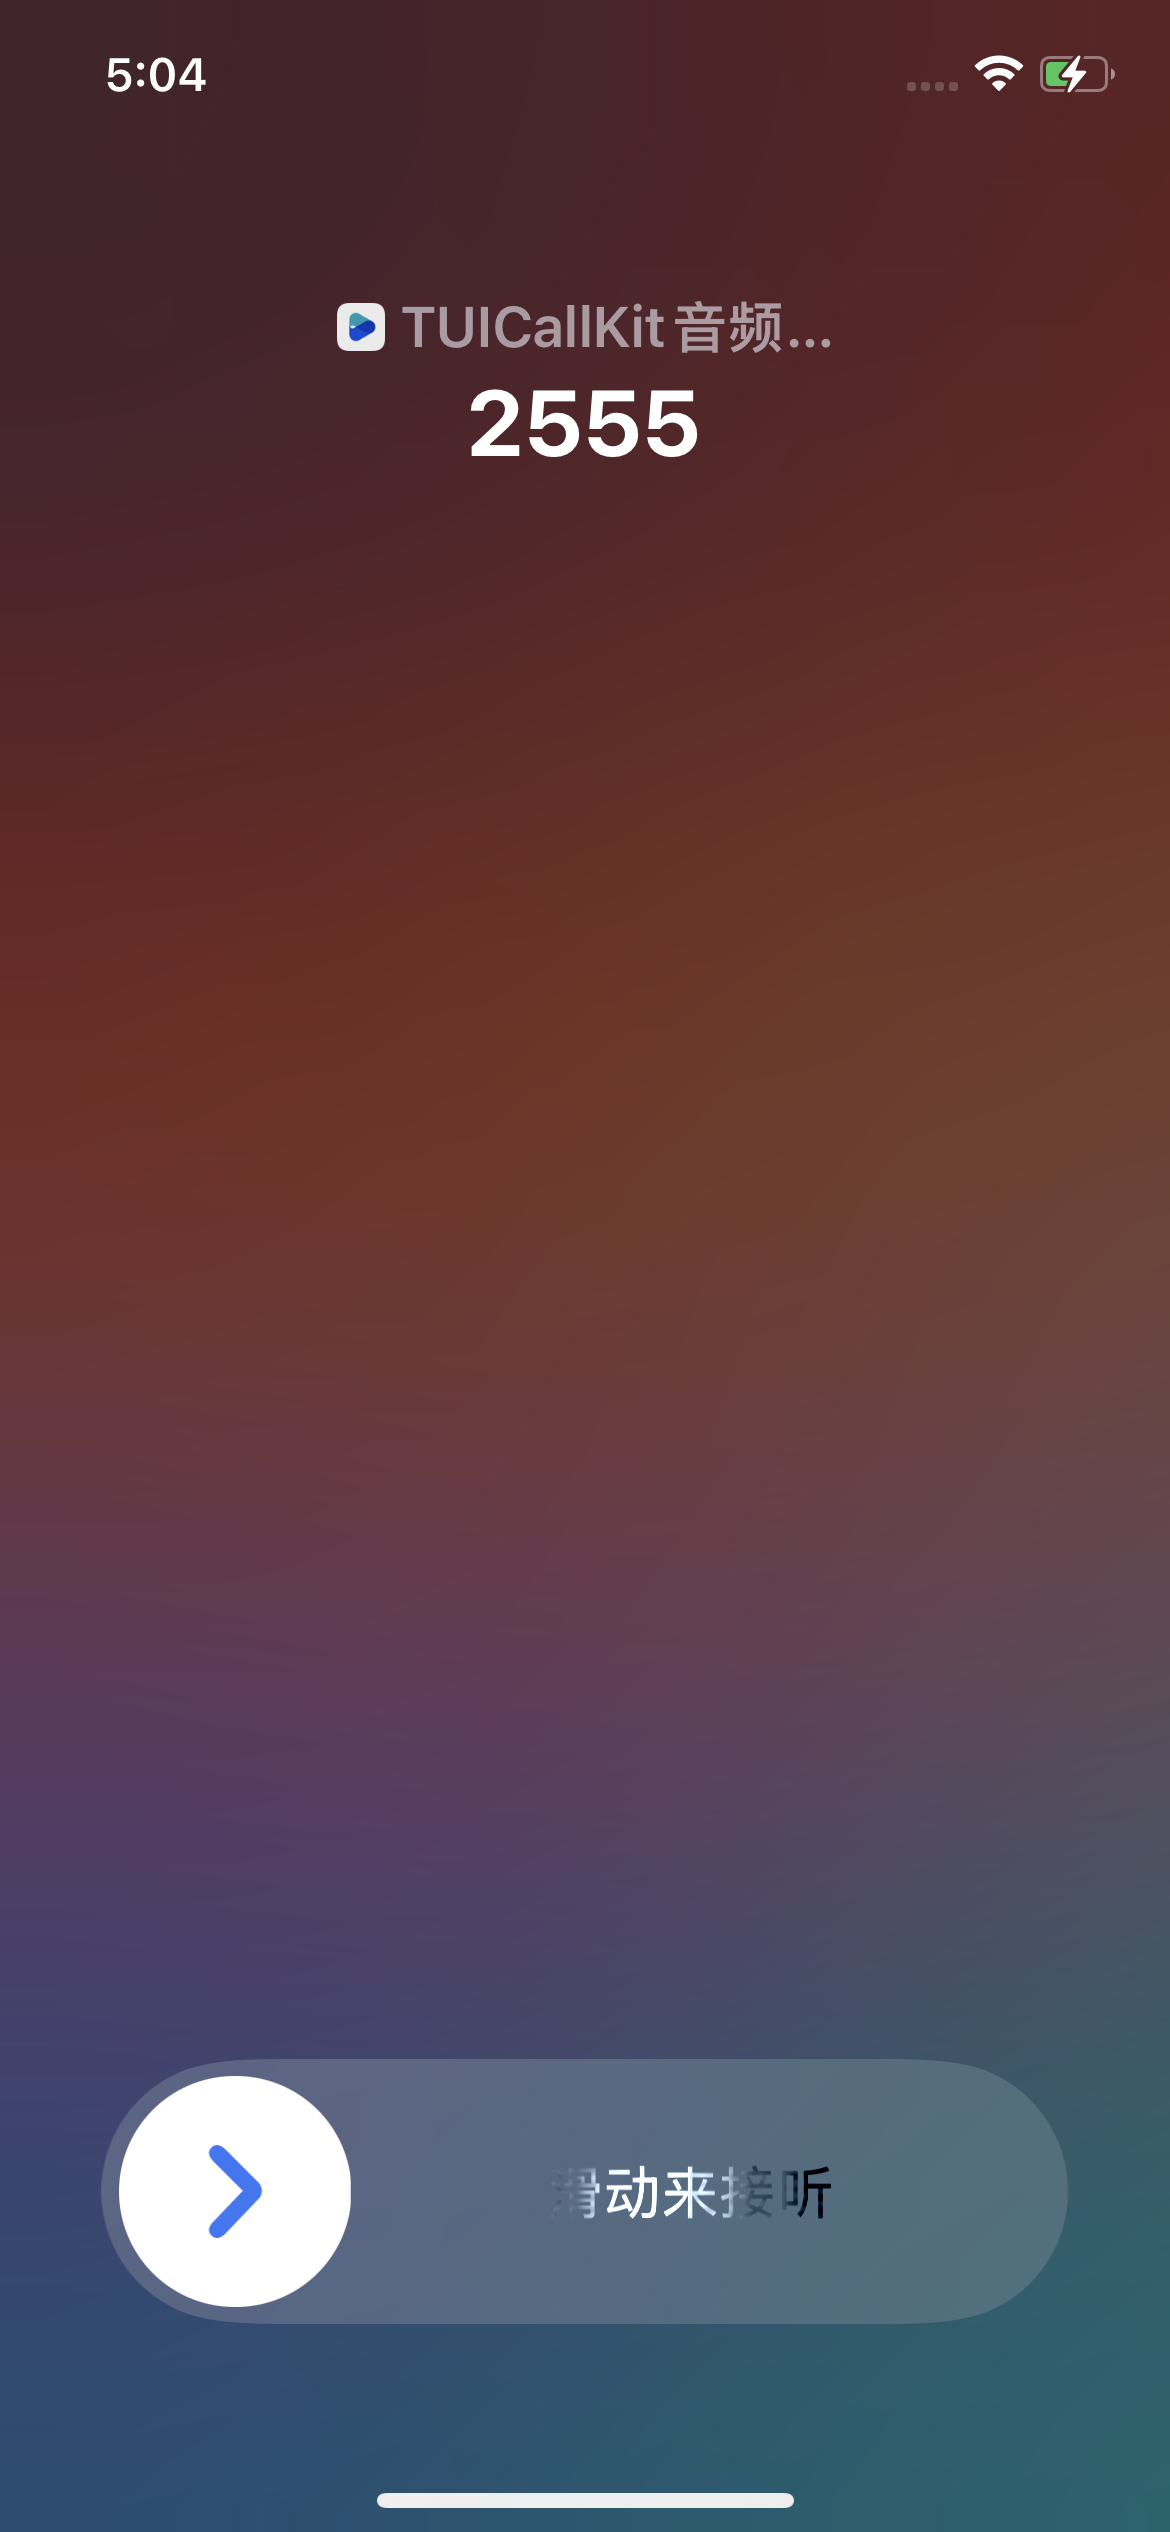
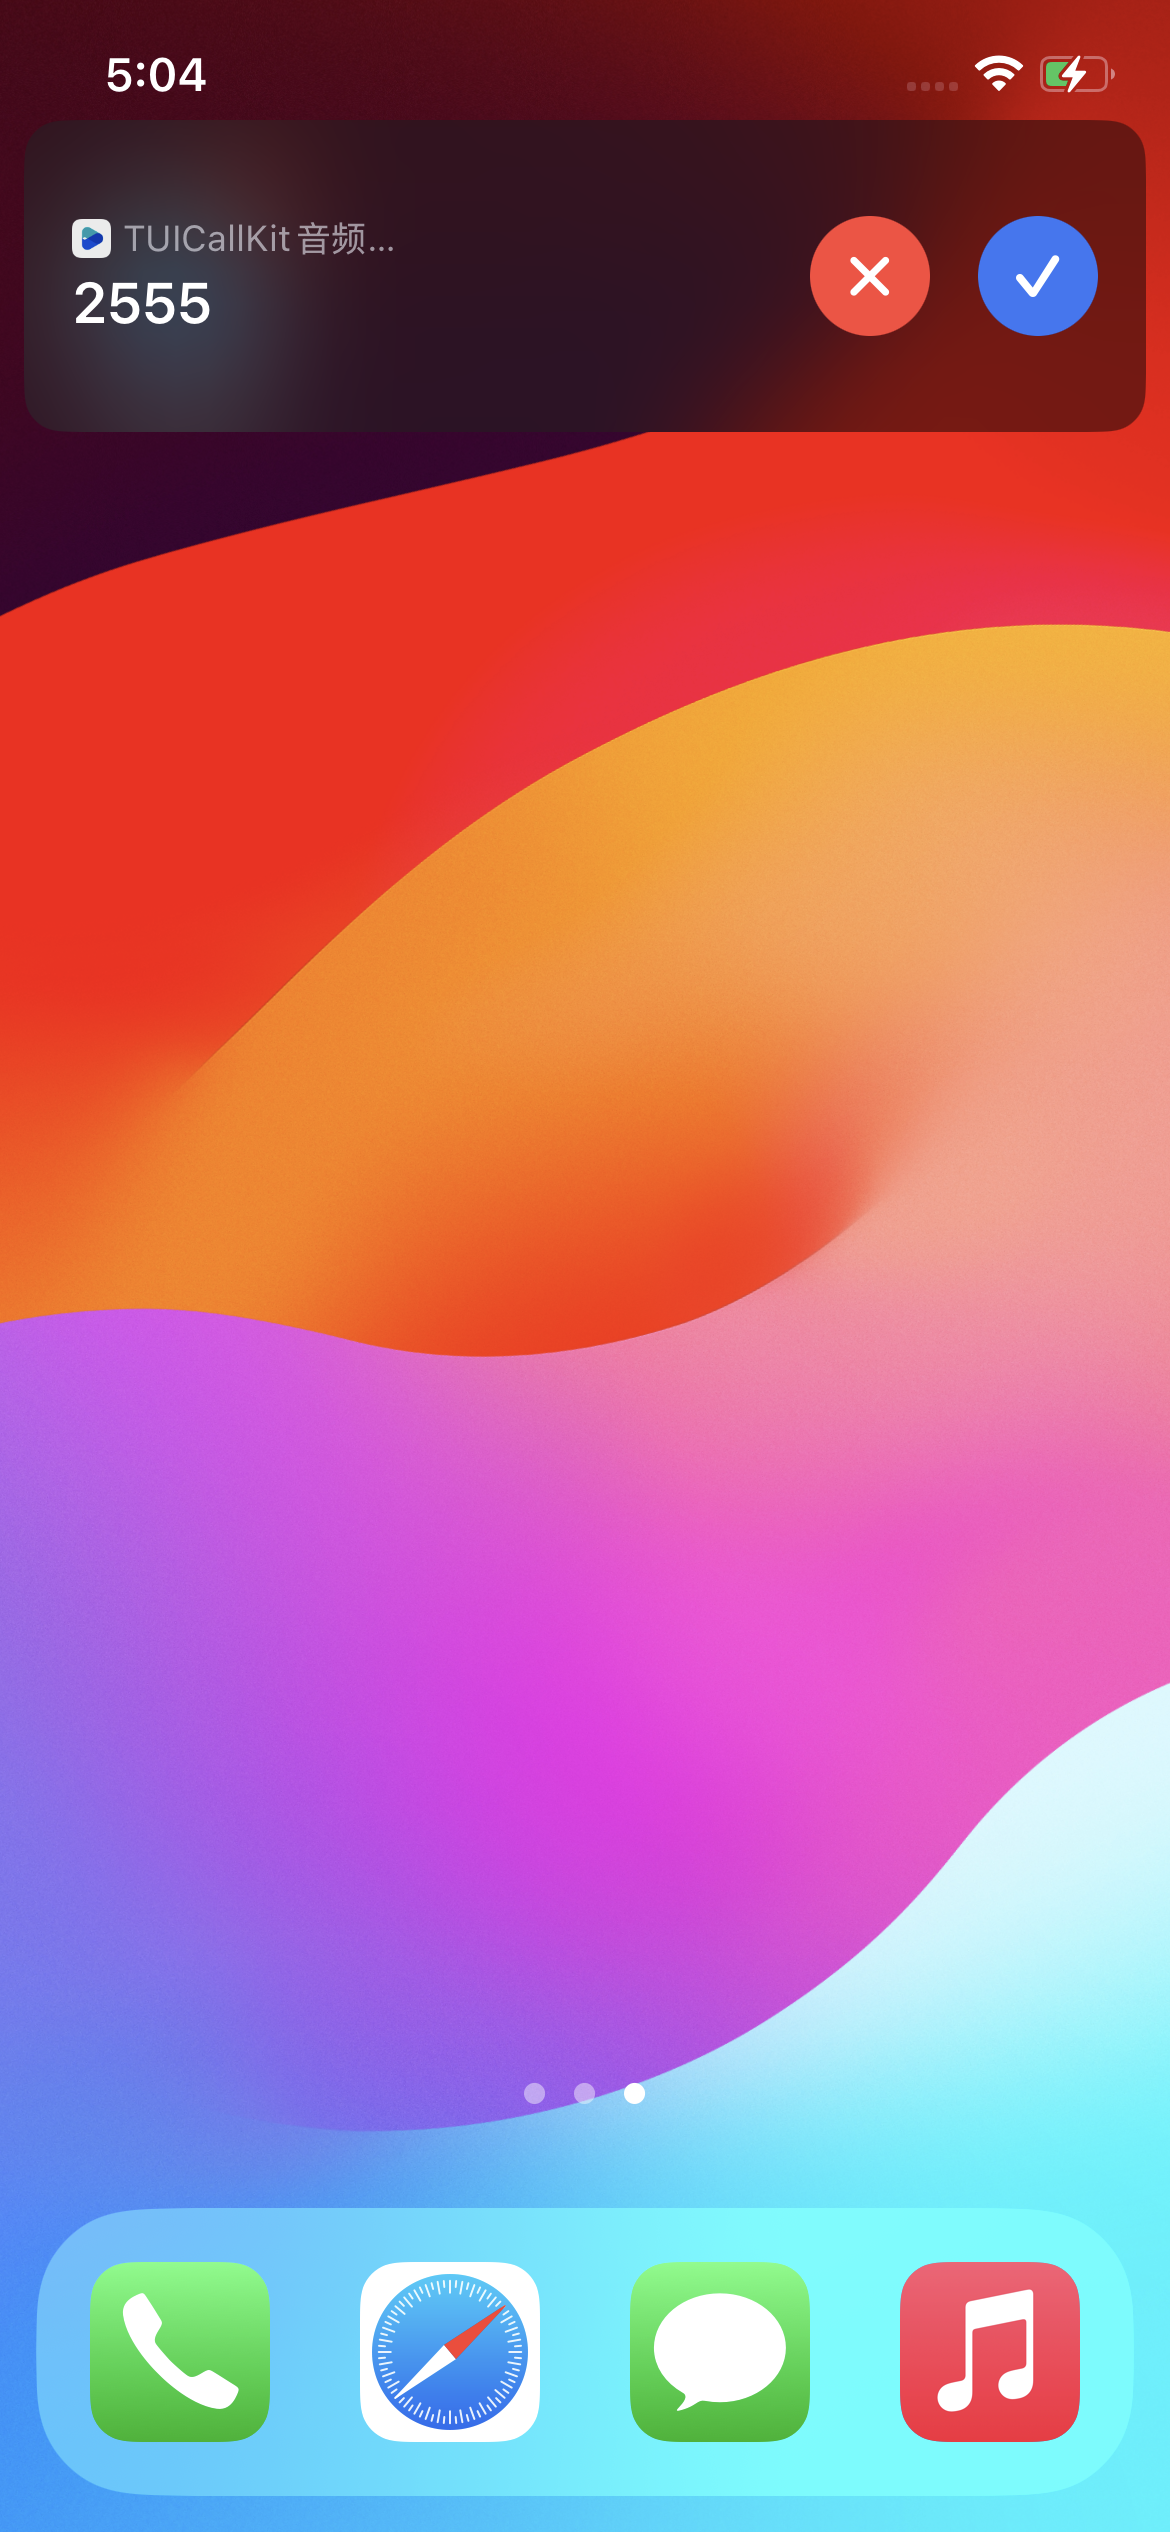
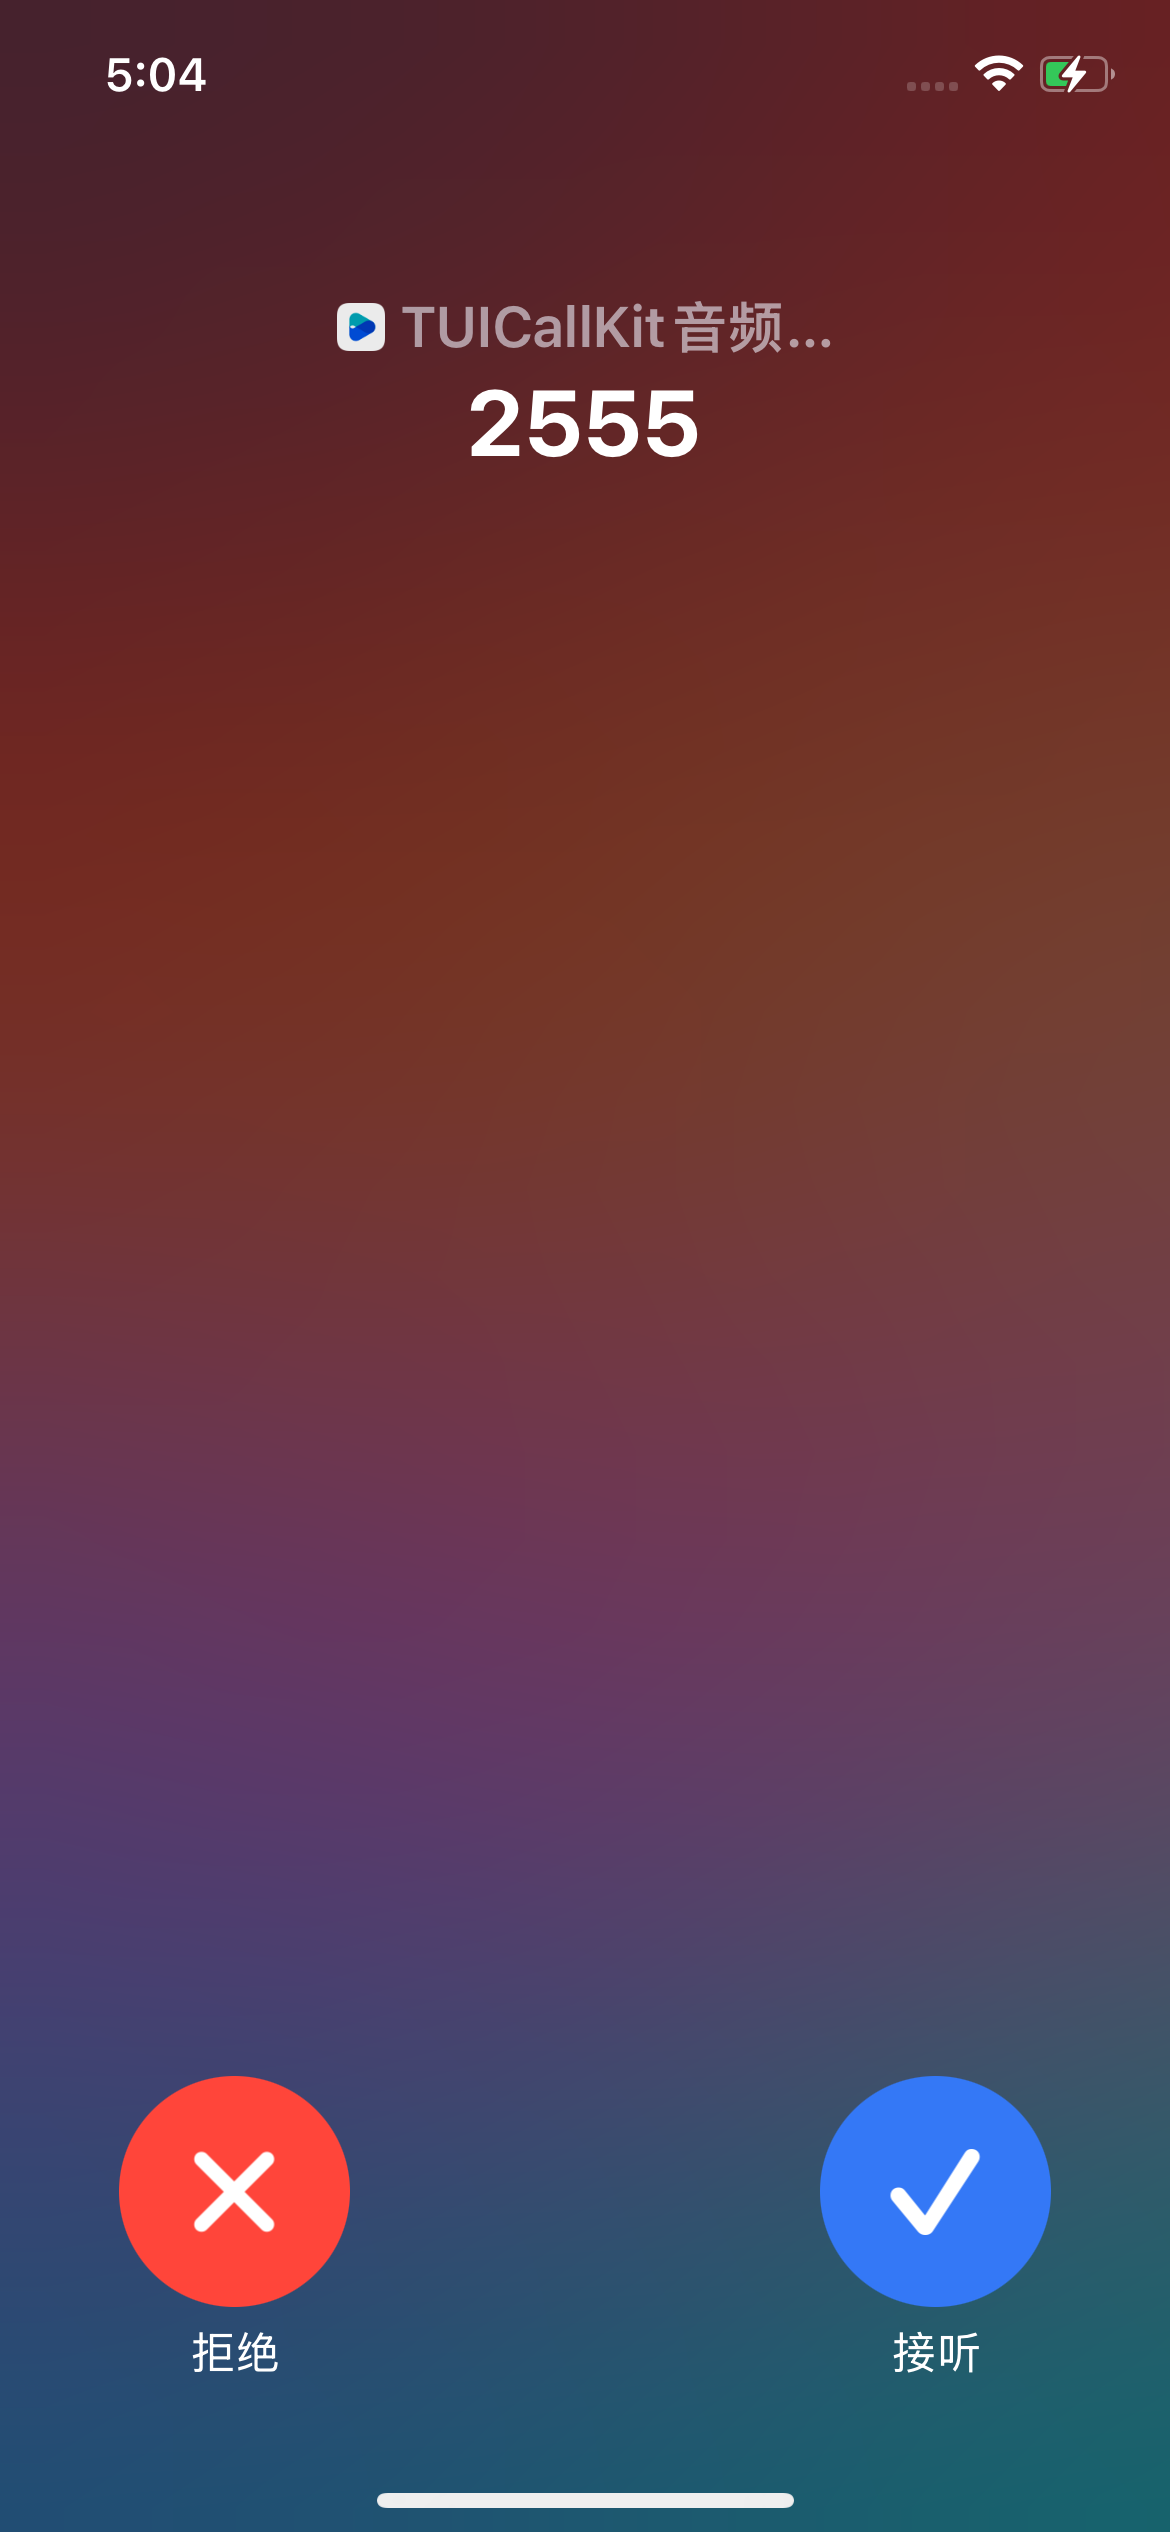
集成效果
锁屏时的效果 | 应用在后台的效果 | 应用在后台展开的效果 |
 |  |  |
准备条件
1. 开通服务
2. 厂商配置
步骤1:申请 VoIP Push 证书
在申请 VoIP Push 证书之前,请先登录 苹果开发者中心 网站开启 App 的远程推送功能。当您的 AppID 具备了 Push Notification 能力后,按照如下步骤申请并配置 VoIP Push 证书:
1. 登录 苹果开发者中心 网站,单击 Certificates, IDs & Profiles 选项卡中的 Certificates,进入 Certificates, Identifiers & Profiles 页面。
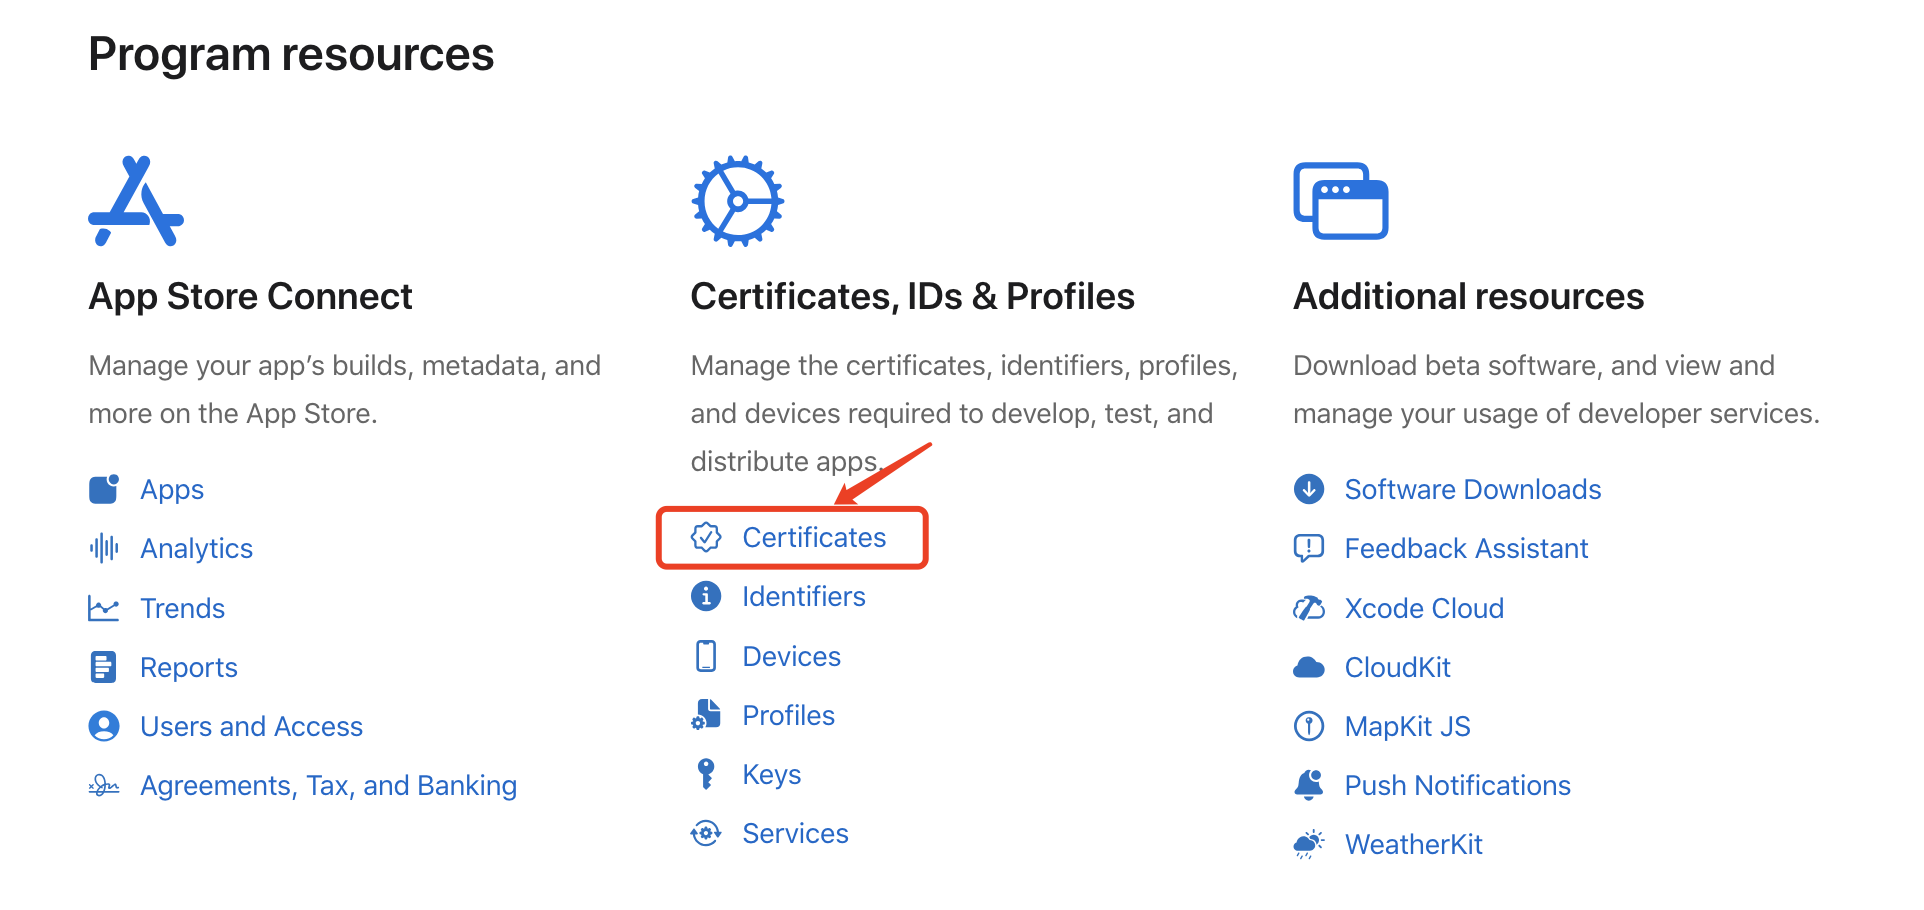
2. 单击 Certificates 右侧的+。

3. 在 Create a New Certificate 选项卡中,选择 VoIP Services Certificate,并单击 Continue。
4. 在 Select an App ID for your VoIP Service Certificate 选项卡中,选择您当前的 App 的 BundleID,并单击 Continue。
5. 紧接着,系统提示我们需要一个 Certificate Signing Request(CSR)。
6. 我们接下来制作 CSR 文件。首先在 Mac 上打开钥匙串访问工具(Keychain Access),在菜单中选择钥匙串访问 > 证书助理 > 从证书颁发机构请求证书 (
Keychain Access - Certificate Assistant - Request a Certificate From a Certificate Authority)。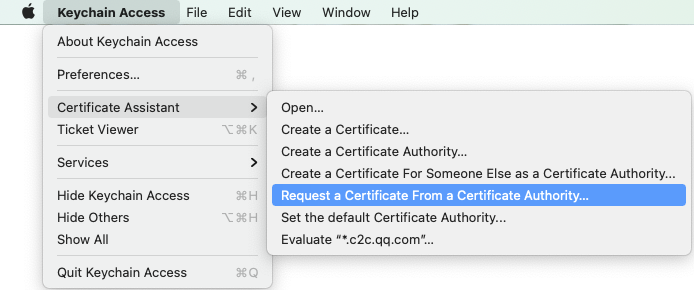
7. 输入用户电子邮件地址(您的邮箱)、常用名称(您的名称或公司名),选择存储到磁盘,单击继续,系统将生成一个
*.certSigningRequest 文件。返回上述步骤5中 Apple Developer 网站刚才的页面,单击 Choose File 上传生成的
*.certSigningRequest文件。
8. 单击 Continue 后生成证书,点击 Download 下载对应的证书到本地。
9. 双击打开刚才下载的
voip_services.cer,系统会将其导入钥匙串中。10. 打开钥匙串应用,在登录 > 我的证书,右键导出刚创建的 VoIP Services 的
P12 文件。说明:
保存
P12文件时,请务必要为其设置密码。步骤2:上传证书到 IM 控制台
1. 选择您的 IM 应用,进入应用的基础配置页面,在离线推送证书配置选项卡中,单击立即前往。
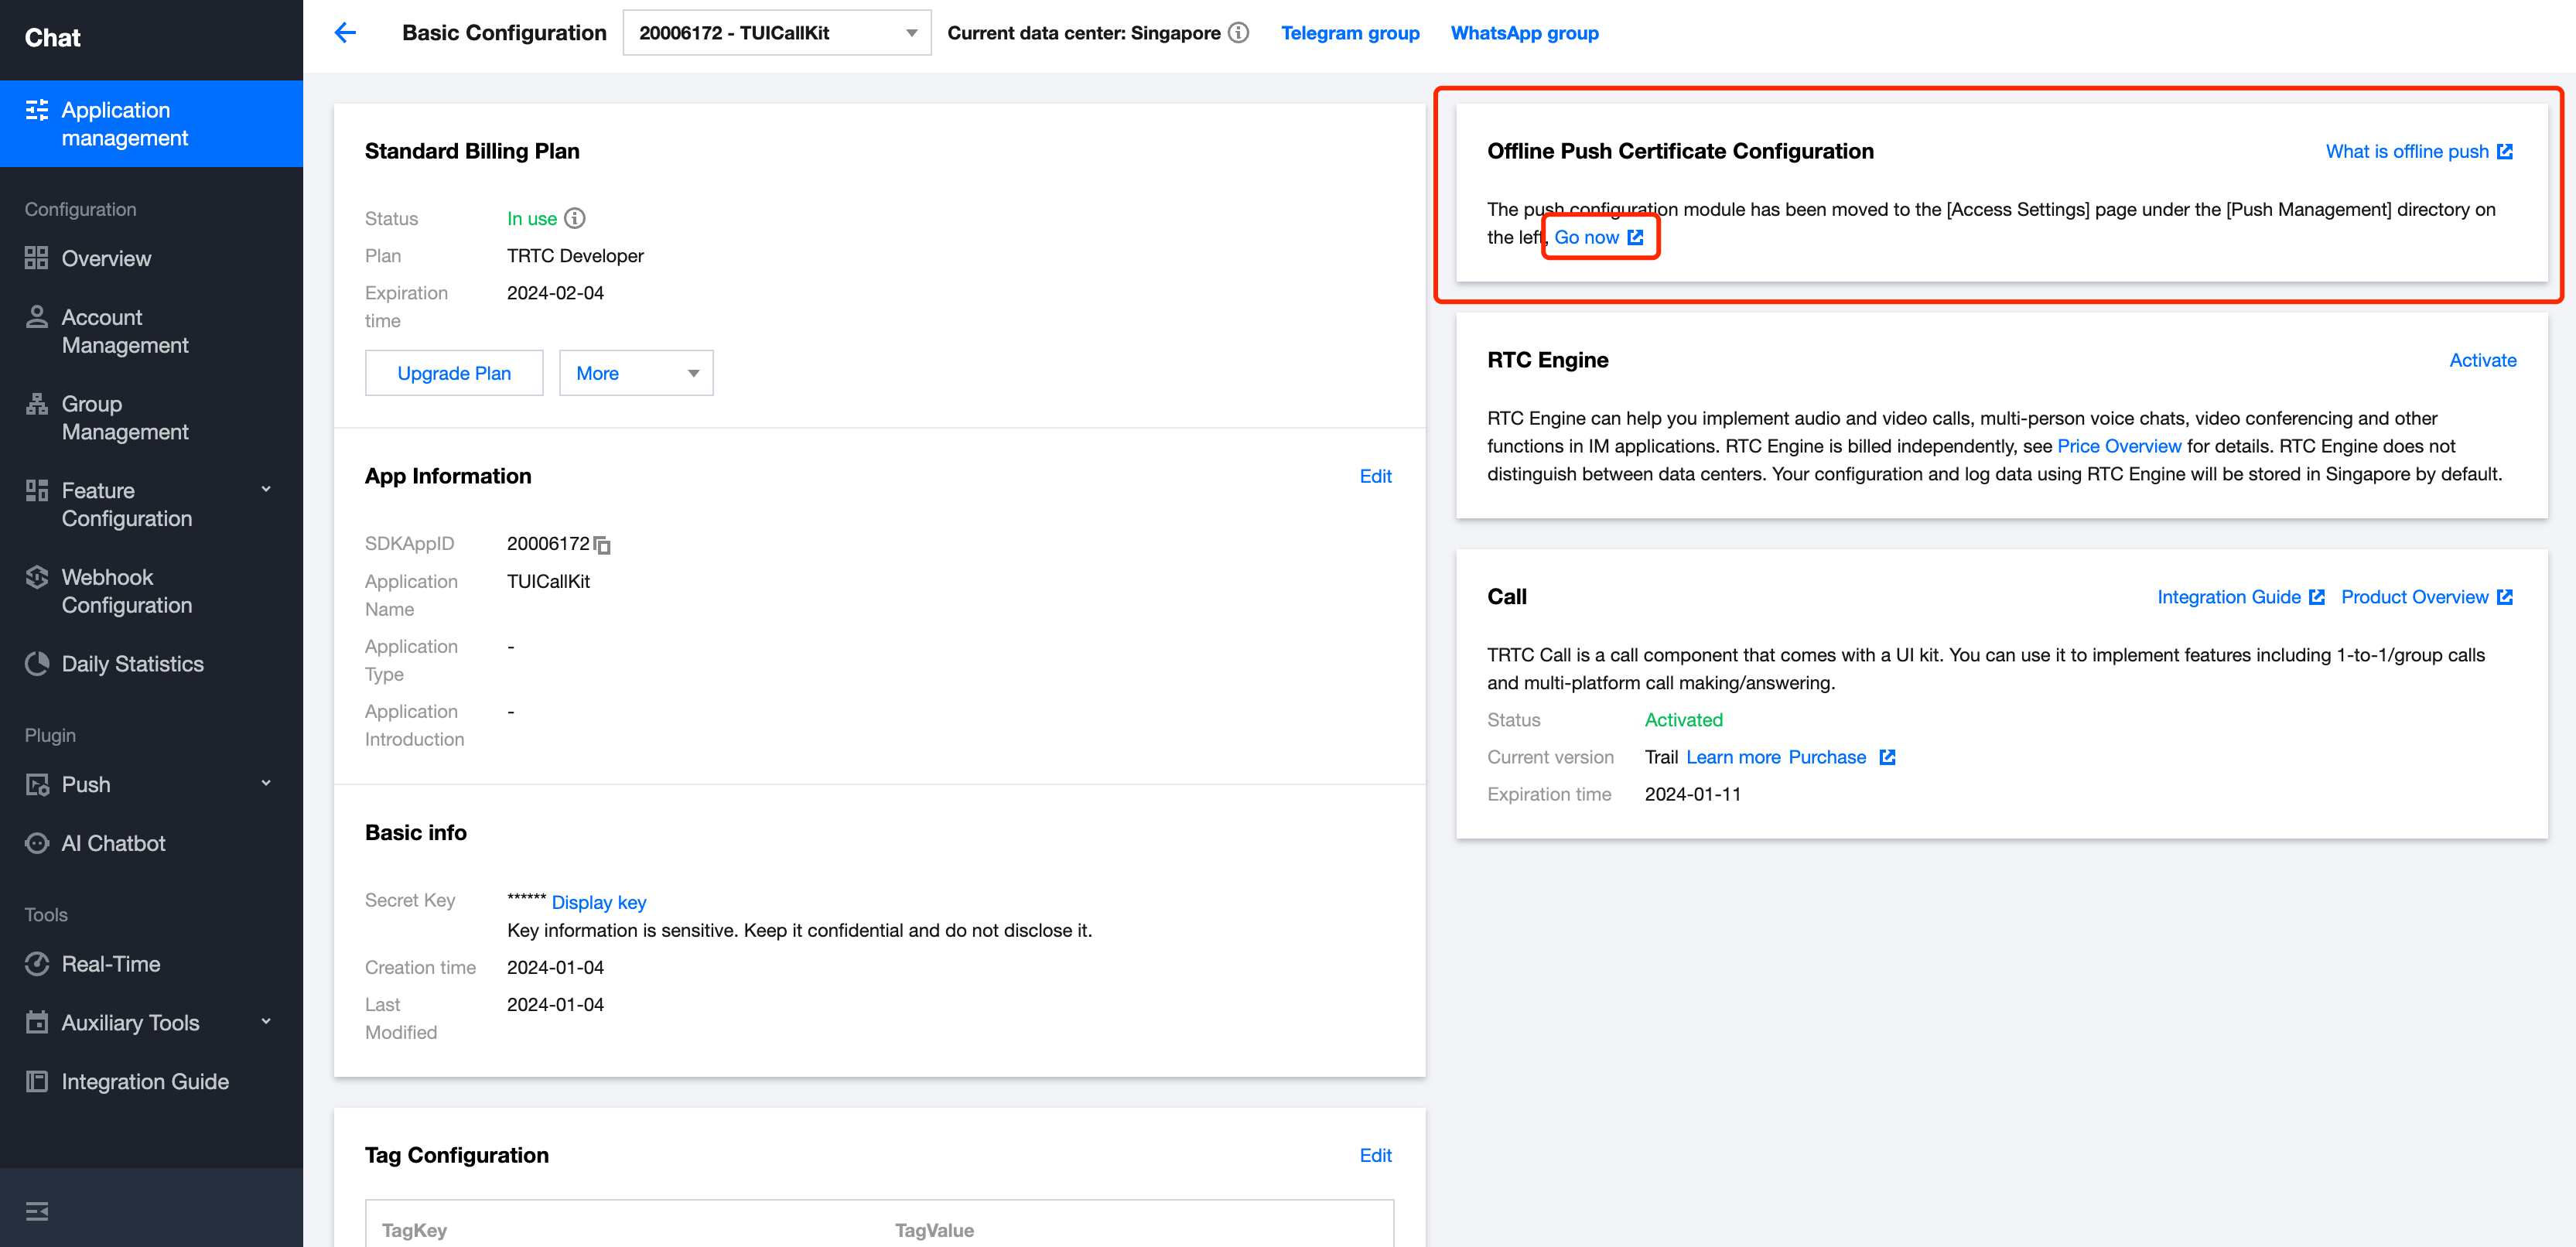

2. 在厂商配置中,切换到 iOS, 点击添加证书按钮,然后在悬浮页面中选择证书类型,上传 iOS 证书(.p12),设置证书密码,单击确认。
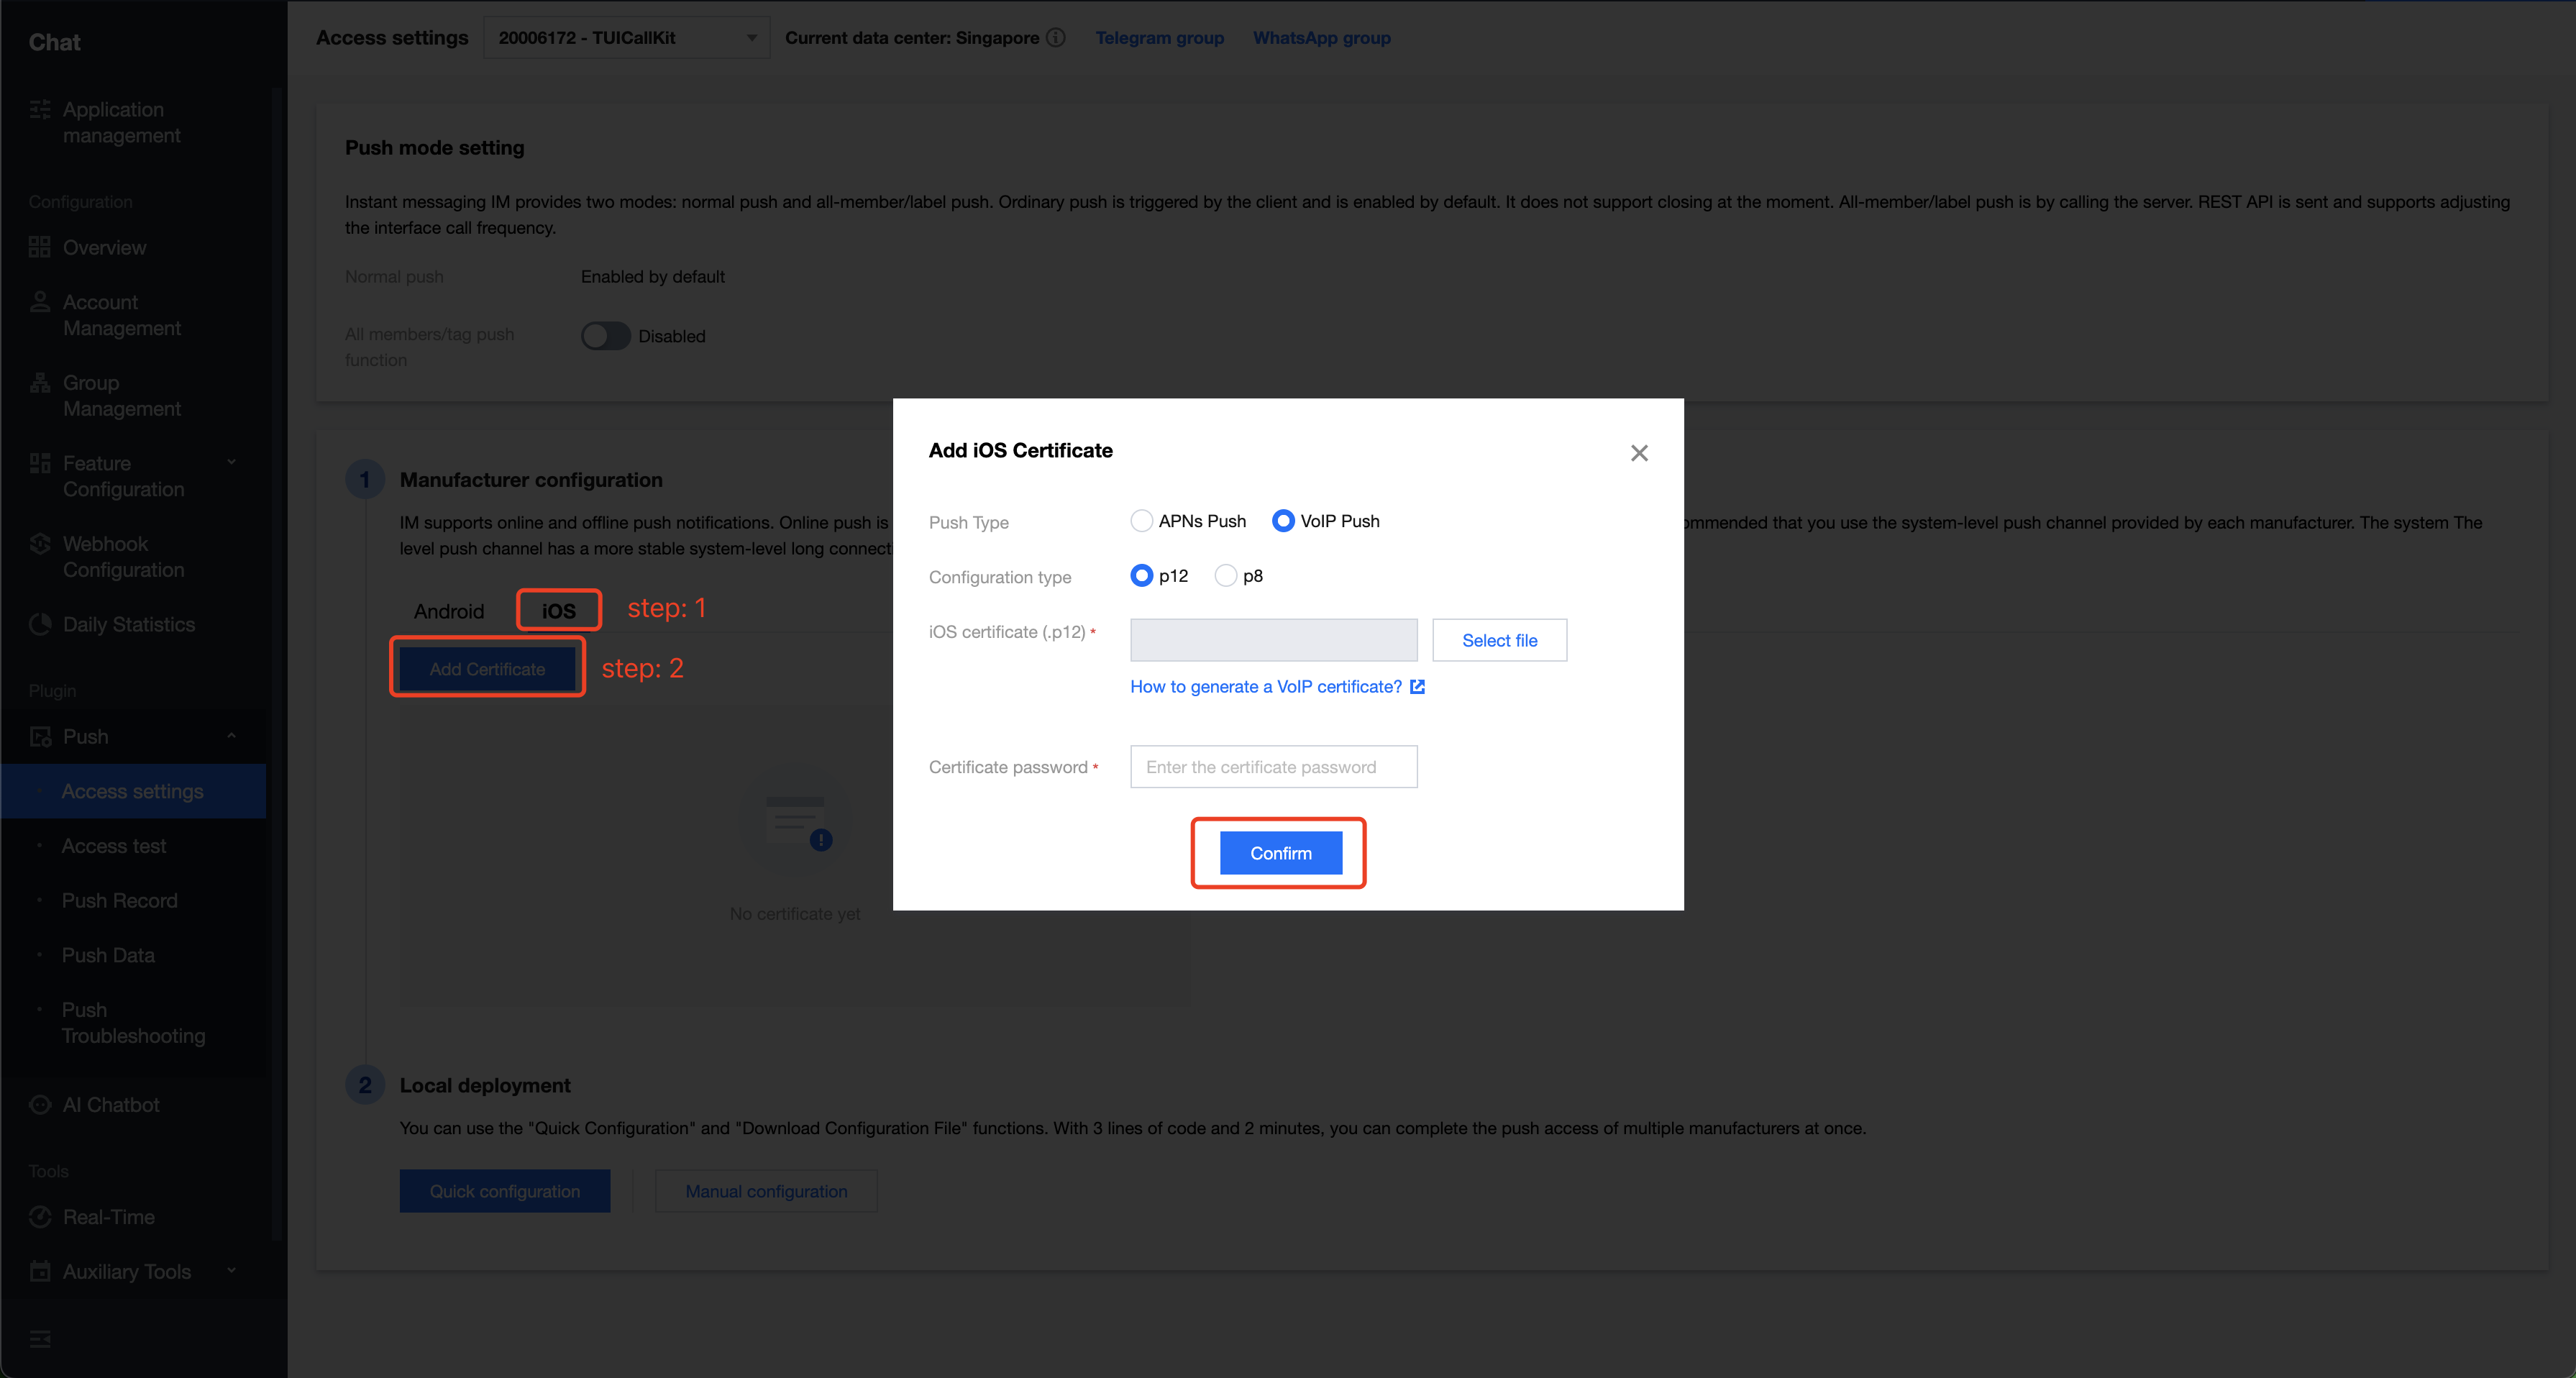

说明:
添加证书时,推送类型默认为 APNs,不影响 VoIP 证书的上传和使用。
VoIP Push 证书本身不区分生产环境和测试环境,生产环境和开发环境使用的是同一份 VoIP Push 证书,请分别上传。
上传证书名最好使用全英文(尤其不能使用括号等特殊字符)。
上传证书需要设置密码,无密码收不到推送。
发布 App Store 的证书需要设置为生产环境,否则无法收到推送。
上传的 p12 证书必须是自己申请的真实有效的证书。
3. 上传完成后,记录不同环境下的证书 ID。
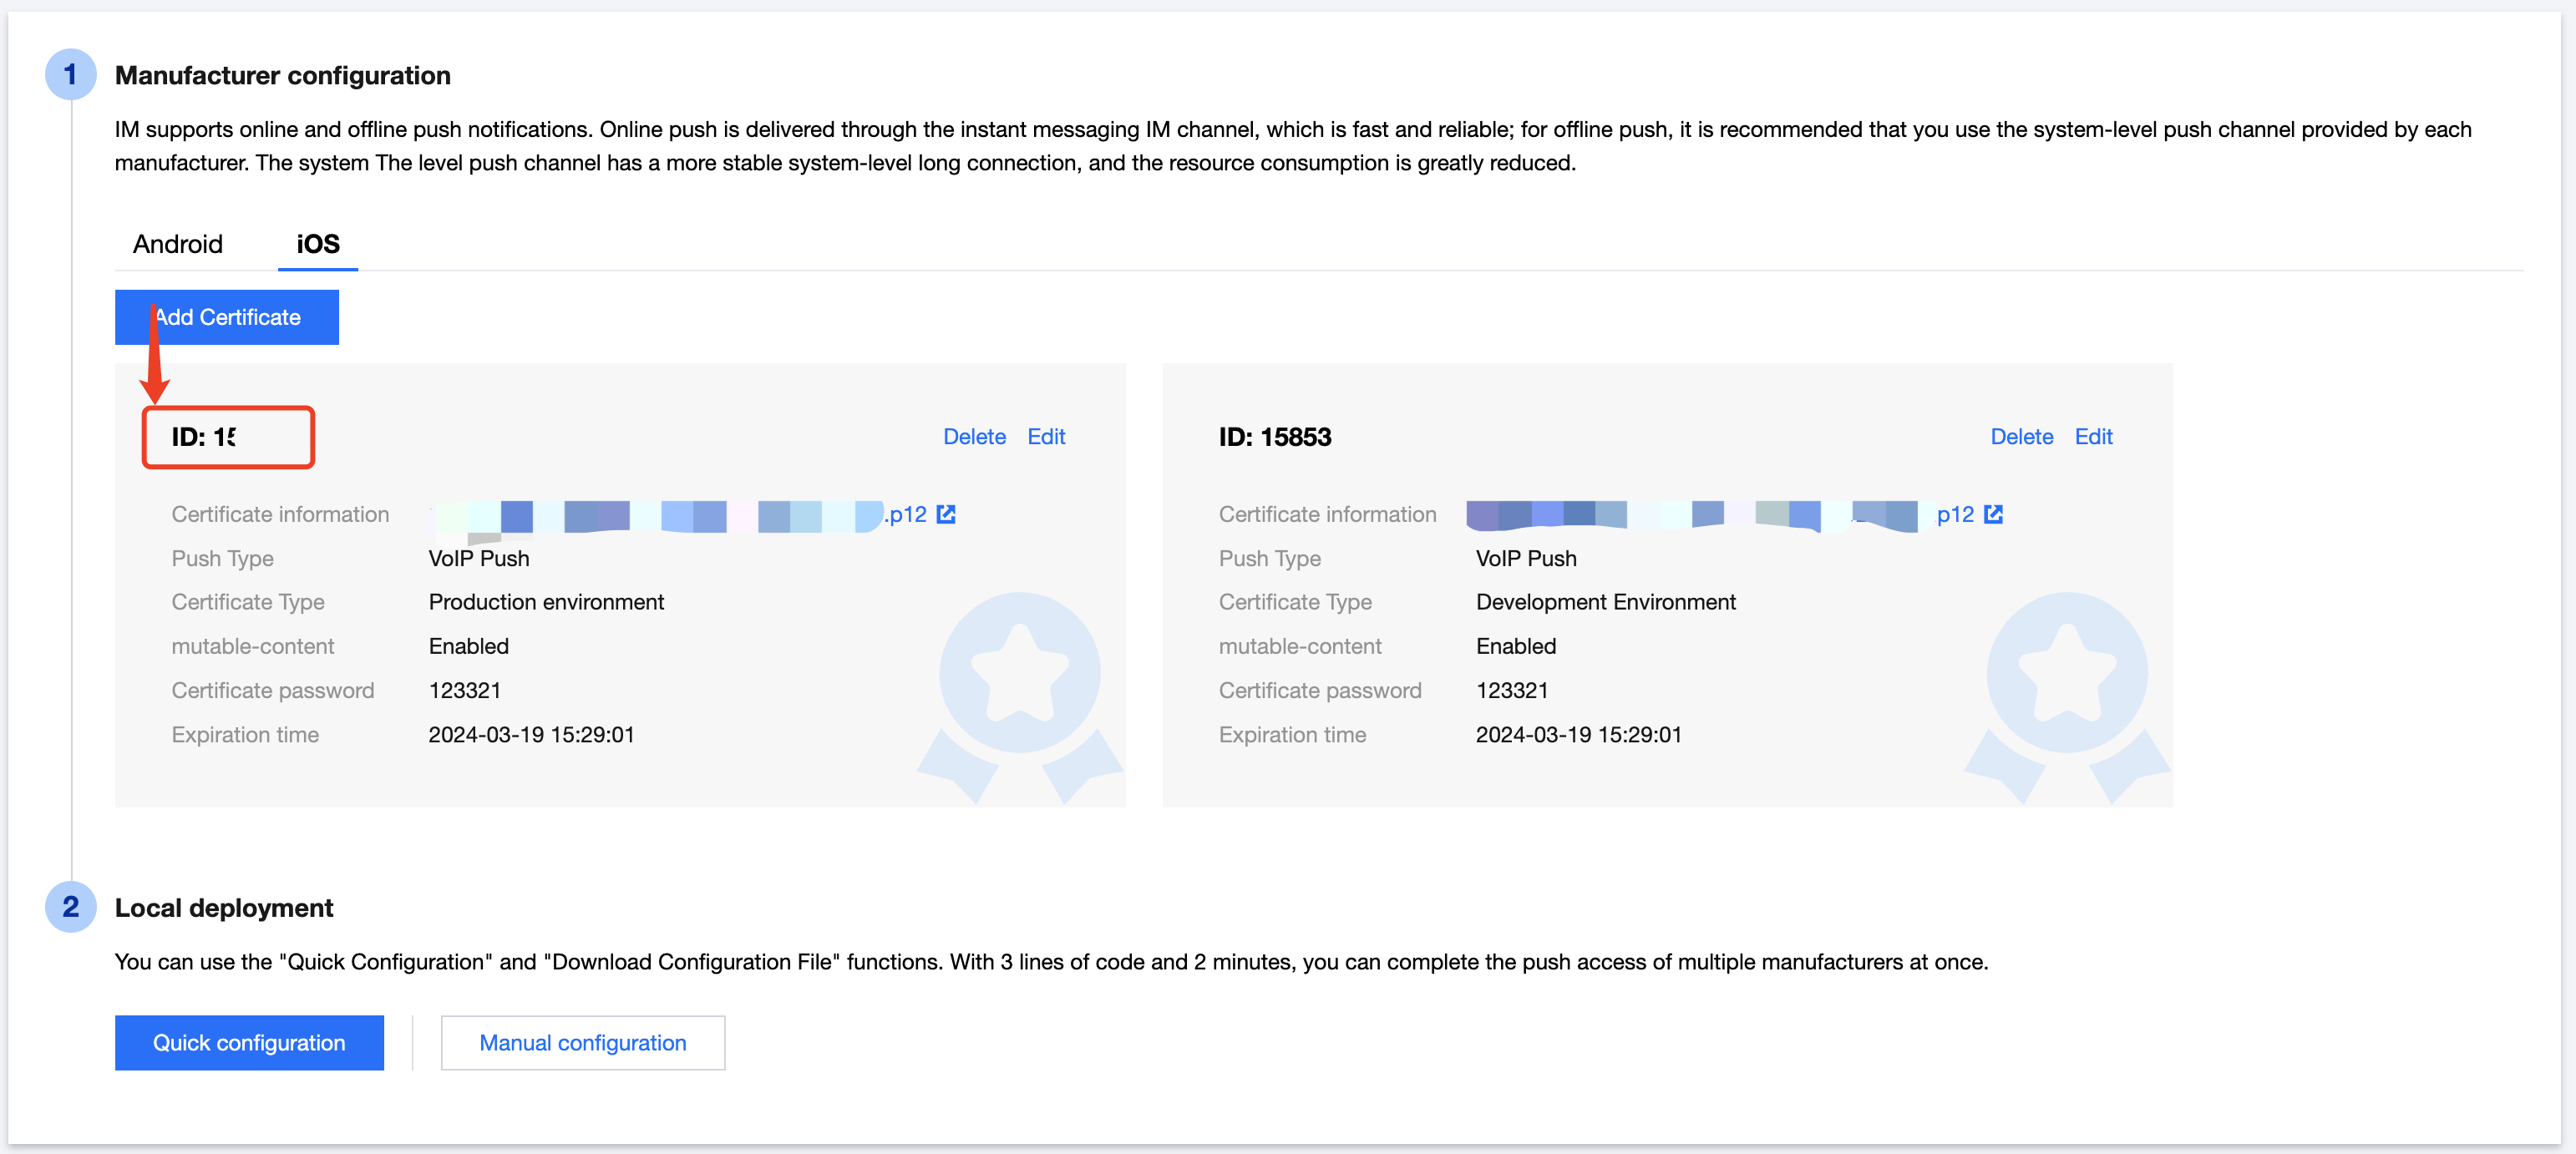

说明:
开发环境和生产环境下的证书 ID 要严格区分,请根据实际环境填写。
功能接入
1. 完成工程配置
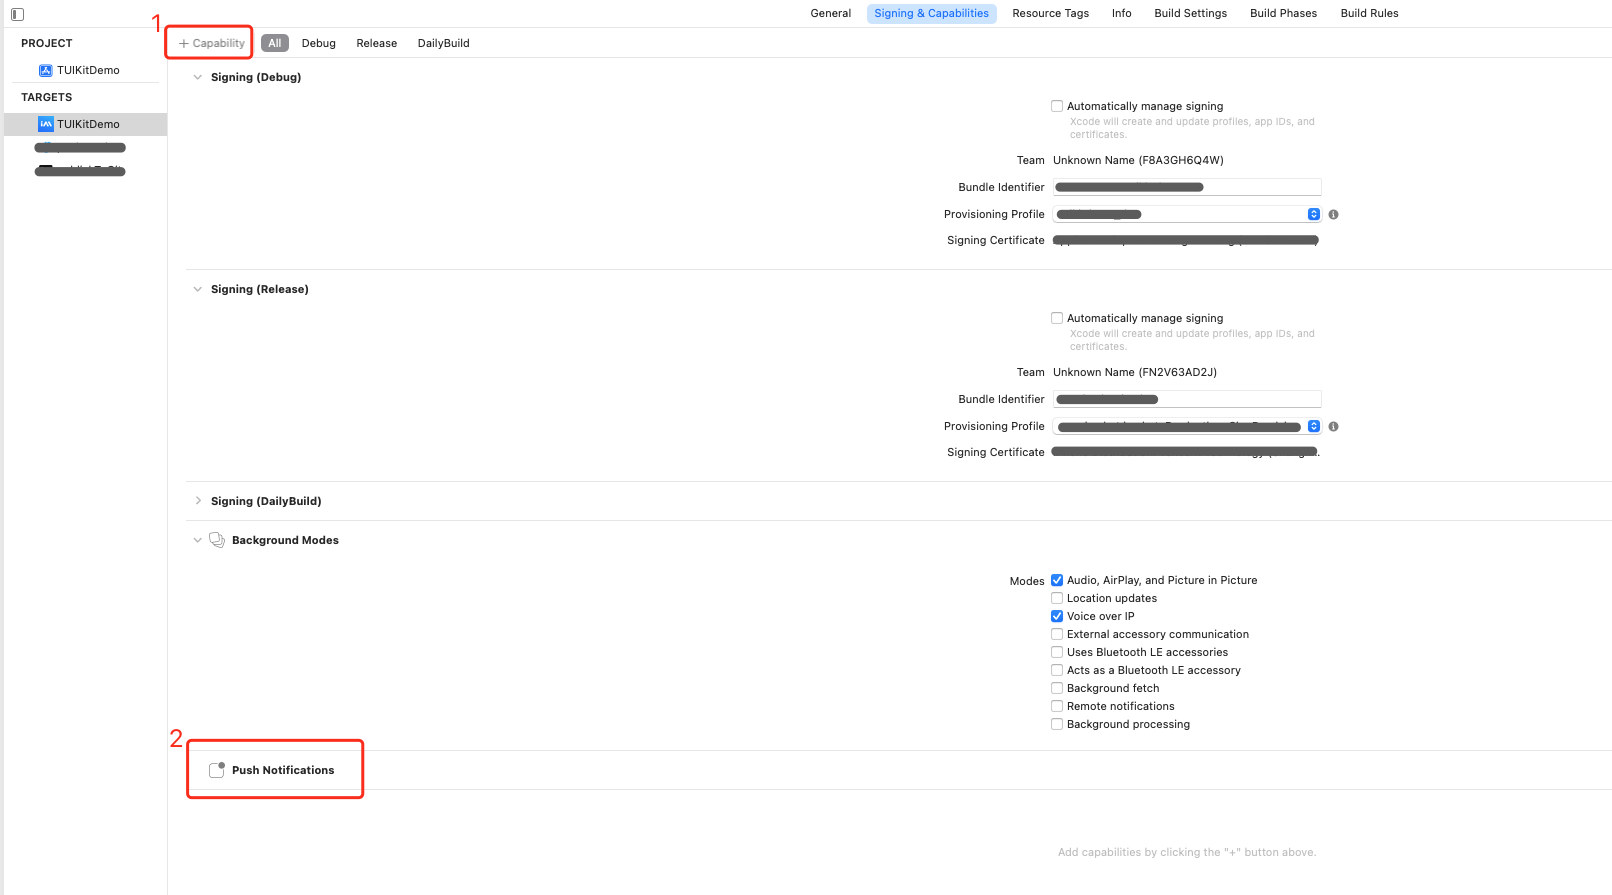
1. 如下图,确认您工程的 Capability 中是否添加 Push Notification 能力。
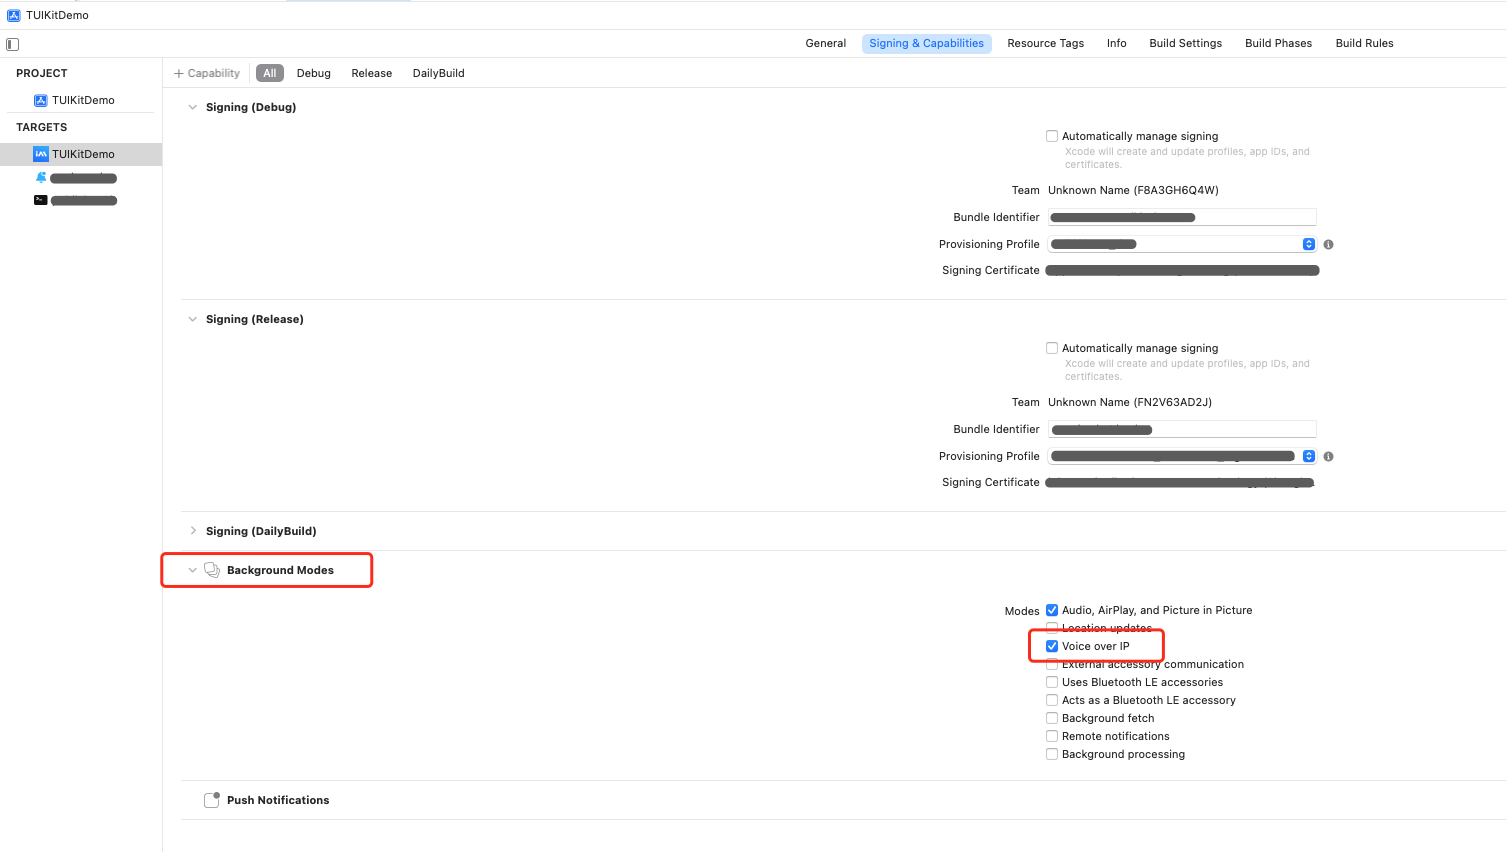
2. 如下图,请检查您工程 Capability 的 Background Modes 中,是否开启了 Voice over IP 选项。
2. 接入 TUIVoIPExtension 组件
使用 CocoaPods 导入组件,具体步骤如下:
1. 在您的
Podfile 文件中添加以下依赖。pod 'TUIVoIPExtension/CallKit'
2. 执行以下命令,安装组件。
pod update
3. 上报 控制台的证书ID。
import TUIVoIPExtensionfunc application(_ application: UIApplication, didFinishLaunchingWithOptions launchOptions: [UIApplication.LaunchOptionsKey: Any]?) -> Bool {// 上报证书 IDTUIVoIPExtension.setCertificateID(1234)return true}
#import <TUIVoIPExtension/TUIVoIPExtension.h>- (BOOL)application:(UIApplication *)application didFinishLaunchingWithOptions:(NSDictionary *)launchOptions {// 上报证书 ID[TUICallKitVoIPExtension setCertificateID:1234];return YES;}
拨打 VoIP 通话
如果您需要拨打 VoIP 通话,需要在调用 calls 时候设置 OfflinePushInfo 中的 iOSPushType 字段为 TUICallIOSOfflinePushTypeVoIP,默认为 TUICallIOSOfflinePushTypeAPNs。
import TUICallKit_Swiftimport RTCRoomEnginelet pushInfo: TUIOfflinePushInfo = TUIOfflinePushInfo()pushInfo.title = ""pushInfo.desc = "您有一个新的通话"pushInfo.iOSPushType = .voIPpushInfo.ignoreIOSBadge = falsepushInfo.iOSSound = "phone_ringing.mp3"pushInfo.androidSound = "phone_ringing"// OPPO必须设置ChannelID才可以收到推送消息,这个channelID需要和控制台一致// OPPO must set a ChannelID to receive push messages. This channelID needs to be the same as the console.pushInfo.androidOPPOChannelID = "tuikit"// FCM channel ID, you need change PrivateConstants.java and set "fcmPushChannelId"pushInfo.androidFCMChannelID = "fcm_push_channel"// VIVO message type: 0-push message, 1-System message(have a higher delivery rate)pushInfo.androidVIVOClassification = 1// HuaWei message type: https://developer.huawei.com/consumer/cn/doc/development/HMSCore-Guides/message-classification-0000001149358835pushInfo.androidHuaWeiCategory = "IM"let params = TUICallParams()params.userData = "User Data"params.timeout = 30params.offlinePushInfo = pushInfoTUICallKit.createInstance().calls(userIdList: ["123456"], callMediaType: .audio, params: params) {} fail: { code, message in}
TUICallDefine.OfflinePushInfo offlinePushInfo = new TUICallDefine.OfflinePushInfo();offlinePushInfo.setTitle("");offlinePushInfo.setDesc("You have receive a new call");// OPPO必须设置ChannelID才可以收到推送消息,这个channelID需要和控制台一致// OPPO must set a ChannelID to receive push messages. This channelID needs to be the same as the console.offlinePushInfo.setAndroidOPPOChannelID("tuikit");offlinePushInfo.setIgnoreIOSBadge(false);offlinePushInfo.setIOSSound("phone_ringing.mp3");offlinePushInfo.setAndroidSound("phone_ringing"); //Note:don't add suffix//VIVO message type: 0-push message, 1-System message(have a higher delivery rate)offlinePushInfo.setAndroidVIVOClassification(1);//FCM channel ID, you need change PrivateConstants.java and set "fcmPushChannelId"offlinePushInfo.setAndroidFCMChannelID("fcm_push_channel");//Huawei message typeofflinePushInfo.setAndroidHuaWeiCategory("IM");//IOS push type: if you want user VoIP, please modify type to TUICallDefine.IOSOfflinePushType.VoIPofflinePushInfo.setIOSPushType(TUICallDefine.IOSOfflinePushType.VoIP);TUICallDefine.CallParams params = new TUICallDefine.CallParams();params.offlinePushInfo = offlinePushInfo;List<String> list = new ArrayList<>();list.add("mike")TUICallKit.createInstance(context).calls(list, TUICallDefine.MediaType.Video, params, null);
TUIOfflinePushInfo offlinePushInfo = TUIOfflinePushInfo();offlinePushInfo.title = "Flutter TUICallKit";offlinePushInfo.desc = "This is an incoming call from Flutter TUICallkit";offlinePushInfo.ignoreIOSBadge = false;offlinePushInfo.iOSSound = "phone_ringing.mp3";offlinePushInfo.androidSound = "phone_ringing";offlinePushInfo.androidOPPOChannelID = "Flutter TUICallKit";offlinePushInfo.androidVIVOClassification = 1;offlinePushInfo.androidFCMChannelID = "fcm_push_channel";offlinePushInfo.androidHuaWeiCategory = "Flutter TUICallKit";offlinePushInfo.iOSPushType = TUICallIOSOfflinePushType.VoIP;TUICallParams params = TUICallParams(offlinePushInfo: offlinePushInfo);TUICallKit.instance.calls(['vince'], TUICallMediaType.audio, params);
#import <TUICallKit_Swift/TUICallKit_Swift-Swift.h>#import <RTCRoomEngine/TUICallEngine.h>- (TUICallParams *)getCallParams {TUIOfflinePushInfo *offlinePushInfo = [self createOfflinePushInfo];TUICallParams *callParams = [TUICallParams new];callParams.offlinePushInfo = offlinePushInfo;callParams.timeout = 30;return callParams;}- (TUIOfflinePushInfo *)createOfflinePushInfo {TUIOfflinePushInfo *pushInfo = [TUIOfflinePushInfo new];pushInfo.title = @"";pushInfo.desc = @"您有一个新的通话";pushInfo.iOSPushType = TUICallIOSOfflinePushTypeVoIP;pushInfo.ignoreIOSBadge = NO;pushInfo.iOSSound = @"phone_ringing.mp3";pushInfo.AndroidSound = @"phone_ringing";// OPPO必须设置ChannelID才可以收到推送消息,这个channelID需要和控制台一致// OPPO must set a ChannelID to receive push messages. This channelID needs to be the same as the console.pushInfo.AndroidOPPOChannelID = @"tuikit";// FCM channel ID, you need change PrivateConstants.java and set "fcmPushChannelId"pushInfo.AndroidFCMChannelID = @"fcm_push_channel";// VIVO message type: 0-push message, 1-System message(have a higher delivery rate)pushInfo.AndroidVIVOClassification = 1;// HuaWei message type: https://developer.huawei.com/consumer/cn/doc/development/HMSCore-Guides/message-classification-0000001149358835pushInfo.AndroidHuaWeiCategory = @"IM";return pushInfo;}[[TUICallKit createInstance] calls:@[@"123456"]callMediaType:TUICallMediaTypeAudioparams:[self getCallParams] succ:^{} fail:^(int code, NSString * _Nullable errMsg) {}];
通过系统通话记录拨打通话
如果需要实现点击系统电话 - 最近通话列表中的通话记录,直接发起单人音视频通话,您需要在 Application 的生命周期回调函数使用 TUIVoIPExtension 组件中的 callWith 接口,具体示例如下:
说明:
仅支持单人音视频通话的直接拨打。
登录账户必须为同一个账户。
1. 在iOS 13(及以后版本)上,使用了 SceneDelegate,且最低兼容版本到iOS 13以下,需分别在 AppDelegate 和 SceneDelegate 中实现如下方法。
import TUIVoIPExtension/// AppDelegate 中的实现,iOS 13 以前版本的处理func application(_ application: UIApplication, continue userActivity: NSUserActivity, restorationHandler: @escaping ([any UIUserActivityRestoring]?) -> Void) -> Bool {TUIVoIPExtension.call(with: userActivity)return true}/// SceneDelegate 中的实现func scene(_ scene: UIScene, willConnectTo session: UISceneSession, options connectionOptions: UIScene.ConnectionOptions) {for userActivity in connectionOptions.userActivities {TUIVoIPExtension.call(with: userActivity);}}func scene(_ scene: UIScene, continue userActivity: NSUserActivity) {TUIVoIPExtension.call(with: userActivity);}
#import <TUIVoIPExtension/TUIVoIPExtension.h>/// AppDelegate 中的实现,iOS 13 以前版本的处理- (BOOL)application:(UIApplication *)application continueUserActivity:(nonnull NSUserActivity *)userActivity restorationHandler:(nonnull void (^)(NSArray<id<UIUserActivityRestoring>> * _Nullable))restorationHandler {[TUIVoIPExtension callWith:userActivity];return YES;}/// SceneDelegate 中的实现- (void)scene:(UIScene *)scene willConnectToSession:(UISceneSession *)sessionptions:(UISceneConnectionOptions *)connectionOptions {[connectionOptions.userActivities enumerateObjectsUsingBlock:^(NSUserActivity * _Nonnull userActivity, BOOL * _Nonnull stop) {[TUIVoIPExtension callWith:userActivity];}];}- (void)scene:(UIScene *)scene continueUserActivity:(NSUserActivity *)userActivity {[TUIVoIPExtension callWith:userActivity];}
2. 在iOS 13(及以后版本)上,未使用SceneDelegate,只需要在 AppDelegate 实现如下方法。
import TUIVoIPExtensionfunc application(_ application: UIApplication, continue userActivity: NSUserActivity, restorationHandler: @escaping ([any UIUserActivityRestoring]?) -> Void) -> Bool {TUIVoIPExtension.call(with: userActivity)return true}
#import <TUIVoIPExtension/TUIVoIPExtension.h>- (BOOL)application:(UIApplication *)application continueUserActivity:(nonnull NSUserActivity *)userActivity restorationHandler:(nonnull void (^)(NSArray<id<UIUserActivityRestoring>> * _Nullable))restorationHandler {[TUIVoIPExtension callWith:userActivity];return YES;}
常见问题
1. 获取不到 VoIP Push,如何处理?
1. 首先检查下 App 的运行环境和证书的环境是否一致,证书 ID 是否匹配,如果不一致,无法收到推送。
2. 请确认当前您登录的账号是否处于离线状态:按 home 键切后台、登录后主动杀进程退出。VoIP Push 目前只支持离线状态下的推送。
3. 检查 完成工程配置 是否正确。
4. 尝试重启测试手机来清除系统缓存和内存(很重要)。
2. 如何自集成 VoIP 推送功能
我们也支持您自己通过SDK的方式来集成 VoIP 推送的能力,整体的方案设计如下:
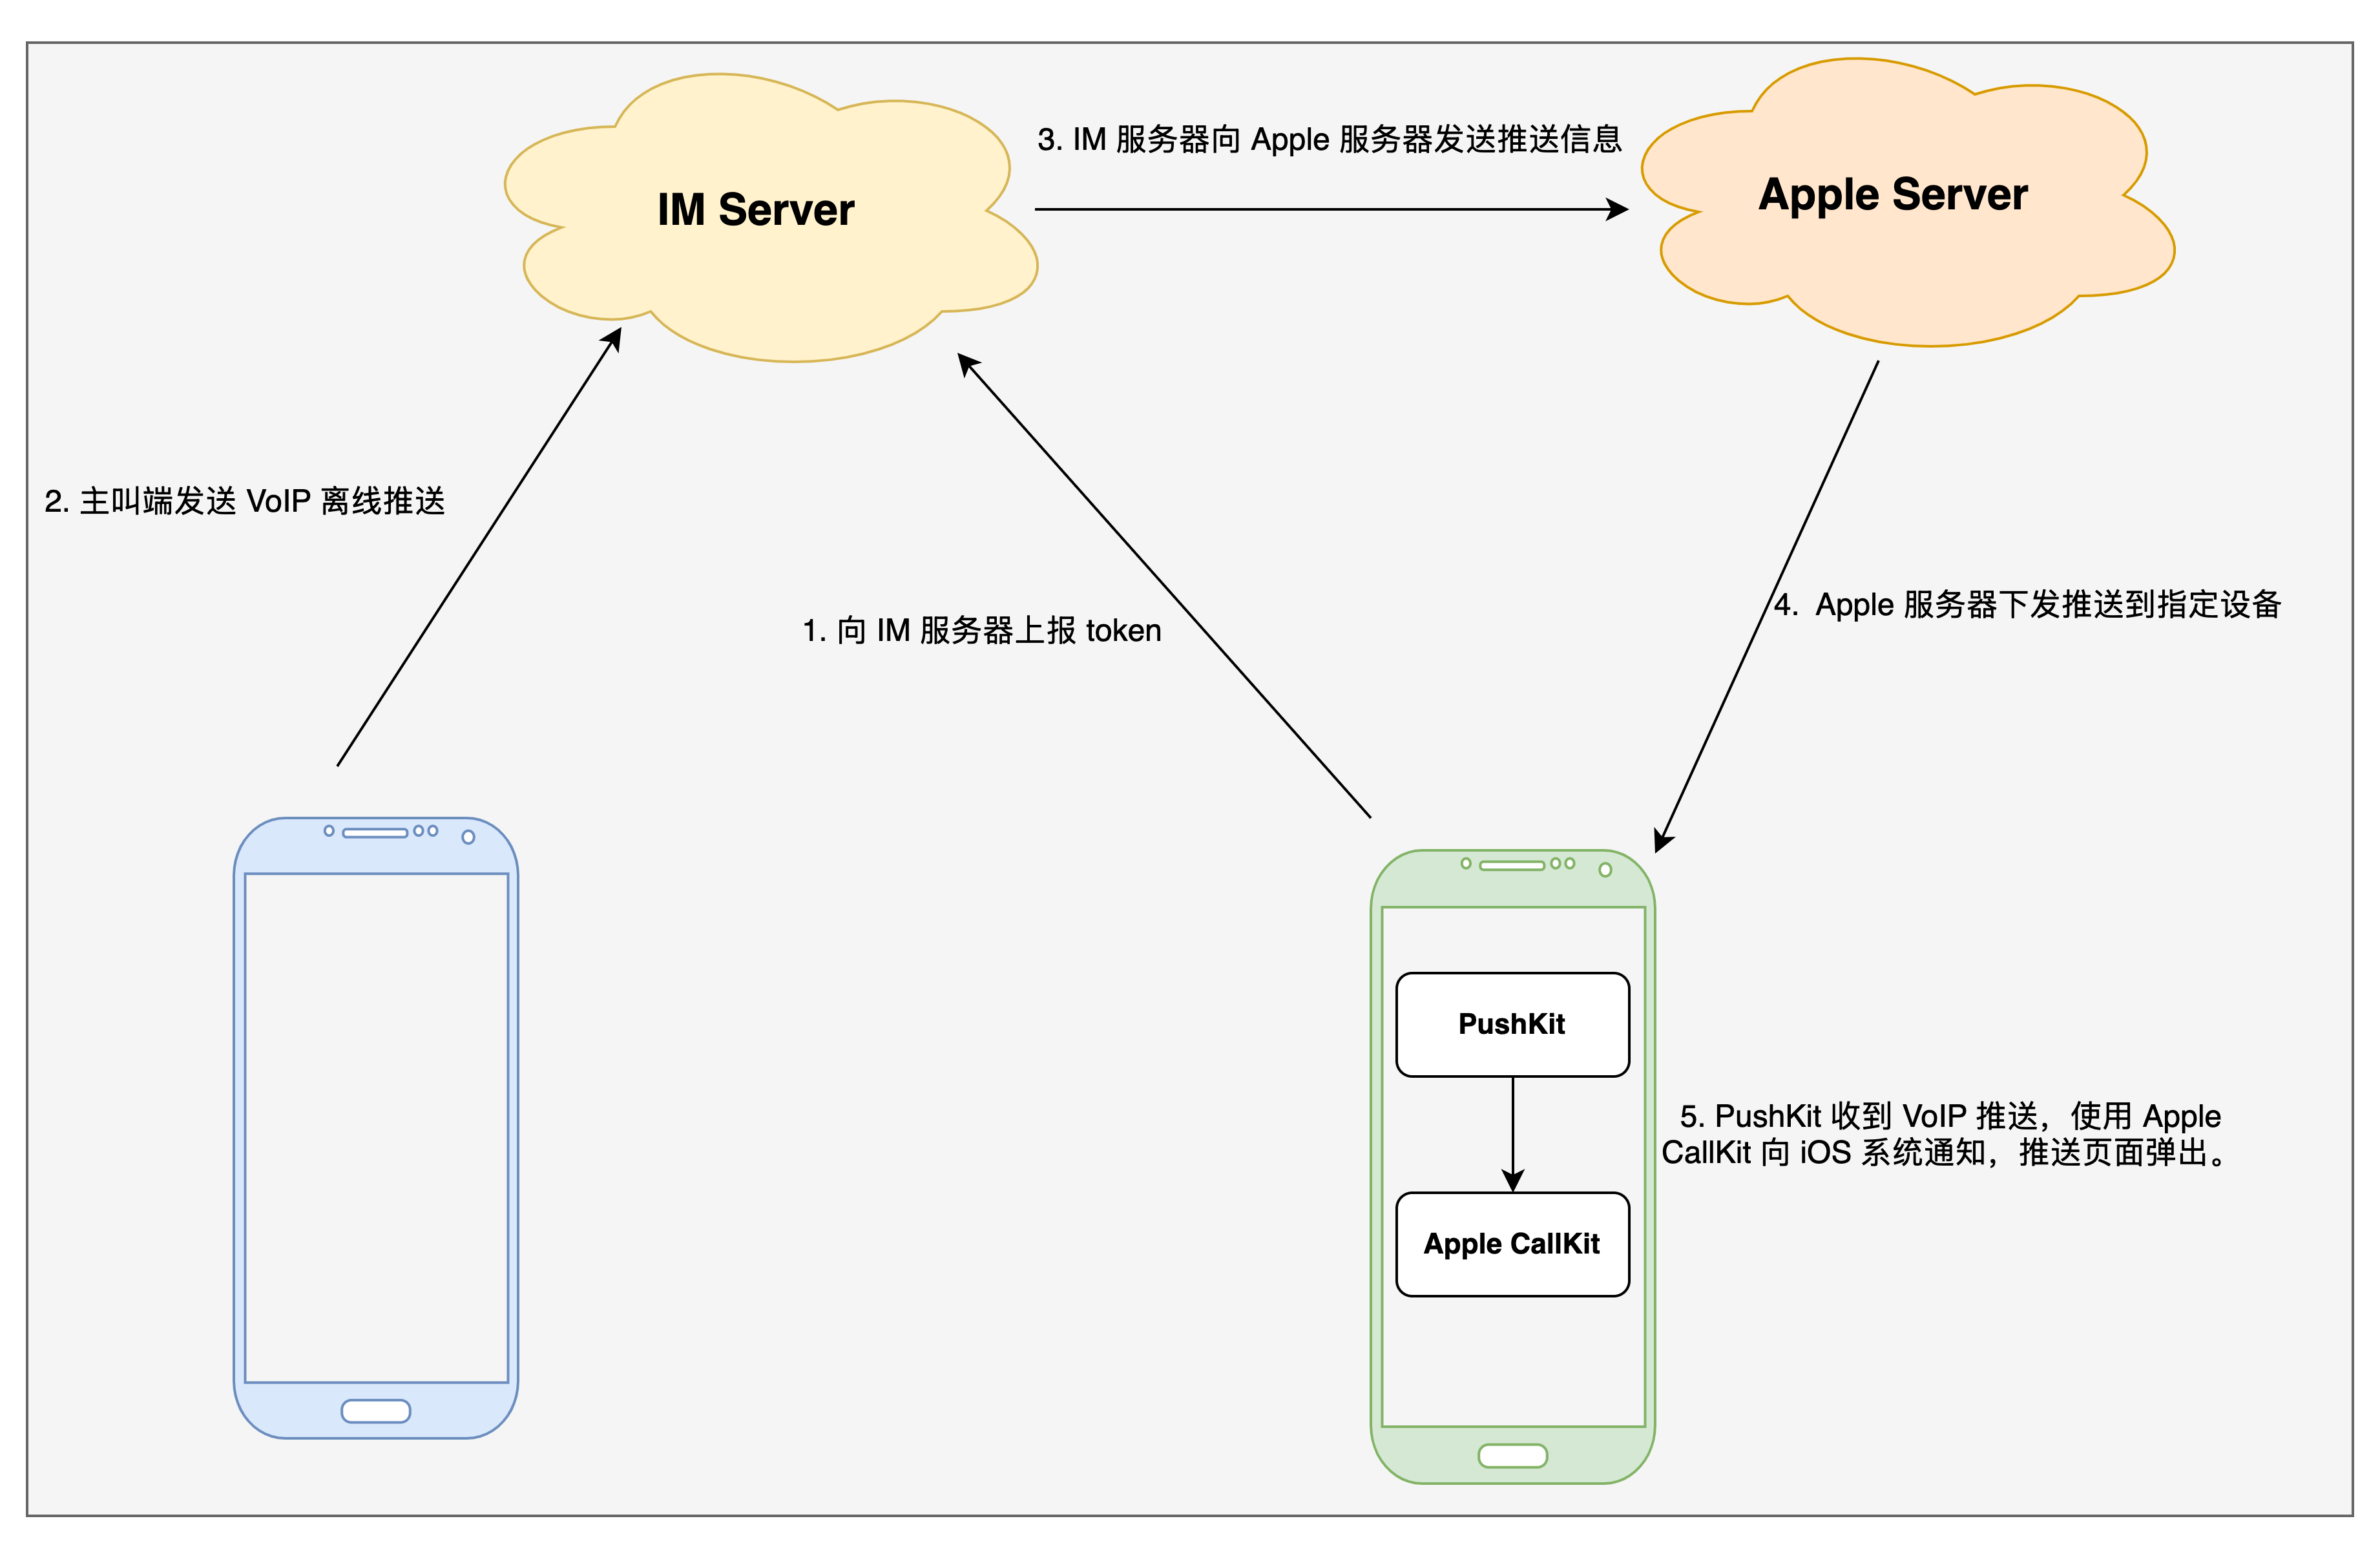
相关流程说明:
1. 参考厂商配置 申请 VoIP 推送证书,并在 IM 控制台上传证书获取证书 ID。
2. 参考 Apple PushKit 使用获取设备 token。
3. 使用 IMSDK 的 setVOIP 接口向 IM 服务器上报设备 token。
4. 参考 Apple CallKit使用展示推送弹窗。
5. 参考 TUICallKit 接口的使用发起 VoIP 通话。