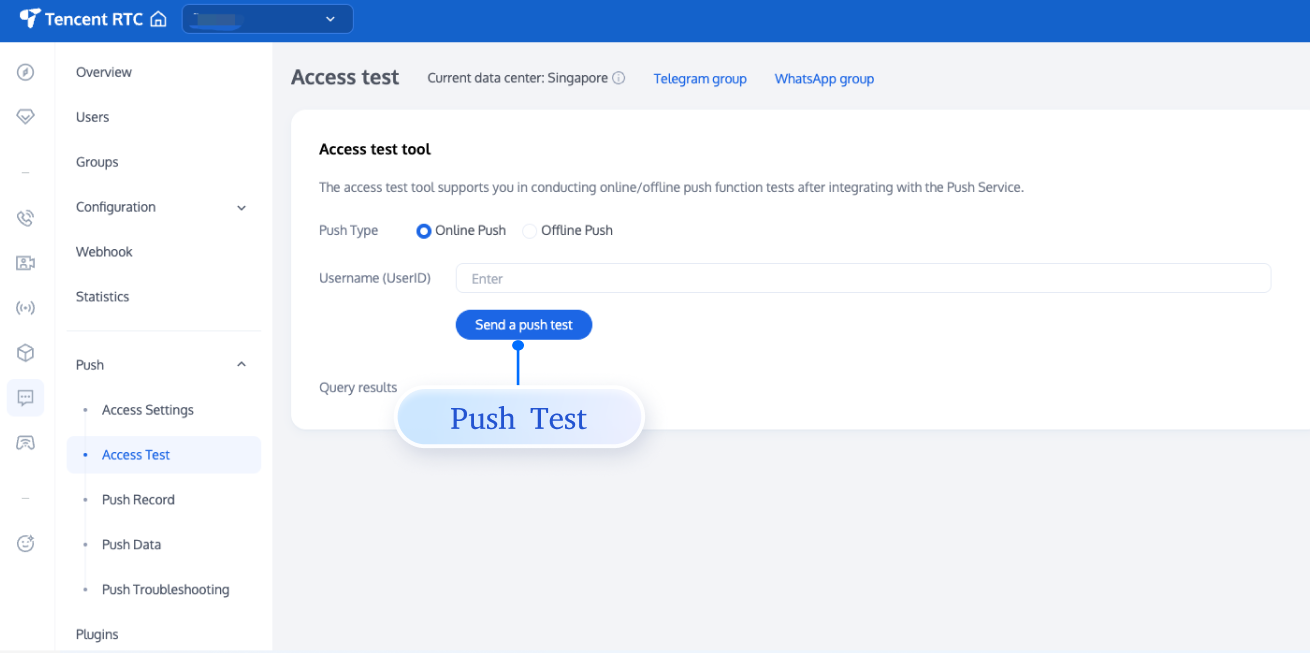
快速跑通
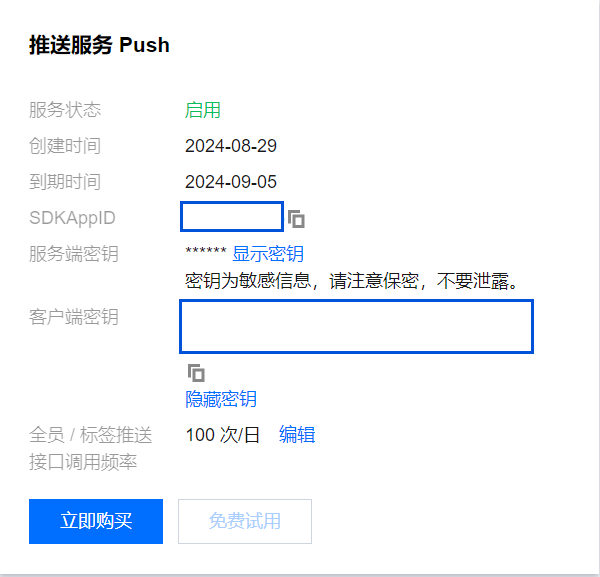
步骤1:开通推送服务(Push)
步骤2:集成 TIMPush 并注册推送
1. 集成 TIMPush
implementation 'com.tencent.timpush:timpush:VERSION'implementation 'com.tencent.liteav.tuikit:tuicore:VERSION'
2. 注册推送(成功后就可以收到在线推送通知了)
int sdkAppId = 0; //您的 sdkAppIdString appKey = ""; //客户端密钥TIMPushManager.getInstance().registerPush(context, sdkAppId, appKey, new TIMPushCallback() {@Overridepublic void onSuccess(Object data) {}@Overridepublic void onError(int errCode, String errMsg, Object data) {}});
说明:
1. 注册离线推送服务成功后,通过该接口 getRegistrationID 可获取推送唯一 ID 标识, 即 RegistrationID,然后可以根据 RegistrationID 来向指定设备推送消息;
2. RegistrationID 是设备的推送唯一标识 ID,默认注册推送服务成功后会自动生成,卸载重装会改变。
3. 实现点击通知栏回调
收到推送消息后点击通知栏,组件会回调该点击事件和透传离线消息。
注意:
注册回调时机建议放在应用 Application 的 oncreate() 函数中。
TIMPushManager.getInstance().addPushListener(new TIMPushListener() {@Overridepublic void onNotificationClicked(String ext) {Log.d(TAG, "onNotificationClicked =" + ext);// 获取 ext 自定义跳转}});
组件会以回调或者广播形式通知应用,应用在回调中配置 App 的跳转页面即可。
注意:
注册回调时机建议放在应用 Application 的 oncreate() 函数中。
// 动态注册广播IntentFilter intentFilter = new IntentFilter();intentFilter.addAction(TUIConstants.TIMPush.NOTIFICATION_BROADCAST_ACTION);LocalBroadcastManager.getInstance(context).registerReceiver(localReceiver, intentFilter);//广播接收者public class OfflinePushLocalReceiver extends BroadcastReceiver {public static final String TAG = OfflinePushLocalReceiver.class.getSimpleName();@Overridepublic void onReceive(Context context, Intent intent) {DemoLog.d(TAG, "BROADCAST_PUSH_RECEIVER intent = " + intent);if (intent != null) {String ext = intent.getStringExtra(TUIConstants.TIMPush.NOTIFICATION_EXT_KEY);// 获取 ext 自定义跳转} else {Log.e(TAG, "onReceive ext is null");}}}
1. 集成 TIMPush
支持 cocoapods 集成,您需要在 Podfile 中添加组件依赖。
target 'YourAppName' do# Uncommment the next line if you're using Swift or would like to use dynamic frameworksuse_frameworks!use_modular_headers!# Pods for Examplepod 'TXIMSDK_Plus_iOS_XCFramework'pod 'TIMPush', 'VERSION'end
执行以下命令,安装 TIMPush 组件。
pod install
# 如果无法安装 TUIKit 最新版本,执行以下命令更新本地的 CocoaPods 仓库列表。
pod repo update
2. 注册推送(成功后就可以收到在线推送通知了)
const int sdkAppId = 0; //您的 sdkAppIdstatic const NSString *appKey = @""; //客户端密钥[TIMPushManager registerPush:sdkAppId appKey:appKey succ:^(NSData * _Nonnull deviceToken) {} fail:^(int code, NSString * _Nonnull desc) {}];
说明:
1. 注册离线推送服务成功后,通过该接口 getRegistrationID 可获取推送唯一 ID 标识, 即 RegistrationID,然后可以根据 RegistrationID 来向指定设备推送消息;
2. RegistrationID 是设备的推送唯一标识 ID,默认注册推送服务成功后会自动生成,卸载重装会改变。
3. 实现点击通知栏回调
收到推送消息后点击通知栏,组件会回调该点击事件和透传离线消息。
注意:
注册回调时机建议放在应用 AppDelegate 的 didFinishLaunchingWithOptions 函数中。
- (BOOL)application:(UIApplication *)application didFinishLaunchingWithOptions:(NSDictionary *)launchOptions {[TIMPushManager addPushListener:self];return YES;}#pragma mark - TIMPushListener- (void)onNotificationClicked:(NSString *)ext {// 获取 ext 自定义跳转}
您需要在 AppDelegate.m 文件中实现
- onRemoteNotificationReceived 方法#pragma mark - TIMPush- (BOOL)onRemoteNotificationReceived:(NSString *)notice {//- 如果返回 YES, TIMPush 将不在执行内置的 TUIKit 离线推送解析逻辑,完全交由您自行处理;//NSString *ext = notice;//OfflinePushExtInfo *info = [OfflinePushExtInfo createWithExtString:ext];//return YES;//- 如果返回 NO,TIMPush 将继续执行内置的 TUIKit 离线推送解析逻辑,继续回调 - navigateToBuiltInChatViewController:groupID: 方法。return NO;}
1. 集成 TIMPush
flutter pub addtencent_cloud_chat_push
2. 注册推送(成功后就可以收到在线推送通知了)
您可定义一个函数来接收该回调,并据此跳转至对应会话页面或您的业务页面。
示例如下:
void _onNotificationClicked({required String ext, String? userID, String? groupID}) { print("_onNotificationClicked: $ext, userID: $userID, groupID: $groupID"); if (userID != null || groupID != null) { // 根据 userID 或 groupID 跳转至对应 Message 页面. } else { // 根据 ext 字段, 自己写解析方式, 跳转至对应页面. } }TencentCloudChatPush().registerPush(onNotificationClicked: _onNotificationClicked, sdkAppId: 您的sdkAppId, appKey: "客户端密钥");
说明:
1. 注册离线推送服务成功后,通过该接口 getRegistrationID 可获取推送唯一 ID 标识, 即 RegistrationID,然后可以根据 RegistrationID 来向指定设备推送消息;
2. RegistrationID 是设备的推送唯一标识 ID,默认注册推送服务成功后会自动生成,卸载重装会改变。
3. 实现点击通知栏回调
Application 类继承 TencentCloudChatPushApplication
package 替换成您自己的包名(一般 Android Studio 会自动生成)

import com.tencent.chat.flutter.push.tencent_cloud_chat_push.application.TencentCloudChatPushApplication;

public class MyApplication extends TencentCloudChatPushApplication {
    @Override
    public void onCreate() {
        super.onCreate();
    }
}
说明:
如果您已经创建了自己的 Application 为了其他用途,请直接
extends TencentCloudChatPushApplication 并保证 onCreate() 函数中,调用了 super.onCreate(); 即可。AppDelegate 类继承 TIMPushDelegateimport UIKitimport Flutter// Add these two import linesimport TIMPushimport tencent_cloud_chat_push// Add `, TIMPushDelegate` to the following line@UIApplicationMain@objc class AppDelegate:FlutterAppDelegate,TIMPushDelegate{override funcapplication(_ application:UIApplication,didFinishLaunchingWithOptions launchOptions:[UIApplication.LaunchOptionsKey:Any]?)->Bool{GeneratedPluginRegistrant.register(with:self)returnsuper.application(application,didFinishLaunchingWithOptions:launchOptions)}// Add this functionfuncofflinePushCertificateID()->Int32{returnTencentCloudChatPushFlutterModal.shared.offlinePushCertificateID();}// Add this functionfuncapplicationGroupID()->String{returnTencentCloudChatPushFlutterModal.shared.applicationGroupID()}// Add this functionfunconRemoteNotificationReceived(_ notice:String?)->Bool{TencentCloudChatPushPlugin.shared.tryNotifyDartOnNotificationClickEvent(notice)returntrue}}
1. HBuilderX 4.29 有 bug,请使用 HBuilderX 4.36 或更高版本,并升级 uni-app 腾讯云推送服务(Push)到 1.1.0 或更高版本。
2. 将 uni-app 腾讯云推送服务(Push)插件导入HbuilderX 中的工程。如图所示:
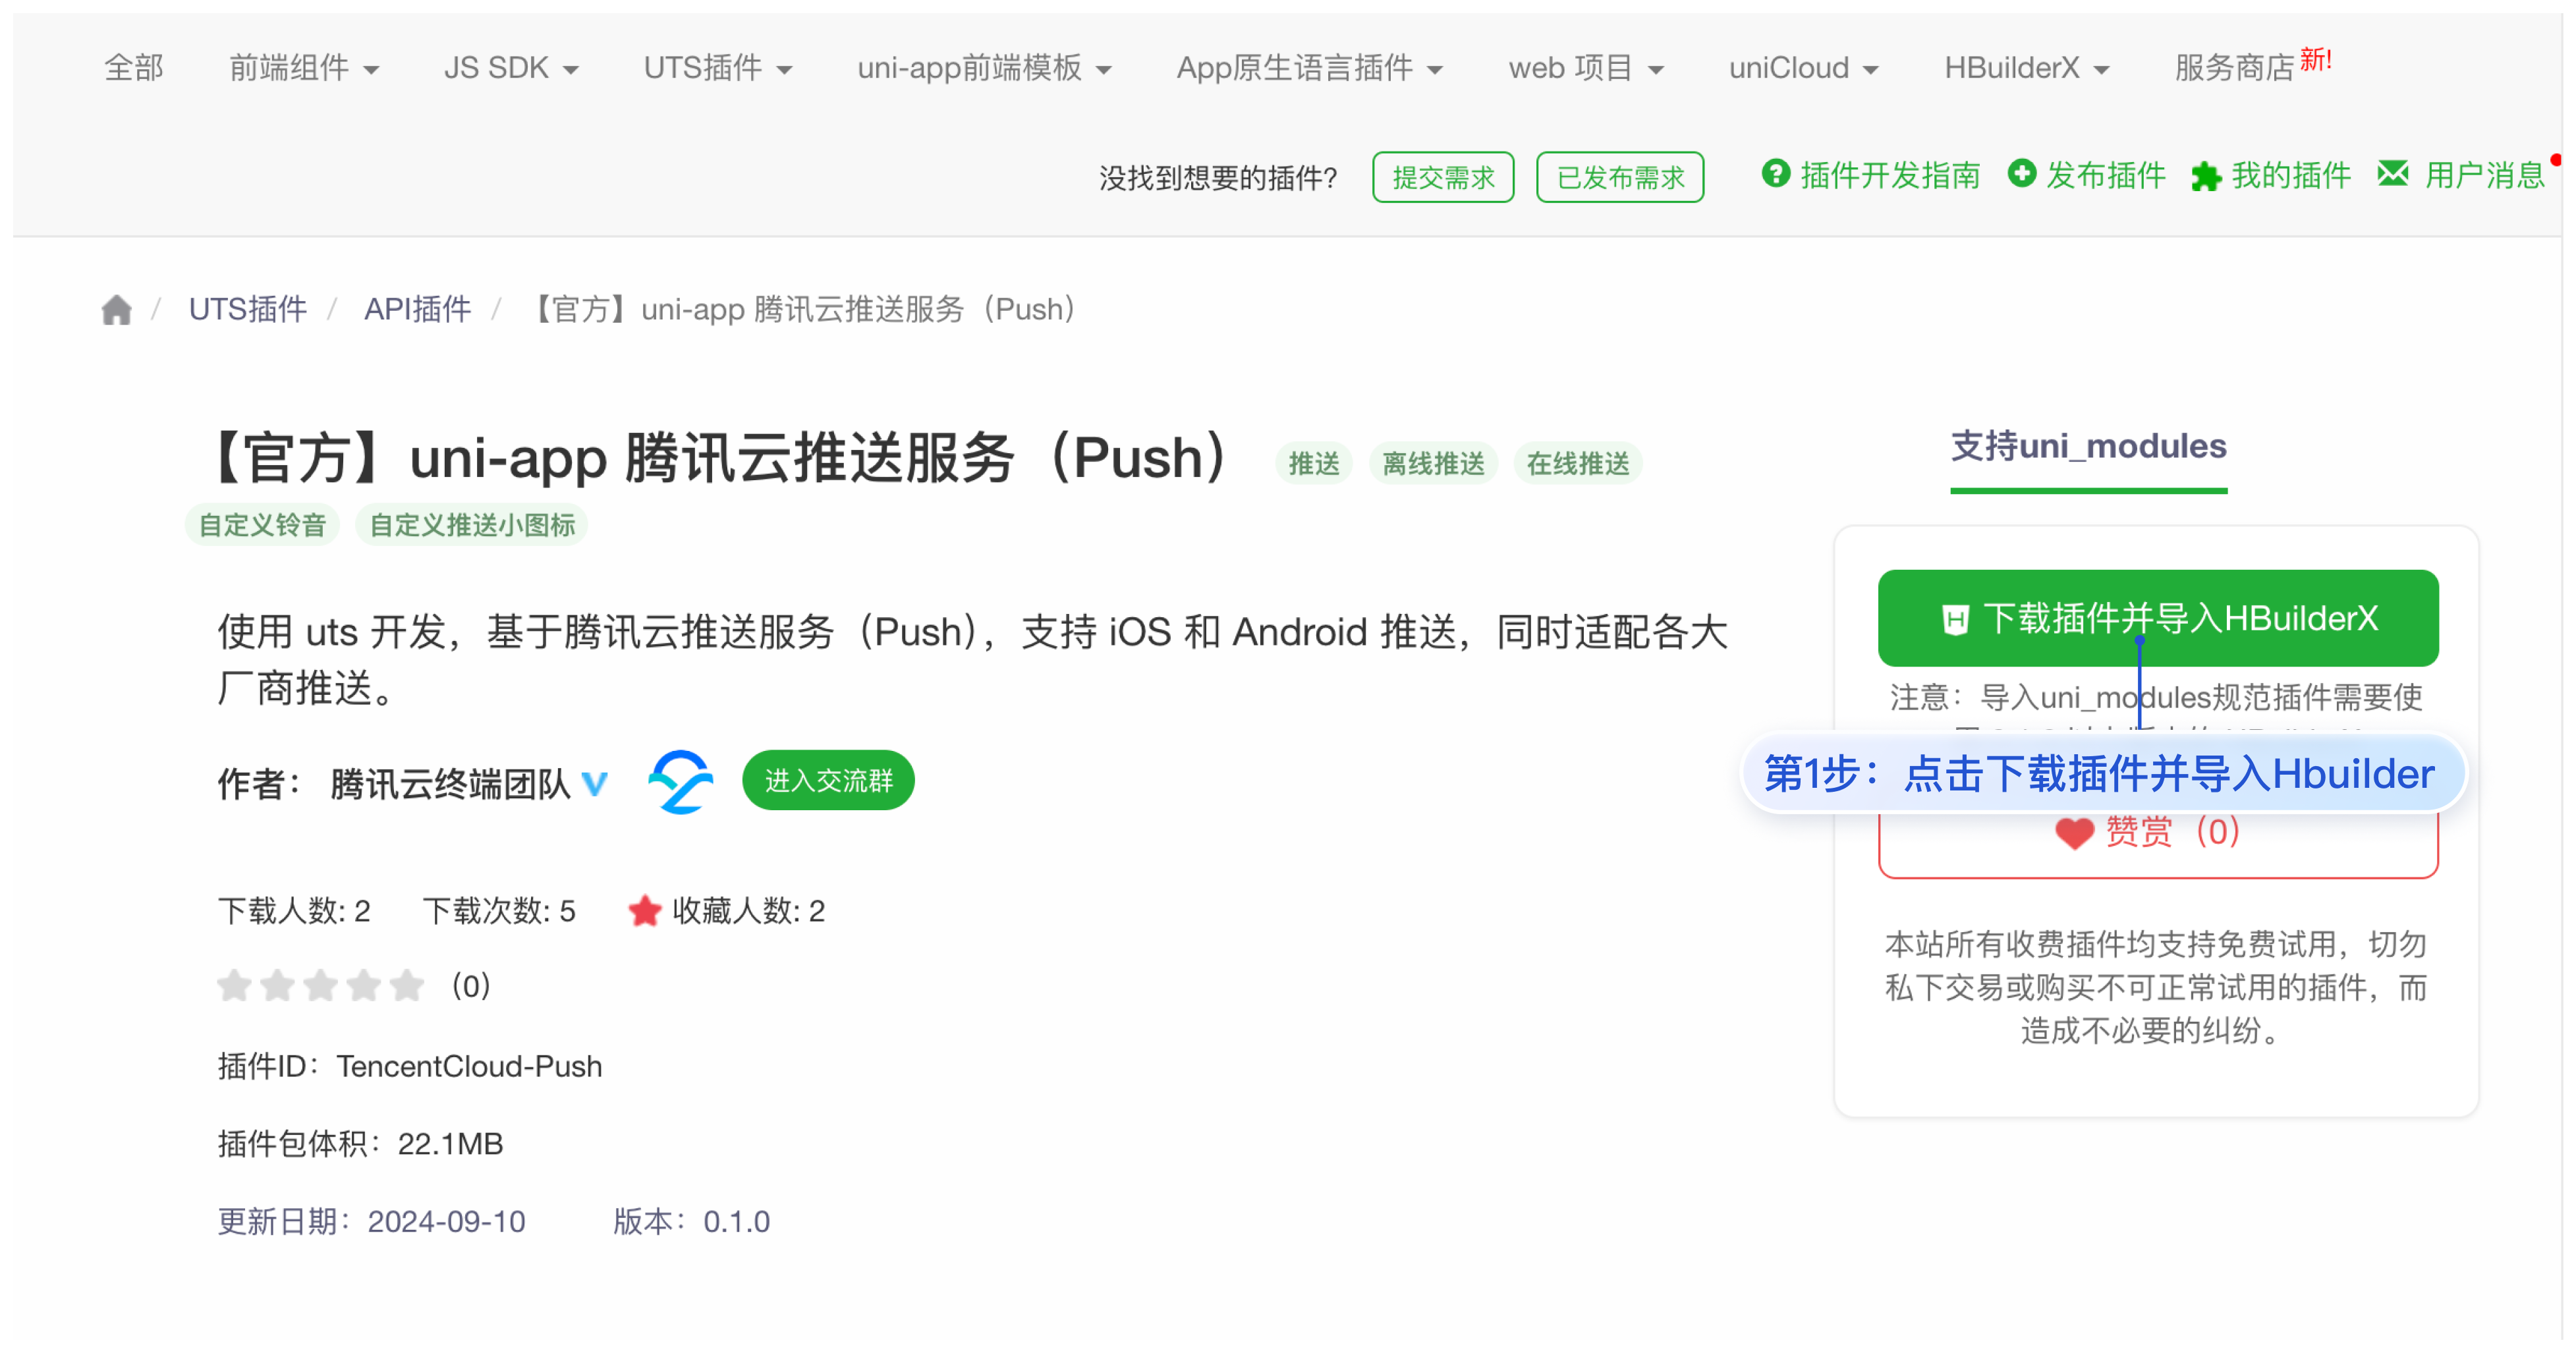
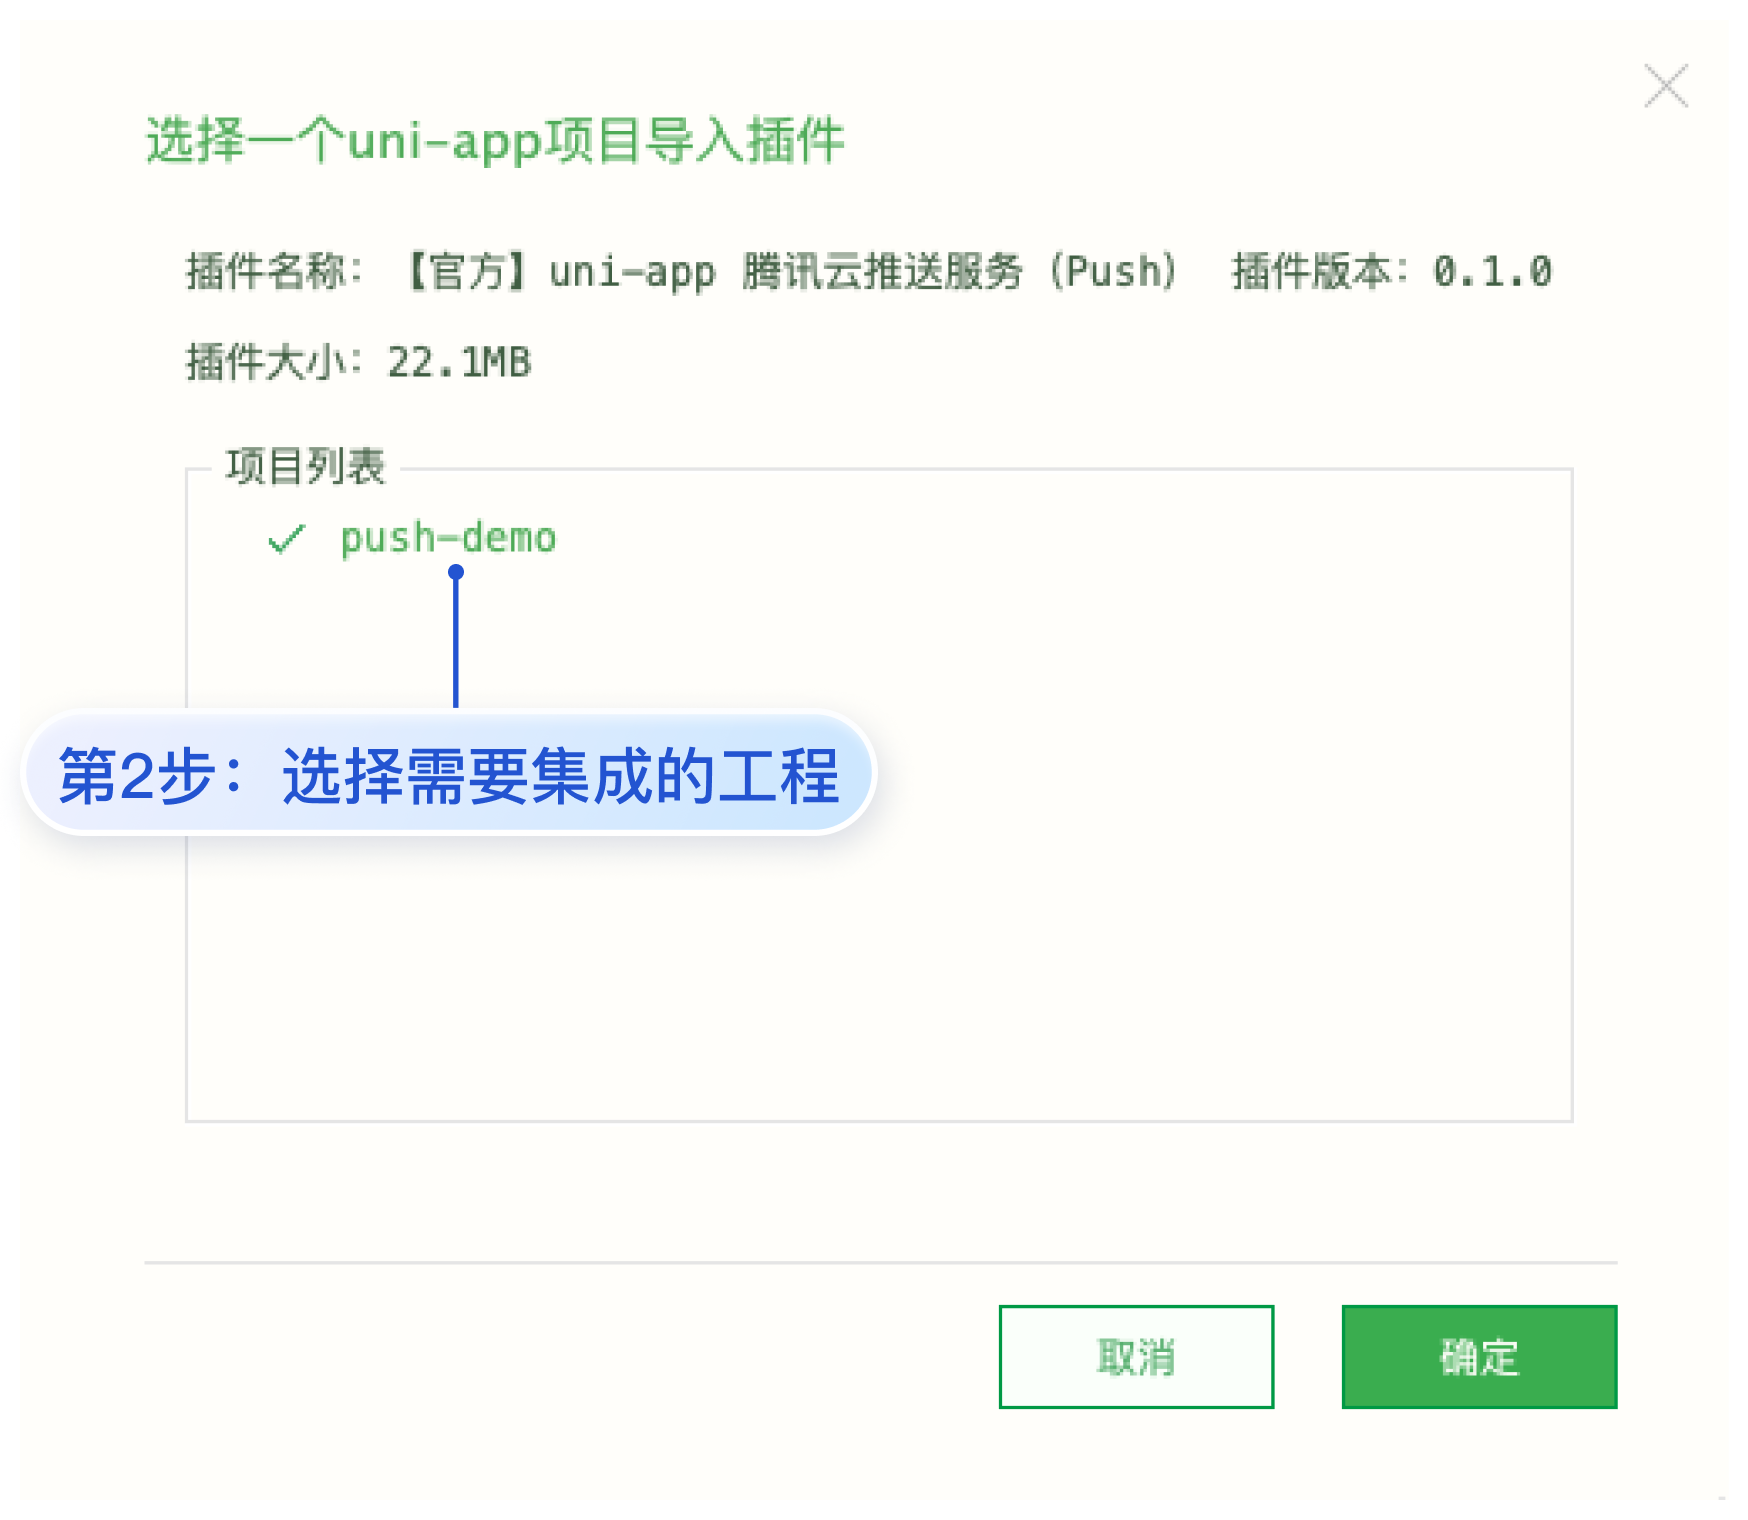
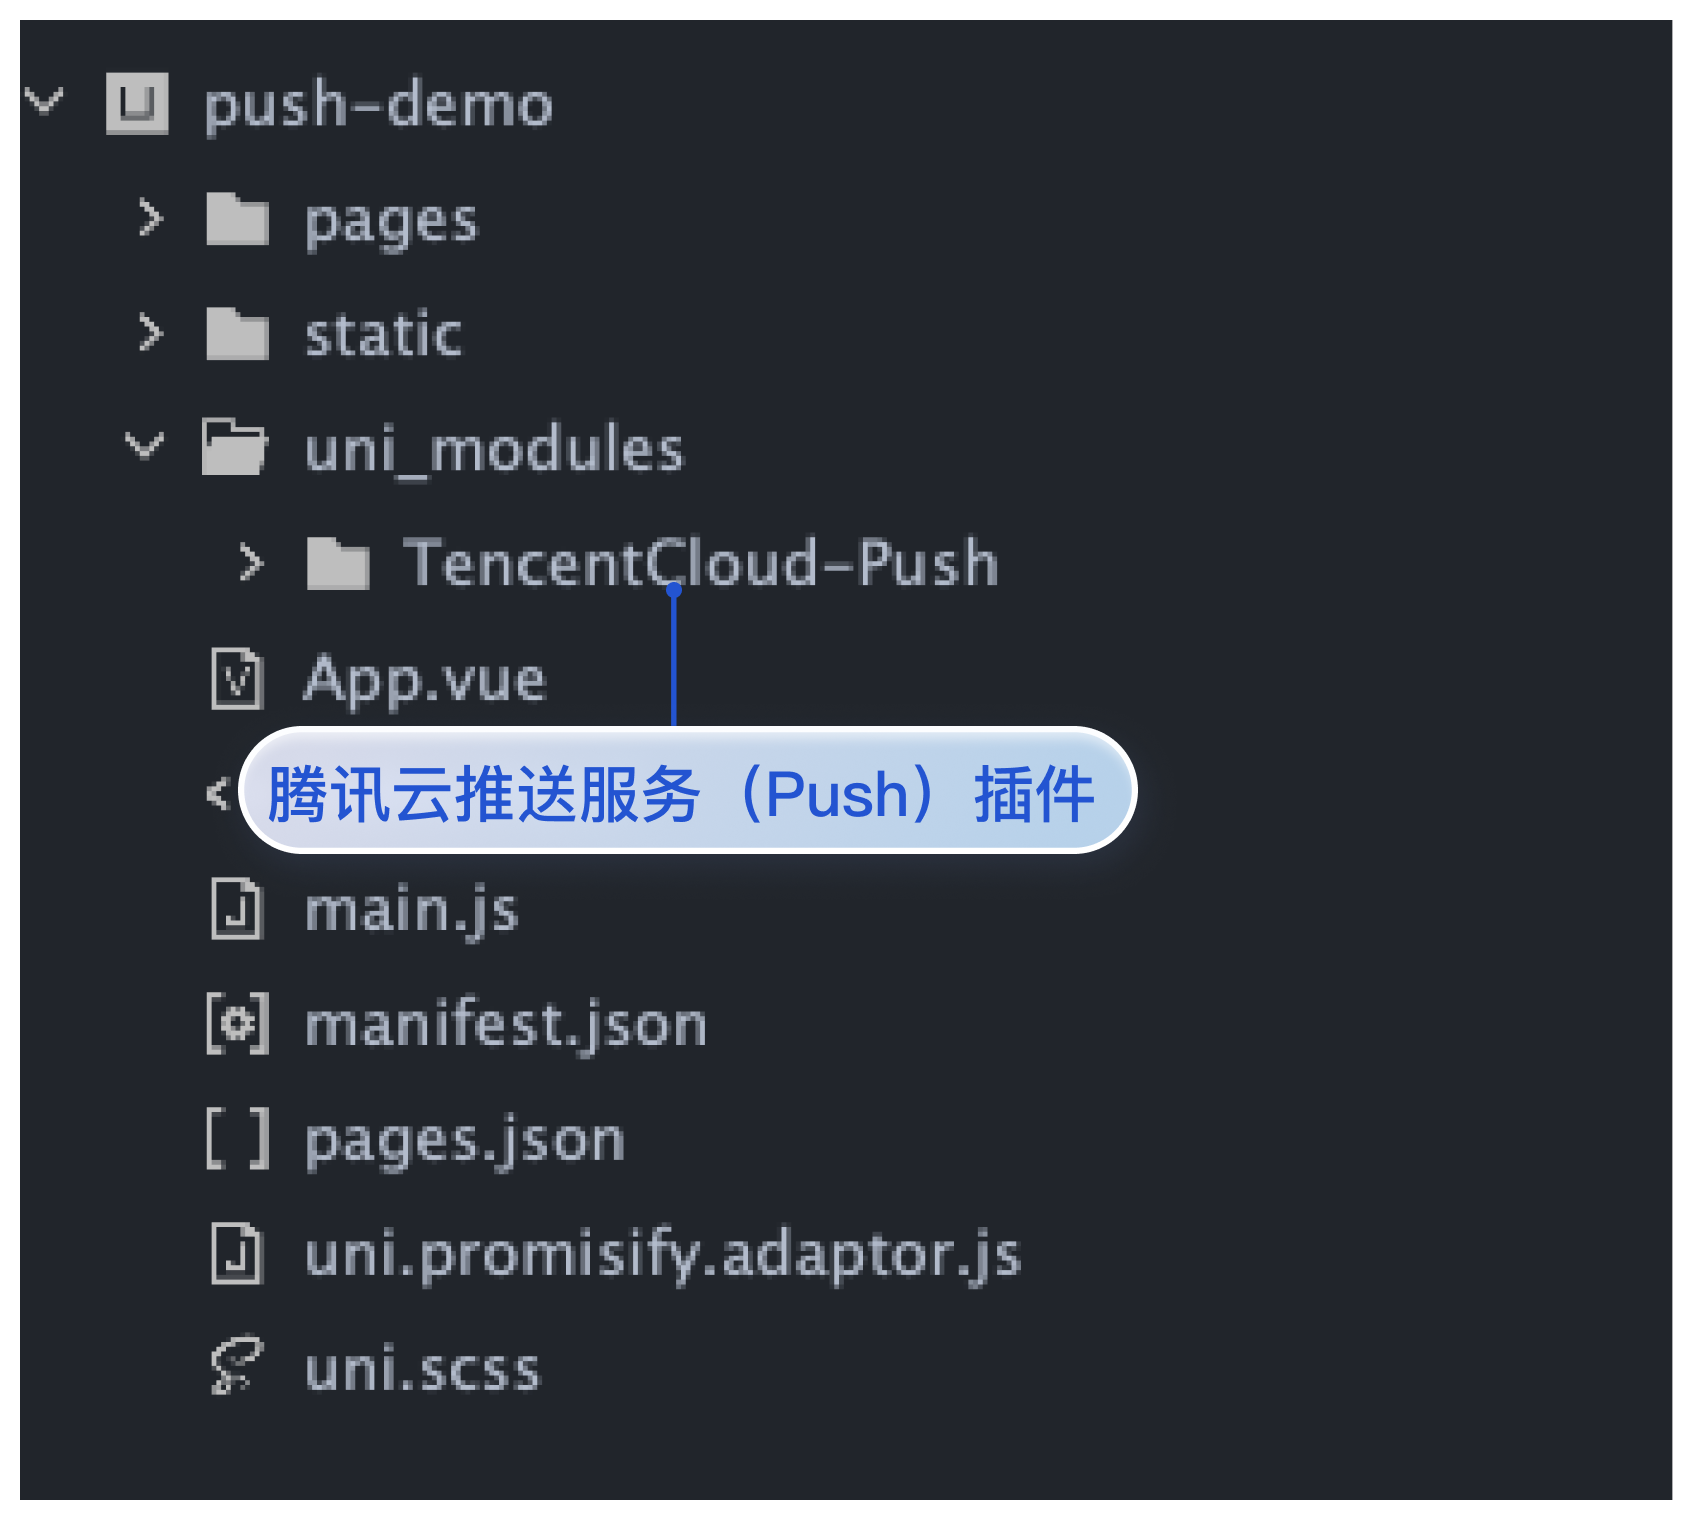
3. 在 App.vue 中引入并注册腾讯云推送服务(Push)(成功后就可以收到在线推送通知了)
说明:
registerPush注册推送服务成功后,您可通过 getRegistrationID 获取推送 ID 标识, 即 RegistrationID。您可以向指定的 RegistrationID 推送消息。// 集成 TencentCloud-Pushimport * as Push from '@/uni_modules/TencentCloud-Push';const SDKAppID = 0; // 您的 SDKAppIDconst appKey = ''; // 客户端密钥Push.registerPush(SDKAppID, appKey, (data) => {console.log('registerPush ok', data);Push.getRegistrationID((registrationID) => {console.log('getRegistrationID ok', registrationID);});}, (errCode, errMsg) => {console.error('registerPush failed', errCode, errMsg);});// 监听通知栏点击事件,获取推送扩展信息Push.addPushListener(Push.EVENT.NOTIFICATION_CLICKED, (res) => {// res 为推送扩展信息console.log('notification clicked', res);});// 监听在线推送Push.addPushListener(Push.EVENT.MESSAGE_RECEIVED, (res) => {// res 为消息内容console.log('message received', res);});// 监听在线推送被撤回Push.addPushListener(Push.EVENT.MESSAGE_REVOKED, (res) => {// res 为被撤回的消息 IDconsole.log('message revoked', res);});
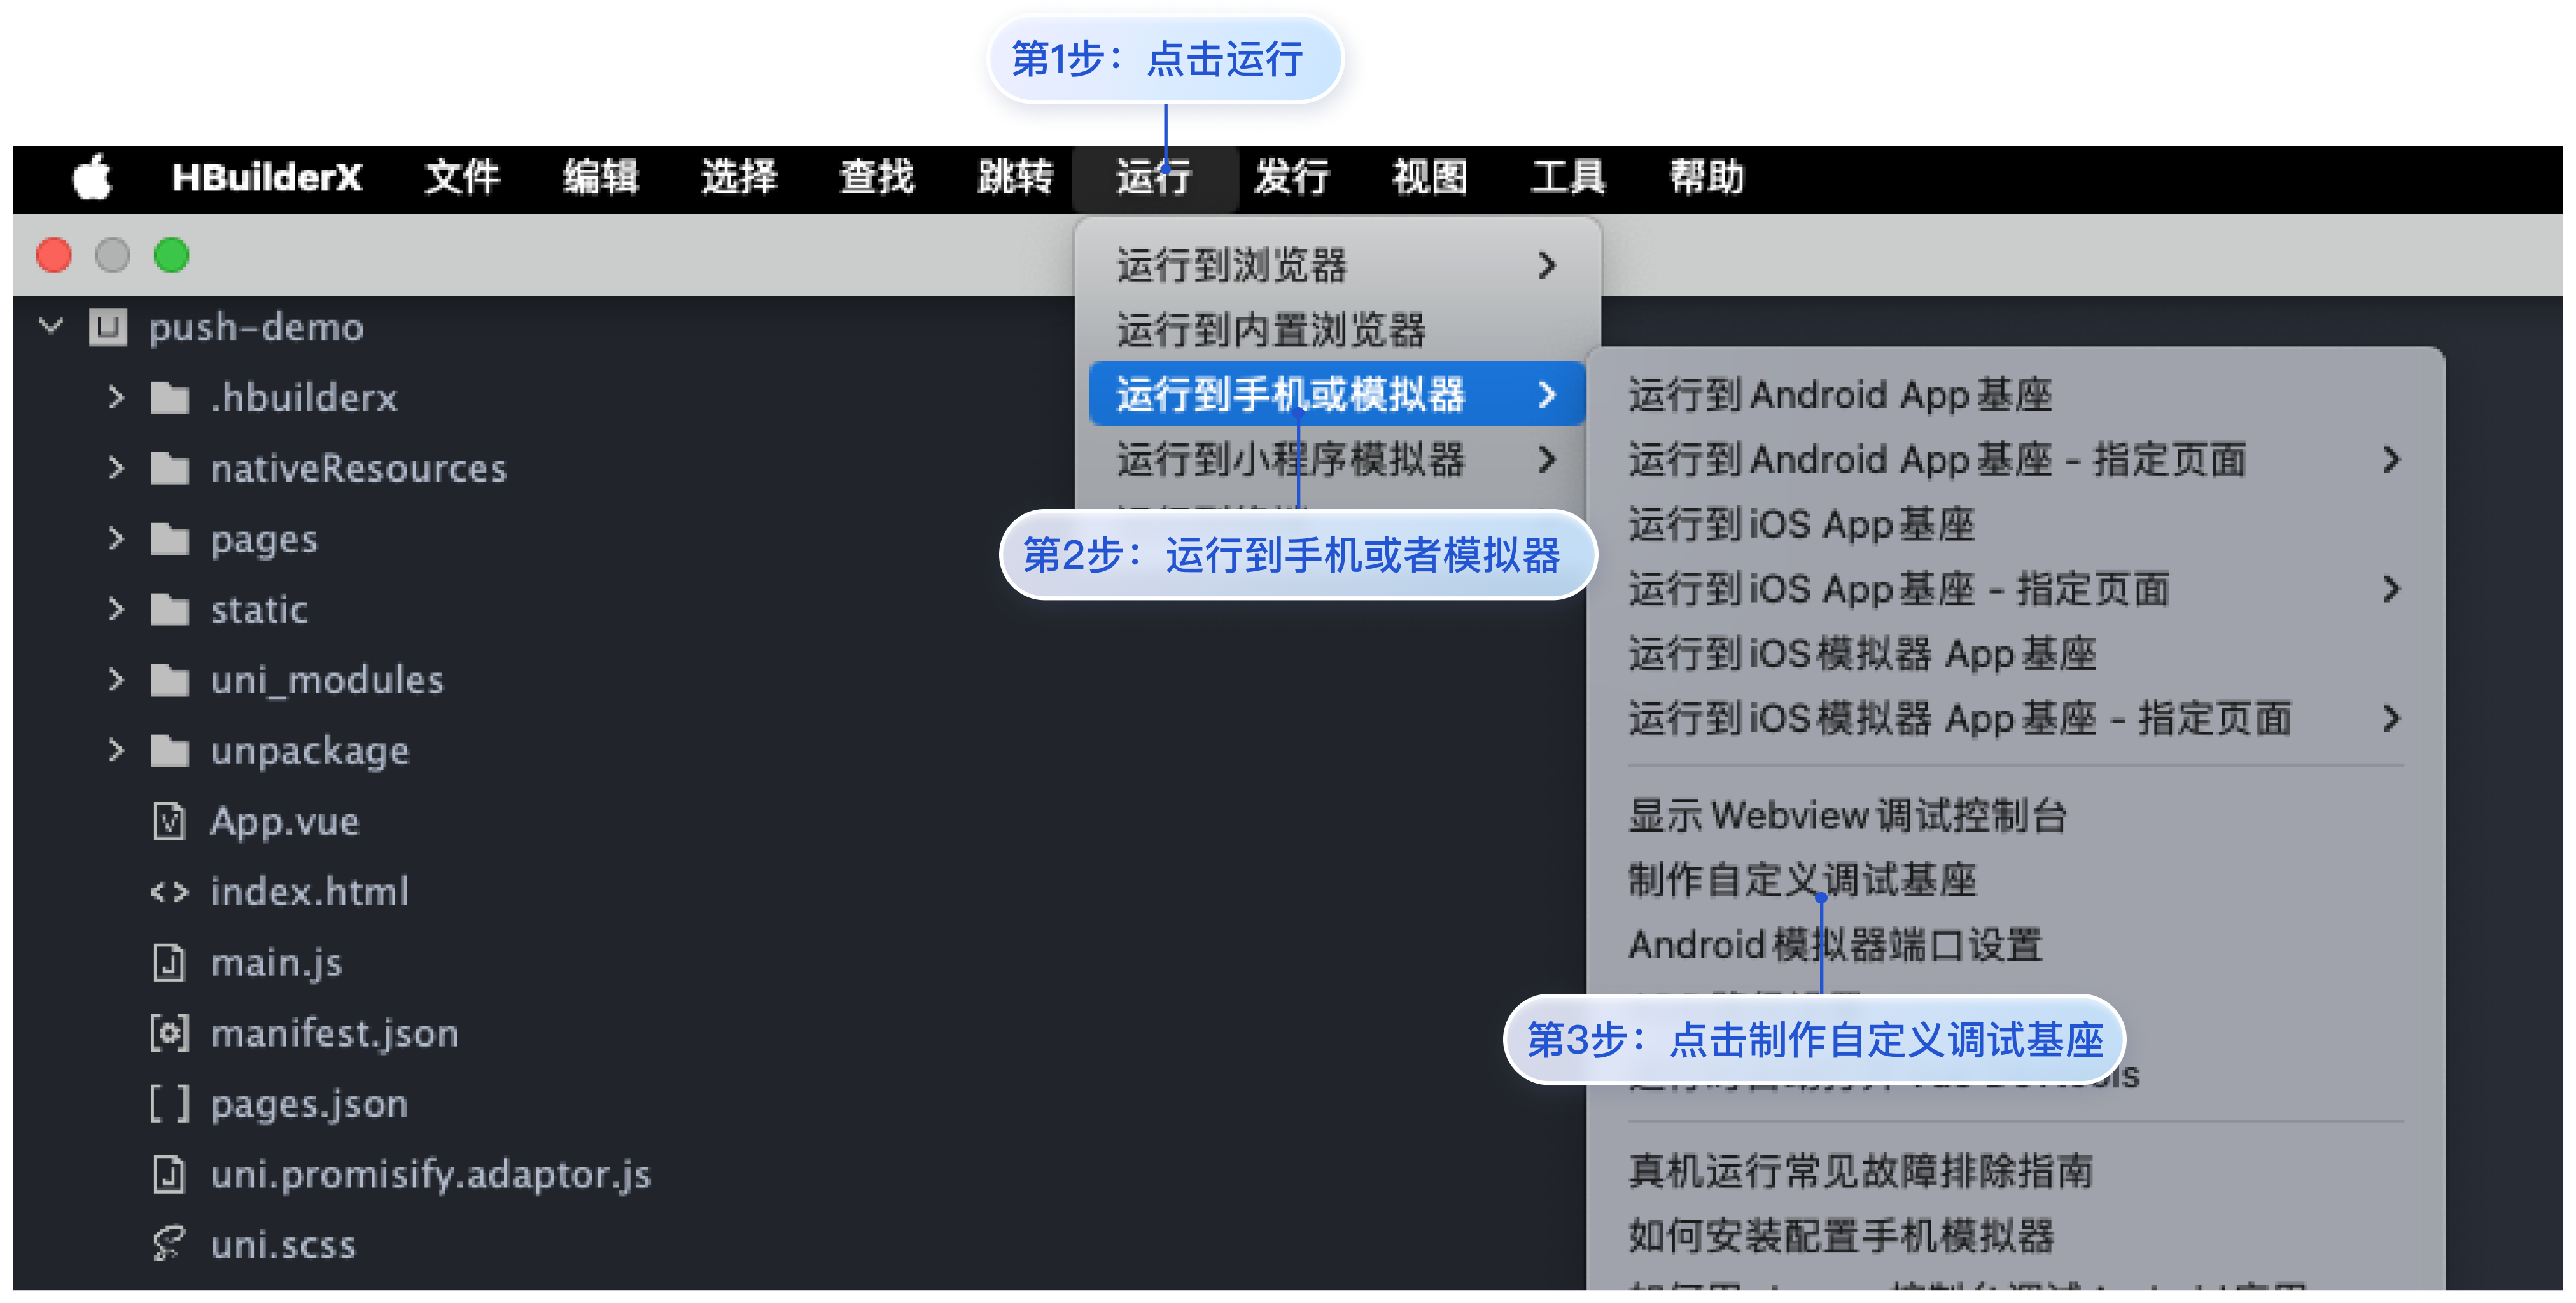
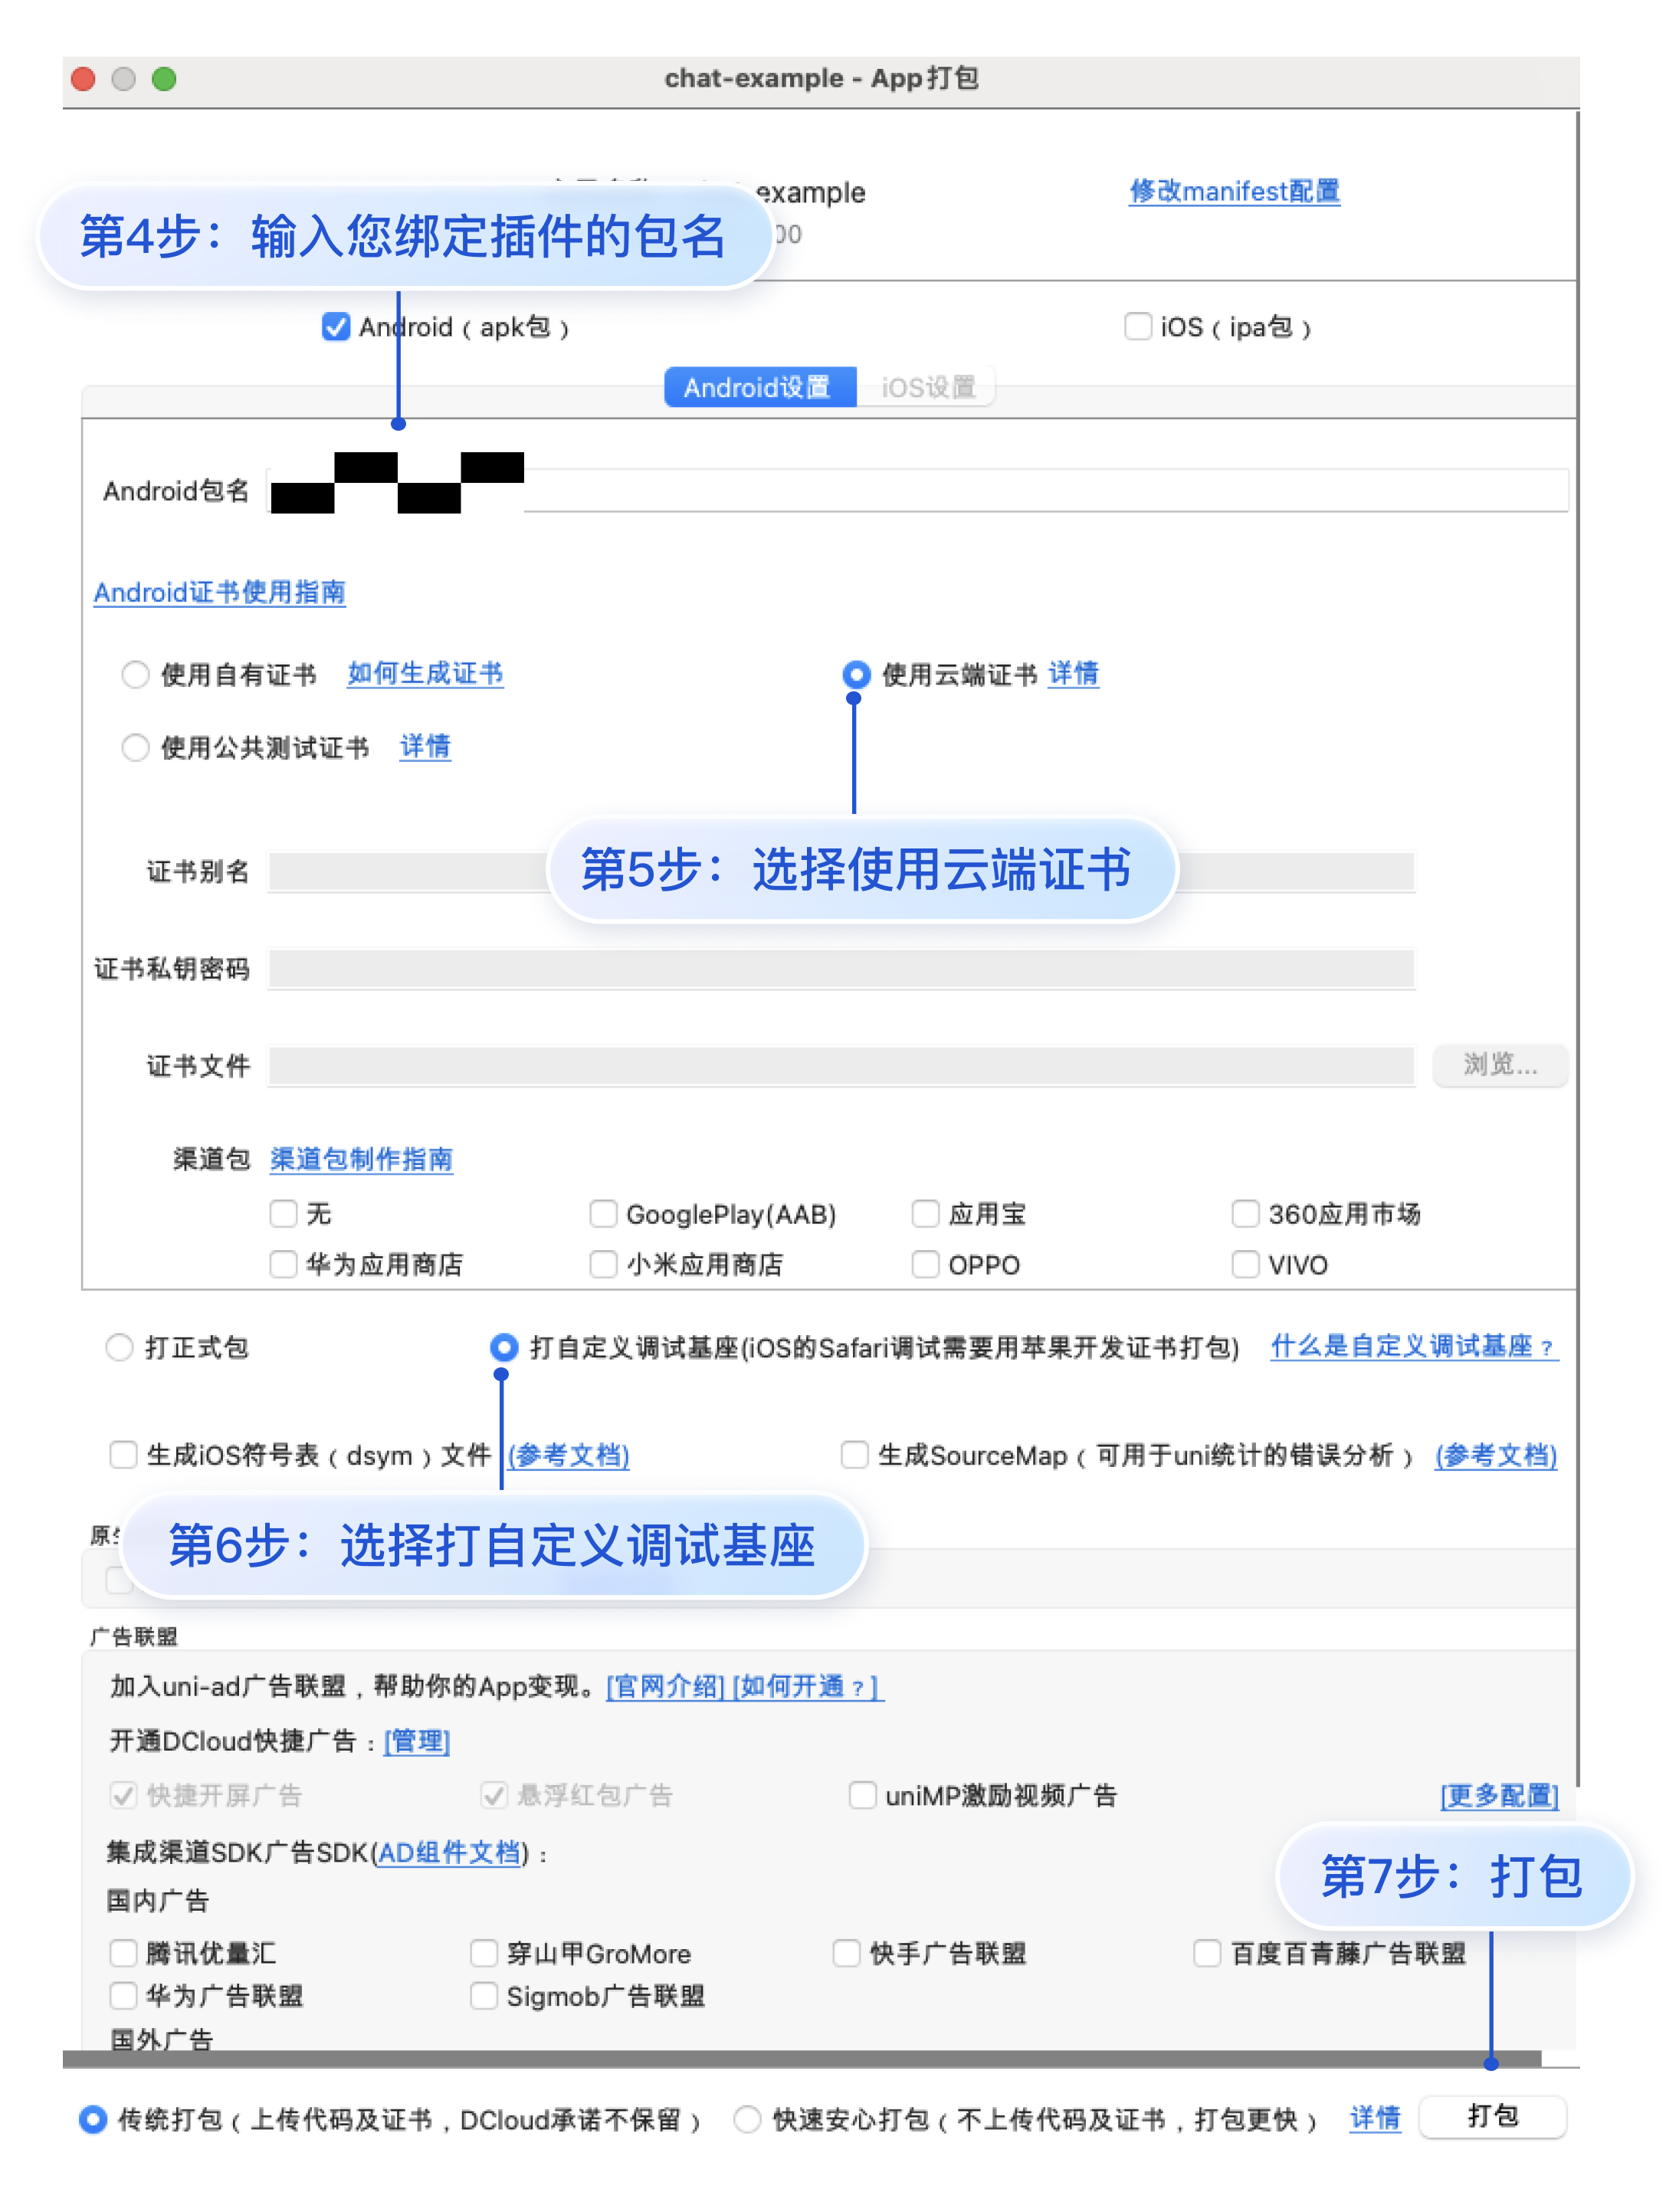
4. 使用云端证书,生成自定义基座
单击 HBuilderX 的运行 > 运行到手机或模拟器 > 制作自定义调试基座,使用云端证书制作 Android 或 iOS 自定义调试基座。如图所示:
1. 创建一个 React Native 项目(已有项目可忽略此步骤)
npx @react-native-community/cli@latest init MyReactNativeApp --version 0.75.0
2. 集成 @tencentcloud/react-native-push
npm install @tencentcloud/react-native-push --save
3. 注册推送
复制下面的代码到 App.tsx,并将 SDKAppID 和 appKey 替换为您的应用的信息。
import Push from '@tencentcloud/react-native-push';const SDKAppID = 0; // 您的 SDKAppIDconst appKey = ''; // 客户端密钥if (Push) {// 如果您需要与 Chat 的登录 userID 打通(即向此 userID 推送消息),请使用 setRegistrationID 接口// Push.setRegistrationID(userID, () => {// console.log('setRegistrationID ok', userID);// });Push.registerPush(SDKAppID, appKey, (data) => {console.log('registerPush ok', data);Push.getRegistrationID((registrationID) => {console.log('getRegistrationID ok', registrationID);});}, (errCode, errMsg) => {console.error('registerPush failed', errCode, errMsg);});// 监听通知栏点击事件,获取推送扩展信息Push.addPushListener(Push.EVENT.NOTIFICATION_CLICKED, (res) => {// res 为推送扩展信息console.log('notification clicked', res);});// 监听在线推送Push.addPushListener(Push.EVENT.MESSAGE_RECEIVED, (res) => {// res 为消息内容console.log('message received', res);});// 监听在线推送被撤回Push.addPushListener(Push.EVENT.MESSAGE_REVOKED, (res) => {// res 为被撤回的消息 IDconsole.log('message revoked', res);});}
4. 配置 Native Modules 和相关依赖
1)使用 Android Studio 打开
MyReactNativeApp/android 目录。2)修改项目入口文件。
...import com.tencent.qcloud.rntimpush.TencentCloudPushApplication// Replace Application with TencentCloudPushApplicationclass MainApplication : TencentCloudPushApplication(), ReactApplication {...// add TencentCloudPushPackage to the list of packages returned in ReactNativeHost's getPackages() methodoverride fun getPackages(): List<ReactPackage> =PackageList(this).packages.apply {// Packages that cannot be autolinked yet can be added manually here, for example:// add(MyReactNativePackage())}}
...import com.tencent.qcloud.rntimpush.TencentCloudPushApplication;// Replace Application with TencentCloudPushApplicationpublic class MainApplication extends TencentCloudPushApplication implements ReactApplication {...// add TencentCloudPushPackage to the list of packages returned in ReactNativeHost's getPackages() method@Overrideprotected List<ReactPackage> getPackages() {List<ReactPackage> packages = new PackageList(this).getPackages();// Packages that cannot be autolinked yet can be added manually here, for example:// packages.add(new MyReactNativePackage());return packages;}...}
3)以上操作都完成后,选择 File > Sync Project with Gradle Files。
1)使用 XCode 打开 MyReactNativeApp/ios/MyReactNativeApp.xcworkspace。
2)进入
MyReactNativeApp/ios 目录,安装 TIMPush。pod install# 如果无法安装最新版本,执行以下命令更新本地的 CocoaPods 仓库列表pod repo update
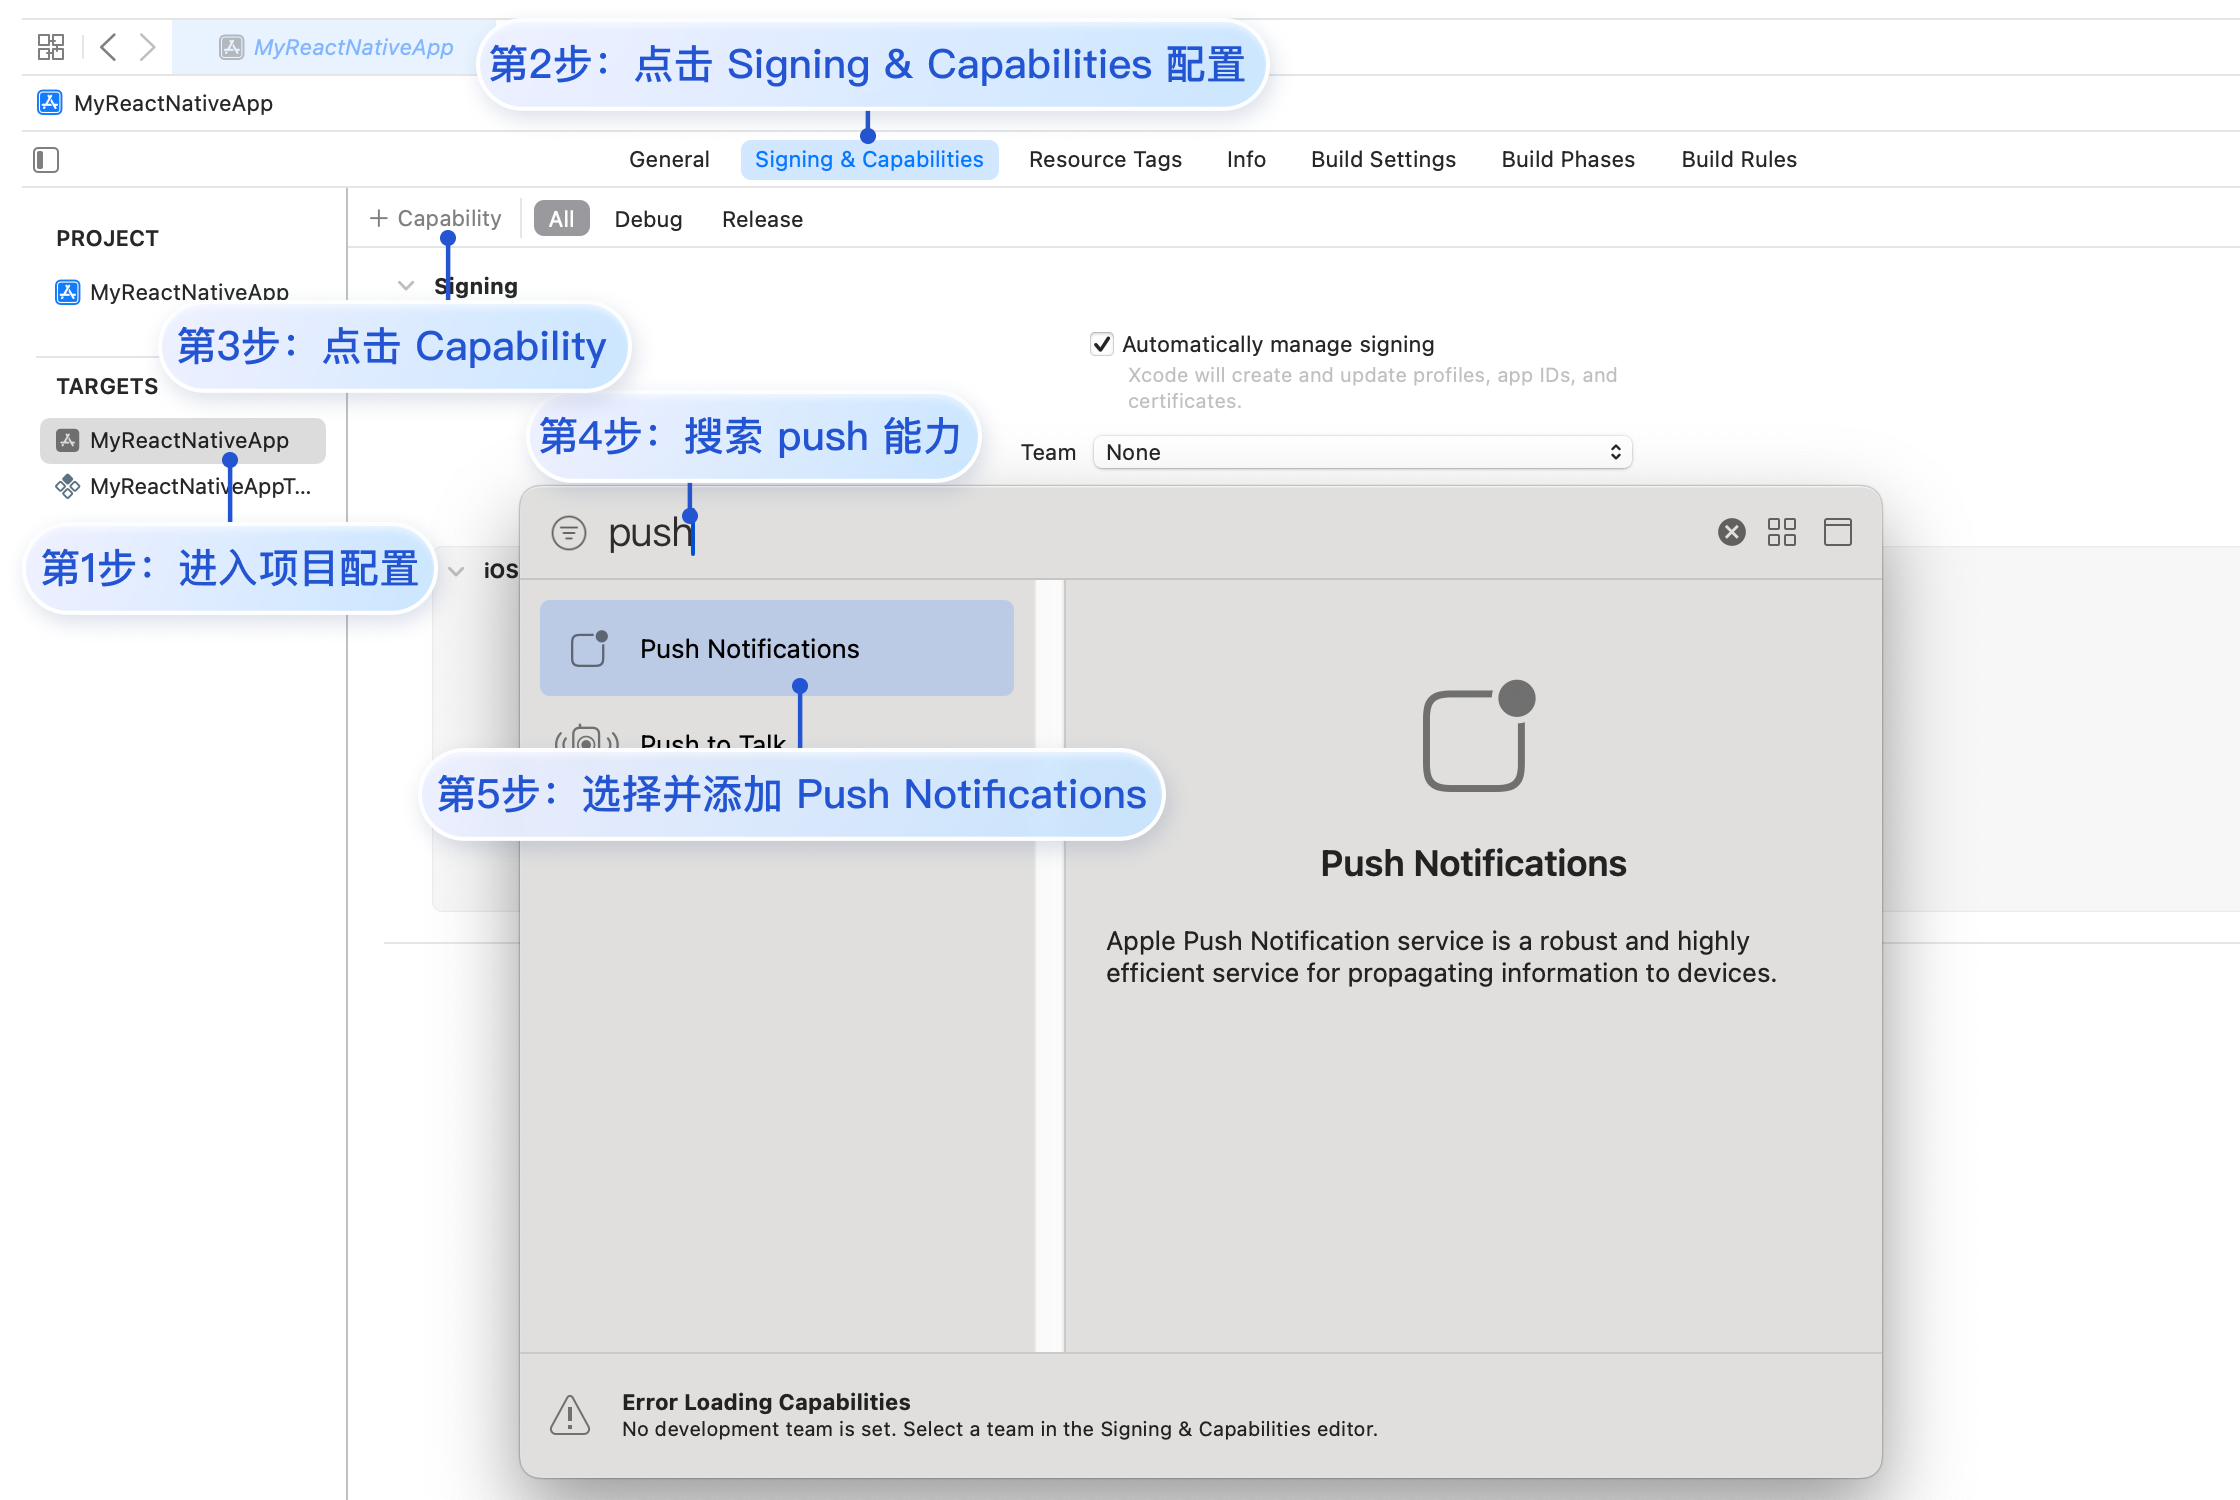
3)在 App 中启用推送通知功能。打开 Xcode 项目,在 Project > Target > Capabilities 页面选择并添加 Push Notifications。

5. 在真机上运行(测试前请务必打开手机通知权限,允许应用通知。)
从项目根目录开始,在命令提示符中运行以下命令,在设备上安装并启动您的应用程序:
For Android:
npm run android
For iOS:
npm run ios
步骤3:指定 RegistrationID 推送
