
AI 对话 Chat 信令方案
IM SDK 集成
集成 IM SDK
建议选择使用 CocoaPods 自动加载的方式集成 IM SDK。
1. 安装 CocoaPods。在终端窗口中输入如下命令(需要提前在 Mac 中安装 Ruby 环境):
sudo gem install cocoapods
2. 创建 Podfile 文件。进入项目所在路径输入以下命令行,之后项目路径下会出现一个 Podfile 文件。
pod init
3. 编辑 Podfile 文件。请您按照如下方式设置 Podfile 文件:
platform :ios, '8.0'source 'https://github.com/CocoaPods/Specs.git'target 'App' do# 集成完整版本的 IM SDK,版本号要大于 '8.1.6129'pod 'TXIMSDK_Plus_iOS','8.1.6129'# 或者集成裁剪体积后的 IM SDK(仅包含 AI 信令相关能力),版本号要大于 '8.2.6361'pod 'TXIMSDK_Plus_SignalingSDK','8.2.6361'end
4. 更新并安装 SDK。
在终端窗口中输入如下命令以更新本地库文件,并安装 IM SDK。
pod install
或使用以下命令更新本地库版本:
pod update
注意:
引用 IM SDK
项目代码中使用 SDK 有两种方式:
在
Xcode > Build Setting > Header Search Paths 设置 SDK 头文件的路径,然后在项目需要使用 SDK API 的文件里,引入具体的头文件。#import "ImSDK_Plus.h"
在项目需要使用 SDK API 的文件里,引入具体的头文件。
#import <ImSDK_Plus/ImSDK_Plus.h>
集成 SDK(aar)
建议选择使用 Gradle 自动加载的方式集成 IM SDK。
1. 添加 SDK 依赖。
1.1 找到 app 的 build.gradle,在 repositories 中添加 mavenCentral() 的依赖。
repositories {google()// 增加 mavenCentral 仓库mavenCentral()}
1.2 然后在 dependencies 中添加 IM SDK 的依赖。
dependencies {// 集成完整版本的 IM SDK,版本号要大于 '8.1.6129'api 'com.tencent.imsdk:imsdk-plus:8.1.6129'// 或者集成裁剪体积后的 IM SDK(仅包含 AI 信令相关能力),版本号要大于 '8.2.6361'api 'com.tencent.imsdk:signalingsdk:8.2.6361'}
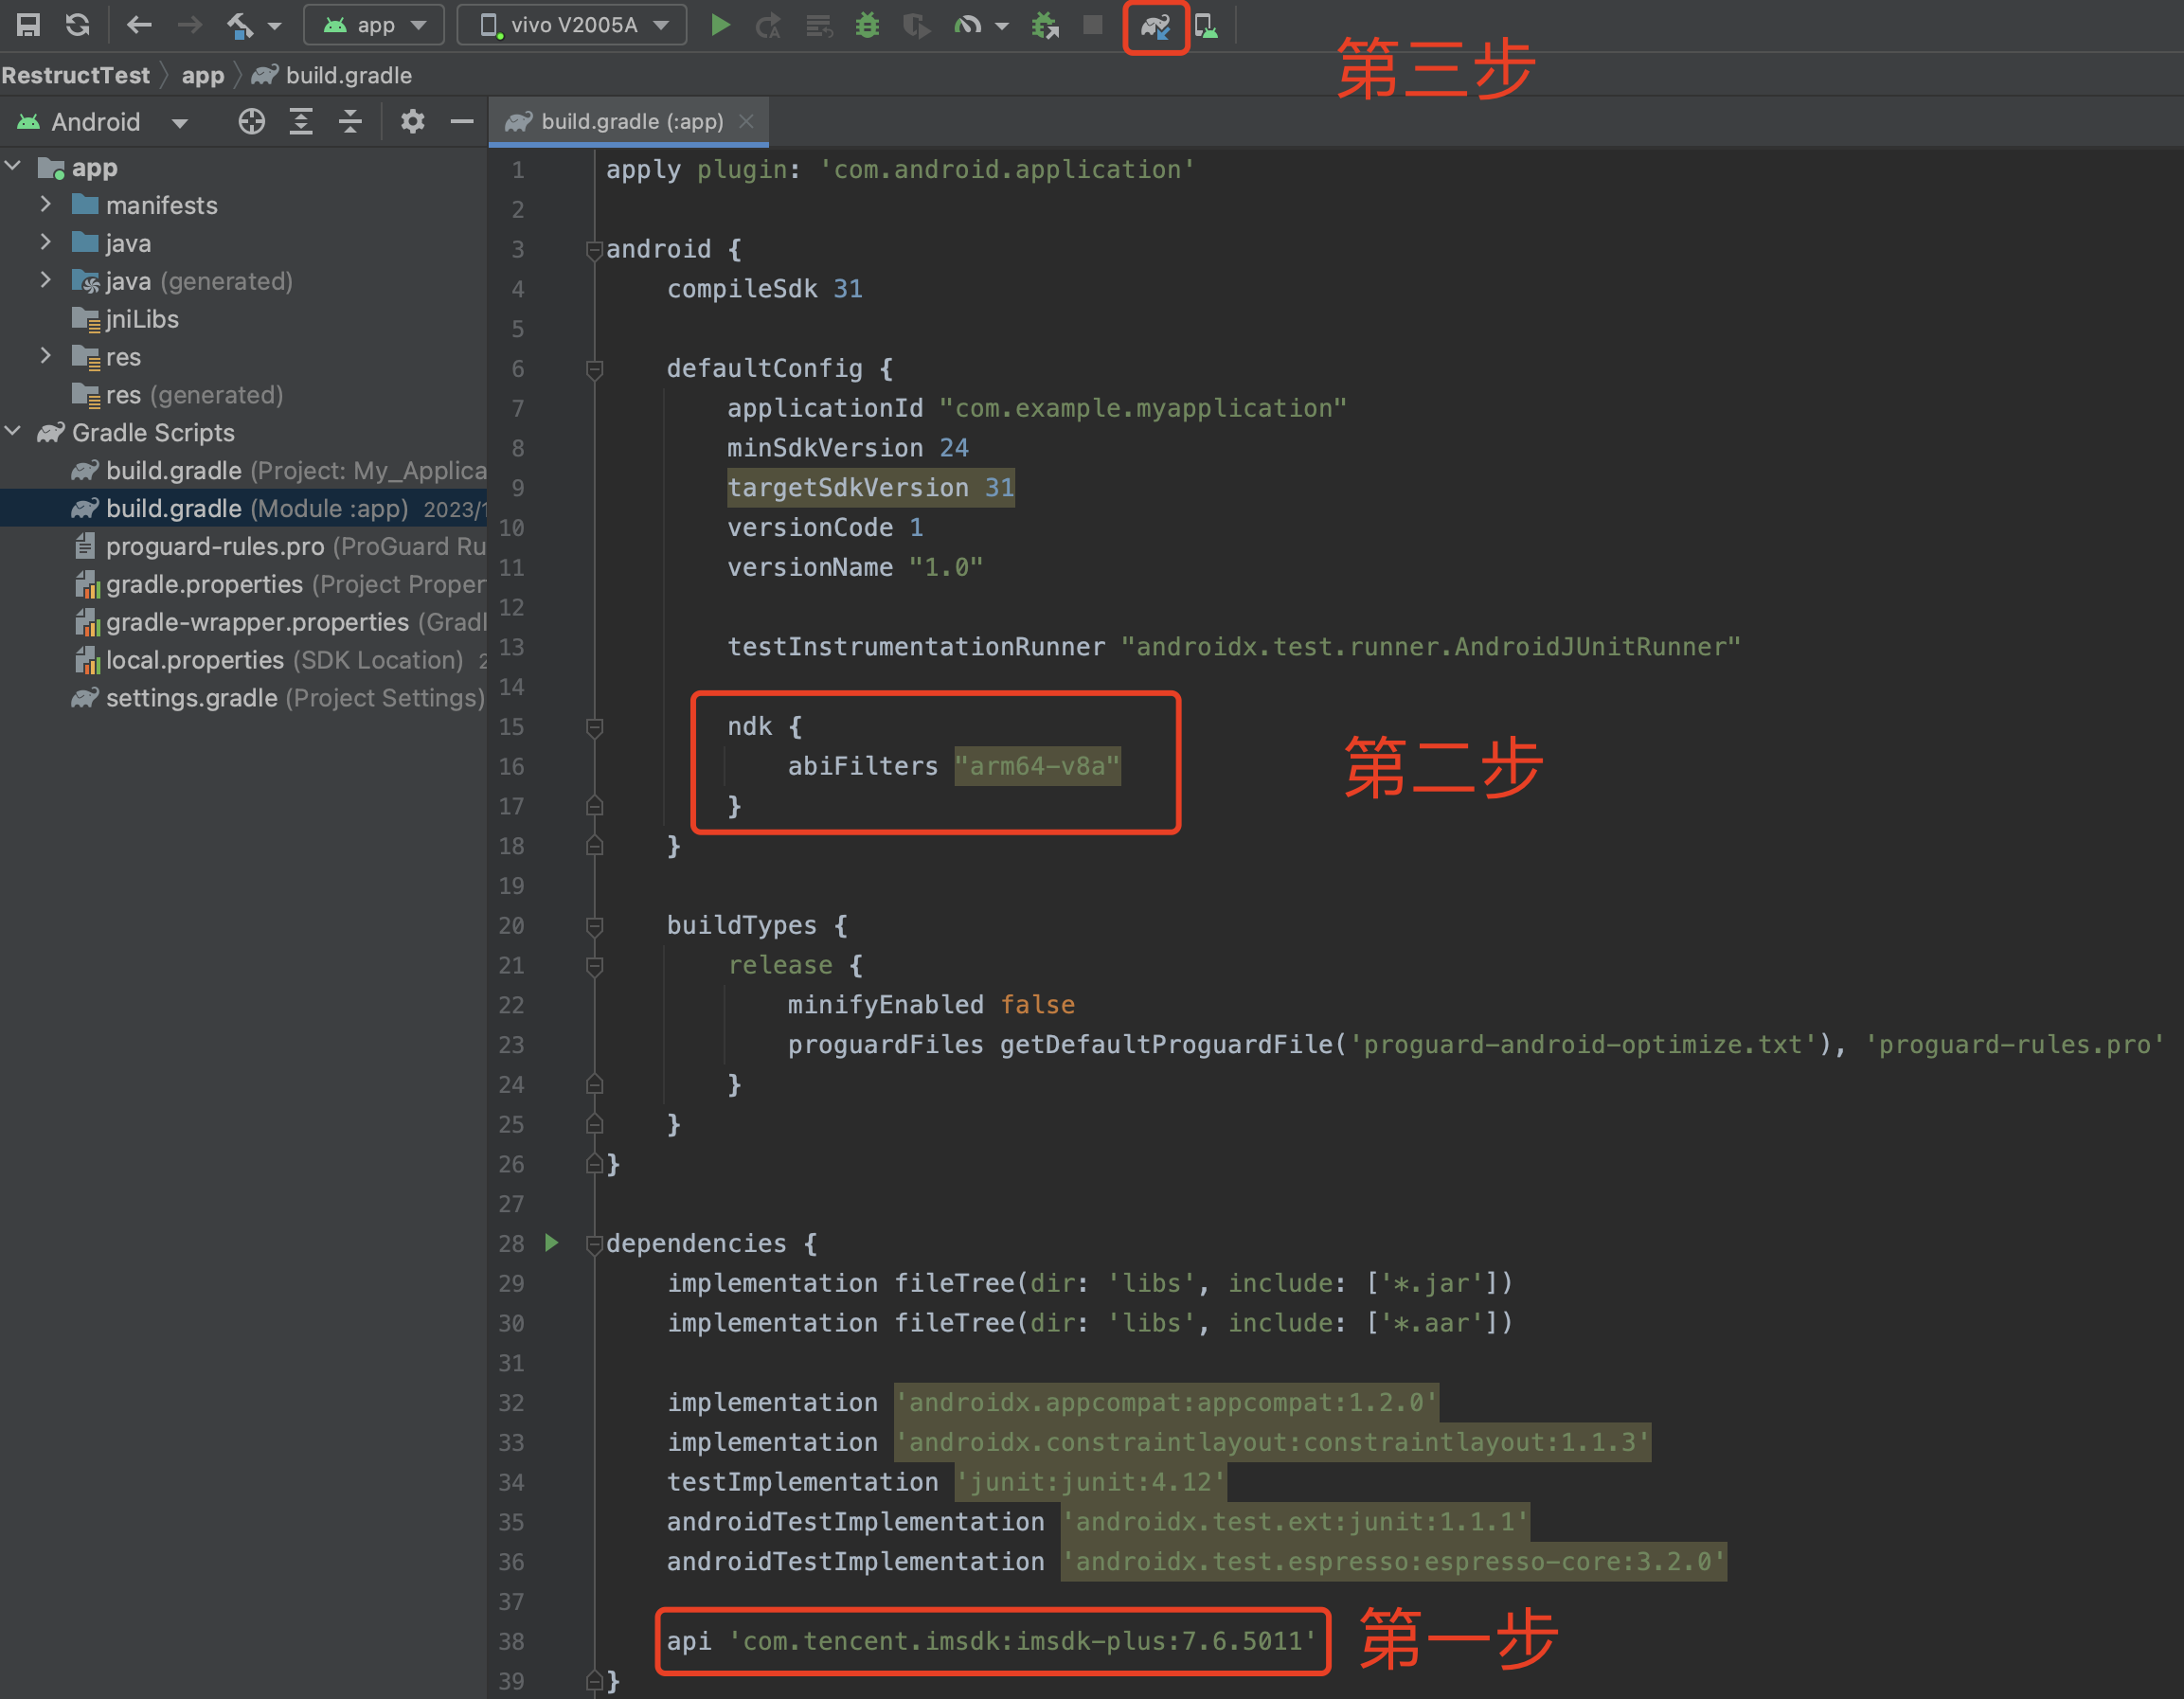
2. 指定 App 使用架构。在 defaultConfig 中,指定 App 使用的 CPU 架构(从 IM SDK 4.3.118版本开始支持 armeabi-v7a,arm64-v8a,x86,x86_64)。
defaultConfig {ndk {abiFilters "arm64-v8a"}}
3. 同步 SDK。请保证您的网络已连接 maven,单击 Sync 按钮,SDK 就会自动下载集成到工程里。
配置 App 权限
在 AndroidManifest.xml 中配置 App 的权限,IM SDK 需要以下权限:
<uses-permission android:name="android.permission.INTERNET" /><uses-permission android:name="android.permission.ACCESS_NETWORK_STATE" /><uses-permission android:name="android.permission.ACCESS_WIFI_STATE" />
设置混淆规则
在 proguard-rules.pro 文件,将 IM SDK 相关类加入不混淆名单。
-keep class com.tencent.imsdk.** { *; }
集成 SDK
建议通过 npm 方式将 IM SDK 集成到您的 Web、小程序中。
// 版本号v3.4.5或更高npm install @tencentcloud/chat
说明:
若同步依赖过程中出现问题,请切换 npm 源后再次重试。
npm config set registry http://r.cnpmjs.org/
引入模块
import TencentCloudChat from '@tencentcloud/chat';
初始化 SDK
1. 调用初始化接口。
// 1. 从即时通信 IM 控制台获取应用 SDKAppID。// 2. 初始化 config 对象V2TIMSDKConfig *config = [[V2TIMSDKConfig alloc] init];// 3. 指定 log 输出级别。config.logLevel = V2TIM_LOG_INFO;// 4. 添加 V2TIMSDKListener 的事件监听器,self 是 id<V2TIMSDKListener> 的实现类,如果您不需要监听 IM SDK 的事件,这个步骤可以忽略。[[V2TIMManager sharedInstance] addIMSDKListener:self];// 5. 初始化 IM SDK,调用这个接口后,可以立即调用登录接口。[[V2TIMManager sharedInstance] initSDK:sdkAppID config:config];
2. 登录。
NSString *userID = @"your user id";NSString *userSig = @"userSig from your server";[[V2TIMManager sharedInstance] login:userID userSig:userSig succ:^{NSLog(@"success");} fail:^(int code, NSString *desc) {// 如果返回以下错误码,表示使用 UserSig 已过期,请您使用新签发的 UserSig 进行再次登录。// 1. ERR_USER_SIG_EXPIRED(6206)// 2. ERR_SVR_ACCOUNT_USERSIG_EXPIRED(70001)// 注意:其他的错误码,请不要在这里调用登录接口,避免 IM SDK 登录进入死循环。NSLog(@"failure, code:%d, desc:%@", code, desc);}];
1. 调用初始化接口。
// 1. 从即时通信 IM 控制台获取应用 SDKAppID。// 2. 初始化 config 对象。V2TIMSDKConfig config = new V2TIMSDKConfig();// 3. 指定 log 输出级别。config.setLogLevel(V2TIMSDKConfig.V2TIM_LOG_INFO);// 4. 添加 V2TIMSDKListener 的事件监听器,sdkListener 是 V2TIMSDKListener 的实现类,如果您不需要监听 IM SDK 的事件,这个步骤可以忽略。V2TIMManager.getInstance().addIMSDKListener(sdkListener);// 5. 初始化 IM SDK,调用这个接口后,可以立即调用登录接口。V2TIMManager.getInstance().initSDK(context, sdkAppID, config);
2. 登录。
String userID = "your user id";String userSig = "userSig from your server";V2TIMManager.getInstance().login(userID, userSig, new V2TIMCallback() {@Overridepublic void onSuccess() {Log.i("imsdk", "success");}@Overridepublic void onError(int code, String desc) {// 如果返回以下错误码,表示使用 UserSig 已过期,请您使用新签发的 UserSig 进行再次登录。// 1. ERR_USER_SIG_EXPIRED(6206)// 2. ERR_SVR_ACCOUNT_USERSIG_EXPIRED(70001)// 注意:其他的错误码,请不要在这里调用登录接口,避免 IM SDK 登录进入死循环。Log.i("imsdk", "failure, code:" + code + ", desc:" + desc);}});
1. 调用初始化接口。
import TencentCloudChat from '@tencentcloud/chat';let options = {SDKAppID: 0 // 接入时需要将0替换为您的即时通信 IM 应用的 SDKAppID};// 创建 SDK 实例,`TencentCloudChat.create()`方法对于同一个 `SDKAppID` 只会返回同一份实例let chat = TencentCloudChat.create(options); // SDK 实例通常用 chat 表示chat.setLogLevel(0); // 普通级别,日志量较多,接入时建议使用// chat.setLogLevel(1); // release 级别,SDK 输出关键信息,生产环境时建议使用
2. 登录。
let promise = chat.login({userID: 'your userID', userSig: 'your userSig'});promise.then(function(imResponse) {console.log(imResponse.data); // 登录成功if (imResponse.data.repeatLogin === true) {// 标识账号已登录,本次登录操作为重复登录。console.log(imResponse.data.errorInfo);}}).catch(function(imError) {console.warn('login error:', imError); // 登录失败的相关信息});
注意:
TRTC 和 IM 的
sdkAppId 和 secretKey 必须相同。收消息的接收者的 IM 必须要登录成功,既是在线状态。
接收者的 TRTC 账号和 IM 账号必须是同一个
userId(即使用同一个 userId 进入 TRTC 房间和 IM 登录)。接收服务端下行消息
type | 说明 |
10000 | 实时字幕、翻译下发 |
10001 | AI 对话实时状态下发 |
10010 | 大模型消息透传 |
接收实时字幕
{"type": 10000, // 10000表示是下发的实时字幕"sender": "user_a", // 说话人的userid"receiver": [], // 接收者userid列表,该消息实际是在房间内广播"payload": {"text":"", // 语音识别出的文本"translation_text":"", // 翻译的文本"start_time":"00:00:01", // 这句话的开始时间"end_time":"00:00:02", // 这句话的结束时间"roundid": "xxxxx" // 唯一标识一轮对话"end": true // 如果为true,代表这是一句完整的话}}
接收机器人状态
{"type": 10001, // 机器人的状态"sender": "user_a", // 发送者userid,这里是机器人的id"receiver": [], // 接受者userid列表,该消息实际是在房间内广播"payload": {"roundid": "xxx", // 唯一标识一轮对话"timestamp": 123"state": 1, // 1 聆听中 2 思考中 3 说话中 4 被打断}}
接收大模型消息透传
{"type": 10010, // 下行大模型消息透传"sender": "user_a", // 发送者userid,这里是机器人的id"receiver": [], // 接受者userid列表,该消息实际是在房间内广播"payload": {"id": "uuid", // 消息id,可以使用uuid,排查问题使用 可选"taskid":"xxxxxx", // 该ai 对话的 taskid, 必选"timestamp": 123 // 时间戳,排查问题使用, 可选"data": {"key": "value" //业务自定义的json格式}}}
代码示例
// 调用 addSimpleMsgListener 设置事件监听器V2TIMManager.sharedInstance().addSimpleMsgListener(listener: self)/// 接收单聊自定义消息/// @param msgID 消息 ID/// @param info 发送者信息/// @param data 自定义消息二进制内容func onRecvC2CCustomMessage(_ msgID: String!, sender info: V2TIMUserInfo!, customData data: Data!) {do {if let jsonObject = try JSONSerialization.jsonObject(with: data, options: []) as? [String: Any] {print("onRecvGroupCustomMessage: \(jsonObject)")handleMessage(jsonObject)} else {print("The data is not a dictionary.")}} catch {print("Error parsing JSON: \(error)")}}
// 调用 addSimpleMsgListener 设置事件监听器V2TIMManager.getInstance().addSimpleMsgListener(sdkListener);/*** 接收单聊自定义消息* @param msgID 消息 ID* @param sender 发送方信息* @param customData 发送内容*/public void onRecvC2CCustomMessage(String msgID, V2TIMUserInfo sender, byte[] customData) {Log.i("onRecvC2CCustomMessage", "msgID:" + msgID + ", from:" + sender.getNickName() + ", content:" + new String(customData));try {String jsonString = new String(customData, "UTF-8");JSONObject jsonObject = new JSONObject(jsonString);System.out.println("onRecvGroupCustomMessage: " + jsonObject);handleMessage(jsonObject);} catch (UnsupportedEncodingException e) {System.out.println("The data is not a dictionary.");} catch (JSONException e) {System.out.println("Error parsing JSON: " + e);}}
const onMessageReceived = (event) => {const messageList = event.data;messageList?.forEach((msg) => {if (msg.type === TencentCloudChat.TYPES.MSG_CUSTOM) {console.log('收到自定义消息', event);const { data } = msg.payload;try {const jsonData = JSON.parse(data);console.log(`receive custom msg from ${msg.from} data: ${data}`);if (jsonData.type === 10000) {console.log('字幕消息', jsonData);return;}if (jsonData.type === 10001) {console.log('机器人的状态', jsonData);return;}if (jsonData.type === 10010) {console.log('下行大模型消息透传', jsonData);return;}} catch (error) {console.error('receive custom msg', data, error);}}});}// 监听消息chat.on(TencentCloudChat.EVENT.MESSAGE_RECEIVED, onMessageReceived);
说明:
端上发送上行信令
可以通过发送自定义信令,跳过 ASR 过程,直接跟 AI 进行文字沟通,或通过发送打断信令来进行打断,或直接发送透传信息给到大模型。
type | 说明 |
20000 | ai_conversation_chat:发送 AI 对话文本 |
20001 | ai_conversation_interrupt:手动打断 |
20010 | 发送透传信息给到大模型 |
发送上行信令,跳过 ASR 过程,直接跟 AI 进行文字沟通
{"type": 20000,"sender": "user_a", // 发送者userid,服务端会 check 该 userid 是否有效"receiver": ["user_bot"], // 接受者 userid 列表,只需要填写机器人 userid,服务端会 check 该 userid 是否有效"payload": {"id": "uuid", // 消息 id,可以使用 uuid,排查问题使用"message": "xxx", // 消息内容"timestamp": 123, // 时间戳,排查问题使用"taskid": "v2_20240920_xxxxx",}}
发送打断信令来进行打断
{"type": 20001,"sender": "userid", // 发送者userid,服务端会 check 该 userid 是否有效"receiver": ["user_bot"], // 接受者 userid 列表,只需要填写机器人 userid"payload": {"id": "uuid", // 消息 id,可以使用 uuid,排查问题使用"timestamp": 123 // 时间戳,排查问题使用"taskid": "v2_20240920_xxxxx",}}
发送透传信息给到大模型
{"type": 20010,"sender": "userid","receiver": ["robotid"],"payload": {"id": "uuid","taskid": "v2_20240920_xxxxx","timestamp": 1234,"data": {"key": "value" //业务自定义的json格式}}}
代码示例
@IBAction func interruptAi(_ sender: UIButton) {let timestamp = Int(Date().timeIntervalSince1970 * 1000)let payload = ["id": userId + "_\(roomId)" + "_\(timestamp)", // 消息id,可以使用uuid,排查问题使用"timestamp": timestamp, // 时间戳,排查问题使用"taskid": aiTaskId,] as [String : Any]let content = ["type": 20001,"sender": userId,"receiver": [botId],"payload": payload] as [String : Any]let contentData = try! JSONSerialization.data(withJSONObject: content, options: [])let contentString = String(data: contentData, encoding: .utf8)!let dataDict = ["service_command": "trtc_ai_service.SendCustomCmdMsg","request_content": contentString] as [String : Any]do {let jsonData = try JSONSerialization.data(withJSONObject: dataDict, options: [])V2TIMManager.sharedInstance().callExperimentalAPI("sendTRTCCustomData", param: jsonData as NSObject) { _ inprint("sendTRTCCustomData success")} fail: { code, desc inprint("sendTRTCCustomData error, \(code), \(desc ?? "null")")}} catch {print("Error serializing dictionary to JSON: \(error)")}}
public void interruptAi() {long timestamp = System.currentTimeMillis();Map<String, Object> payload = new HashMap<>();payload.put("id", userId + "_" + roomId + "_" + timestamp); // 消息id,可以使用uuid,排查问题使用payload.put("timestamp", timestamp); // 时间戳,排查问题使用payload.put("taskid", aiTaskId);Map<String, Object> content = new HashMap<>();content.put("type", 20001);content.put("sender", userId);content.put("receiver", Collections.singletonList(botId));content.put("payload", payload);String contentString = new JSONObject(content).toString();Map<String, Object> dataDict = new HashMap<>();dataDict.put("service_command", "trtc_ai_service.SendCustomCmdMsg");dataDict.put("request_content", contentString);try {byte[] jsonData = new JSONObject(dataDict).toString().getBytes("UTF-8");V2TIMManager.getInstance().callExperimentalAPI("sendTRTCCustomData", jsonData, new V2TIMValueCallback() {@Overridepublic void onSuccess(Object o) {System.out.println("sendTRTCCustomData success");}@Overridepublic void onError(int code, String desc) {System.out.println("sendTRTCCustomData error, " + code + ", " + (desc != null ? desc : "null"));}});} catch (UnsupportedEncodingException e) {System.out.println("Error serializing dictionary to JSON: " + e);}}
// 发送打断信令chat.callExperimentalAPI('sendTRTCCustomData', {serviceCommand: 'trtc_ai_service.SendCustomCmdMsg',data: {type: 20001,sender: "user_a", // 发送者userid, 服务端会check该userid是否有效receiver: ["user_bot"], // 接受者userid列表,只需要填写机器人useridpayload: {id: "uuid", // 消息id,可以使用uuid,排查问题使用timestamp: 123, // 时间戳,排查问题使用taskid: "任务的taskid",}}});
注意:
type、sender、receiver 以及 payload 中的 taskid、id、timestamp 是必填字段。

