Seeking alternatives after Twilio video sunset?
Check our migration guide 
Only  $9.9! Get 50,000 minutes with our Starter Plan, perfect for your MVP project.
Only $9.9! Get 50,000 minutes with our Starter Plan, perfect for your MVP project.
Grab It Now 
Seeking alternatives after Twilio video sunset?
Check our migration guide 
Only  $9.9! Get 50,000 minutes with our Starter Plan, perfect for your MVP project.
Only $9.9! Get 50,000 minutes with our Starter Plan, perfect for your MVP project.
Grab It Now 
Menu

Integrating TUIRoom (iOS)

Overview

TUIRoom is an open-source UI component for audio/video communication. With just a few lines of code changes, you can integrate it into your project to implement screen sharing, beauty filters, low-latency video calls, and other features. In addition to the iOS component, we also offer components for Android, Windows, macOS, and more.
Note
All TUIKit components are based on Tencent Cloud's TRTC and Chat services. When you activate TRTC, Chat and the trial edition of the Chat SDK (which supports up to 100 DAUs) will also be activated automatically. For Chat billing details, see Pricing.


Integration

Step 1. Import the TUIRoom component

To import the component using CocoaPods, follow the steps below:
1. Create a TUIRoom folder in the same directory as Podfile in your project.
2. Go to the component’s GitHub page, clone or download the code, and copy the Source, Resources, TUIBeauty, and TXAppBasic folders and the TUIRoom.podspec file in TUIRoom/iOS/ to the TUIRoom folder in your project.
3. Add the following dependencies to your Podfile and run pod install to import the component.
# :path => "The relative path of `TUIRoom.podspec`"
pod 'TUIRoom', :path => "./TUIRoom/TUIRoom.podspec", :subspecs => ["TRTC"]
# :path => "The relative path of `TXAppBasic.podspec`"
pod 'TXAppBasic', :path => "./TUIRoom/TXAppBasic/"
# :path => "The relative path of `TUIBeauty.podspec`"
pod 'TUIBeauty', :path => "./TUIRoom/TUIBeauty/"
Note
The Source and Resources folders and the TUIRoom.podspec file must be in the same directory.
TXAppBasic.podspec is in the TXAppBasic folder.
TUIBeauty.podspec is in the TCBeautyKit folder.

Step 2. Configure permissions

Your app needs mic and camera permissions to implement audio/video communication. Add the two items below to Info.plist of your app. Their content is what users see in the mic and camera access pop-up windows.
<key>NSCameraUsageDescription</key>
<string>RoomApp needs to access your camera to capture video.</string>
<key>NSMicrophoneUsageDescription</key>
<string>RoomApp needs to access your mic to capture audio.</string>


Step 3. Create and initialize an instance of the component

Objective-C
Swift
@import TUIRoom;
@import TUICore;

// 1. Log in to the component
[TUILogin login:@"Your SDKAppID" userID:@"Your UserID" userSig:@"Your UserSig" succ:^{

} fail:^(int code, NSString *msg) {

}];
// 2. Initialize the `TUIRoom` instance
TUIRoom *tuiRoom = [TUIRoom sharedInstance];
```

import TUIRoom
import TUICore

// 1. Log in to the component
TUILogin.login("Your SDKAppID", userID: "Your UserID", userSig: "Your UserSig") {

} fail: { code, msg in

}

// 2. Initialize the `TUIRoom` instance
let tuiRoom = TUIRoom.sharedInstance
```

Parameter description:
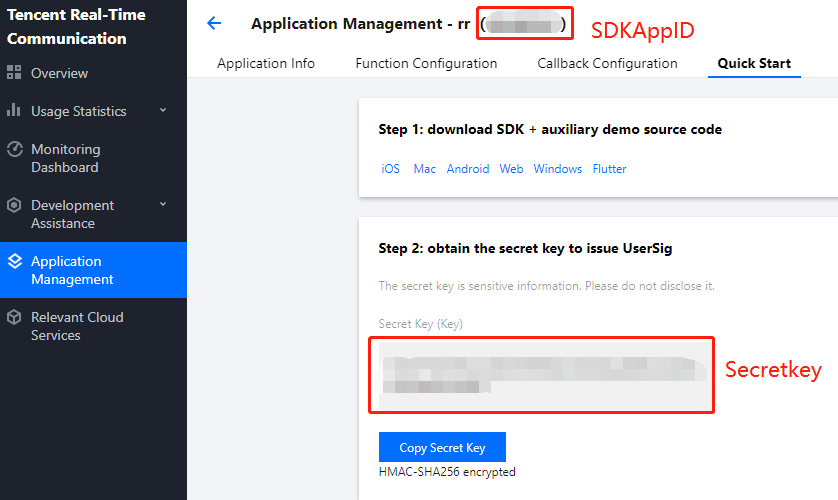
SDKAppID: TRTC application ID. If you haven't activated TRTC, log in to the TRTC console, create a TRTC application, click Application Info, and select the Quick Start tab to view its SDKAppID.


Secretkey: TRTC application key. Each secret key corresponds to an SDKAppID. You can view your application’s secret key on the Application Management page of the TRTC console.
UserId: Current user ID, which is a custom string that can contain up to 32 bytes of letters and digits (special characters are not supported).
UserSig: Security signature calculated based on SDKAppID, userId, and Secretkey. You can click here to quickly generate a UserSig for testing or calculate it on your own by referring to our TUIRoom demo project. For more information, see UserSig.

Step 4. Implement group audio/video communication

1. Create a room
Objective-C
Swift
@import TUIRoom;

[tuiRoom createRoomWithRoomId:12345 speechMode:TUIRoomFreeSpeech isOpenCamera:YES isOpenMicrophone:YES];

import TUIRoom

tuiRoom.createRoom(roomId: 12345, speechMode: .freeSpeech, isOpenCamera: true, isOpenMicrophone: true)
```


2. Join a room
Objective-C
Swift
@import TUIRoom;

[tuiRoom enterRoomWithRoomId:12345 isOpenCamera:YES isOpenMicrophone:YES]

import TUIRoom

tuiRoom.enterRoom(roomId: 12345, isOpenCamera: true, isOpenMicrophone: true)
```


Step 5. Implement room management (optional)

1. The room owner calls TUIRoomCore#destroyRoom to close the room.
Objective-C
Swift
@import TUIRoom;

[[TUIRoomCore shareInstance] destroyRoom:^(NSInteger code, NSString * _Nonnull message) {

}];
```

import TUIRoom

TUIRoomCore.shareInstance().destroyRoom { [weak self] _, _ in
guard let self = self else { return }
self.navigationController?.popViewController(animated: true)
}
```

2. A user in the room calls TUIRoomCore#leaveRoom to leave the room.
Objective-C
Swift
@import TUIRoom;

[[TUIRoomCore shareInstance] leaveRoom:^(NSInteger code, NSString * _Nonnull message) {

}];
```

import TUIRoom

TUIRoomCore.shareInstance().leaveRoom { [weak self] _, _ in
guard let self = self else { return }
self.navigationController?.popViewController(animated: true)
}
```


Step 6. Implement screen sharing (optional)

Call TUIRoomCore#startScreenCapture to implement screen sharing. For detailed directions, see Real-Time Screen Sharing (iOS).
Objective-C
Swift
@import TUIRoom;
@import TXLiteAVSDK_Professional;

TRTCVideoEncParam *params = [[TRTCVideoEncParam alloc] init];
params.videoResolution = TRTCVideoResolution_1280_720;
params.resMode = TRTCVideoResolutionModePortrait;
params.videoFps = 10;
params.enableAdjustRes = NO;
params.videoBitrate = 1500;

[[TUIRoomCore shareInstance] startScreenCapture:param];
```

import TUIRoom

// Start screen sharing
let params = TRTCVideoEncParam()
params.videoResolution = TRTCVideoResolution._1280_720
params.resMode = TRTCVideoResolutionMode.portrait
params.videoFps = 10
params.enableAdjustRes = false
params.videoBitrate = 1500
TUIRoomCore.shareInstance().startScreenCapture(params)

```


FAQs

How do I install CocoaPods?

Enter the following command in a terminal window (you need to install Ruby on your Mac first):
sudo gem install cocoapods
Note
If you have any suggestions or feedback, please contact colleenyu@tencent.com.