Integration

TUIRoomKit is a UI solution for audio/video conferencing rooms provided by TRTC. This guide explains how to integrate TUIRoomKit into an existing Vue3 project and how to customize its styles, layouts, and features.
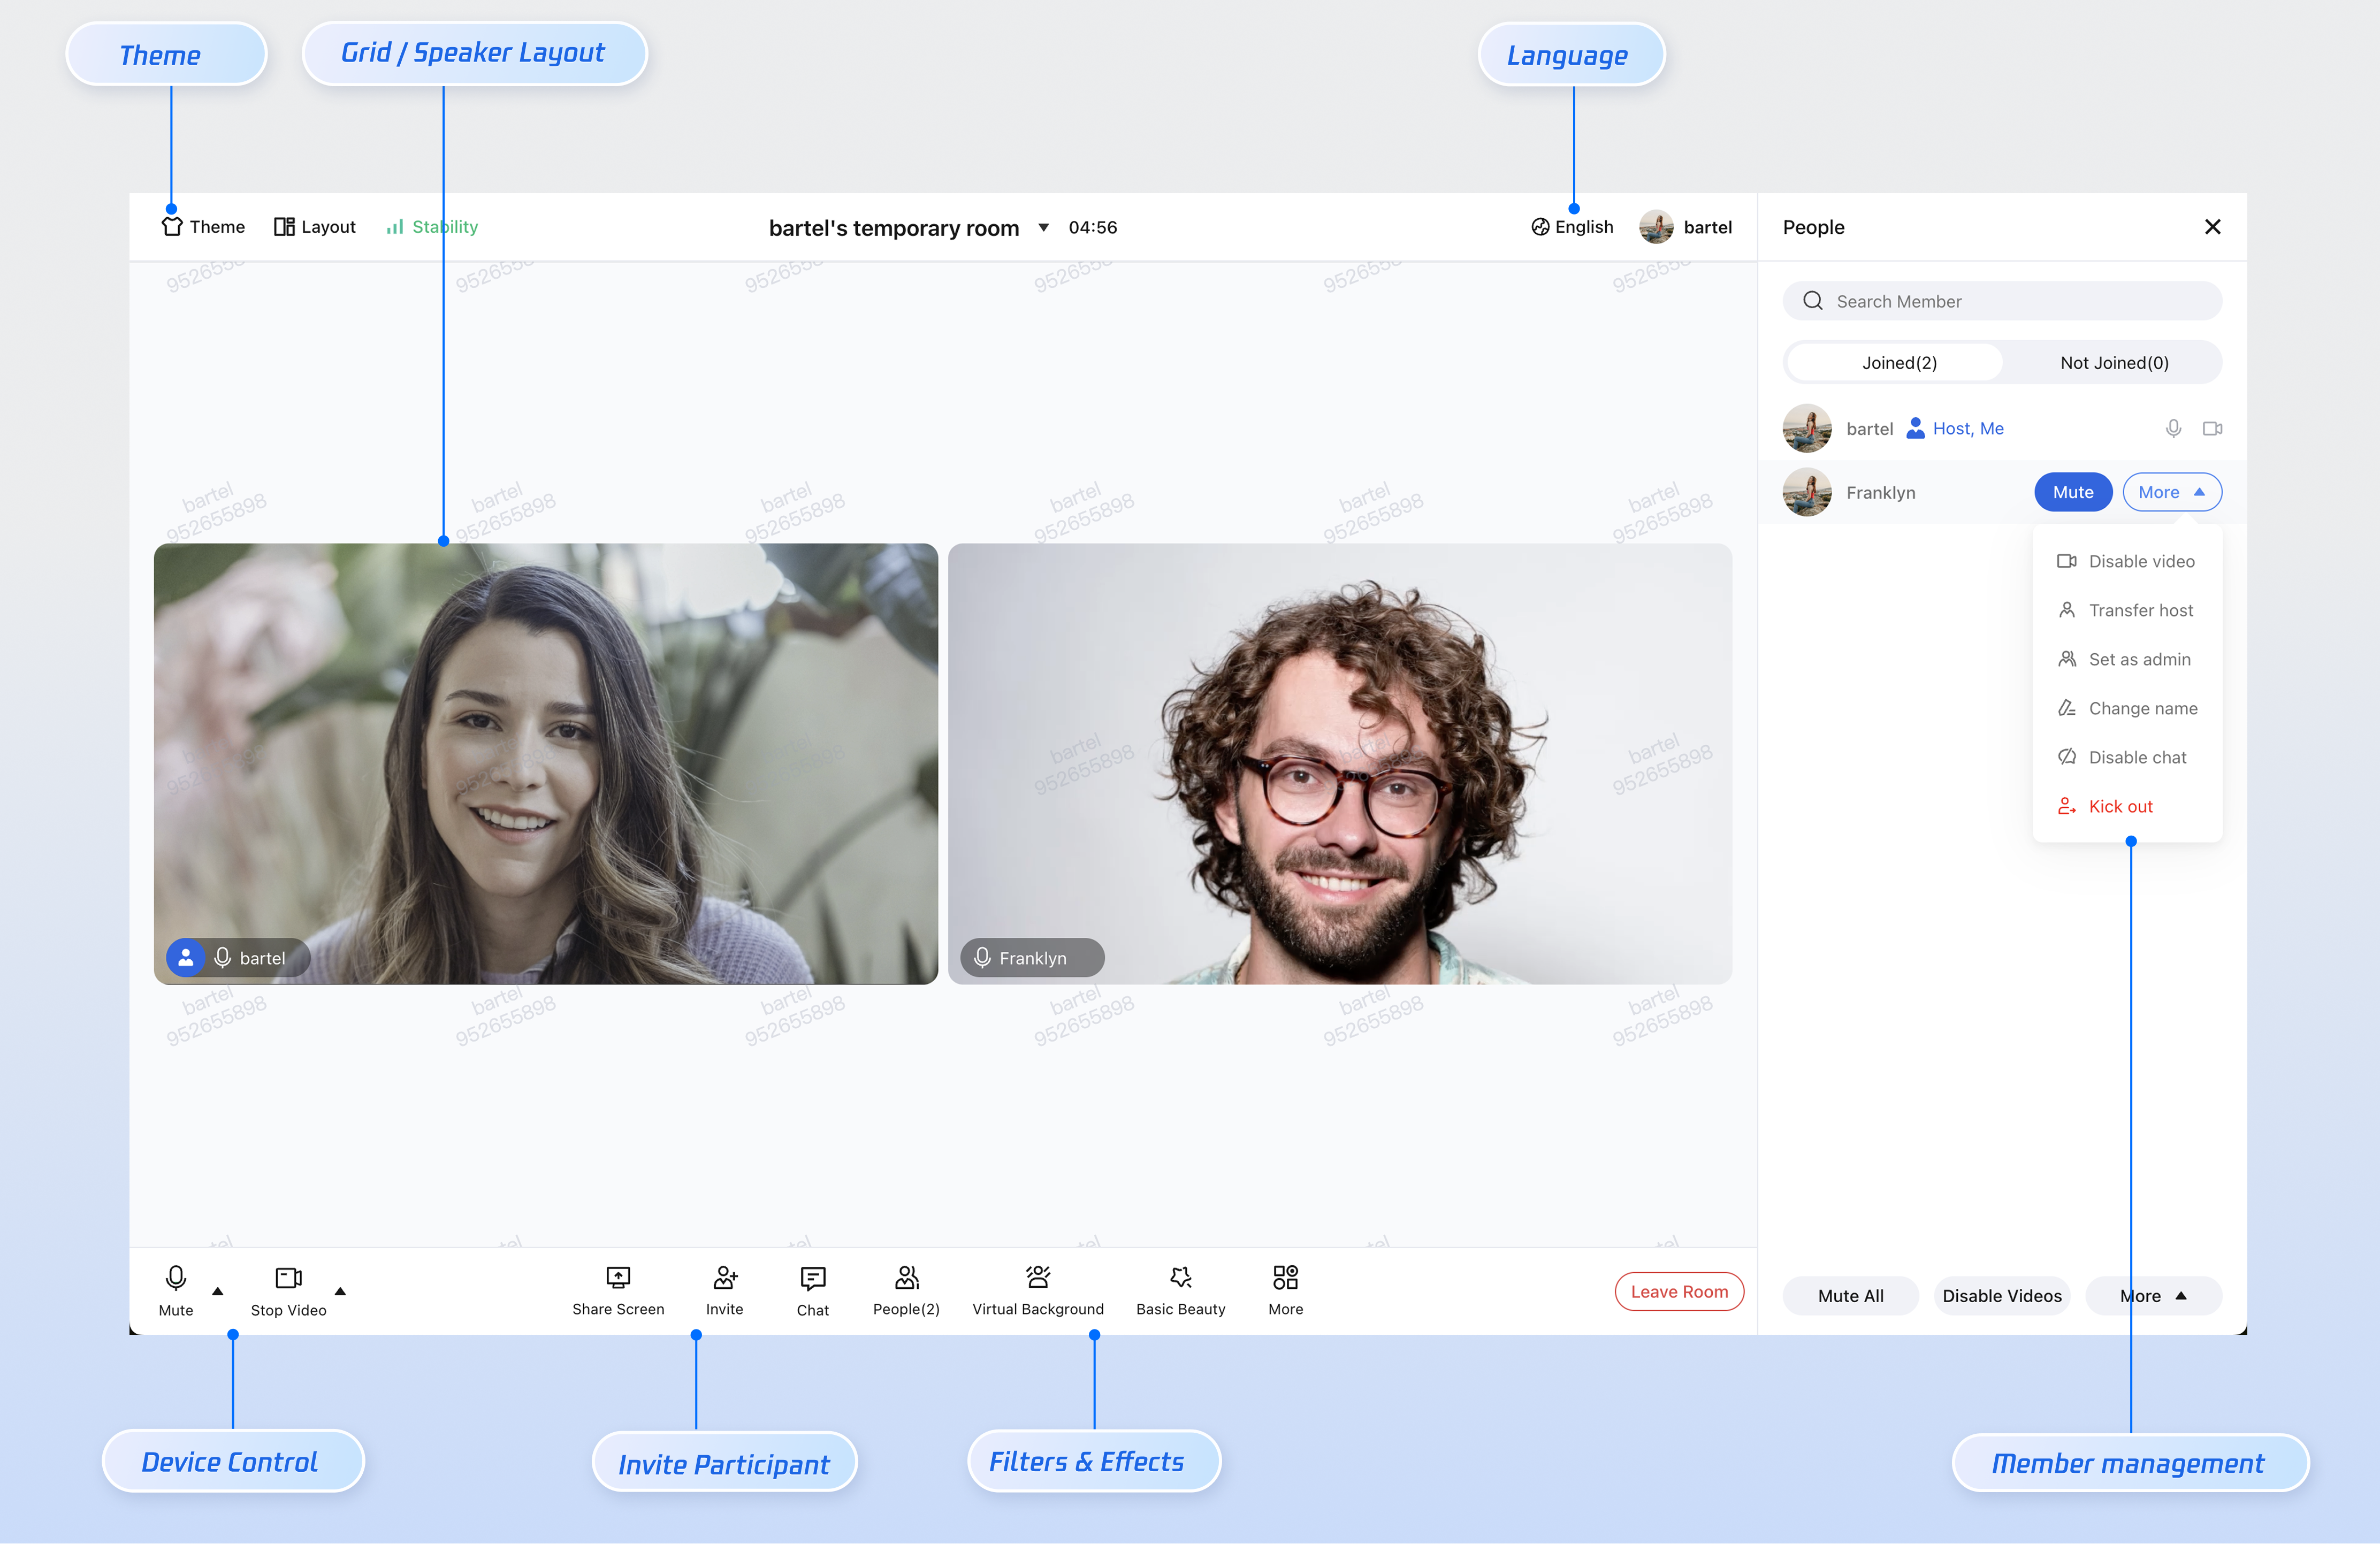
Desktop Multi-Party Conference

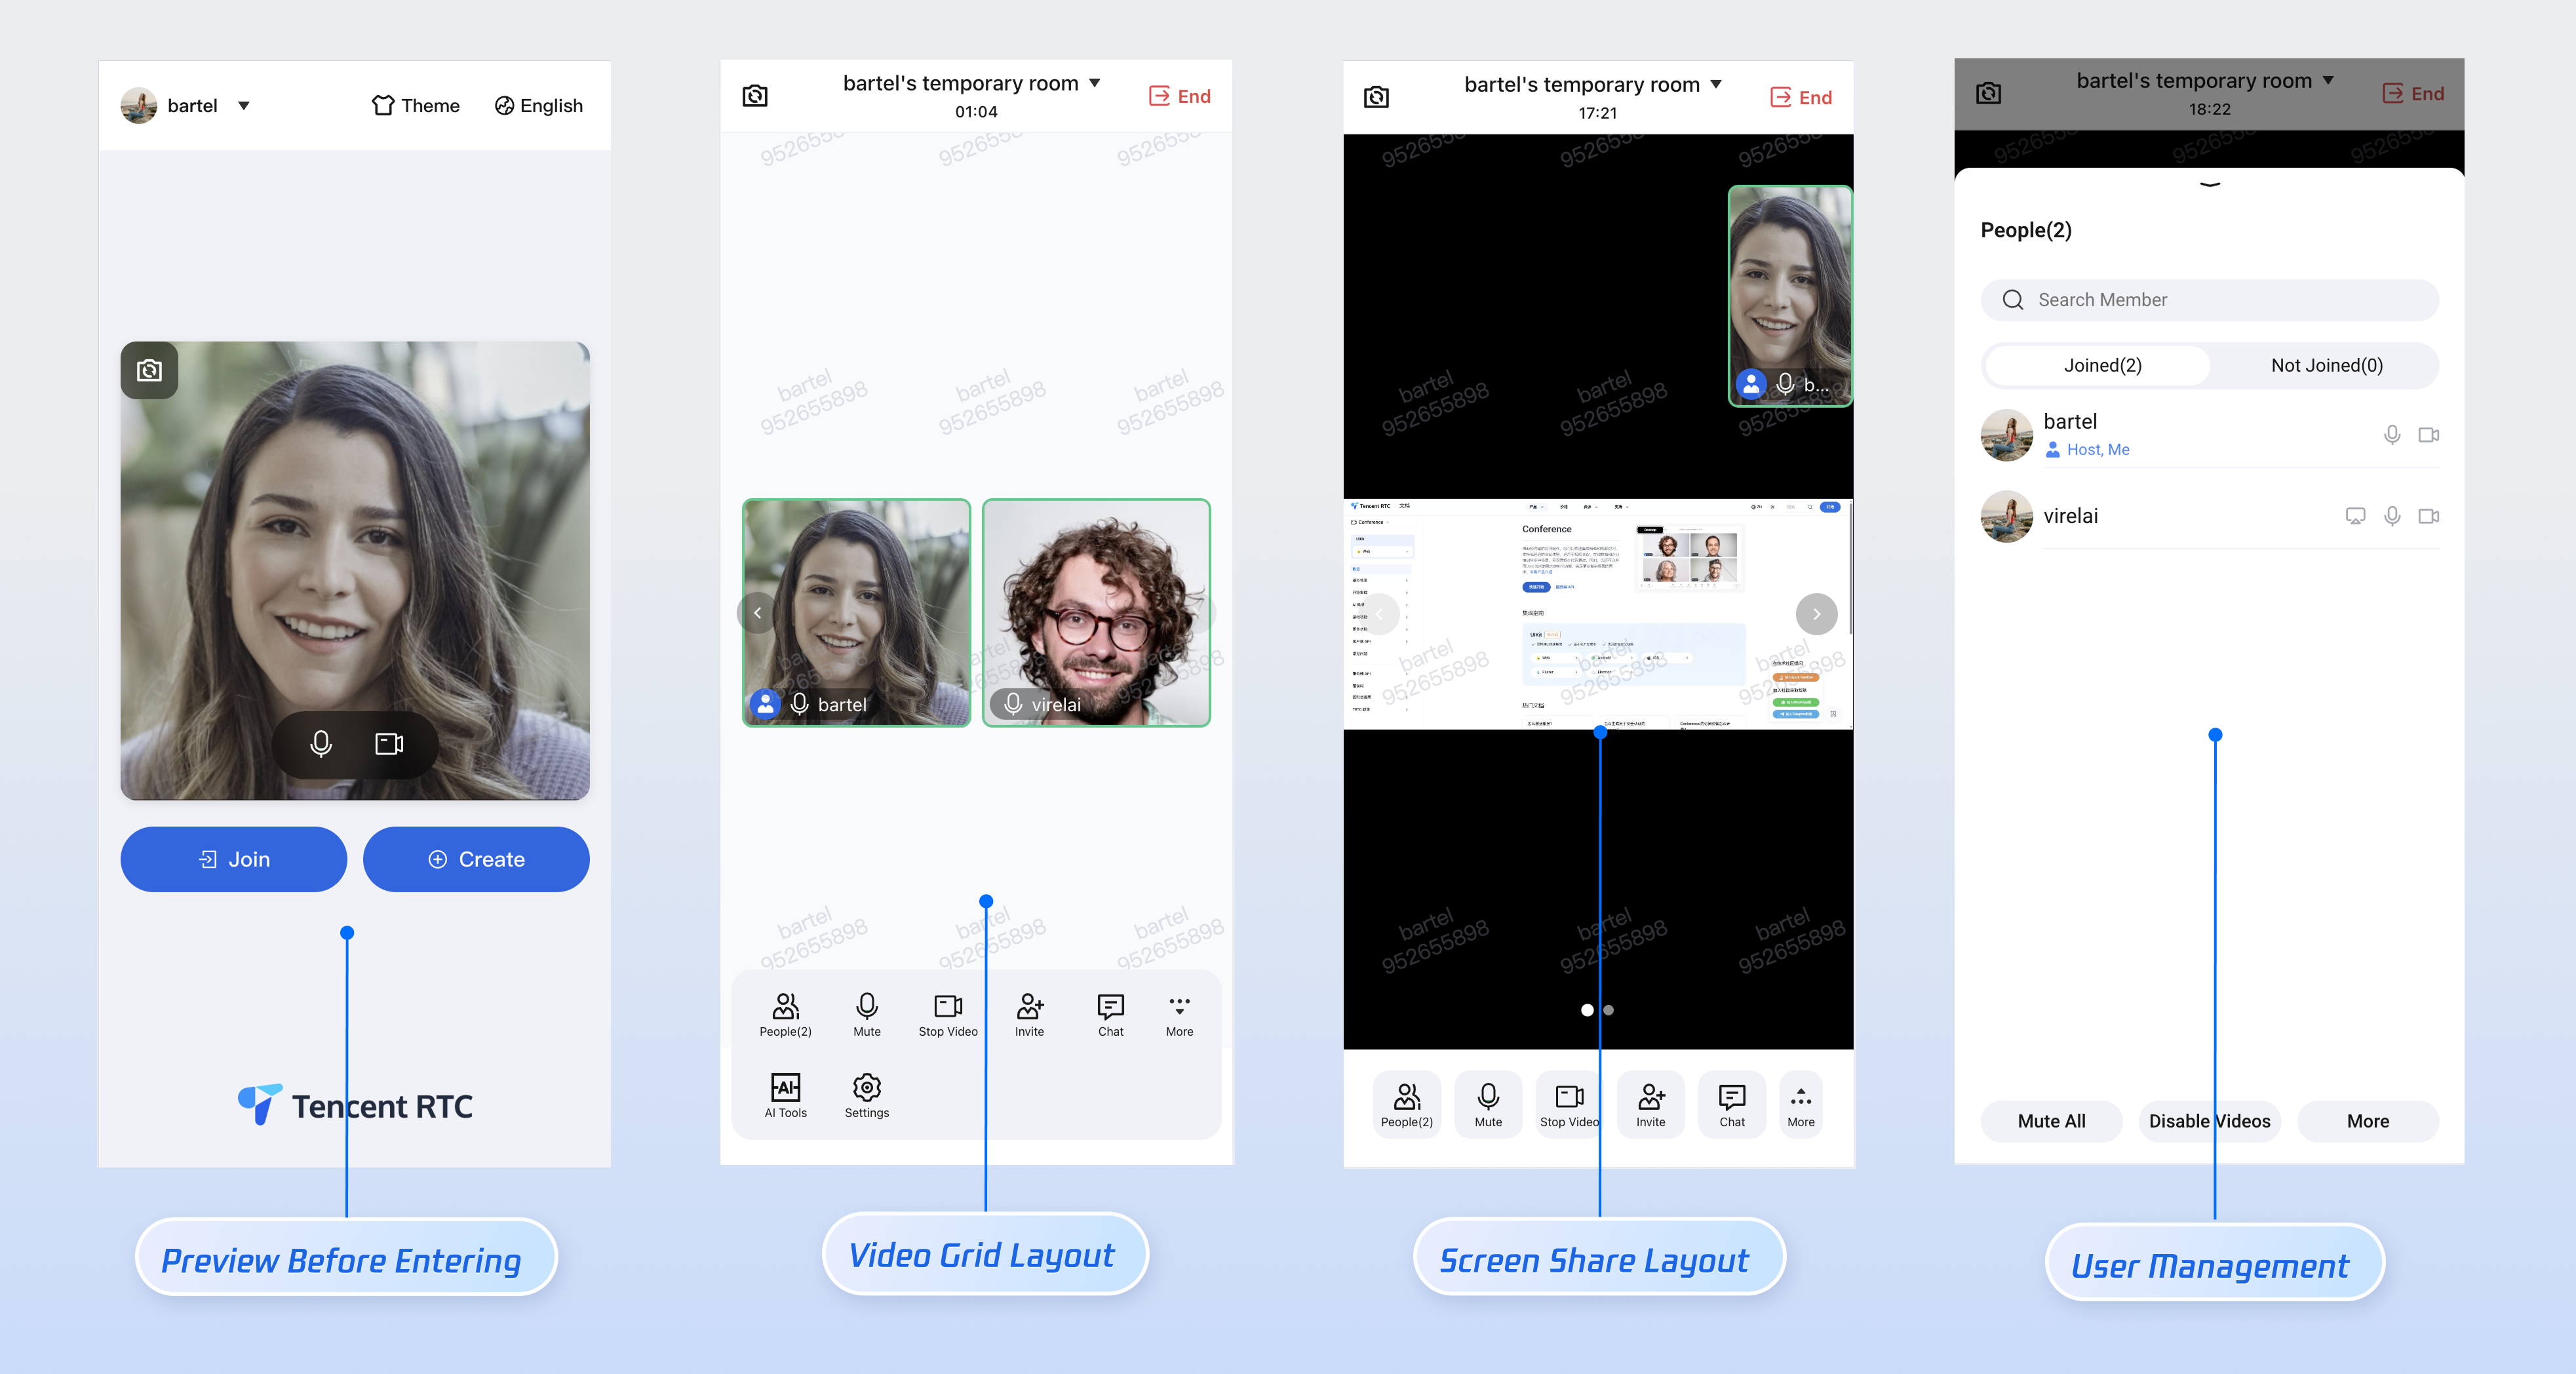
H5 Multi-Party Conference


Prerequisites

Activate the Service

See Activate the Service to obtain the TUIRoomKit trial version and retrieve your SDKAppID and SDKSecretKey.
SDKAppID: Application identifier. TRTC uses SDKAppID for billing statistics.
SDKSecretKey: Application secret, used to initialize configuration files with sensitive information.

Environment Setup

Node.js: ≥ 18.19.1 (official LTS version recommended)
Vue: ≥ 3.4.21
Modern browsers: Browsers that support WebRTC APIs
Devices: Camera, microphone, speaker

Quick Integration

Step 1: Install Dependencies

Install the following dependencies in your project.
npm
pnpm
yarn
npm install @tencentcloud/roomkit-web-vue3@5 tuikit-atomicx-vue3 @tencentcloud/uikit-base-component-vue3 @tencentcloud/universal-api
pnpm install @tencentcloud/roomkit-web-vue3@5 tuikit-atomicx-vue3 @tencentcloud/uikit-base-component-vue3 @tencentcloud/universal-api
yarn add @tencentcloud/roomkit-web-vue3@5 tuikit-atomicx-vue3 @tencentcloud/uikit-base-component-vue3 @tencentcloud/universal-api

Step 2: Import TUIRoomKit Components

<template>
<UIKitProvider theme="light" language="zh-CN">
<ConferenceMainView v-if="isPC"></ConferenceMainView>
<ConferenceMainViewH5 v-else></ConferenceMainViewH5>
</UIKitProvider>
</template>

<script setup lang="ts">
import { ref } from 'vue';
import { UIKitProvider } from '@tencentcloud/uikit-base-component-vue3';
import { ConferenceMainView, ConferenceMainViewH5 } from '@tencentcloud/roomkit-web-vue3';
import { getPlatform } from '@tencentcloud/universal-api';

const isPC = ref(getPlatform() === 'pc');
</script>

Step 3: User Authentication

Authentication is required to access all TUIRoomKit features. Call conference.login as soon as your user is authenticated—for example, right after a user logs into your web page. After calling conference.login, we recommend calling conference.setSelfInfo to set the user’s display name and avatar, which are shown in the participant video area and the member list.
Note:
Make sure to use the generated UserSig in your configuration. In production, generate UserSig on your server and have the client request a dynamic UserSig from your business server for authentication as needed. See How to calculate UserSig for production.
import { onMounted } from 'vue';
import { conference } from '@tencentcloud/roomkit-web-vue3';

// Replace these parameters with your actual business data and SDKAppID from the console
const SDKAppID = 0;
const userId = 'your_user_id';
const userSig = 'your_dynamic_user_sig';
const userName = 'Display Name';

onMounted(async () => {
try {
// 1. SDK authentication
await conference.login({
sdkAppId: SDKAppID,
userId,
userSig,
});
// 2. (Optional) Set display name and avatar
await conference.setSelfInfo({
userName,
avatarUrl: 'https://your-avatar-url.com/image.png',
});
} catch (error) {
console.error('TUIRoomKit login failed:', error);
}
});

Integration Issue: Listening for Authentication Success Across Routes

If your authentication and Enter Room pages use different routes, the Enter Room page may load before conference.login finishes. Use Vue's watch to monitor loginUserInfo.value?.userId. When this value is non-empty, authentication is successful.
import { watch } from 'vue';
import { useLoginState } from 'tuikit-atomicx-vue3/room';
import { conference } from '@tencentcloud/roomkit-web-vue3';

const { loginUserInfo } = useLoginState();

watch(() => loginUserInfo.value?.userId, async (userId) => {
if (userId) {
await conference.createAndJoinRoom({ roomId: '123456' });
}
}, { immediate: true });

Step 4: Create a Room

The Room ID is the core identifier for a meeting and must be generated and managed by your business system (it must be globally unique). Choose the creation method that fits your business scenario:

Scenario 1: Quick Meeting Created by the Client App

Use Case: The user clicks "Quick Meeting" and the client app immediately creates a room and enters it (for example, ad-hoc communication or IM chat–initiated meetings).
Implementation: The client app either generates the Room ID locally or requests a unique Room ID from the backend, then calls conference.createAndJoinRoom to create the room and enter it.
import { conference } from '@tencentcloud/roomkit-web-vue3';

const startQuickMeeting = async () => {
// 1. Generate a unique Room ID
const myRoomId = `room_${Date.now()}`;
// 2. Create and Enter Room
await conference.createAndJoinRoom({
roomId: myRoomId,
options: {
roomName: 'My Quick Meeting',
},
});
};

Scenario 2: Meeting Scheduled by the Client App

Use Case: Meetings scheduled for a future time (for example, weekly team meetings or online training). Users can set the meeting title, scheduled time, and invitees in advance.
Implementation: The client app generates (or requests) a unique Room ID from your backend, then calls the scheduleRoom API with the scheduled time and other parameters to create the reservation. After the reservation is created successfully, the meeting details are synced to the invitees’ meeting lists.
import { useRoomState } from 'tuikit-atomicx-vue3/room';

const { scheduleRoom } = useRoomState();

const createSchedule = async () => {
try {
// Room ID: string, required, recommended to be generated by backend for uniqueness
const roomId = '123456';
// Note: Timestamp must be in seconds (Date.getTime() returns milliseconds, divide by 1000)
const startTime = Math.floor(new Date().getTime() / 1000) + 3600; // Starts in 1 hour
const duration = 1800; // 30 minutes

const options = {
roomName: 'Product Requirement Review',
scheduleStartTime: startTime, // unit: seconds
scheduleEndTime: startTime + duration, // unit: seconds
scheduleAttendees: ['userA', 'userB'], // List of participant IDs
password: '123', // Optional: meeting password
};

await scheduleRoom({ roomId, options });
} catch (error) {
console.error('Scheduling failed', error);
}
};

Scenario 3: Server-Side Room Creation

Use Case: Highly regulated industries such as government, healthcare, and large enterprises.
Implementation: Your backend service initiates room creation by calling the Server REST API to create a room.
POST /v4/room_engine_http_srv/create_room
{
"roomId": "your-room-id",
"roomName": "Meeting Name",
"startTime": 1710000000,
"endTime": 1710003600,
"invitees": ["userId1", "userId2"]
}

Step 5: Join a Room

When participants join a room, select the method that fits your business logic.

Scenario 1: Join Existing Room by Room ID

Use Case: The room has already been created by the host or server, and participants have received the Room ID or meeting invite link.
Implementation: Participants enter the Room ID or parse it from the invite link, then call conference.joinRoom to Enter Room.
import { conference } from '@tencentcloud/roomkit-web-vue3';

const joinExistingMeeting = async (sharedRoomId: string) => {
await conference.joinRoom({
roomId: sharedRoomId,
});
};

Scenario 2: Join from Meeting List

Use Case: Meetings scheduled via "Client Scheduling" or "Server-Side Creation". Users can go to the "Meeting List" page to view their scheduled or invited meetings and join quickly.
Implementation: Use the getScheduledRoomList API from useRoomState to fetch the user's scheduled meetings and render them. When the user clicks a meeting, retrieve its Room ID and call conference.joinRoom to Enter Room.
<template>
<div>
<h3>My Scheduled Meetings</h3>
<ul v-if="roomList.length > 0">
<li v-for="room in roomList" :key="room.roomId" class="item">
<div class="info">
<b>{{ room.roomName || 'Unnamed Meeting' }}</b>
<span>Room ID: {{ room.roomId }}</span>
</div>
<button class="btn" @click="handleJoinRoom(room.roomId)">Join Meeting</button>
</li>
</ul>
<div v-else>No scheduled meetings to join</div>
</div>
</template>

<script setup lang="ts">
import { ref, watch } from 'vue';
import { conference } from '@tencentcloud/roomkit-web-vue3';
import { useRoomState, useLoginState } from 'tuikit-atomicx-vue3/room';

const { getScheduledRoomList } = useRoomState();
const { loginUserInfo } = useLoginState();
const roomList = ref<any[]>([]);

// 1. Listen for authentication, fetch meeting list after login
watch(
() => loginUserInfo.value?.userId,
async (userId) => {
if (userId) {
try {
roomList.value = await getScheduledRoomList() || [];
} catch (error) {
console.error('Failed to fetch scheduled meeting list:', error);
}
}
},
{ immediate: true }
);

// 2. Join room on click
const handleJoinRoom = async (roomId: string) => {
try {
await conference.joinRoom({ roomId });
} catch (error) {
console.error(`Failed to join meeting (${roomId}):`, error);
}
};
</script>

<style scoped>
/* Minimal base styles */
ul { padding: 0; list-style: none; }
.item { display: flex; justify-content: space-between; padding: 10px; border-bottom: 1px solid #eee; }
.info { display: flex; flex-direction: column; font-size: 14px; color: #666; }
.info b { font-size: 16px; color: #333; }
.btn { background: #006eff; color: #fff; border: none; padding: 6px 12px; border-radius: 4px; cursor: pointer; }
</style>

Scenario 3: Enter Room When Existence Is Uncertain

Use Case: Peer-to-peer scenarios (e.g., online consultation, 1v1 video customer service) where you cannot determine if the room has been created.
Implementation: Both parties use a shared business document number (e.g., order number) as Room ID and call conference.createAndJoinRoom to Enter Room.
import { conference } from '@tencentcloud/roomkit-web-vue3';

const enterDualMeeting = async (bizOrderId: string) => {
// No need to check if room exists; SDK handles creation and Enter Room logic automatically
await conference.createAndJoinRoom({
roomId: bizOrderId,
options: {
roomName: `Business Communication: ${bizOrderId}`,
},
});
};
Note:
The conference.createAndJoinRoom API handles: "If the room does not exist, create it (become host); if it exists, join it (become participant)", resolving state conflicts under high concurrency.

Step 6: Leave Room or End Room

TUIRoomKit provides built-in UI buttons for leaving or ending the room. Users can click "Leave Room" or "End Room" directly.
To trigger leave or end actions programmatically, use the following APIs.

Scenario 1: Leave Room

Both participants and hosts can call leaveRoom() to leave the meeting. This does not affect other members; the room remains active.
import { conference } from '@tencentcloud/roomkit-web-vue3';

await conference.leaveRoom();
Note:
When the host leaves the room or closes the web page, the room is not automatically ended. Other participants can continue using TUIRoomKit features. The system will automatically reclaim room resources 6 hours after the scheduled end time, provided the room is empty.

Scenario 2: End a Room

When the host calls endRoom(), all participants receive a notification that the room has ended.
import { conference } from '@tencentcloud/roomkit-web-vue3';

await conference.endRoom();
Note:
endRoom() must be called by the host after successfully Entered Room. Calling as a non-host or before Enter Room will result in an error.

Step 7: Listen to the Room State

In real-world audio/video conferencing, room state can change due to factors like the host ending the meeting, account login on another device, or network issues causing Enter Room failure.
TUIRoomKit automatically handles audio/video resource cleanup and UI prompts, but routing transitions must be managed by your business layer. Register state listeners when the meeting component mounts (onMounted), and remove listeners when the component unmounts (onUnmounted).
<template>
<ConferenceMainView></ConferenceMainView>
</template>

<script setup lang="ts">
import { ref, onMounted, onUnmounted } from 'vue';
import { ConferenceMainView, conference, RoomEvent } from '@tencentcloud/roomkit-web-vue3';

const backToHome = () => {};
const backToLogin = () => {};

onMounted(() => {
conference.on(RoomEvent.ROOM_DISMISS, backToHome);
conference.on(RoomEvent.ROOM_LEAVE, backToHome);
conference.on(RoomEvent.ROOM_ERROR, backToHome);
conference.on(RoomEvent.KICKED_OUT, backToHome);
conference.on(RoomEvent.KICKED_OFFLINE, backToLogin);
conference.on(RoomEvent.USER_SIG_EXPIRED, backToLogin);
});

onUnmounted(() => {
conference.off(RoomEvent.ROOM_DISMISS, backToHome);
conference.off(RoomEvent.ROOM_LEAVE, backToHome);
conference.off(RoomEvent.ROOM_ERROR, backToHome);
conference.off(RoomEvent.KICKED_OUT, backToHome);
conference.off(RoomEvent.KICKED_OFFLINE, backToLogin);
conference.off(RoomEvent.USER_SIG_EXPIRED, backToLogin);
});
</script>
Event
Trigger Timing
Recommended Handling
RoomEvent.ROOM_DISMISS
Room ended, triggers for all participants
Return to home or meeting list
RoomEvent.ROOM_LEAVE
User clicks "Leave" button in TUIRoomKit UI
Return to home or meeting list
RoomEvent.ROOM_ERROR
Enter Room failure or unhandled error in room
Return to home or meeting list
RoomEvent.KICKED_OUT
Kicked out by host
Return to home or meeting list
RoomEvent.KICKED_OFFLINE
Same account logged in on another device, current device forced offline
Redirect to login page
RoomEvent.USER_SIG_EXPIRED
UserSig expired
Redirect to login page

Start the Project

npm
pnpm
yarn
npm run dev
pnpm run dev
yarn run dev
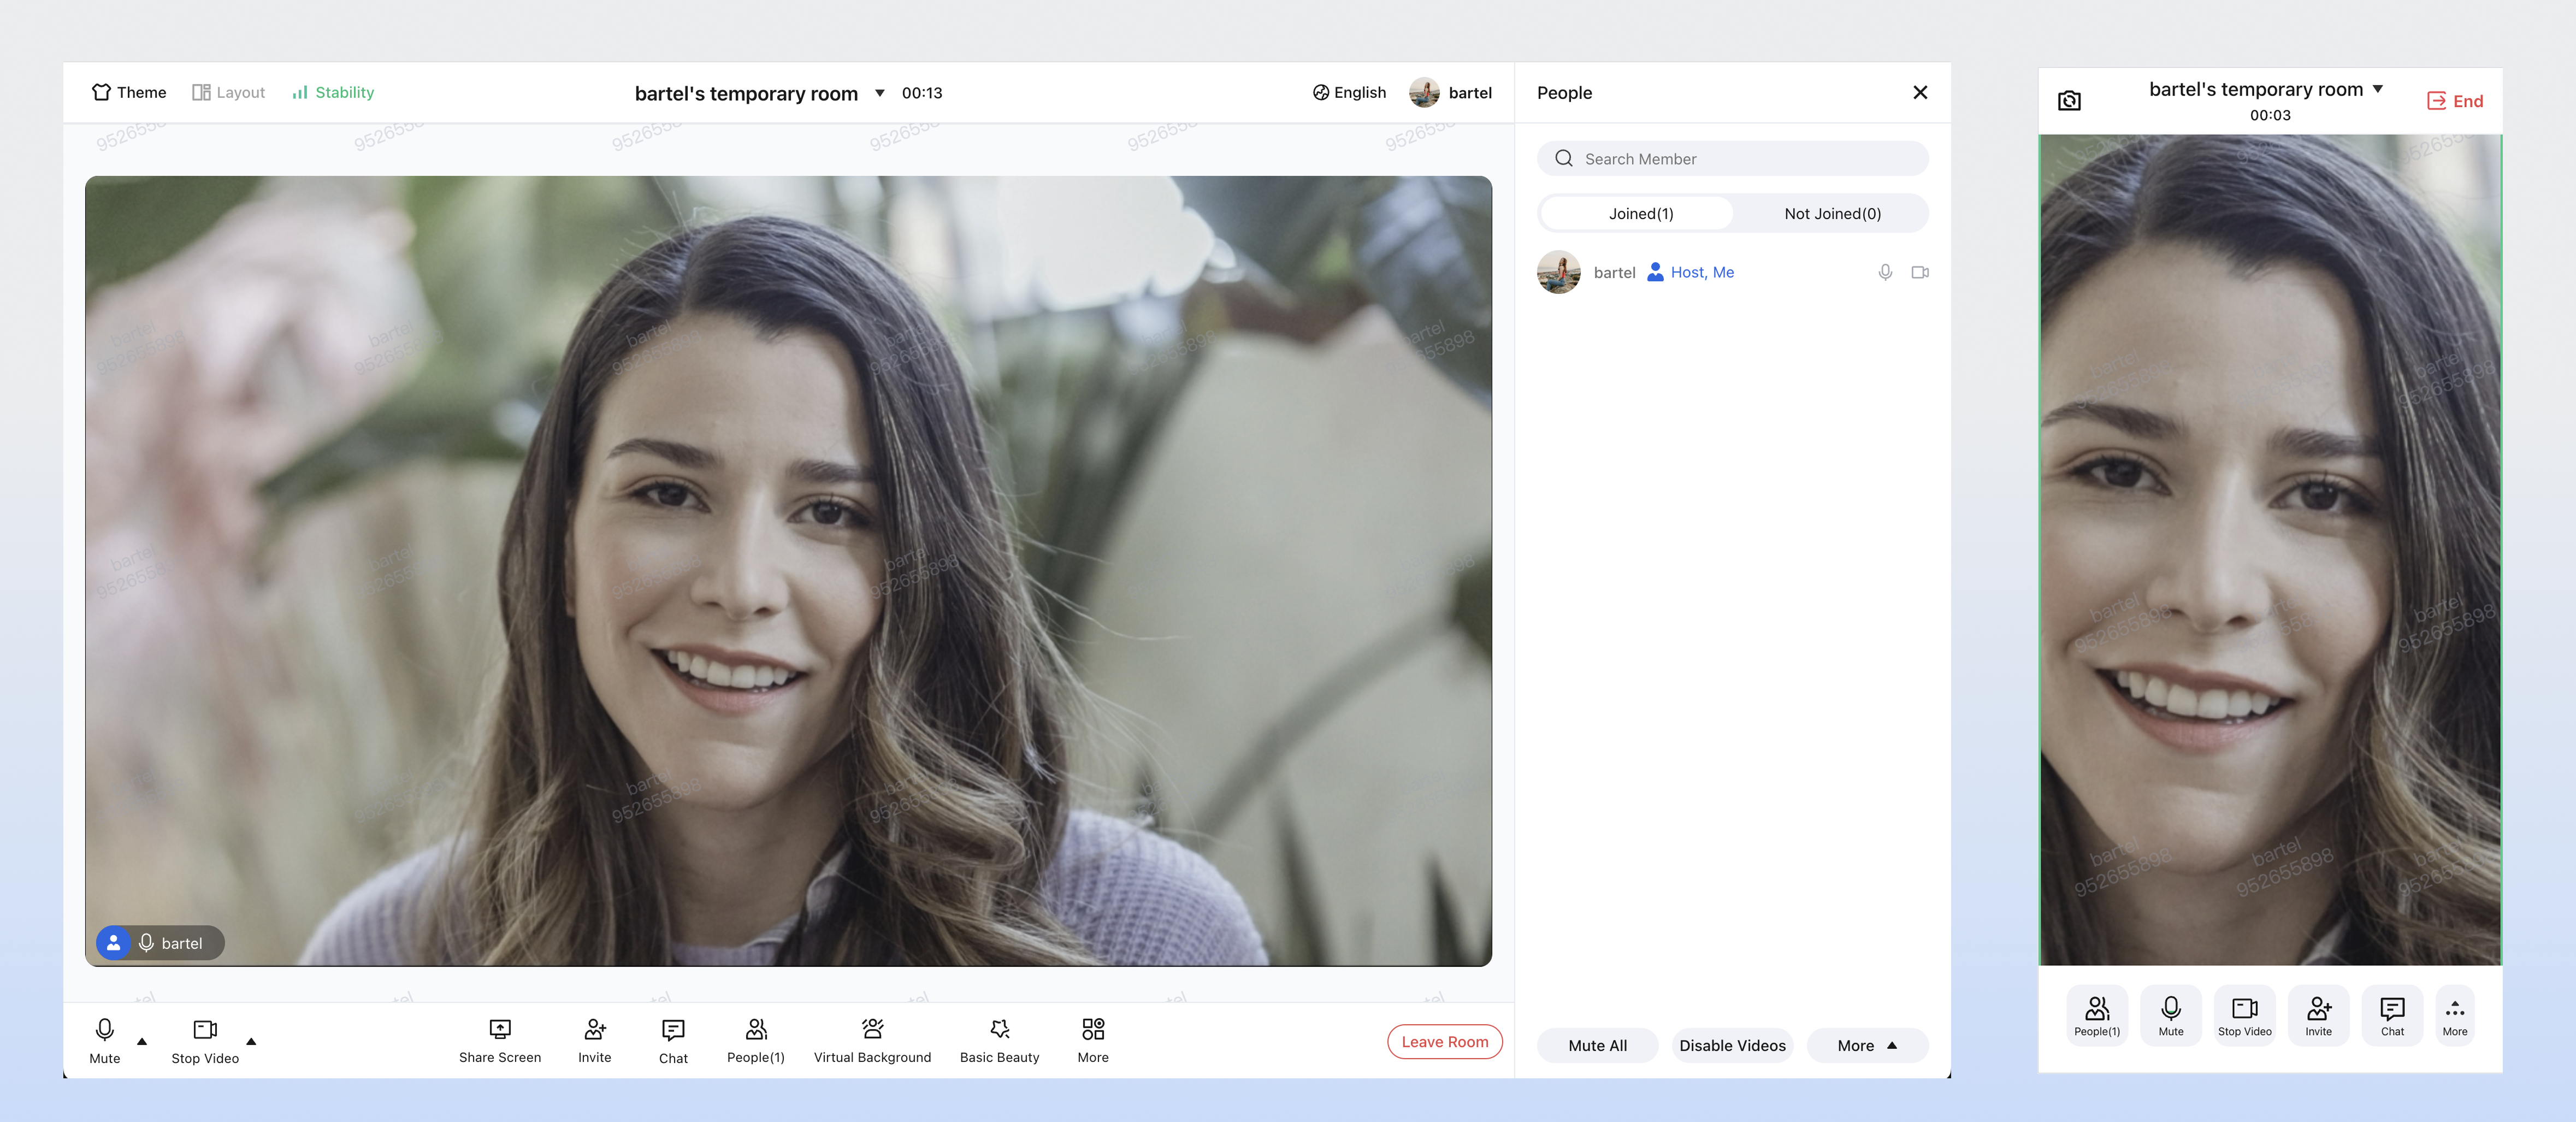
After the project starts successfully, open the debug address in your browser (usually http://localhost:5173) to access the application. You will see a meeting interface like the following:


Next Steps

After completing the basic integration, you can further customize the UI to fit your business requirements.

Configure Theme and Language

Change the default theme and language by setting the UIKitProvider parameters in App.vue.
UIKitProvider Parameter
Optional Values
Default Value
theme
"light"
"dark"
language
"zh-CN"
"en-US"
<UIKitProvider theme="light" language="zh-CN">
<router-view />
</UIKitProvider>
<script setup lang="ts">
import { UIKitProvider } from '@tencentcloud/uikit-base-component-vue3';

Configure User Contact List

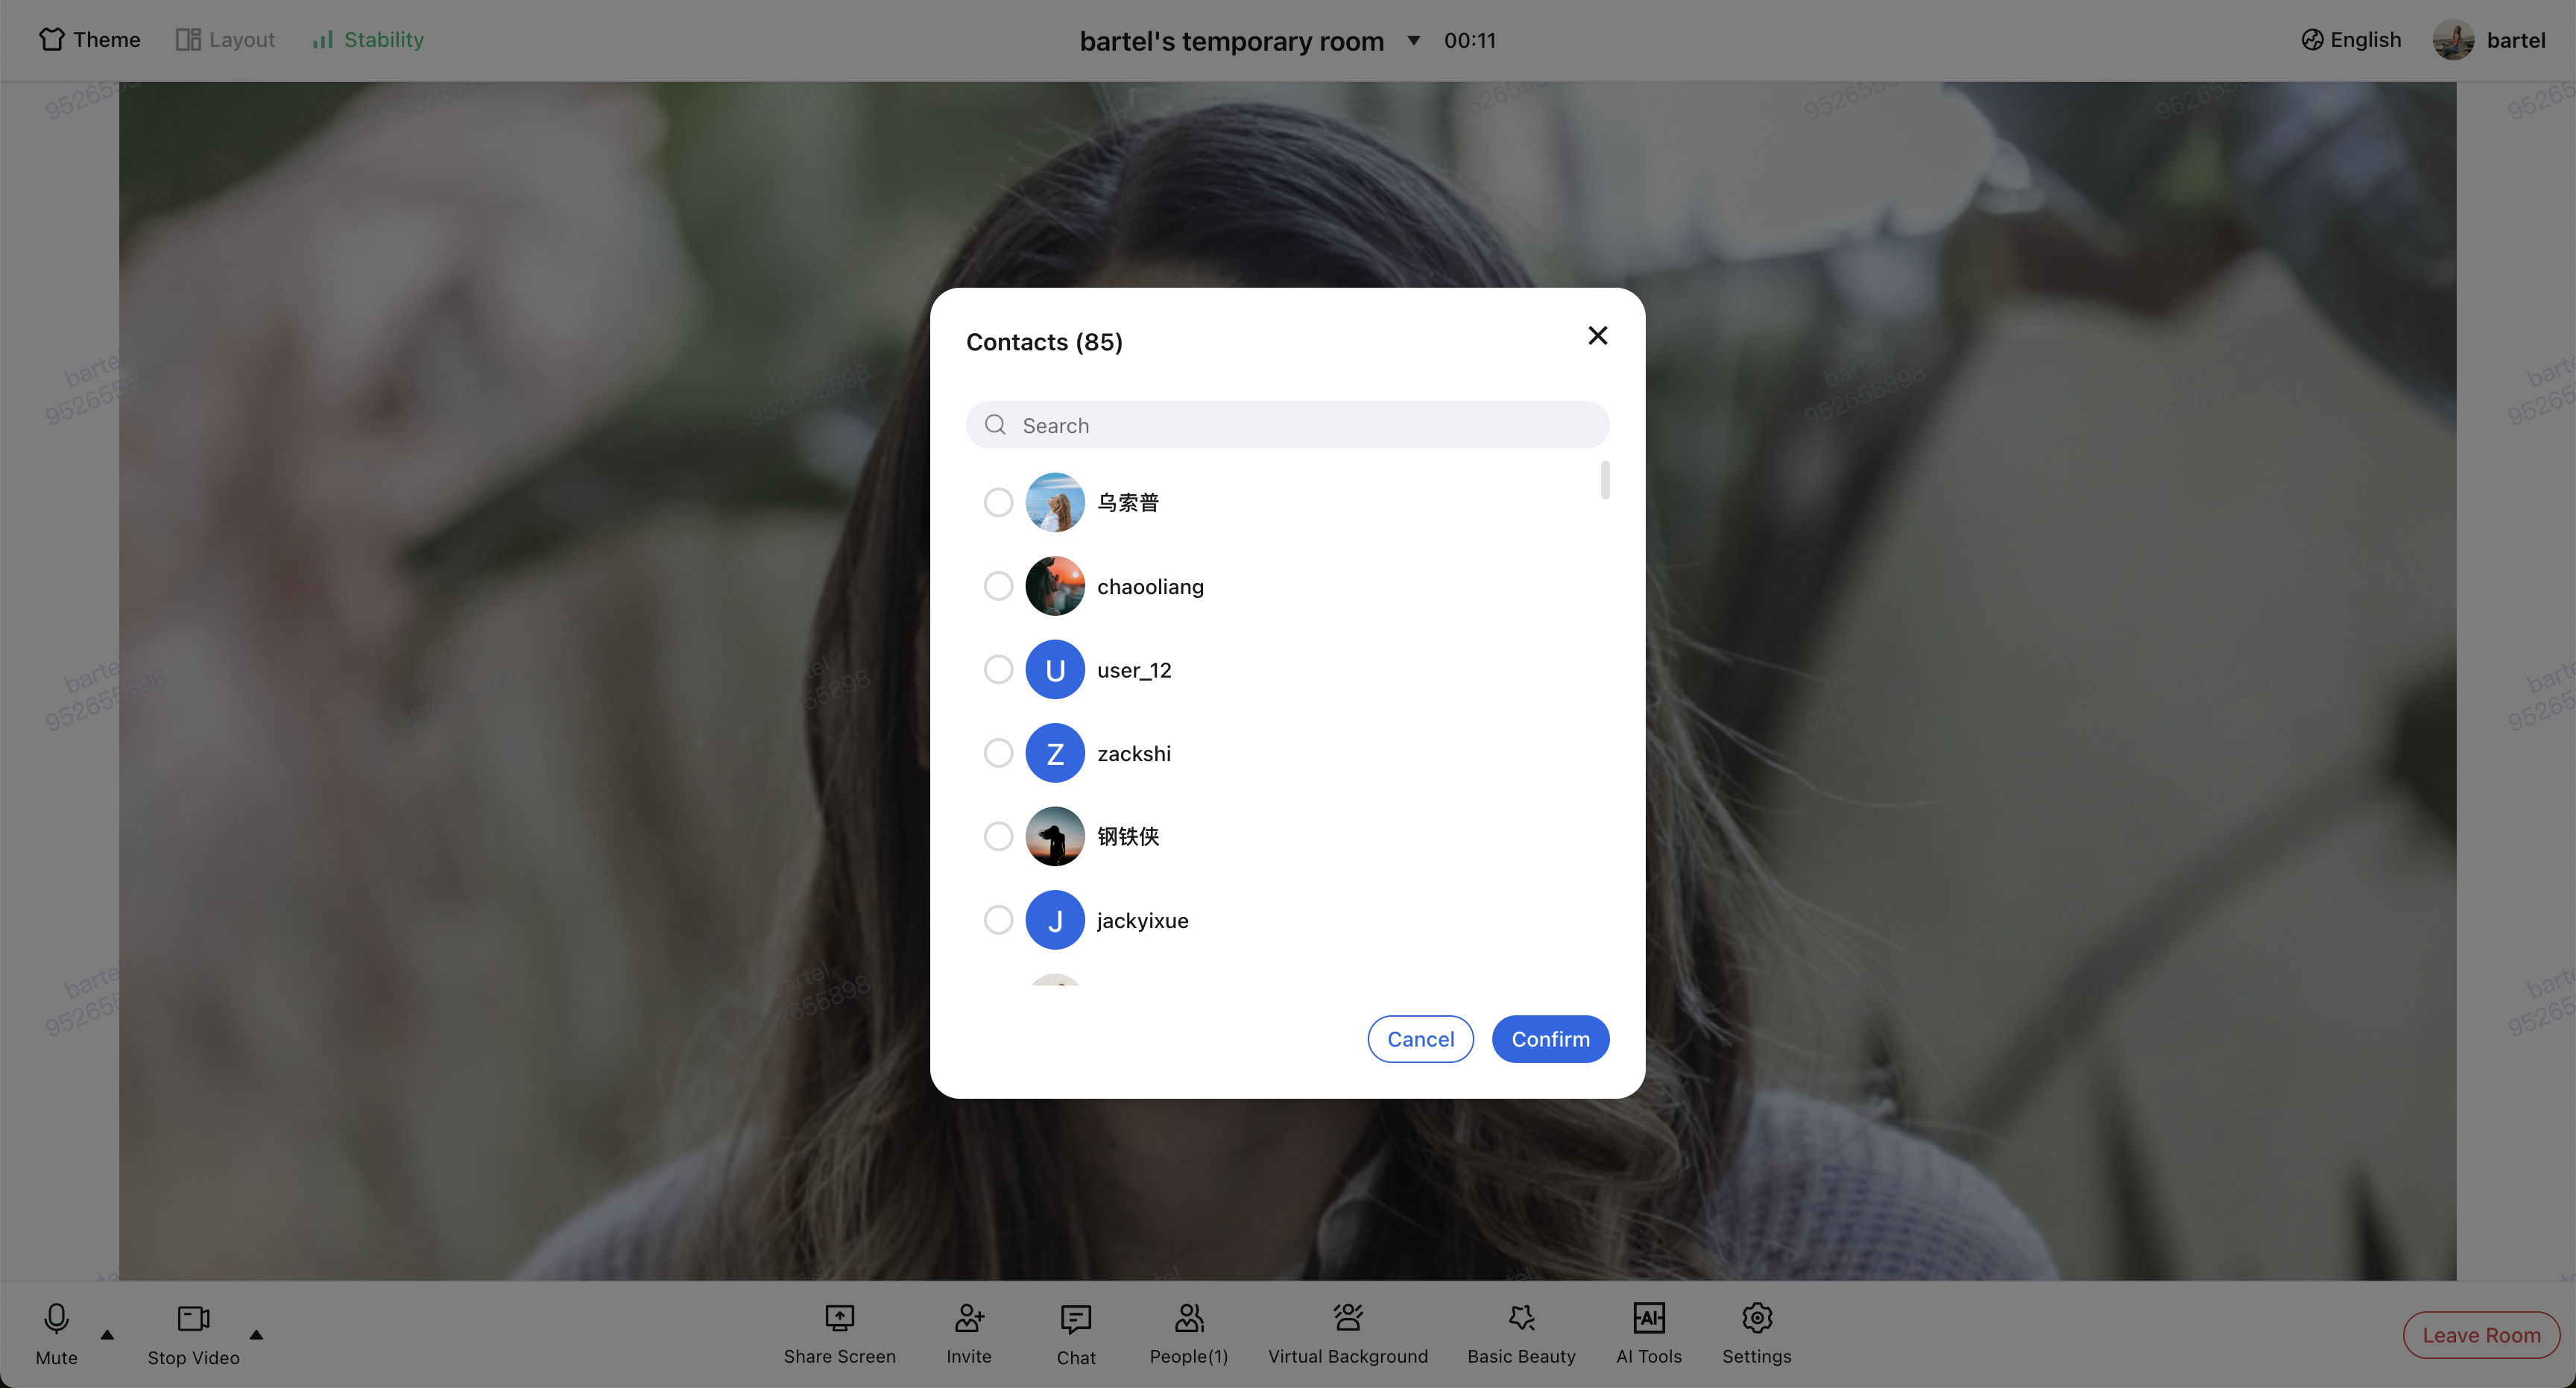
TUIRoomKit's built-in invite and scheduling selection components use the TRTC IM user relationship chain (friend list) by default. To display your company's internal organization or a custom friend list, first use the Server APIs to sync your business contacts to the TRTC IM system:
1.
Use Account Management > Import Multiple Accounts REST API to batch import user accounts.
2.
Use Friend Management > Import Friends REST API to batch import user relationships.

By default, TUIRoomKit uses the current page address as the Room Share Link.

To customize the link, call conference.setFeatureConfig to update the Room Share Link.
import { conference } from '@tencentcloud/roomkit-web-vue3';

// Call after conference.createAndJoinRoom or conference.joinRoom succeeds, ensuring Room ID is available
const roomId = '123456';
conference.setFeatureConfig({
shareLink: `https://your-domain.com/room?roomId=${roomId}`,
});

Configure Video Stream Layout

TUIRoomKit supports three video stream layouts: grid, sidebar, and top bar. The default is grid layout. To change the layout, call conference.setFeatureConfig.
import { RoomLayoutTemplate } from 'tuikit-atomicx-vue3/room';

// Option 1: Set sidebar layout as default
conference.setFeatureConfig({ layoutTemplate: RoomLayoutTemplate.SidebarLayout });

// Option 2: Set top bar layout as default
conference.setFeatureConfig({ layoutTemplate: RoomLayoutTemplate.CinemaLayout });

FAQs

Does the meeting end immediately if the host closes the web page or exits unexpectedly?

No. If the host closes the browser or disconnects due to network issues, the meeting does not end immediately. The meeting continues, and other participants can interact as usual.
To conserve resources, proactively end the room when the meeting finishes by:
UI operation: Host clicks the "End Room" button in TUIRoomKit UI
Client APIs: Call conference.endRoom()
Server APIs: Use REST API for remote destruction
Note: If not ended proactively, the system will automatically reclaim resources 6 hours after the scheduled end time, provided the room is empty.

Can multiple devices use the same userId to join the same meeting at the same time?

No. TUIRoomKit does not allow the same userId to join the same room from multiple devices simultaneously.
Kick-out mechanism: If a later device attempts to Enter Room with the same userId, the device already in the room will be forcibly logged out.
Solution: To support multi-device (e.g., phone and PC) joining the same meeting, assign a unique userId to each device.

Why does it work locally but fail to access the camera or microphone after deployment?

Cause: Browsers enforce strict security and privacy controls for audio/video device access (microphone, camera). Only secure environments are allowed: https://, localhost, file://, etc. HTTP is considered insecure and browsers will block media device access.
Solution: If local (localhost) tests work but deployment fails, check if your web page is served over HTTP. You must use HTTPS and ensure a valid security certificate.
Related resources: See URL domain and protocol restrictions for more details.

Is iframe integration supported?

Yes. To integrate TUIRoomKit via iframe, configure the allow attribute to grant necessary browser permissions (microphone, camera, screen sharing, fullscreen, etc), as shown:
// Enable microphone, camera, screen sharing, fullscreen permissions
<iframe src="https://your-domain.com/index.html" allow="microphone; camera; display-capture; display; fullscreen;">

Is intranet proxy supported?

Yes. Set intranet proxy parameters as shown below. For more information, see Firewall Restrictions.
// Set intranet proxy parameters before Enter Room
import TUIRoomEngine from '@tencentcloud/tuiroom-engine-js';
import { useRoomEngine } from 'tuikit-atomicx-vue3/room';
const { roomEngine } = useRoomEngine();

TUIRoomEngine.once('ready', () => {
const trtcCloud = roomEngine.instance?.getTRTCCloud();
trtcCloud.callExperimentalAPI(JSON.stringify({
api: 'setNetworkProxy',
params: {
websocketProxy: "wss://proxy.example.com/ws/",
turnServer: [{
url: '14.3.3.3:3478',
username: 'turn',
credential: 'turn',
}],
iceTransportPolicy: 'relay',
},
}));
});

Can I modify the TUIRoomKit source code directly?

TUIRoomKit offers rich customization out of the box—custom themes and languages, UI tweaks, custom video layouts and widgets, watermarking, and more—so you can meet most UI and interaction requirements without changing the source.
For maintainability, we recommend using the built-in customization options whenever possible, rather than exporting the source. Once exported, you’re no longer on TUIRoomKit’s standard npm upgrade path, which usually means higher long-term maintenance and fewer benefits from future releases (new features, bug fixes, and performance improvements).
Recommended: Start with the options in the UI customization documentation. If the current APIs don’t cover your use case, contact us.
If you’ve assessed the trade-offs and still need deep customization that changes the underlying architecture, you can export the source code as follows:
Vue3
1. Run the source export script. The default copy path is ./src/components/RoomKit
node ./node_modules/@tencentcloud/roomkit-web-vue3/scripts/eject.js
2. Follow the script prompt to confirm whether to copy TUIRoomKit source code to ./src/components/RoomKit. Enter y to customize the copy directory, otherwise enter n.


3. After exporting, TUIRoomKit source code will be added to your specified project path. Update the import path for ConferenceMainView, ConferenceMainViewH5, and the conference object from the npm package to the relative path of the TUIRoom source.
- import { ConferenceMainView, ConferenceMainViewH5, conference } from '@tencentcloud/roomkit-web-vue3';
// Change import path to the actual TUIRoomKit source path
+ import { ConferenceMainView, ConferenceMainViewH5, conference } from './components/RoomKit/index.ts';
4. Configure ESLint
If you encounter ESLint errors after exporting TUIRoomKit source, add the RoomKit folder to .eslintignore to ignore ESLint validation.
// Replace with actual TUIRoomKit source path
src/components/RoomKit

Contact Us

If you have any questions or suggestions during integration or usage, contact us for support.