Video Live Integration

This document will guide you on how to quickly integrate the desktop TUILiveKit component into your project, thereby providing your application with live streaming capabilities.

Environmental Preparation

Operating System: Windows 10 or 11.
Node.js version ≥ 16.19.1 (official LTS version is recommened, and the npm version should match the node version).

Step 1: Activate the service

Before using audio and video services provided by Tencent Cloud, you need to go to the console and activate the service for your application. For detailed steps, refer to Activate the service.

Step 2: Download the TUILiveKit source code

Get the source code from Github, or you can clone the code with the following git command:
git clone https://github.com/Tencent-RTC/ultra-live-electron.git

Step 3: Integrate TUILiveKit

When TUILiveKit runs on the desktop, it requires the creation of two Electron windows, which are used to host the main interface and the settings interface of TUILiveKit. We call these two windows the TUILiveKit main window and sub-window, respectively. After integrating TUILiveKit into your existing application, you can create and open the TUILiveKit main window by clicking a button, allowing you to start using all the features of TUILiveKit.

Prerequisite dependencies

The following must be supported in your existing code:
Vue3
Webpack
TypeScript
Electron
Note:
If you do not have a project that meets the integration requirements, refer to the FAQ in this document.

Install dependencies

npm install --save pinia
npm install --save trtc-electron-sdk@11.8.603-alpha.1 # Must use this version
npm install --save @tencentcloud/tuiroom-engine-electron@2.4.0-alpha.3 # TUILiveKit Engine
npm install --save trtc-electron-plugin-xmagic@latest # TUILiveKit beauty plugin
npm install --save-dev native-ext-loader electron-devtools-installer electron-builder

Copy TUILiveKit soure code to your project

1. Copy TUILiveKit components
Copy the ultra-live-electron/src/TUILiveKit directory into the src directory of your project.
2. Copy TUILiveKit window creation code
Copy the ultra-live-electron/TUILiveKit.main.js and ultra-live-electron/TUILiveKit.preload.js files into the root directory of your project.
3. Copy TUILiveKit main window and sub-window pages and their router configuration
Copy ultra-live-electron/src/views/TUILiveKitChild.vue and ultra-live-electron/src/views/TUILiveKitMain.vue files into src/views directory of you project.
Add the routing configurations of the following pages to the src/router/index.ts file of your project:
// src/router/index.ts
import { createRouter, createWebHashHistory, RouteRecordRaw } from 'vue-router';
import HomeView from '../views/HomeView.vue';

const routes: Array<RouteRecordRaw> = [
{ // The default page of your application, which contains a button to trigger the opening of the TUILiveKit main window
path: '/',
name: 'home',
component: HomeView
},
// ********************************** TUILiveKit required code start ********************************** //
{ // TUILiveKit main window page
path: '/tui-live-kit-main',
name: 'tui-live-kit-main',
component: () => import(/* webpackChunkName: "TUILiveKitMain" */ '../views/TUILiveKitMain.vue')
},
{ // TUILiveKit sub-window page
path: '/tui-live-kit-child',
name: 'tui-live-kit-child',
component: () => import(/* webpackChunkName: "TUILiveKitChild" */ '../views/TUILiveKitChild.vue'),
},
// ********************************** TUILiveKit required code end ********************************** //
];

// ********************************** TUILiveKit required code start ********************************** //
window.ipcRenderer.on('window-type', (event: any, type: string) => {
console.log(`[router] window type:${type}`);
console.log(`[router] current href:${window.location.href}`);
router.replace({ name: `tui-live-kit-${type}`});
});
// ********************************** TUILiveKit required code end ********************************** //

const router = createRouter({
history: createWebHashHistory(),
routes
});

export default router;
4. Copy beauty-related code, resources, and configurations
Copy the ultra-live-electron/public/assets directory and ultra-live-electron/public/avatar.png file into the public directory of your project.
Copy the ultra-live-electron/scripts/prestart.js file into the scripts directory of your project, and add the following command in the scripts section of the package.json file of your project.
{
"scripts": {
"prestart": "node ./scripts/prestart.js"
}
}
The above configurations, code, and resources enable your project to run correctly without errors, but they do not enable beauty features. To enable them, see How do I enable beauty features.
5. Modify vue.config.js
Add the following configuration in the vue.config.js file of your project:
// vue.config.js
const { defineConfig } = require('@vue/cli-service')
// *********************************** TUILiveKit required code start *********************************** //
const os = require("os");
const isProduction = process.env.NODE_ENV === "production";
const platform = os.platform();
// *********************************** TUILiveKit required code end *********************************** //

module.exports = defineConfig({
transpileDependencies: true,
// *********************************** TUILiveKit required code start *********************************** //
publicPath: "./",
configureWebpack: {
devtool: isProduction ? "source-map" : "inline-source-map",
target: "electron-renderer",
module: {
rules: [
{
test: /\.node$/,
loader: "native-ext-loader",
options: {
rewritePath: isProduction
? platform === "win32"
? "./resources"
: "../Resources"
: "./node_modules/trtc-electron-sdk/build/Release",
},
},
],
},
}
// *********************************** TUILiveKit required code end *********************************** //
});
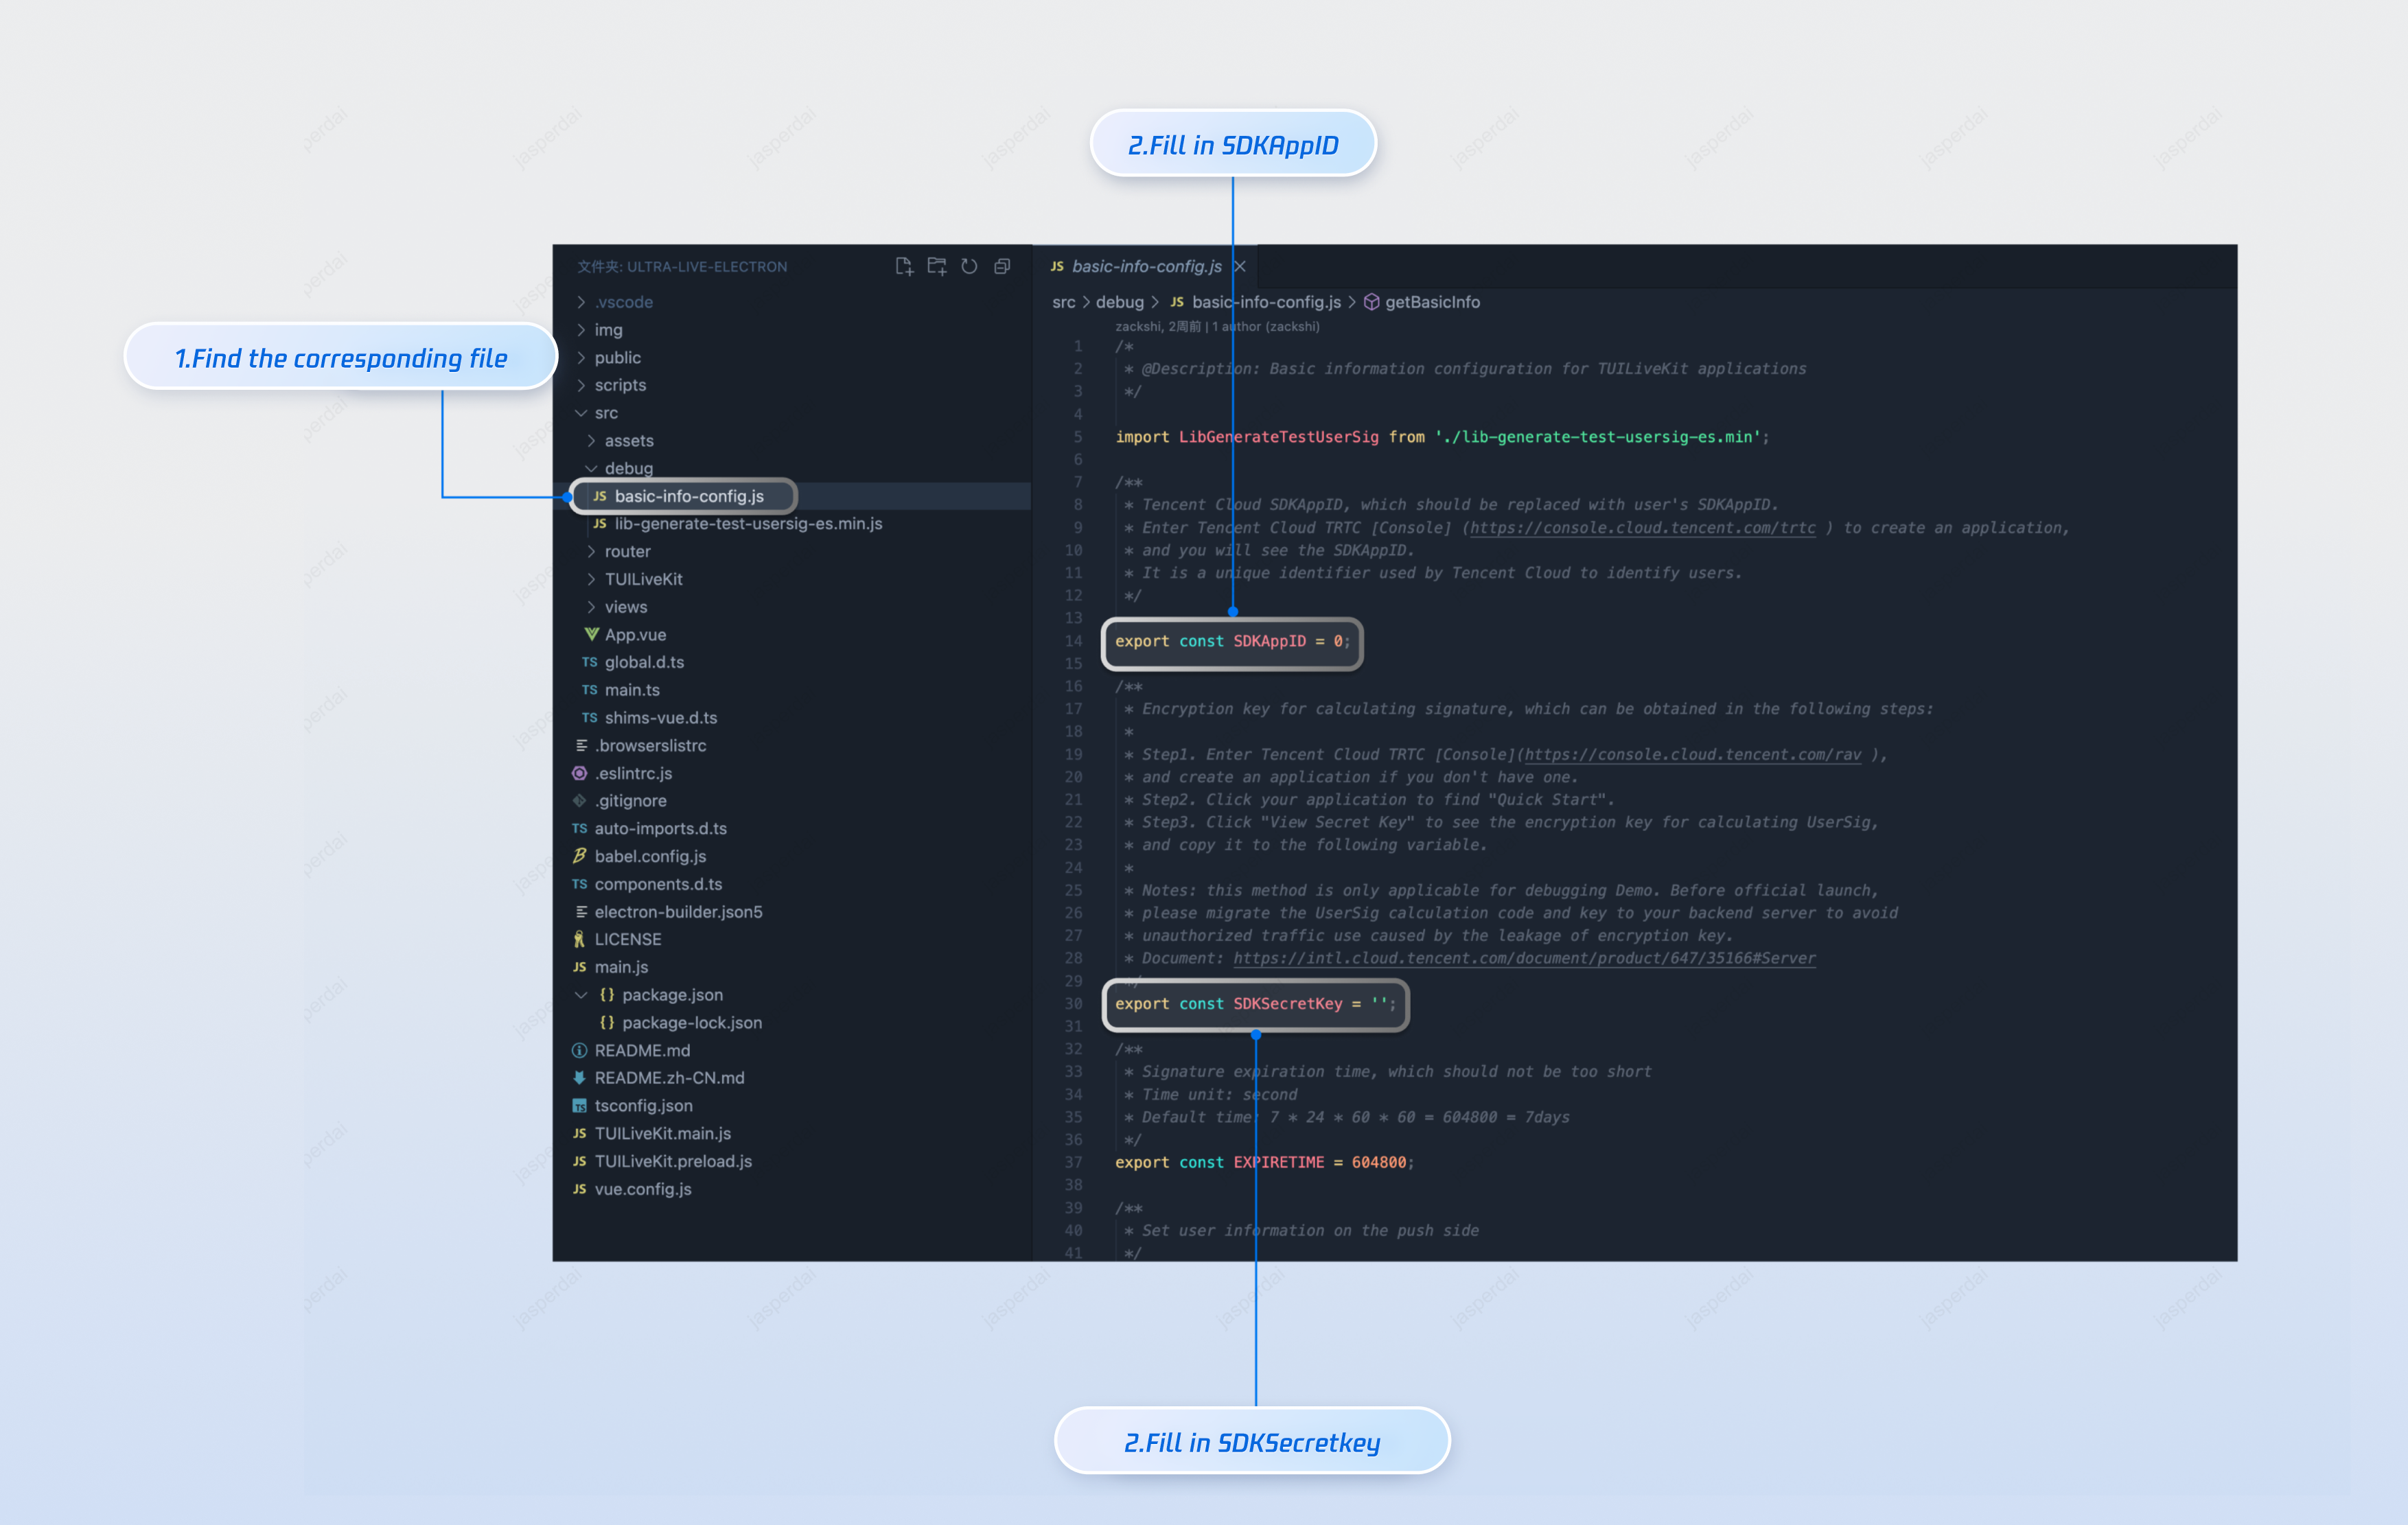
6. Copy the src/debug directory and configure SDKAppID and SDKSecretKey .
Copy the ultra-live-electron/src/debug directory into the src directory of your project. Open the copied file basic-info-config.js, and add the SDKAppID and SDKSecretKey obtained from Step 1: Activate the service .
// basic-info-config.js
/**
* Tencent Cloud SDKAppID, which should be replaced with user's SDKAppID.
* Enter Tencent Cloud TRTC [Console] (https://console.trtc.io/) to create an application,
* and you will see the SDKAppID.
* It is a unique identifier used by Tencent Cloud to identify users.
*/
export const SDKAppID = 0;


/**
* Encryption key for calculating signature, which can be obtained in the following steps:
*
* Step1. Enter Tencent Cloud TRTC [Console](https://console.trtc.io/),
* and create an application if you don't have one.
* Step2. Click your application to find "Quick Start".
* Step3. Click "View Secret Key" to see the encryption key for calculating UserSig,
* and copy it to the following variable.
*
* Notes: this method is only applicable for debugging Demo. Before official launch,
* please migrate the UserSig calculation code and key to your backend server to avoid
* unauthorized traffic use caused by the leakage of encryption key.
* Document: https://intl.cloud.tencent.com/document/product/647/35166#Server
*/
export const SDKSecretKey = '';
7. Enable pinia
Open the src/main.ts file in your project, add the following configuration to enable pinia:
// main.ts
import { createApp } from 'vue';
// *********************************** TUILiveKit required code start *********************************** //
import { createPinia } from 'pinia';
// *********************************** TUILiveKit required code end *********************************** //
import App from './App.vue'
import router from './router'

createApp(App)
// *********************************** TUILiveKit required code start *********************************** //
.use(createPinia())
// *********************************** TUILiveKit required code end *********************************** //
.use(router)
.mount('#app');
8. Modify global.d.ts
In the src/global.d.ts file of your project, add the following declarations for the Window type:
// src/global.d.ts
export {}
declare global {
interface Window {
// *********************************** TUILiveKit required code start *********************************** //
ipcRenderer: any;
nativeWindowHandle: Uint8Array;
mainWindowPort: MessagePort | null;
}
// *********************************** TUILiveKit required code end *********************************** //
}

Add an entry to open the TUILiveKit main window

Vue Component
Electron preload script
Eletron main process
package.json
In a page view of your vue project, add a button. When clicked, it will notify the Electron main process to open the TUILiveKit main window. As shown below, this is our implementation example code.
// HomeView.vue
<template>
<div class="home">
<button @click="openTUILiveKit">Open TUILiveKit</button>
</div>
</template>

<script setup lang="ts">
import { ref } from 'vue';
import type { Ref } from 'vue';
import { getBasicInfo } from '../debug/basic-info-config';

const isOpen:Ref<boolean> = ref(false);

const openTUILiveKit = async () => {
if (!isOpen.value) {
const currentUserInfo = await getBasicInfo();
if (currentUserInfo) {
window.ipcRenderer.send('openTUILiveKit', {
userInfo: currentUserInfo // Note: User information is required to open TUILiveKit main window
});
isOpen.value = true;
} else {
console.error('Error: cannot get current user info');
}
}
};
</script>
To facilitate communication with the Electron main process in Vue components and JavaScript/TypeScript scripts, put the ipcRenderer object of Electron onto the global object window in the preload script of your Electron project.
// preload.js
const { ipcRenderer } = require("electron");

// Enable `ipcRenderer` can be used in vue and Javascript module
window.ipcRenderer = ipcRenderer;
When received openTUILiveKit message from Vue component, the Electron main process will open the TUILiveKit main window.
// main.js
const { app, BrowserWindow, ipcMain } = require('electron');
const path = require('path');
// *********************************** TUILiveKit required code start *********************************** //
const { TUILiveKitMain } = require("./TUILiveKit.main");
// *********************************** TUILiveKit required code end *********************************** //

let mainWindow = null;
const createWindow = () => {
mainWindow = new BrowserWindow({
width: 800,
height: 600,
// *********************************** TUILiveKit required code start *********************************** //
webPreferences: {
preload: path.join(__dirname, 'preload.js'),
nodeIntegration: true,
contextIsolation: false,
}
// *********************************** TUILiveKit required code end *********************************** //
});

// *********************************** TUILiveKit required code start *********************************** //
bindIPCMainEvent();
// *********************************** TUILiveKit required code end *********************************** //
if (app.isPackaged) {
mainWindow.loadFile("dist/index.html");
} else {
mainWindow.loadURL('http://localhost:8080');
}
}

// *********************************** TUILiveKit required code start *********************************** //
function bindIPCMainEvent() {
ipcMain.on("openTUILiveKit", (event, args) => {
console.log(`[main] open live kit`, args);
TUILiveKitMain.open(args); // Open TUILiveKit main window
});
}
// *********************************** TUILiveKit required code end *********************************** //
app.whenReady().then(() => {
createWindow();
app.on('activate', () => {
if (BrowserWindow.getAllWindows().length === 0) createWindow()
});
})

app.on('window-all-closed', () => {
if (process.platform !== 'darwin') app.quit()
});
Add the following command in "scripts" of your project package.json file to enable the starting of Electron applicaiton in development mode.
{
"scripts": {
"start": "electron ."
}
}

Step 4: Run in development mode

1. Enter the root directory of your project with cmd.exe and execute the following command to start the Vue web project.
npm run serve
If you encounter an error Component name "Index" should always be multi-word vue/multi-word-component-names at startup, it indicates that there is a difference in eslint configuration between your project and TUILiveKit. Add the following "vue/multi-word-component-names" validation rule in your project's .eslintrc.js file or eslintConfig section of the package.json file.
// .eslintrc.js
module.exports = {
root: true,
env: {
node: true
},
'extends': [
'plugin:vue/vue3-essential',
'eslint:recommended',
'@vue/typescript/recommended'
],
parserOptions: {
ecmaVersion: 2020
},
rules: {
'no-console': process.env.NODE_ENV === 'production' ? 'warn' : 'off',
'no-debugger': process.env.NODE_ENV === 'production' ? 'warn' : 'off',
// *********************************** TUILiveKit required code start *********************************** //
"vue/multi-word-component-names": process.env.NODE_ENV === 'production' ? 'warn' : 'off',
// *********************************** TUILiveKit required code end *********************************** //
}
}
2. Enter the root directory of your project with another cmd.exe and execute the following command to start an Electron application in development mode:
npm run start
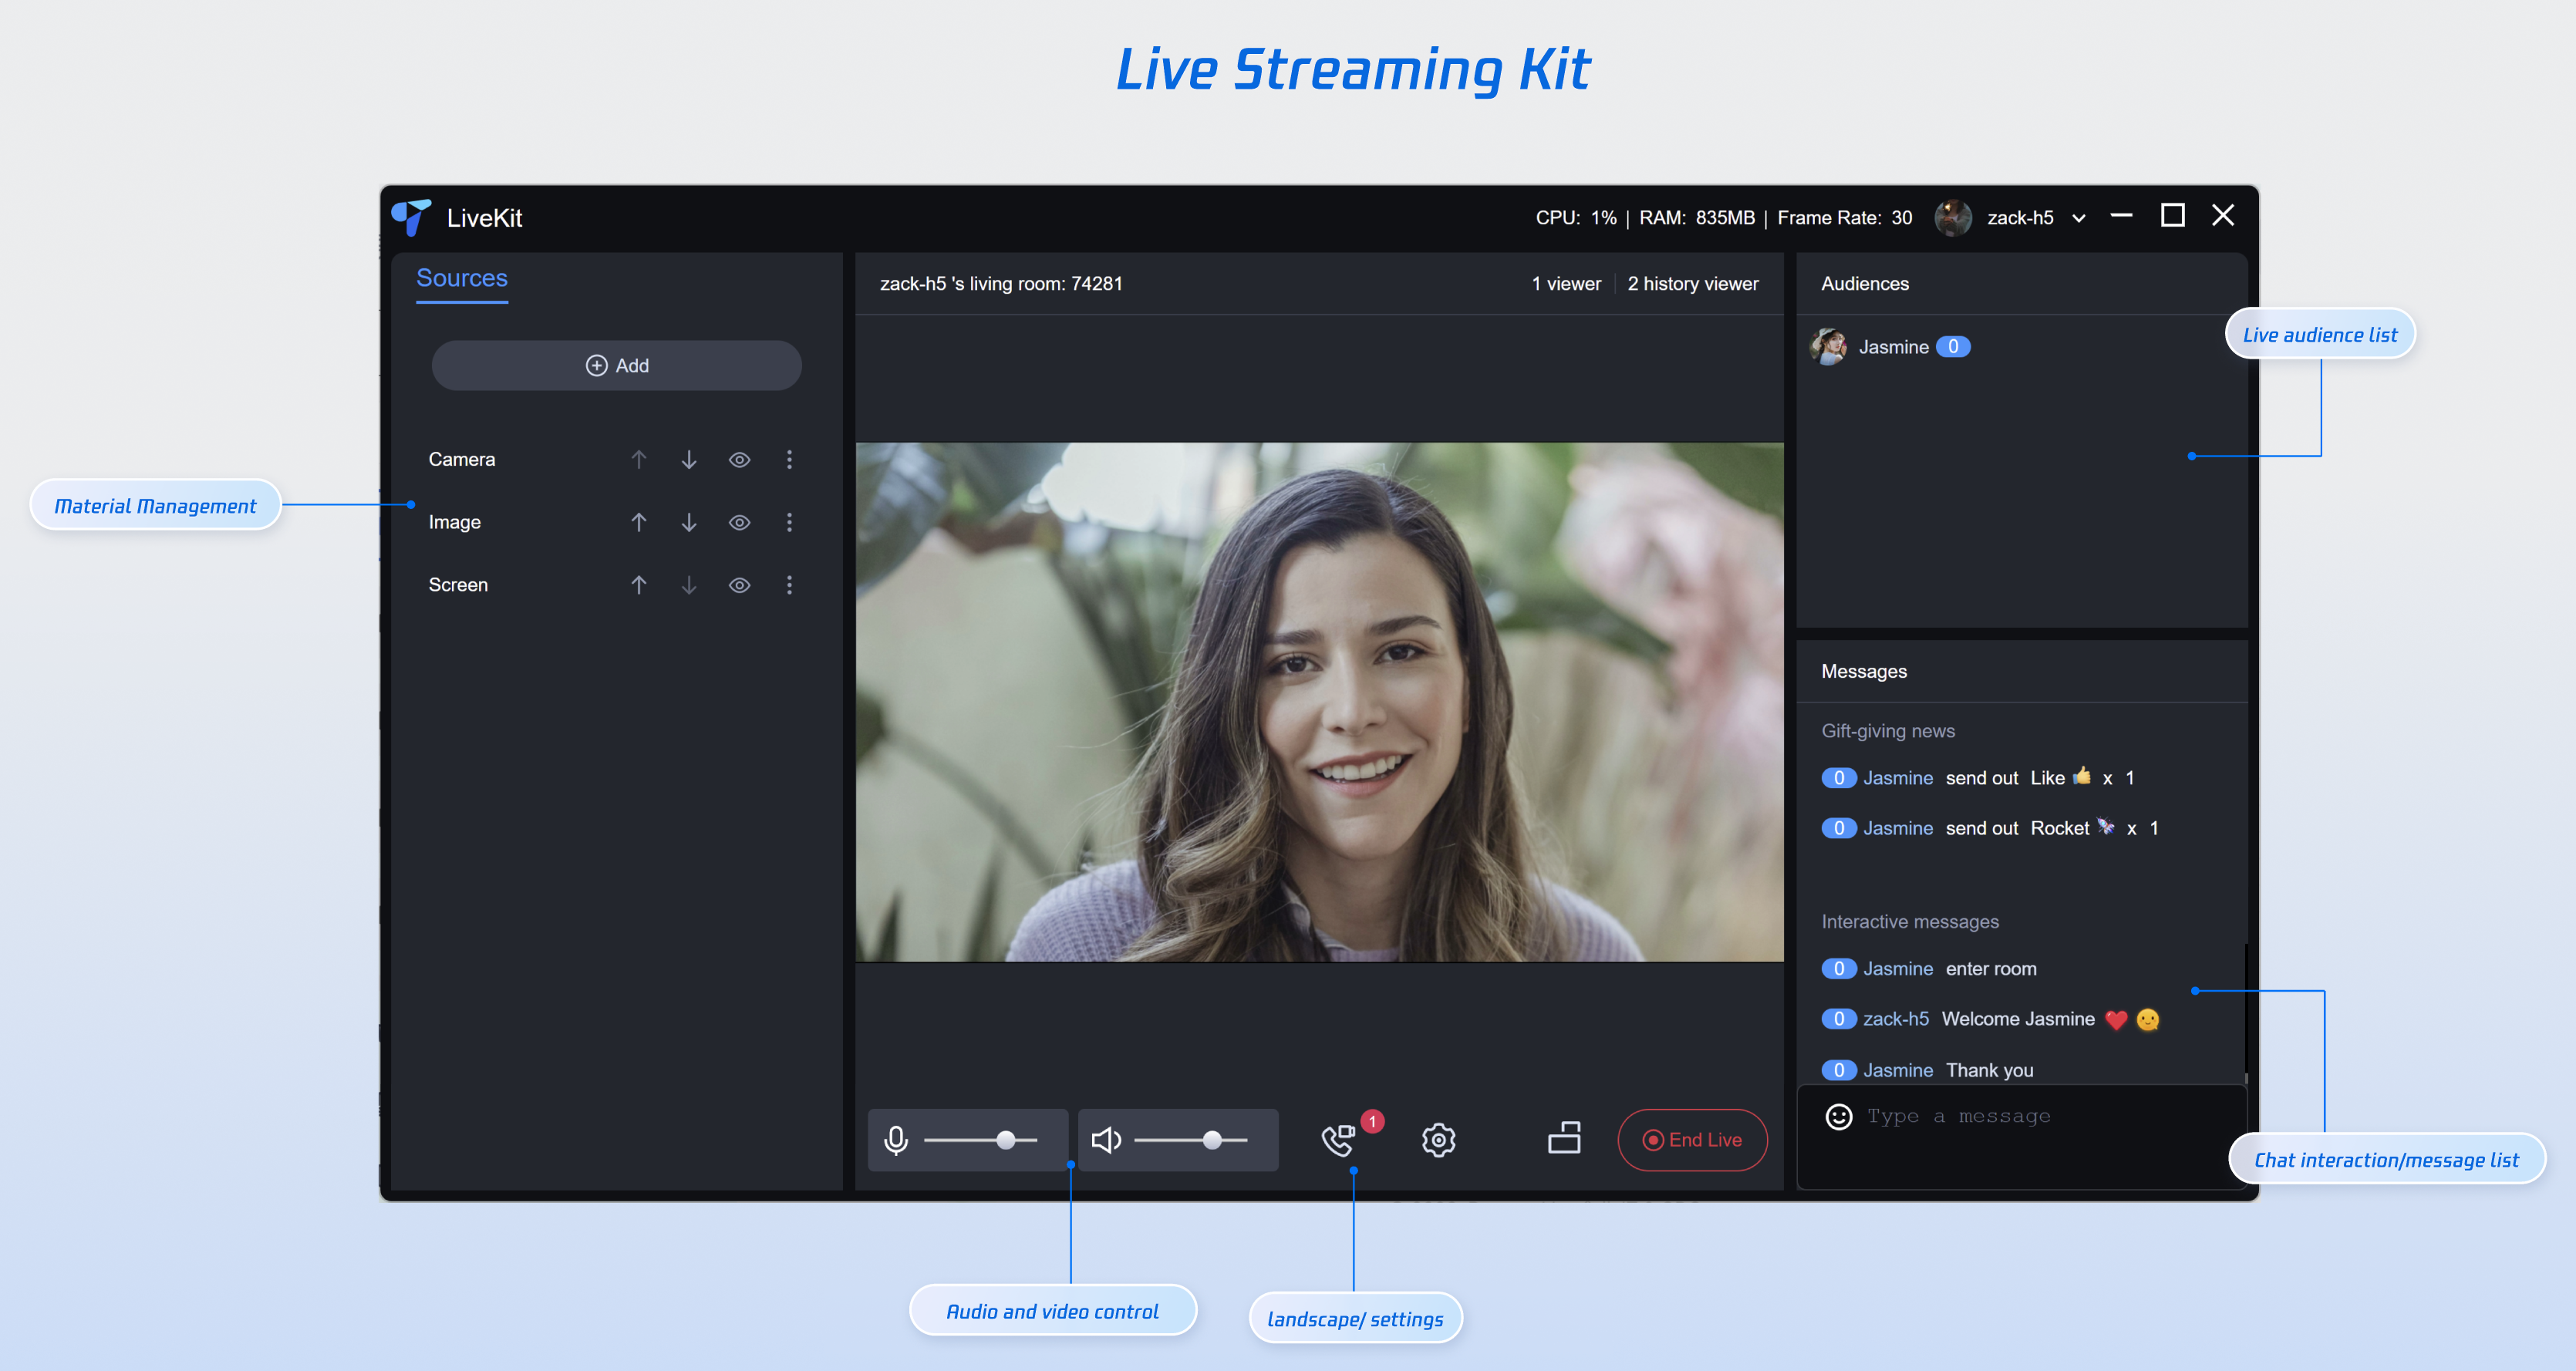
After successfully starting, click the "Open TUILiveKit" button to open TUILiveKit main window shown below:


Step 5: Start your first live stream

1. Add a camera
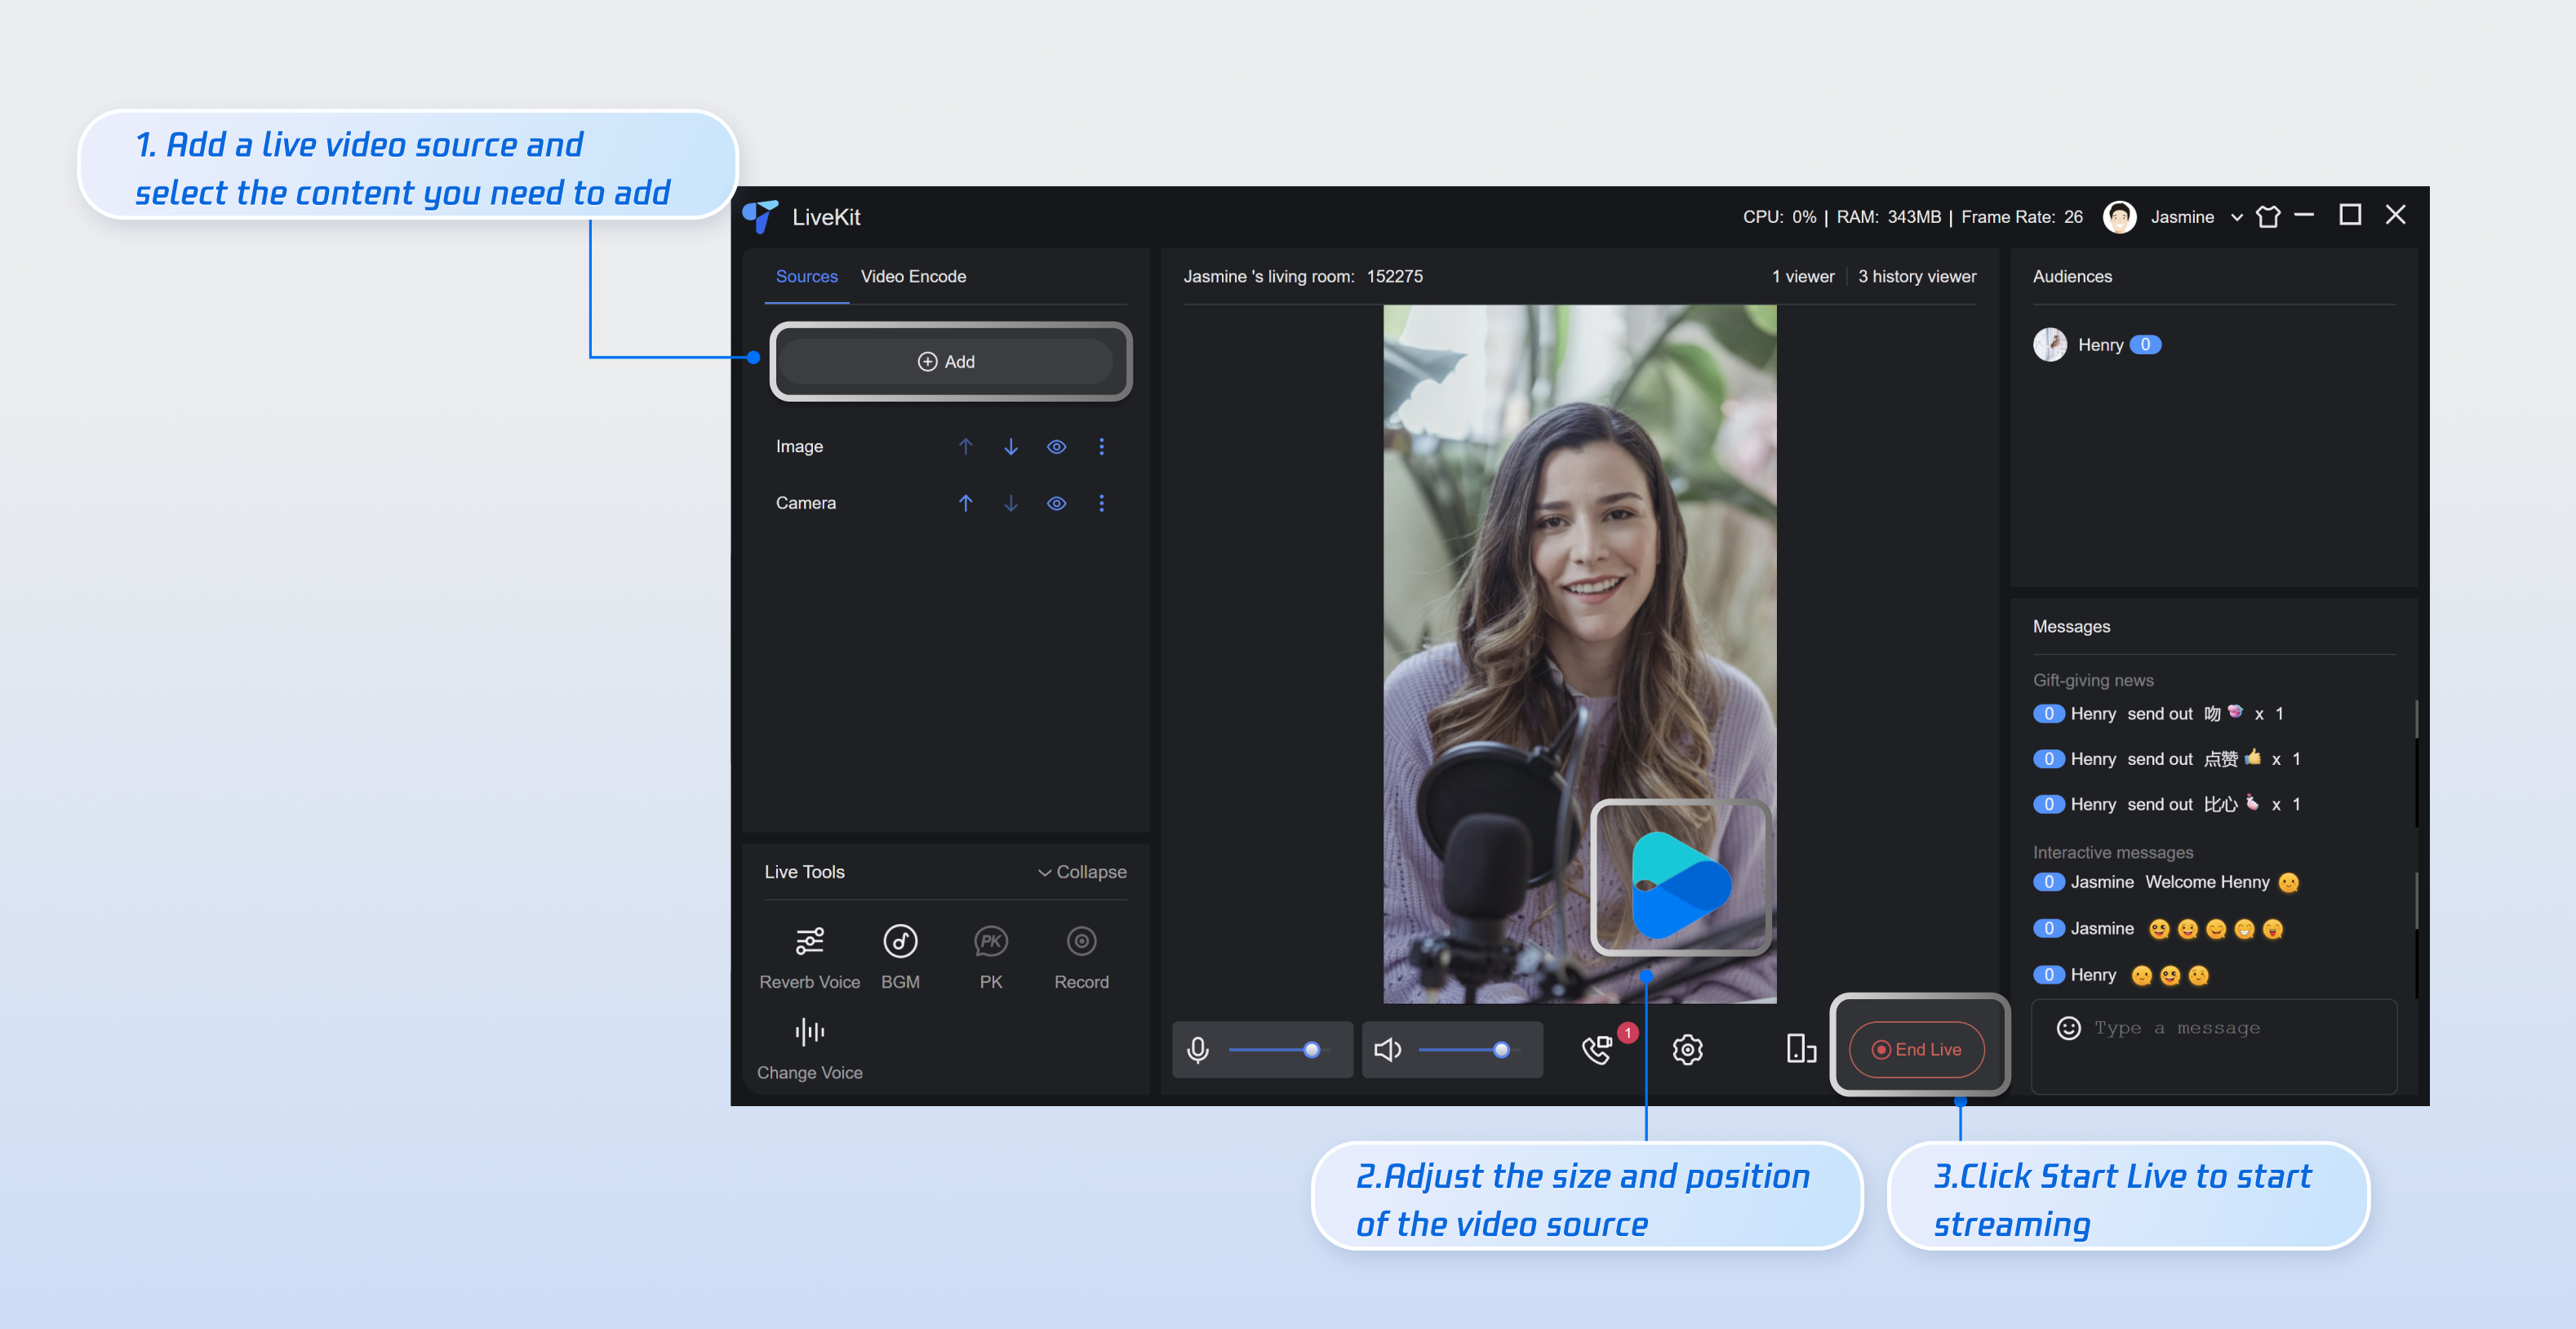
Before you can begin streaming, you need to add a video source. Supported video sources include: camera, screen sharing, window sharing, and images. The image below shows the window after adding a camera.


2. Add your logo image
You can use a custom logo image to display during live streaming. The image below shows the preview after adding a logo with a transparent background. When you click the logo, a yellow border will appear, indicating that it is currently selected. You can then move and resize using the mouse, or you can rotate and adjust the layer order using the right-click menu.


3. Start the live stream
Click the Go Live button to start live streaming. Once the stream starts, the End button will appear, which you can click to end the live stream.


4. View the live stream
In the desktop version, the host can start a live stream but can't view it. To view the stream, you need to use the mobile app. In the app, find the corresponding live room and enter it to see the host's video stream. For more information on using the mobile app, refer to the documentation for iOSand Android.

Step 6: Build the installation package

1. Copy the ultra-live-electron/electron-builder.json5 file into your project's root directory. You can modify the productName and appId as you like.
2. Add the following command in your project's package.json file to enable building the installation package.
{
"scripts": {
"build:win64": "electron-builder --win --x64",
"pack:win64": "npm run build && npm run build:win64"
}
}
3. Build the installation package
Enter the root path of your project with cmd.exe and execute the following command. The created installation package is in release directory.
npm run pack:win64
4. Install the pacakge and run.

FAQs

I want to use TUILiveKit, but I don't have a project that meets the integration requirements. How can I start?

There are several ways to get started with TUILiveKit:
If you do not have a project, you can start with our open source project code on Github. Just clone it and modify the code as needed.
If you already have a project, you can modify it according to our open source Template project: trtc-electron-template-vue3-webpack to ingerate TUILiveKit.
If you have a JavaScript project without TypeScript support, you can refer to "How to integrate TUILiveKit in JavaScript project?".

Does TUILiveKit support Vite?

Currently, TUILiveKit does not support running with Vite.

How do i integrate TUILiveKit in a JavaScript project?

JavaScript projects cannot be integrated with TUILiveKit directly. You need to modify the project to support TypeScript in order to integrate TUILiveKit.
1. Install dependencies
npm install --save-dev typescript@4.5.5 @typescript-eslint/eslint-plugin@5.4.0 @typescript-eslint/parser@5.4.0 @vue/cli-plugin-typescript@5.0.0 @vue/eslint-config-typescript@9.1.0
2. Copy the ultra-live-electron/tsconfig.json file into your project root directory.
3. Copy the ultra-live-electron/src/global.d.ts file into your project root directory.

How do I enable beauty features?

The beauty features used in TUILiveKit are based on Tencent Effect SDK. which you need to purchase and activate in order to obtain the licenseURL and licenseKey. You can then add them to the src/TUILiveKit/utils/beauty.ts file to quickly enable beauty features for testing.
Note:
The above method is only suitable for quick integration and testing purposes. Adding your licenseURL and licenseKey to a JavaScript file is quick and simple, but there is a very high risk of exposing both your licenseURL and licenseKey. For commercial projects, you should obtain the licenseURL and licenseKey by calling a backend service.
// beauty.ts
export const XmagicLicense = {
licenseURL: "",
licenseKey: "",
};

Suggestions and Feedback

If you have any suggestions or feedback, please contact info_rtc@tencent.com.