
iOS
Note:
Self-integrated push only supports regular message push, no longer maintained. It is strongly recommended to use the Push Plugin (TIMPush), which requires simple configuration to integrate multiple vendors' push services with one click. It not only supports regular message push but also supports full-member push and user tag-based push. It provides complete push lifecycle query, data statistics, issue troubleshooting, and other features, offering you a stable, timely, and diversified one-stop comprehensive push service.
This article aims to introduce how to self-integrate Apple's APNS push service.
Configuring Offline Push
To receive APNs offline message notifications, follow these steps:
3. When the app logs in each time, it requests the deviceToken from Apple.
4. Call the setAPNS API to report it to the backend of Chat.
Step 1: Apply for an APNs certificate
Activate remote push for the app
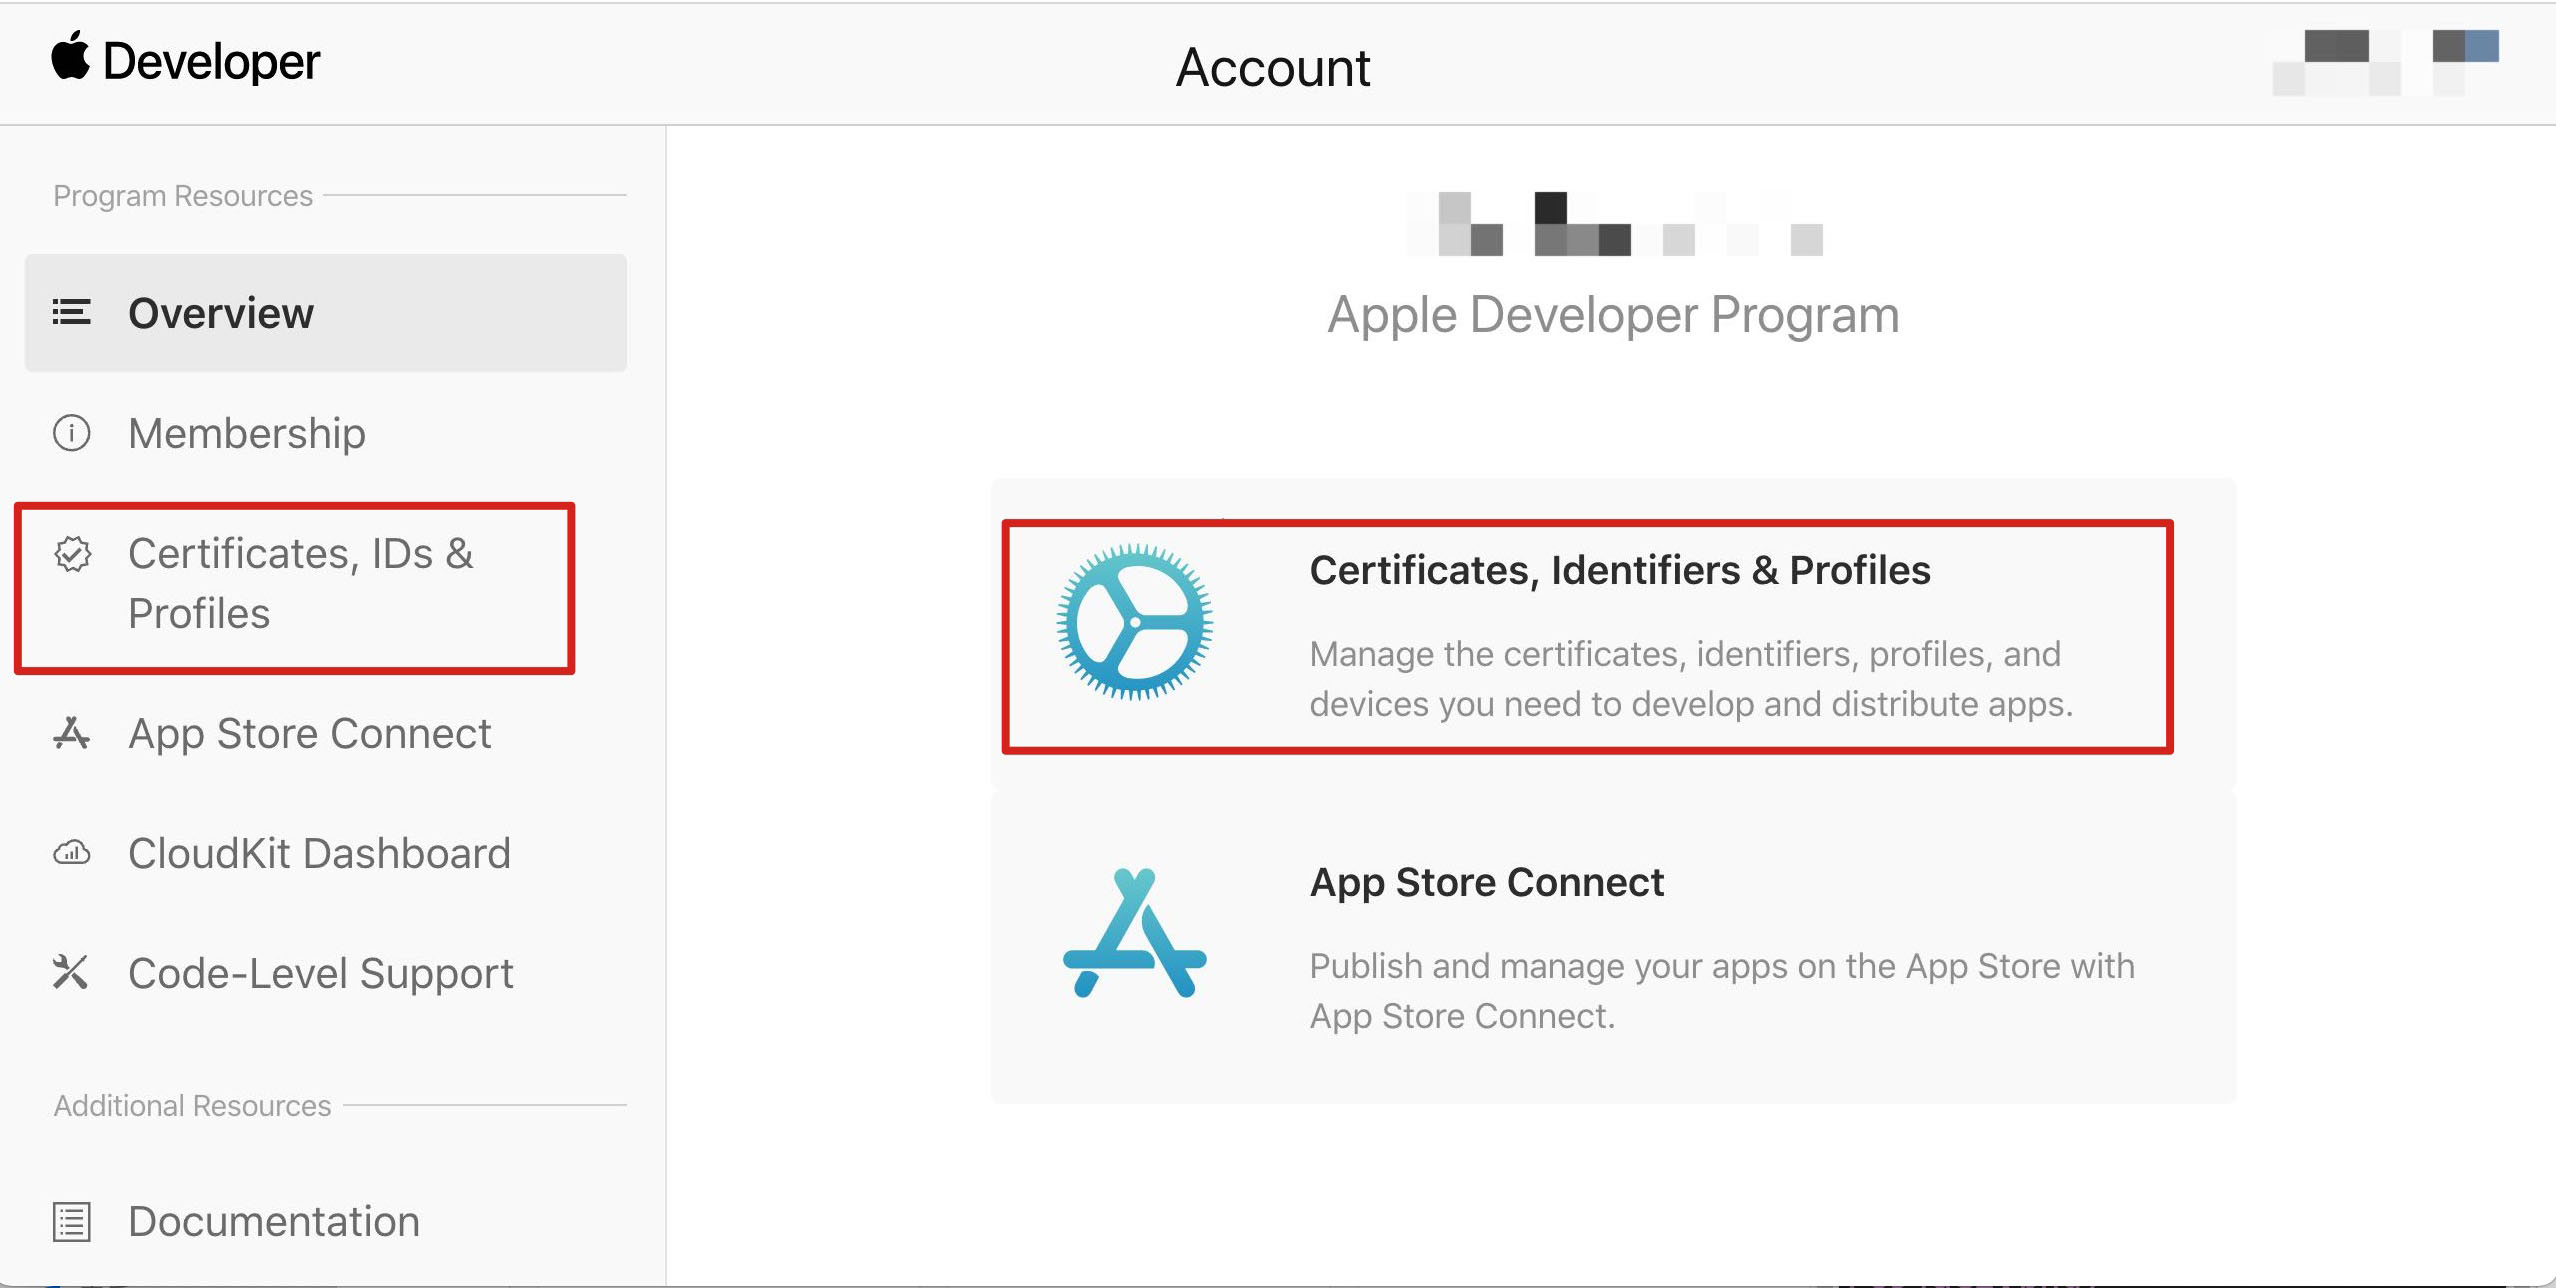
1. Log in to the Apple Developer website, click Certificates, Identifiers & Profiles or the sidebar Certificates, IDs & Profiles to enter the Certificates, IDs & Profiles page.
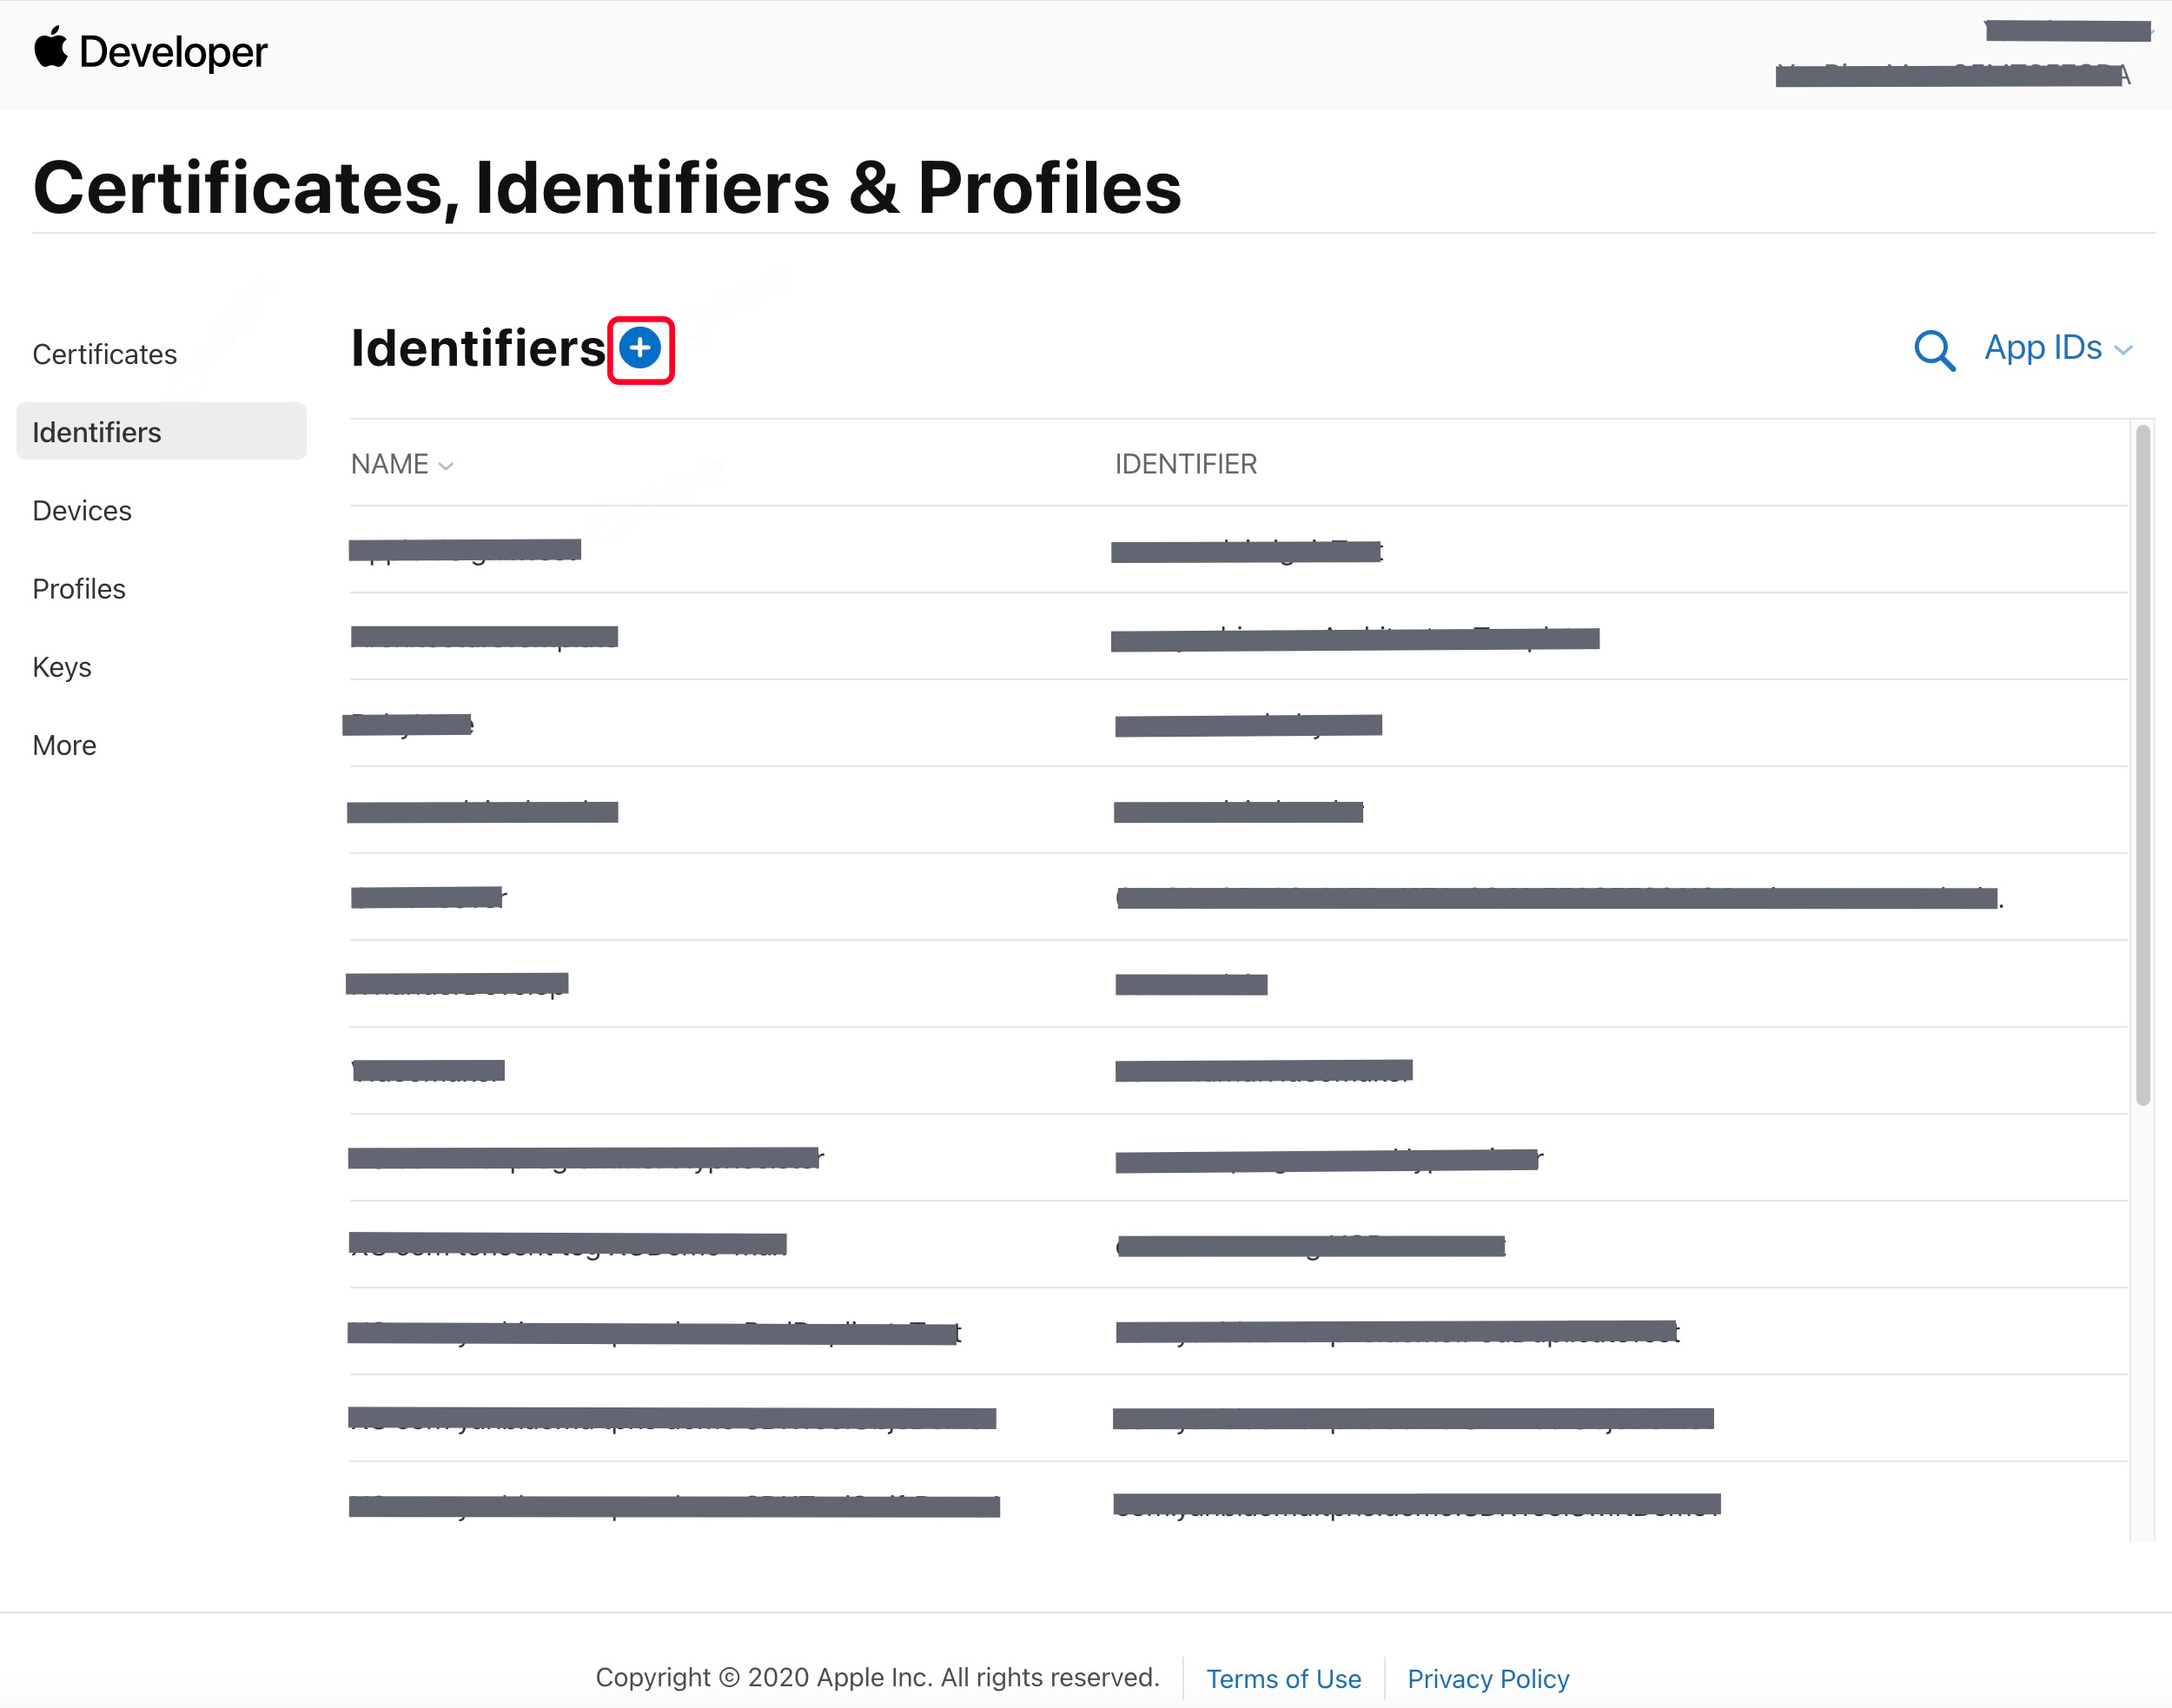
2. Click Identifiers on the right-side +.
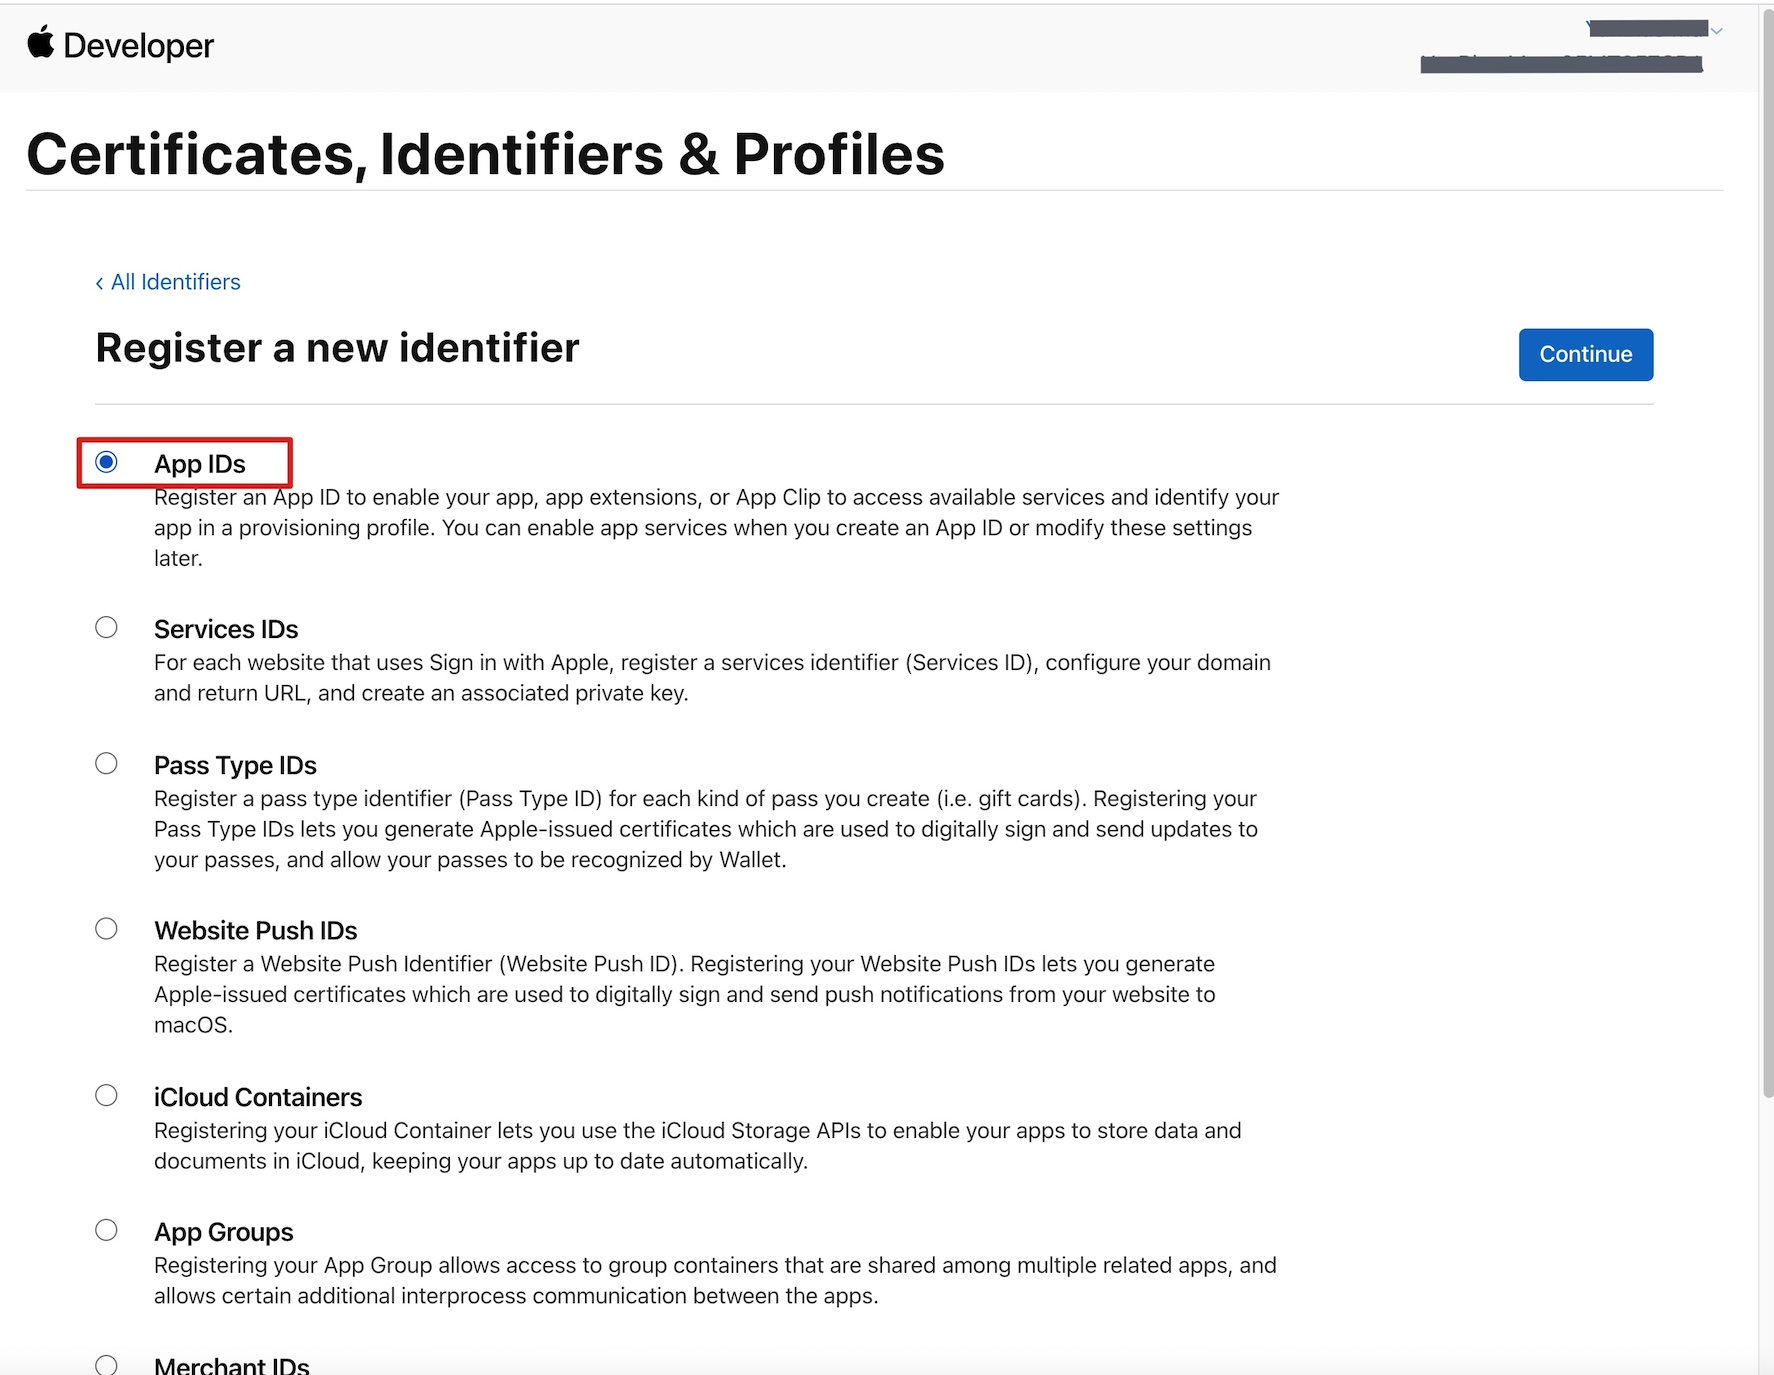
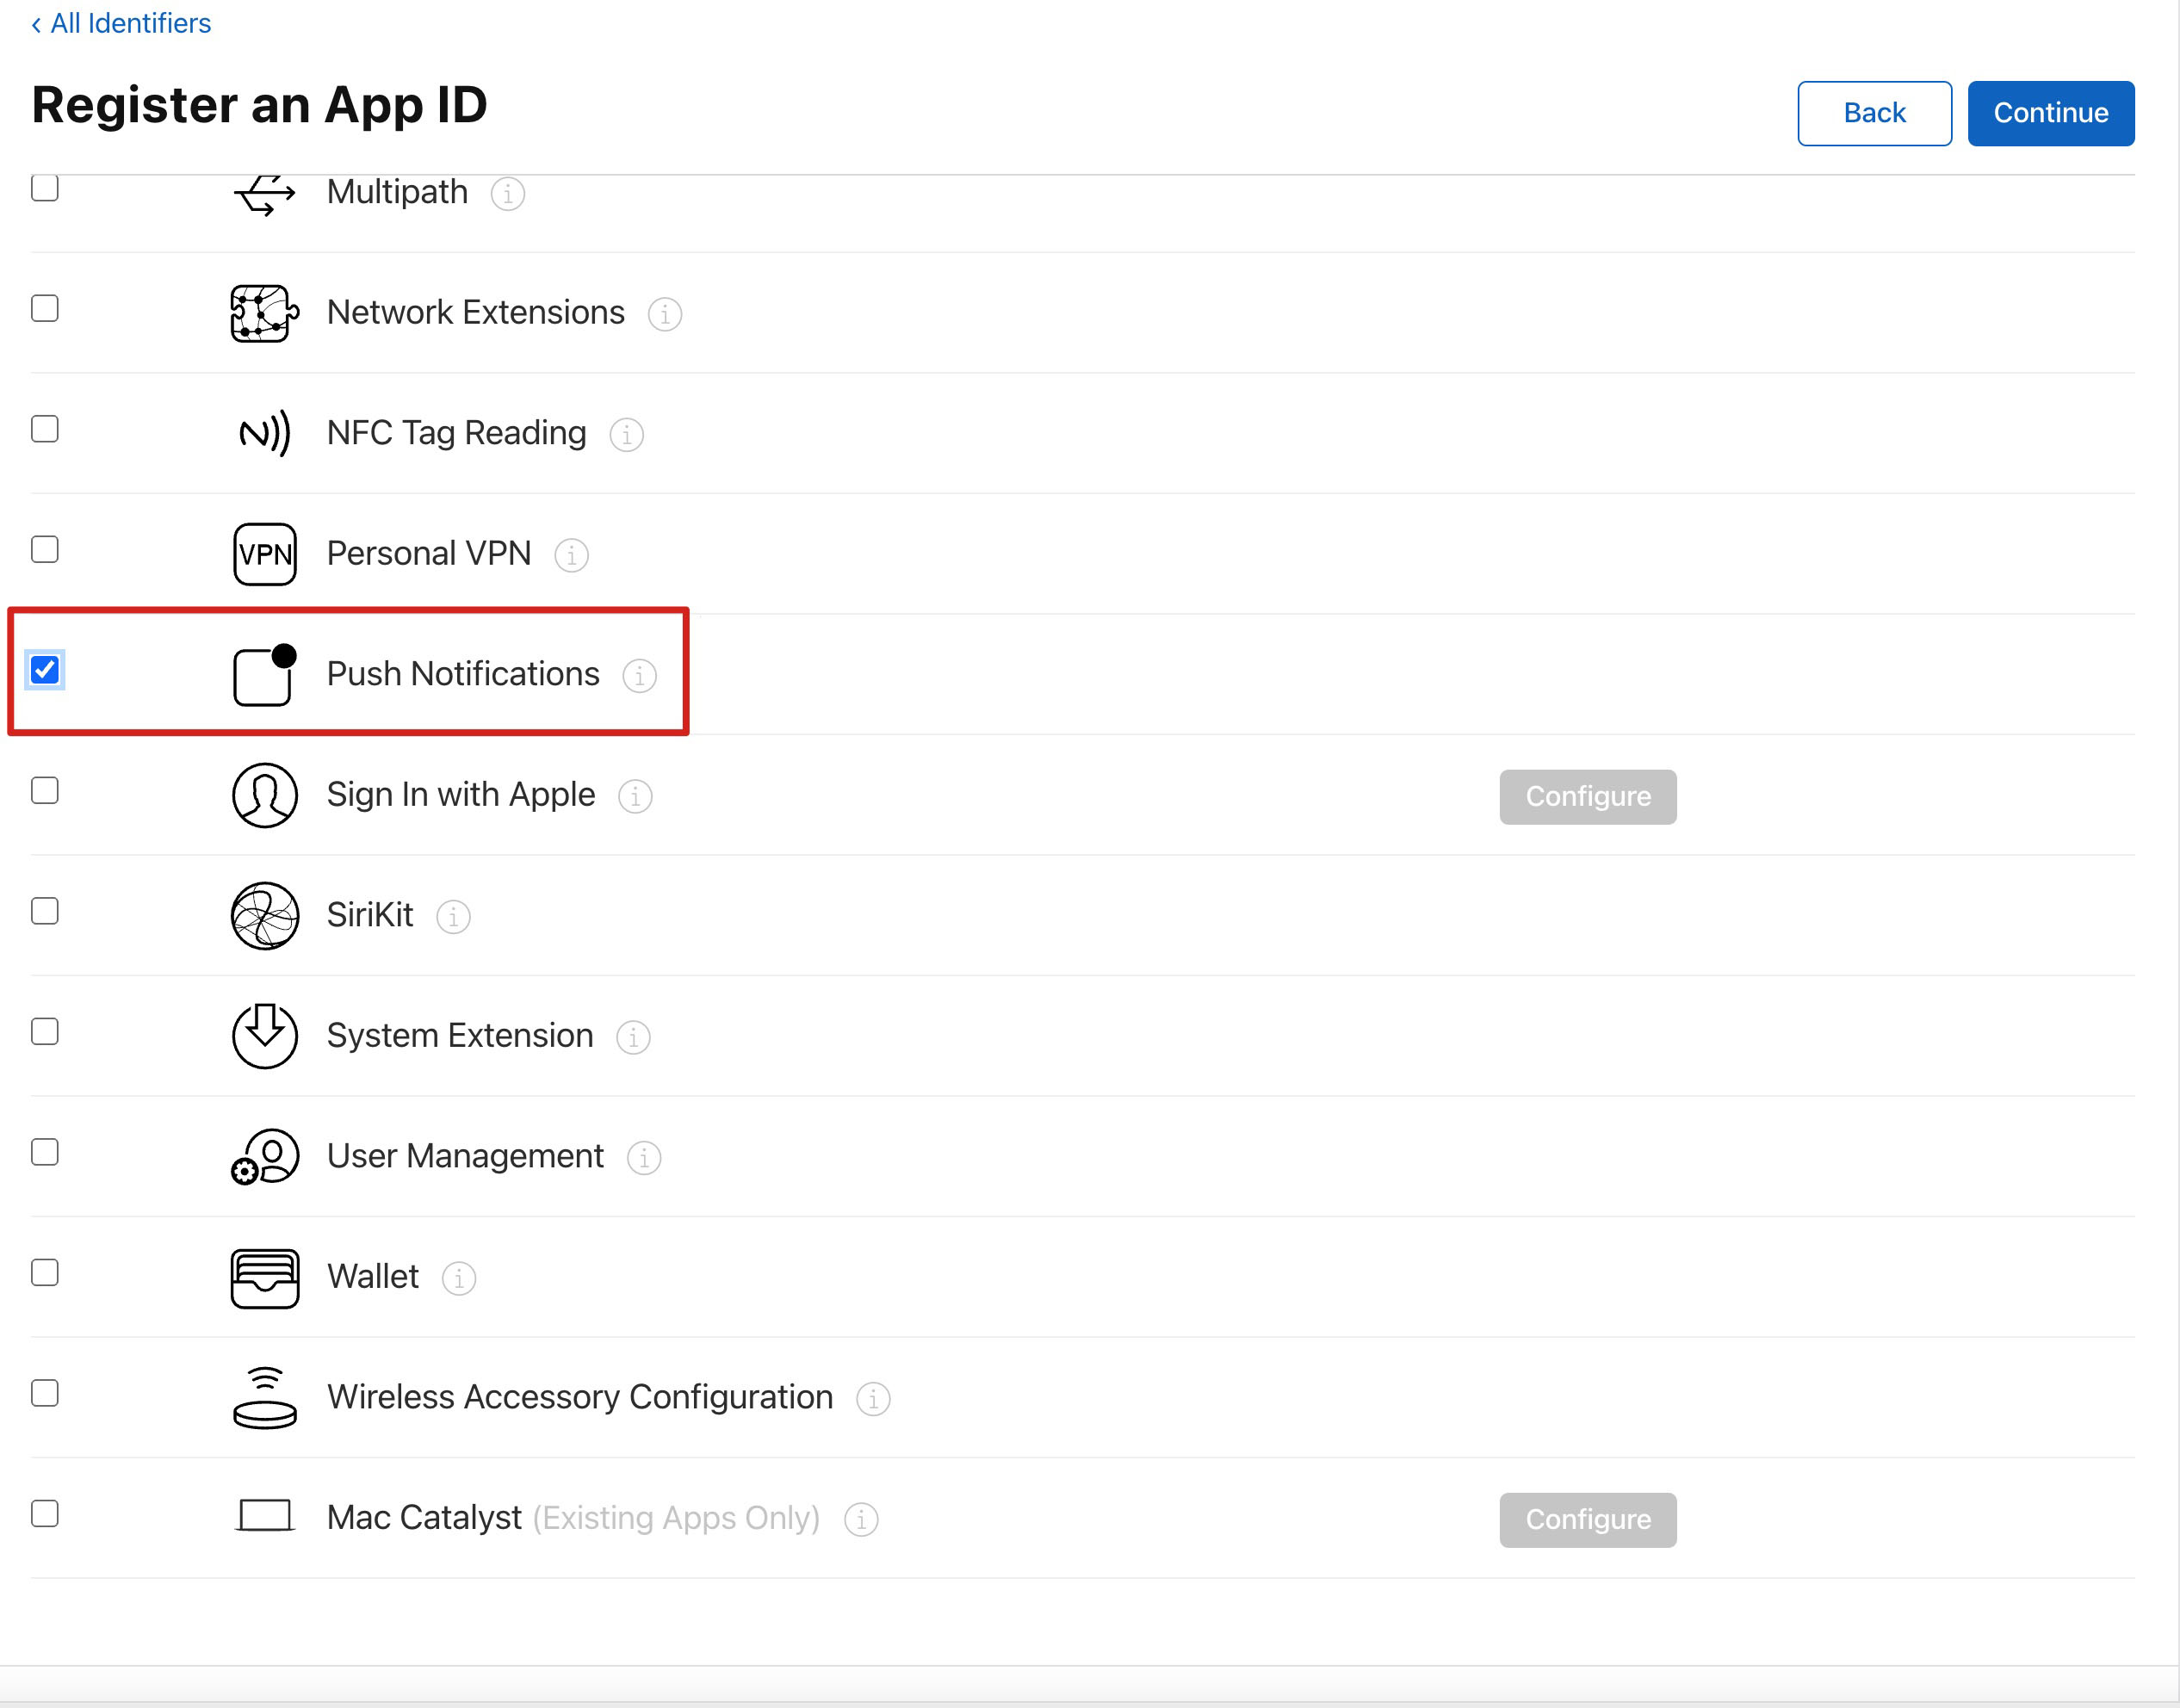
3. You can follow the steps below to create a new AppID, or add a
Push Notification service to your existing AppID .Note:
Your App's
Bundle ID cannot use a wildcard *, otherwise, remote push service will not be available.4. Select App IDs, click Continue to proceed with Next .
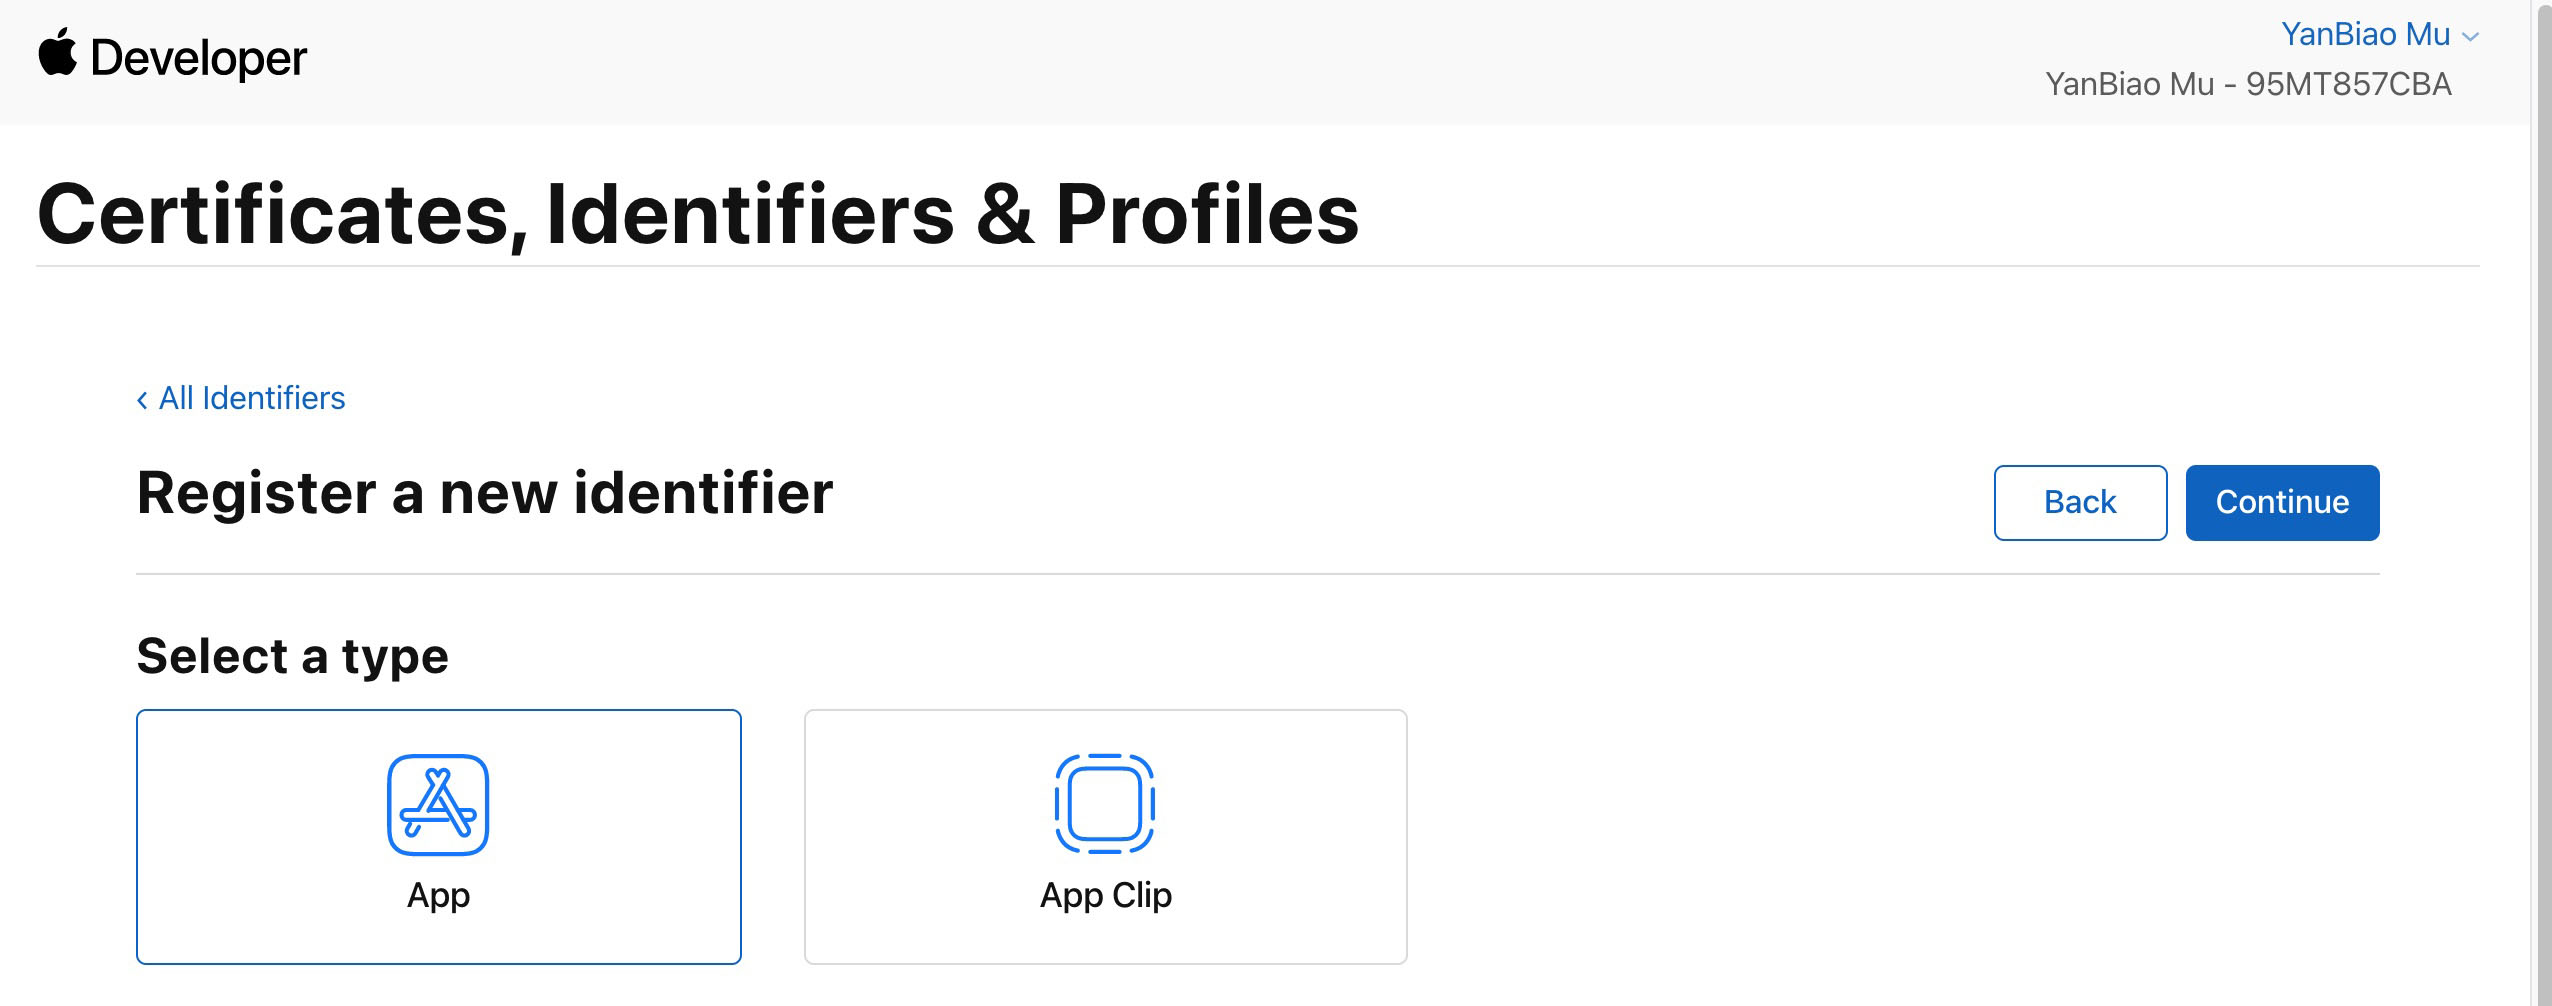
5. Choose App, click Continue to proceed with Next .
6. Configure
Bundle ID and other information, click Continue to proceed with Next .
7. Select Push Notifications to activate remote push service.
Generating Certificate
1. Select your AppID, choose Configure.
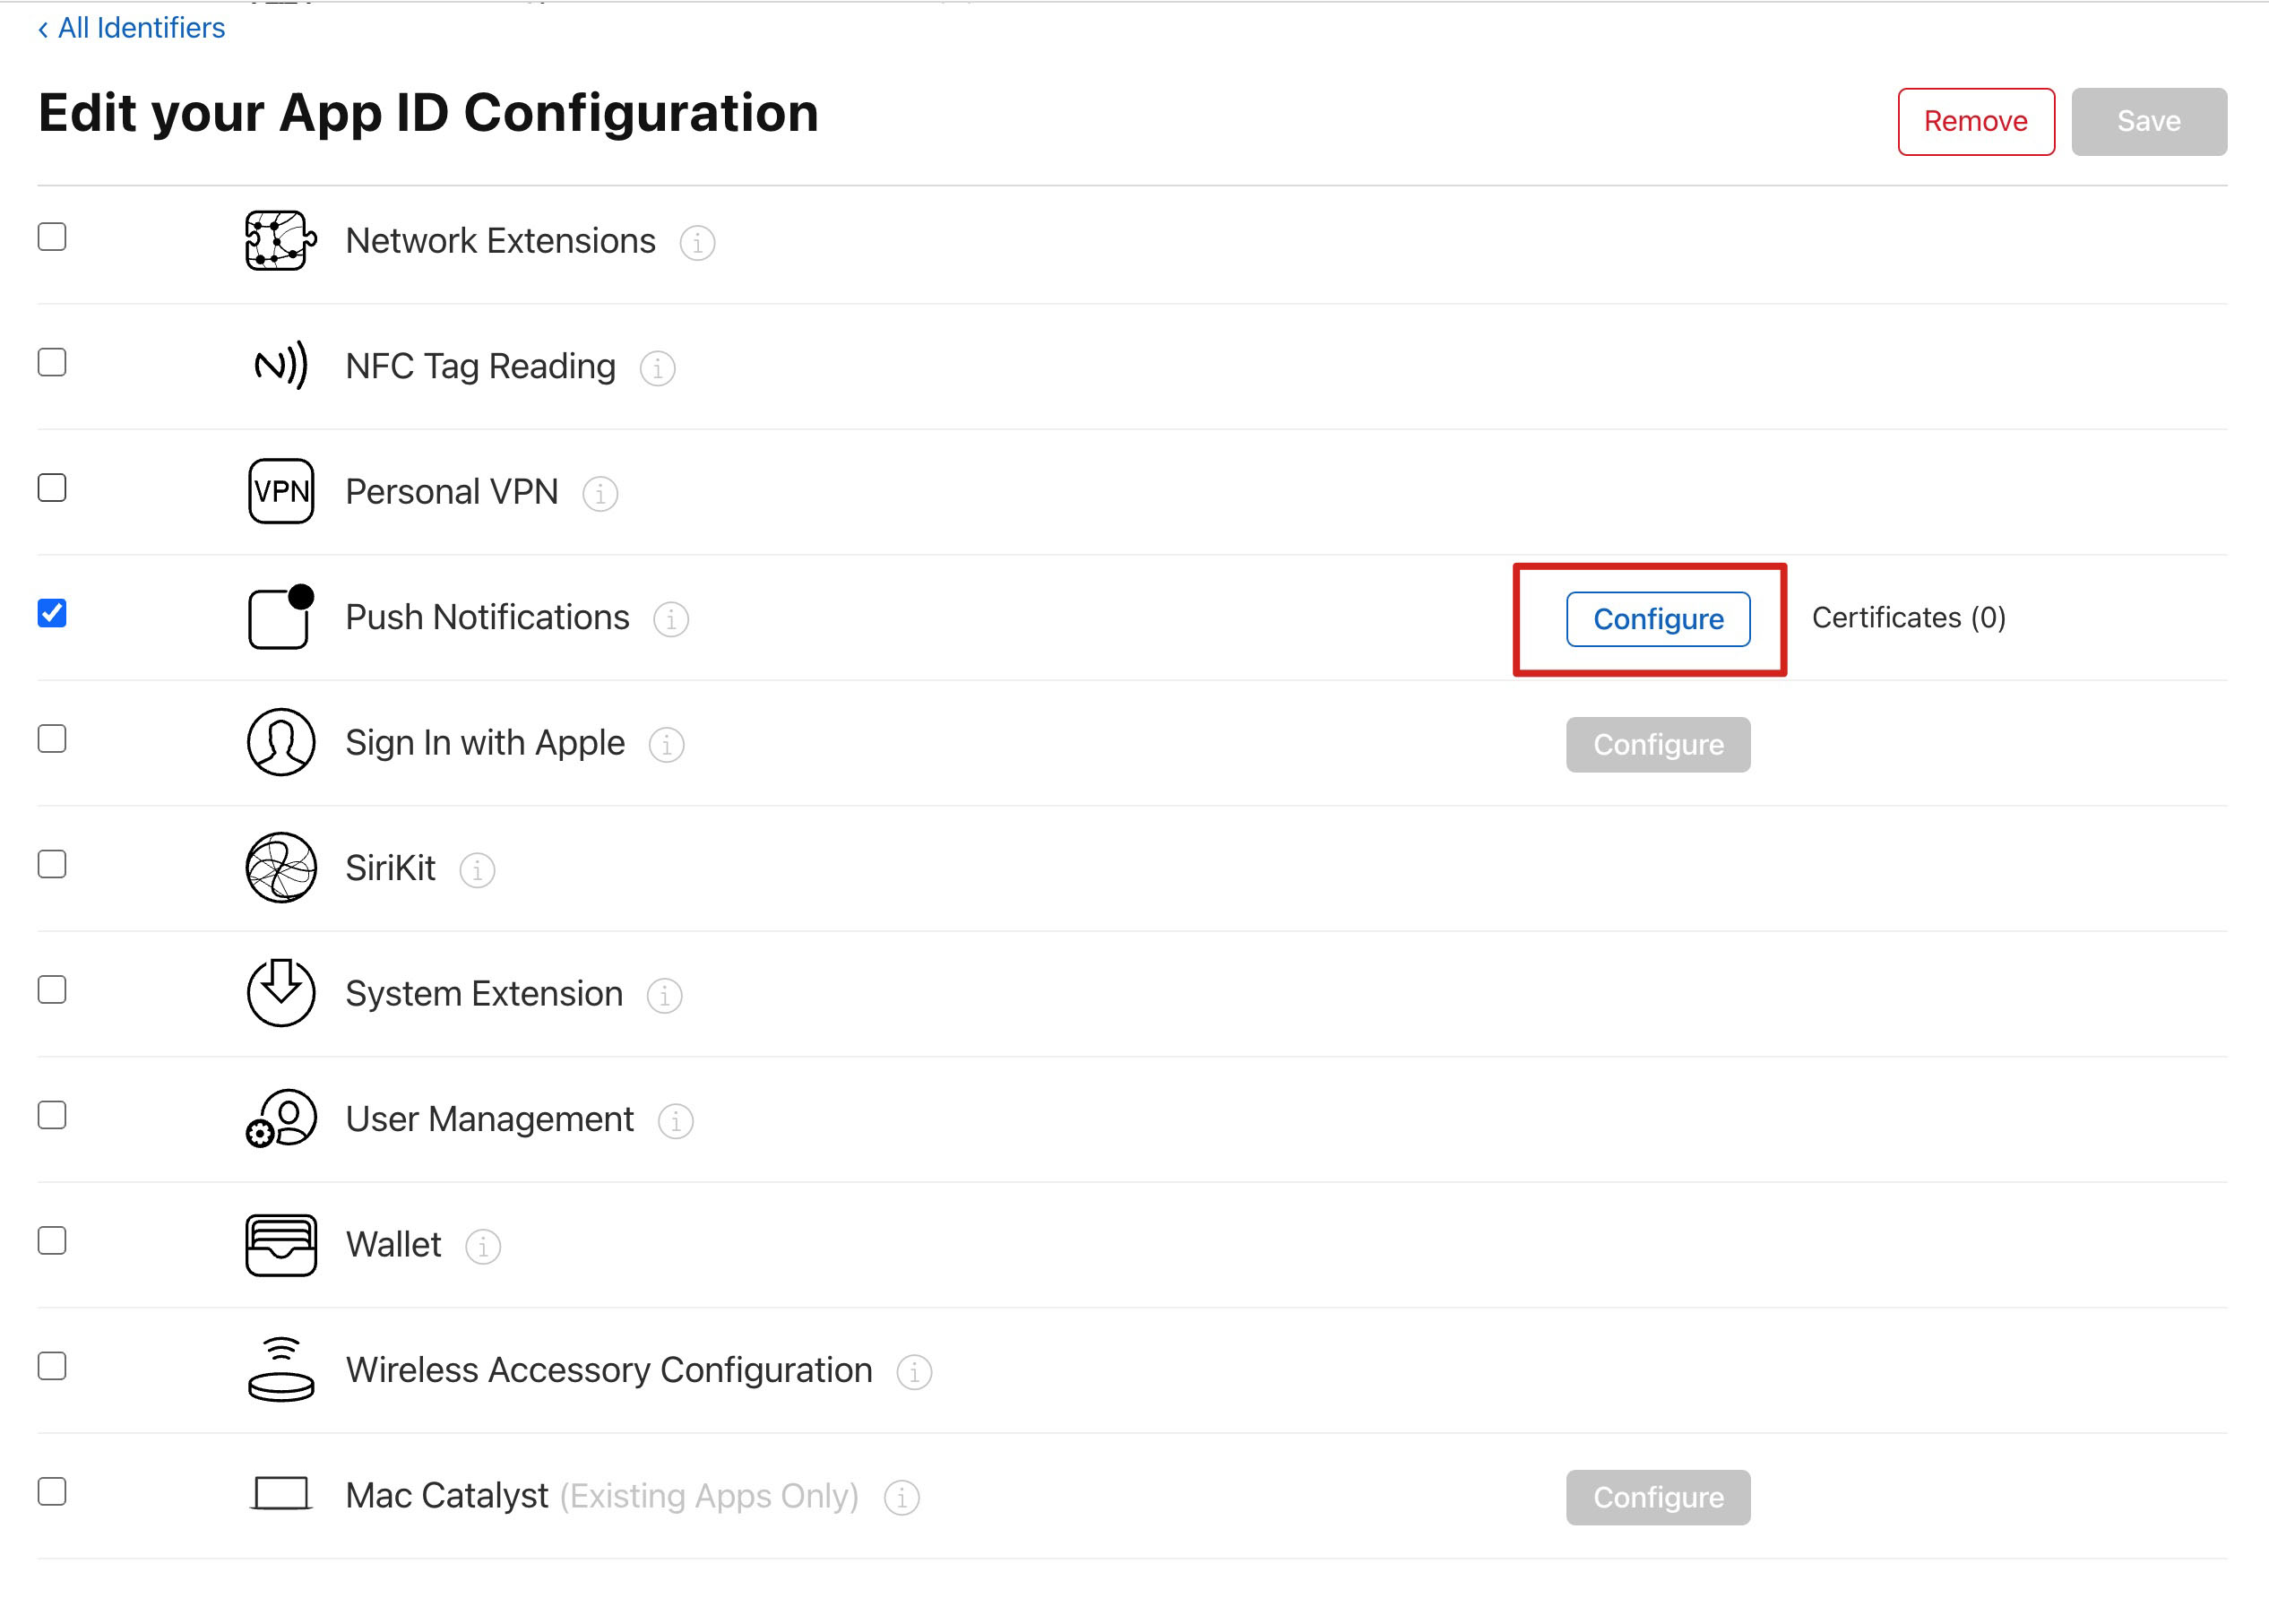
2. You can see in the Apple Push Notification service SSL Certificates window, there are two
SSL Certificate, one for the development environment (Development) and the other for the production environment (Production) remote push certificate, as shown below: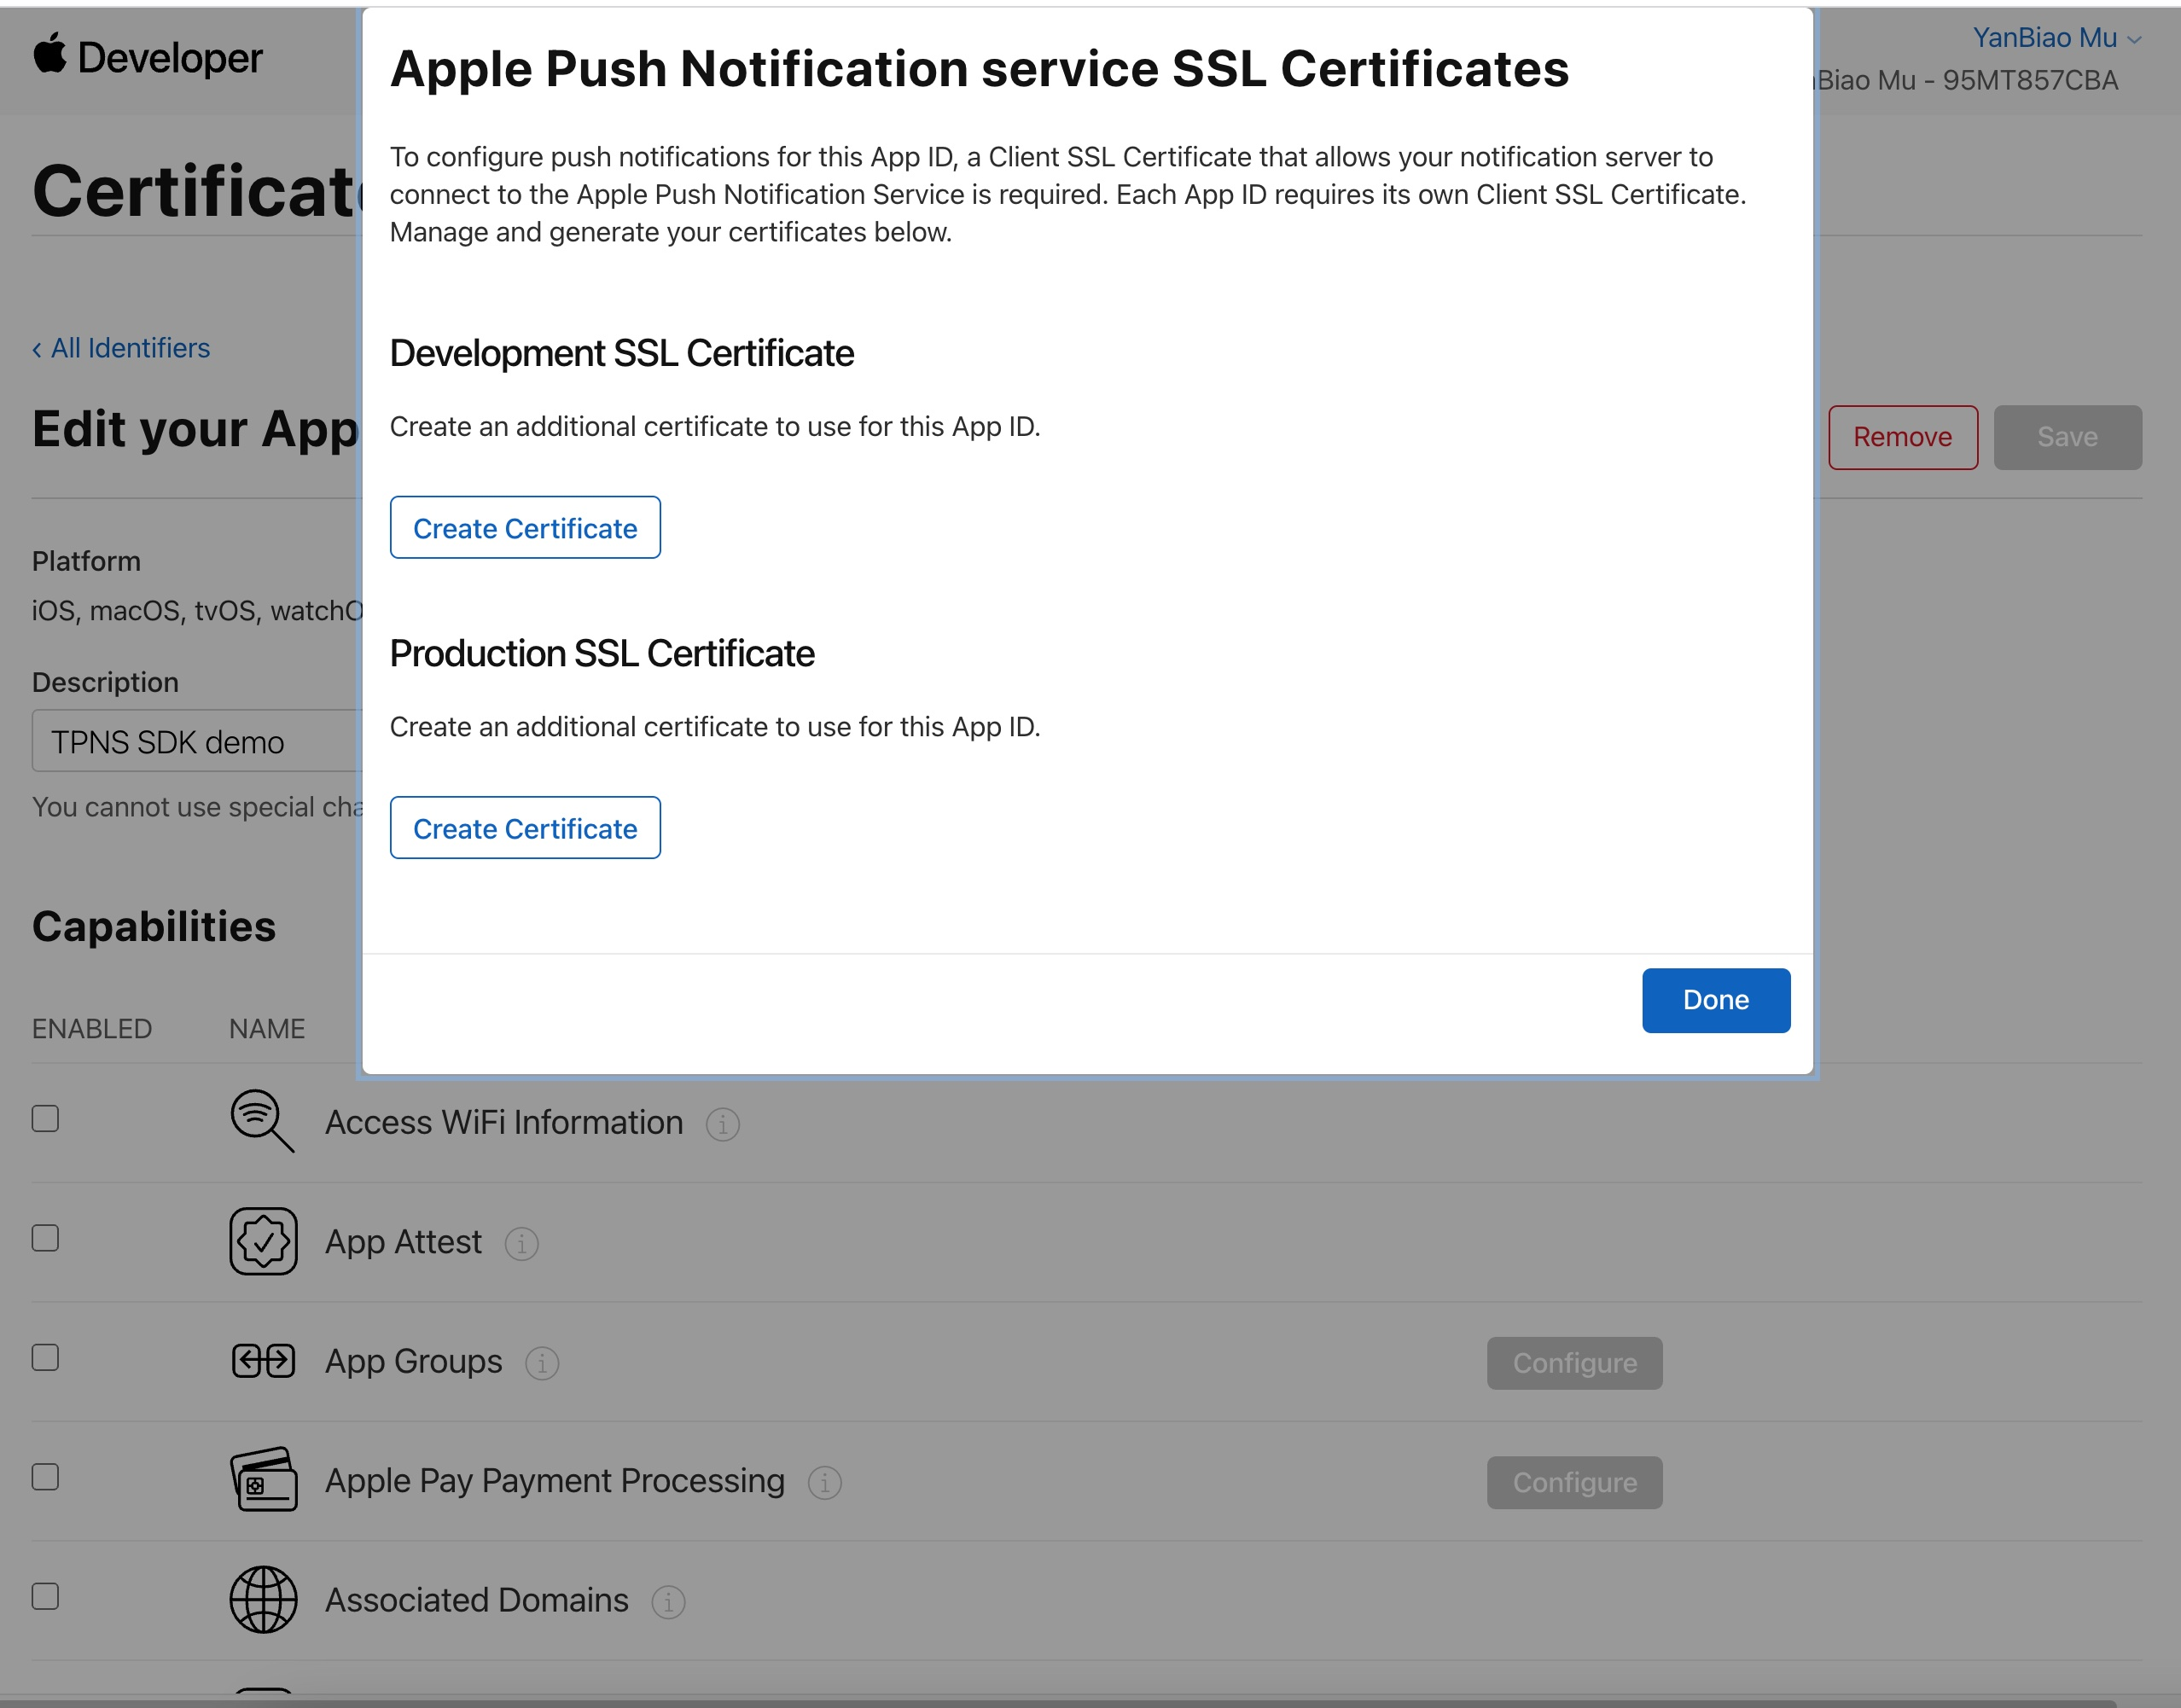
3.
First
, we choose the Development Create Certificate; the system will prompt us that a Certificate Signing Request (CSR) is required.
4. Open Keychain Access on your Mac, in the menu, select Keychain Access > Certificate Assistant > Request a Certificate From a Certificate Authority (
Keychain Access - Certificate Assistant - Request a Certificate From a Certificate Authority).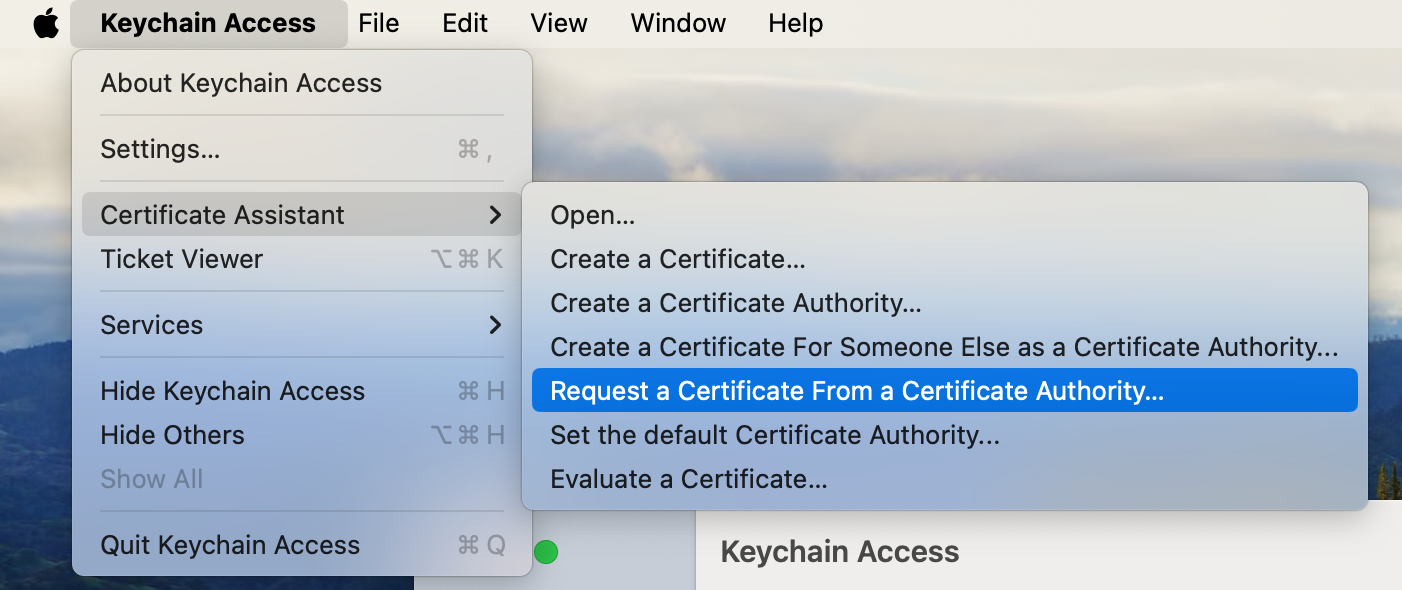
5. Enter the user's email address (your email), common name (your name or company name), select Save to disk, click Continue, and the system will generate a
*.certSigningRequest file.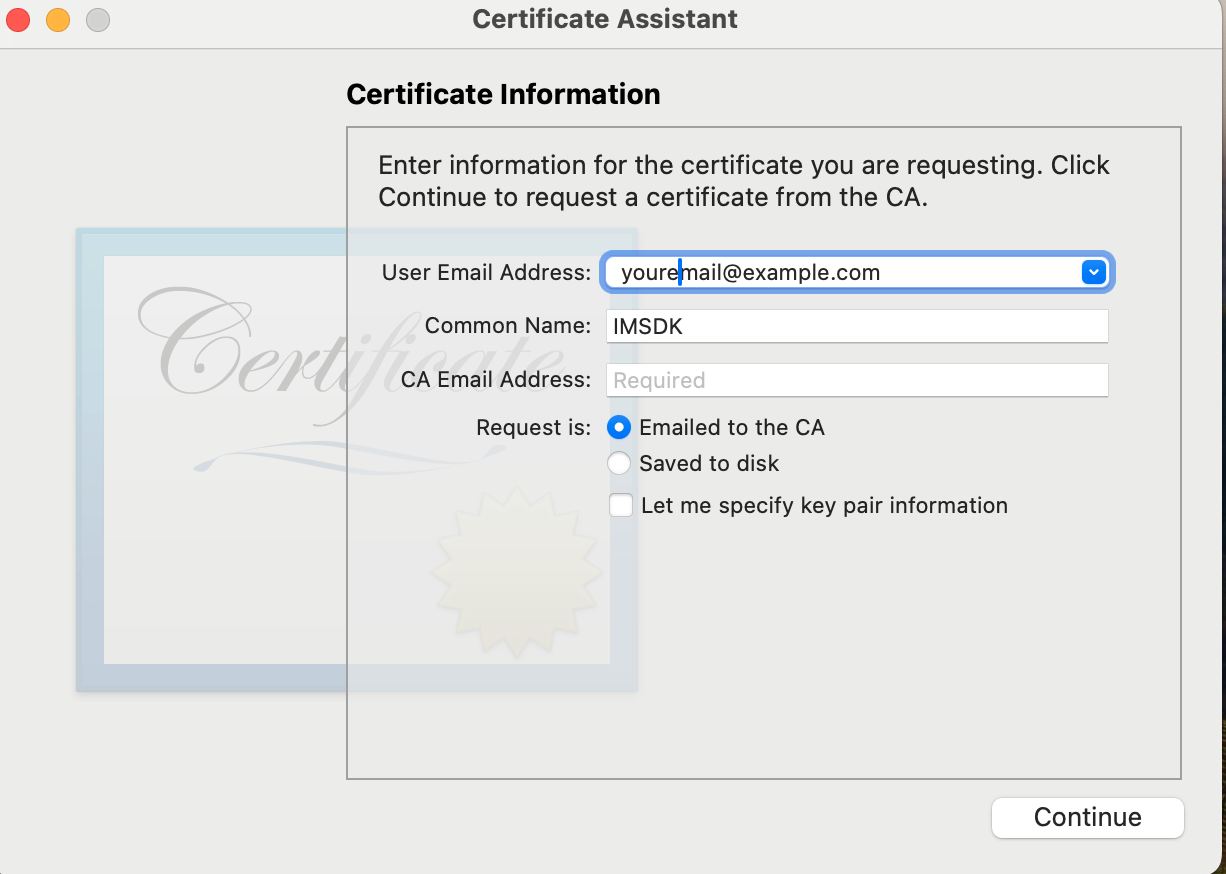
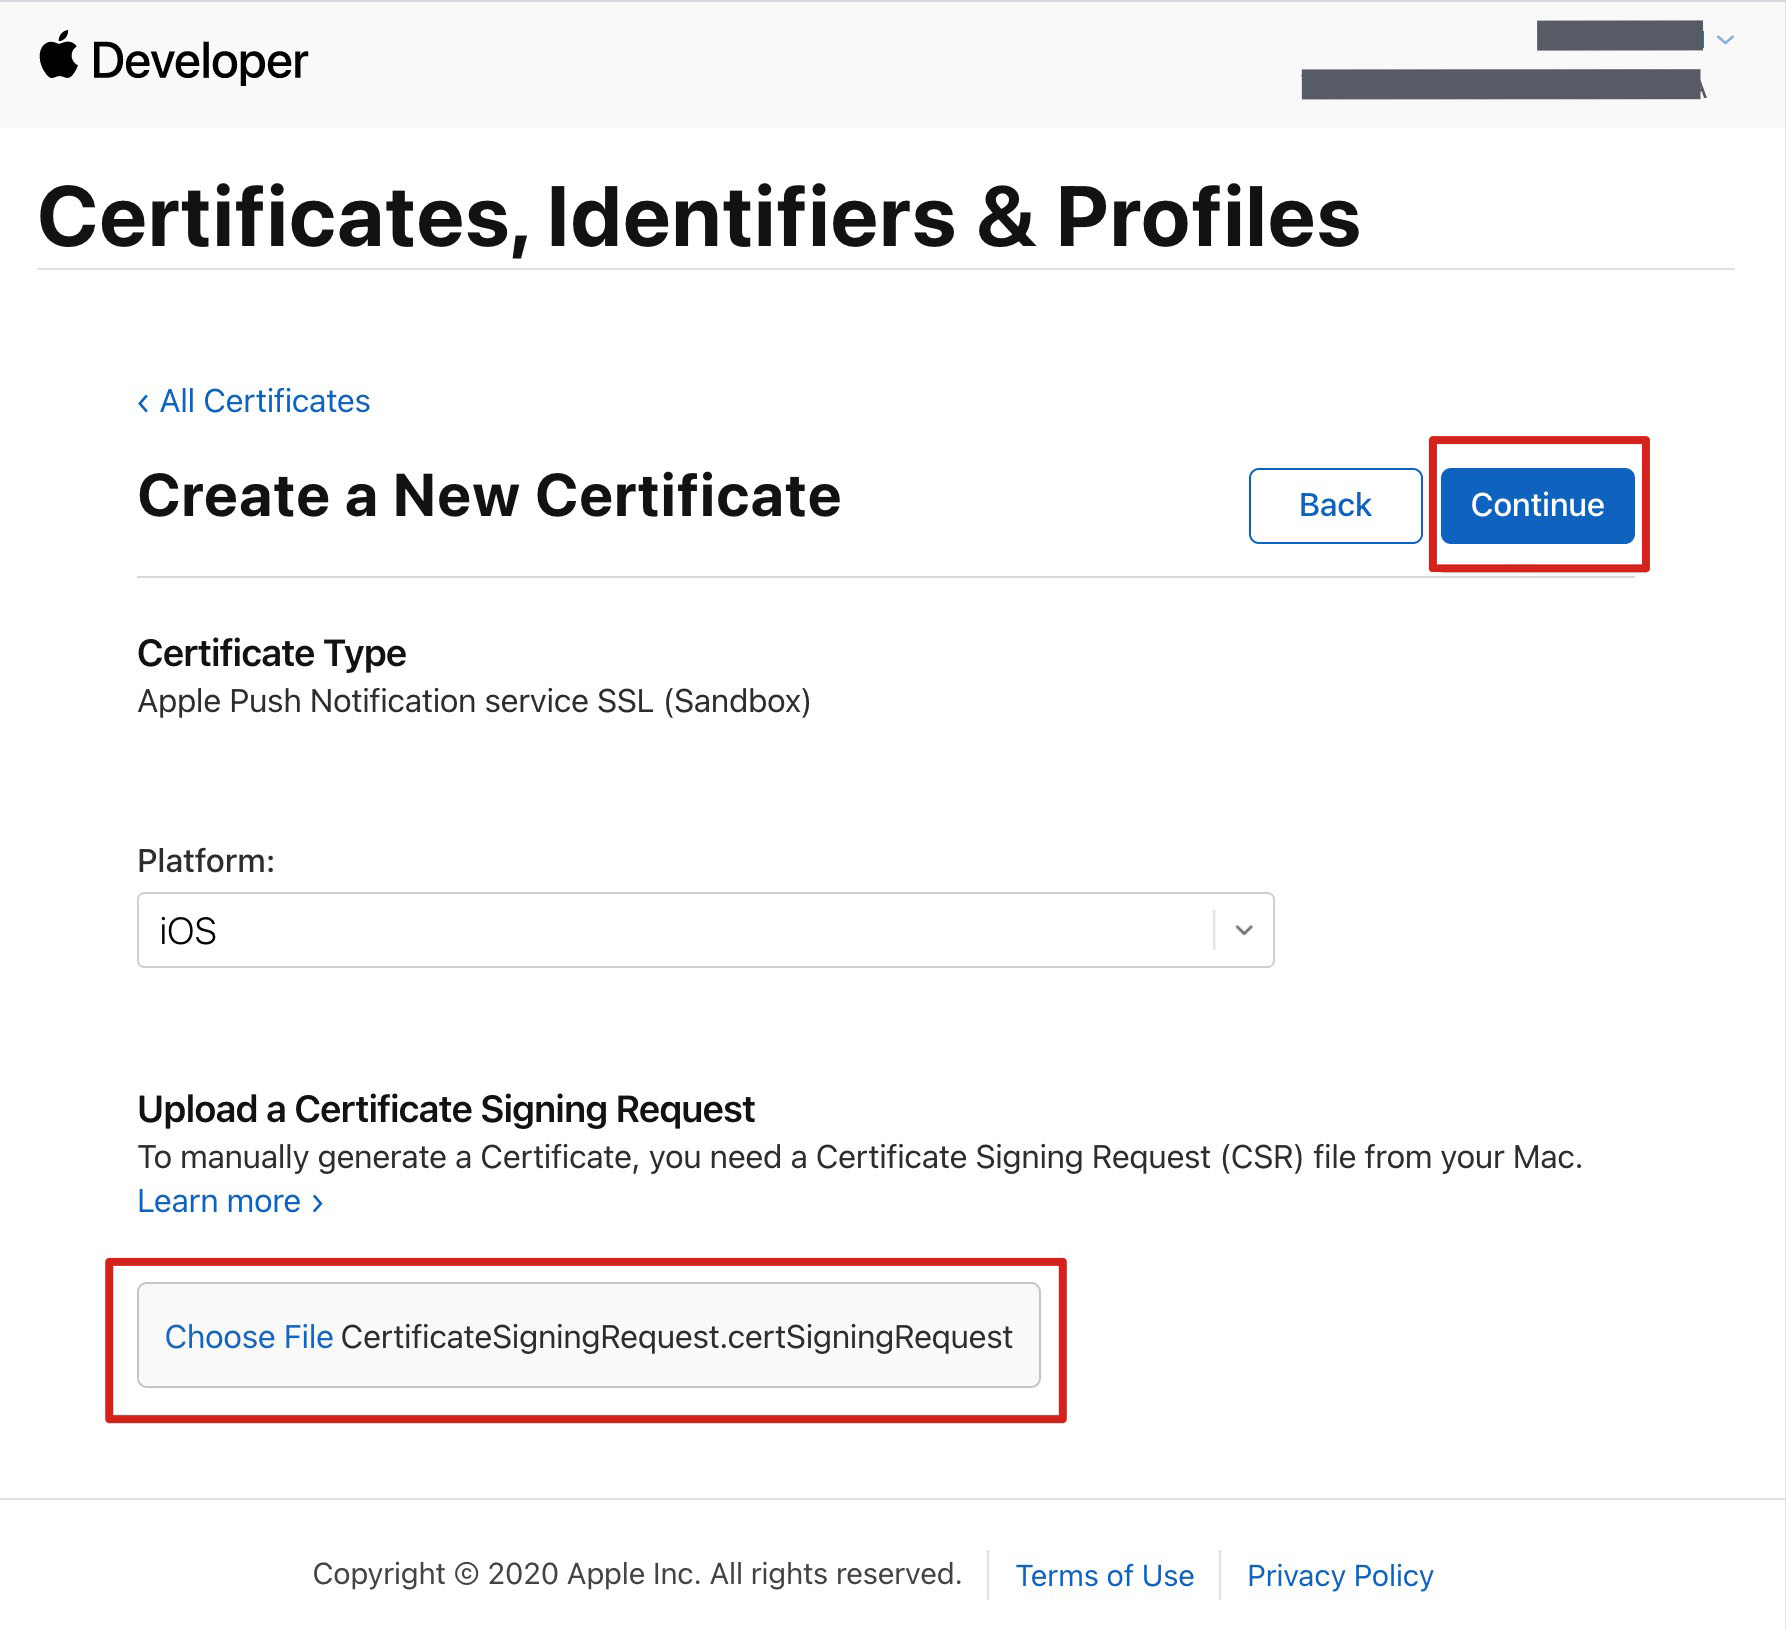
6. Return to the previous page of the Apple Developer website in Step 3, click Choose File to upload the generated
*.certSigningRequest file.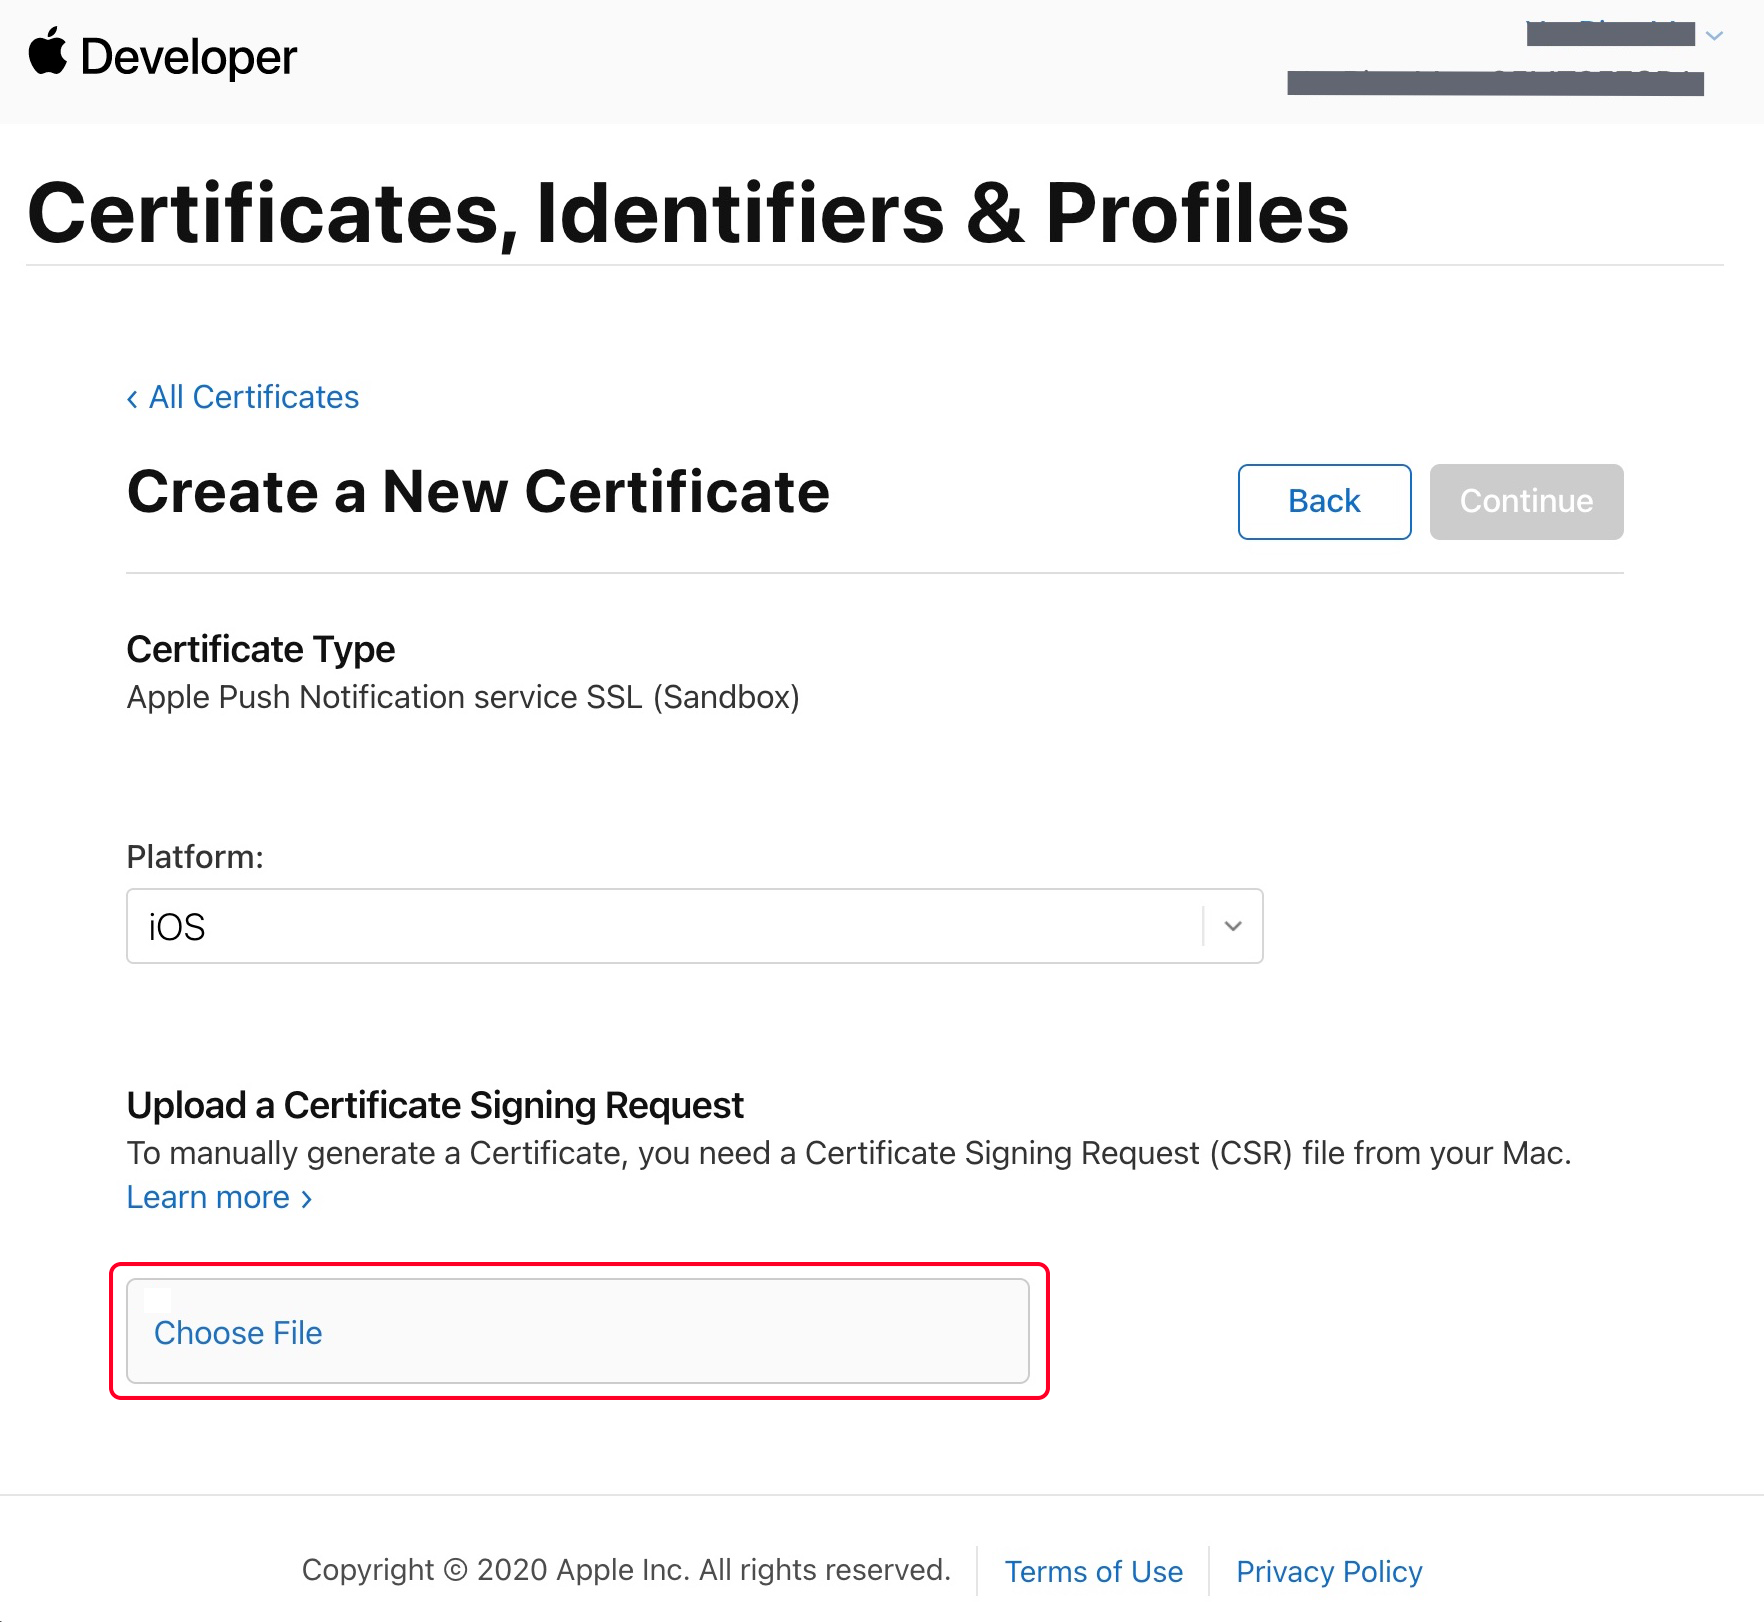
7. Click Continue to generate the push certificate.
8. Click Download to download the
Development SSL Certificate to your local machine.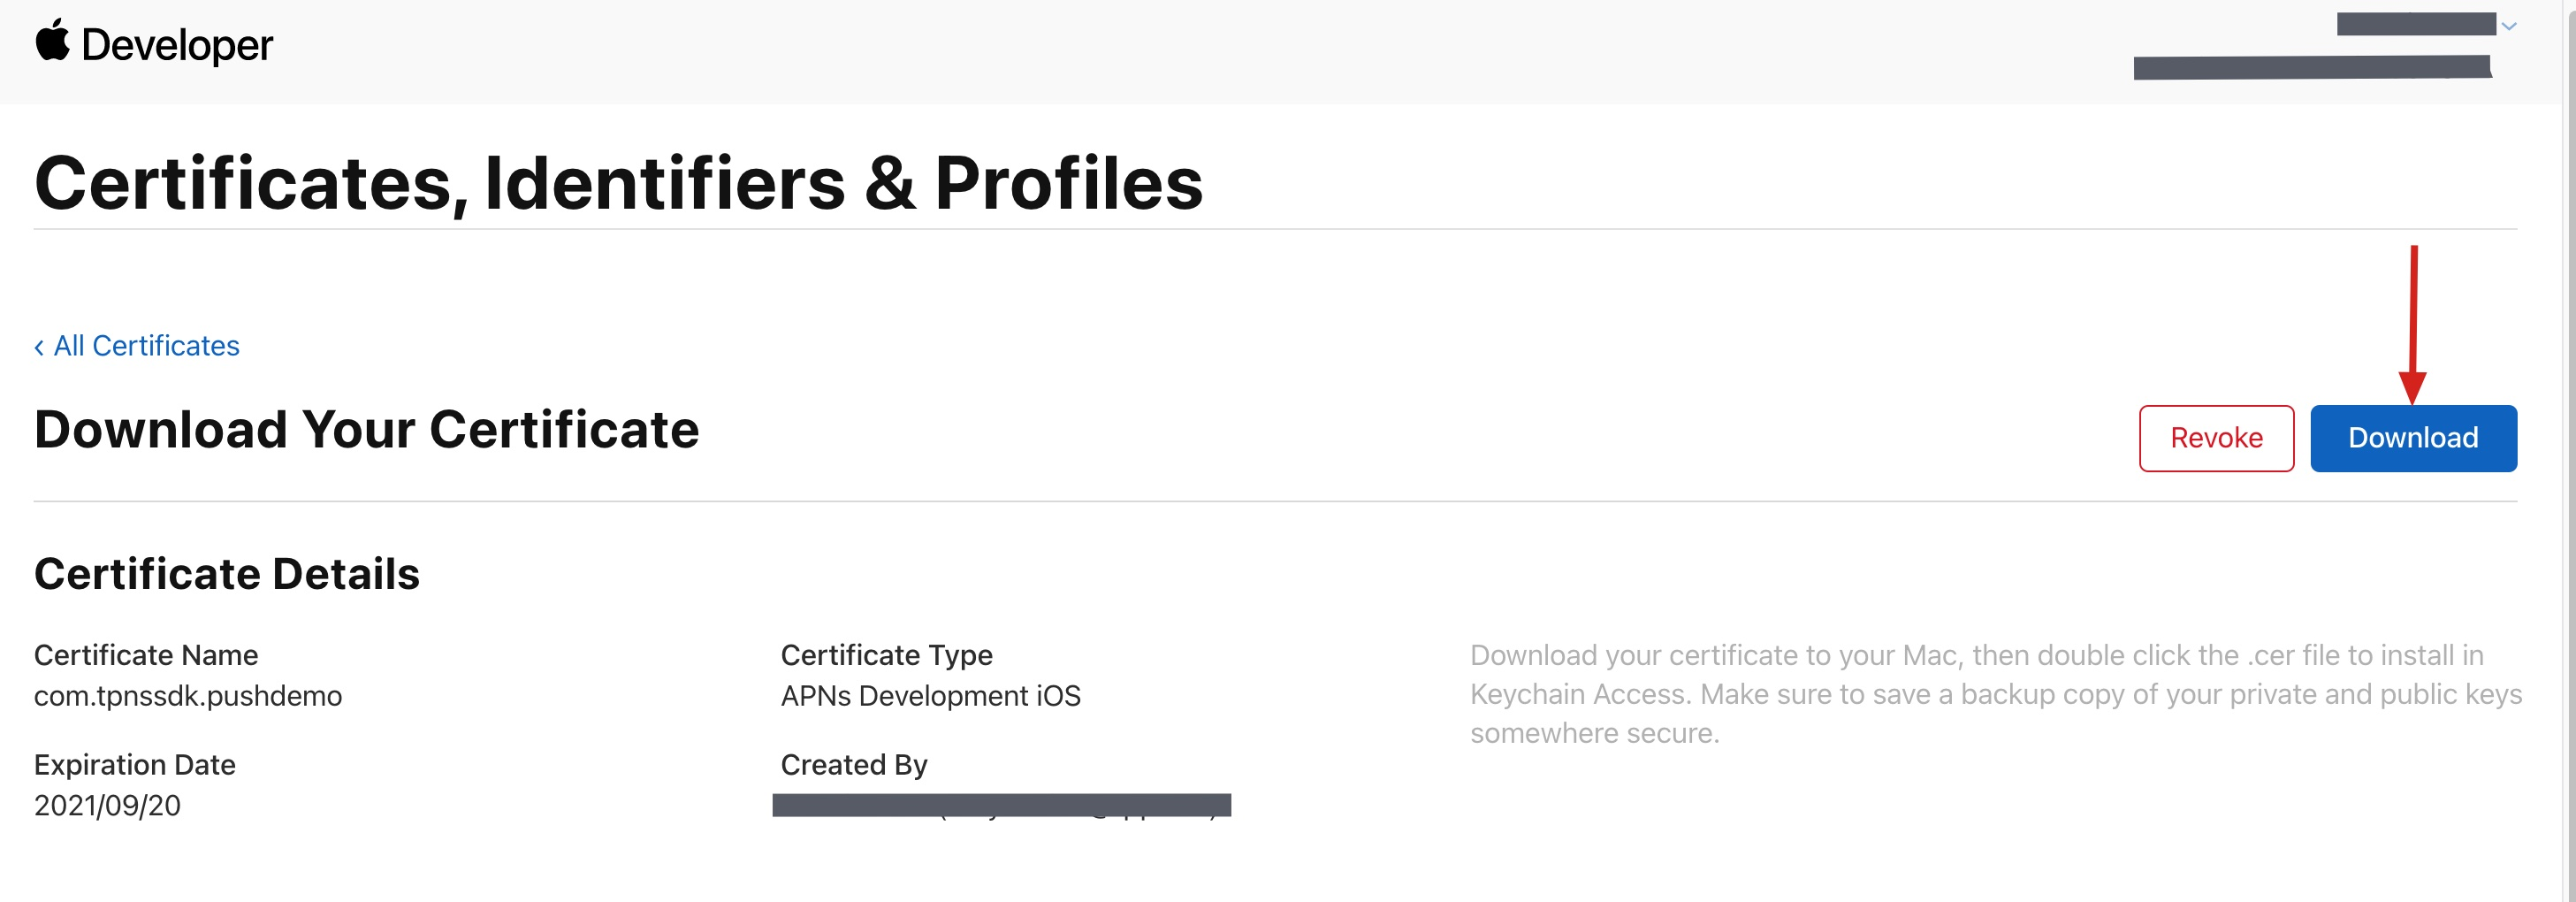
9. Follow the steps 1 - 8 above again to download the
Production SSL Certificate to your local machine.Note:
Actually, this certificate is a Sandbox and Production merged certificate that applies to both the development and production environments.

10. Double-click the downloaded
SSL Certificate for the development and production environments. The system will import it into the keychain.11. Open the Keychain Access app, go to Login > My Certificates, and right-click to export the newly created development environment (
Apple Development IOS Push Service) and production environment (Apple Push Services) P12 files respectively.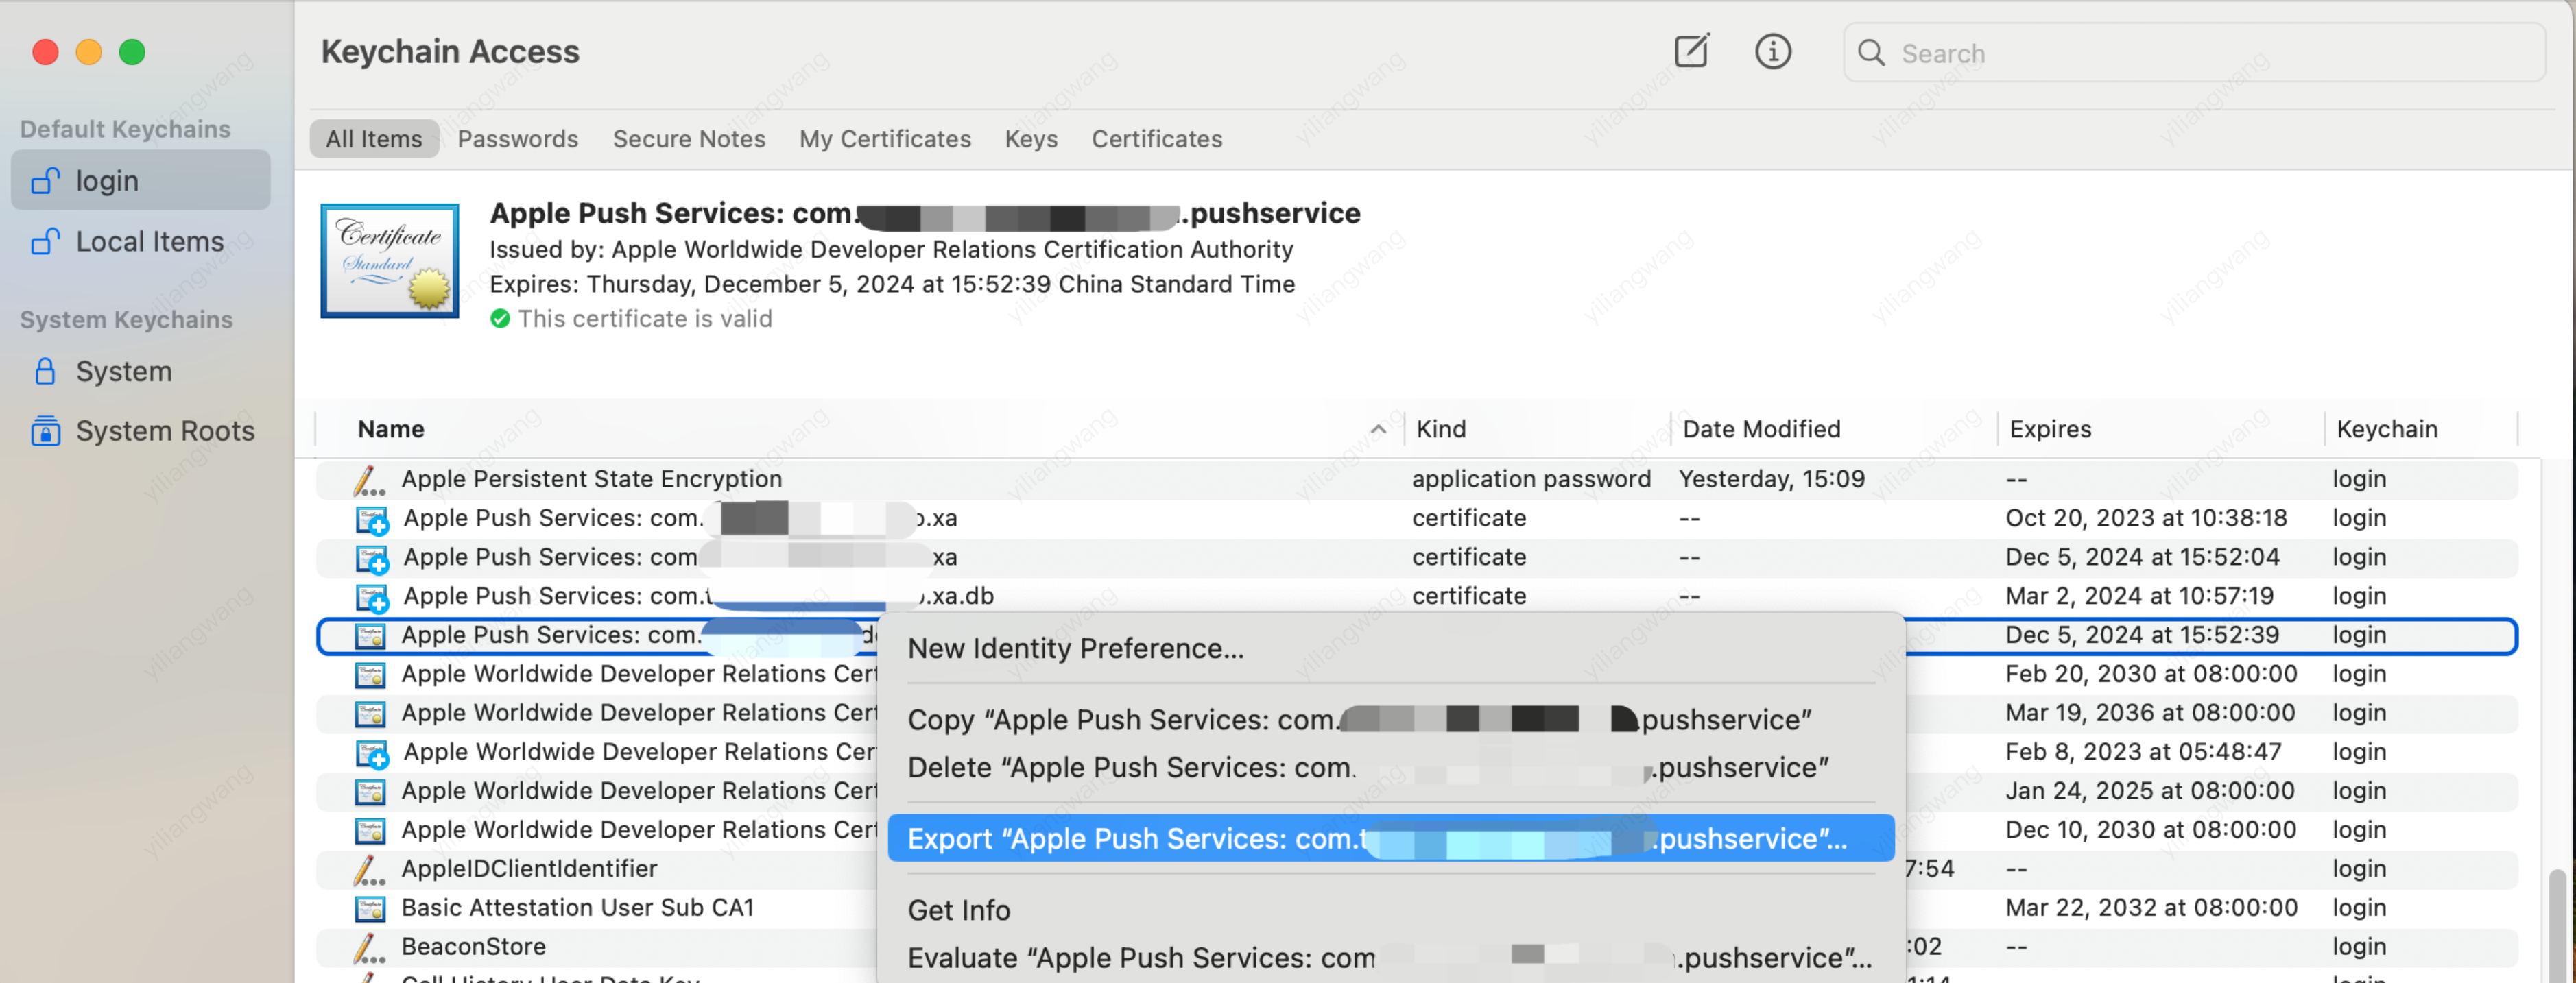
Note:
When saving the
P12 file, make sure to set a password.Step 2: Upload the certificate to the console
1. log in Chat Console.
2. Go to the basic configuration page of the application settings, click Push Management > Access Settings > Add Certificate to add a push certificate.
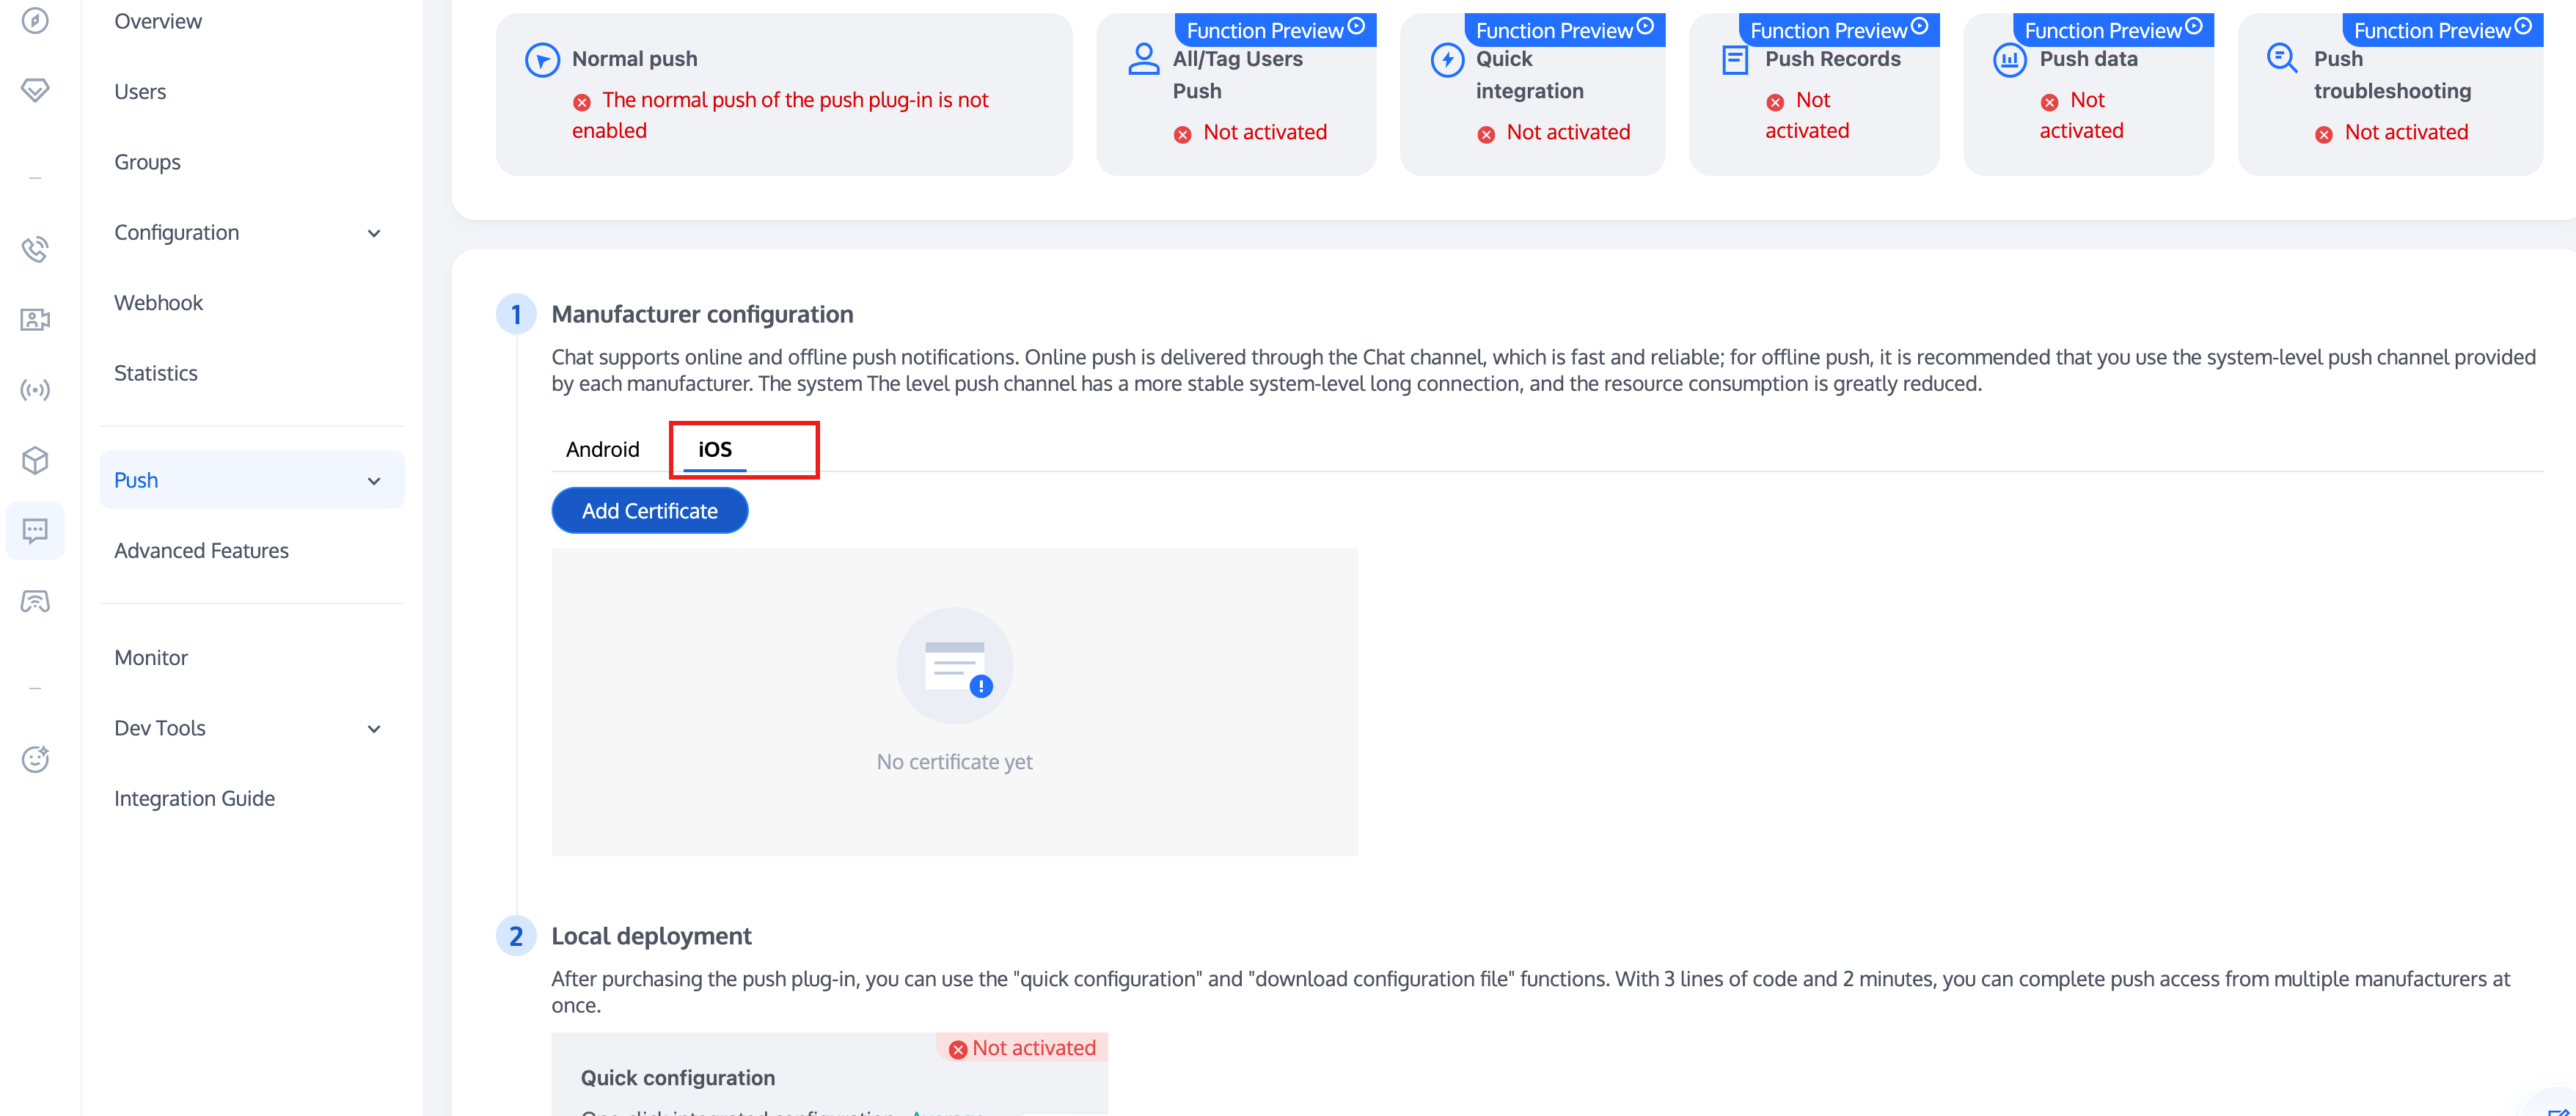
3. Select the certificate type, upload the iOS certificate (p.12), set the certificate password, and click Yes.
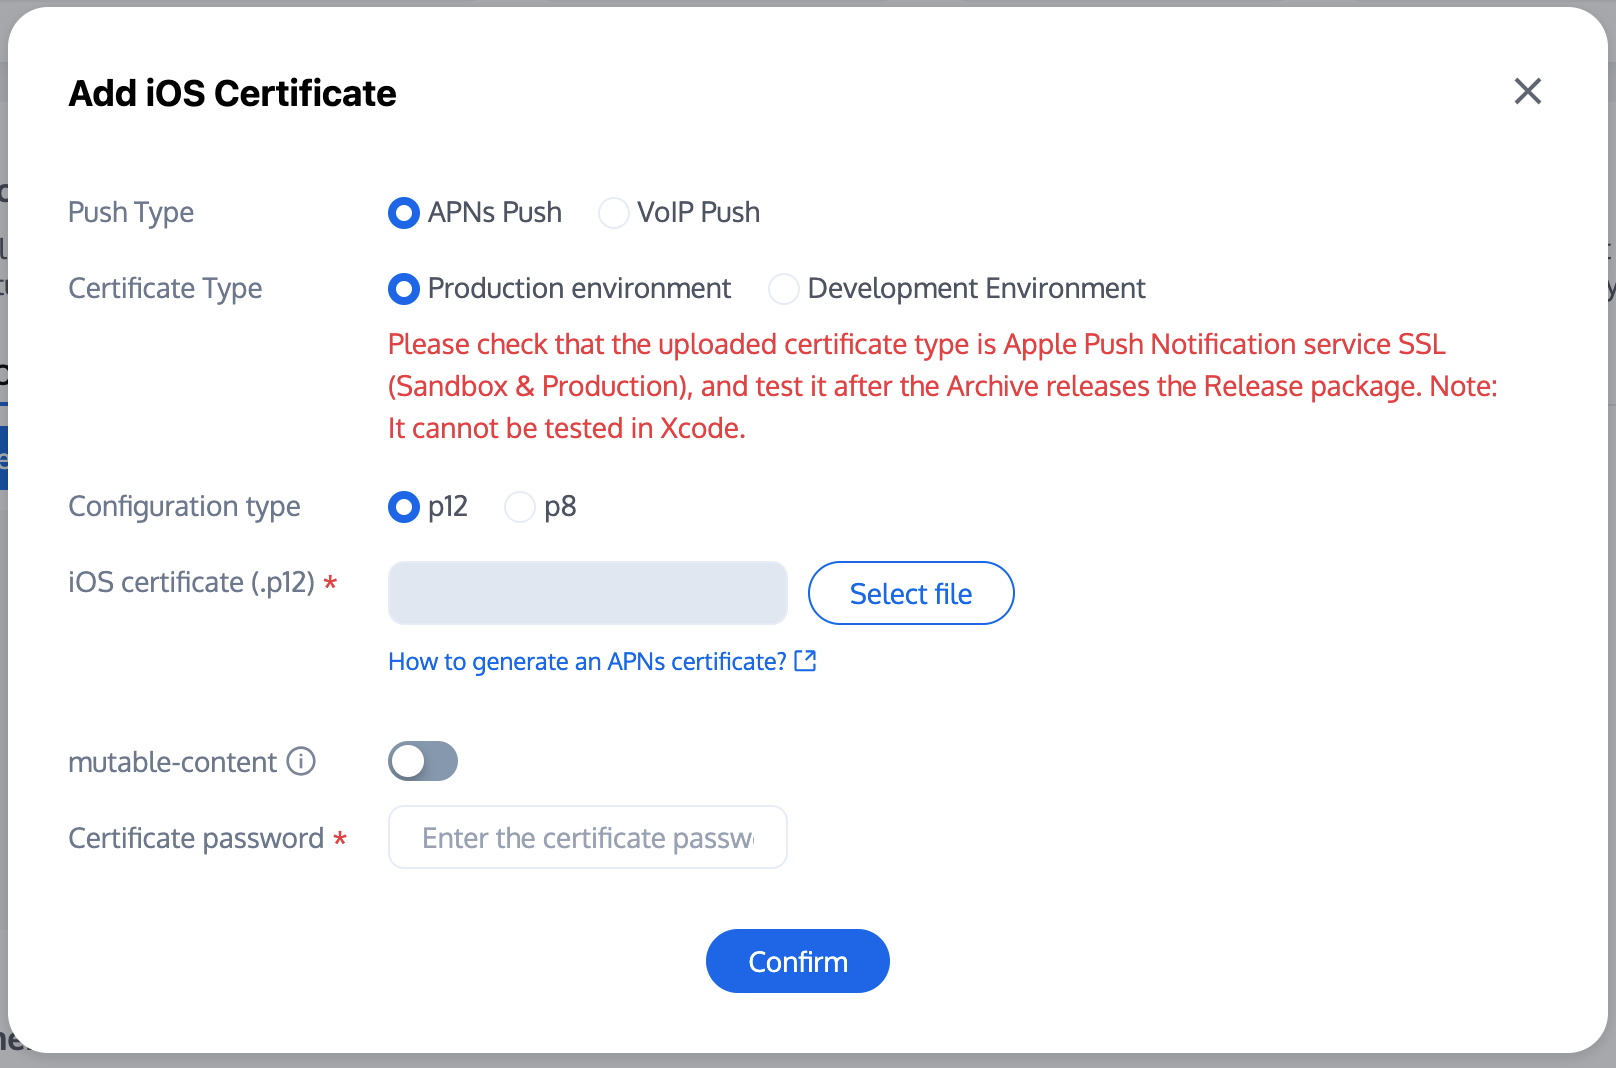
Note:
We recommend naming the uploaded certificate in English (special characters such as brackets are not allowed).
You need to set a password for the uploaded certificate. Without a password, push notifications cannot be received.
For an app published on App Store, the environment of the certificate must be the production environment. Otherwise, push notifications cannot be received.
The uploaded .p12 certificate must be your own authentic and valid certificate.
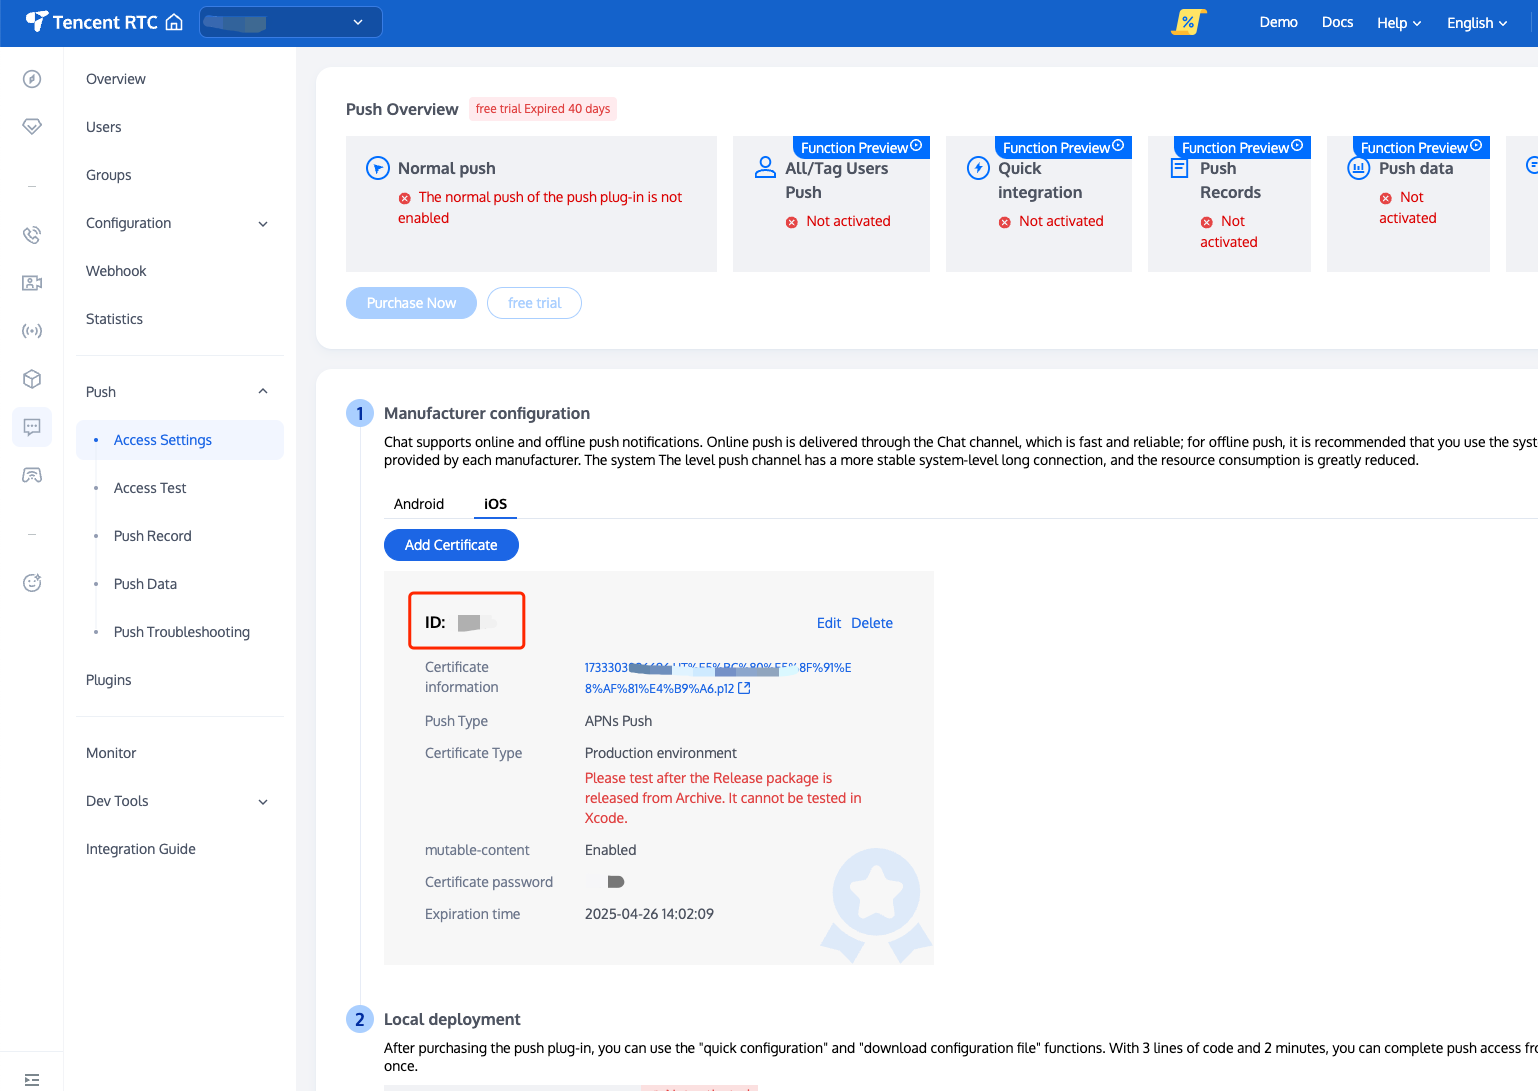
4.
After generating the push certificate information, record the certificate ID.
Step 3: The app requests the deviceToken from Apple's backend
You can add the following code in your app to get the deviceToken from Apple's backend server:
Note:
For the purpose of compliance, we recommend requesting the deviceToken from Apple after the user agrees to the privacy policy.
// Request the DeviceToken from Apple's backend- (void)registNotification{if ([[[UIDevice currentDevice] systemVersion] floatValue] >= 8.0){[[UIApplication sharedApplication] registerUserNotificationSettings:[UIUserNotificationSettings settingsForTypes:(UIUserNotificationTypeSound | UIUserNotificationTypeAlert | UIUserNotificationTypeBadge)categories:nil]];[[UIApplication sharedApplication] registerForRemoteNotifications];}else{[[UIApplication sharedApplication] registerForRemoteNotificationTypes:(UIUserNotificationTypeBadge | UIUserNotificationTypeSound | UIUserNotificationTypeAlert)];}}// The deviceToken will be returned in the callback of AppDelegate, and it needs to be reported to Tencent Cloud backend after login-(void)application:(UIApplication *)app didRegisterForRemoteNotificationsWithDeviceToken:(NSData *)deviceToken{// Record the deviceToken returned by Apple_deviceToken = deviceToken;}
Step 4: Log in to the Chat SDK and then upload the deviceToken to Tencent Cloud
After successfully logging in to the Chat SDK, you can call the setAPNS API to upload the deviceToken obtained in Step 3 to the Tencent Cloud backend. The sample code is as follows:
- (void)onReportToken:(NSData *)deviceToken{if (deviceToken) {V2TIMAPNSConfig *confg = [[V2TIMAPNSConfig alloc] init];// Enterprise Certificate ID// Register a developer certificate with Apple, download and generate the certificate (P12 file) in the developer account, and upload the generated P12 file to the Tencent certificate console.// The console will automatically generate a certificate ID and pass it to the `busiId` parameter.confg.businessID = self.apnsCertificateID;confg.token = deviceToken;confg.isTPNSToken = NO;[[V2TIMManager sharedInstance] setAPNS:confg succ:^{NSLog(@"%s, succ", __func__);} fail:^(int code, NSString *msg) {NSLog(@"%s, fail, %d, %@", __func__, code, msg);}];}}
Note:
Push Format
General Pushing Rules
For single chat messages, the APNs push rules are as follows. The nickname is the sender's user nickname. If the nickname is not set, only the content is displayed.
Nickname: Content
For group chat messages, the APNs push rules are as follows. The display priority for names is the message sender's
group name card > nickname. If neither is set, nothing is displayed.Name (Group Name): Content
Push Rules for Different Message Types
The APNs push content is composed of various
Elem contents in the message body. The offline message display effects of different Elem are shown in the table below.Parameter | Description |
Text Elem | Directly Display Content |
Voice Elem | Display [Voice] |
File Elem | Display [File] |
Image Elem | Display [Image] |
Custom Elem |
Note:
If the default push rules do not meet your requirements, ChatSDK supports customization. For details, see Custom Offline Push Display.
Multi-App Interconnection
If you need to receive push messages between multiple apps, you can set the
SDKAppID in multiple apps to the same value.Note:
Different apps need to use different push certificates. You need to apply for an APNs certificate for each app and complete the offline push configuration.
Custom Definition Badge
By default, when the App goes to the background, ChatSDK sets the current total number of unread Chat messages as the badge.
If you want to customize the badge, follow these steps:
1.1 The App calls the - (void)setAPNSListener:(id<V2TIMAPNSListener>)apnsListener interface to set the listener.
1.2 The App implements the - (uint32_t)onSetAPPUnreadCount interface and returns the custom-defined badge number.
If the app integrates offline push notifications, when a new offline push is received, the app badge will increment by 1 based on the base badge (default is the total number of unread Chat messages, or the custom badge if defined).
// 1. Set the listener- (BOOL)application:(UIApplication *)application didFinishLaunchingWithOptions:(NSDictionary *)launchOptions {// Listen for push notifications[V2TIMManager.sharedInstance setAPNSListener:self];// Listen for unread conversation counts[[V2TIMManager sharedInstance] setConversationListener:self];return YES;}// 2. Save the unread count after it changes- (void)onTotalUnreadMessageCountChanged:(UInt64)totalUnreadCount {self.unreadNumber = totalUnreadCount;}// 3. Report custom-defined unread count after the app is pushed to the background/** After the application enters the background, customize the app's unread count. If not handled, the default app unread count is the sum of all conversation unread counts* <pre>** - (uint32_t)onSetAPPUnreadCount {* return 100; // Custom-defined unread count* }** </pre>*/- (uint32_t)onSetAPPUnreadCount {// 1. Get the custom-defined badgeuint32_t customBadgeNumber = ...// 2. Add the IM message unread countcustomBadgeNumber += self.unreadNumber;// 3. Report to the IM server via IMSDKreturn customBadgeNumber;}
Custom Notification Sound
iOS Notification Sound
When calling sendMessage to send a message, set the offlinePushInfo field
iOSSound, and pass the audio filename to iOSSound.Note:
Offline push notification sound settings (effective only for iOS), when `iOSSound = kIOSOfflinePushNoSound`, it indicates no sound will be played upon receiving.
When `iOSSound = kIOSOfflinePushDefaultSound`, it indicates the system sound will be played upon receiving.
To customize `iOSSound`, you first need to link the audio file into the Xcode project, and then set the audio filename (including the extension) to `iOSSound`.
V2TIMOfflinePushInfo *pushInfo = [[V2TIMOfflinePushInfo alloc] init];pushInfo.title = @"push title";pushInfo.iOSSound = @"phone_ringing.mp3"; // your voice file's name[[V2TIMManager sharedInstance] sendMessage:msg receiver:receiver groupID:groupID priority:V2TIM_PRIORITY_DEFAULT onlineUserOnly:NO offlinePushInfo:pushInfo progress:nil succ:^{} fail:^(int code, NSString *msg) {}];
Android Notification Sound
When calling sendMessage to send a message, set the offlinePushInfo field
AndroidSound, and pass the audio filename to AndroidSound.Note:
Offline push sound settings (effective only on Android, supported only in ChatSDK 6.1 and above). Only Huawei and Google phones support ringtone notifications.
For Xiaomi ringtone settings, please refer to: Xiaomi Open Platform > Server-side Java SDK Documentation.
To customize `AndroidSound`, you first need to place the audio file in the raw directory of the Android project, and then set the `AndroidSound` with the audio filename (without the extension).
V2TIMOfflinePushInfo *pushInfo = [[V2TIMOfflinePushInfo alloc] init];pushInfo.title = @"push title";pushInfo.AndroidSound = @"phone_ringing"; // your voice file's name[[V2TIMManager sharedInstance] sendMessage:msg receiver:receiver groupID:groupID priority:V2TIM_PRIORITY_DEFAULT onlineUserOnly:NO offlinePushInfo:pushInfo progress:nil succ:^{} fail:^(int code, NSString *msg) {}];
Customizing Offline Push Display
When calling sendMessage to send a message, set the offlinePushInfo fields
title and desc. After setting title, the push content will additionally display the title content. After setting desc, the push content will become the desc content.V2TIMOfflinePushInfo *info = [[V2TIMOfflinePushInfo alloc] init];info.title = @"Harvy"; // Title of the offline push display.info.desc = @"You have a call invitation."; // Content of the offline push display.// receiver and groupID cannot both be empty, and only one can exist at a time[[V2TIMManager sharedInstance] sendMessage:msg receiver:receiver groupID:groupID priority:V2TIM_PRIORITY_DEFAULT onlineUserOnly:NO offlinePushInfo:pushInfo progress:nil succ:^{} fail:^(int code, NSString *msg) {}];

Note:
You can also use the APNs
mutable-content field in conjunction with NSNotification Service Extension to customize the display content.Customizing Tap-to-Redirect Logic for Offline Push
When calling sendMessage to send a message, set the offlinePushInfo field
ext. When a user receives an offline push message to start the App, they can obtain the ext field in the AppDelegate -> didReceiveRemoteNotification system callback, and then redirect to the specified UI interface based on the content of the ext field.This article uses the scenario of "Denny sending a message to Vinson" as an example.
The sender, Denny, needs to set the push extension field
ext when sending the message:// Denny sets offlinePushInfo and specifies the ext field when sending the messageV2TIMMessage *msg = [[V2TIMManager sharedInstance] createTextMessage:@"Text Message"];V2TIMOfflinePushInfo *info = [[V2TIMOfflinePushInfo alloc] init];info.ext = @"jump to denny";[[V2TIMManager sharedInstance] sendMessage:msg receiver:@"vinson" groupID:nil priority:V2TIM_PRIORITY_DEFAULTonlineUserOnly:NO offlinePushInfo:info progress:^(uint32_t progress) {} succ:^{} fail:^(int code, NSString *msg) {}];
Recipient: Vinson's App may be offline, but can still receive APNS offline push. When Vinson clicks on the push message, the App will launch:
// After Vinson starts the app, the following callbacks will be received- (void)application:(UIApplication *)application didReceiveRemoteNotification:(NSDictionary *)userInfofetchCompletionHandler:(void (^)(UIBackgroundFetchResult result))completionHandler {// Parsing the push extension field descif ([userInfo[@"ext"] isEqualToString:@"jump to denny"]) {// Jump to the chat interface with Denny}}
FAQs
Why doesn't offline push work for common messages?
First, check whether the app runtime environment is the same as the certificate environment. Otherwise, offline push messages will not be received.
Secondly, check if the app and certificate environment are set to development. If it is a development environment, applying for a
deviceToken from Apple may fail. This problem is not found in the production environment, you can switch to the production environment for testing.Why doesn't offline push work for custom messages?
The offline push for custom messages differs from that for regular messages. We cannot parse the content of custom messages, making it impossible to determine the push content. Therefore, custom messages are not pushed by default. If you require push, you need to set the offlinePushInfo
desc field during sendMessage. The desc information will by default be displayed during push.How do I disable the receiving of offline push messages?
To disable receiving offline push messages, you can set the
config parameter of the setAPNS API to nil. This feature has been supported starting from version 5.6.1200.Failed to receive push, and a bad devicetoken error was reported in the background?
The Apple deviceToken depends on the current compiling environment. If the certificate ID and token used to log in to IMSDK and upload the deviceToken to Tencent Cloud are inconsistent, it will result in an error.
If you are using the Release environment compilation, the
- application:didRegisterForRemoteNotificationsWithDeviceToken: callback returns the production environment's token. At this time, set the `businessID` to the production environment's Certificate ID.If you use the Debug environment to compile, the
- application:didRegisterForRemoteNotificationsWithDeviceToken: callback will return a development environment token. At this time, the businessID needs to be set to the development environment's Certificate ID.V2TIMAPNSConfig *confg = [[V2TIMAPNSConfig alloc] init];/* Register a developer certificate with Apple, download and generate the certificate (P12 file) in the developer account, and upload the generated P12 file to the Tencent certificate console. The console will automatically generate a certificate ID and pass it to the `busiId` parameter. */// Push certificate IDconfg.businessID = sdkBusiId;confg.token = self.deviceToken;[[V2TIMManager sharedInstance] setAPNS:confg succ:^{} fail:^(int code, NSString *msg) {}];
Under the iOS development environment, is the registration occasionally not returning a deviceToken or indicating a failure in requesting the token from APNs?
This problem is caused by instability of APNs. You can resolve the problem in the following ways:
Insert a SIM card into the phone and use the 4G network to test.
Uninstall and reinstall the application, restart the application, or shut down and restart the phone.
Use a package for the production environment.
Use another phone with iOS system.

