
Video Component
Component Overview
Core controls for live streaming (LiveCoreView) provide APIs for preview before broadcasting, starting video live streaming, stopping video live streaming, audience viewing the live streaming, stopping watching live, anchor connection between anchors and audience in the live streaming room, and cross-room connection with other anchors. You can use our core controls to quickly build the main process of video live streaming within half an hour. Then add other live streaming components or your own business UI view on top.
Environment Preparation
Android 5.0 (SDK API Level 21) or later.
Gradle 7.0 or higher.
Android 5.0 or higher mobile devices.
Platform | Version |
Flutter | Flutter 3.27.4 or later. Dart 3.6.2 or later. |
Android | Android Studio 3.5 or later. Android 5.0 or later Android devices. |
iOS | Xcode 15.0 or later. Ensure your project has a deemed valid developer signature. |
Step 1: Activating the Services
Please refer to Activating the Service (TUILiveKit) to claim the experience edition or enable the paid edition.
Step 2: Integration and Configuration
1. Under the app directory, find the
build.gradle.kts (or build.gradle) file and add the following code in it to join the dependency of the LiveCoreView component:api("io.trtc.uikit:live-stream-core:latest.release")
api 'io.trtc.uikit:live-stream-core:latest.release'
2. Since we use reflection features in the SDK, you need to add some SDK classes to the non-obfuscation list. Therefore, add the following code in the
proguard-rules.pro file:-keep class com.tencent.** { *; }-keep class com.trtc.uikit.livekit.livestreamcore.** { *; }-keep class com.google.gson.** { *;}
3. In the app directory, find the
AndroidManifest.xml file, add tools:replace="android:allowBackup" and android:allowBackup="false" in the application node, override the settings within the component, and use your own settings.// app/src/main/AndroidManifest.xml<application...// add the following configuration to overwrite the configuration in the dependent sdkandroid:allowBackup="false"tools:replace="android:allowBackup">=
Use CocoaPods to import components. If you encounter problems, please first refer to Environment Preparation. The steps to import components are as follows:
1. Add
pod 'LiveStreamCore' dependency in your Podfile file.target 'xxxx' do......pod 'LiveStreamCore'end
If you do not have a
Podfile file, first cd to the xxxx.xcodeproj directory in the terminal, then create it through the following command:pod init
2. In the terminal, first
cd to the Podfile directory, then execute the following commands to install components.pod install
If you cannot install the latest version of SeatGridView, first delete Podfile.lock and Pods. Then perform the following command to update the local CocoaPods repository list.
pod repo update
Then execute the following commands to update the Pod version of the component library.
pod update
3. First compile and run it. If you encounter problems, please refer to common issues. If the issue remains unresolved, try running our Example project. You are welcome to provide feedback on any problems encountered during integration and use.
In the root directory of the project, run the following command to install the live_stream_core plug-in via the command line.
flutter pubaddlive_stream_core
Step 3: Logging In
Add the following code in your project. It enables logging in to the TUI component by calling relevant APIs in TUICore. This step is critical. Only after successfully logged in can you use the features provided by LiveCoreView properly.
TUIRoomEngine.login(applicationContext,1400000001, // replace with the SDKAppID obtained in step 1"denny", // replace with your UserID"xxxxxxxxxxx", // you can count a UserSig in the console and fill it in this locationobject : TUIRoomDefine.ActionCallback() {override fun onSuccess() {Log.i(TAG, "login success")}override fun onError(errorCode: Int, errorMessage: String) {Log.e(TAG, "login failed, errorCode: $errorCode msg:$errorMessage")}})
TUIRoomEngine.login(context,1400000001, // replace with the SDKAppID obtained in step 1"denny", // replace with your UserID"xxxxxxxxxxx", // you can count a UserSig in the console and fill it in this locationnew TUIRoomDefine.ActionCallback() {@Overridepublic void onSuccess() {Log.i(TAG, "login success");}@Overridepublic void onError(TUICommonDefine.Error error, String message) {Log.e(TAG, "login failed, errorCode: " + errorCode + " msg:" + errorMessage);}});
Add the following code in your project. It enables logging in to the TUI component by calling the relevant APIs in RTCRoomEngine. This procedure is critical. Only after logging in successfully can you use the features provided by SeatGridView properly.
//// AppDelegate.swift//import RTCRoomEnginefunc application(_ application: UIApplication, didFinishLaunchingWithOptions launchOptions: [UIApplication.LaunchOptionsKey: Any]?) -> Bool {TUIRoomEngine.login(sdkAppId: 1400000001, // replace with SDKAppID obtained in step 1userId: "denny", // replace with your UserIDuserSig: "xxxxxxxxxxx") { // you can count a UserSig in the console and fill it in this locationprint("login success")} onError: { code, message inprint("login failed, code: \(code), error: \(message ?? "nil")")}return true}
Add the following code in your project. It enables logging in to the TUI component by calling the login-related APIs in
RTCRoomEngine. This step is critical. Only after successfully logged in can you use the features provided by LiveStreamCore properly.final result = await TUIRoomEngine.login('Replace with your activated SDKAppID','Replace with your userId','Replace with your userSig');
Parameter Description
Here are the key parameters needed in the login function:
Parameters | Type | Description |
SDKAppID | int | |
UserID | String | The current user ID, string type, only allows letters (a-z and A-Z), digits (0-9), hyphens, and underscores. |
userSig | String | Use the SecretKey obtained from Step 3 of Step 1 to encrypt information such as SDKAppID and UserID. This process generates a UserSig, which is an authentication token used by Tencent Cloud to verify whether the current user can use the TRTC service. You can generate a temporary UserSig using the auxiliary tool in the console. For more information, see how to calculate and use UserSig. |
Note:
Development environment: If you are in the local development and debugging stage, you can adopt the local
GenerateTestUserSig.genTestSig function to generate userSig. In this method, the SDKSecretKey is very easy to decompile and reverse. Once your key is leaked, an attacker can steal your Tencent Cloud traffic.Production environment: If your project is ready to go live, implement server-side generation of UserSig.
Step 4: Implement Live Streaming Functionality Using Core Controls
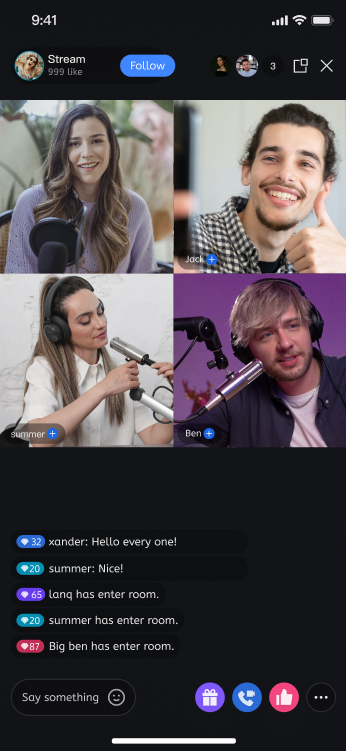
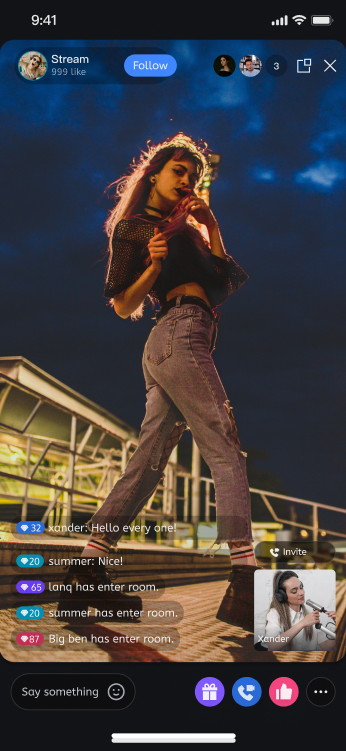
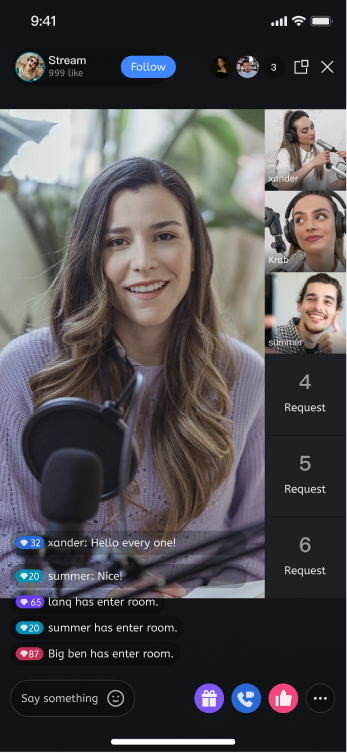
Anchor starts live streaming and audience watches live for effect preview.
Anchor starts live | audience viewing the live stream |
 |
 |
Different Layout Styles
dynamic grid layout | floating small window layout | fixed grid layout | fixed small window layout |
 |  |  |  |
Anchor Preview and Go Live
Create core controls:
You can load our core control in your streaming Activity through Java code or XML method. The code method example is as follows (xml method is similar):
val livecoreView = LiveCoreView(this)
LiveCoreView liveCoreView = new LiveCoreView(this);
import LiveStreamCorelet liveCoreView = LiveCoreView()
You need to create a controller
LiveCoreController first, then assign value to the live streaming core component LiveCoreWidget.LiveCoreController is responsible for providing API, LiveCoreWidget is used to show the mic seat UI. You can add LiveCoreWidget anywhere you need to display the mic seat UI.import 'package:live_stream_core/live_core_widget/live_core_widget.dart';final controller =LiveCoreController();LiveCoreWidget(controller: controller);
Enable live preview: local camera preview, has not truly launched the live streaming room.
livecoreView.startCamera(true, null)
liveCoreView.startCamera(true, null);
import LiveStreamCoreliveCoreView.startCamera(useFrontCamera: true) {} onError: { code, message in}
import 'package:live_stream_core/live_core_widget/live_core_widget.dart';import 'package:rtc_room_engine/rtc_room_engine.dart';final startCameraResult = await controller.startCamera(true);
Anchor open live room: open a live streaming room and push local camera capture and microphone data to the room.
val liveInfo = TUILiveListManager.LiveInfo()liveInfo.roomId = "123456"/**Select layout: If you want to select another layout to go live, set liveInfo.seatLayoutTemplateId = 600600: dynamic grid layout (default)601: floating small window layout800: fixed grid layout801: fixed small window layout*/liveInfo.seatLayoutTemplateId = 600livecoreView.startLiveStream(liveInfo, null)livecoreView.startMicrophone(null)
TUILiveListManager.LiveInfo liveInfo = new TUILiveListManager.LiveInfo();liveInfo.roomId = "roomId_123456";/**Select layout: If you want to select another layout to go live, set liveInfo.seatLayoutTemplateId = 600600: dynamic grid layout (default)601: floating small window layout800: fixed grid layout801: fixed small window layout*/liveInfo.seatLayoutTemplateId = 600livecoreView.startLiveStream(liveInfo, null);livecoreView.startMicrophone(null);
import LiveStreamCoreimport RTCRoomEnginelet liveInfo = TUILiveInfo()liveInfo.roomId = "123456"liveInfo.seatMode = .applyToTake/**Select layout: If you want to select another layout to go live, set liveInfo.seatLayoutTemplateId = 600600: dynamic grid layout (default)601: floating small window layout800: fixed grid layout801: fixed small window layout*/liveInfo.seatLayoutTemplateId = 600liveCoreView.startLiveStream(liveInfo: liveInfo) { roomInfo in} onError: { code, message in}liveCoreView.startMicrophone {} onError: { code, message in}
import 'package:live_stream_core/live_core_widget/live_core_widget.dart';import 'package:rtc_room_engine/rtc_room_engine.dart';final roomInfo = TUIRoomInfo(roomId: '123456');roomInfo.name = 'replace with your roomName'roomInfo.isSeatEnabled = true;roomInfo.roomType = TUIRoomType.livingRoom;roomInfo.seatMode = TUISeatMode.applyToTake;final startLiveStreamResult = await controller.startLiveStream(roomInfo);final startMicrophoneResult = await controller.startMicrophone();
Audience Viewing
Create core controls:
You can load our core control in your streaming Activity through Java code or XML method. The code method example is as follows (xml method is similar):
val livecoreView = LiveCoreView(this)
LiveCoreView liveCoreView = new LiveCoreView(this);
import LiveStreamCorelet liveCoreView = LiveCoreView()
import 'package:live_stream_core/live_core_widget/live_core_widget.dart';final controller =LiveCoreController();LiveCoreWidget(controller: controller);
Audience Joins Live Room: Audience enters the live room and pulls the live stream host's video stream and audio stream.
livecoreView.joinLiveStream("roomId_123456", null)
livecoreView.joinLiveStream("roomId_123456", null);
import LiveStreamCoreliveCoreView.joinLiveStream(roomId: "roomId_123456") { roomInfo in} onError: { code, message in}
import 'package:live_stream_core/live_core_widget/live_core_widget.dart';var result = await controller.joinLiveStream('replace with your roomId');
Audience Co-Broadcasting
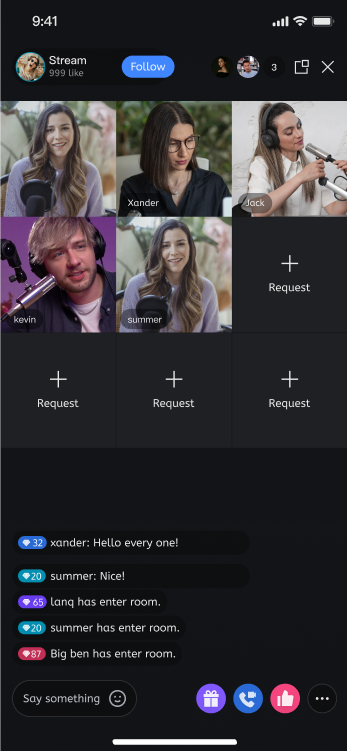
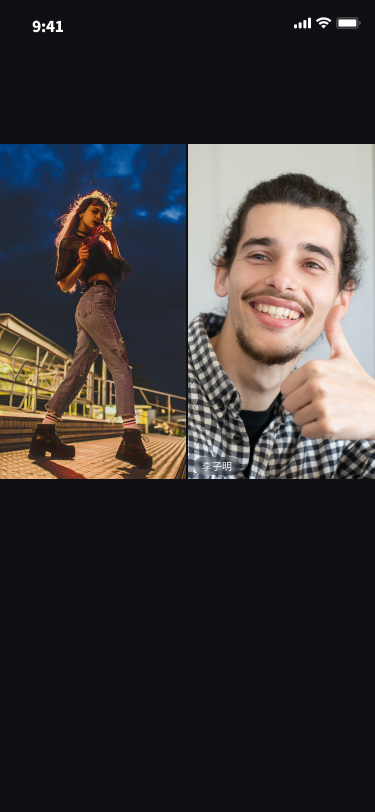
Audience Co-Broadcasting Effect Preview:
Single-Person Co-Broadcasting | Multi-Person Co-Anchoring |
 |  |
You can call the following API function to implement the audience mic connection feature. For example, Audience B requests to connect with Anchor A as follows.
Note:
The following is the proactive invocation method provided by LiveCoreView.
All callback methods refer to those in the ConnectionObserver object set by LiveCoreView.
Audience Sending Mic Connection Request
Audience B sends a microphone connection request to Anchor A.
val userId = "anchorUserId"; // Change to room owner's UserId, defaults to room owner UserId when input empty stringval timeout = 60;liveCoreView.requestIntraRoomConnection(userId, 10, null)
String userId = "anchorUserId"; // Change to room owner's UserId, defaults to room owner UserId when input empty stringint timeout = 60;liveCoreView.requestIntraRoomConnection(userId, timeout, true, null);
let timeout = 60let userId = "anchorUserId" // Change to room owner's UserId, defaults to room owner UserId when input empty stringliveCoreView.requestIntraRoomConnection(userId: userId, timeOut: timeOut, openCamera: true) {} onError: { code, message in}
NSInteger timeout = 60;NSString userId = "anchorUserId" // Change to room owner's UserId, defaults to room owner UserId when input empty string[liveCoreView requestIntraRoomConnection:""timeOut:timeoutonSuccess:^(void) {} onError:^(NSInteger code, NSString * _Nonnull message) {}];
import 'package:live_stream_core/live_core_widget/live_core_widget.dart';final timeout = 60;final userId = 'anchorUserId'; // Change to room owner's UserId, defaults to room owner UserId when input empty stringfinal openCamera = true;final result = await controller.requestIntraRoomConnection(userId,timeout,openCamera);
Anchor Received Mic Connection Request
Anchor A will receive Audience B's mic connection request in the onUserConnectionRequest callback method.
override fun onUserConnectionRequest(inviterUser: UserInfo) {Log.i(TAG, "Received audience connection request: ${inviterUser.userId}")}
@Overridepublic void onUserConnectionRequest(LiveStreamDefine.LiveUser inviterUser) {Log.i(TAG, "Received audience connection request: " + inviterUser.userId);}
func onUserConnectionRequest(inviterUser: TUIUserInfo) {print("Received audience connection request: \(inviterUser.userId)")}
- (void)onUserConnectionRequest:(TUIUserInfo *)inviterUser {NSLog(@"Received audience connection request: %@", hostUser.userId);}
import 'package:live_stream_core/live_core_widget/live_core_widget.dart';import 'package:rtc_room_engine/rtc_room_engine.dart';// Create a listener Observer instancefinal controller =LiveCoreController();final exampleObserver = ExampleObserver();// add observercontroller.addObserver(exampleObserver);class ExampleObserver extends ConnectionObserver {ExampleObserver() {super.onUserConnectionRequest = (inviterUser) {debugPrint('Received audience connection request: ${inviterUser.userId}');};}}
Anchor Responding to Mic Connection Request
Anchor A can call respondIntraRoomConnection to respond to Audience B whether to agree to mic connection.
// Host agrees to connect micliveCoreView.respondIntraRoomConnection(audienceBUserId, true, null)
// Host agrees to connect micliveCoreView.respondIntraRoomConnection(userId, true, null);// Host rejects mic connectionliveCoreView.respondIntraRoomConnection(userId, false, null);
// Host agrees to connect micliveCoreView.respondIntraRoomConnection(userId: audienceBUserId, isAccepted: true) {} onError: { code, message in}
// Host agrees to connect mic[liveCoreView respondIntraRoomConnection:audienceBUserIdisAccepted:YESonSuccess:^(void) {} onError:^(NSInteger code, NSString * _Nonnull message) {}];
import 'package:live_stream_core/live_core_widget/live_core_widget.dart';// Host agrees to connect micfinal result = await controller.respondIntraRoomConnection('audienceBUserId',true);
Audience Received Broadcaster Response Callback
After Anchor A grants Audience B's mic connection request, Audience B will receive Anchor A's agreement to mic connection through the onUserConnectionAccepted callback.
override fun onUserConnectionAccepted(inviterUser: UserInfo) {Log.i(TAG, "Audience agreed to connection: ${inviterUser.userId}")}
@Overridepublic void onUserConnectionAccepted(LiveStreamDefine.LiveUser liveUser) {Log.i(TAG, "Audience agreed to connection: " + liveUser.userId);}@Overridepublic void onUserConnectionRejected(LiveStreamDefine.LiveUser liveUser) {Log.i(TAG, "Audience rejected connection: " + liveUser.userId);}
func onUserConnectionAccepted(userId: String) {print("Audience agreed to connection: \(userId)")}
- (void)onUserConnectionAccepted:(NSString *)userId {NSLog(@"Audience agreed to connection: %@", userId);}
import 'package:live_stream_core/live_core_widget/live_core_widget.dart';import 'package:rtc_room_engine/rtc_room_engine.dart';// Create a listener Observer instancefinal controller = LiveCoreController();final exampleObserver = ExampleObserver();// add observercontroller.addObserver(exampleObserver);class ExampleObserver extends ConnectionObserver {ExampleObserver() {super.onUserConnectionAccepted = (user) {debugPrint('Broadcaster agrees to connecting line: ${user.userId}');};}}
Callback for Changes in the List of Mic-Connected Users
After Anchor A grants Audience B's mic connection request, LiveCoreView will send the mic-connected user change to both Anchor A and Audience B at the same time.
override fun onConnectedUsersUpdated(inviterUser: UserInfo) {Log.i(TAG, "Changes in the list of mic-connected users")}
@Overridepublic void onConnectedUsersUpdated(List<UserInfo> userList, List<UserInfo> joinList, List<UserInfo> leaveList) {Log.i(TAG, "Changes in the list of mic-connected users")}
func onConnectedUsersUpdated(userList: [TUIUserInfo], joinList: [TUIUserInfo], leaveList: [TUIUserInfo]) {print("Changes in the list of mic-connected users")}
- (void)onConnectedUsersUpdated:(NSArray<TUIUserInfo *> *)userListjoinList:(NSArray<TUIUserInfo *> *)joinListleaveList:(NSArray<TUIUserInfo *> *)leaveList {NSLog(@"Changes in the list of mic-connected users"); // Here you can handle userList, joinList and leaveList if necessary}
import 'package:live_stream_core/live_core_widget/live_core_widget.dart';import 'package:rtc_room_engine/rtc_room_engine.dart';// Create a listener Observer instancefinal controller = LiveCoreController();final exampleObserver = ExampleObserver();// add observercontroller.addObserver(exampleObserver);class ExampleObserver extends ConnectionObserver {ExampleObserver() {super.OnConnectedUsersUpdated = (userList, joinList, leaveList) {debugPrint('Changes in the list of mic-connected users');};}}
Disconnect the mic during the process by calling the following API.
Audience Co-Broadcasting Upon Success, Anchor Hangs Up Mic Connection
After Audience B and Anchor A successfully connect via microphone, Anchor A disconnects from Audience B.
val userId = "audienceBUserId"liveCoreView.disconnectUser(userId, null)
String userId = "audienceUserId";liveCoreView.disconnectUser(userId, null);
let userId = "audienceBUserId"liveCoreView.disconnectUser(userId: userId) {} onError: { code, message in}
NSString *userId = @"audienceBUserId";[liveCoreView disconnectUser:userIdonSuccess:^{} onError:^(NSInteger code, NSString * _Nonnull message) {}];
import 'package:live_stream_core/live_core_widget/live_core_widget.dart';import 'package:rtc_room_engine/rtc_room_engine.dart';final userId = 'audienceBUserId';final result = await controller.disconnectUser(userId);
Audience Received Anchor Disconnect Callback
Anchor A disconnects from Audience B's mic connection request, and Audience B receives the onUserConnectionTerminated callback.
override fun onUserConnectionTerminated(inviterUser: UserInfo) {Log.i(TAG, "Anchor closed connecting line")}
@Overridepublic void onUserConnectionTerminated() {Log.i(TAG, "Anchor closed connecting line")}
func onUserConnectionTerminated() {print("Anchor closed connecting line")}
- (void)onUserConnectionTerminated {NSLog(@"Anchor closed connecting line");}
import 'package:live_stream_core/live_core_widget/live_core_widget.dart';import 'package:rtc_room_engine/rtc_room_engine.dart';// Create a listener Observer instancefinal controller = LiveCoreController();final exampleObserver = ExampleObserver();// add observercontroller.addObserver(exampleObserver);class ExampleObserver extends ConnectionObserver {ExampleObserver() {super.onUserConnectionTerminated = (user) {debugPrint('Anchor closed connecting line') ;};}}
Audience Co-Broadcasting Upon Success, Audience Ends Mic Connection
After Audience B and Anchor A successfully connect for co-broadcasting, Audience B can call terminateIntraRoomConnection to proactively disconnect.
liveCoreView.terminateIntraRoomConnection()
liveCoreView.terminateIntraRoomConnection();
liveCoreView.terminateIntraRoomConnection()
[liveCoreView terminateIntraRoomConnection]
import 'package:live_stream_core/live_core_widget/live_core_widget.dart';final result = await controller.terminateIntraRoomConnection();
Anchor Received Audience Disconnect Callback
When Audience B proactively disconnects, Anchor receives the onUserConnectionExited callback.
override fun onUserConnectionExited(inviterUser: LiveStreamDefine.LiveUser) {Log.i(TAG, "Audience exit connection")}
@Overridepublic void onUserConnectionExited(UserInfo liveUser) {Log.i(TAG, "Audience exit connection: ${liveUser.userId}");}
func onUserConnectionExited(userInfo: TUIUserInfo) {print("Audience exit connection")}
- (void)onUserConnectionExited:(TUIUserInfo *)userInfo {NSLog(@"Audience exited connection");}
import 'package:live_stream_core/live_core_widget/live_core_widget.dart';import 'package:rtc_room_engine/rtc_room_engine.dart';// Create a listener Observer instancefinal controller = LiveCoreController();final exampleObserver = ExampleObserver();// add observercontroller.addObserver(exampleObserver);class ExampleObserver extends ConnectionObserver {ExampleObserver() {super.onUserConnectionExited = (user) {debugPrint('Audience exited connection');};}}
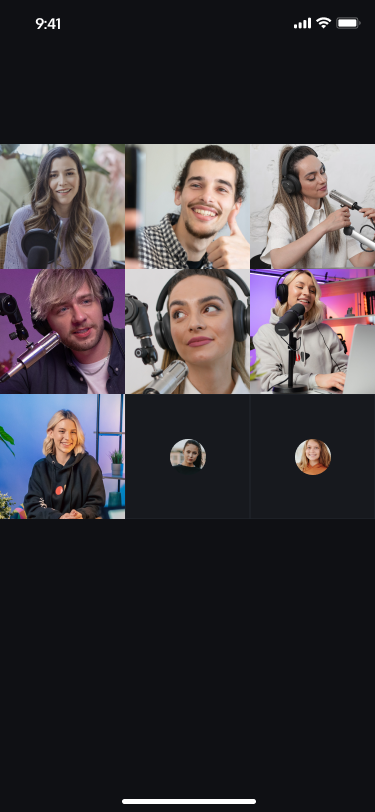
Anchor Connection
Anchor connection effect preview:
Dual-Anchor Connection | Multi-Anchor Connection |
 |  |
You can call the following API to complete the Anchor connection feature. Here, Anchor A connects with Anchor B as follows.
Note:
The following is the proactive invocation method provided by LiveCoreView.
All callback methods refer to those in the ConnectionObserver object set by LiveCoreView.
Anchor Initiates a Connection
Anchor A initiates a connecting line by calling
requestCrossRoomConnection, inputting the room id of Anchor B in the parameter roomId.val roomId = "anchorBRoomId"mLiveViewList.requestCrossRoomConnection(roomId, 10, null)
String roomId = "anchorBRoomId";mLiveViewList.requestCrossRoomConnection(roomId, 10, null);
let roomId = "anchorRoomId"liveCoreView.requestCrossRoomConnection(roomId: roomId, timeOut: 60) {} onError: { code, message in}
NSString *roomId = @"anchorRoomId";[liveCoreView requestCrossRoomConnection:roomIdtimeOut:60onSuccess:^(void) {} onError:^(NSInteger code, NSString * _Nonnull message) {}];
import 'package:live_stream_core/live_core_widget/live_core_widget.dart';final roomId = 'anchorBRoomId';final result = await controller.requestCrossRoomConnection(roomId);
Anchor A can receive the callback acceptance via
onCrossRoomConnectionAccepted.Anchor B Received Connection Request
Anchor B receives the connection request callback via
onCrossRoomConnectionRequest.override fun onCrossRoomConnectionRequest(inviterUser: UserInfo) {Log.i(TAG, "Received Anchor A room request: ${inviterUser.userId}")}
@Overridepublic void onCrossRoomConnectionRequest(LiveStreamDefine.RoomInfo roomInfo) {Log.i(TAG, "Received Anchor A room request: " + roomInfo.roomId);}
func onCrossRoomConnectionRequest(hostUser: TUIConnectionUser) {print("Received Anchor A room request: \(hostUser.userId)")}
- (void)onCrossRoomConnectionRequest:(TUIConnectionUser *)hostUser {NSLog(@"Received Anchor A connecting line room request: %@", hostUser.userId);}
import 'package:live_stream_core/live_core_widget/live_core_widget.dart';import 'package:rtc_room_engine/rtc_room_engine.dart';// Create a listener Observer instancefinal controller = LiveCoreController();final exampleObserver = ExampleObserver();// add observercontroller.addObserver(exampleObserver);class ExampleObserver extends ConnectionObserver {ExampleObserver() {super.onCrossRoomConnectionRequest = (user) {debugPrint('Received Anchor A connecting line room request: ${user.userId}');};}}
Anchor B responds to the connection request by calling
respondToCrossRoomConnection.'}liveCoreView.respondToCrossRoomConnection(roomId, true, null)
// Grant connection requestliveCoreView.respondToCrossRoomConnection(roomId, true, null);
liveCoreView.respondToCrossRoomConnection(roomId: roomId, isAccepted: true) {} onError: { code, message in}
[liveCoreView respondToCrossRoomConnection:roomIdisAccepted:trueonSuccess:^(void) {} onError:^(NSInteger code, NSString * _Nonnull message) {}];
import 'package:live_stream_core/live_core_widget/live_core_widget.dart';final roomId = 'anchorBRoomId';final isAccpeted = true;final result = await controller.respondToCrossRoomConnection(roomId, isAccpeted);
Anchor A, B and the audience in the room receive the
onConnectedRoomsUpdated callback, notifying that the connection list has changed. override fun onConnectedRoomsUpdated(inviterUser: UserInfo) {Log.i(TAG, "Anchor connection room list update")}
@Overridepublic void onConnectedRoomsUpdated(List<LiveStreamDefine.RoomInfo> roomList) {Log.i(TAG, "Anchor connection room list update")}
func onConnectedRoomsUpdated(hostUserList: [TUIConnectionUser]) {print("Anchor connection room list update")}
- (void)onConnectedRoomsUpdated:(NSArray<TUIConnectionUser *> *)hostUserList {NSLog(@"Anchor connection room list refresh");}
import 'package:live_stream_core/live_core_widget/live_core_widget.dart';import 'package:rtc_room_engine/rtc_room_engine.dart';// Create a listener Observer instancefinal controller = LiveCoreController();final exampleObserver = ExampleObserver();// add observercontroller.addObserver(exampleObserver);class ExampleObserver extends ConnectionObserver {ExampleObserver() {super.onConnectedRoomsUpdated= (user) {debugPrint('Anchor connection room list refresh') ;};}}
Exiting Connection Process
Anchor B calls
terminateIntraRoomConnection to exit connection.public void disconnect(TUIRoomDefine.ActionCallback callback) {mTUILiveConnectionManager.disconnect(callback);}
liveCoreView.terminateIntraRoomConnection()
liveCoreView.terminateCrossRoomConnection()
[liveCoreView terminateCrossRoomConnection];
import 'package:live_stream_core/live_core_widget/live_core_widget.dart';final result = await controller.terminateIntraRoomConnection();
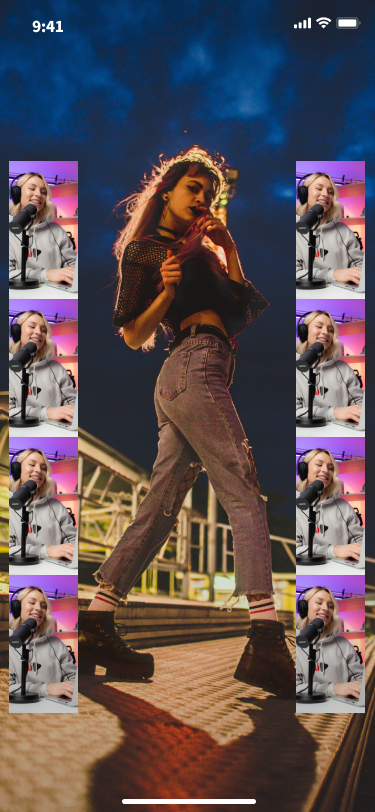
Setting Connection Layout
Custom Layout Connection Effect Preview
Anchor Connection - Grid Layout | Anchor Connection - Floating Window Layout | Anchor Connection - Custom Layout |
 |  |
 |
You can quickly set the layout between you and the connected host or mic-connecting audience in the following ways.
// Set grid layoutmLiveStreamListView.setLayoutMode(LiveCoreViewDefine.LayoutMode.GRID_LAYOUT, "")// Set floating window layoutmLiveStreamListView.setLayoutMode(LiveCoreViewDefine.LayoutMode.FLOAT_LAYOUT, "")// Set custom layoutvar layoutJson = ""mLiveStreamListView.setLayoutMode(LiveCoreViewDefine.LayoutMode.FREE_LAYOUT, layoutJson)
// Set grid layoutmLiveStreamListView.setLayoutMode(LiveCoreViewDefine.LayoutMode.GRID_LAYOUT, "");// Set floating window layoutmLiveStreamListView.setLayoutMode(LiveCoreViewDefine.LayoutMode.FLOAT_LAYOUT, "");// Set custom layoutString layoutJson = "";mLiveStreamListView.setLayoutMode(LiveCoreViewDefine.LayoutMode.FREE_LAYOUT, layoutJson);
import LiveStreamCore// Set grid layoutliveCoreView.setLayoutMode(layoutMode: .gridLayout)// Set floating window layoutliveCoreView.setLayoutMode(layoutMode: .floatLayout)// Set custom layoutlet layoutJson = ""liveCoreView.setLayoutMode(layoutMode: .freeLayout, layoutJson: layoutJson)
import 'package:live_stream_core/live_core_widget/live_core_widget.dart';// Set grid layoutcontroller.setLayoutMode(LayoutMode.gridLayout);// Set floating window layoutcontroller.setLayoutMode(LayoutMode.floatLayout);// Set custom layoutfinal layoutJson = '';controller.setLayoutMode(LayoutMode.freeLayout, layoutJson);
Note:
Note: The custom layout layoutJson is a string in JSON format. For detailed content, view custom layout json.
Custom Layout JSON
The JSON structure of the custom layout is as follows:
{"1": { // number of video views"backgroundColor": "#000000", // Background color of the canvas, use hexadecimal format"viewInfoList": [{ // layout information and background color of each video view"x": 0, // horizontal offset ratio to screen width, value ranges from 0 to 1"y": 0, // vertical offset ratio to screen width, value ranges from 0 to 1"width": 1, // width ratio of video view to screen width, value ranges from 0 to 1"height": -1, // height ratio of video view to screen width, value ranges from 0 to 1 or -1; -1 means the view height is identical to the screen height"zOrder": 0, // Z-order of video view, the larger the value, the view aligns top"backgroundColor": "#000000" // Background color of video view in RGB hexadecimal format}]}}
Anchor PK
LiveCoreView provides APIs related to Anchor PK. Since the UI effect varies for each play mode, LiveCoreView only provides APIs. You need to implement the UI effect yourself.
Anchor PK effect preview:
Dual-Anchor PK | Multi-Anchor PK |
 |  |
Note:
- The PK feature depends on the connection feature, so you need to trigger a PK request during an anchor connection.
The following proactive invocation APIs are provided by
LiveCoreView.All callback methods refer to those in the
BattleObserver object set by LiveCoreView.You can call the following API to complete the Anchor PK feature. Here, Anchor A battles with Anchor B as follows.
Anchor a Initiating PK
Anchor A initiates a PK by calling
requestBattle.val BATTLE_DURATION = 30val battleConfig = BattleConfig()battleConfig.duration = BATTLE_DURATIONbattleConfig.needResponse = truebattleConfig.extensionInfo = ""val list: MutableList<String> = ArrayList()list.add("anchorBUserId")val BATTLE_REQUEST_TIMEOUT = 10liveCoreView.requestBattle(battleConfig, list, BATTLE_REQUEST_TIMEOUT,object : LiveCoreViewDefine.BattleRequestCallback {override fun onSuccess(battleId: String, requestedUserIdList: List<String>) {}override fun onError(error: TUICommonDefine.Error, message: String) {}})
final int BATTLE_DURATION = 30;TUILiveBattleManager.BattleConfig battleConfig = new TUILiveBattleManager.BattleConfig();battleConfig.duration = BATTLE_DURATION;battleConfig.needResponse = true;battleConfig.extensionInfo = "";List<String> list = new ArrayList<>();list.add("anchorBUserId");final int BATTLE_REQUEST_TIMEOUT = 10;liveCoreView.requestBattle(battleConfig, list, BATTLE_REQUEST_TIMEOUT,new LiveCoreViewDefine.BattleRequestCallback() {@Overridepublic void onSuccess(String battleId, List<String> requestedUserIdList) {}@Overridepublic void onError(TUICommonDefine.Error error, String message) {}});
let roomId = "anchorRoomId"let config = TUIBattleConfig()config.duration = battleDurationconfig.needResponse = trueconfig.extensionInfo = ""let userIdList: [String] = []let timeout: TimeInterval = 10liveCoreView.requestBattle(config: config, userIdList: userIdList, timeout: timeout) {[weak self] (battleId, battleUserList) in} onError: { _, _ in}
import 'package:live_stream_core/live_core_widget/live_core_widget.dart';import 'package:rtc_room_engine/rtc_room_engine.dart';final roomId = 'anchorRoomId';final config = TUIBattleConfig();config.duration = 30;final result = await controller.requestBattle(config, [roomId], 10);
Anchor A can receive the PK callback acceptance via
onBattleRequestAccept.Anchor B Received Battle Request
Anchor B receives the PK request callback via
onBattleRequestReceived.override fun onBattleRequestReceived(battleId: String, inviterUser: BattleUser, invitee: BattleUser) {Log.i(TAG, "Received Anchor A's battle request: $battleId")}
@Overridepublic void onBattleRequestReceived(String battleId, BattleUser inviter, BattleUser invitee) {Log.i(TAG, "Received Anchor A's battle request: " + battleId);}
extension ViewContrller: BattleObserver { //replace with your actual class namefunc onBattleRequestReceived(battleId: String, inviter: TUIBattleUser, invitee: TUIBattleUser) {}}
import 'package:live_stream_core/live_core_widget/live_core_widget.dart';import 'package:rtc_room_engine/rtc_room_engine.dart';// Create a listener Observer instancefinal controller = LiveCoreController();final exampleObserver = ExampleObserver();// add observercontroller.addObserver(exampleObserver);class ExampleObserver extends BattleObserver {ExampleObserver() {super.onBattleRequestReceived= (battleId, inviter, invitee) {debugPrint('Received Anchor A battle request');};}}
Anchor B responds to the battle request by calling
respondToBattle.// Grant battle requestval battleId = "battleId"liveCoreView.respondToBattle(battleId, true, null)
// Grant battle requestString battleId = "battleId";liveCoreView.respondToBattle(battleId, true, null);
liveCoreView.respondToBattle(battleId: manager.battleState.battleId, isAccepted: false, onSuccess: { [weak self] in}, onError: { _, _ in})
import 'package:live_stream_core/live_core_widget/live_core_widget.dart';import 'package:rtc_room_engine/rtc_room_engine.dart';// Grant battle requestfinal battleId = '';final result = await controller.respondToBattle(battleId, true);
Anchor A, B and the audience in the room received
onBattleStarted and the start notification. override fun onBattleStarted(battleInfo: BattleInfo) {Log.i(TAG, "PK start callback")}
@Overridepublic void onBattleStarted(BattleInfo battleInfo) {Log.i(TAG, "Anchor connection room list update")}
extension ViewContrller: BattleObserver { //replace with your actual class namefunc onBattleStarted(battleInfo: TUIBattleInfo)) {}}
import 'package:live_stream_core/live_core_widget/live_core_widget.dart';import 'package:rtc_room_engine/rtc_room_engine.dart';// Create a listener Observer instancefinal controller = LiveCoreController();final exampleObserver = ExampleObserver();// add observercontroller.addObserver(exampleObserver);class ExampleObserver extends BattleObserver {ExampleObserver() {super.onBattleStarted = (battleInfo) {debugPrint('PK start callback');};}}
Exit PK Process
Natural end: When PK time ends, you will receive the
onBattleEnded callback.Active stop: Anchor B calls
terminateBattle and will exit PK, while Anchor A receives onUserExitBattle.mLiveCoreView.terminateBattle(battleId, null)
mLiveCoreView.terminateBattle(battleId, null);
liveCoreView.terminateBattle(battleId: manager.battleState.battleId) {} onError: { _, _ in}
import 'package:live_stream_core/live_core_widget/live_core_widget.dart';import 'package:rtc_room_engine/rtc_room_engine.dart';final battleId = '';final result = await controller.terminateBattle(battleId);

