This document guides you through building a voice chat room application with host broadcasting and audience participation features using the AtomicXCore SDK's LiveListStore and LiveSeatStore.
Core Concepts
Core Concept
Type
Core Responsibilities & Description
LiveListStore
class
createLive(): Start live stream as host.
endLive(): End live stream as host.
joinLive(): Audience joins live room.
leaveLive(): Leave live room.
LiveInfo
struct
liveID: Unique room identifier.
seatLayoutTemplateID: Layout template ID (e.g., 600 for dynamic grid).
LiveSeatStore
class
Core seat management class. Manages all seat information and seat-related operations in the room.
Provides a real-time seat list data stream via liveSeatState.seatList.
LiveSeatState
struct
Represents the current state of all seats.
seatList: a StateFlow containing the real-time seat list.
speakingUsers: users currently speaking and their volume.
SeatInfo
class
Data model for a single seat. The seat list (seatList) emitted by LiveSeatStore is a list of SeatInfo objects.
Key fields:
index: seat position.
isLocked: whether the seat is locked.
userInfo: user information for the seat. If the seat is empty, this field is empty.
SeatUserInfo
class
Detailed data model for the user occupying a seat. When a user successfully takes a seat, the userInfo field in SeatInfo is populated.
Key fields:
userID: unique user ID.
userName: user nickname.
avatarURL: user avatar URL.
microphoneStatus: microphone status (on/off).
cameraStatus: camera status (on/off).
Prerequisites
Step 1: Activate the Service
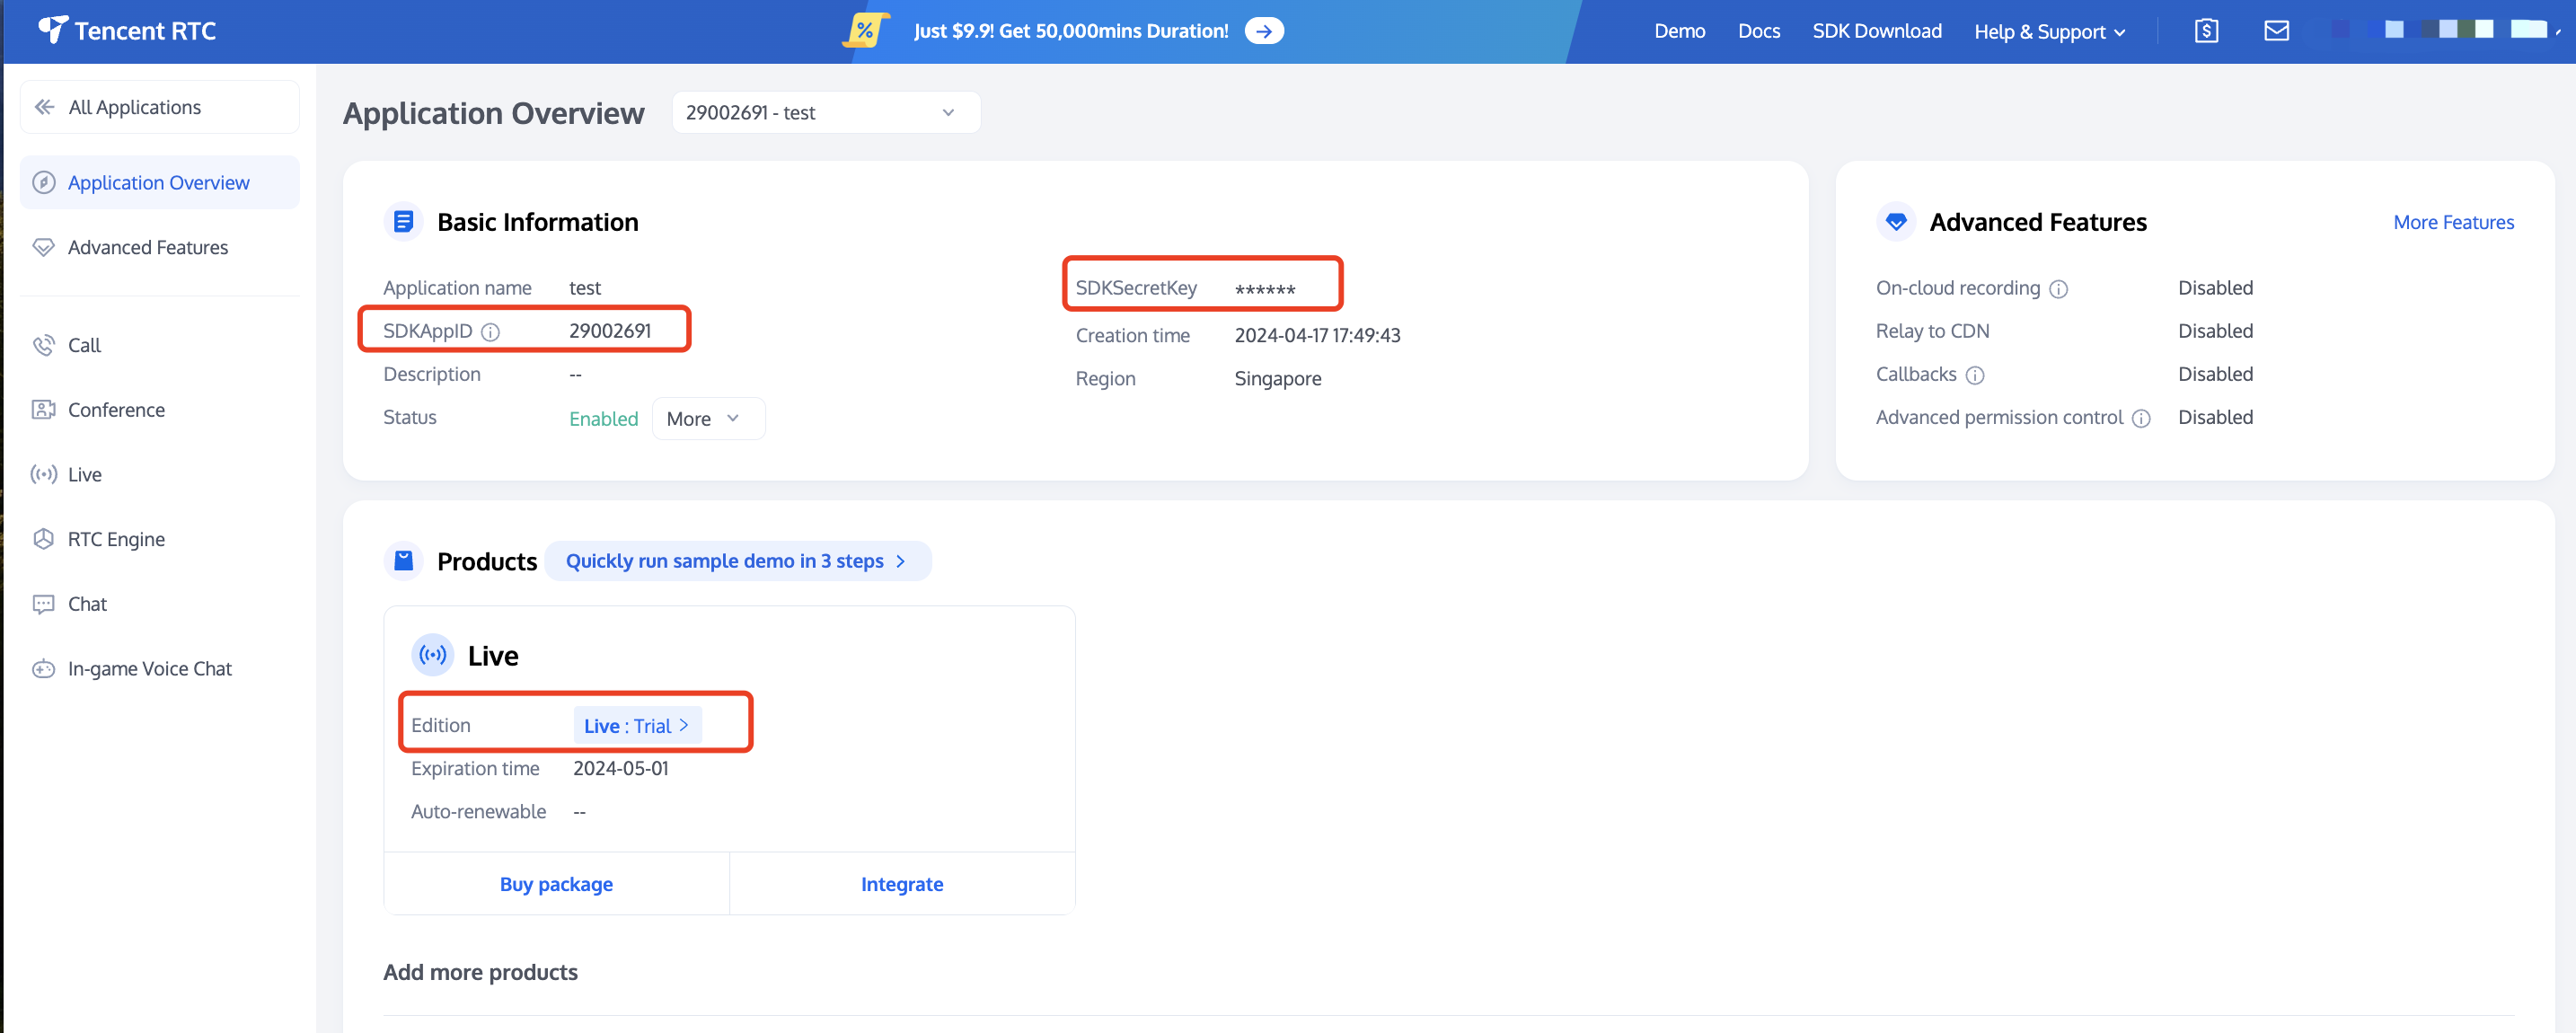
See Activate Service to obtain either the trial or paid version of the SDK.Then, go to the Console for application management, and get the following:
SDKAppID: Application identifier (required). Tencent Cloud uses SDKAppID for billing and details.
SDKSecretKey: Application secret key, used to initialize the configuration file with secret information.
Step 2: Import AtomicXCore into Your Project
1. Install the Component: Add pod 'AtomicXCore' to your Podfile, then run pod install.
target 'xxxx'do
pod 'AtomicXCore'
end
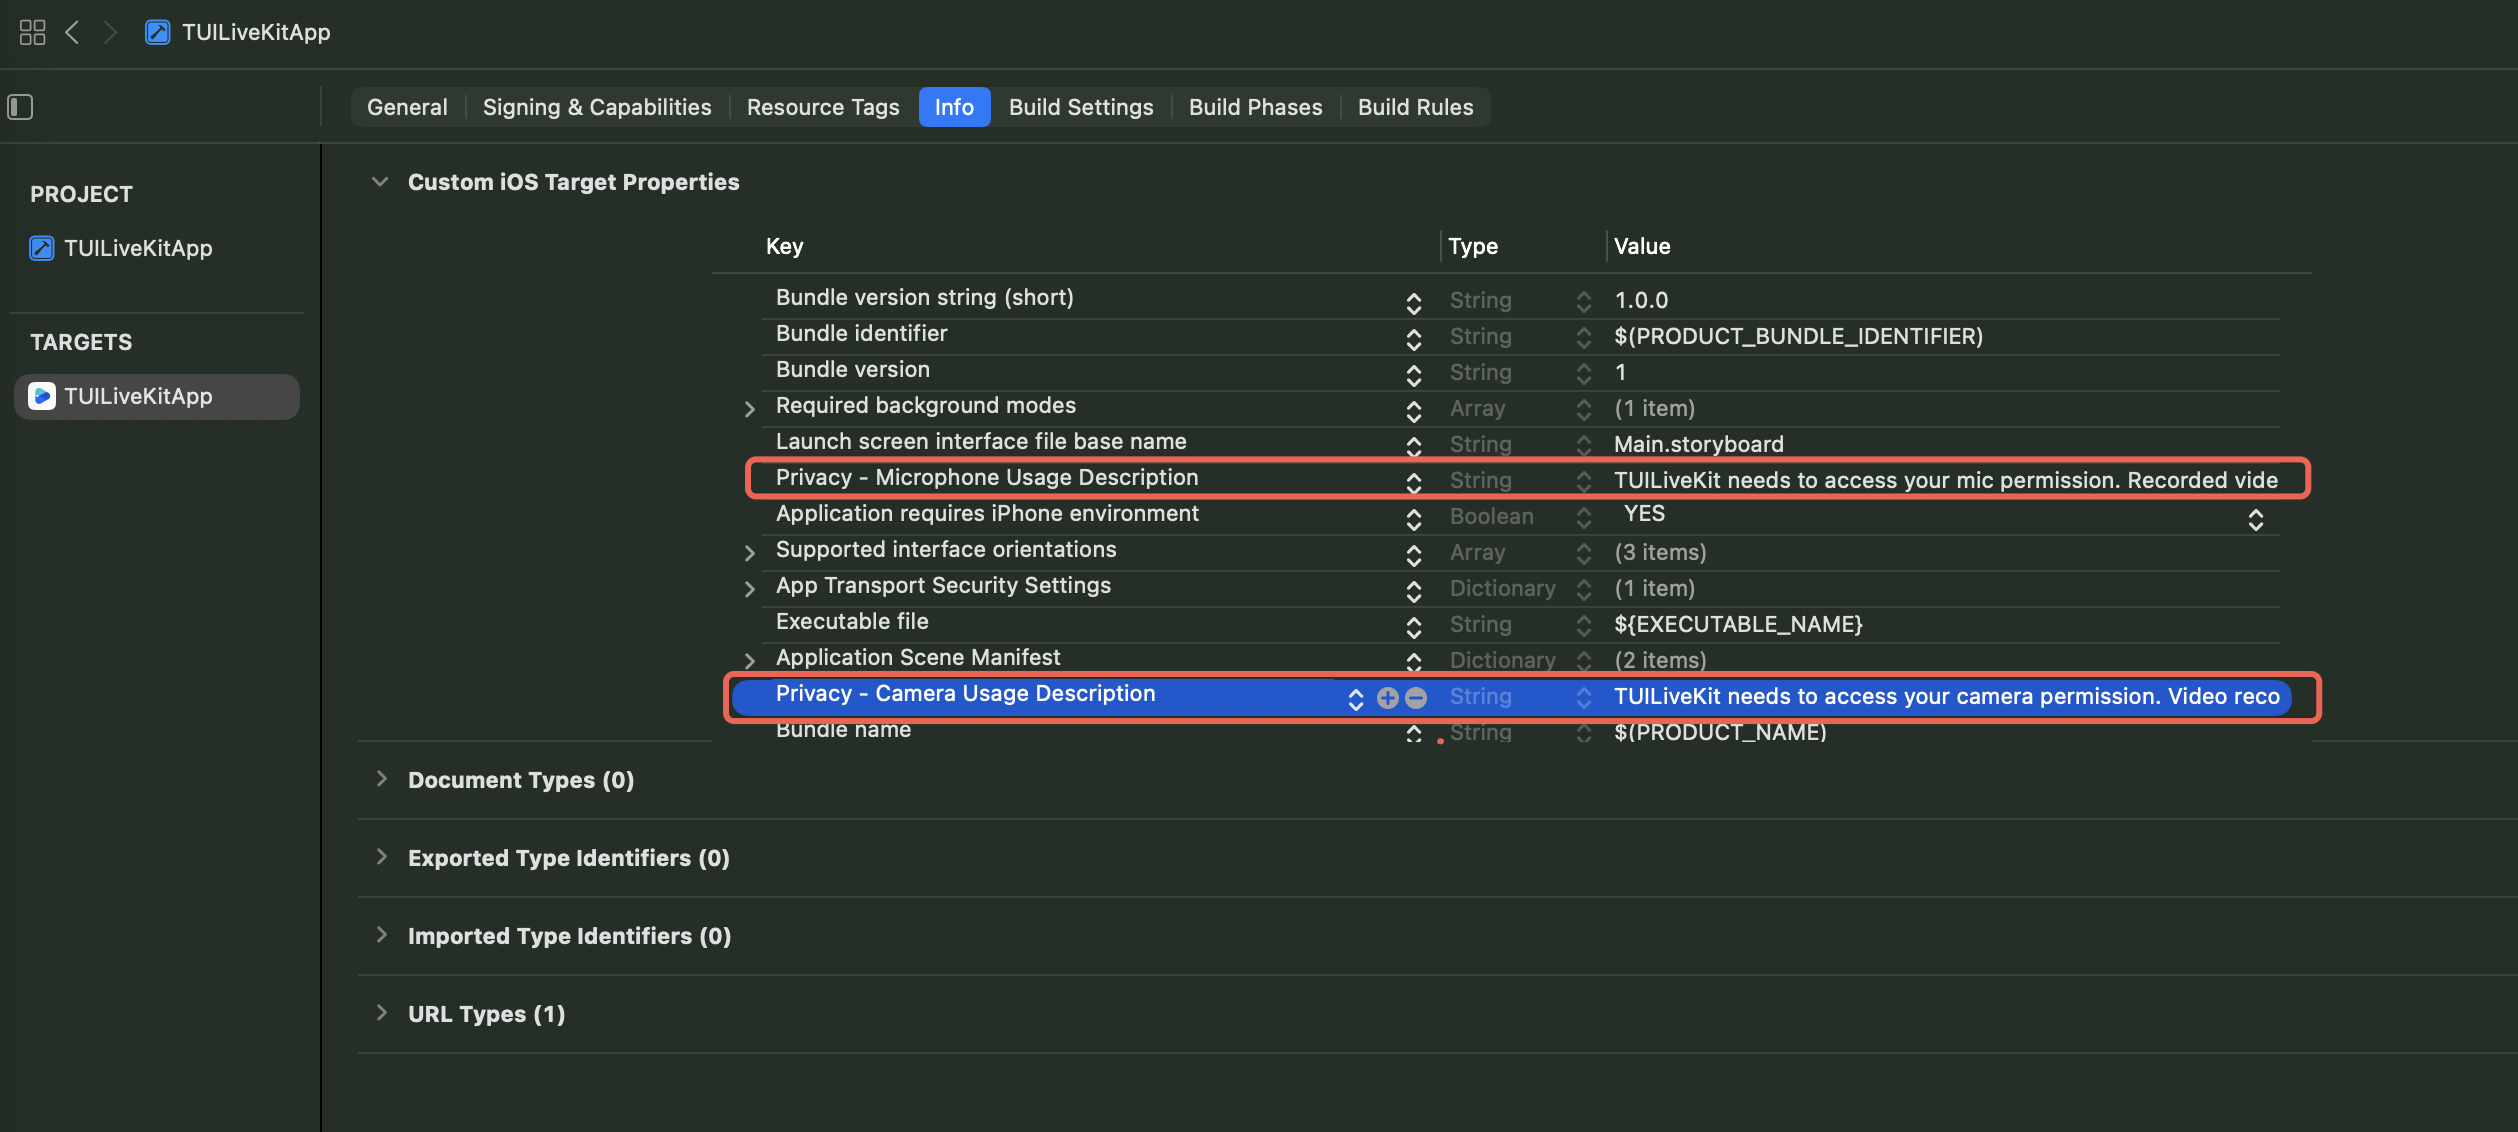
2. Configure App Permissions: Add camera and microphone usage descriptions to your app's Info.plist file.
<key>NSMicrophoneUsageDescription</key>
<string>TUILiveKit needs microphone permission to enable sound in recorded videos</string>
Step 3: Implement Login Logic
Call LoginStore.shared.login in your project to complete authentication. This is required before using any functionality of AtomicXCore.
Note:
We recommend calling LoginStore.shared.login only after your app's own user authentication is successful, to ensure clear and consistent login logic.
The unique ID for the current user. Must contain only English letters, numbers, hyphens, and underscores.
userSig
String
A ticket for Tencent Cloud authentication. Please note:
Development Environment: You can use the local GenerateTestUserSig.genTestSig function to generate a UserSig or generate a temporary UserSig via the UserSig Generation Tool.
Production Environment: To prevent key leakage, you must use a server-side method to generate UserSig. For details, see Generating UserSig on the Server.
Follow these steps to quickly set up a voice chat room as the host.
1. Initialize the Seat Store
In your host ViewController, instantiate LiveSeatStore. Use the Combine framework to observe changes in liveSeatStore.state for real-time seat updates and UI rendering.
print("AudienceVC Seat list updated: \(seatInfoList.count) seats")
}
.store(in:&cancellables)
}
}
2. Join the Voice Chat Room
Join the room by calling joinLive on LiveListStore:
importUIKit
importAtomicXCore
classYourAudienceViewController:UIViewController{
// ... other code ...
overridefuncviewDidLoad(){
super.viewDidLoad()
// ... other code ...
joinLive()
}
privatefuncjoinLive(){
liveListStore.joinLive(liveID: liveID){ result in
DispatchQueue.main.async{
switch result {
case.success(let liveInfo):
print("joinLive success")
case.failure(let errorInfo):
print("joinLive error: \(errorInfo.message)")
}
}
}
}
}
3. Build the Mic Seat UI
Building the seat UI for audience members is identical to the host process. Refer to the host Build the Mic Seat UI.
4. Leave the Voice Chat Room
To leave the room, call leaveLive on LiveListStore:
importUIKit
importAtomicXCore
classYourAudienceViewController:UIViewController{
// ... other code ...
privatefuncleaveLive(){
liveListStore.leaveLive { result in
switch result {
case.success:
print("leaveLive success")
case.failure(let errorInfo):
print("leaveLive error: \(errorInfo.message)")
}
}
}
}
Run and Test
After completing these steps, you will have a functional voice chat live streaming room. For advanced features, see "Enriching Voice Chat Room Scenarios" below.
Advanced Features
Implementing Speaking Wave Animation for Users on Seat
In voice chat rooms, it's common to show a wave animation over the avatar of users who are currently speaking. LiveSeatStore provides a speakingUsers stream for this purpose.
Example
Implementation
Note:
For a complete implementation of the speaking wave animation, refer to SeatGridView.swift in TUILiveKit.
In your YourAnchorViewController or YourAudienceViewController, subscribe to speakingUsers and update the UI accordingly:
Synchronizing Custom Status in Live Streaming Room
In live streaming room, the host may need to synchronize custom information to all audience members, such as "current room topic" or "background music info". Use the metaData feature of LiveListStore to achieve this.
Implementation
1. On the host side, set custom information (recommended as JSON) to one or more keys using the updateLiveMetaData API. AtomicXCore will synchronize these changes in real time to all audience members.
2. On the audience side, subscribe to LiveListState.currentLive and listen for changes in metaData. When a relevant key is updated, parse its value and update your business state.
Code Example
importAtomicXCore
importCombine
// 1. Define a background music model (recommended: Codable)
Why is there no sound after the audience calls joinLive?
Check device permissions: Ensure your app declares and requests microphone access (NSMicrophoneUsageDescription) in Info.plist.
Check host configuration: Verify the host has enabled the microphone via DeviceStore.shared.openLocalMicrophone(completion: nil).
Check network: Confirm the device has a stable network connection.
Why is the seat list not displayed or not updating?
Check store initialization: Confirm you create the LiveSeatStore instance (LiveSeatStore.create(liveID: liveID)) with the same liveID before calling createLive or joinLive.
Check data subscription: Make sure you use Combine to subscribe to liveSeatStore.state.seatList, and the cancellables lifecycle matches your ViewController.
Check API calls: Ensure createLive (host) or joinLive (audience) was called successfully (check the .success branch in switch result).