
Live Streaming Widget Customization (iOS)
LiveCoreView is a cross-platform core component for live video streaming that provides essential capabilities such as going live, viewing streams, co-hosting, and host PK (player-kill) battles. Using its widget system, you can display real-time custom information—like usernames, levels, and PK progress bars—directly in the video area. This guide walks you through customizing your own video widget UI on iOS by implementing the delegate protocol.Demo Showcase
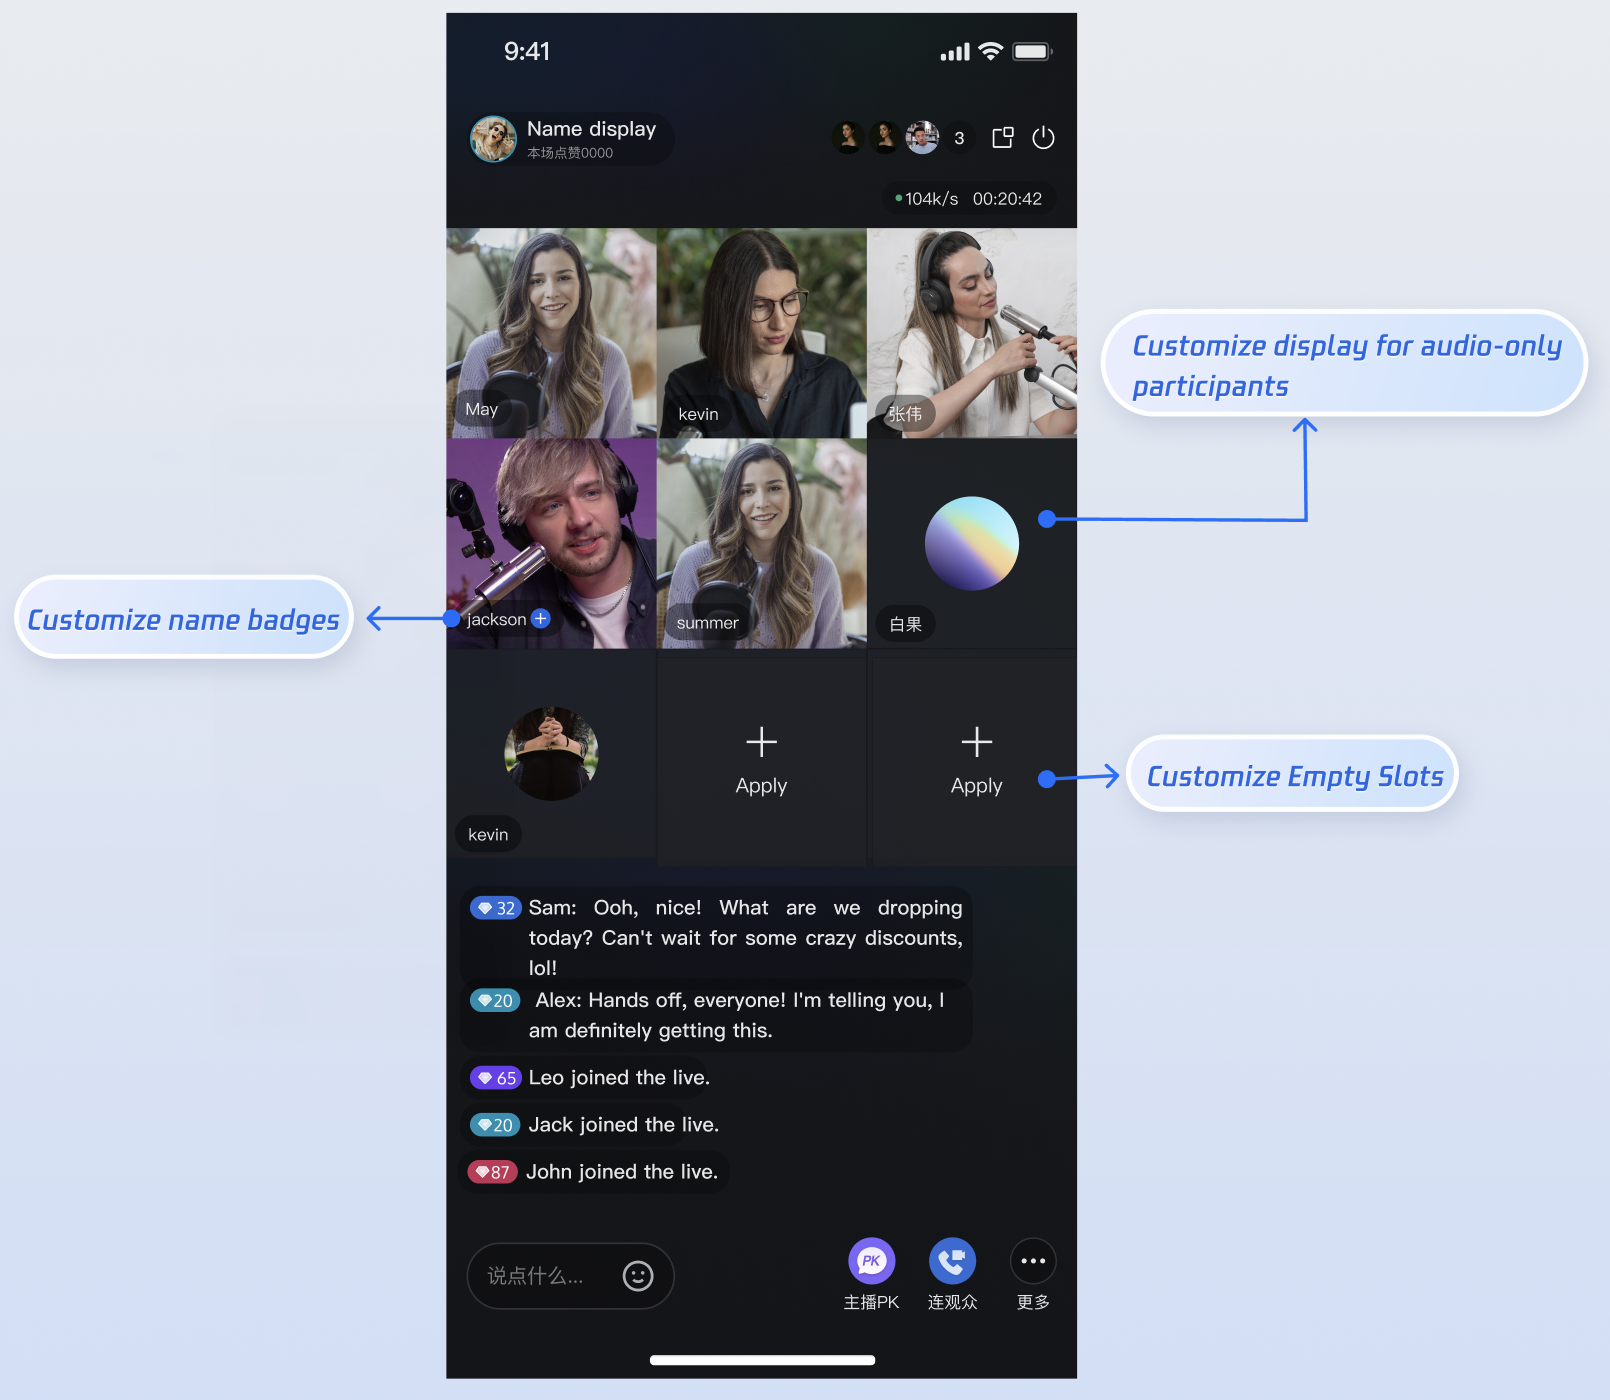
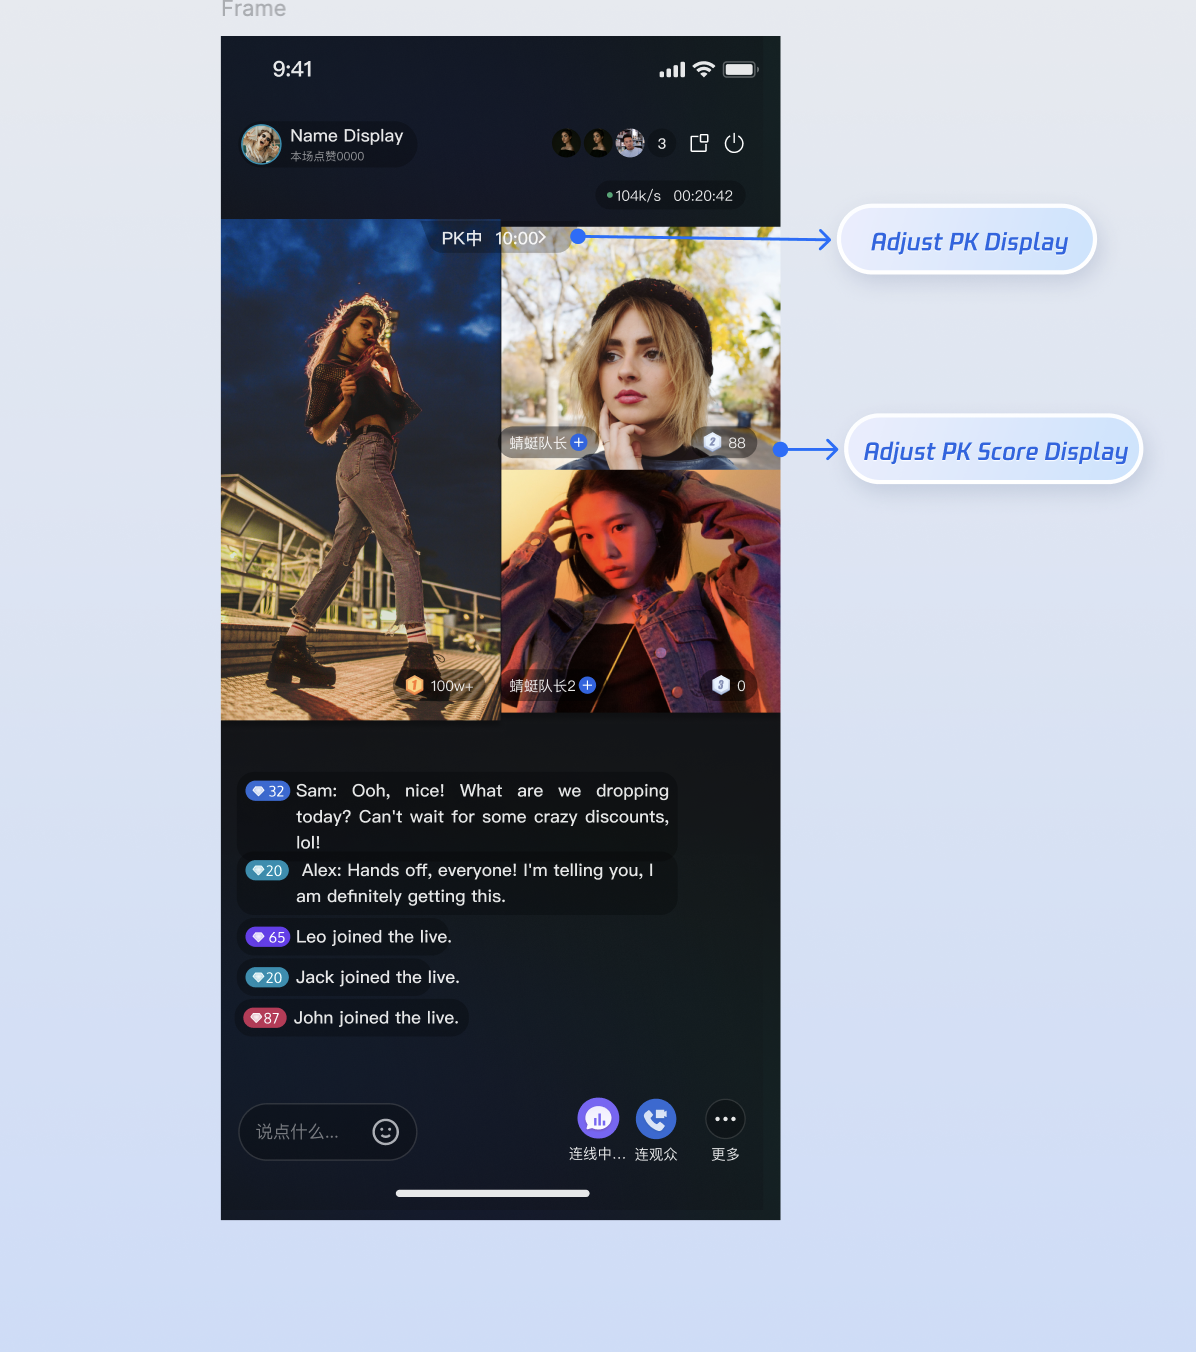
Co-hosting Video Widget | PK Video Widget |
 |  |
Prerequisites
Before you begin customizing video widgets, follow the main workflow setup in Host Go Live and Audience Watch.
Core Principles
LiveCoreView enables custom view rendering through the VideoViewDelegate protocol. When the live streaming scenario changes (for example, a user joins the mic or a PK session starts), LiveCoreView invokes delegate methods to determine which view to display. To customize the UI, simply implement the corresponding delegate methods and return your custom UIView instances.Method | Description | Applicable Scenario |
createCoGuestView | Creates the widget view for audience co-hosting. | Audience co-hosting, invite to co-host |
createCoHostView | Creates the widget view for cross-room co-hosting (host connection) | Host co-hosting |
createBattleView | Creates the widget view for an individual user in a PK scenario (e.g., avatar, score) | Host PK |
createBattleContainerView | Creates the overall container view for PK scenarios (e.g., background, PK score bar) | Host PK |
Customizing Connecting Scenario Widgets
When an audience member connect with a host(co-guest) or hosts connect across rooms(co-host), the live room UI switches from a single-user mode to a multi-user layout. At this stage, you may want to present user-specific information (like nickname, level, or mute status) on each video window to help distinguish the different seats.
Applicable Scenarios
Display or update user info (nickname, level, mute icon) when a host and audience are connecting via video.
Change how the other host appears (nickname, level, mute icon) during cross-room host connecting.
Customize the default background when there’s no video (e.g., display a placeholder avatar).
Customize the view for empty seats.
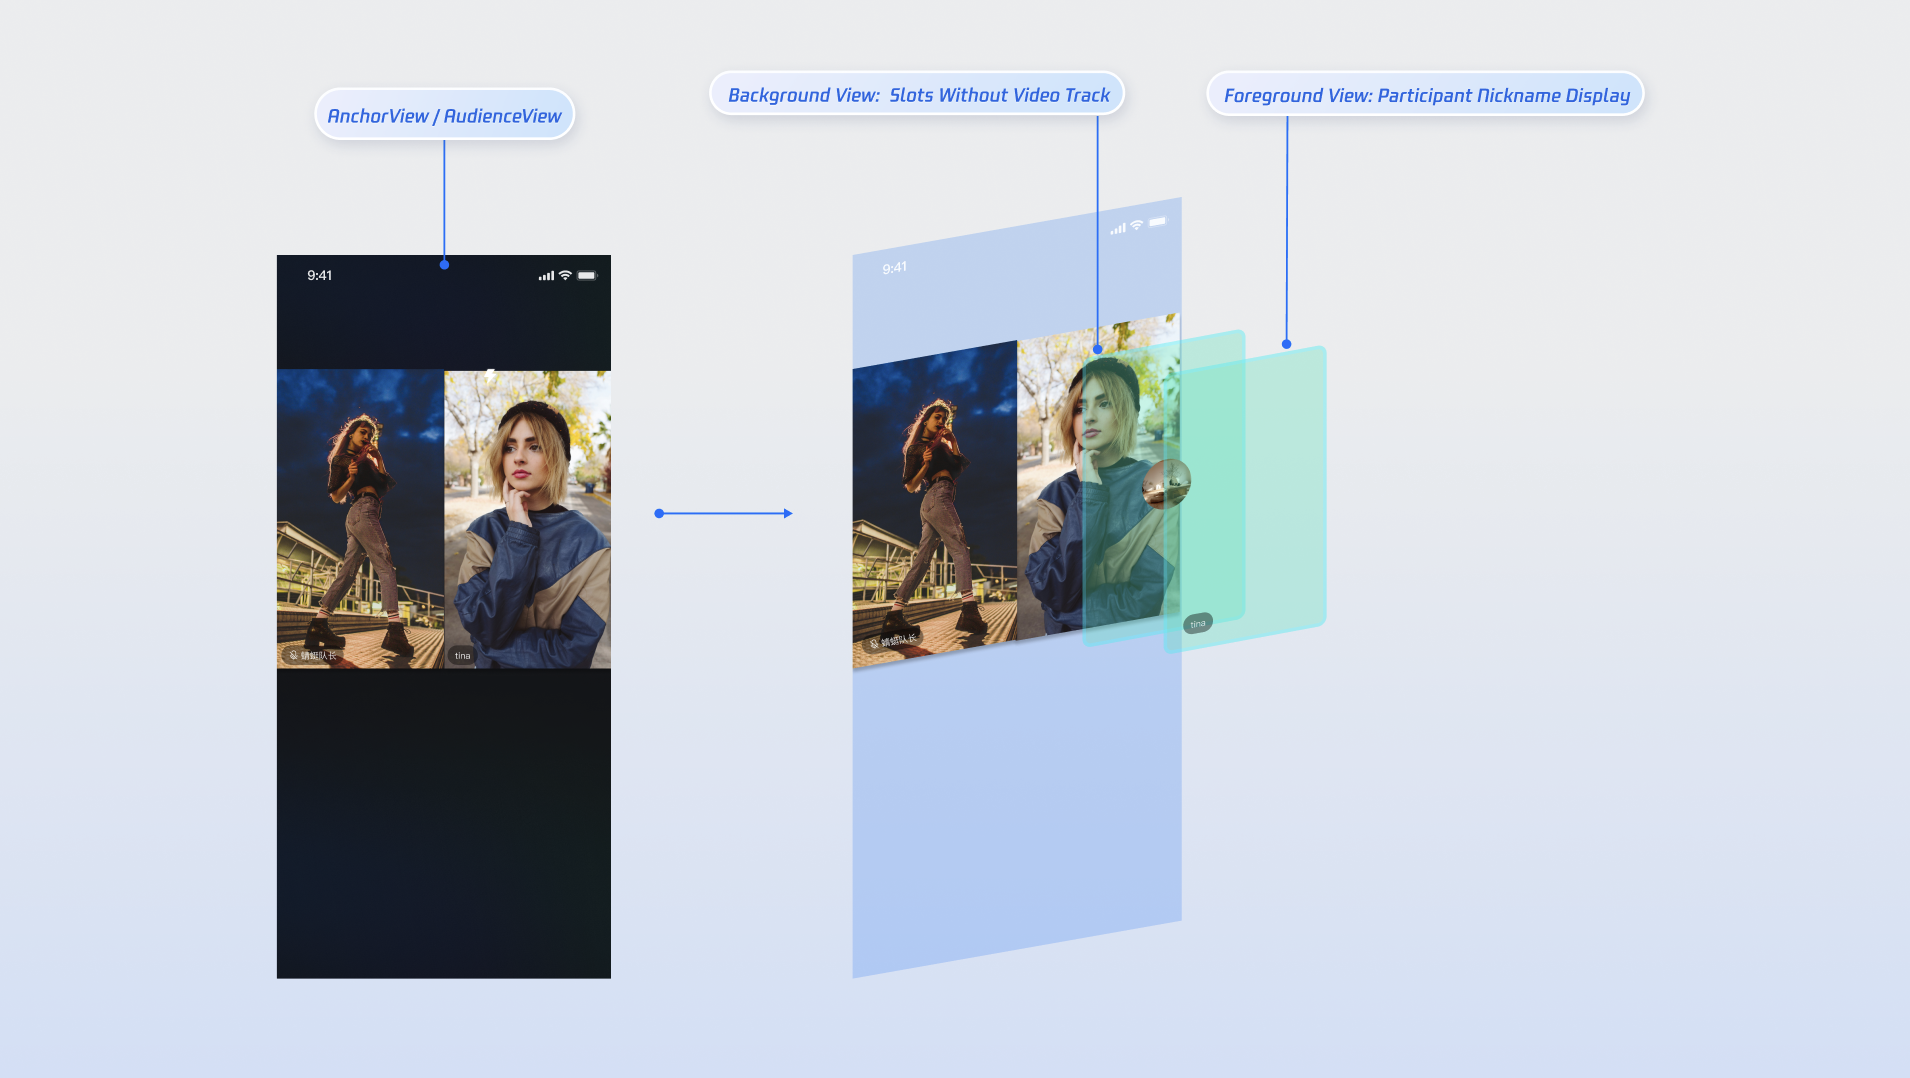
View Hierarchy Illustration
Implementation Steps
Step 1: Create Custom Widget Views
Define three basic view classes: one for user info, one for empty seat prompts, and one for backgrounds when no video stream is available.
Create a custom user info view:
Note:
Reference the AnchorCoGuestView.swift file in the TUILiveKit open-source project for the default implementation.
import UIKitclass CustomInfoView: UIView {let nameLabel = UILabel()let muteIcon = UIImageView(image: UIImage(named: "mute_icon"))init(name: String, isMuted: Bool) {super.init(frame: .zero)nameLabel.text = namemuteIcon.isHidden = !isMuted}required init?(coder: NSCoder) {fatalError("init(coder:) has not been implemented")}// ... layout code ...}
Create a custom empty seat view:
Note:
Reference the AnchorEmptySeatView.swift file in the TUILiveKit open-source project for the default implementation.
import UIKitclass EmptySeatView: UIView {let addIcon = UIImageView(image: UIImage(named: "add_icon"))let addLabel = UILabel()// ... layout code ...}
Create a custom avatar placeholder for when there's no video stream:
Note:
Reference the AnchorBackgroundWidgetView.swift file in the TUILiveKit open-source project for the default implementation.
import UIKitclass CustomAvatarView: UIView {let avatarView = UIImageView(frame: .zero)init(avatarURL: String) {super.init(frame: .zero)// load avatar URL}required init?(coder: NSCoder) {fatalError("init(coder:) has not been implemented")}// ... layout code ...}
Step 2: Implement Delegate Logic
Create a delegate class (or extend your existing
ViewController) and implement the VideoViewDelegate methods createCoGuestView (for audience connecting) and createCoHostView (for host connecting), returning your custom views.Implement the
createCoGuestView method in VideoViewDelegate to return a custom widget for audience connecting:class VideoWidgetProvider: VideoViewDelegate {/// seatInfo: Data for the seat (user info, audio/video status)/// viewLayer: View layer (.foreground for the top view / .background for the background view)func createCoGuestView(seatInfo: SeatInfo, viewLayer: ViewLayer) -> UIView? {let isUserOnSeat = !seatInfo.userInfo.userID.isEmptyswitch viewLayer {case .foreground:if isUserOnSeat {// Non-empty seat: return custom foreground viewlet widget = CustomInfoView(name: seatInfo.userInfo.userName,isMuted: seatInfo.userInfo.microphoneStatus == .off)return widget}// Empty seat: return custom empty seat viewreturn EmptySeatView()case .background:if isUserOnSeat {// Custom background view (shown when camera is off)let bgView = CustomAvatarView(avatarURL: seatInfo.userInfo.avatarURL)return bgView}return nil}}}
Implement the
createCoHostView method for host connecting:class VideoWidgetProvider: VideoViewDelegate {/// seatInfo: Data for the seat (user info, audio/video status)/// viewLayer: View layer (.foreground for the top view / .background for the background view)func createCoHostView(seatInfo: SeatInfo, viewLayer: ViewLayer) -> UIView? {let isUserOnSeat = !seatInfo.userInfo.userID.isEmptyswitch viewLayer {case .foreground:if isUserOnSeat {// Custom foreground view—can style differently from audience connectinglet widget = CustomInfoView(name: seatInfo.userInfo.userName,isMuted: seatInfo.userInfo.microphoneStatus == .off)return widget}// Custom empty seat view—can style differently from audience connectingreturn EmptySeatView()case .background:if isUserOnSeat {// Custom background view (shown when camera is off)—can style differently from audience co-hostinglet bgView = CustomAvatarView(avatarURL: seatInfo.userInfo.avatarURL)return bgView}return nil}}}
Parameter Descriptions
Parameter | Type | Description |
seatInfo | SeatInfo | Contains detailed information about the user on the seat. |
seatInfo.userInfo.userName | String | The nickname of the user occupying the seat. |
seatInfo.userInfo.avatarURL | String | The avatar URL for the user occupying the seat. |
seatInfo.userInfo.microphoneStatus | DeviceStatus | The microphone status of the user on the seat. |
seatInfo.userInfo.cameraStatus | DeviceStatus | The camera status of the user on the seat. |
viewLayer | ViewLayer | Enum for the widget layer: .foreground is always drawn on top of the video..background appears below the foreground view and is only shown when the user has no video stream (camera off). Commonly used to show the user's default avatar or a placeholder image. |
Customizing Host PK Scenario Widgets
PK is the most interactive feature in live streaming. During PK, the screen is usually split into sections (one per participant). Developers often add PK-specific UI elements—such as score bars, individual seat scores, countdown animations, or "VS" effects—to the top or center of the screen, creating a competitive atmosphere.
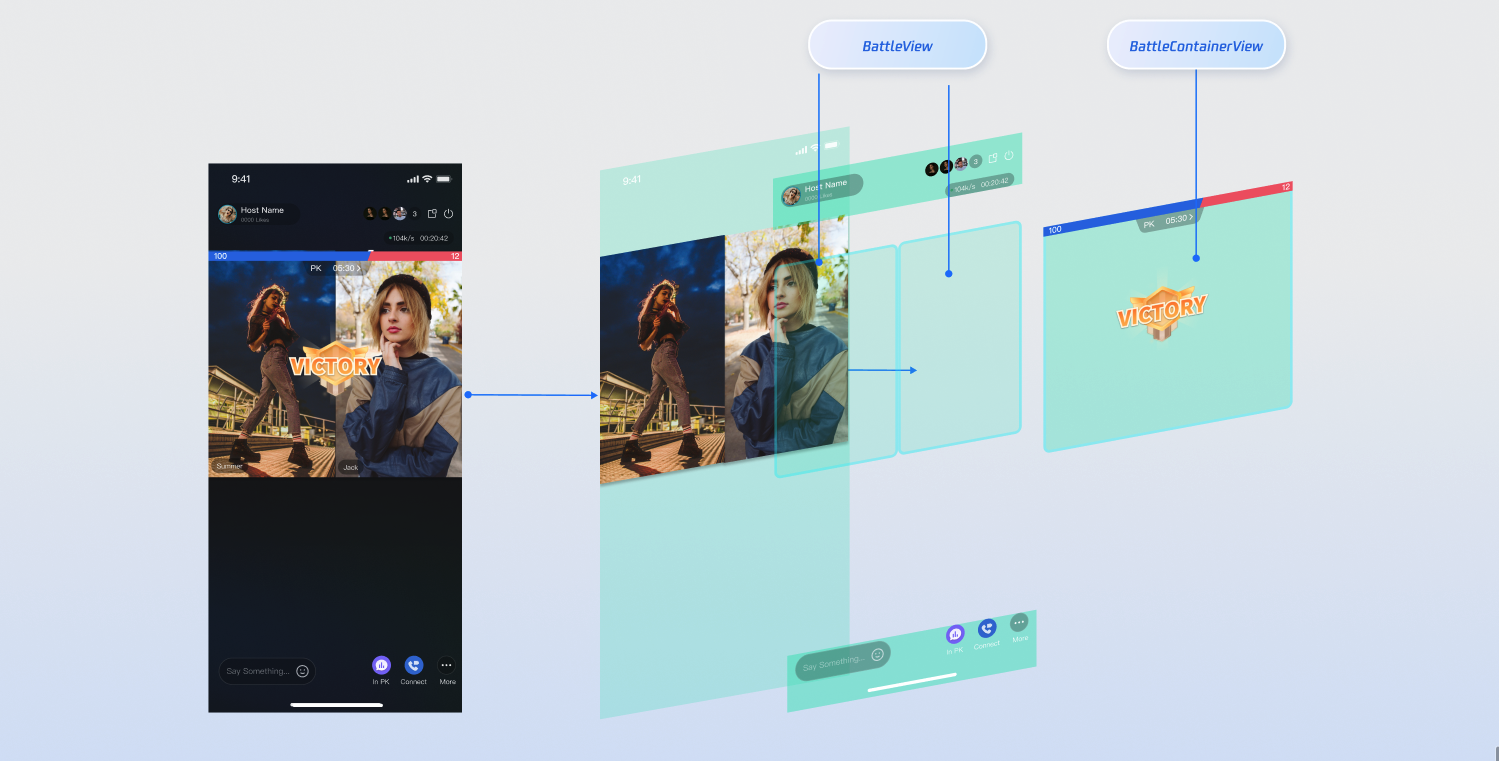
View Hierarchy Illustration
Note:
PK depends on co-hosting. You must establish a host connection before initiating a PK session.
Implementation Steps
Step 1: Create Custom UI Components
A typical PK scenario uses two types of views:
1. Single-user widget: Displayed on each host's window (e.g., a score bar).
2. Global container: Overlays the entire screen (e.g., VS animation, countdown timer).
Note:
Reference AnchorBattleMemberInfoView.swift and AnchorBattleInfoView.swift in TUILiveKit for default implementation details.
// Single-user score bar exampleclass MyBattleScoreView: UIView {private let scoreView = UIView()// ... layout code ...}// Global VS panel exampleclass MyBattleContainer: UIView {private let battleTimeView = UIImageView(frame: .zero)// Implements countdown and VS animation}
Step 2: Implement Delegate Logic
Implement the
VideoViewDelegate methods createBattleView and createBattleContainerView:class VideoWidgetProvider: VideoViewDelegate {/// 1. Create [PK single-user info] widget (displayed above each host's video)func createBattleView(seatInfo: SeatInfo) -> UIView? {let scoreView = MyBattleScoreView()return scoreView}/// 2. Create [PK global container] widget (displayed above the entire video area)func createBattleContainerView() -> UIView? {let container = MyBattleContainer()return container}}
Integration and Activation
This is the most critical step. You must inject your
VideoWidgetProvider (the delegate implementation) into the core live streaming workflow.Host Integration: Before initializing
AnchorView, initialize LiveCoreView and assign its delegate.import AtomicXCoreimport SnapKitclass YourAnchorViewController: UIViewController {private let anchorView: AnchorViewprivate let widgetProvider = VideoWidgetProvider()init(liveInfo: LiveInfo) {let videoView = LiveCoreView(viewType: .pushView)videoView.videoViewDelegate = widgetProvider // Assign delegateanchorView = AnchorView(liveInfo: liveInfo, coreView: videoView)super.init(nibName: nil, bundle: nil)}required init?(coder: NSCoder) {fatalError("init(coder:) has not been implemented")}override func viewDidLoad() {super.viewDidLoad()view.addSubview(anchorView)anchorView.snp.makeConstraints { make inmake.edges.equalToSuperview()}}}
Audience Integration: On the audience side, use
AudienceContainerViewDelegate to inject the core view at the right time.class YourAudienceViewController: UIViewController {private let audienceView: AudienceContainerViewprivate let widgetProvider = VideoWidgetProvider()public init(roomId: String) {self.audienceView = AudienceContainerView(roomId: roomId)super.init(nibName: nil, bundle: nil)self.audienceView.delegate = self}required init?(coder: NSCoder) {fatalError("init(coder:) has not been implemented")}}extension YourAudienceViewController: AudienceContainerViewDelegate {func onCreateCoreView(for liveInfo: LiveInfo) -> LiveCoreView? {let view = LiveCoreView(viewType: .playView)view.videoViewDelegate = widgetProvider // Assign delegatereturn view}}
Advanced: Accessing Real-time Business Data
For more complex scenarios (like PK), you may need real-time business data beyond what's available in
SeatInfo, such as countdown timers or PK scores. In these cases, integrate with the core data stores in AtomicXCore from your custom views.Store/Component | Function Description | API Documentation |
CoGuestStore | Audience connecting data: list of connected users, invitation list, application list, etc. | |
CoHostStore | Host connecting data: list of connected users, invitation list, application list, etc. | |
BattleStore | PK data: current PK info, PK user list, PK score list. |
FAQs
Why isn’t my custom view showing after setting the delegate?
Check these two common issues:
1. Delegate object is released:
videoViewDelegate is a weak reference. If you define the delegate inside a function (e.g., let delegate = VideoWidgetProvider()), it will be released as soon as the function exits.Solution:
Declare the delegate object as a property (member variable) of your
ViewController to ensure it remains in memory.2. Assignment timing too late:
You must assign
LiveCoreView’s videoViewDelegate before creating the AnchorView. Assigning it afterward means AnchorView will have already loaded the default view.How can I customize only the co-guest view and keep the default PK view?
VideoViewDelegate operates in full takeover mode. Once you assign a custom delegate, the SDK's default delegate logic in AnchorView and AudienceView is fully disabled.Solution:
You must implement all related delegate methods in your class. For any view you don't want to customize (such as PK), you can:
1. Copy source code:
Find the default implementation class in the
LiveKit source code (e.g., AnchorBattleInfoView) and return instances of these defaults in your delegate.2. Manual implementation:
Refer to the default style and quickly create a similar simple view to return.
My custom widget appears but cannot be clicked—why?
Since the
.foreground view layer is always on top of the video, check the following:Confirm your view is placed in the
.foreground layer.Ensure
isUserInteractionEnabled is set to true on your view.Check that its parent view does not disable user interaction.

