
インテグレーション
この文章では、短時間で
TUIRoomKitコンポーネントを導入する方法について説明します。このガイドに従い、以下の重要なステップを 10 分以内に完了し、包括的な UI インターフェイスを備えたオーディオ・ビデオミーティング機能を実現することができます。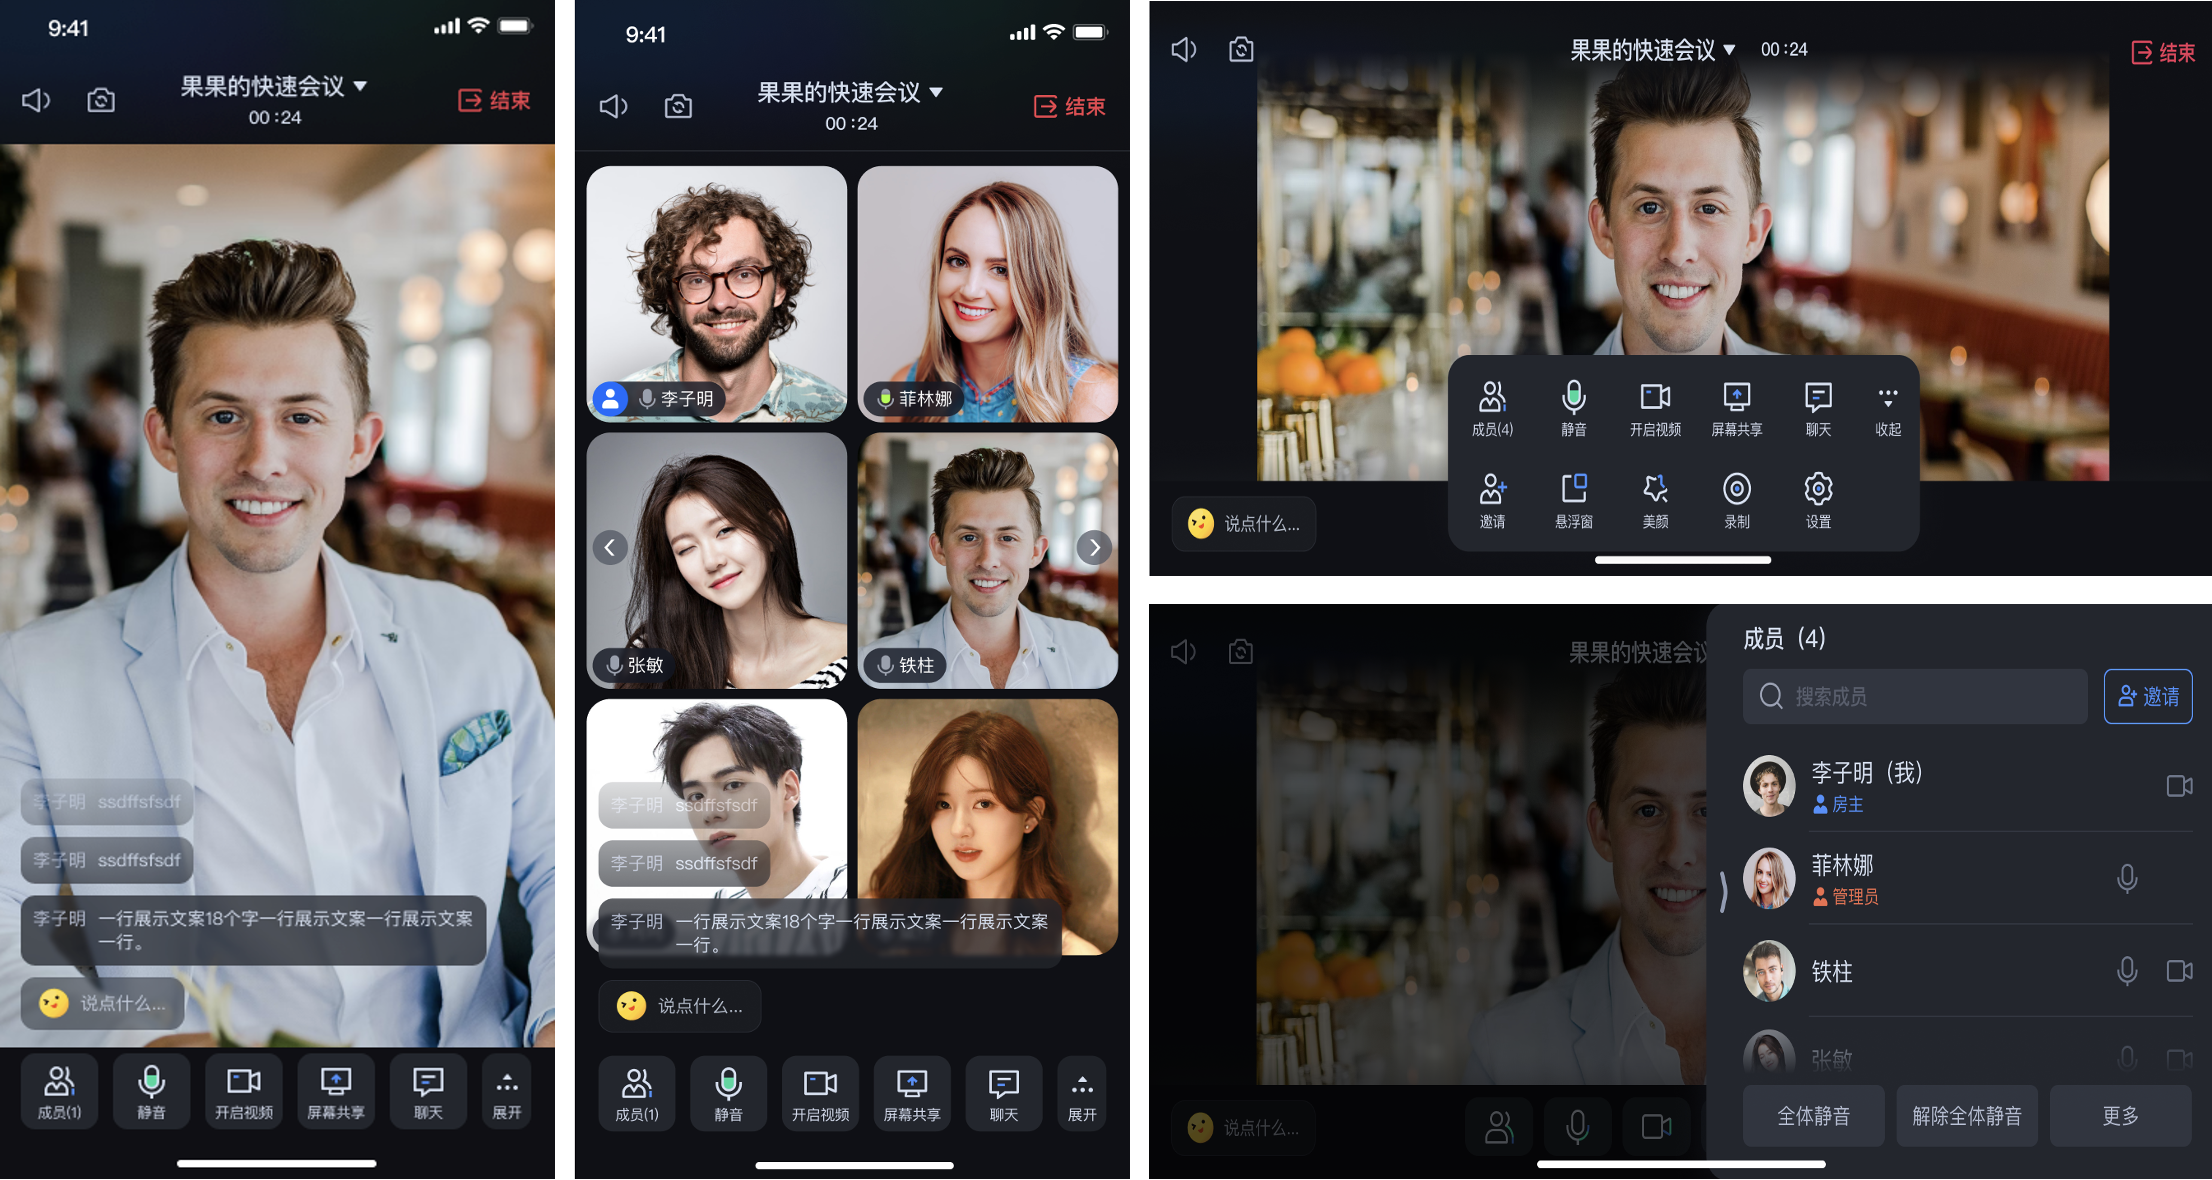
環境の準備
最低 Android 4.4(SDK API Level 19)と互換性があり、Android 5.0 (SDK API Level 21)以上のバージョンを使用することが推奨されます。
Android Studio 3.5 以上のバージョン(Gradle 3.5.4 以上のバージョン)。
Android 4.4 以上のモバイルデバイス。
ステップ 1:サービスのアクティブ化
TUIRoomKit を使用してミーティングを開始する前に、コンソールで TUIRoomKit 専用の多人数オーディオ・ビデオインタラクションサービスを有効にする必要があります。具体的な手順については、 サービスのアクティブ化を参照してください。
ステップ 2:TUIRoomKit コンポーネントのダウンロード
1. Github でコードをクローン/ダウンロードし、下図に示すように、
Androidディレクトリのtimcommon、 tuiroomkitサブディレクトリを現在のプロジェクトの app の同じレベルのディレクトリにコピーします。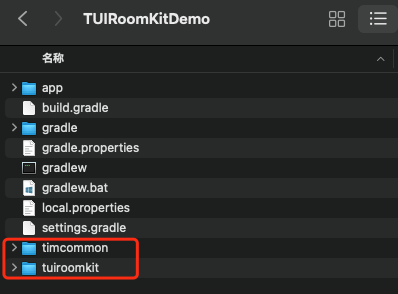
ステップ 3:プロジェクト設定
1. プロジェクトのルートディレクトリにある
setting.gradle(またはsettings.gradle.kts)ファイルを見つけて、そこにtuiroomkitコンポーネントをプロジェクトに導入するための以下のコードを追加します。include ':timcommon'include ':tuiroomkit'
include (":timcommon") include (":tuiroomkit")
2. app で
build.gradle(またはbuild.gradle.kts)ファイルを見つけ、新しく追加されたtuiroomkitコンポーネントへの現在のappの依存を宣言するための以下のコードをそこに追加します。api project(':tuiroomkit')
api(project(":tuiroomkit"))
3. SDK 内部で Java のリフレクション特性を使用しているため、SDK 内の一部のクラスを難読化されていないリストに追加する必要があります。そのため、proguard-rules.pro ファイルに以下のコードを追加する必要があります。
-keep class com.tencent.** { *; }
4. app ディレクトリの AndroidManifest.xml ファイルを見つけ、application ノードにtools:replace="android:allowBackup "を追加し、コンポーネント内の設定を上書きし、自分の設定を使用します。
// app/src/main/AndroidManifest.xml<application android:name=".DemoApplication" android:allowBackup="false" android:icon="@drawable/app_ic_launcher" android:label="@string/app_name" android:largeHeap="true" android:theme="@style/AppTheme" tools:replace="android:allowBackup">
ステップ 4:ログイン
TUILoginの関連インタフェースを呼び出すことで、コンポーネントのログインを完了するための以下のコードをプロジェクトに追加します。このステップは非常に重要です。ログインして初めて TUIRoomKitの機能を正常に使用できるため、関連するパラメータが正しく設定されているかどうかをよく確認してください。import com.tencent.qcloud.tuicore.TUILogin; import com.tencent.qcloud.tuicore.interfaces.TUICallback;import com.tencent.cloud.tuikit.roomkit.debug.GenerateTestUserSig;String userId = "denny"; // お客様の UserID に置き換えてくださいint sdkAppId = 1400000001; // ステップ 1 で取得して sdkAppId に置き換えてくださいString sdkSecretKey = "xxxx"; // お客様の sdkSecretKeyに置き換えてくださいString userSig = GenerateTestUserSig.genTestUserSig(sdkAppId, userId, sdkSecretKey);TUILogin.login(context,sdkAppId,userId,userSig,new TUICallback() {@Overridepublic void onSuccess() {}@Overridepublic void onError(int errorCode, String errorMessage) {}});
import com.tencent.qcloud.tuicore.TUILogin import com.tencent.qcloud.tuicore.interfaces.TUICallbackimport com.tencent.cloud.tuikit.roomkit.debug.GenerateTestUserSigval userId = "denny" // お客様の UserID に置き換えてくださいval sdkAppId = 1400000001 // ステップ 1 で取得した sdkAppId に置き換えてくださいval sdkSecretKey = "xxxx" // お客様の sdkSecretKey に置き換えてくださいval userSig = GenerateTestUserSig.genTestUserSig(sdkAppId, userId, sdkSecretKey)TUILogin.login(this,sdkAppId,userId,userSig,object : TUICallback() {override fun onSuccess() {}override fun onError(errorCode: Int, errorMessage: String) {}})
TUILogin.login 関数パラメータの説明: |
SDKAppID: サービスのアクティブ化 の最後のステップで取得されます。 UserID:現在のユーザーの ID 、文字列タイプ。英字(a-z と A-Z)、数字(0-9)、ハイフン(-)、アンダースコア(_)のみを含めることができます。 UserSig: サービスのアクティブ化 のステップ 3 で取得した SDKSecretKeyを使用してSDKAppID、UserIDなどの情報を暗号化することにより、UserSigを得ることができます。それは認証用のチケットであり、現在ユーザーがTRTCのサービスを使用できるかどうかを、Tencent Cloud が識別するために使用されます。コンソールの 補助ツール を使用して一時的に使用可能なものを生成することができますUserSig。詳細情報については、 UserSig の計算方法と使用方法を参照してください。 説明: 開発環境:ローカル開発のデバッグ段階である場合は、ローカルの GenerateTestUserSig.genTestUserSig() 関数を使って userSig を生成することができます。この方法における SDKSecretKey は簡単に逆コンパイル・逆クラッキングされやすいです。一旦キーが漏洩すると、攻撃者はお客様の Tencent Cloud のトラフィックを盗むことができるようになります。 本番環境:プロジェクトがオンラインでリリースされる場合、 サーバー側で UserSig を生成する 方法を使用してください。 |
ステップ 5:最初のミーティングの開始
1. プロジェクトのディレクトリで
app/src/main/res/layout(layout ディレクトリがない場合は新規作成してください) activity_conference.xml ファイルを作成し、画面のレイアウトを追加します。<?xml version="1.0" encoding="utf-8"?><FrameLayout xmlns:android="http://schemas.android.com/apk/res/android" android:id="@+id/conference_container" android:layout_width="match_parent" android:layout_height="match_parent" />
2. ConferenceMainFragment はミーティングの主画面で、quickStartConference メソッドを呼び出して(このメソッドにカスタムルーム番号を渡す)クイックミーティングを開始し、クイックミーティングのコールバック onConferenceStarted で現在の Activity に ConferenceMainFragment を追加すると、クイックミーティングを開始できます。
プロジェクトで ConferenceOwnerActivity.java ファイルを作成します。
import com.tencent.cloud.tuikit.roomkit.ConferenceError; import com.tencent.cloud.tuikit.roomkit.ConferenceMainFragment; import com.tencent.cloud.tuikit.roomkit.ConferenceObserver;public class ConferenceOwnerActivity extends AppCompatActivity {private ConferenceObserver mConferenceObserver;@Overrideprotected void onCreate(Bundle savedInstanceState) {super.onCreate(savedInstanceState);setContentView(R.layout.activity_conference);ConferenceMainFragment fragment = new ConferenceMainFragment();mConferenceObserver = new ConferenceObserver() {@Overridepublic void onConferenceStarted(String conferenceId, ConferenceError error) {super.onConferenceStarted(conferenceId, error);if (error != ConferenceError.SUCCESS) {return;}FragmentManager manager = getSupportFragmentManager();FragmentTransaction transaction = manager.beginTransaction();transaction.add(R.id.conference_container, fragment);transaction.commitAllowingStateLoss();}};fragment.setConferenceObserver(mConferenceObserver);// 「123456」をカスタムルーム番号に置き換えてくださいfragment.quickStartConference("123456");}}
import com.tencent.cloud.tuikit.roomkit.ConferenceError import com.tencent.cloud.tuikit.roomkit.ConferenceMainFragment import com.tencent.cloud.tuikit.roomkit.ConferenceObserverclass ConferenceOwnerActivity : AppCompatActivity() { private var mConferenceObserver : ConferenceObserver? = null override fun onCreate(savedInstanceState: Bundle?) { super.onCreate(savedInstanceState) setContentView(R.layout.activity_conference) var fragment = ConferenceMainFragment() mConferenceObserver = object: ConferenceObserver() { override fun onConferenceStarted(conferenceId: String?, error: ConferenceError?) { super.onConferenceStarted(conferenceId, error) if (error != ConferenceError.SUCCESS) { return } val fragmentManager = supportFragmentManager val transaction = fragmentManager.beginTransaction() transaction.add(R.id.conference_container, fragment) transaction.commitAllowingStateLoss() } } fragment.setConferenceObserver(mConferenceObserver) // Replace "123456" with the corresponding conference number fragment.quickStartConference("123456") } }
app/src/main/AndroidManifest.xml ファイルに ConferenceOwnerActivity を登録します。
<!--app/src/main/AndroidManifest.xml --><?xml version="1.0" encoding="utf-8"?> <manifest xmlns:android="http://schemas.android.com/apk/res/android" xmlns:tools="http://schemas.android.com/tools"> <application ... <activity ... </activity><!-- 以下のコードを追加して登録します ConferenceOwnerActivity --> <activity android:name=".ConferenceOwnerActivity" /> </application> </manifest>
注意:
ConferenceOwnerActivity は AppCompatActivity を継承する必要があります。そうしないと画面が表示されません。
ConferenceOwnerActivity は AndroidManifest.xml ファイルに登録する必要があります。
3. TUILogin.login 関数 を呼び出した後、ビジネスに応じてミーティングを開始する必要がある場所で ConferenceOwnerActivity ミーティング画面を立ち上げます。例えば、空のプロジェクトの MainActivity.java でミーティング画面を立ち上げるサンプルコードは以下の通りです。
import android.content.Intent;import android.os.Bundle;import androidx.appcompat.app.AppCompatActivity;public class MainActivity extends AppCompatActivity { @Override protected void onCreate(Bundle savedInstanceState) { super.onCreate(savedInstanceState); setContentView(R.layout.activity_main);// ミーティング画面の立ち上げ Intent intent = new Intent(MainActivity.this, ConferenceOwnerActivity.class); startActivity(intent); } }
import android.content.Intentimport android.os.Bundleimport androidx.appcompat.app.AppCompatActivityclass MainActivity : AppCompatActivity() {override fun onCreate(savedInstanceState: Bundle?) {super.onCreate(savedInstanceState)setContentView(R.layout.activity_main)// ミーティング画面の立ち上げval intent = Intent(this, ConferenceOwnerActivity::class.java)startActivity(intent)}}
ステップ 6:一般メンバーのミーティング参加
1. ConferenceMainFragment はミーティングの主画面であり、joinConference メソッド(このメソッドに参加したいルーム番号を渡す)を呼び出してミーティングに参加し、ミーティング参加のコールバック onConferenceJoined で ConferenceMainFragment を現在の Activity に追加するだけで、現在のミーティングに参加できます。
プロジェクトで ConferenceGeneralActivity.java ファイルを作成します。
import android.util.Log;import com.tencent.cloud.tuikit.roomkit.ConferenceError; import com.tencent.cloud.tuikit.roomkit.ConferenceMainFragment; import com.tencent.cloud.tuikit.roomkit.ConferenceObserver;public class ConferenceGeneralActivity extends AppCompatActivity {private ConferenceObserver mConferenceObserver;@Overrideprotected void onCreate(Bundle savedInstanceState) {super.onCreate(savedInstanceState);setContentView(R.layout.activity_conference);ConferenceMainFragment fragment = new ConferenceMainFragment();mConferenceObserver = new ConferenceObserver() {@Overridepublic void onConferenceJoined(String conferenceId, ConferenceError error) {super.onConferenceJoined(conferenceId, error);if (error != ConferenceError.SUCCESS) {return;}FragmentManager manager = getSupportFragmentManager();FragmentTransaction transaction = manager.beginTransaction();transaction.add(R.id.conference_container, fragment);transaction.commitAllowingStateLoss();}};fragment.setConferenceObserver(mConferenceObserver);// 「123456」を参加するルーム番号に置き換えてくださいfragment.joinConference("123456");}}
import android.util.Logimport com.tencent.cloud.tuikit.roomkit.ConferenceError import com.tencent.cloud.tuikit.roomkit.ConferenceMainFragment import com.tencent.cloud.tuikit.roomkit.ConferenceObserverclass ConferenceGeneralActivity : AppCompatActivity() { private val tag: String = "ConferenceGeneralActivity" private var mConferenceObserver : ConferenceObserver? = null override fun onCreate(savedInstanceState: Bundle?) { super.onCreate(savedInstanceState) setContentView(R.layout.activity_conference) var fragment = ConferenceMainFragment() mConferenceObserver = object: ConferenceObserver() { override fun onConferenceJoined(conferenceId: String?, error: ConferenceError?) { super.onConferenceJoined(conferenceId, error) if (error != ConferenceError.SUCCESS) { Log.e(tag, "Error : $error") return } val fragmentManager = supportFragmentManager val transaction = fragmentManager.beginTransaction() transaction.add(R.id.conference_container, fragment) transaction.commitAllowingStateLoss() } } fragment.setConferenceObserver(mConferenceObserver) // Replace "123456" with the corresponding conference number fragment.joinConference("123456") } }
app/src/main/AndroidManifest.xml ファイルに ConferenceGeneralActivity を登録します。
<!--app/src/main/AndroidManifest.xml --><?xml version="1.0" encoding="utf-8"?> <manifest xmlns:android="http://schemas.android.com/apk/res/android" xmlns:tools="http://schemas.android.com/tools"> <application ... <activity ... </activity><!-- 以下のコードを追加して登録します ConferenceOwnerActivity --> <activity android:name=".ConferenceOwnerActivity" /><!-- 以下のコードを追加して登録します ConferenceGeneralActivity --><activity android:name=".ConferenceGeneralActivity" /> </application> </manifest>
注意:
ConferenceGeneralActivity は AppCompatActivity を継承する必要があります。そうしないと画面が表示されません。
ConferenceGeneralActivity は AndroidManifest.xml ファイルに登録する必要があります。
2. TUILogin.login 関数 を呼び出した後、ビジネスに応じてミーティングをに参加する必要がある場所で ConferenceGeneralActivity ミーティング画面を立ち上げます。例えば、空のプロジェクトの MainActivity.java でにミーティング参加画面を立ち上げるサンプルコードは以下の通りです。
import android.content.Intent;import android.os.Bundle;import androidx.appcompat.app.AppCompatActivity;public class MainActivity extends AppCompatActivity { @Override protected void onCreate(Bundle savedInstanceState) { super.onCreate(savedInstanceState); setContentView(R.layout.activity_main);// ミーティング画面の立ち上げ Intent intent = new Intent(MainActivity.this, ConferenceGeneralActivity.class); startActivity(intent); } }
import android.content.Intentimport android.os.Bundleimport androidx.appcompat.app.AppCompatActivityclass MainActivity : AppCompatActivity() {override fun onCreate(savedInstanceState: Bundle?) {super.onCreate(savedInstanceState)setContentView(R.layout.activity_main)// ミーティング画面の立ち上げval intent = Intent(this, ConferenceGeneralActivity::class.java)startActivity(intent)}}
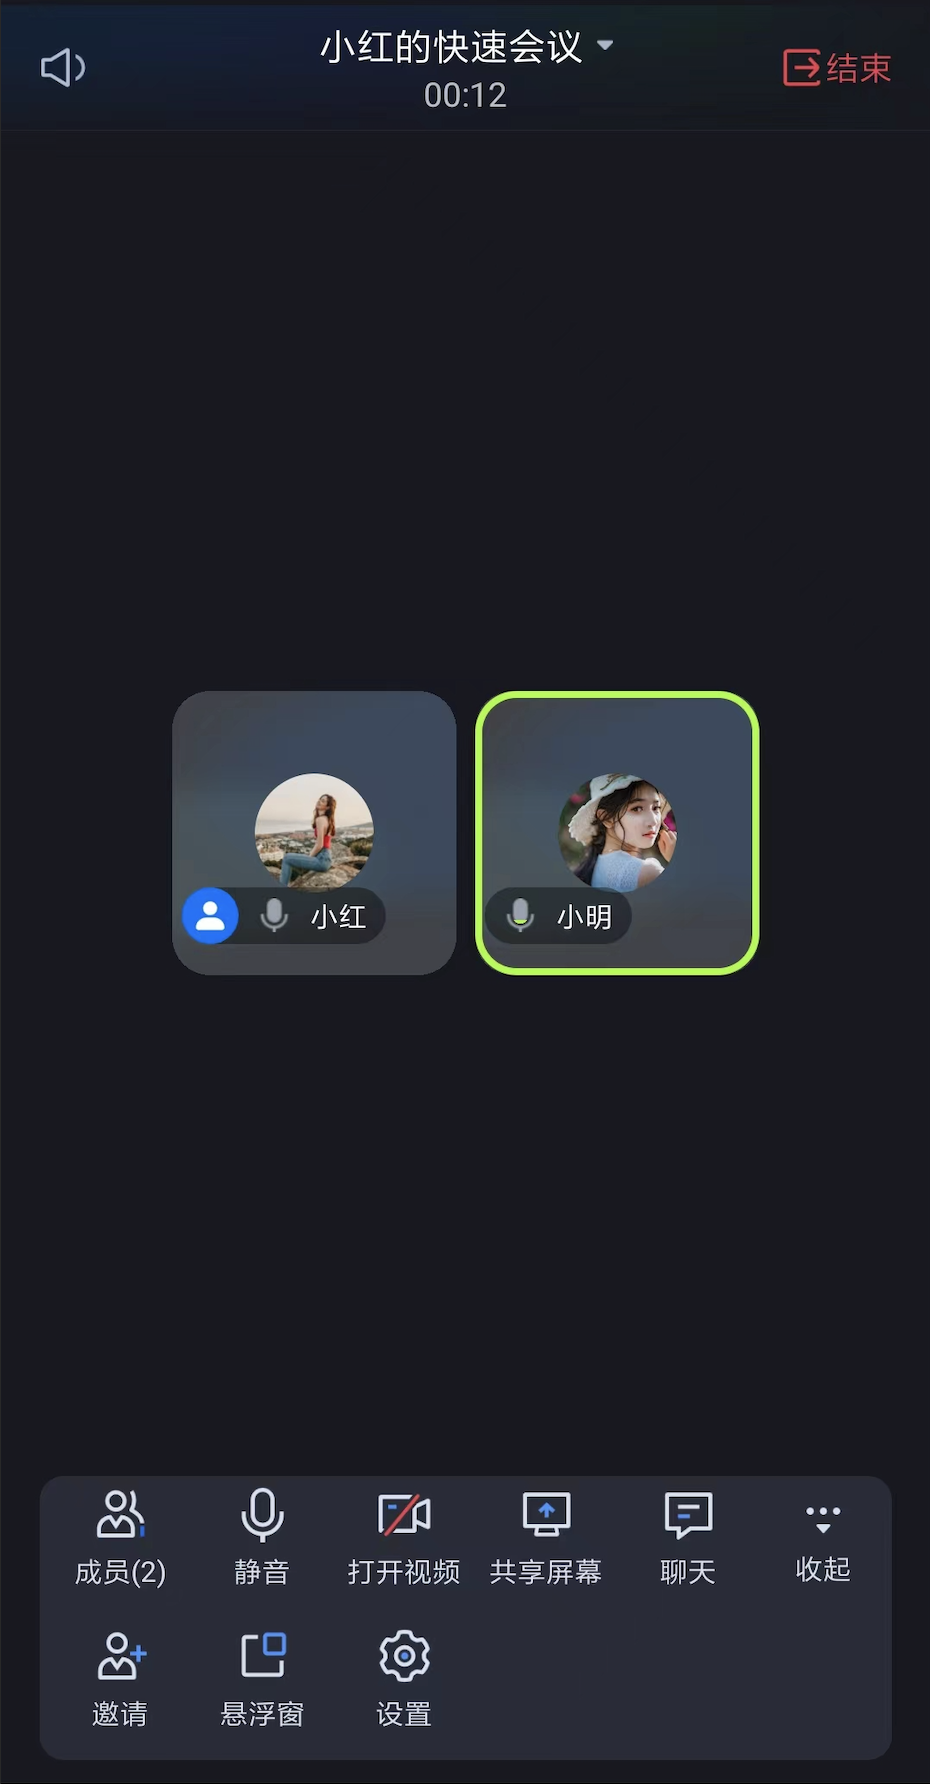
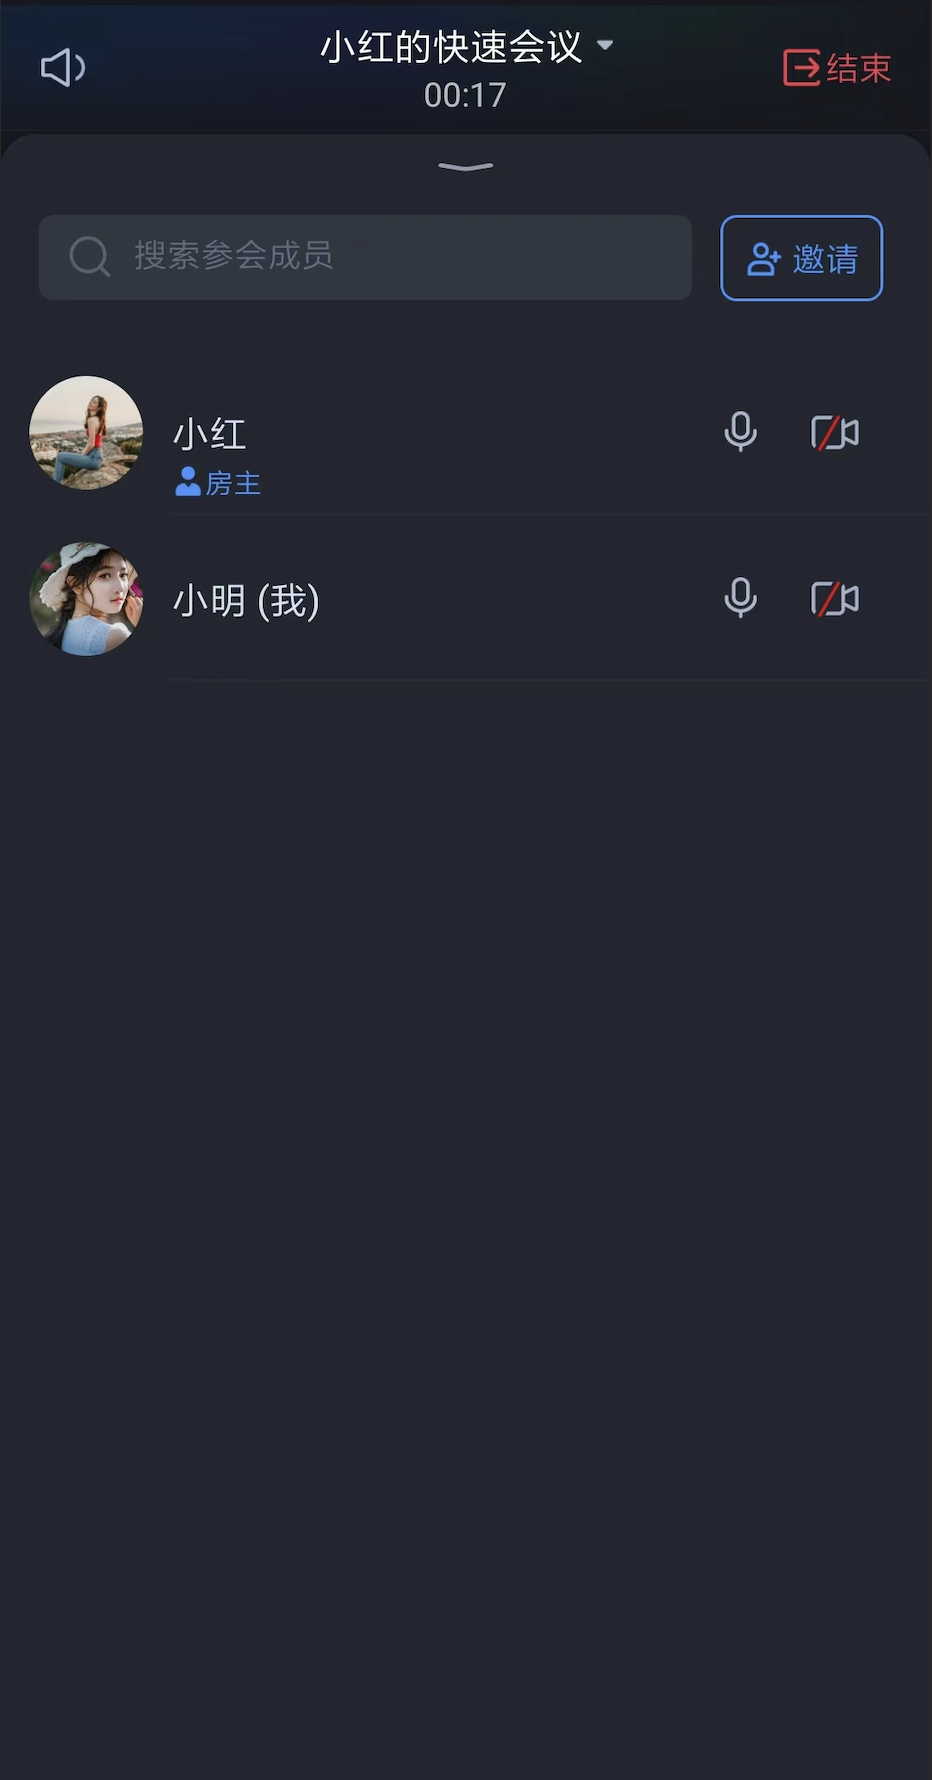
画面表示
ステップ 1-6 が正常に完了すると、UI 画面は以下のようになります。
ミーティングの主画面 | ユーザーリスト |
 |  |
よくある質問
コミュニケーションとフィードバック
導入や使用中にご要望やご意見がございましたら、info_rtc@tencent.com までお問い合わせください。

