Chat Unity UIKit & UIKit Demo is a game scene UI component library based on Tencent Cloud Chat SDK. It currently includes Conversation and Chat components with sending and receiving text messages, sending and receiving emoji messages, custom emoticons and other functions. Introducing this UIKit in your Unity project can help you quickly build your chat system.
Environmental requirements
Platform
version
Unity
2019.4.15f1 and above
Android
Android Studio 3.5 and above, App requires Android 4.1 and above
iOS
Xcode 11.0 and above. Please ensure that your project has a valid developer signature certificate.
Prerequisites
Enable Service
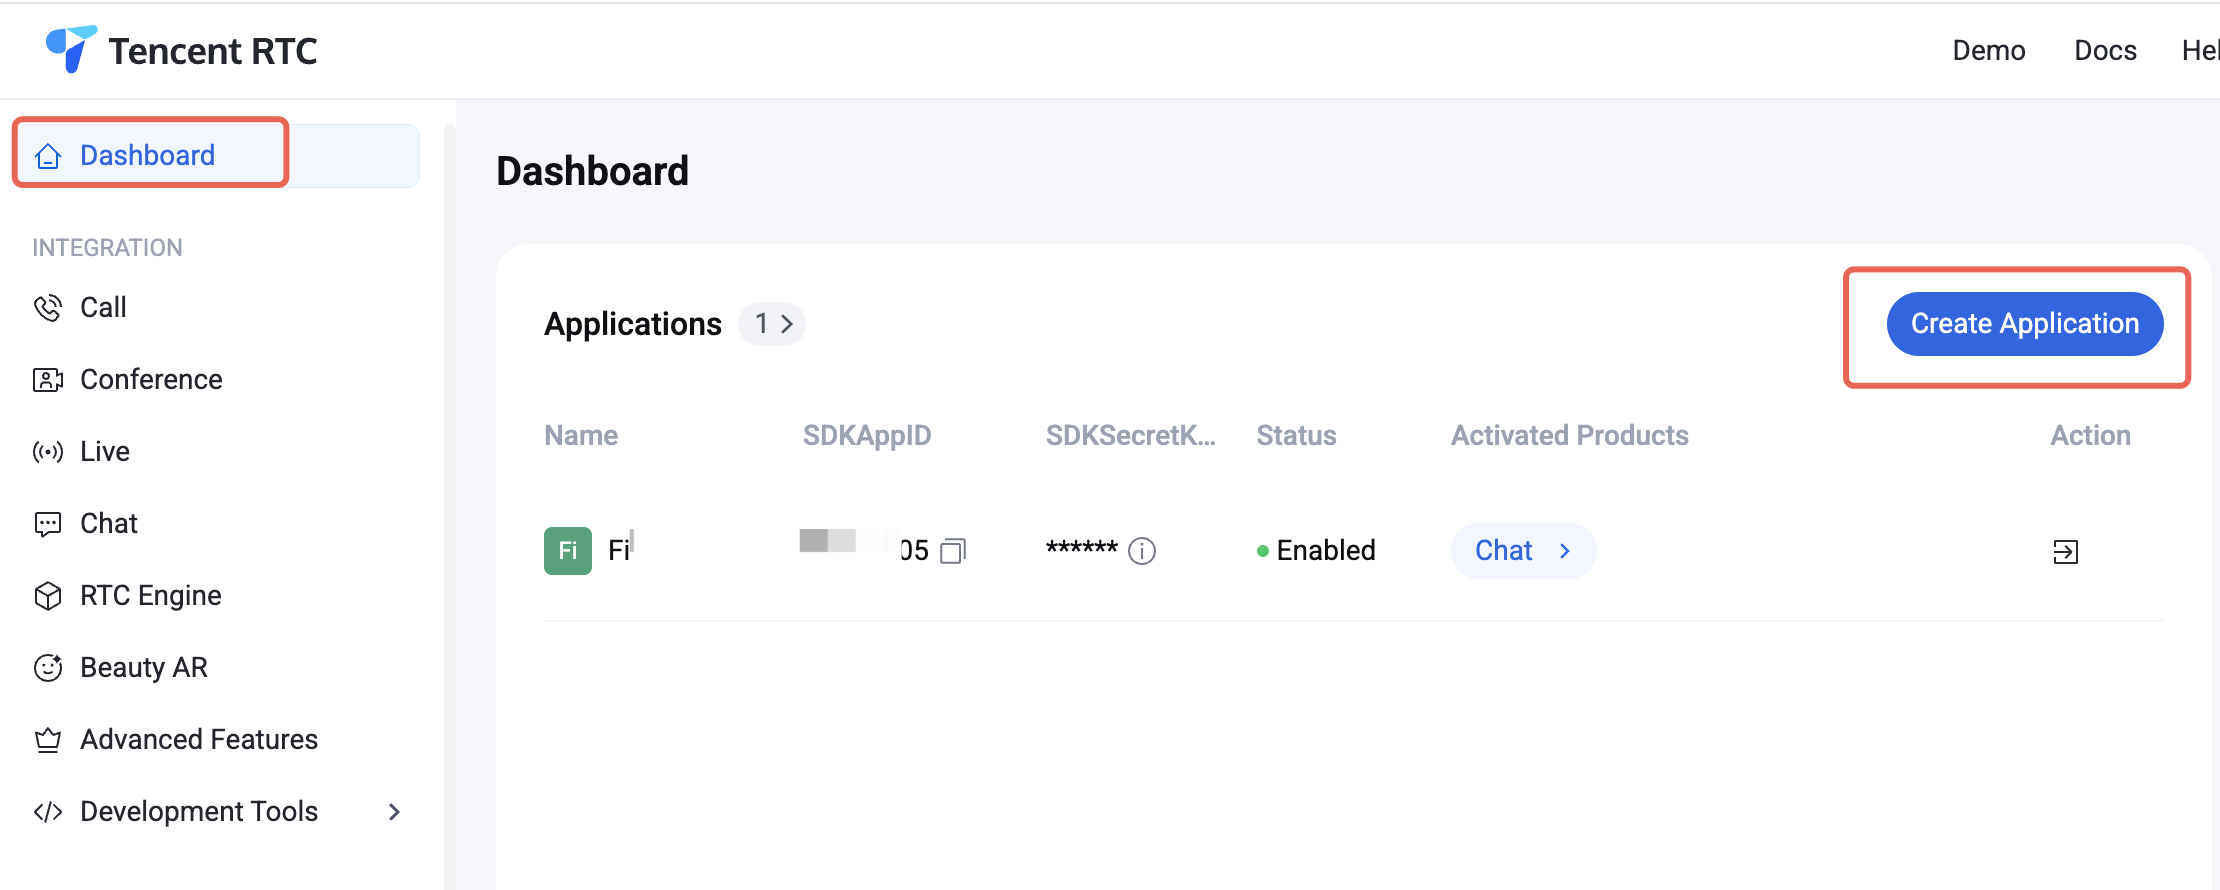
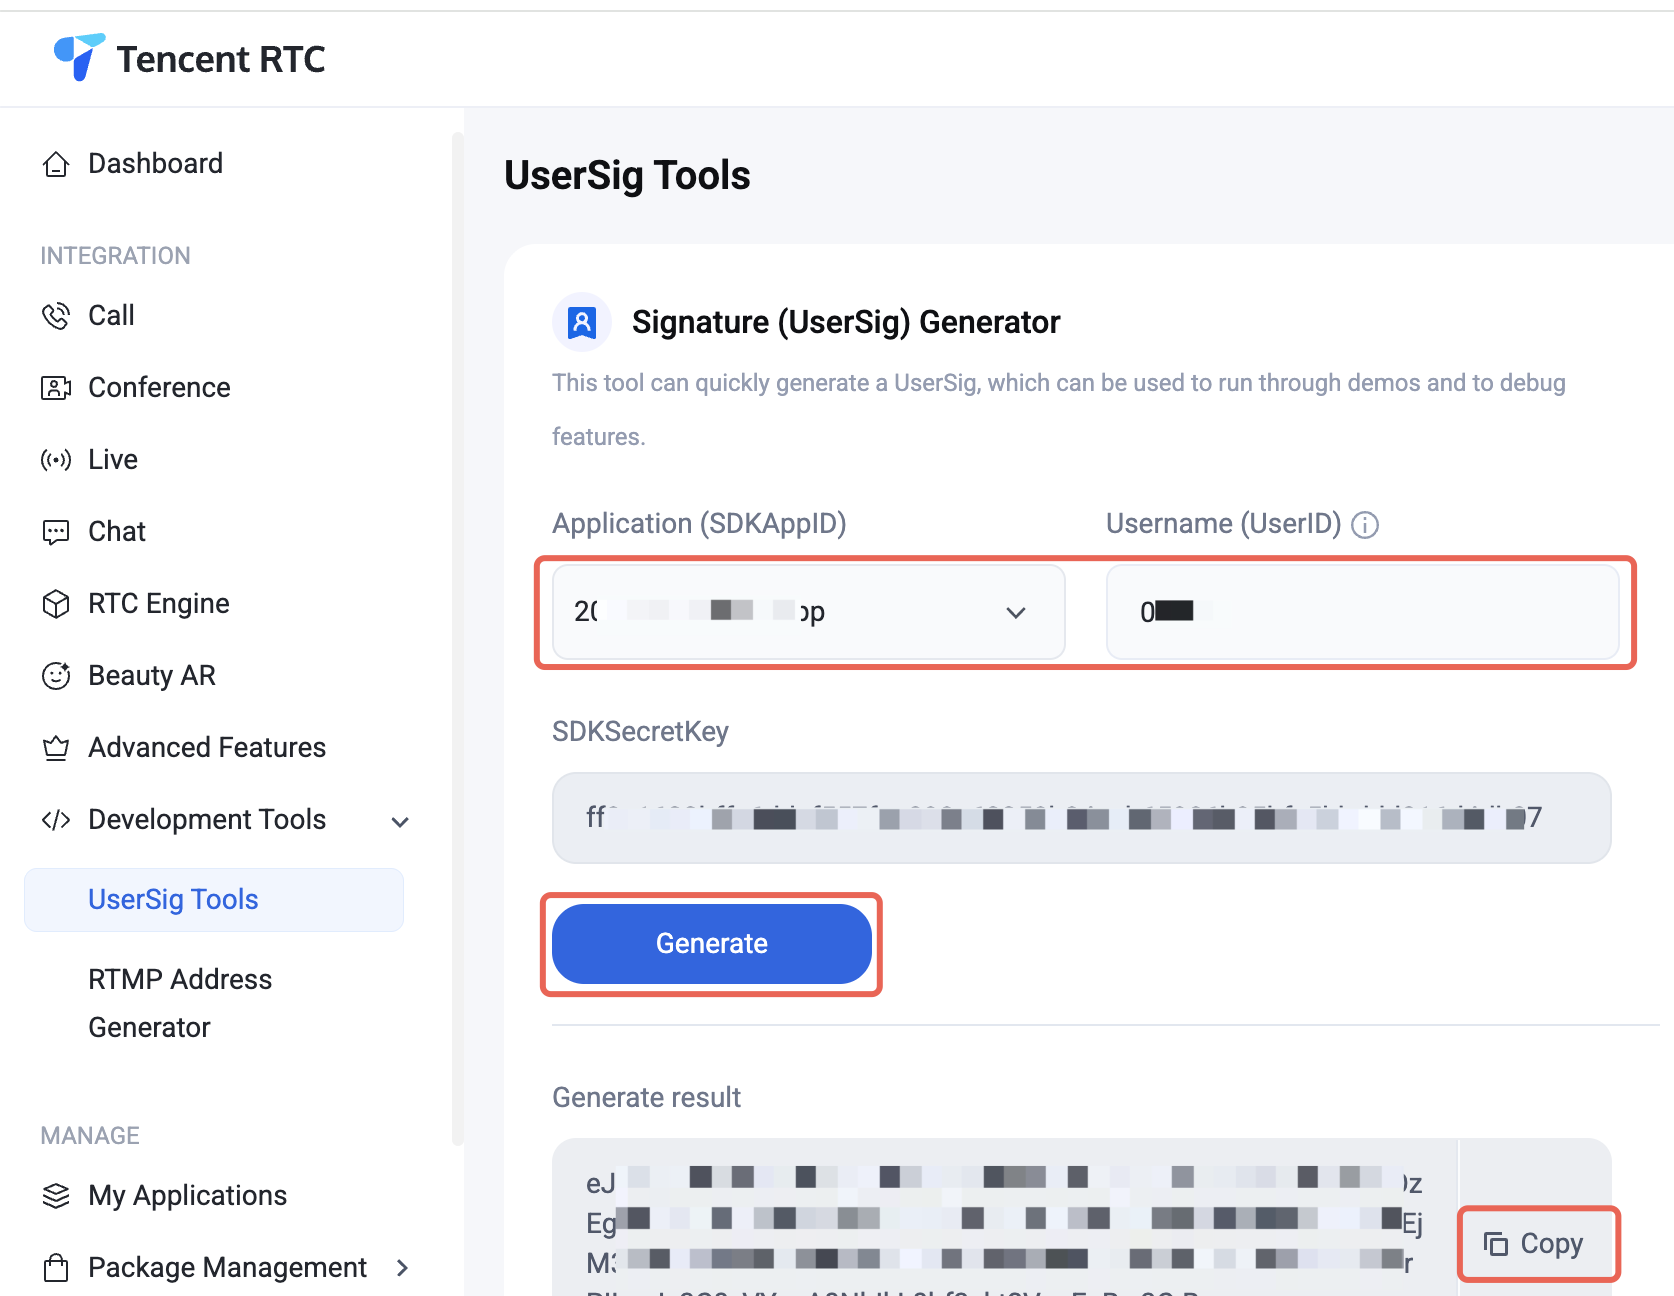
1. Log in to the Console. If you already have an application, record its SDKAppID and SDKSecretKey and proceed directly to the next section.
2. Click Create on the overview panel to start creating a new application.
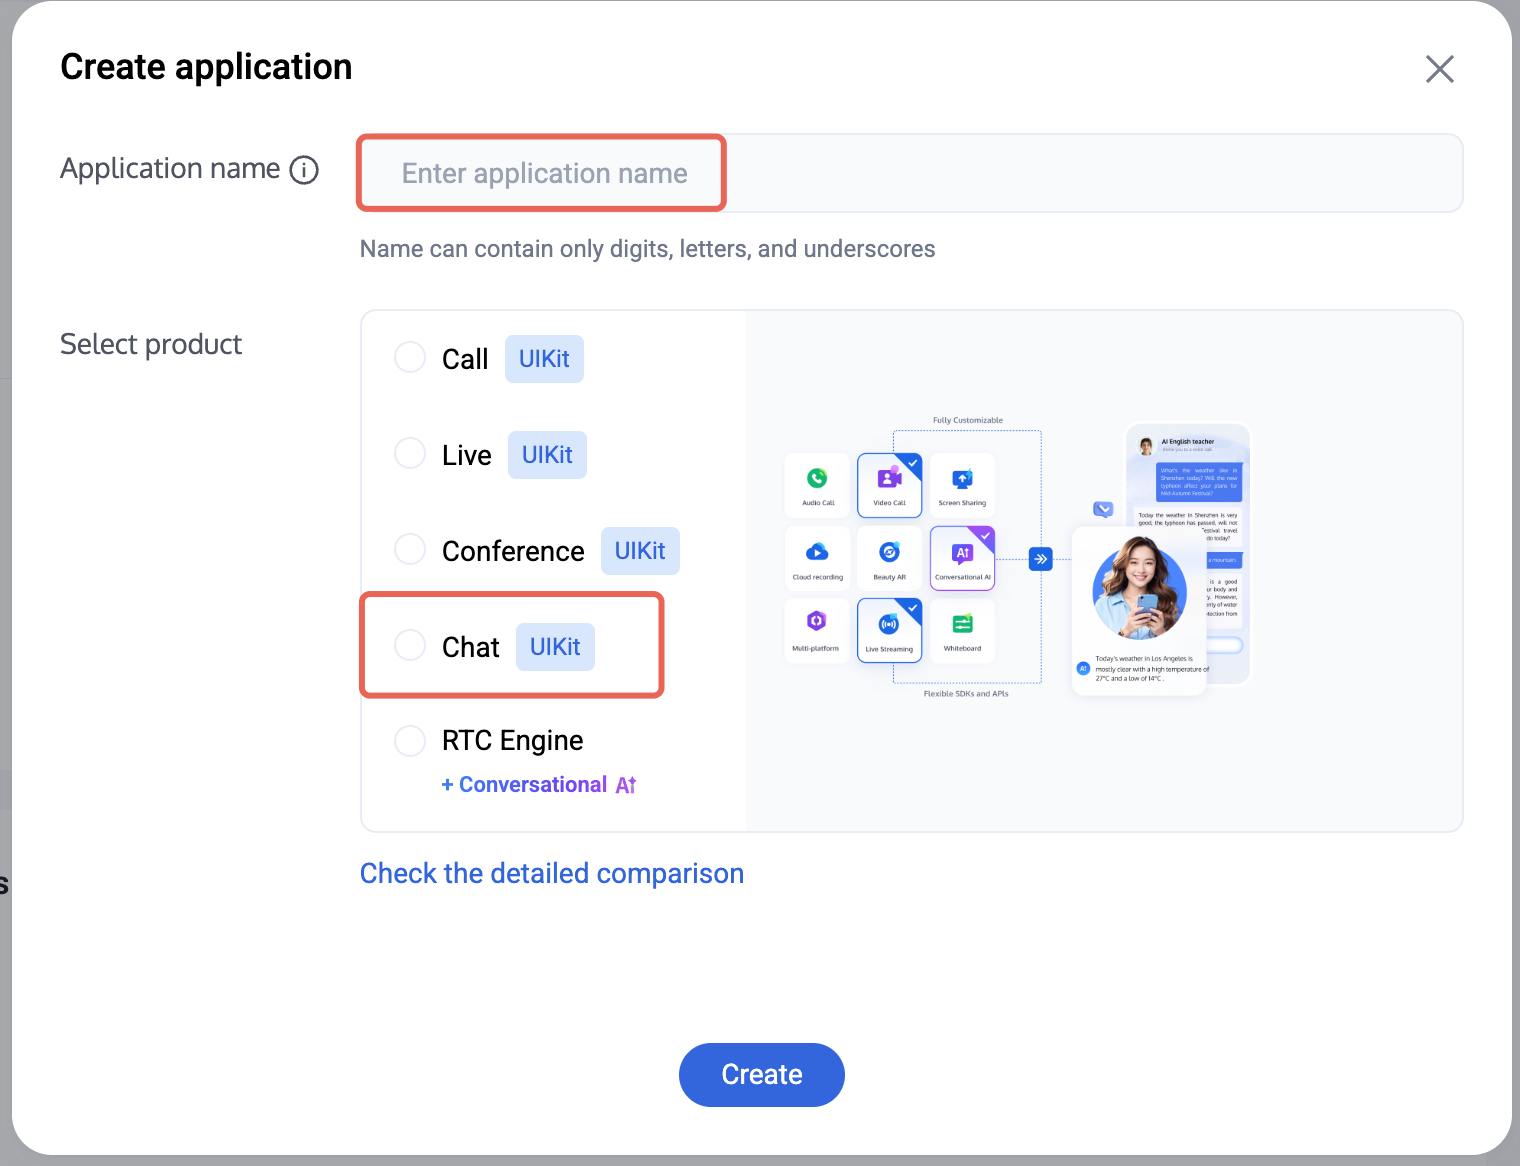
3. In the application creation dialog, enter the Application Name and select Chat as the product.
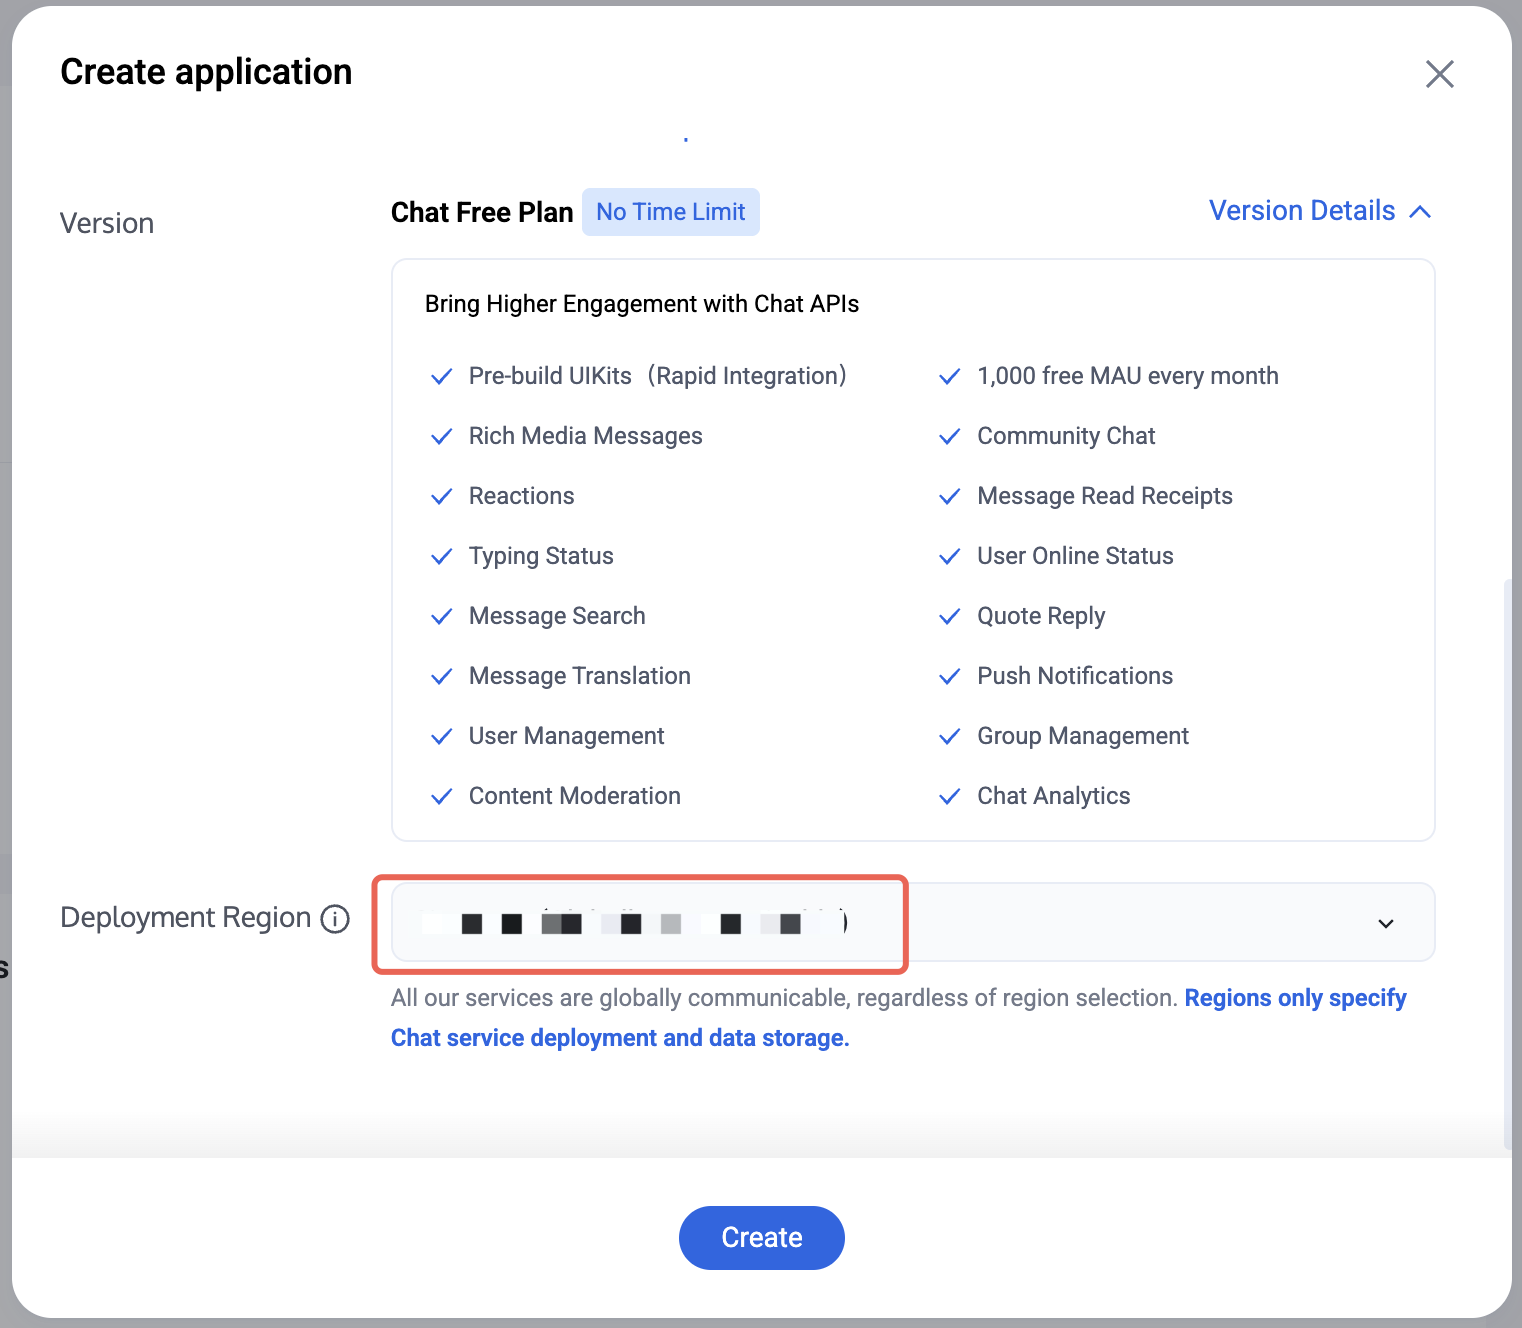
4. After selecting the product, the Deployment Region will be displayed. Choose as needed.
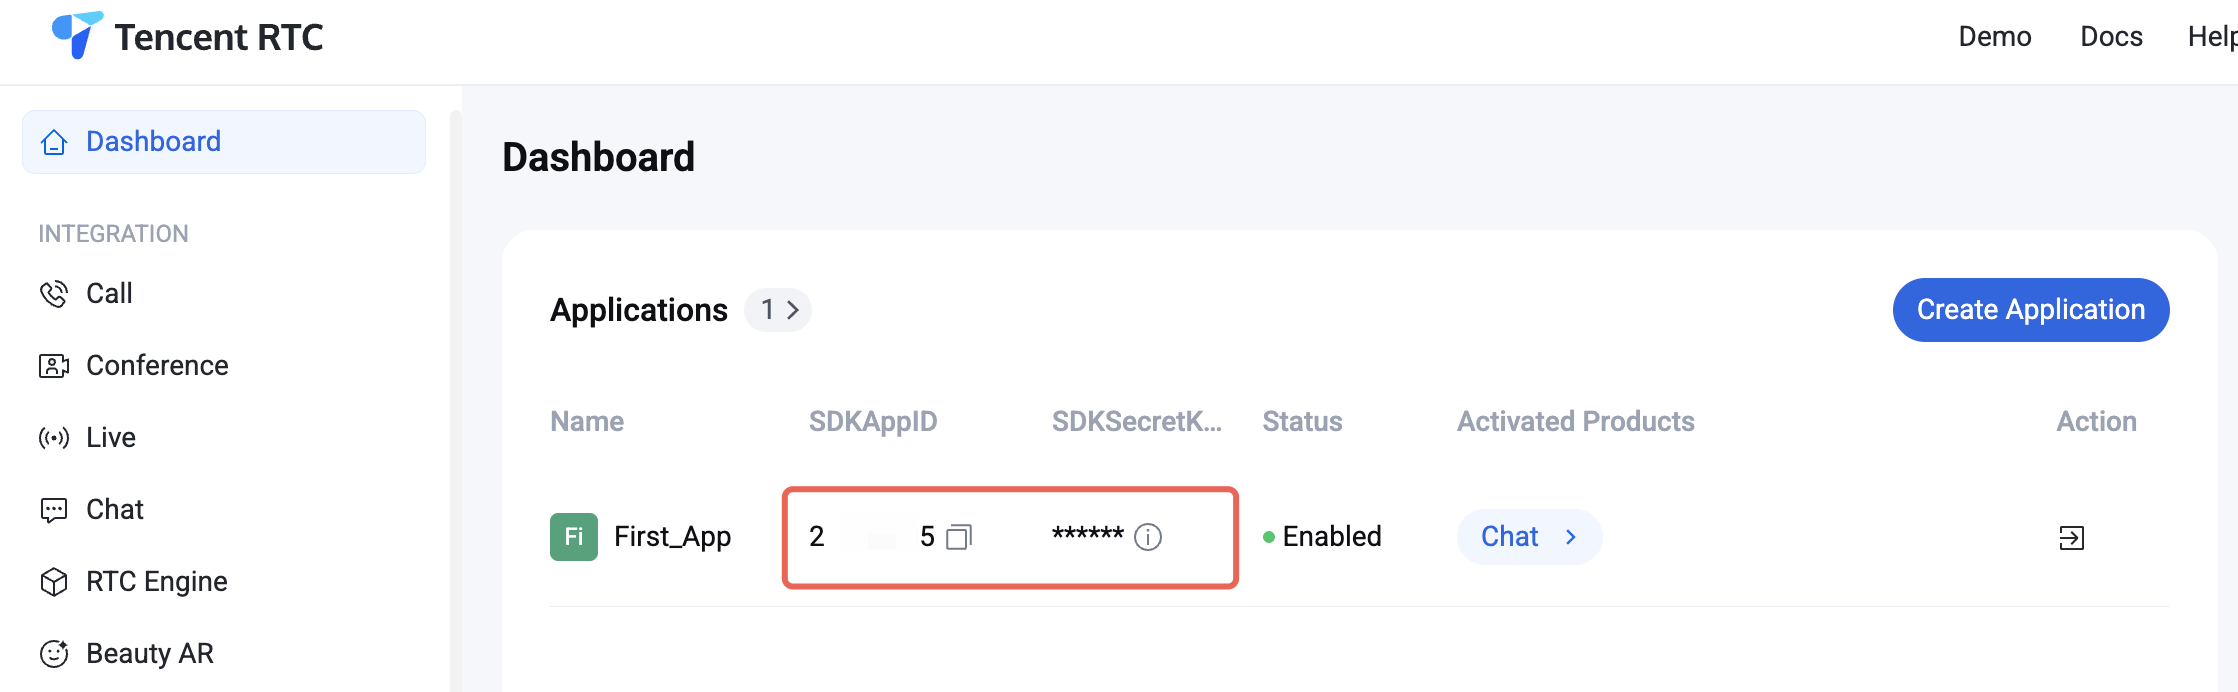
5. Once creation is complete, you can view the SDKAppID and SDKSecretKey for the new application in the console overview panel. You will need these two pieces of information to run the Demo later.
Warning:
Please keep your SDKSecretKey safe to prevent leakage!
6. Go to the UserSig tool, select the application you just created, enter the UserID, and generate the corresponding UserSig. Copy this information for later login use.
How to import UIKit into the project
import AssetPackage
1. Create/start an existing Unity project.
2. Add dependencies in the Packages/manifest.json file:
3. Download the chat-uikit-unity.unitypackage under the UIKit github directory, and import the resource package.
Initialize and log in
There are two ways to initialize and log in to Chat:
Outside the component: the entire application just needs to be initialized and logged in once. You need to add the corresponding event callbacks yourself.
Inside the component(Recommended): pass parameters into the component through configuration. UIKit has bound corresponding event callbacks for you, including events for receiving new messages and events for updating the session list.
Method 1: Outside the component
Initialize Chat in the Unity project you created, note that the Chat application only needs to be initialized once. This step can be skipped if integrating in an existing Chat project.
sdkConfig.sdk_config_log_file_path = Application.persistentDataPath +"/TIM-Log";// Set local log address
TIMResult res = TencentIMSDK.Init(long.Parse(sdkappid), sdkConfig);
}
publicstaticvoidLogin(){
if(userid ==""|| user_sig =="")
{
return;
}
TIMResult res = TencentIMSDK.Login(userid, user_sig,(int code,string desc,string json_param,string user_data)=>{
// callback after login
});
}
Method 2: inside the component
You can also pass SDKAppID, UserSig, and UserID into the component through configuration to initialize and log in Chat. (same as demo)
It is only recommended if you are trying to run Demo. Using this method directly in your project
usingcom.tencent.imsdk.unity.uikit;
// The demo login logic is as follows
publicstaticvoidInit(){
Core.SetConfig(sdkappid, userId, sdkUserSig);
Core.Init();
Core.Login();
}
// If you run the unity demo directly, it is recommended to log in through the mobile phone number/verification code input box on the Main page. It can ensure the normal operation of callbacks and so on.
// Since Unity on the computer does not support mobile phone number login, please enter userid into the mobile phone number input box and userSig into the verification code input box.
// Assets/Example/Scripts/Main.cs
privatevoidLogin()
{
// Comment out the previous Login function content and add the following content
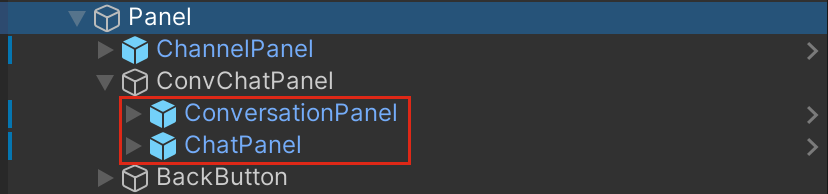
You can put the following prefabs into your scene and modify the corresponding styles and layouts.
Structure
Assets/Example
This directory corresponds to the content displayed when the actual project is running, including two pages of Scenes, the corresponding codes are Main.cs (login interface) and Chat.cs (chat interface).
Chat contains c2c chat and group chat content, you can get the conversation (friends) list and send text and emoticon messages. The content in Chat is composed of components in Prefabs, you can modify the display content and style by modifying Prefabs.
Assets/Prefabs
The following components can be used in combination (refer to the Chat page of Scenes), or the components can be modified and used separately according to requirements.
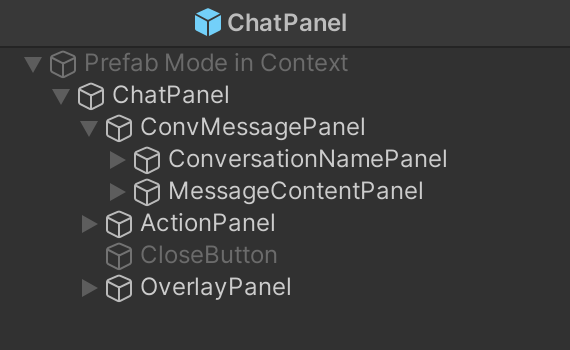
ChatPanel
message history list
Message display area ConvMessagePanel
ConversationNamePanel ConversationNamePanel
Historical message display area MessageContentPanel
message input area ActionPanel
Emoticons area OverlayPanel
Close chat window button CloseButton
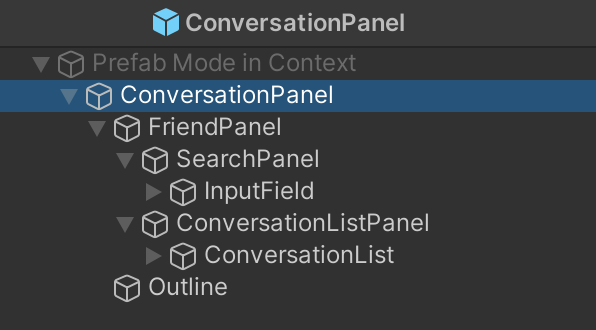
ConversationPanel
conversation list. Now it mainly displays the single-chat sessions of friends. The corresponding code is in Script/Components/Conversation.cs. Styles for each conversation are in ConversationItem.prefabs.
conversation list area FriendPanel
Search area SearchPanel
Conversation list ConversationListPanel
ChannelPanel
The channel list consists of 4 channel buttons, namely World, Channel, Team, Friends. The first three channels are group chat channels, and the friend channel is a c2c channel and will display a list of c2c conversations. Click events and styles for channel buttons are in Script/Components/Chat.cs.
AvatarPanel
The avatar style in a conversation (ConversationItem), a single chat record (messageItem, etc.). Contains avatars and segment avatars.
ConversationItem
The session style of the conversation list, including the avatar (AvatarPanel), conversation name and rank.
MessageItem, MessageItemSelf
Text message content. Text message from others and from self is separated.
Avatar area MessageSenderPanel
Message area MessageContentPanel
Sender information area SenderNamePanel
sender name MessageSender
Sender rank Icon and name Icon and Text
message body Panel
StickerMessageItem, StickerMessageSelf
The content of the emoji message. The content is the same as MessageItem
GroupTipItem
Group reminder message content, for users to enter the group, withdraw from the group, Admin messages, etc. Contains group name and message body.
Timestamp
Time nodes in historical messages.
StickerItem, MenuItem
they are emoticons and emoticons in the shortcut menu respectively.
How to start the demo project
Initialize login
Pass the SDKAppID, UserSig, and UserID into the component through configuration to initialize and log in the chat.
Note:
The entire project only needs to be initialized once
usingcom.tencent.imsdk.unity.uikit;
// The demo login logic is as follows
publicstaticvoidInit(){
Core.SetConfig(sdkappid, userId, sdkUserSig);
Core.Init();
Core.Login();
// you can pass function
// Core.Login(HandleAfterLogin);
}
// If you run the unity demo directly, it is recommended to log in through the mobile phone number/verification code input box on the Main page. It can ensure the normal operation of callbacks and so on.
// Since Unity on the computer does not support mobile phone number login, please enter userid into the mobile phone number input box and userSig into the verification code input box.
// Assets/Example/Scripts/Main.cs
privatevoidLogin()
{
// Comment out the previous Login function content and add the following content
The demo is divided into four channels: World, Channel, Team, and friends. Among them, the Friends channel displays a list of c2c sessions and added friends, click on a session to start chatting.
The other three channels are group conversations. If you need to send messages in this channel, you need to create a group first and add its ID to the project.
Create groups
Added via REST API
You can create a group through create_group in the background REST API. See link for details.
Add in console
You can also create groups through the console. Go to your chat application in the console > Group Management > Add Group.
Add group to channel
Enter Assets/Example/Scripts/Config/Config.cs, fill in the group ID of the created group into communityID (community), channelID (channel), groupID (team).
and call joinGroup after login to enter the corresponding group after login and send messages in the group.
Send a message
If you have added a group to the channel, you can send group chat messages through the World, Channel, and team channel.
You can also click on a c2c conversation in the friend channel to send a c2c chat message.
Modify emoticons and Rank information
Rank
In this Demo, each user's rank is randomly generated, if you need to use rank information, you can set it in the user's custom field.
And display the corresponding rank icon according to the rank name.
1. Load the icon or avatar frame corresponding to the rank into Resources. (If you use URL to get it, you can ignore this step)
2. Modify the display of the avatar frame and icon in the code. The parts that need to be modified are the conversation list and the message list
2.1 Session list
2.1.1 Supplement the acquired rank information in the session acquisition function completeConvList. The final friend session information displayed is in the friendProfiles list.
2.1.2 Modify the rendered icons and avatars in GenerateList (conversation list rendering) in Conversation.cs
2.2 Message list
2.2.1 Obtain the segment information in the message sender's information in RenderMessageForScroll of Chat.cs (if you need to modify other display content, you can also get it from here)
2.2.2 Modify the displayed style and other details in MsgItem.cs
Emojis
Emojis are displayed in OverlayPanel in Chat.cs using StickerPanel. You can import your own emoji to use. (You need to import your own emojis in advance)
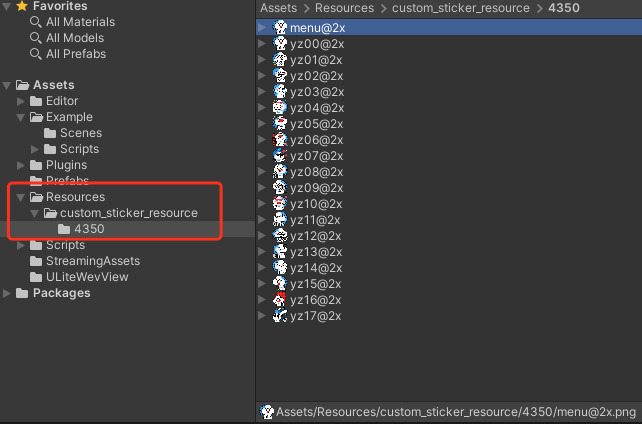
1. Import the emojis used in the Assets/Resources folder
2. Change the Texture Type of the image to Sprite (2D and UI), and modify the Pixels Per Unit according to the size of the image.
3. Define the corresponding emoji package data
// Generate a list of emojis, StickerPackage is a set of emojis
Chat Unity UIKit Demo provides a language switching system based on the system language, and supports Simplified Chinese and English. You can add languages or modify the configuration inside according to your needs.
1. Language files
Language data is placed in Resources/LanguageTxt. Now contains Chinese.txt(Simplified Chinese) and English.txt(English) for simplified Chinese and English. If you need other languages, you can add the corresponding txt file.
The structure of the file is as follows:
//English.txt
Key: Value
//Chinese.txt
Key: value
Note:
key should be consistent with the Key of other languages, and consistent with subsequent enum.
Value is the value of the language corresponding to Key.
Use a colon to separate Key and Value.
2. Set language
3. Set language and entry
4. If you have added a language, add the corresponding language vocabulary txt file and add a new language in Language in LanguageDataManager.cs, and add the corresponding Key in LanguageTextName.
6. Component settings (static modification)
Add the LanguageUIText(Script) component to the text component that needs to be set, and select the Key of the word to be displayed. The displayed Key corresponds to the enum in LanguageTextName and the Key in the vocabulary file.
7. Set language
To set the language, call SetCurrentLanguageValue when the software starts. If you want to fix the language, you can directly assign a value to currentLanguage in LanguageDataManager.cs (it can be used as the default language). The Demo judges and assigns values according to the system language.If the components that need to be modified are not only static components, the simple method is to save the currently used language to config (saved to Core in Demo) and judge and display it in the code.
Pass Config information before Init, including sdkappid, userid and usersig.
usingcom.tencent.imsdk.unity.uikit;
Core.SetConfig(sdkappid, userid, usersig);
Init
Use the Init method provided by UIKit to initialize the SDK, and the AddRecvNewMsgCallback and SetConvEventCallback callbacks will be automatically bound.
usingcom.tencent.imsdk.unity.uikit;
Core.Init();
SetStickerPackageList
Set sticker package list through SetStickerPackageList.
usingcom.tencent.imsdk.unity.uikit;
Core.SetStickerPackageList(Config.stickers);
Login
Log in to the account through Login, and execute the bound callback function after the login is completed.
usingcom.tencent.imsdk.unity.uikit;
Core.Login((paramsstring[] args)=>{
});
SetMessageList
Add the message list of a session, merge it into the current session message dictionary after processing, and trigger the OnMsgListChanged event.
Set the currently selected session and fire the OnCurrentConvChanged event.
usingcom.tencent.imsdk.unity.uikit;
Core.SetMessageList(convID, convType);
SetCurrentStickerIndex
Set the currently selected sticker group and trigger OnCurrentStickerIndexChanged event.
usingcom.tencent.imsdk.unity.uikit;
Core.SetMessageList(stickerIndex);
Logout
Log out and clear data.
usingcom.tencent.imsdk.unity.uikit;
Core.Logout((string[] parameters)=>{
// Logout callback
});
TencentChatSDK
Unity TencentChatSDK provides comprehensive instant communication capabilities based on the Unity platform. You can use TencentChatSDK to get other chatting related functions. For example, get user information through TencentChatSDK.
TIMResult res = TencentIMSDK.ProfileGetUserProfileList(param,(int code,string desc,List<UserProfile> profile,string user_data)=>{
});
FAQ
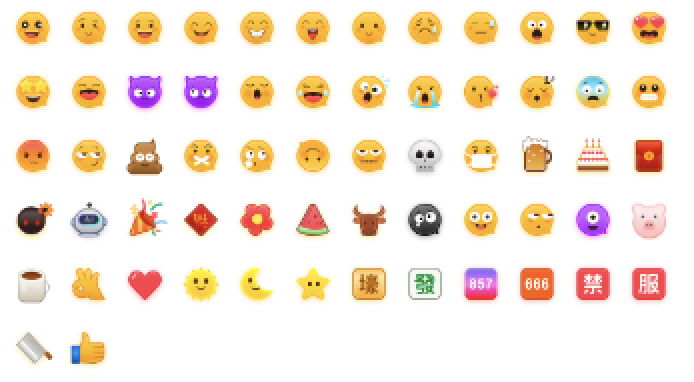
Using Emoji Packs
To respect the copyright of emoji designs, the Chat Demo/TUIKit project does not include cutouts of large emoji elements. Please replace them with your own designs or other emoji packs for which you hold the copyright before officially launching for commercial use. The default smiley face emoji pack shown below is copyrighted by Tencent RTC, you can upgrade to Chat Pro Plus Edition and Enterprise Edition to use it for free.