IM terminal users need to obtain the latest messages at any time. However, considering the limited performance and battery SOC of mobile devices, IM recommends you use the system-grade push channels (APNs) provided by Apple for message notifications when the app is running in the background to avoid excessive resource consumption caused by maintaining a persistent connection. Compared with third-party push channels, APNs provide more stable system-grade persistent connections, enabling users to receive push messages at any time and greatly reducing resource consumption.
Note:
If you want users to receive IM message notifications when, without proactive logout, the app is switched to the background, the mobile phone screen is locked, or the app process is killed by a user, you can enable the IM offline push.
If the logout API is called to log out proactively or you are forced to log out due to multi-device login, you cannot receive offline push messages even though IM offline push is enabled.
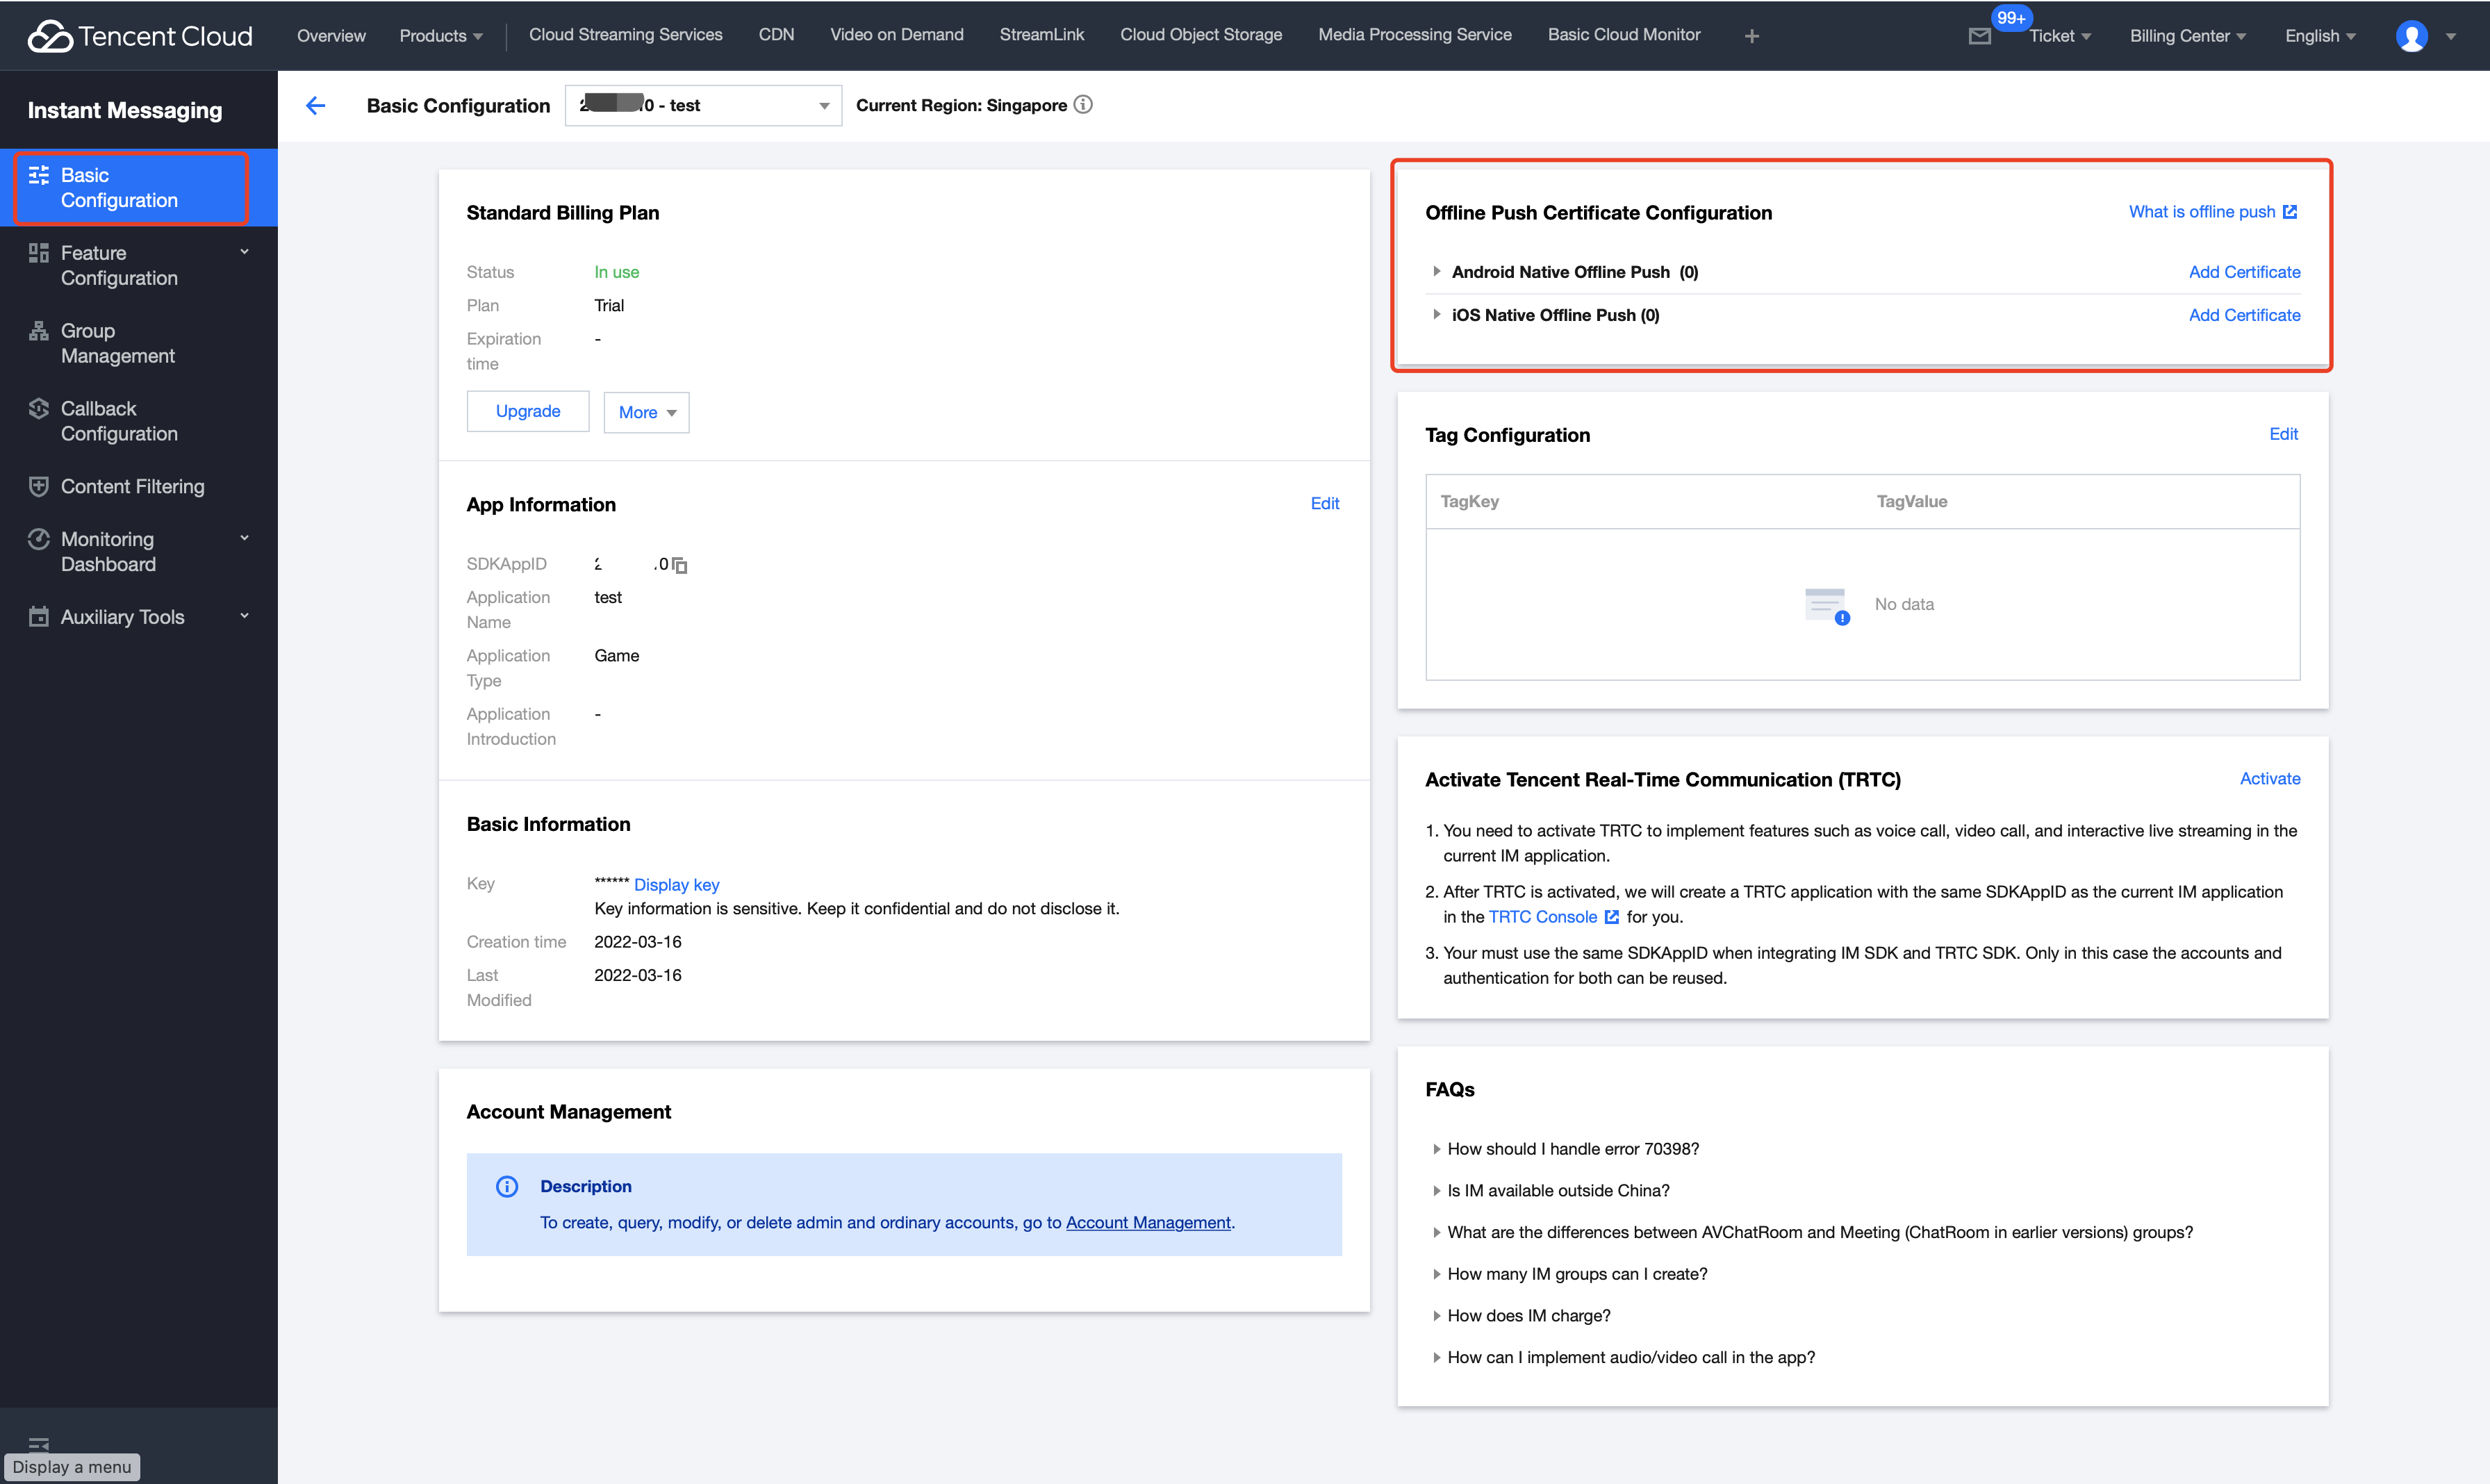
Configuring Offline Push
If you want to receive APNs offline message notifications, follow these steps:
3. The app requests deviceToken from Apple every time it logs in.
4. Call setAPNS to report the token to the IM backend.
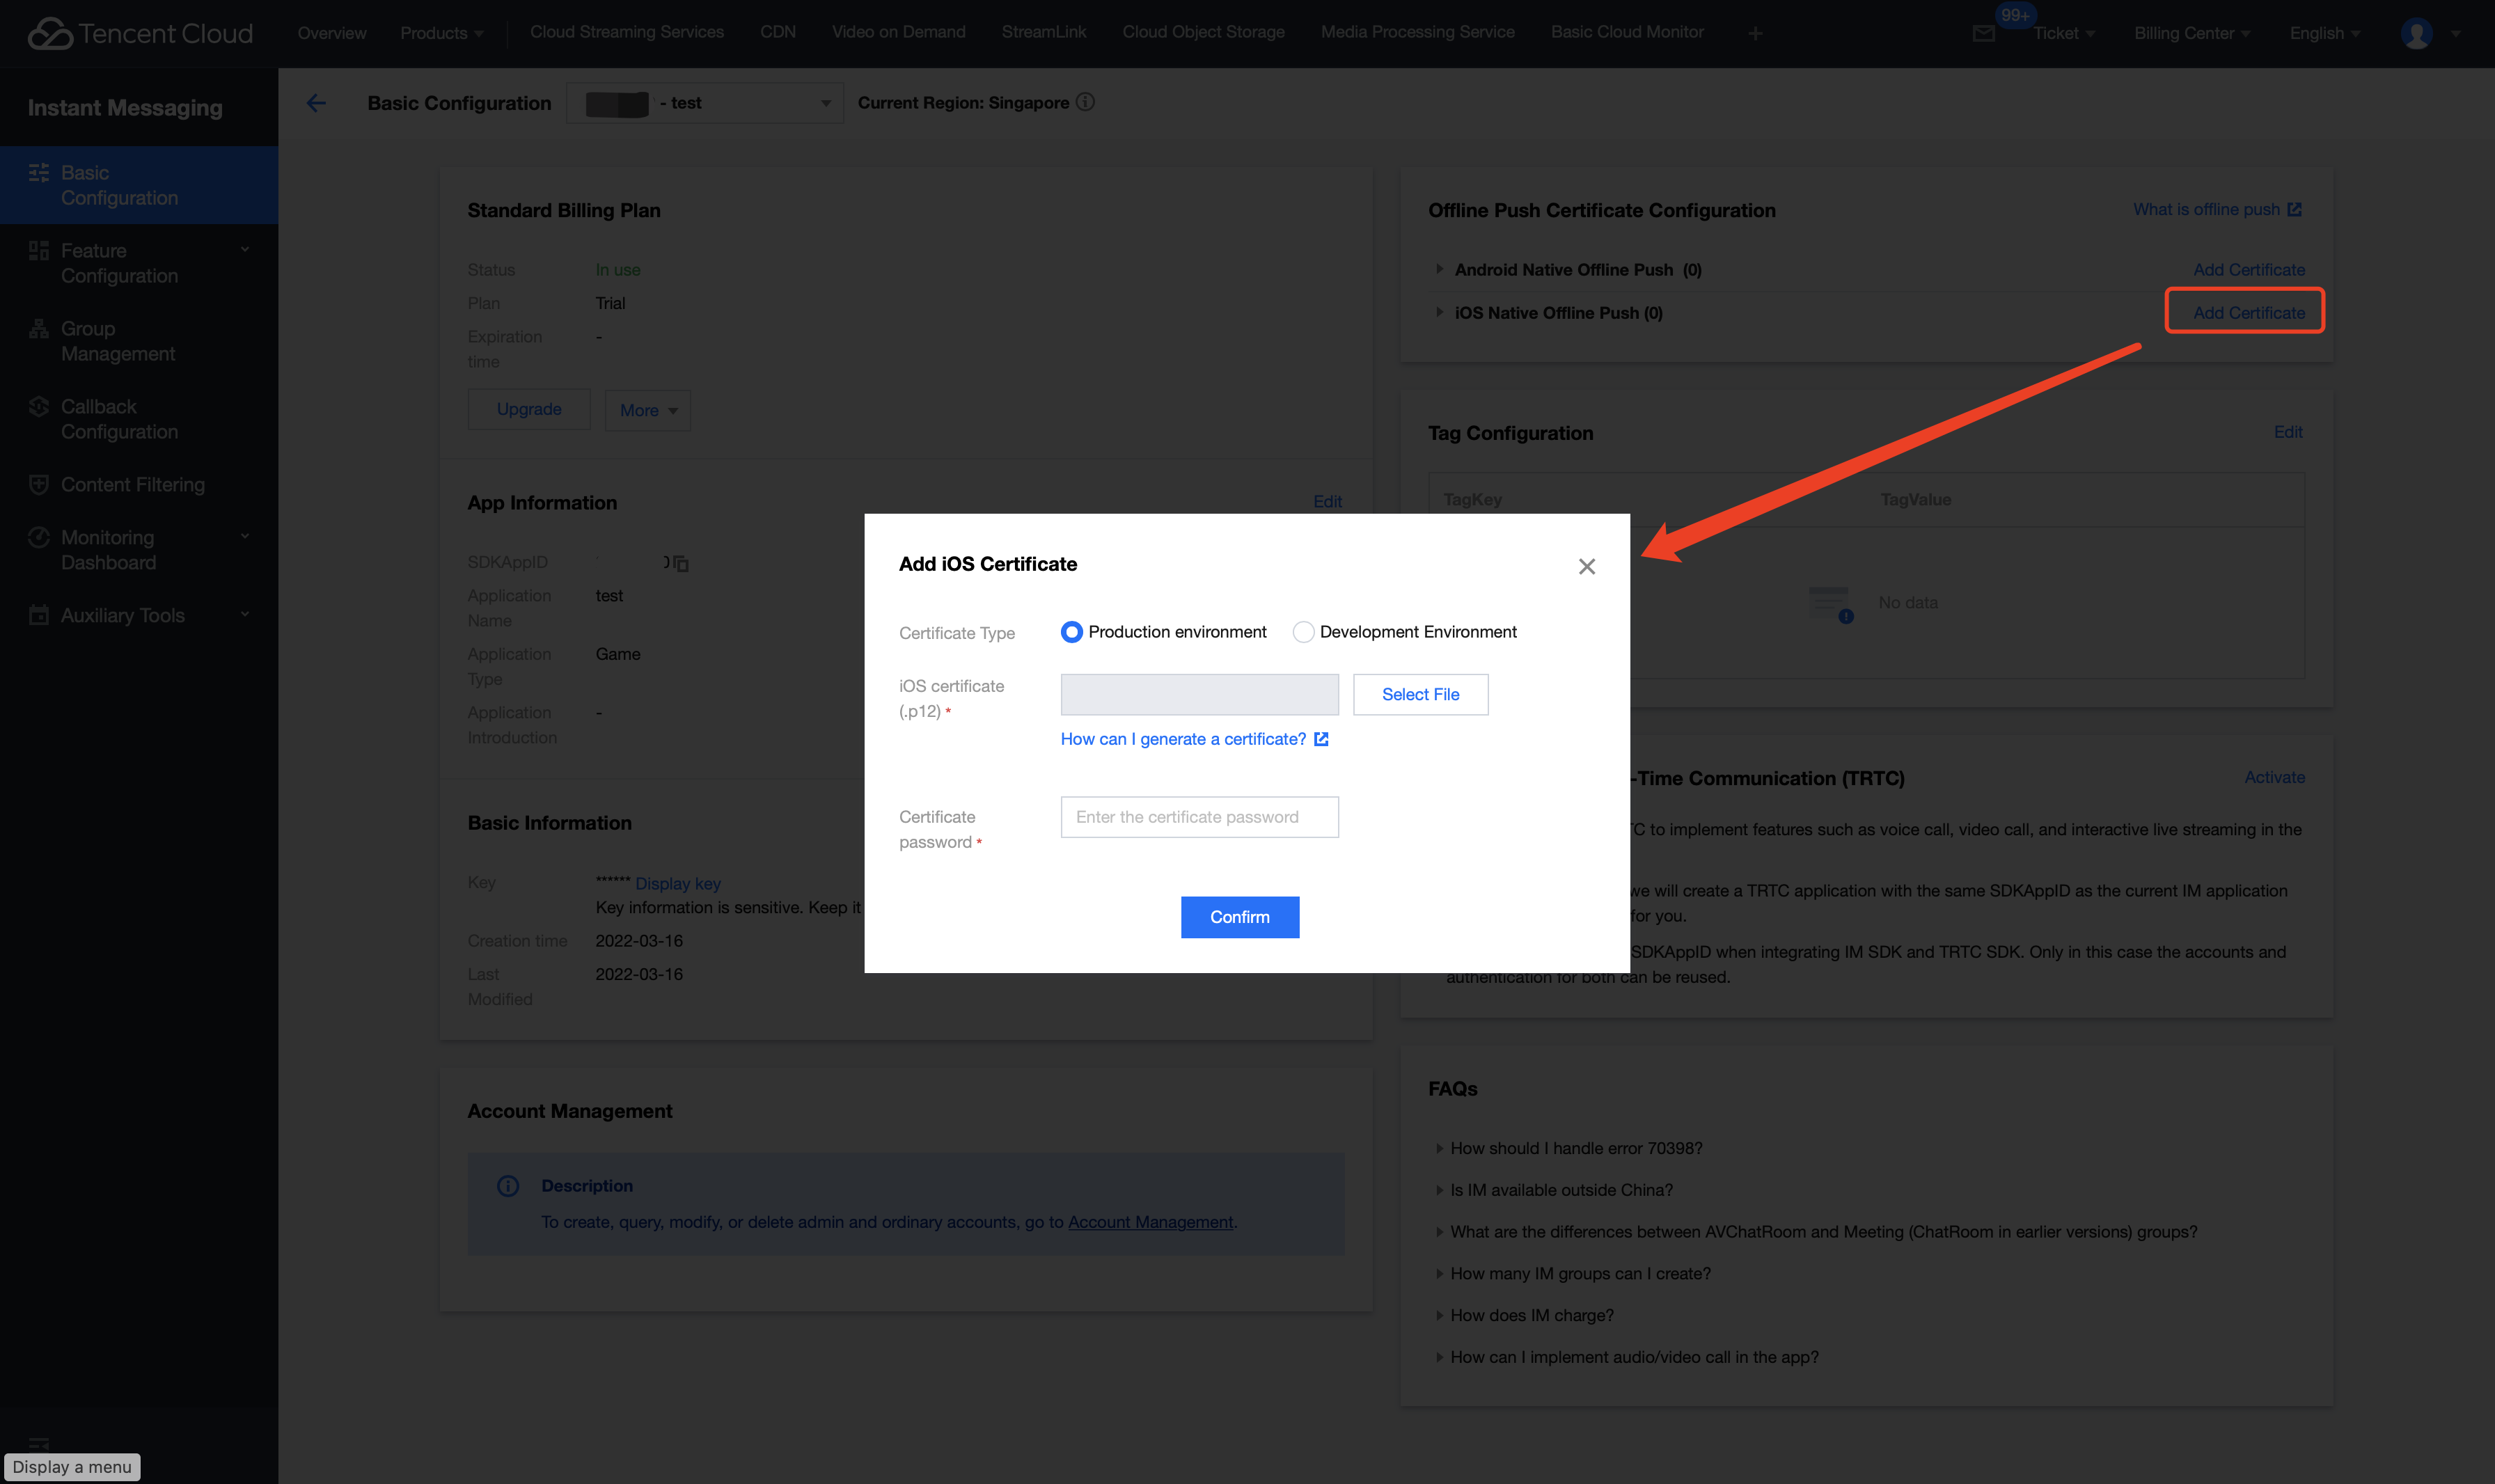
Step 1: Apply for APNs certificates
Activate the remote push service for your app
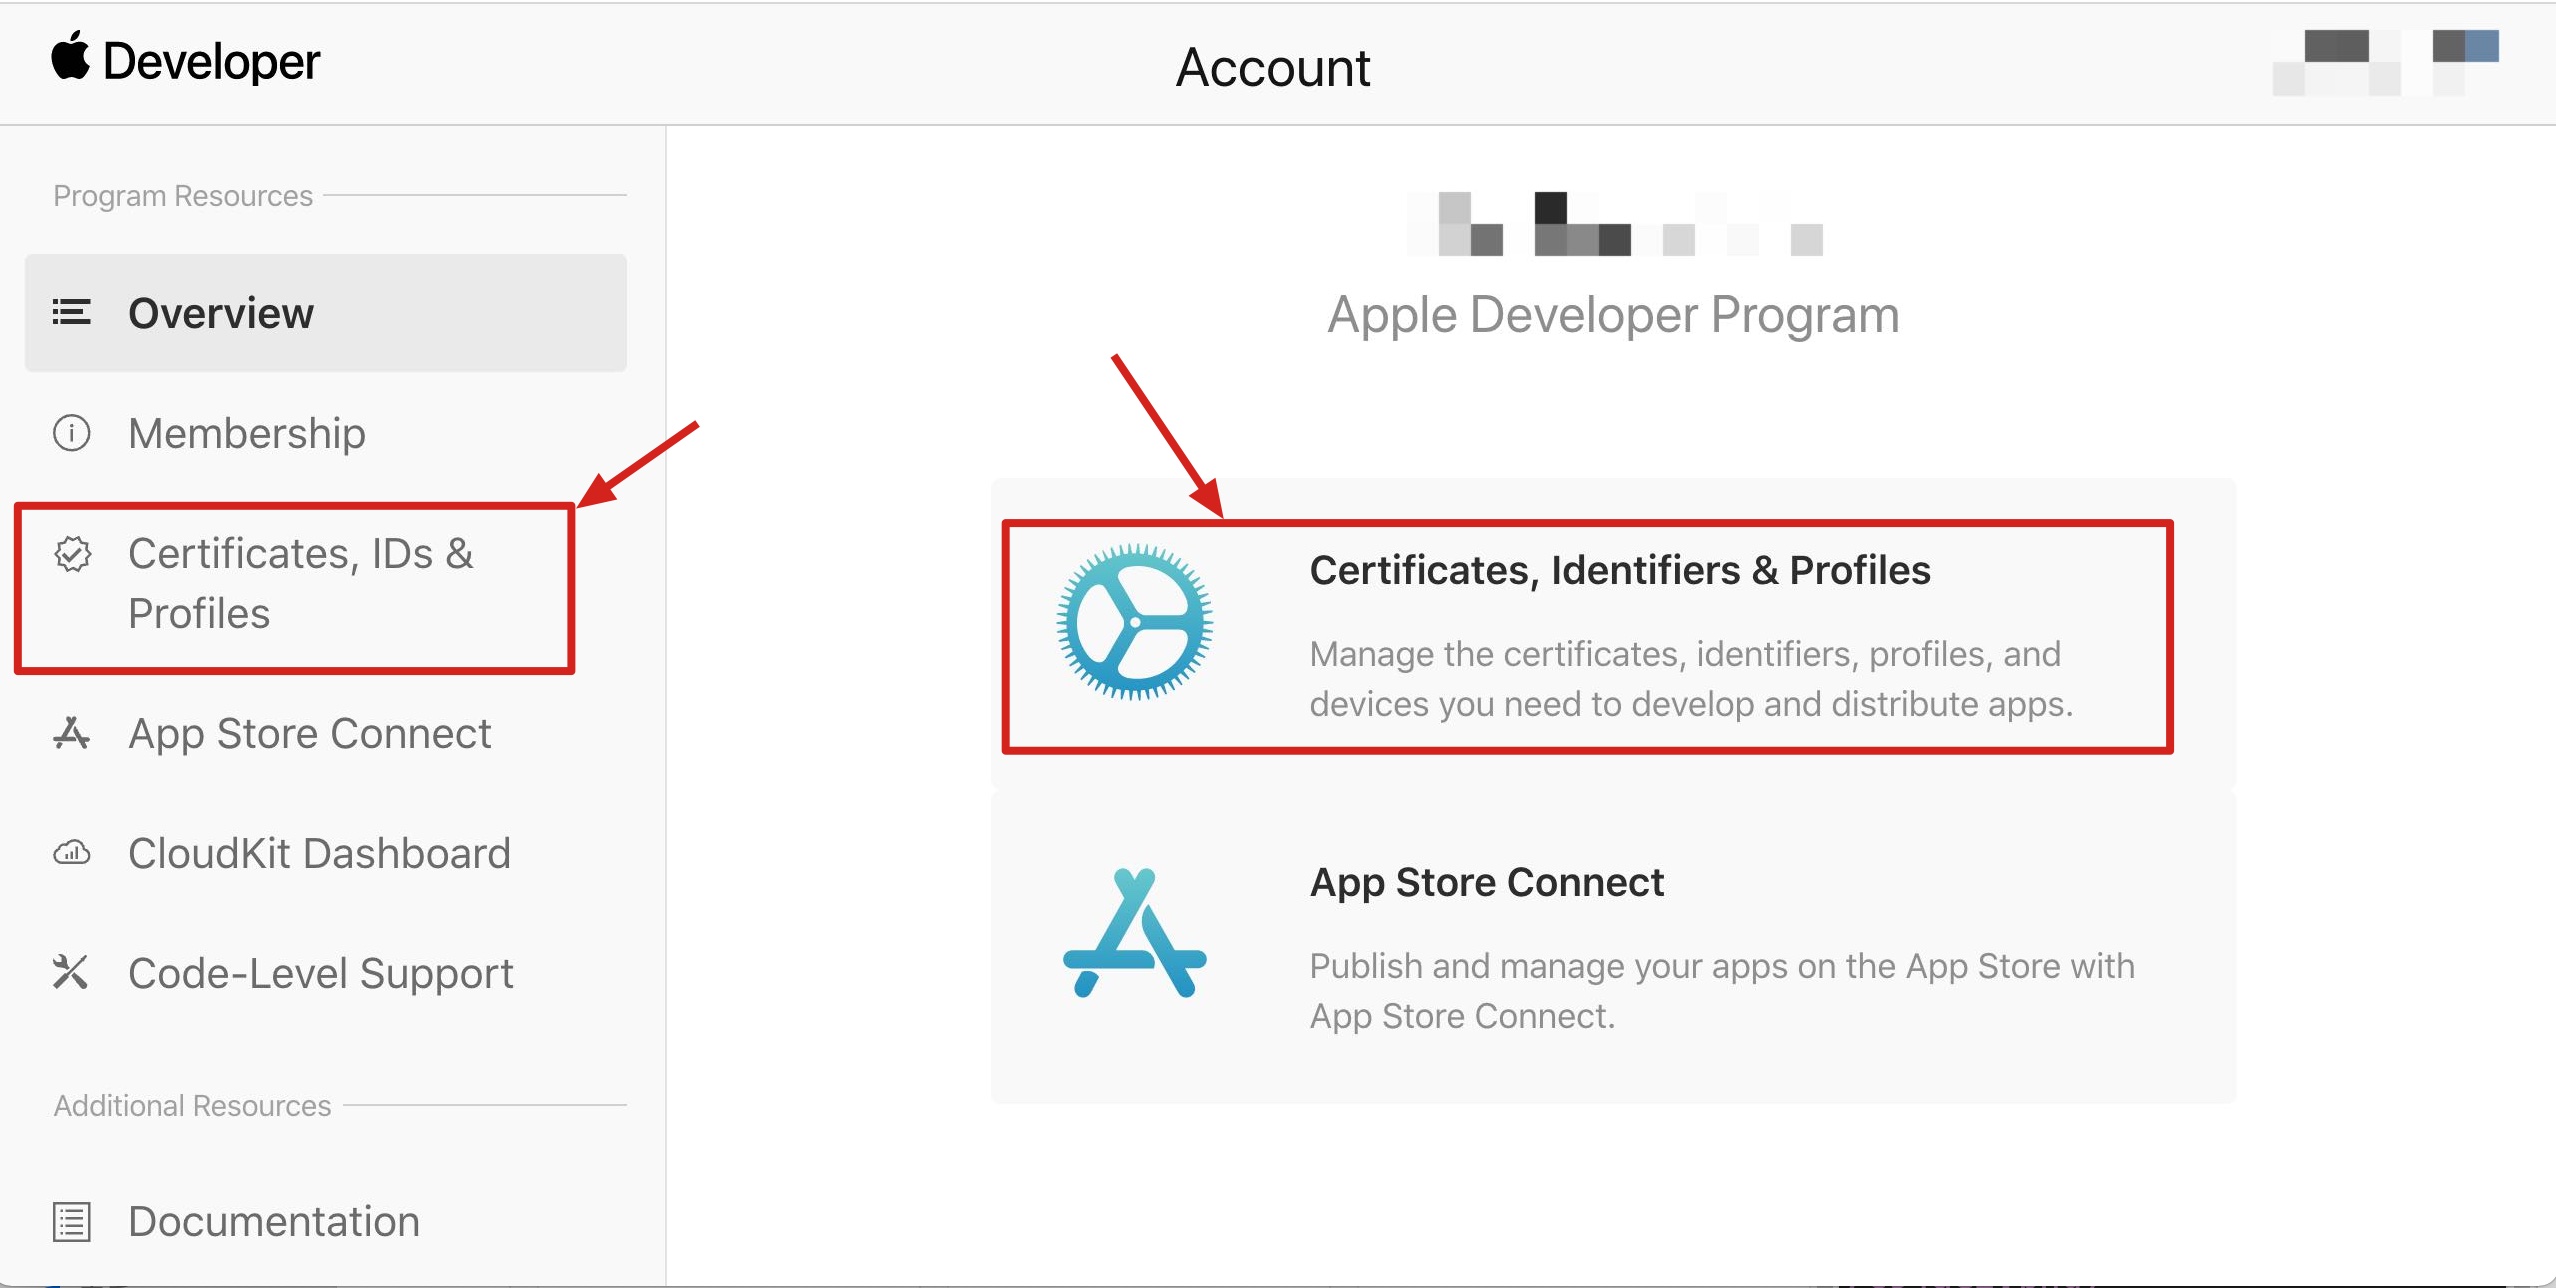
1. Log in to the Apple Developer website and click Certificates, Identifiers & Profiles in the right pane or Certificates, IDs & Profiles in the left sidebar to access the Certificates, IDs & Profiles page.
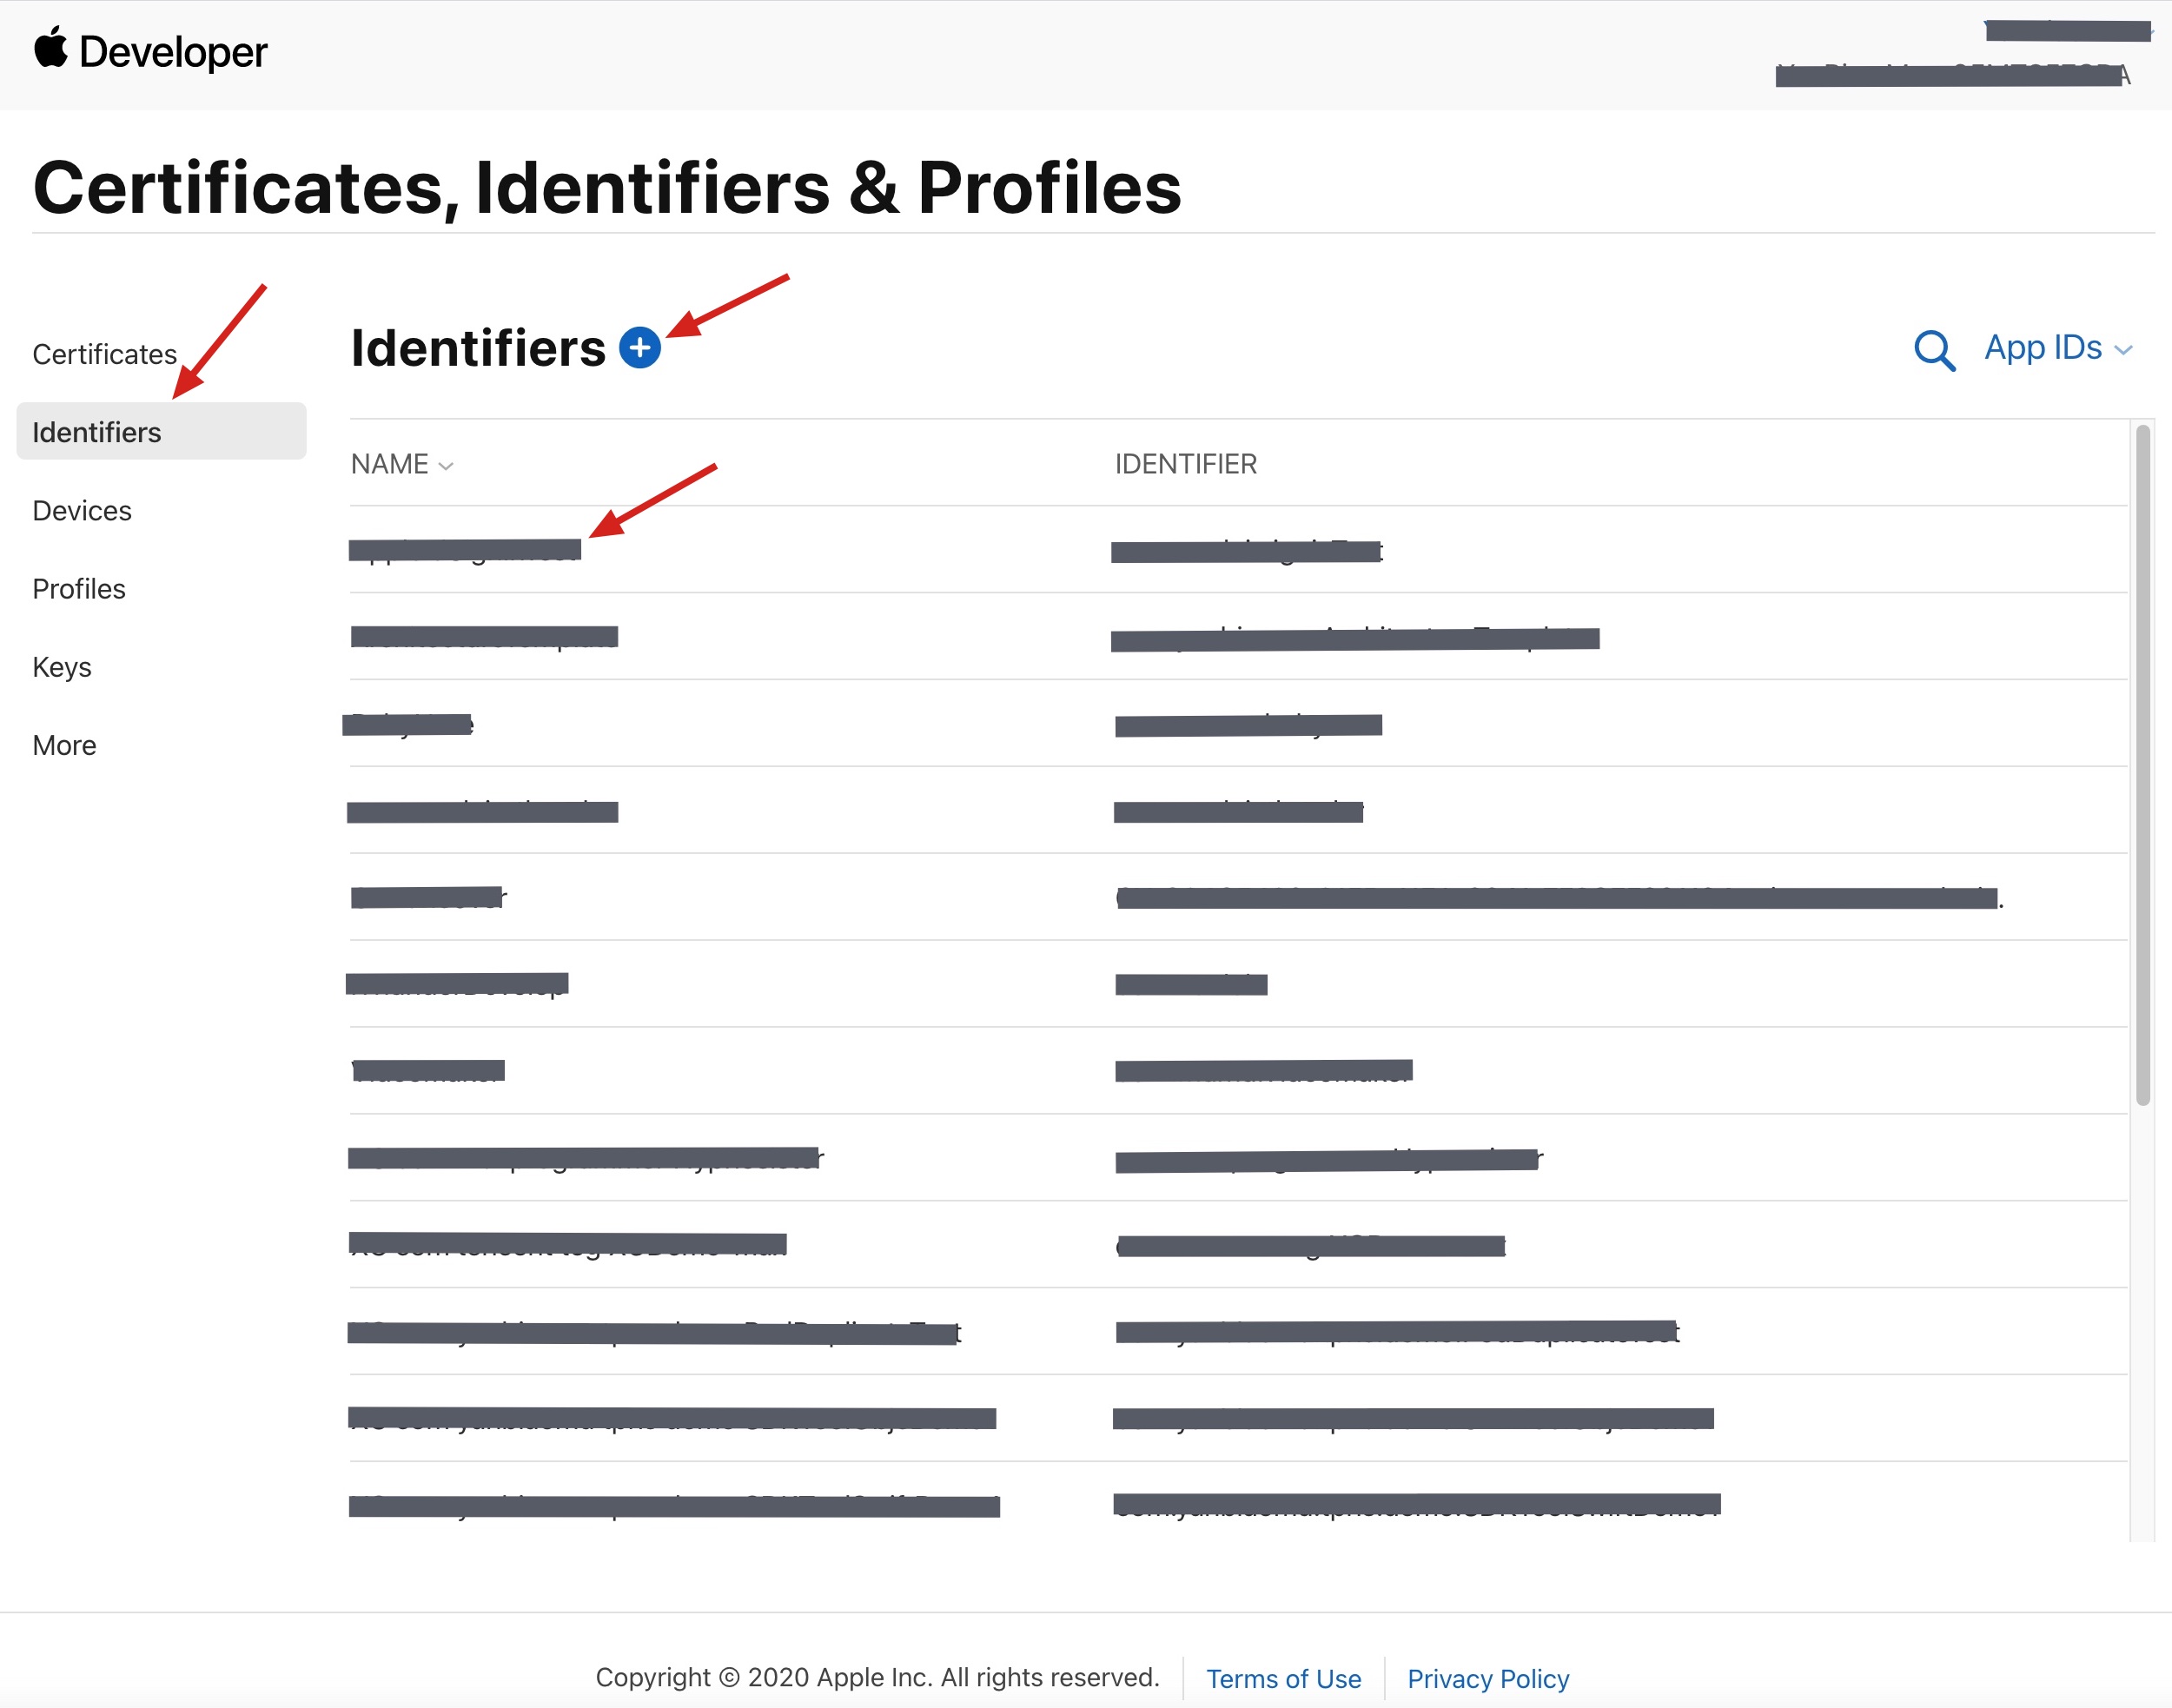
2. Click + on the right of Identifiers.
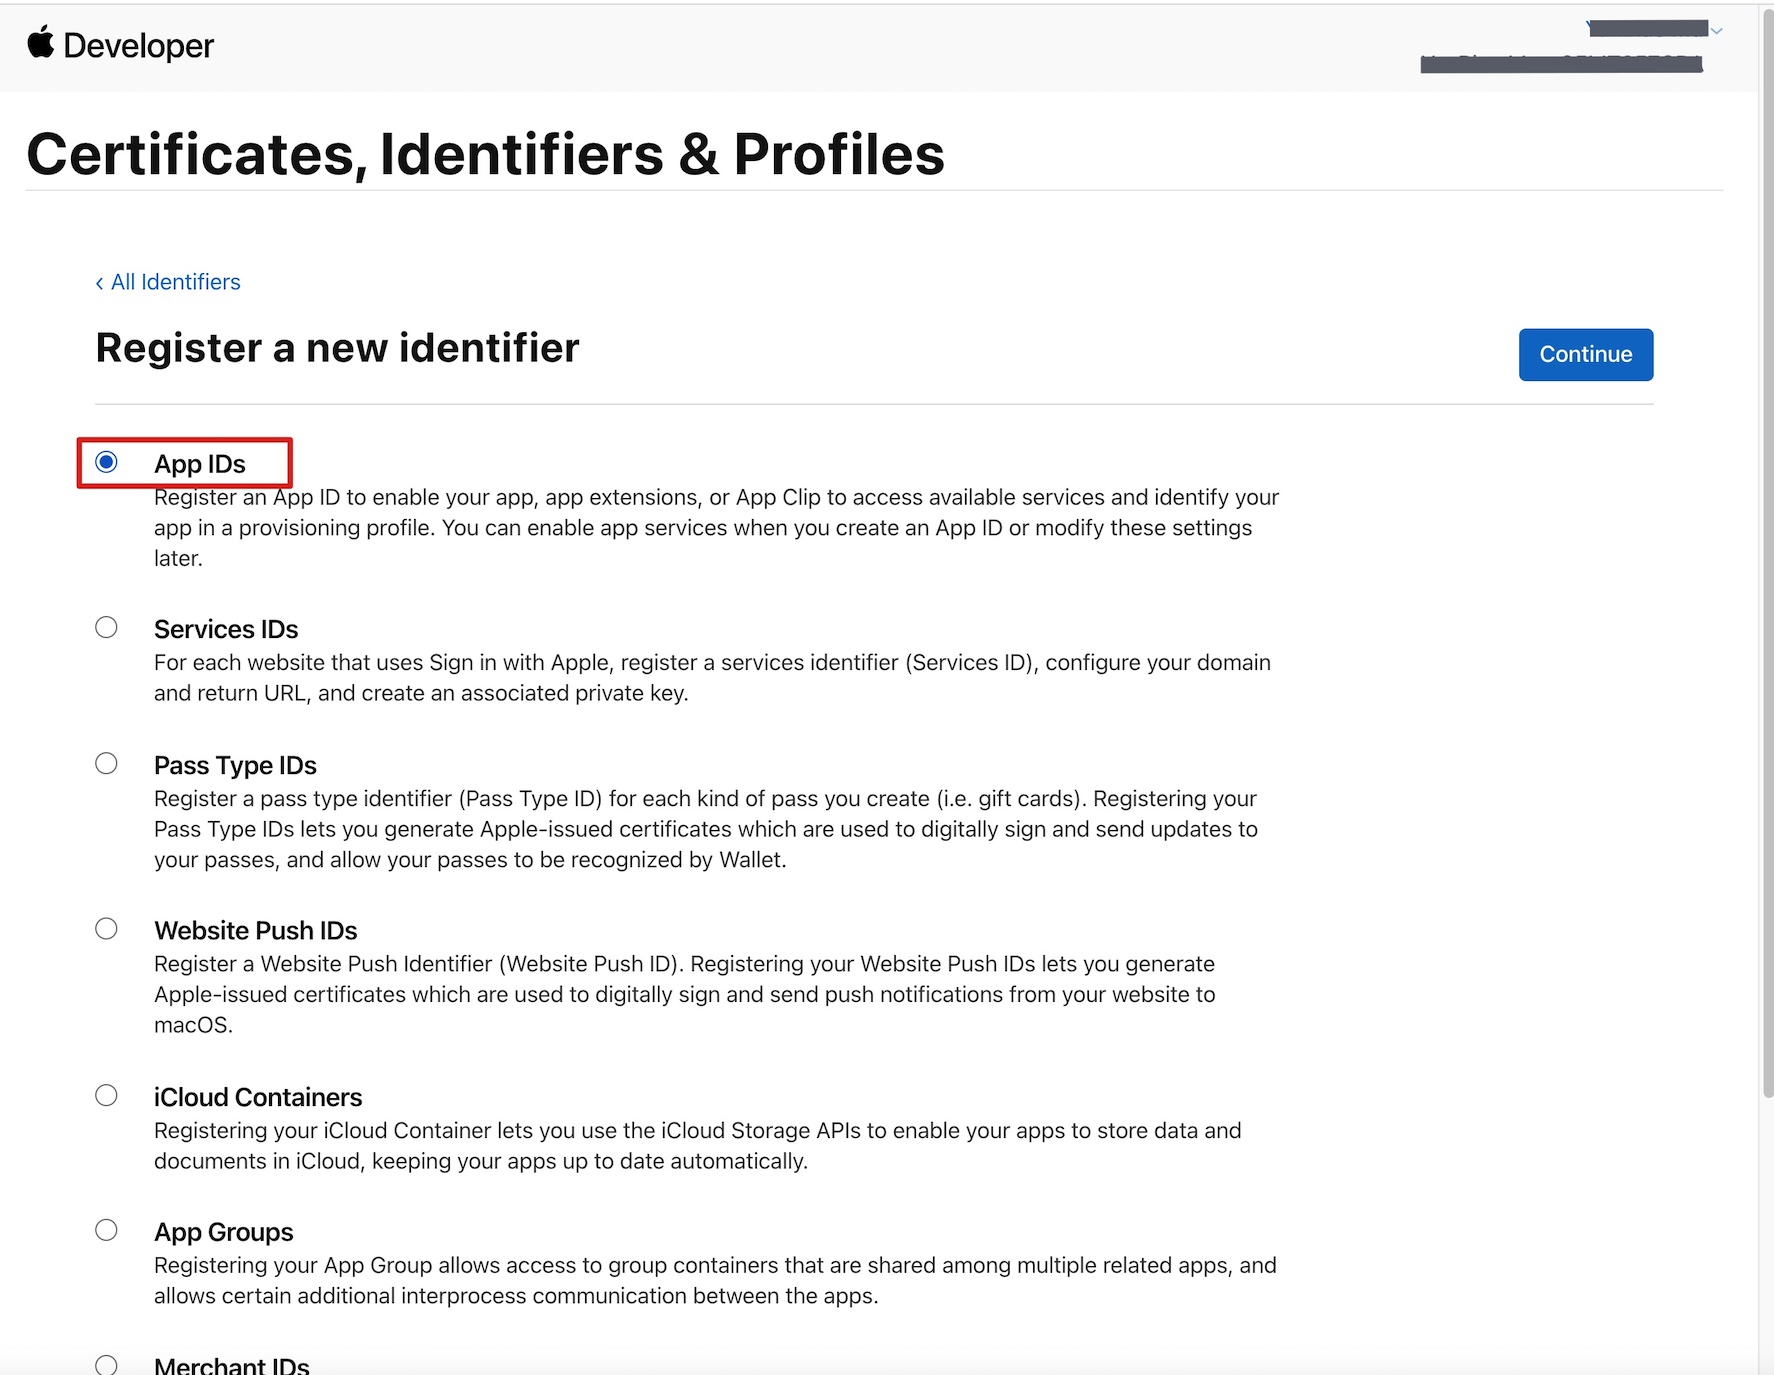
3. You can register an AppID by following the steps below or add the Push Notification service to your existing AppID.
Note:
Please note that your Bundle ID cannot contain the wildcard *. Otherwise, you will be unable to use the remote push service.
4. Check App IDs and click Continue.
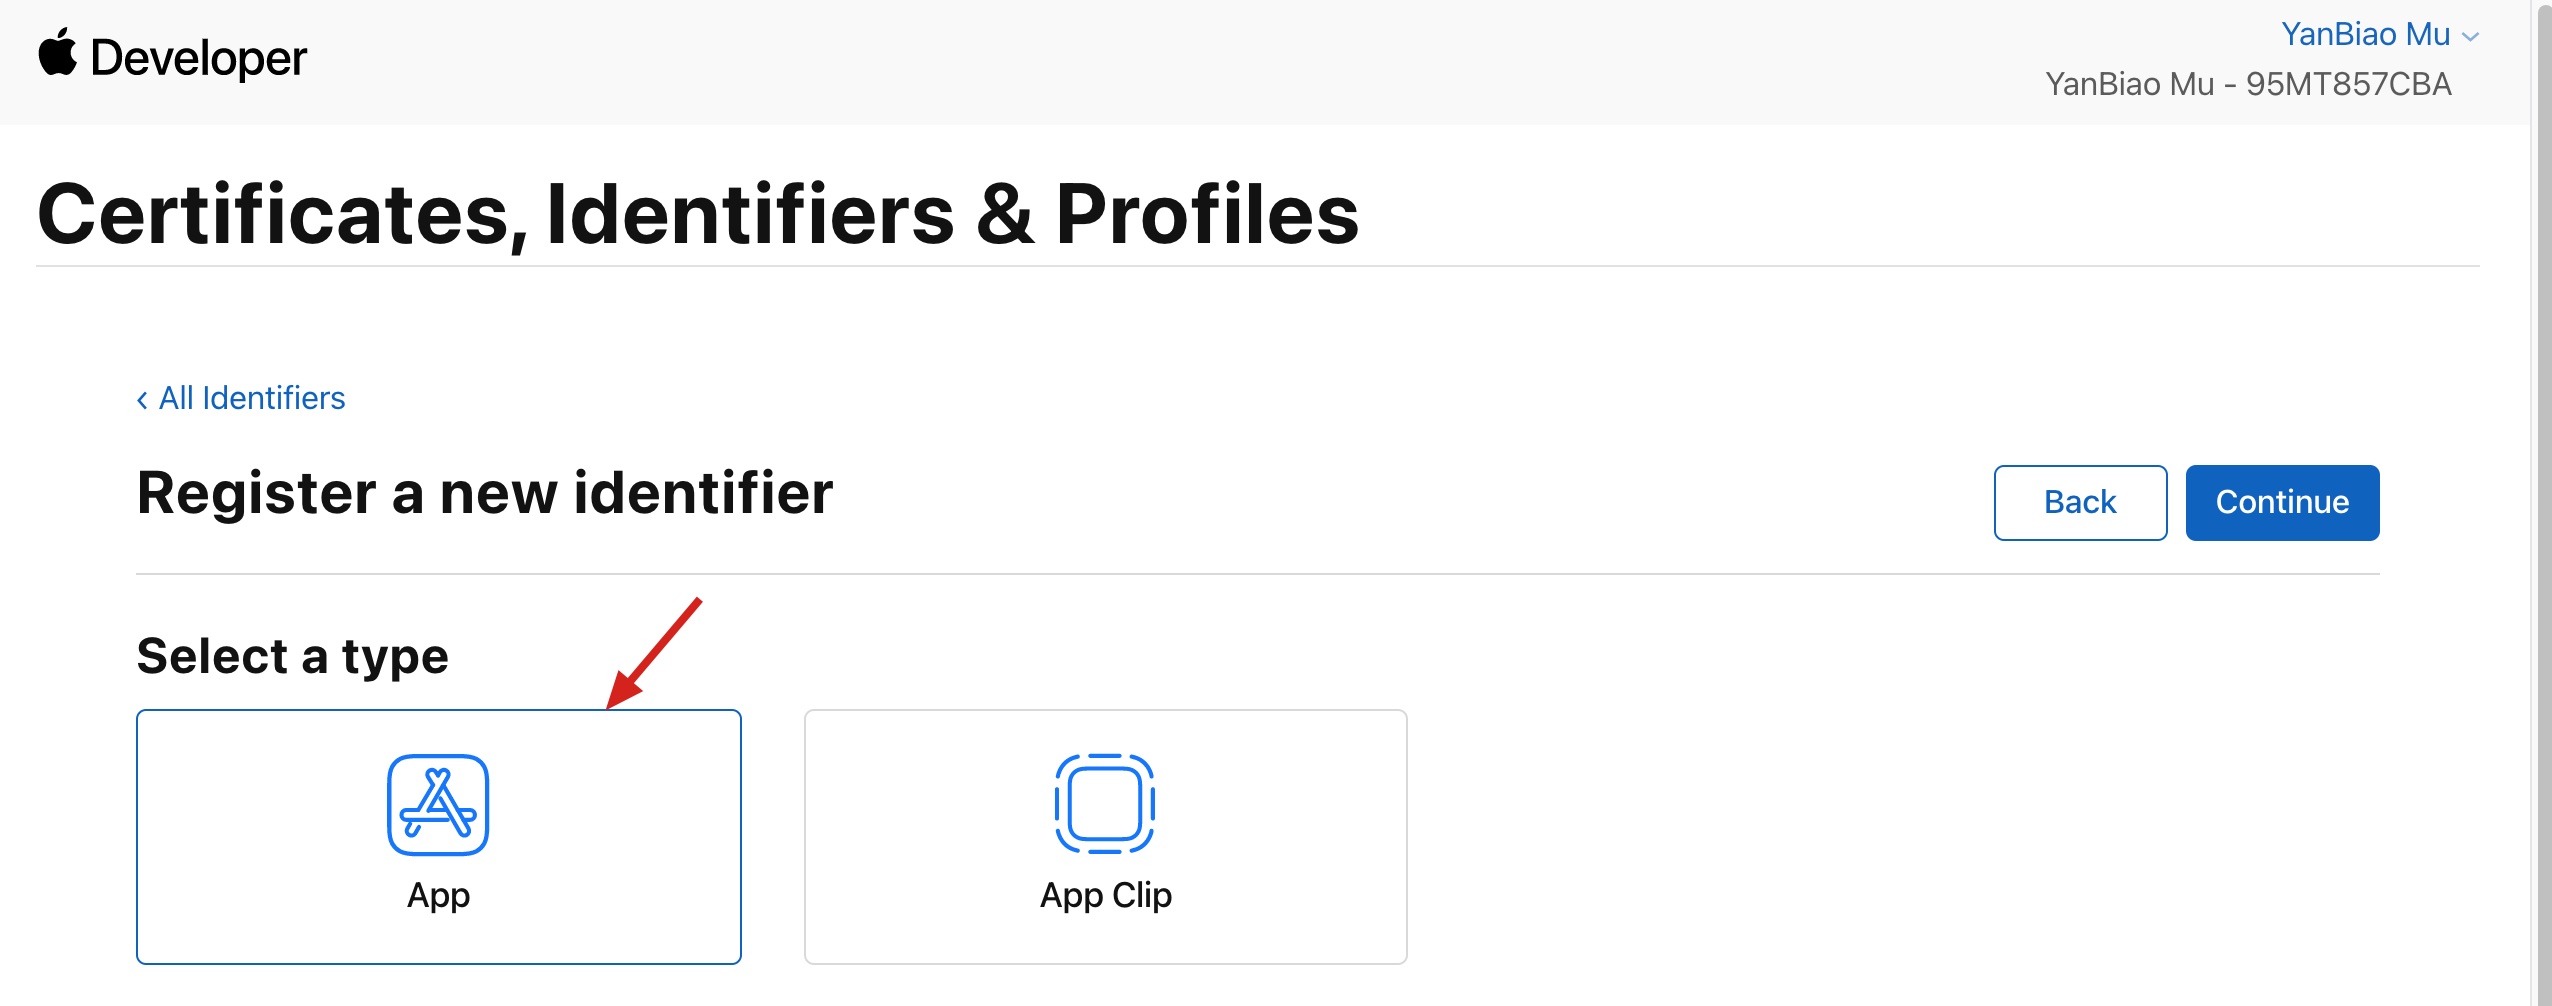
5. Select App and click Continue.
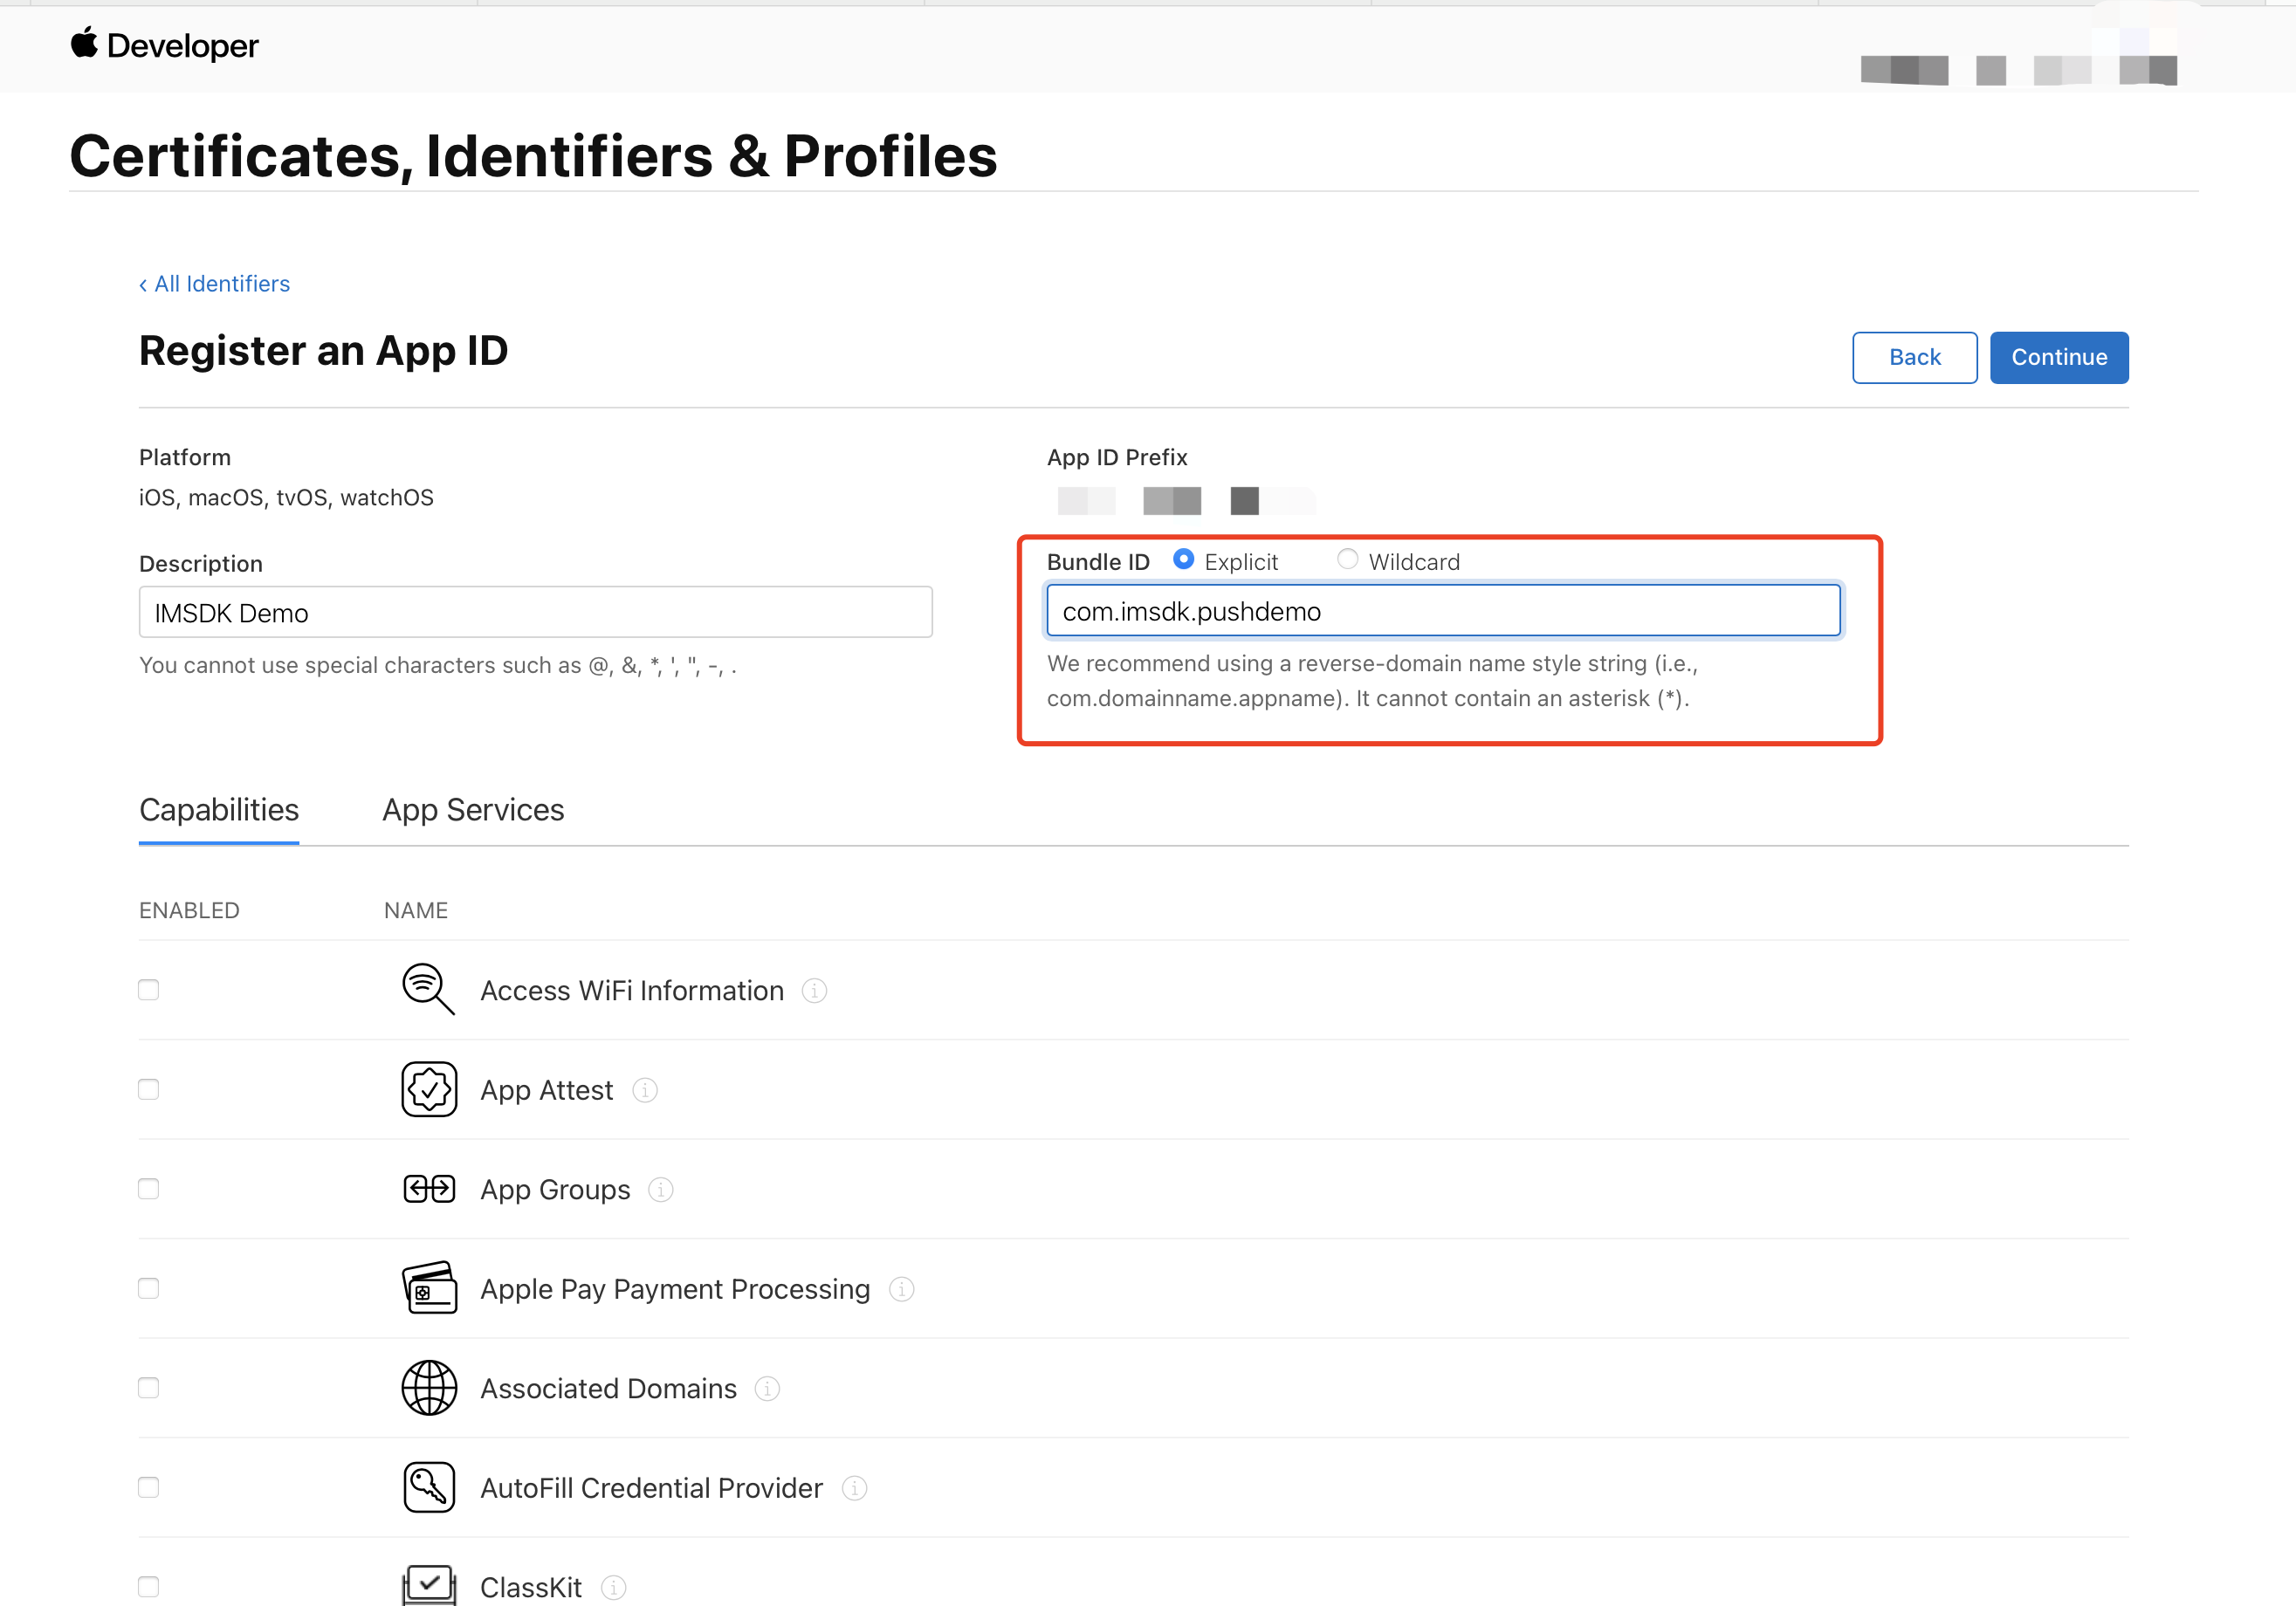
6. Configure Bundle ID and other information. Click Continue.
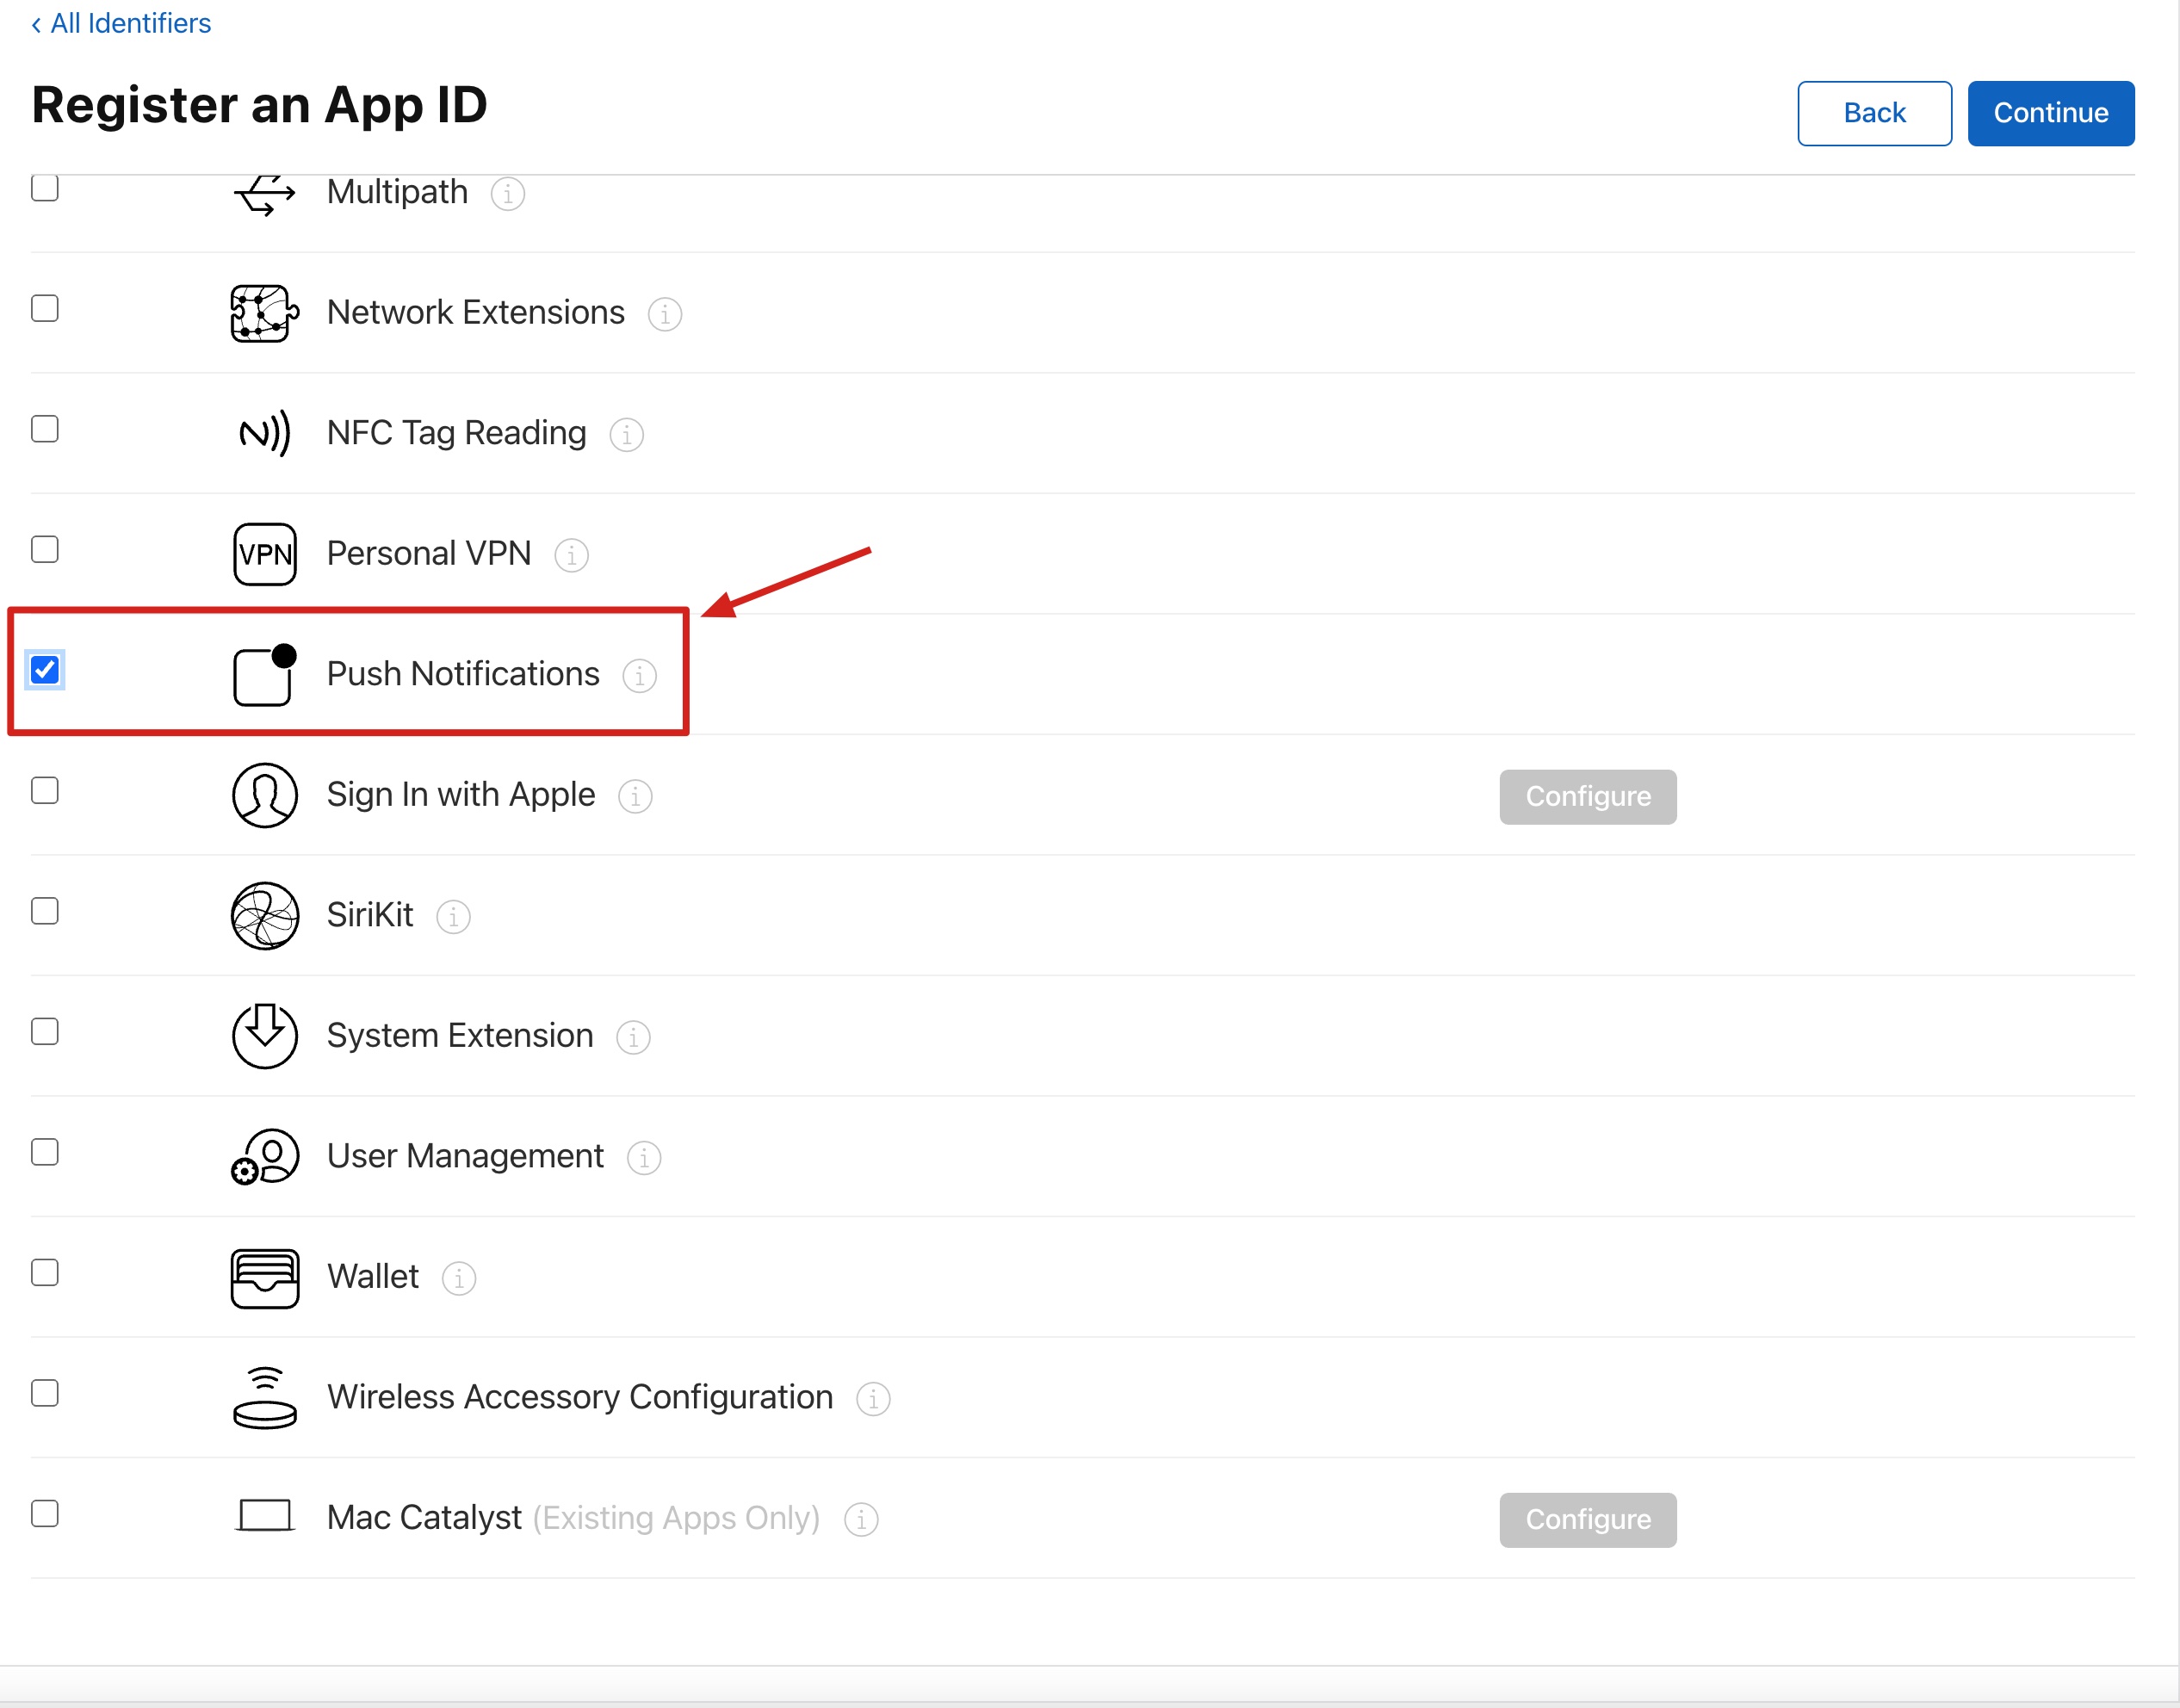
7. Select Push Notifications to activate the remote push service.
Generating certificates
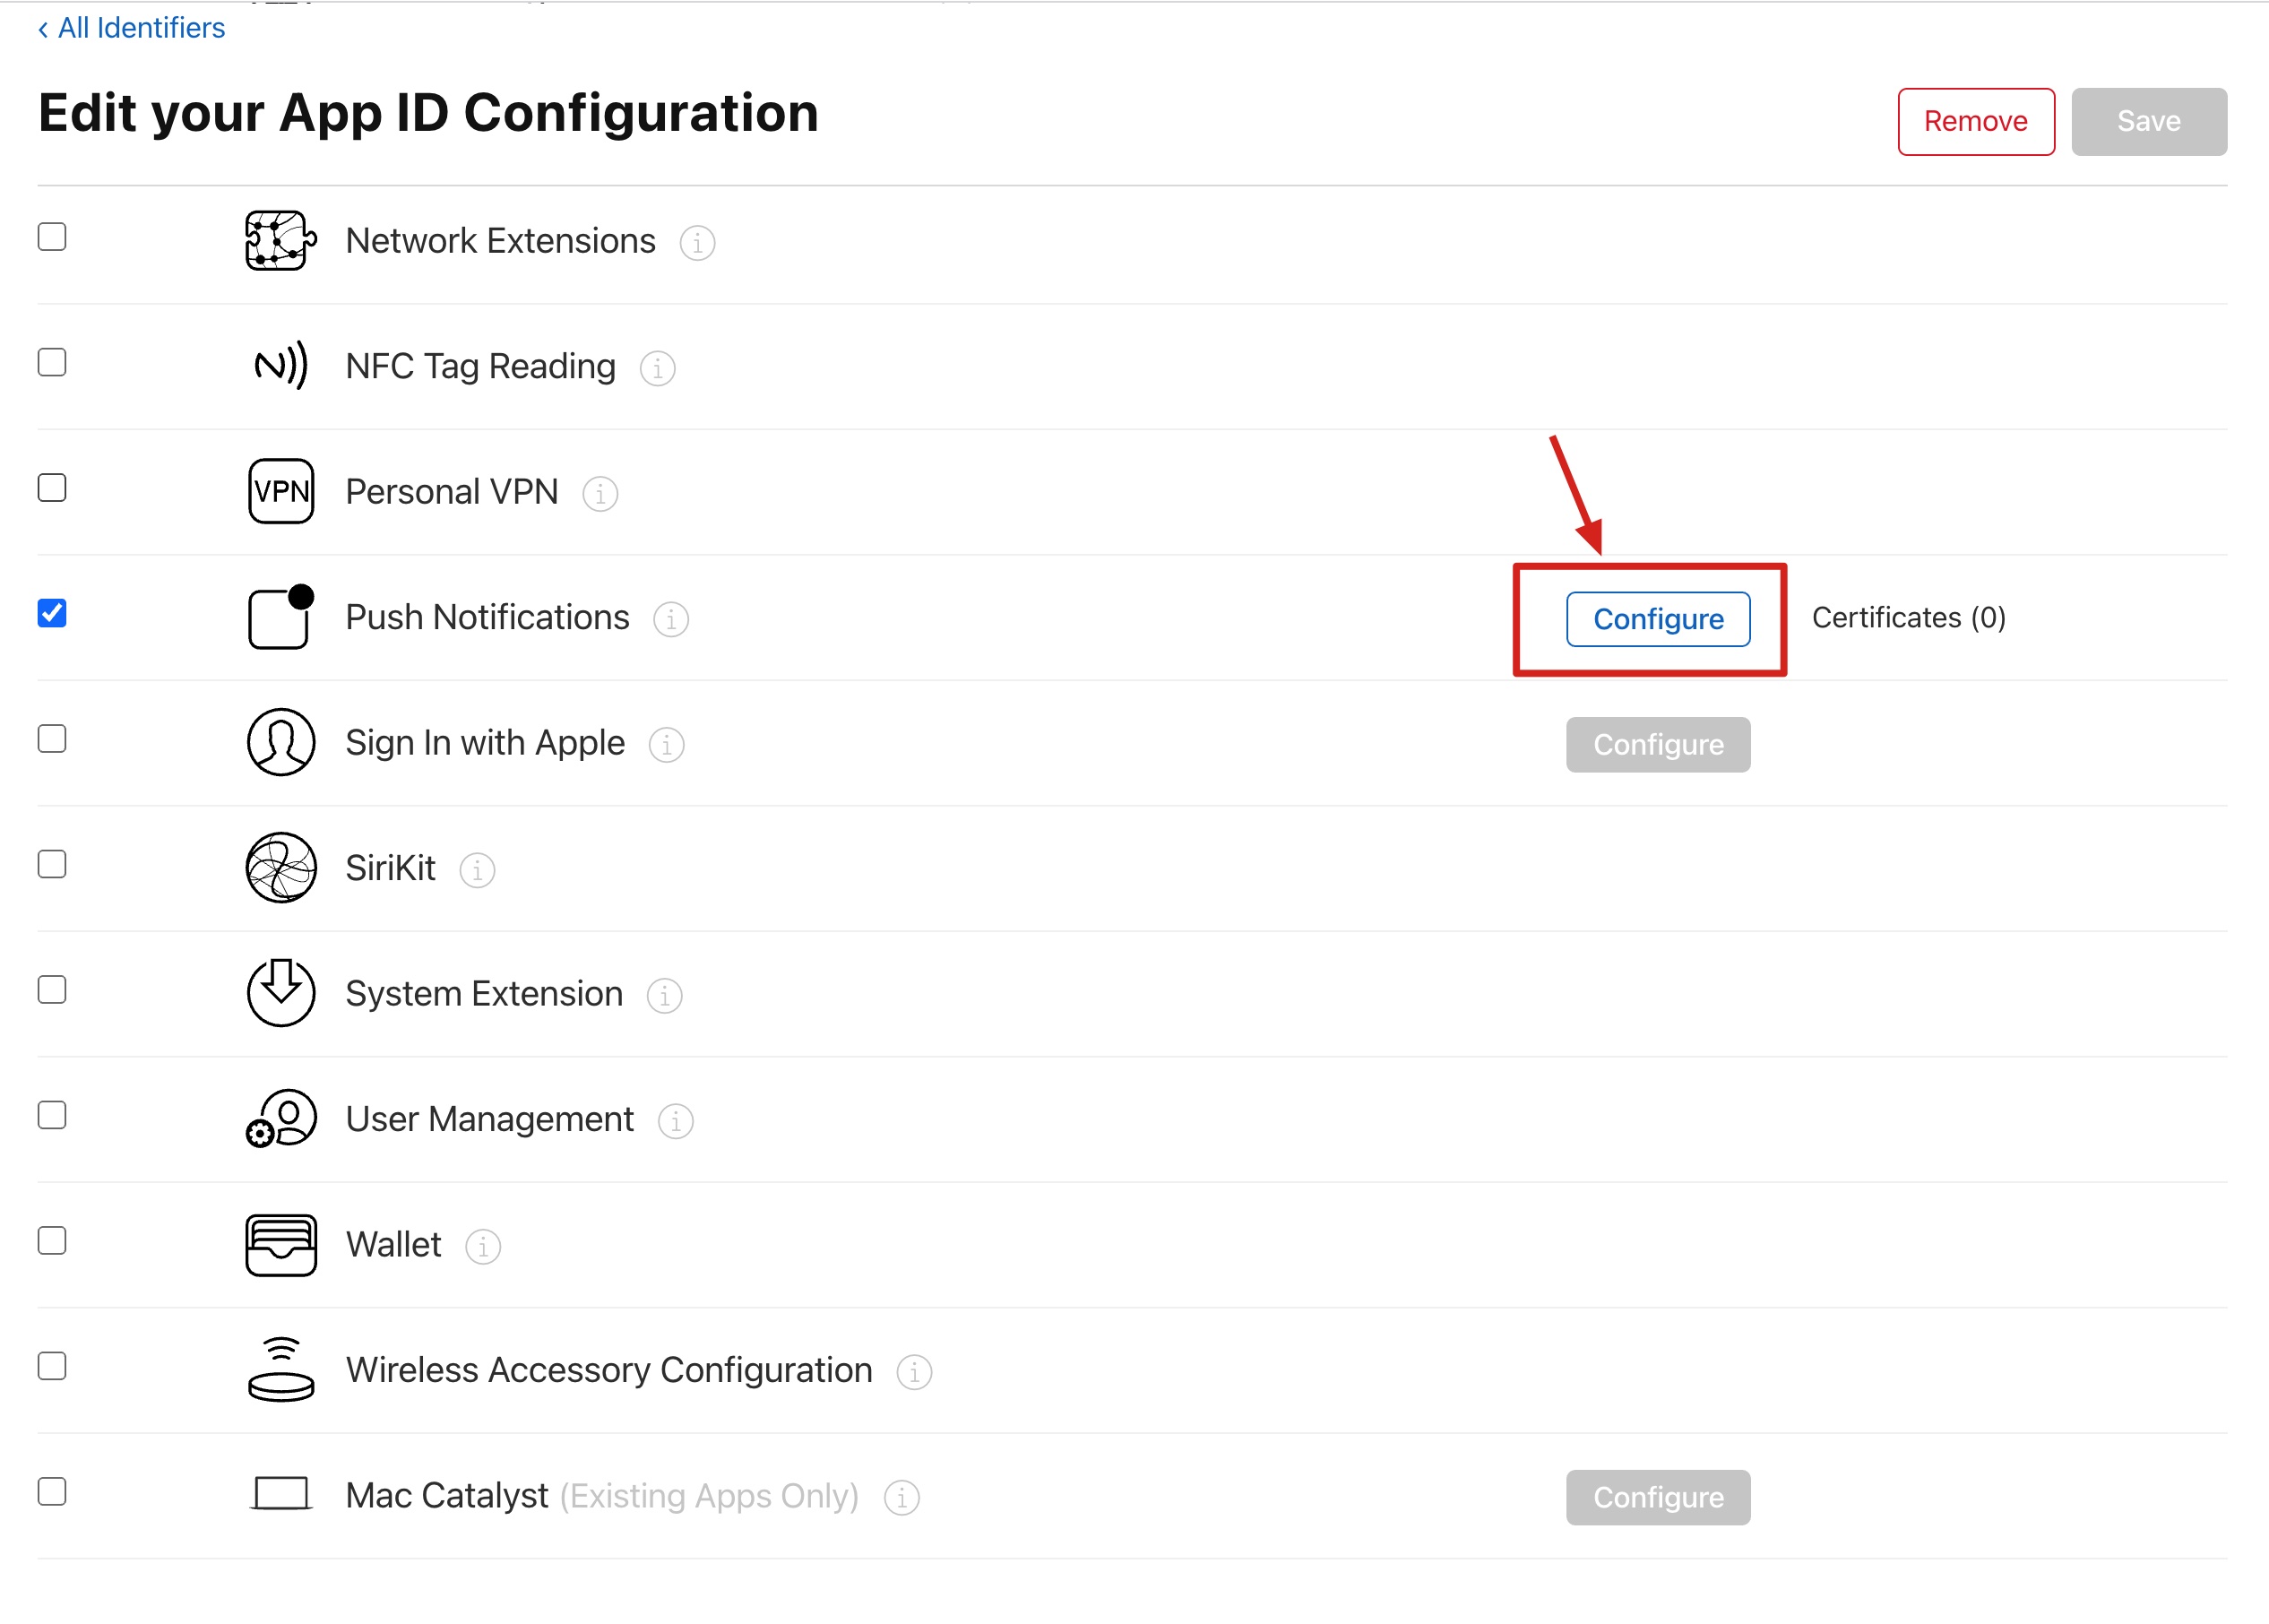
1. Select your AppID and click Configure.
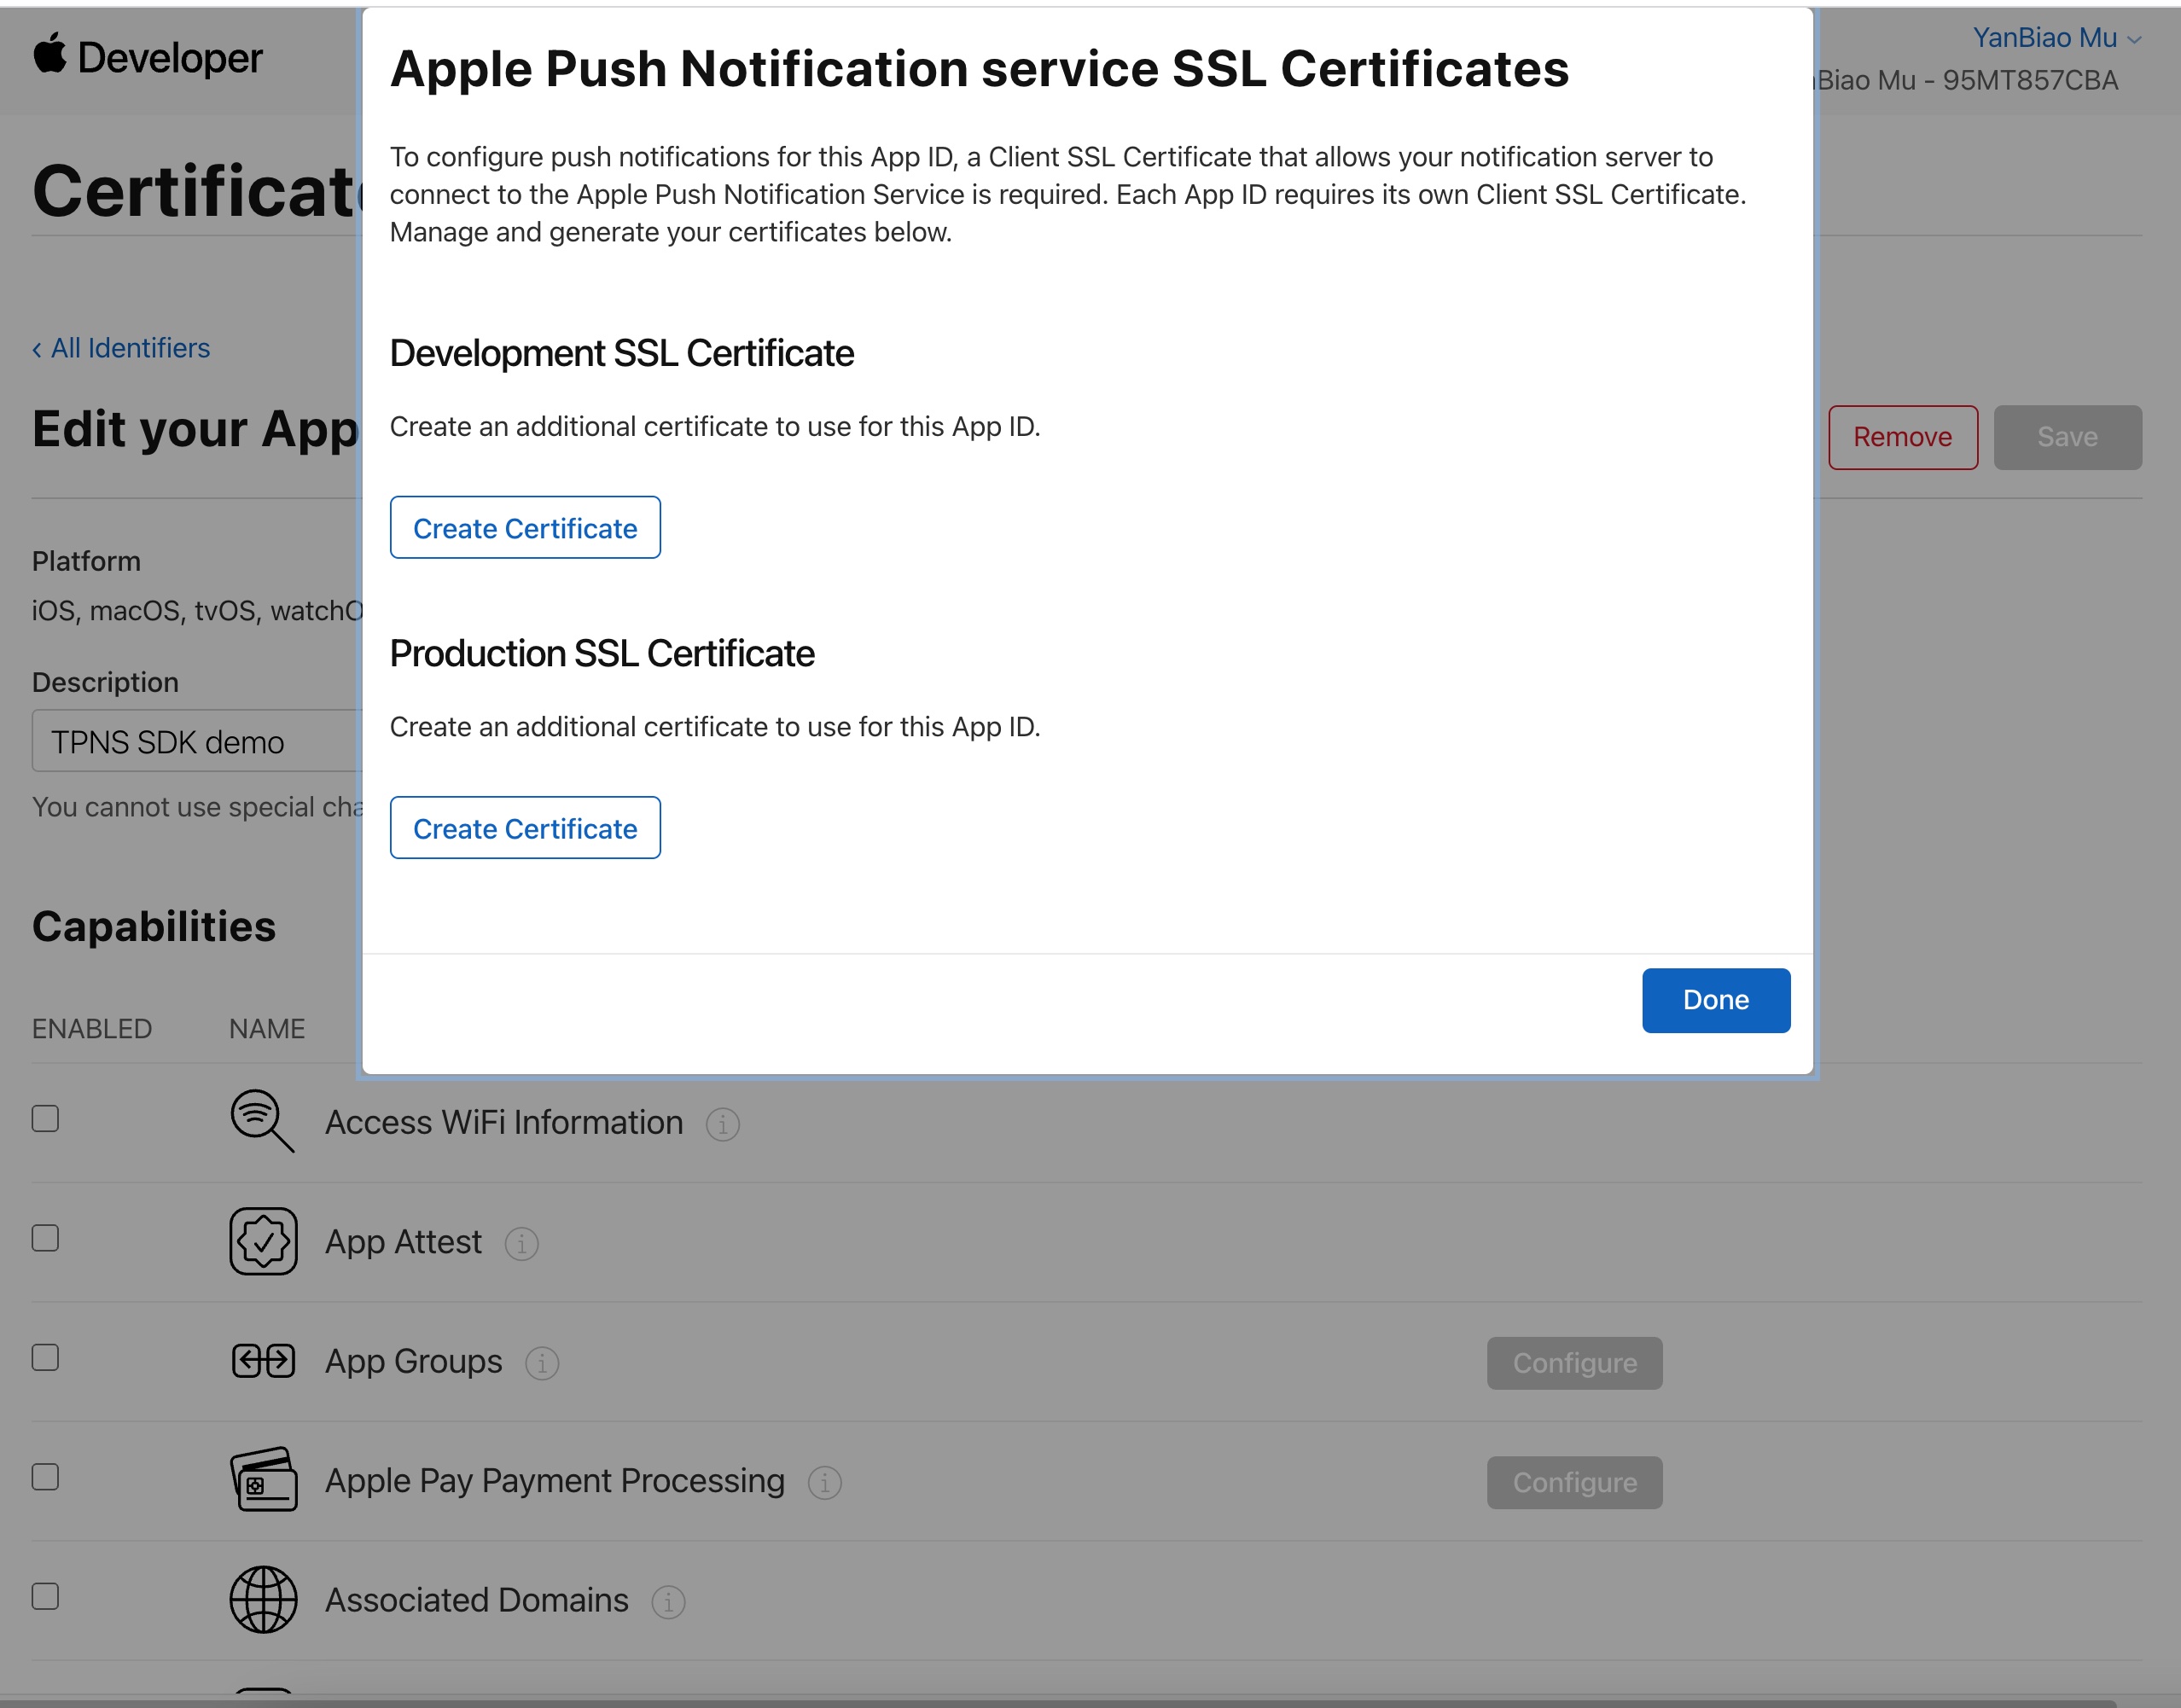
2. In the Apple Push Notification service SSL Certificates, you will see two SSL certificates: Development SSL Certificate and Production SSL Certificate.
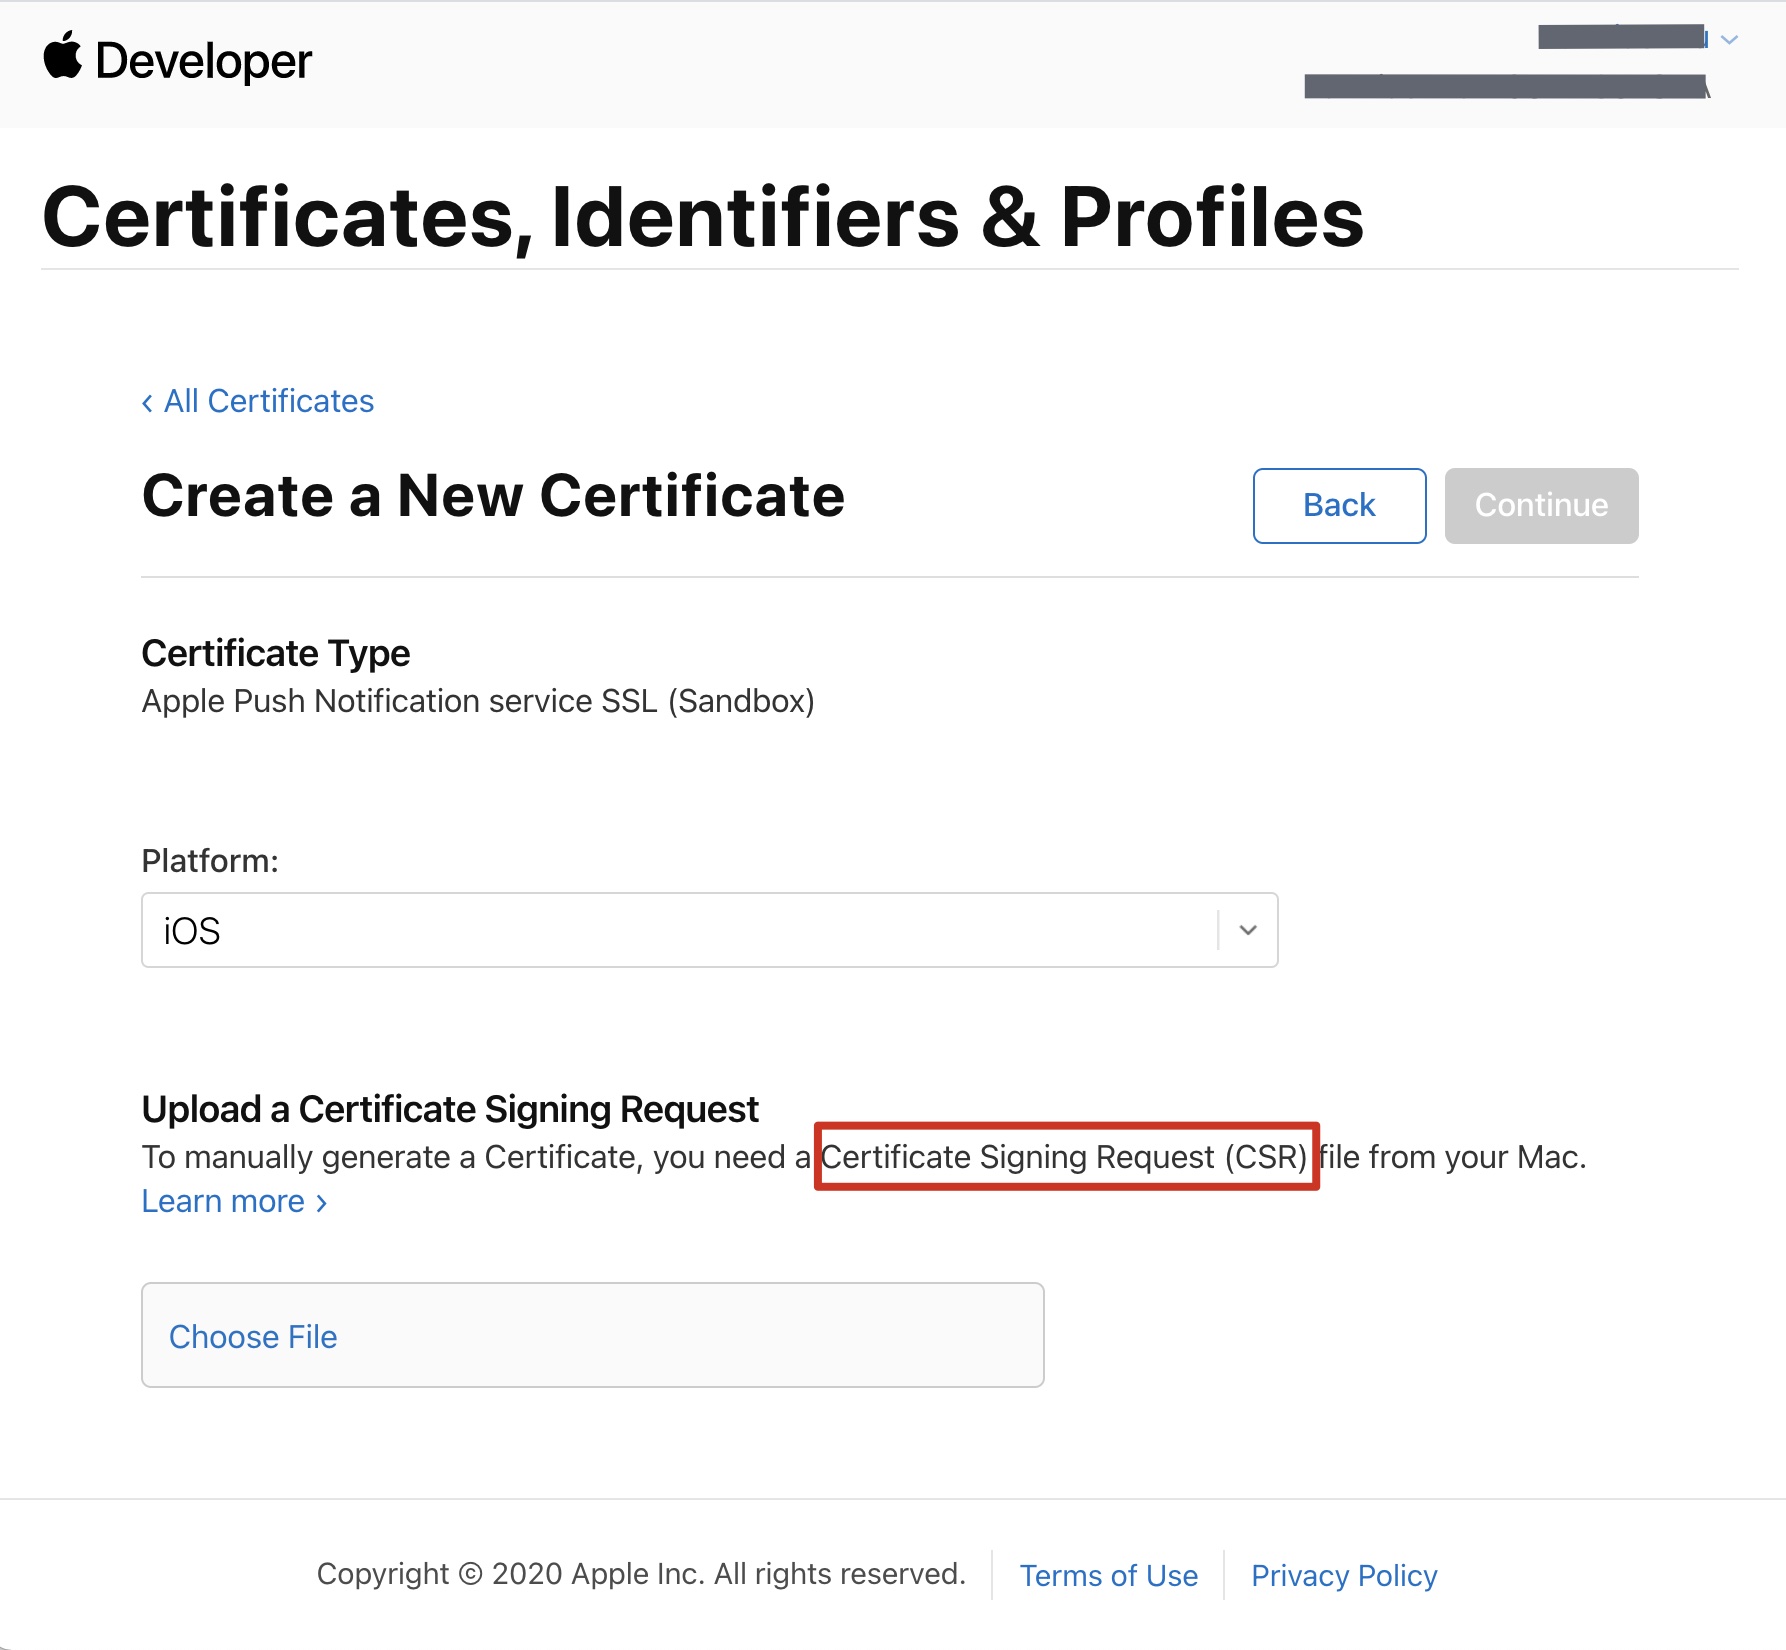
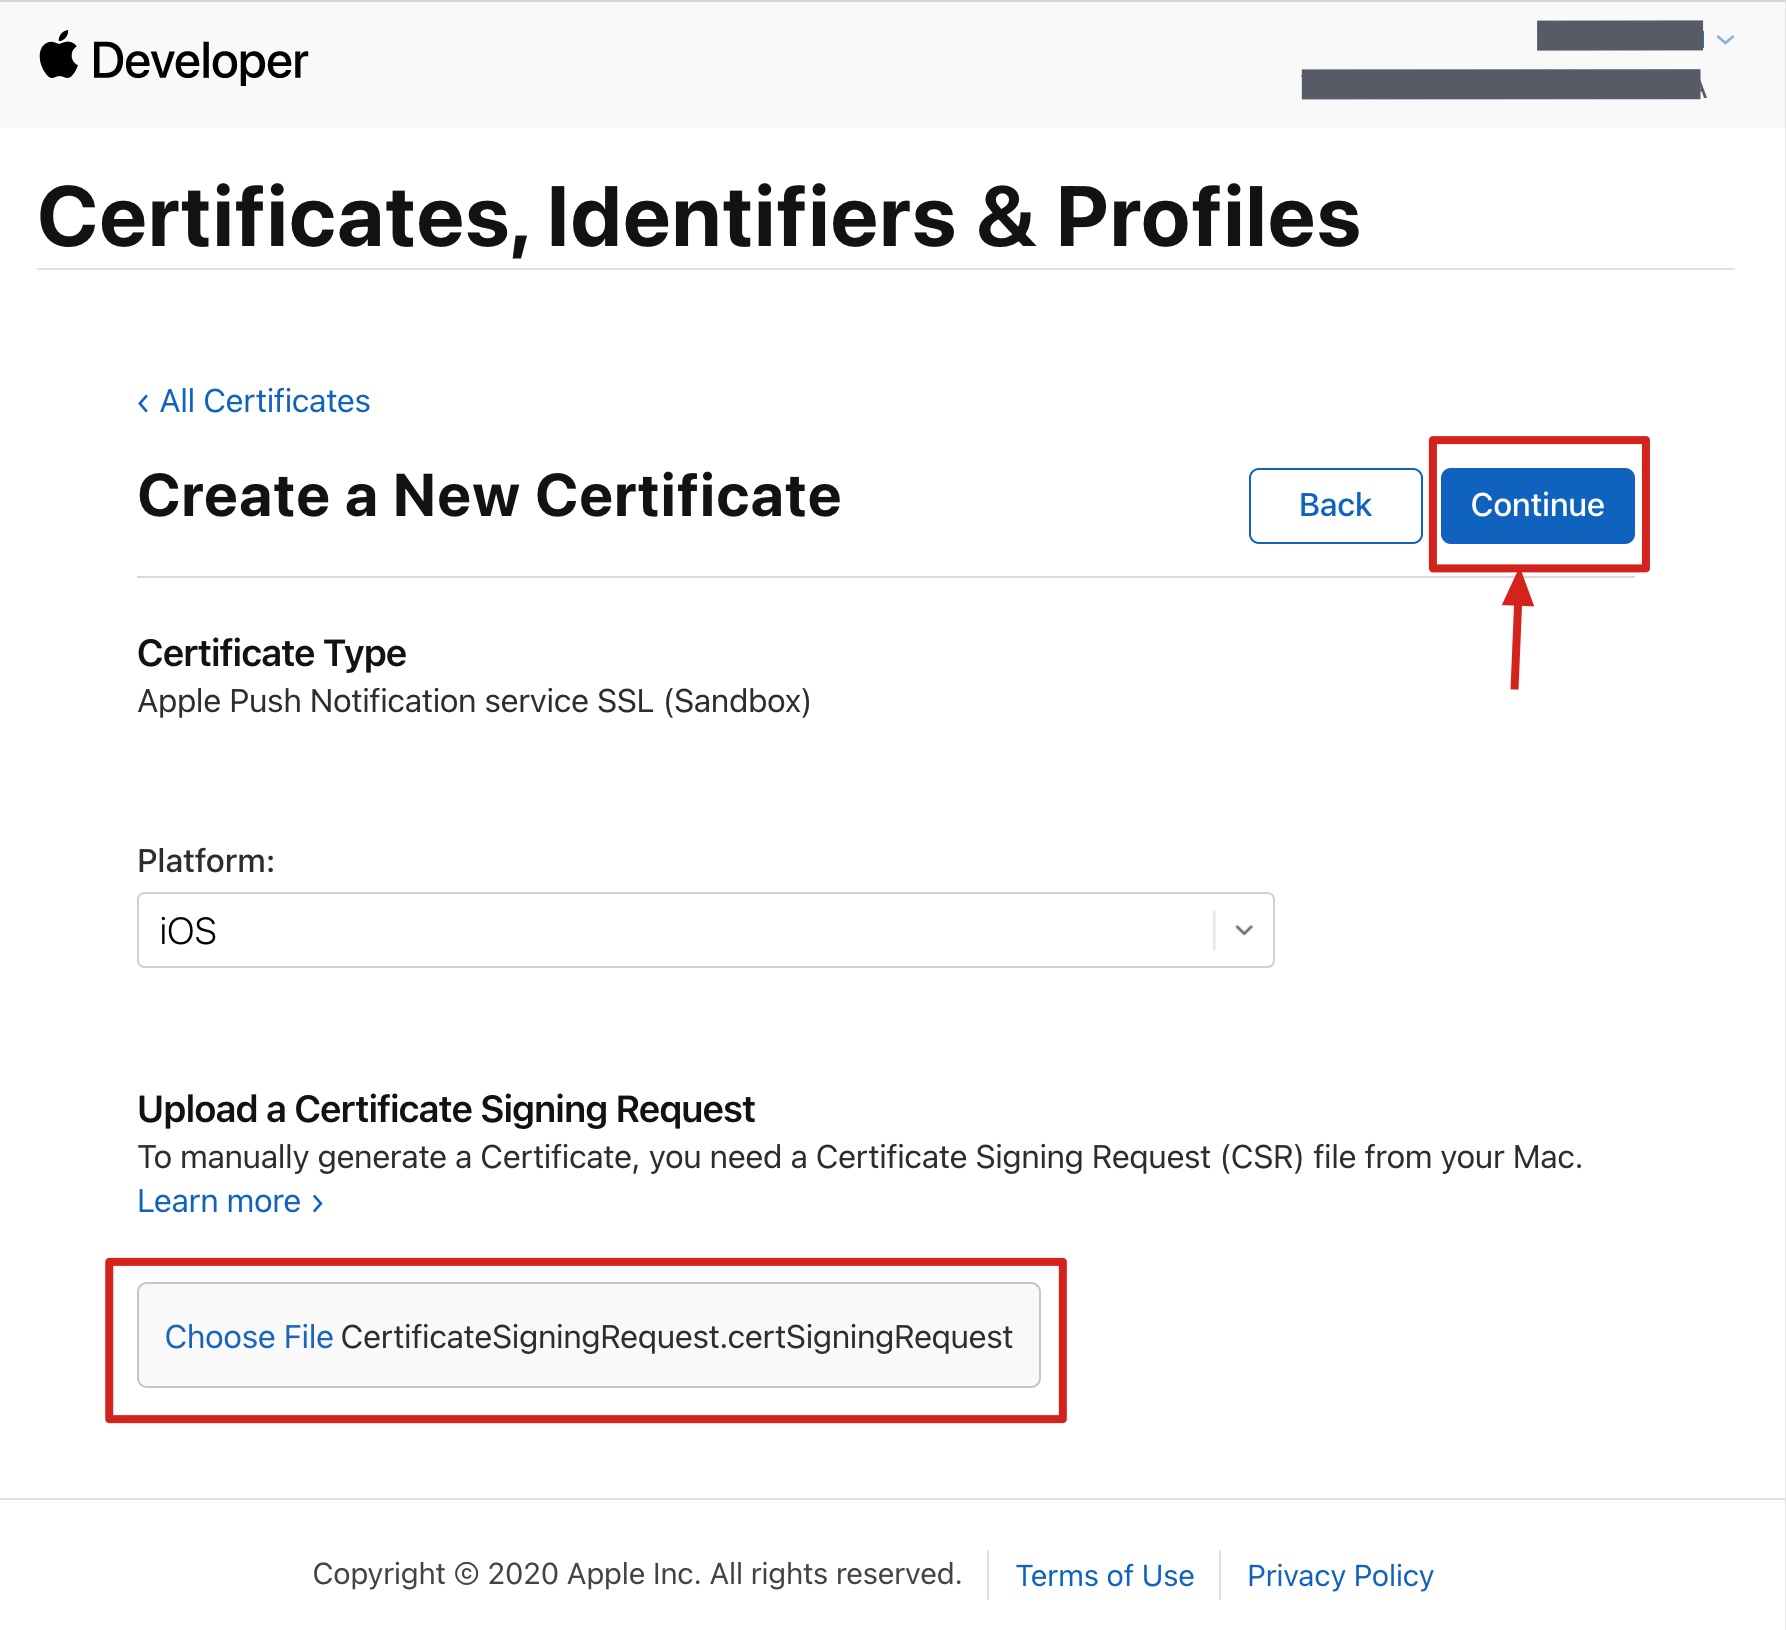
3. Click Create Certificate under Development SSL Certificate to create a certificate. You will be prompted that Certificate Signing Request (CSR) is required.
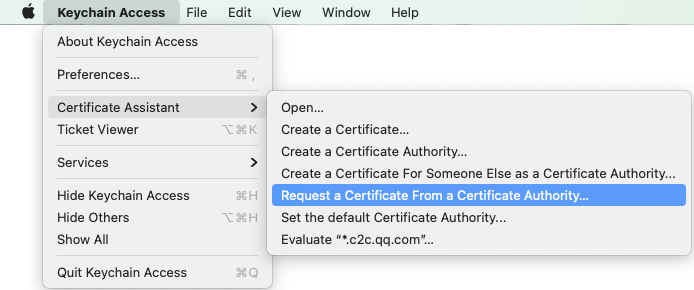
4. Open Keychain Access on Mac. Select Keychain Access > Certificate Assistant > Request a Certificate From a Certificate Authority.
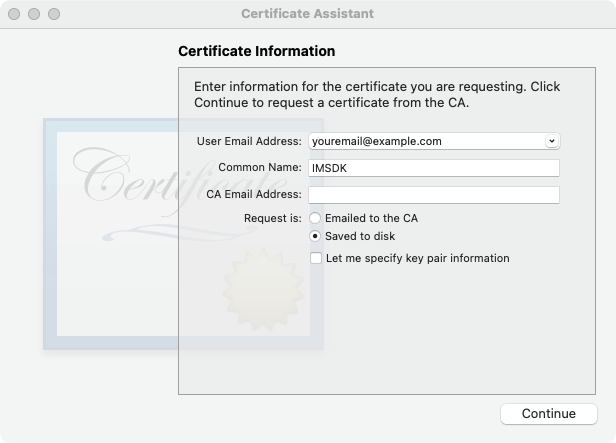
5. Fill in your email for User Email Address and your name or company name for Common Name. Select Saved to disk and click Continue. Then the system will generate a *.certSigningRequest file.
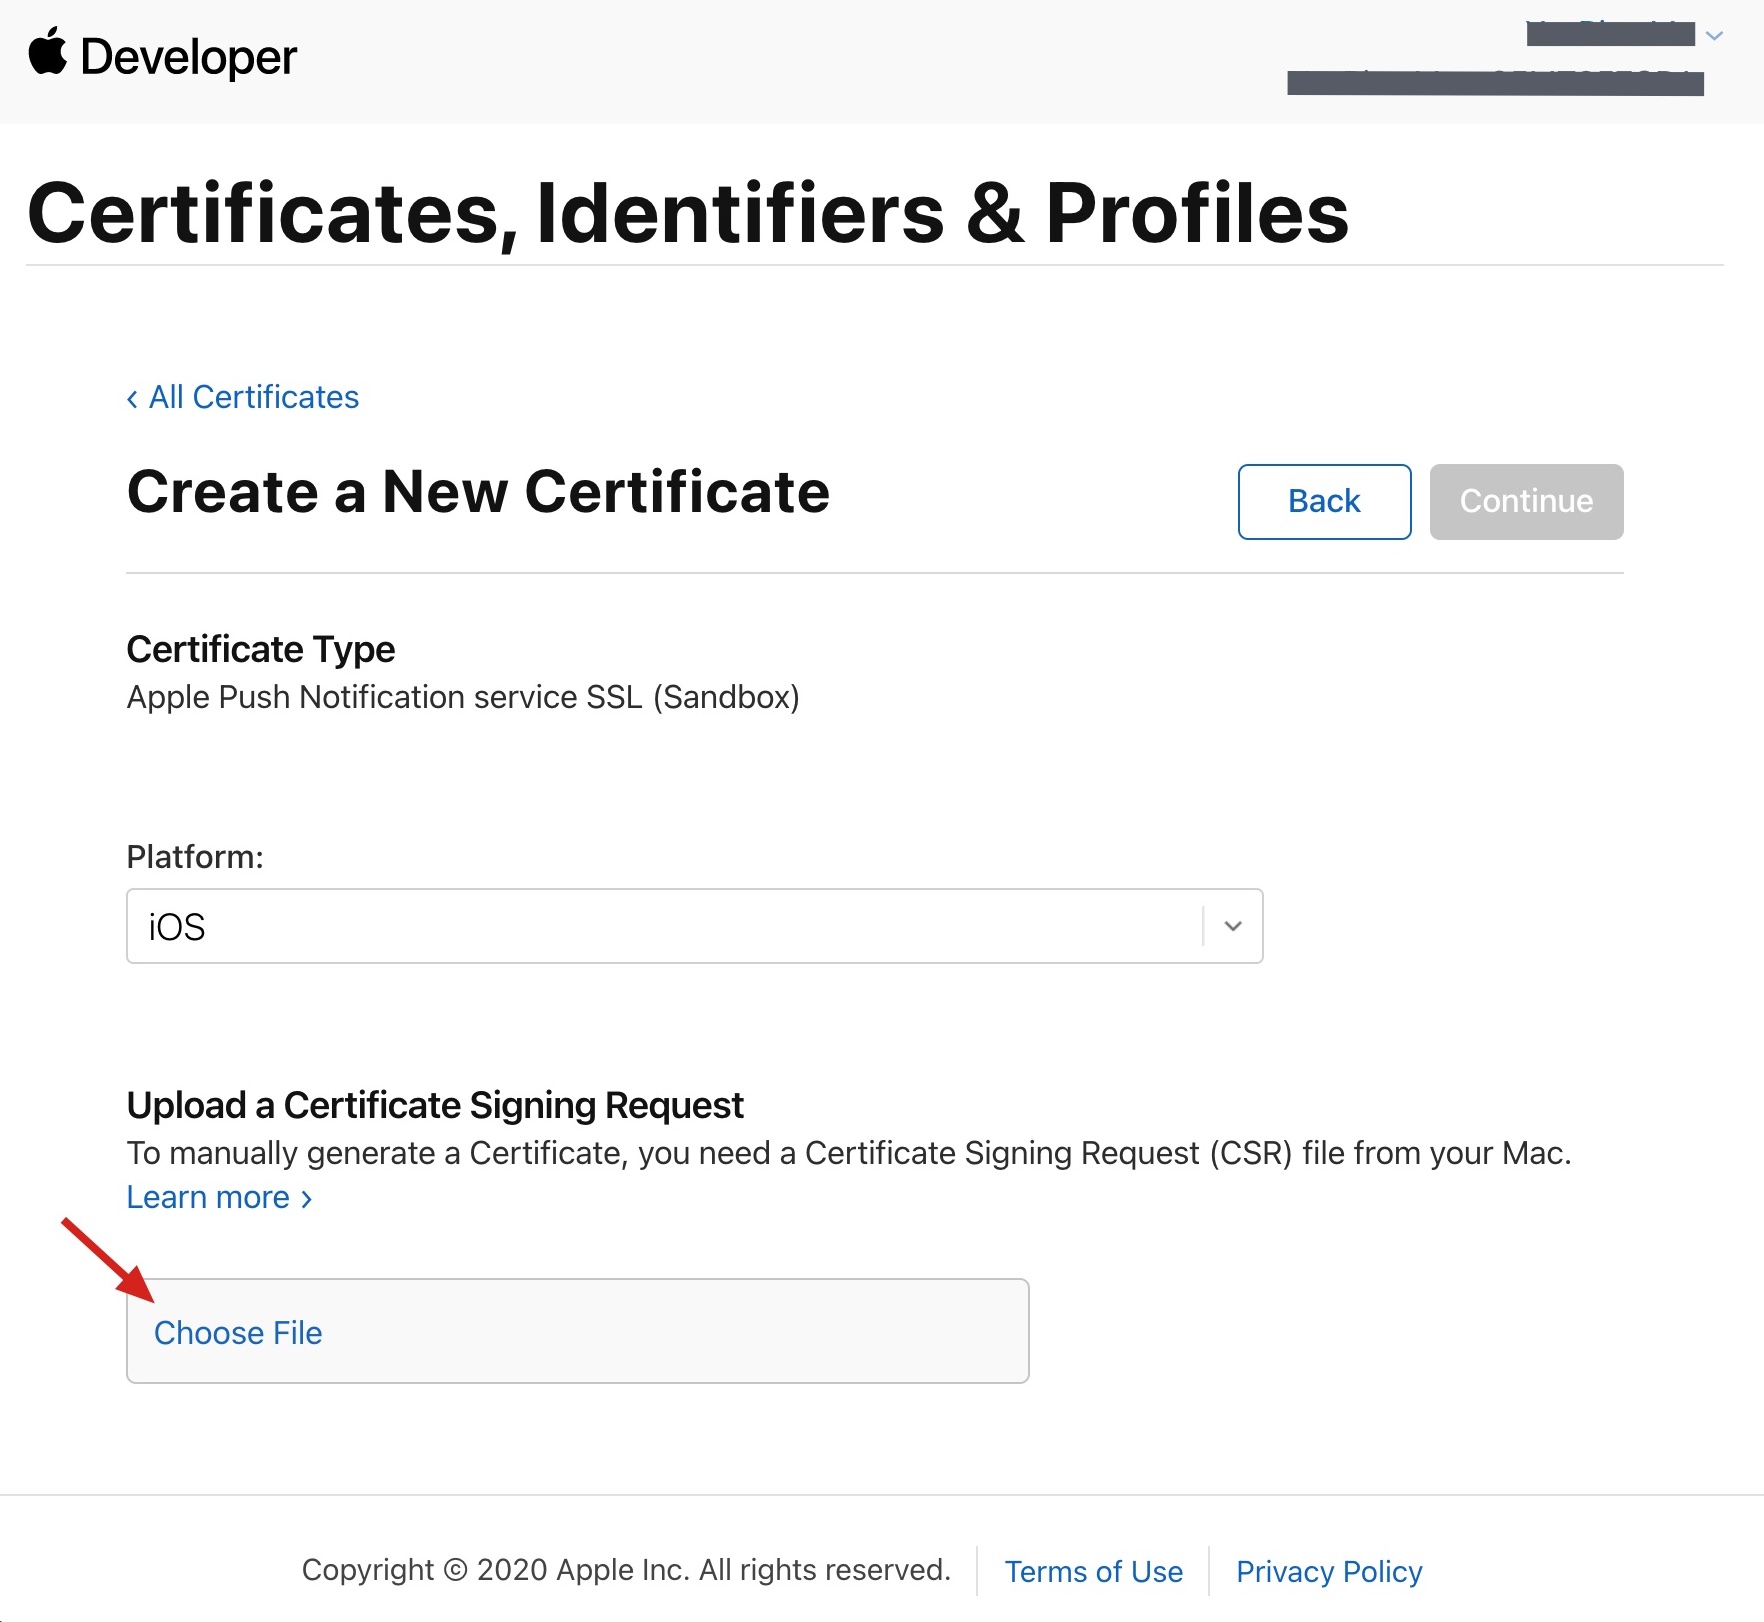
6. Return the Apple Developer page shown in step 3 and click Choose File to upload the *.certSigningRequest file.
7. Click Continue to generate the push certificate.
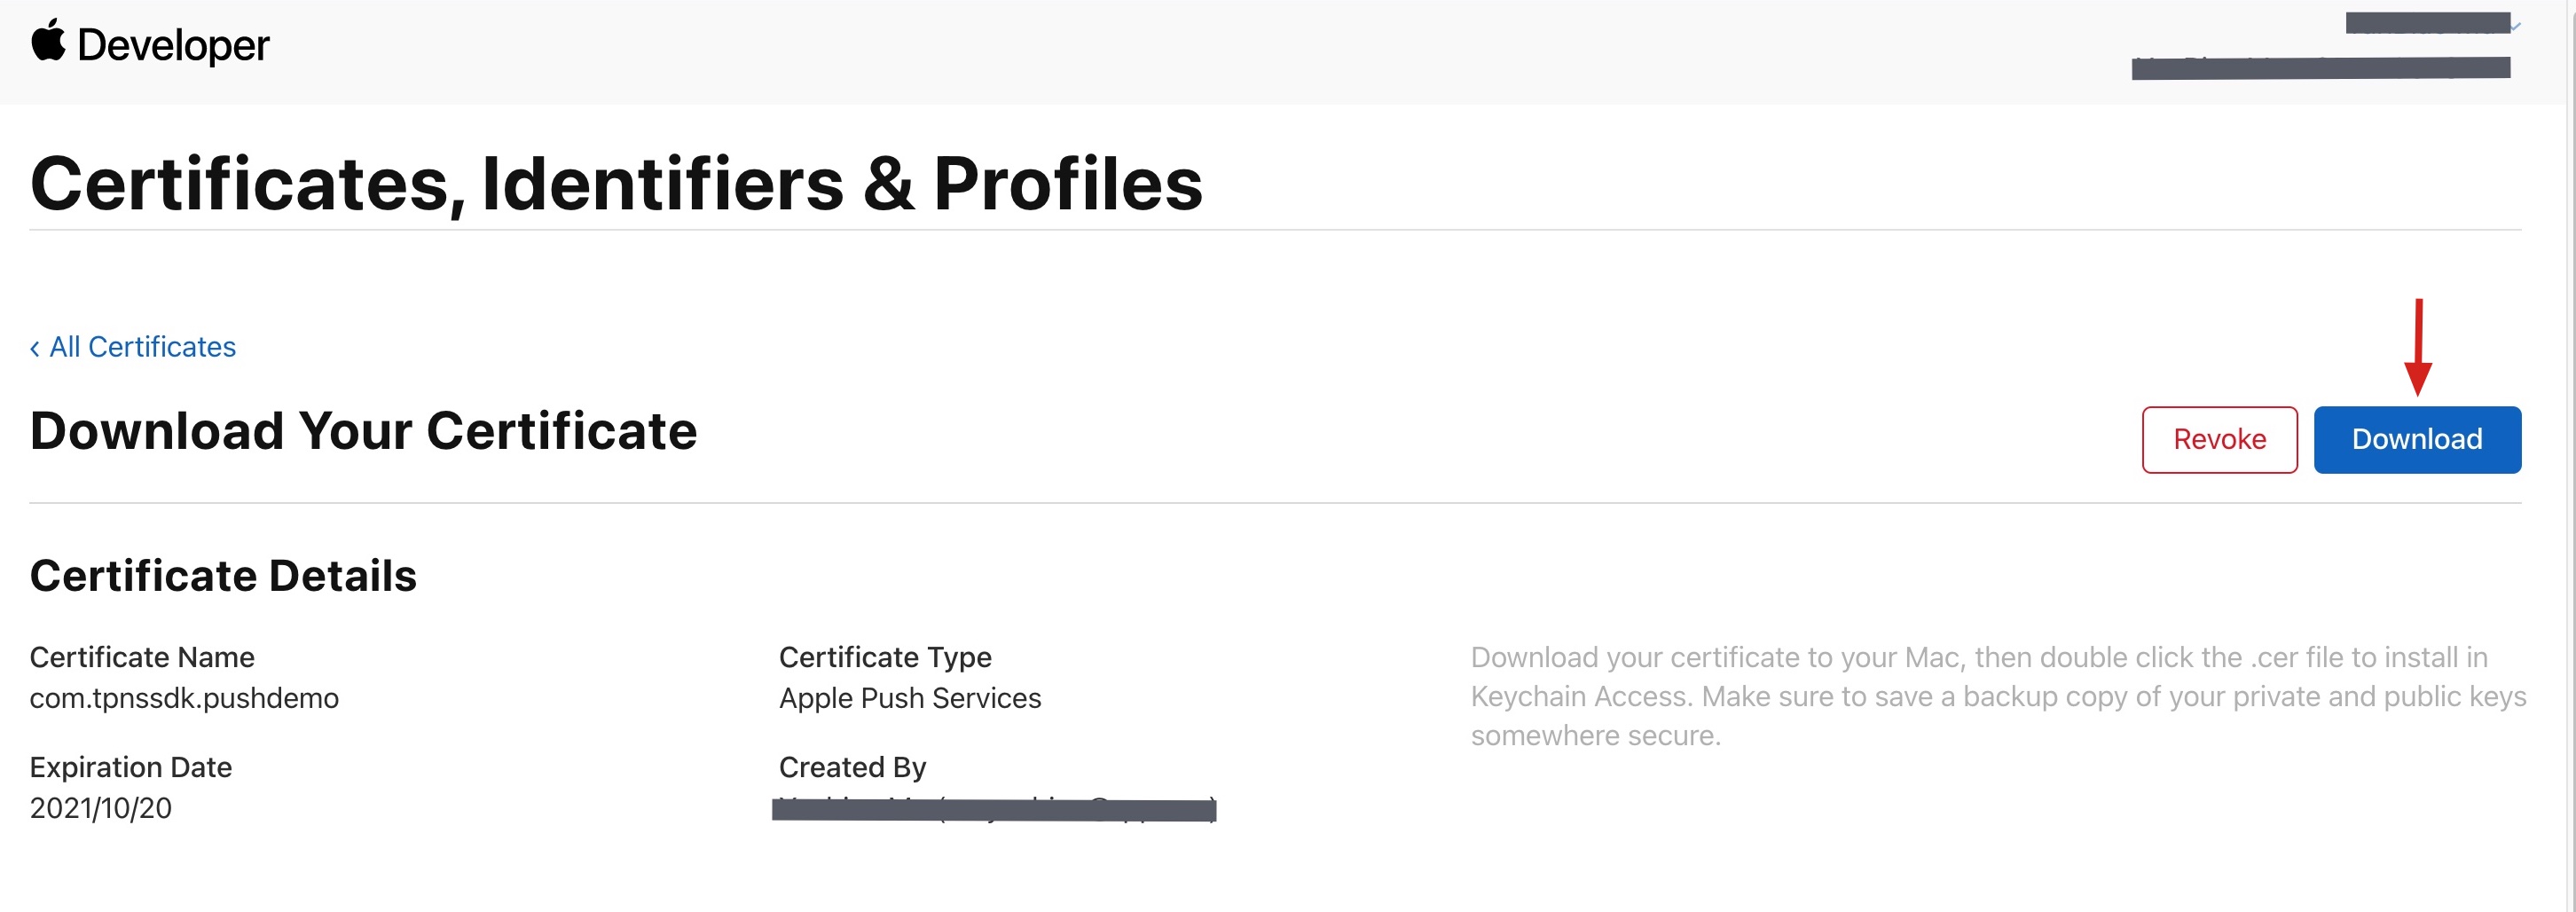
8. Click Download to save the Development SSL Certificate locally.
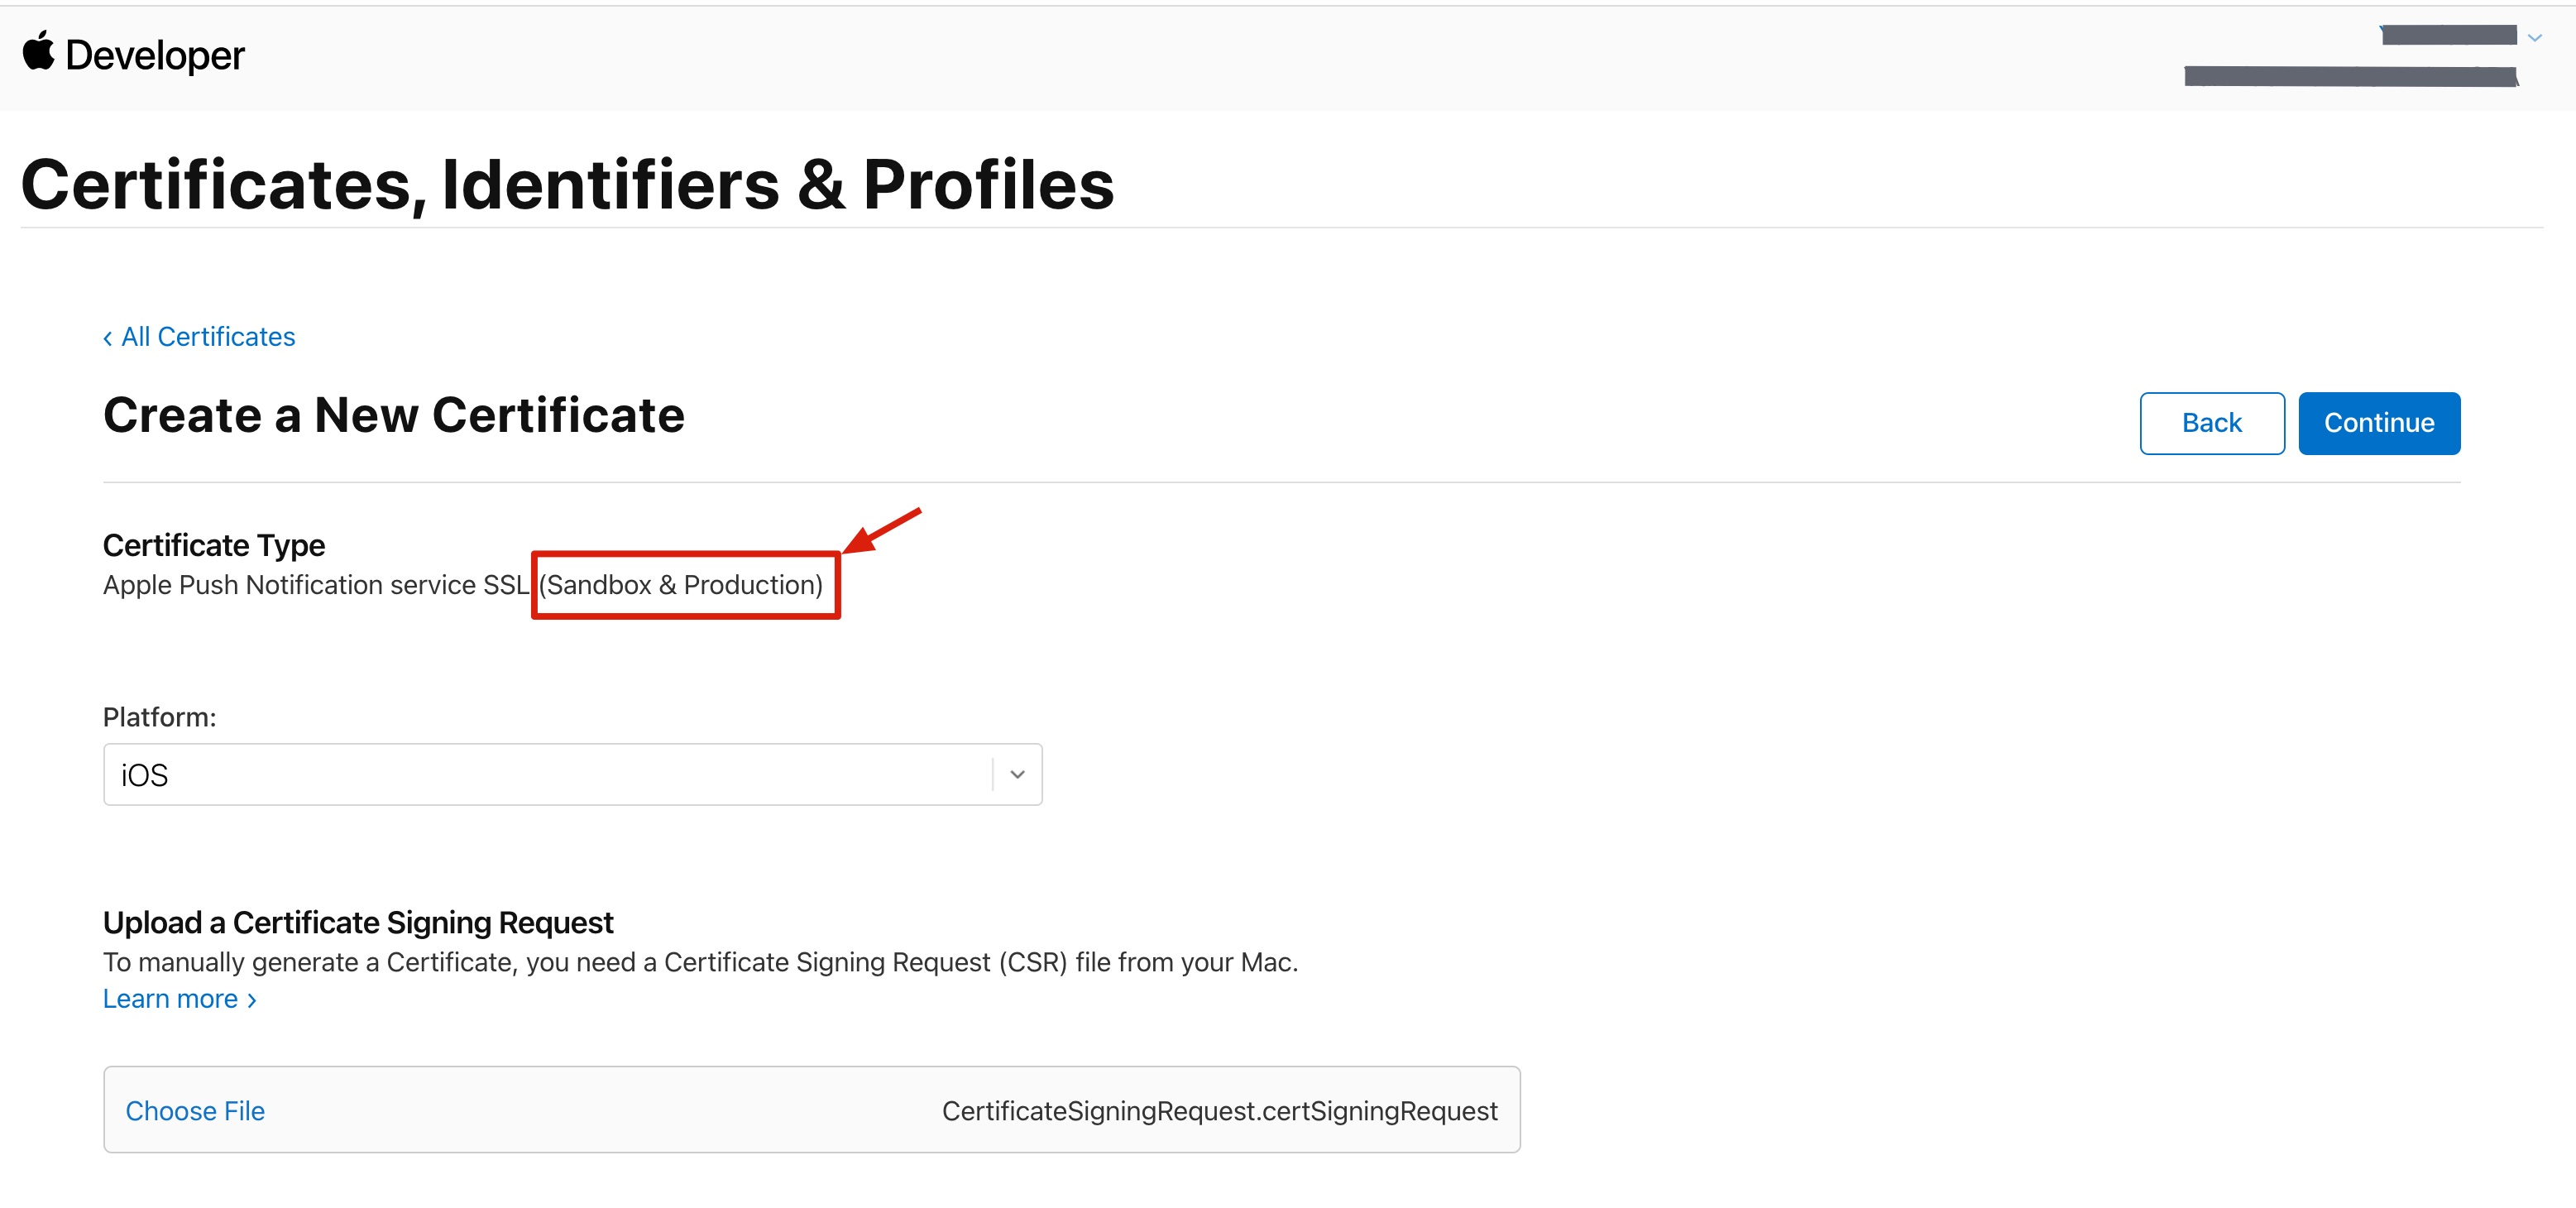
9. Repeat steps 1-8 to generate and download the production SSL certificate locally.
Note:
Actually, this certificate is a Sandbox and Production merged certificate that applies to both the development and production environments.
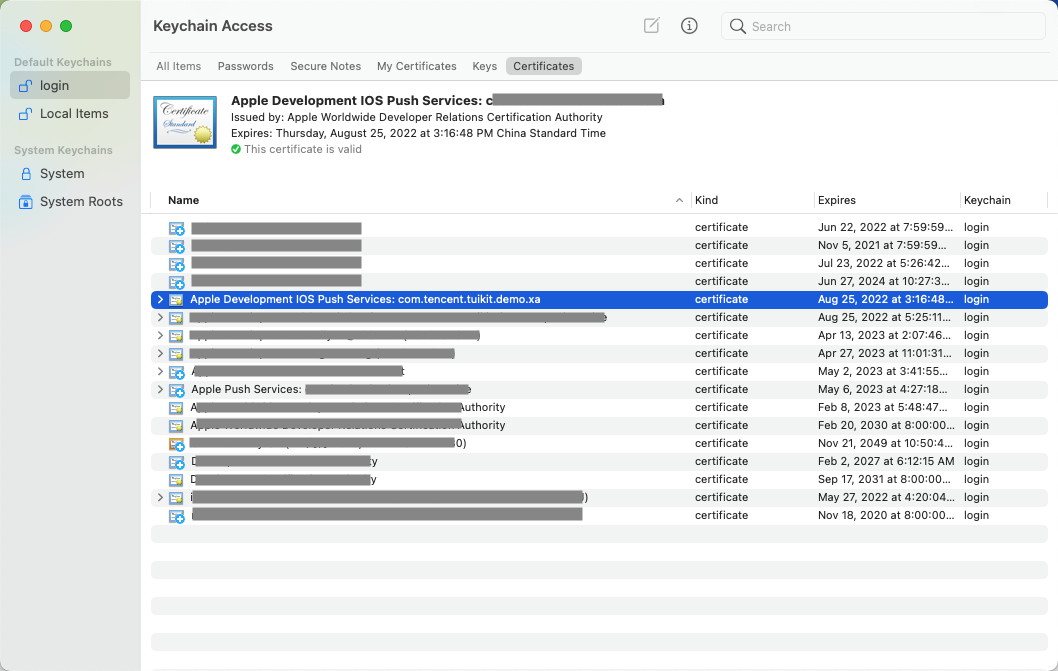
10. Double-click and open the development SSL certificate and production SSL certificate that have been downloaded to import them to Keychain Access.
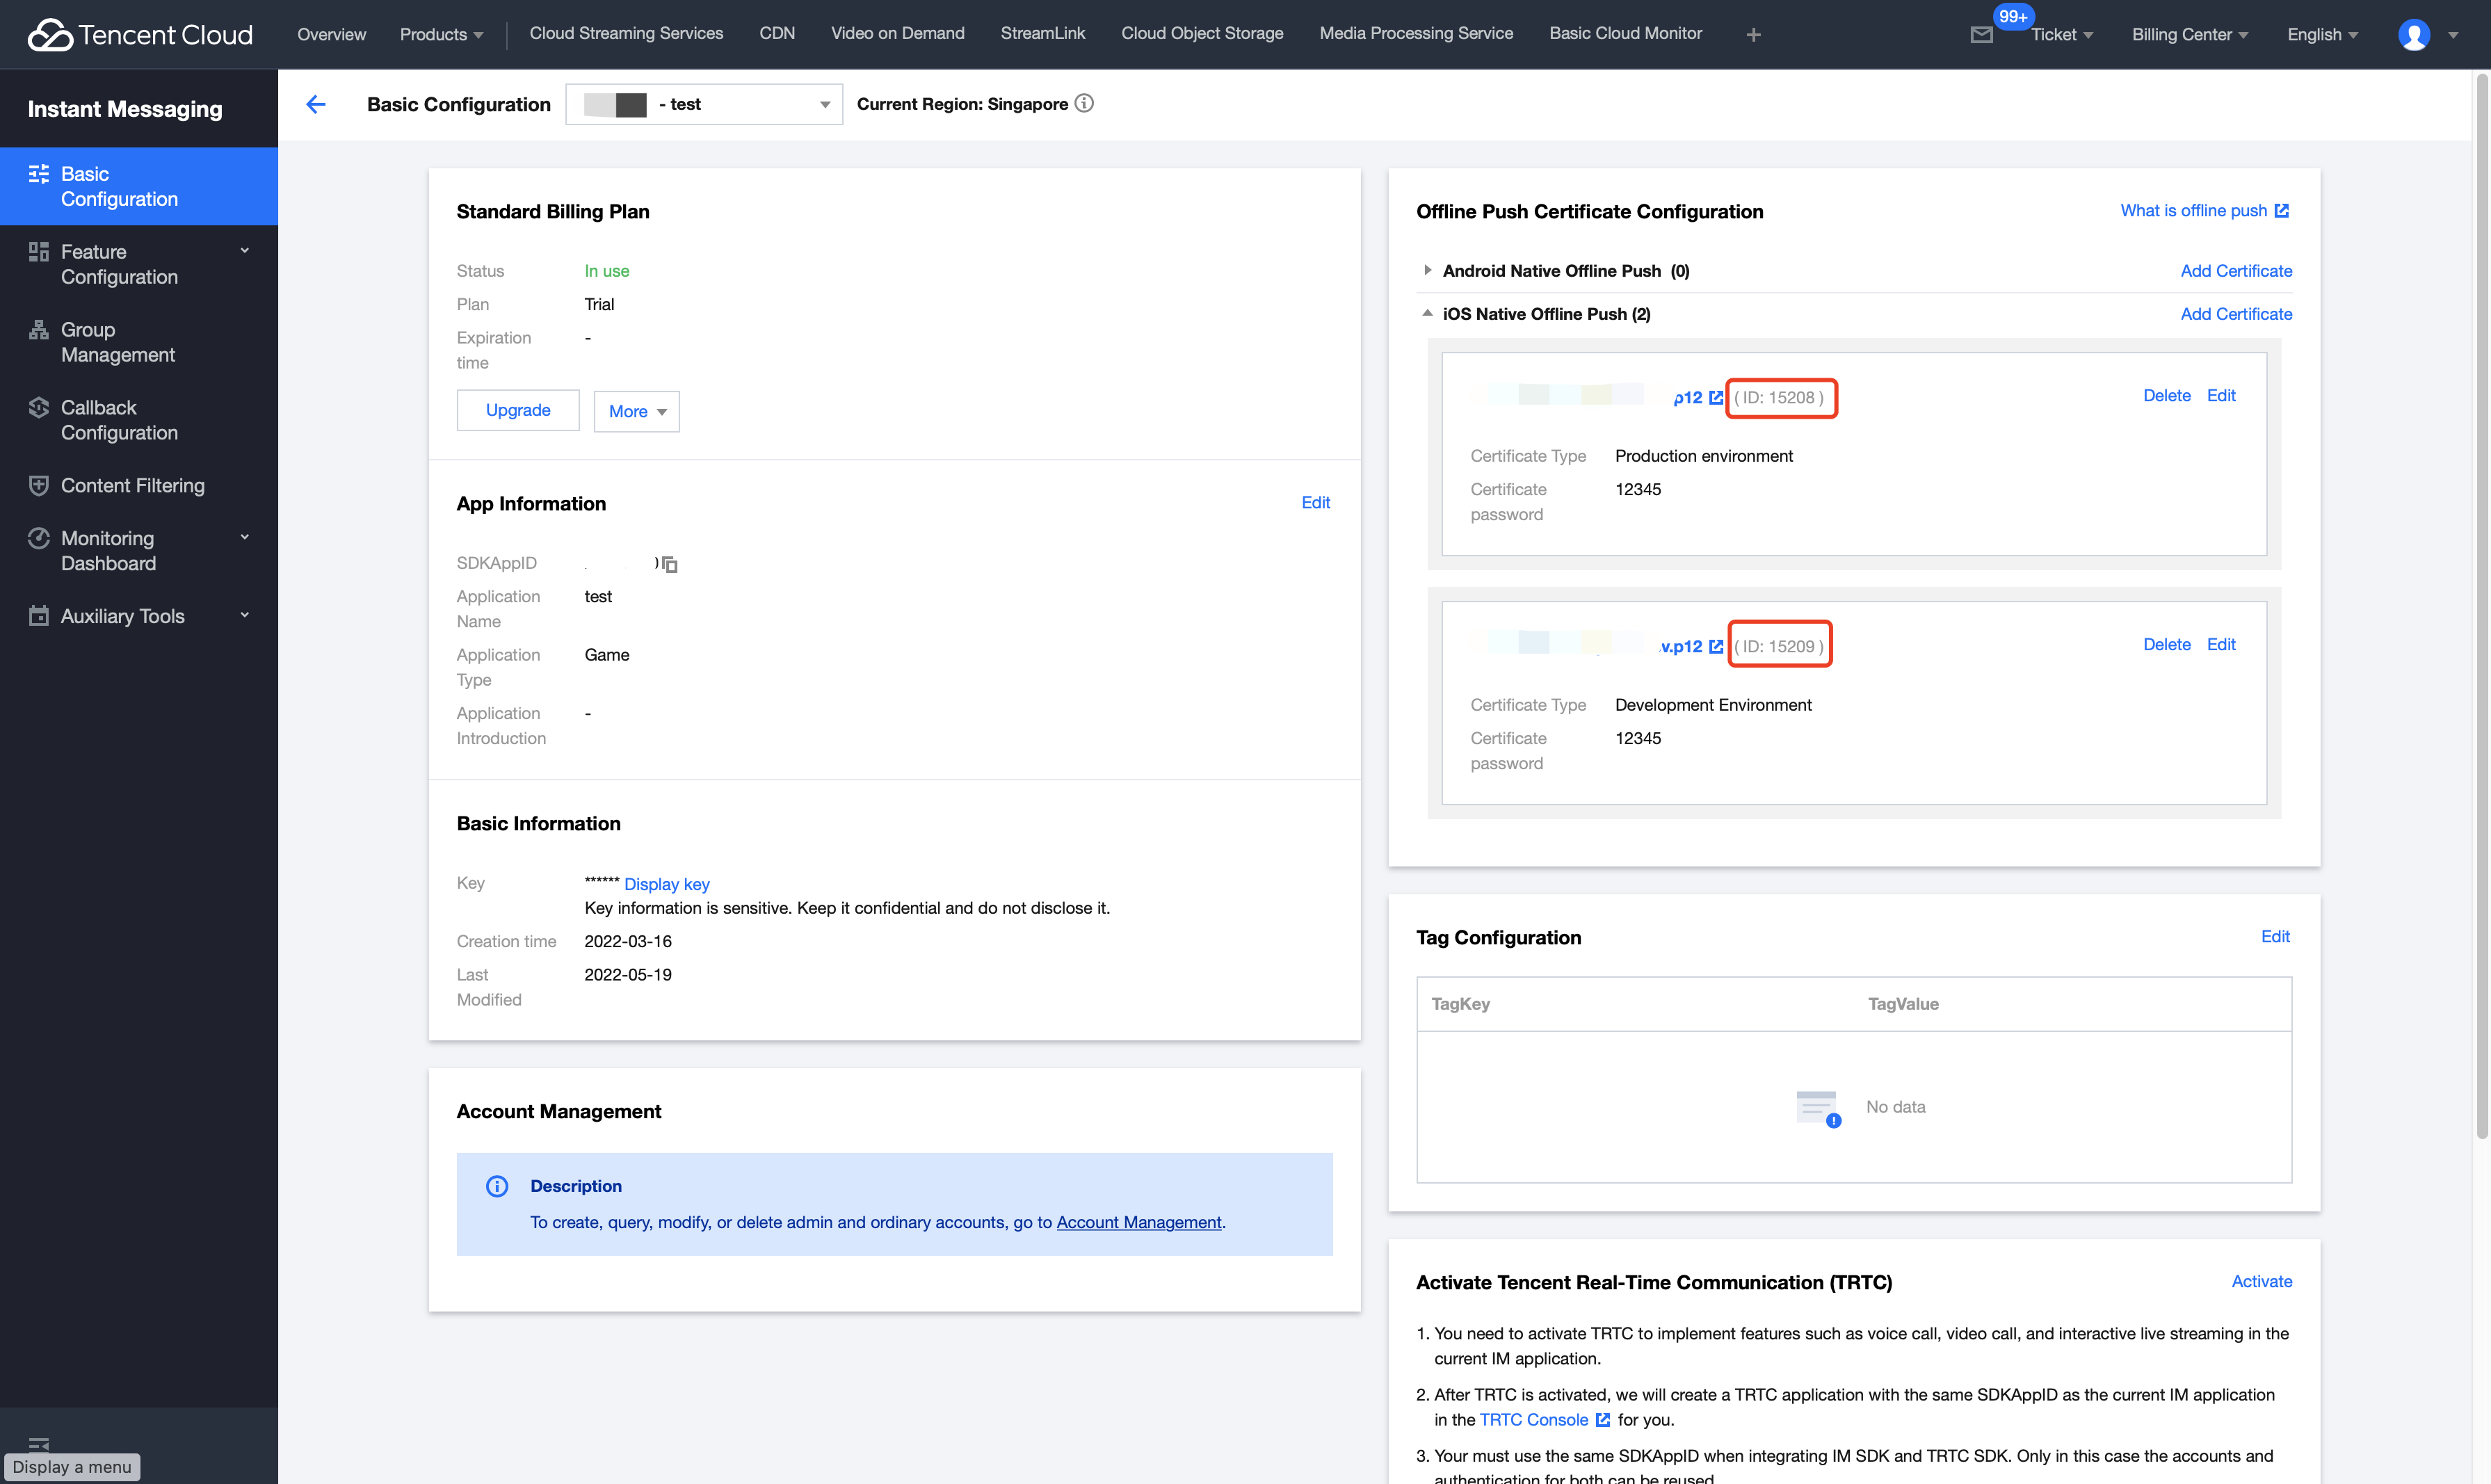
11. Open Keychain Access, choose Login > My Certificates, and right-click to export the P12 files generated for the development environment (Apple Development IOS Push Service) and production environment (Apple Push Services).
Note:
Remember to set the password when saving the P12 files.
Step 4: Log in to IM SDK and upload deviceToken to Tencent Cloud
After logging in to the IM SDK, call the setAPNS API to upload the deviceToken obtained in step 3 to the Tencent Cloud backend. The following is the sample code.
/* Users need to register a developer certificate with Apple, download and generate the certificate (P12 file)in their developer accounts, and upload the generated P12 file to the Tencent certificate console. The console will automatically generate a certificate ID and pass it to the `businessID` parameter.*/
businessID must be consistent with the certificate ID assigned by the console.
Push Format
An example of the push format is as shown below.
General push rules
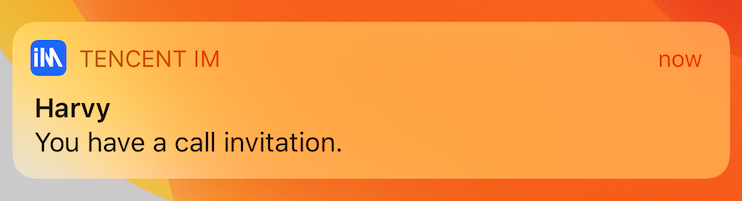
For one-to-one messages, the APNs push format is as follows. Nickname indicates the sender's nickname. If no nickname is specified, only content is displayed.
Nickname: Content
For group messages, the APNs push format is as follows. The display priority for Name is: sender's Group name card > Group nickname. If neither is available, no name is displayed.
Name (group name): Content
Push rules for different types of messages
The APNs push content consists of the content of each Elem in the message body. The display of different Elem in offline messages is shown in the following table.
Parameter
Description
Text Elem
Directly display the content
Audio Elem
Display [audio]
File Elem
Display [file]
Image Elem
Display [image]
Custom Elem
Display the desc field set when message is sent. If desc is not set, it will not be pushed.
Note:
If the default push rules do not meet your requirements, you can customize your own push rule. For more information, see Setting Custom Display for Offline Push.
Communication among multiple apps
If you want multiple apps to receive push message from each other, you can set SDKAppID to the same value for the apps.
1.2 Use the app to implement the - (uint32_t)onSetAPPUnreadCount API and return the badge number to be customized internally.
If offline push is enabled in the app, and a new offline push message is received, the badge number of the app will be increased by one based on the benchmark badge number (which is the total unread message count of IM by default and is the custom badge number if there is any).
// 3. The app goes to the background and reports the custom unread message count
/** After the app goes to the background, customize the unread message count of the app. If you do not customize the unread message count, the sum of the unread message counts of all conversations is used as the unread message count of the app.
* <pre>
*
* - (uint32_t)onSetAPPUnreadCount {
* return 100; // Custom unread message count
* }
*
* </pre>
*/
-(uint32_t)onSetAPPUnreadCount {
// 1. Get the custom badge number
uint32_t customBadgeNumber =...
// 2. Add the unread message count of IM
customBadgeNumber +=self.unreadNumber;
// 3. Use the IM SDK to report to the IM server
return customBadgeNumber;
}
Customizing Push Alert Sounds
iOS push alert sound
When calling sendMessage to send messages, set the iOSSound field in offlinePushInfo to the name of the audio file.
Note:
Offline push sound setting is valid only for iOS. When iOSSound is kIOSOfflinePushNoSound, no sound is played when a push message is received.
When iOSSound is kIOSOfflinePushDefaultSound, the system alert sound is played when a push message is received.
To customize iOSSound, link the audio file to the Xcode project and set iOSSound to the audio filename (with the extension name).
When calling sendMessage to send messages, set the AndroidSound field in offlinePushInfo to the name of the audio file.
Note:
For offline push sound setting (valid only for Android and supported by IM SDK 6.1 or later), only Huawei and Google mobile phones support ringtone setting.
To customize AndroidSound, you need to place the audio file to the raw directory of the Android project and set the audio file name (without the file extension) as the value of AndroidSound.
Set the title and desc fields of offlinePushInfo when calling sendMessage to send messages. Once set, the title content will be added to the default push content and desc will be displayed as the push content.
You can also use the multable-content field of APNs and NSNotification Service Extension to customize the display content. If you have any questions or feedback, feel free to contact us.
Customizing Click-to-Redirect Logic
When calling sendMessage to send messages, set the ext field in V2TIMOfflinePushInfo. When the user receives an offline push message and starts the app, the ext field can be obtained from the AppDelegate -> didReceiveRemoteNotification system callback, and the user is redirected to the UI as specified by ext.
The following example assumes that Denny sends a message to Vinson.
Sender: Denny needs to set ext before sending a message.
// Denny sets `offlinePushInfo` and specifies `ext` before sending a message
Recipient: Although Vinson's app is not online, it can still receive an APNs offline message notification. When Vinson clicks this notification, the app is started.
// Vinson receives the following callback when the app is started.
if([userInfo[@"ext"] isEqualToString:@"jump to denny"]){
// Go to the chat window with Denny.
}
}
FAQs
Why doesn't offline push work for common messages?
First, verify that the app runtime environment is the same as the certificate environment. Otherwise, offline push messages will not be received.
Then, verify that the app and the certificate run in the development environment. If that is the case, requesting deviceToken from Apple might fail. Please switch to the production environment to solve the problem.
Why doesn't offline push work for custom messages?
The offline push for custom messages is different from that for ordinary messages. As we cannot parse the content of custom messages, the push content cannot be determined. Therefore, by default, custom messages are not pushed offline. If you need offline push for custom messages, you need to set the desc field in offlinePushInfo during sendMessage, and the desc information will be displayed by default during push.
How do I disable the receiving of offline push messages?
To disable the receiving of offline push messages, set the config parameter of the setAPNS API to nil. This feature is supported from v5.6.1200.
What should I do if push messages cannot be received and the backend reports the "bad devicetoken" error?
If the compilation environment is Release, - application:didRegisterForRemoteNotificationsWithDeviceToken: calls back the release environment token, businessID must be set to the certificate ID of the production environment.
If the compilation environment is Debug, - application:didRegisterForRemoteNotificationsWithDeviceToken: calls back the development environment token, businessID must be set to the certificate ID of the development environment.
/* Users need to register a developer certificate with Apple, download and generate the certificate (P12 file) in their developer accounts, and upload the generated P12 file to the Tencent certificate console. The console will automatically generate a certificate ID and pass it to the `businessID` parameter.*/