
통합
Feature Overview
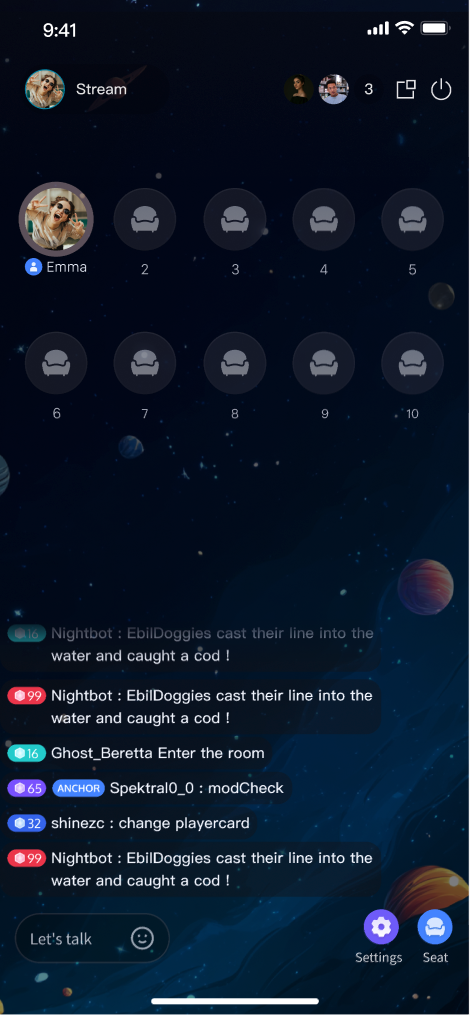
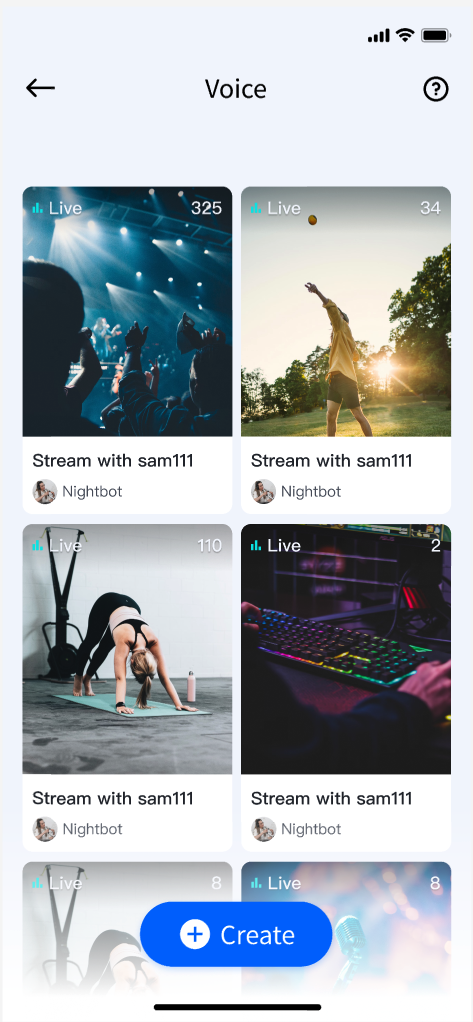
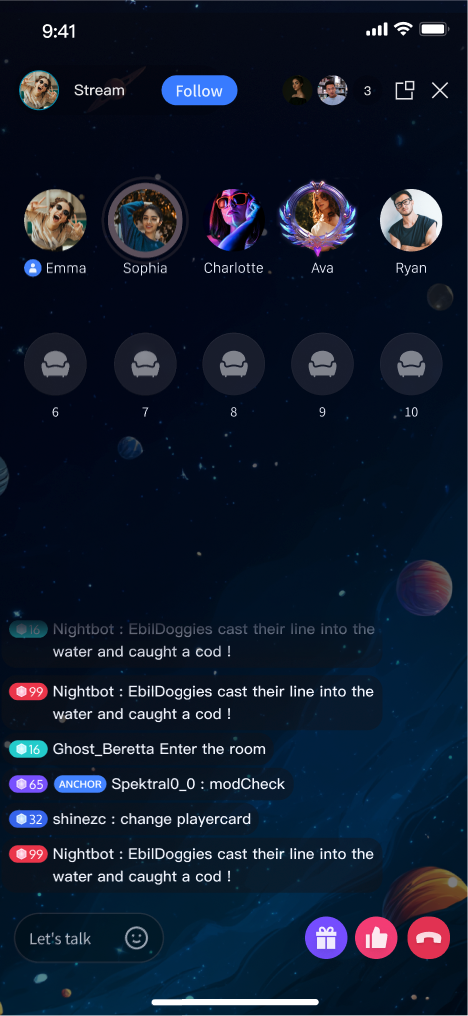
TUILiveKit is a comprehensive voice chat room component. After integration, you can quickly implement the following key modules:Host Preparation Page | Host Live Page | Live Stream List | Audience Viewing Page |
 |  |  |  |
Prerequisites
Activate the Service
Before using TUILiveKit, please refer to Activate Service to get the TUILiveKit trial version or activate the Pro Edition package.
Environment Requirements
Flutter
Flutter 3.27.4 or higher.
Dart 3.6.2 or higher.
Android
Android 5.0 (SDK API Level 21) or later.
Gradle 7.0 or higher.
Android 5.0 or higher mobile devices.
iOS
Xcode 15 or later.
iOS 13.0 or later.
CocoaPods environment installed. If not installed, refer to how to install cocoapods.
Code Integration
Step 1: Install TUILiveKit
flutter pubaddtencent_live_uikit
After installation completes, you should see output similar to:
Resolving dependencies...Downloading packages.........+ tencent_live_uikit x.x.x......Changed xx dependencies!xx packages have newer versions incompatible with dependency constraints.Try `flutter pub outdated` for more information.
Step 2: Configure the Project
1. If you're building for Android, add certain SDK classes to the obfuscation exclusion list because the SDK uses Java reflection internally.
Configure and enable obfuscation rules in your project's
android/app/build.gradle file:android {......buildTypes {release {......// Configure and activate obfuscation rulesminifyEnabled trueproguardFiles getDefaultProguardFile('proguard-android.txt'), 'proguard-rules.pro'}}}
Add the following code in the
android/app/proguard-rules.pro file. If the file does not exist, create a new one:-keep class com.tencent.** { *; }
This completes the Proguard configuration.
2. Enable Multidex support in your
android/app/build.gradle:android {......defaultConfig {......// Enable Multidex supportmultiDexEnabled true}}
1. When building for iOS release, configure symbol retention rules. In Xcode, select your target (usually Runner) in TARGETS, go to Project > Build Settings > Deployment, and set Strip Style to
Non-Global Symbols to retain required global symbol information. This is mandatory—otherwise, runtime exceptions may prevent you from entering the room.2. (Optional) If you need to debug on the iOS simulator and your Mac uses an Intel chip, add the following to your
ios/Podfile:target 'xxxx' do......end......post_install do |installer|installer.pods_project.targets.each do |target|flutter_additional_ios_build_settings(target)target.build_configurations.each do |config|config.build_settings['VALID_ARCHS'] = 'arm64 arm64e x86_64'config.build_settings['VALID_ARCHS[sdk=iphonesimulator*]'] = 'x86_64'endendend
3. TUILiveKit requires microphone access. You need to request microphone permission in your iOS app. Add the following entry to the top-level
<dict> in your iOS project's Info.plist. This message is displayed to users when requesting permission:<key>NSMicrophoneUsageDescription</key><string>CallingApp needs to access your microphone permission. Recorded video will have sound when enabled</string>
Add the following preprocessor definition in your
ios/Podfile to enable microphone permissions:post_install do |installer|installer.pods_project.targets.each do |target|flutter_additional_ios_build_settings(target)target.build_configurations.each do |config|config.build_settings['GCC_PREPROCESSOR_DEFINITIONS'] ||= ['$(inherited)','PERMISSION_MICROPHONE=1',]endendend
After completing these steps, your app should compile successfully.
Step 3. Configure Navigation and Localization
To enable TUILiveKit’s page navigation and multi-language support, update your Flutter app configuration:
Add
TUILiveKitNavigatorObserver.instance to navigatorObservers to track route changes and manage component lifecycle.Add the required localization delegates to
localizationsDelegates to display UI text in the correct system language.Below is an example using
MaterialApp:import 'package:tencent_live_uikit/tencent_live_uikit.dart';// Your own APP main classclass XXX extends StatelessWidget {const XXX({super.key});@overrideWidget build(BuildContext context) {return MaterialApp(// Add TUILiveKit navigator observer to listen for page routing changes and lifecycle managementnavigatorObservers: [TUILiveKitNavigatorObserver.instance],// Add localized agent to support multilingual copywriting displaylocalizationsDelegates: [...LiveKitLocalizations.localizationsDelegates,...BarrageLocalizations.localizationsDelegates,...GiftLocalizations.localizationsDelegates],// Other app configurations......);}}
After configuring these settings, TUILiveKit navigation and internationalization will be enabled.
Complete Login
After integrating the code, call
TUILogin.login to authenticate. This step is required before you can use any TUILiveKit features. Make sure all parameters are set correctly.Note:
In production, it is highly recommended that you call
login after your own user authentication and login operations. This prevents business logic confusion or data inconsistency, and better aligns with your existing user management and permission controls.import 'package:tencent_cloud_uikit_core/tencent_cloud_uikit_core.dart';......login() async {await TUILogin.instance.login(1400000001, // replace with the SDKAppID from the open service console"denny", // replace with your UserID"xxxxxxxxxxx", // you can calculate a UserSig in the console and fill it in this locationTUICallback(onError: (code, message) {print("TUILogin login fail, {code:$code, message:$message}");},onSuccess: () async {print("TUILogin login success");},),);}
Login API Parameters
Parameter | Type | Description |
SDKAppID | int | |
UserID | String | Unique identifier for the current user. Only letters, numbers, hyphens, and underscores are allowed. To avoid multi-device login conflicts, do not use simple IDs like 1, 123, etc. |
userSig | String | Authentication credential for TRTC. Please note: In Development Environment: You can adopt the genTestSig function of the local GenerateTestUserSig class (example/lib/debug/generate_test_user_sig.dart) to generate userSig or, generate a temporary UserSig via the UserSig Generation Tool.In Production Environment: To prevent key leakage, always generate UserSig on your server. For details, see Generating UserSig on the Server. |
Next Steps
You’ve successfully integrated the voice chat component and completed login. Next, implement features such as Host Live Stream, Audience Viewing, and Live Stream List. See the table below for details:
Feature | Description | Integration Guide |
Host Live Streaming | The complete process for hosts to create a voice chat room, including preparation and all live interactions. | |
Audience viewing | Audience members can listen, request to join the mic, view bullet comments, and more after entering a voice chat room. | |
Live Stream List | Displays the list of available voice chat rooms and their details. |
FAQs
Repeated Login
You do not need to log in each time you enter a room. Typically, a single call to
TUILogin.login is sufficient. We recommend aligning TUILogin.login and TUILogin.logout with your own authentication logic.Unable to Enter Room on iOS Release Builds
In Xcode, select your application target (usually Runner) from the TARGETS list, choose Item > Build Settings > Deployment, and set Strip Style to
Non-Global Symbols to preserve the necessary global symbol information. Otherwise, runtime exceptions may prevent you from entering the room.Contact Us
If you have questions or need help during integration, join our Telegram technical group or contact us for support.

