
비디오 화면 속 화면 솔루션
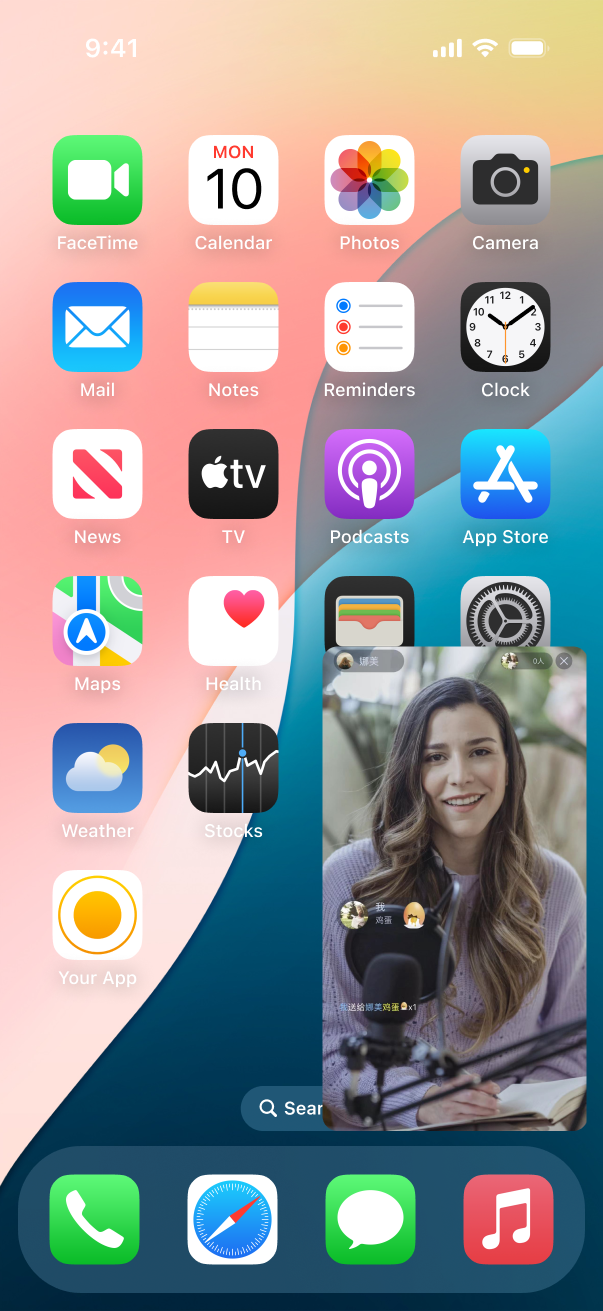
인터랙티브 라이브 스트리밍과 같은 비디오 시나리오에서 모바일 시청자가 오랫동안 스트리머 화면을 시청하다가 다른 앱을 임시로 조작해야 하는 상황이 발생할 수 있습니다. 이때 스트리머 화면을 중단하지 않고 다른 앱을 조작할 수 있다면 시청자에게 더 좋은 체험을 제공해줄 수 있습니다. 비디오 화면 속 화면(PIP)은 이러한 시나리오를 위한 솔루션이고 구현 효과는 아래 이미지와 같습니다. 본 문서에서는 iOS, Android 및 Flutter에서의 PIP 구현 방법을 각각 소개하겠습니다.
화면 속 화면은 iOS와 Android에서 제공하는 시스템 기능에 의존하여 구현되며, 스트리머 측(카메라 및 업로드 데이터 수집 필요)과 시청자 측(다운로드 데이터만 필요)으로 나눌 수 있습니다. iOS 시스템은 권한 관리가 엄격하기 때문에 iOS에서는 시청자 측 화면 속 화면만 제공되며, Android에서는 스트리머와 시청자 측 모두 화면 속 화면이 제공됩니다. 비디오 재생의 경우 일반적으로 Real-Time Communication Engine (RTC Engine)을 사용한 재생과 라이브 스트리밍 재생 두 가지 방법이 있으며, 화면 속 화면 솔루션에서도 이 두 가지 경우에 대해 각각 설명해줍니다.
iOS에서 시청자 화면 속 화면의 구현
해당 권한의 활성화
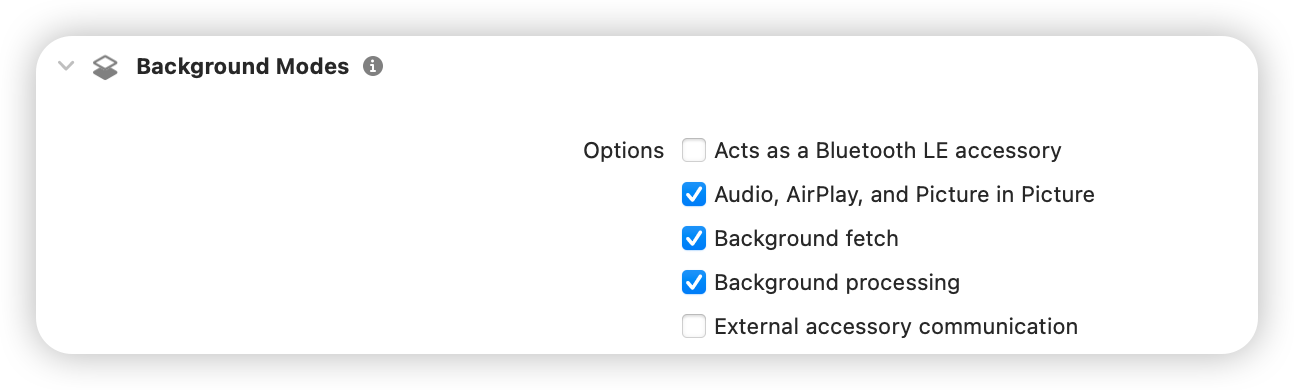
iOS 프로젝트의 Signing & Capabilities에서 다음 권한을 활성화해야 합니다.
SDK 호출로 구현하기
iOS SDK는 화면 속 화면 기능을 구현하기 위한 인터페이스를 제공하며, API 호출을 통해 편리하게 화면 속 화면을 활성화할 수 있습니다(관련 API는 아래 예제 코드 참조). 그러나 SDK는 단일 스트리머의 화면 속 화면 시청 기능만 제공하며, 여러 스트리머의 PK 화면 속 화면 시청 기능을 얻으려면 시스템 API를 호출해야 합니다. 자세한 내용은 시스템 API 호출 구현을 참조하세요.
RTC Engine의 재생
설명:
RTC Engine의 SDK가 12.1및 그의 이상 버전이 필요합니다.
관객 측에서 다음 인터페이스를 호출하여 활성화합니다.
NSDictionary *param = @{@"api" : @"enablePictureInPictureFloatingWindow",@"params" : @{@"enable" : @(true)}};NSError *err = nil;NSData *jsonData = [NSJSONSerialization dataWithJSONObject:param options:0 error:&err];if (err) {NSLog(@"error: %@", err);}NSString *paramJsonString = [[NSString alloc] initWithData:jsonData encoding:NSUTF8StringEncoding];[self.trtcCloud callExperimentalAPI:paramJsonString];
let param: [String : Any] = ["api": "enablePictureInPictureFloatingWindow", "params": ["enable":true]]if let jsonData = try? JSONSerialization.data(withJSONObject: param, options: .fragmentsAllowed) {let paramJsonString = String.init(data: jsonData, encoding: .utf8) ?? ""trtcCloud.callExperimentalAPI(paramJsonString)}
필요한 경우 해당 파라미터 위치에 false을 전송하면 됩니다.
시스템 API 호출로 구현하기
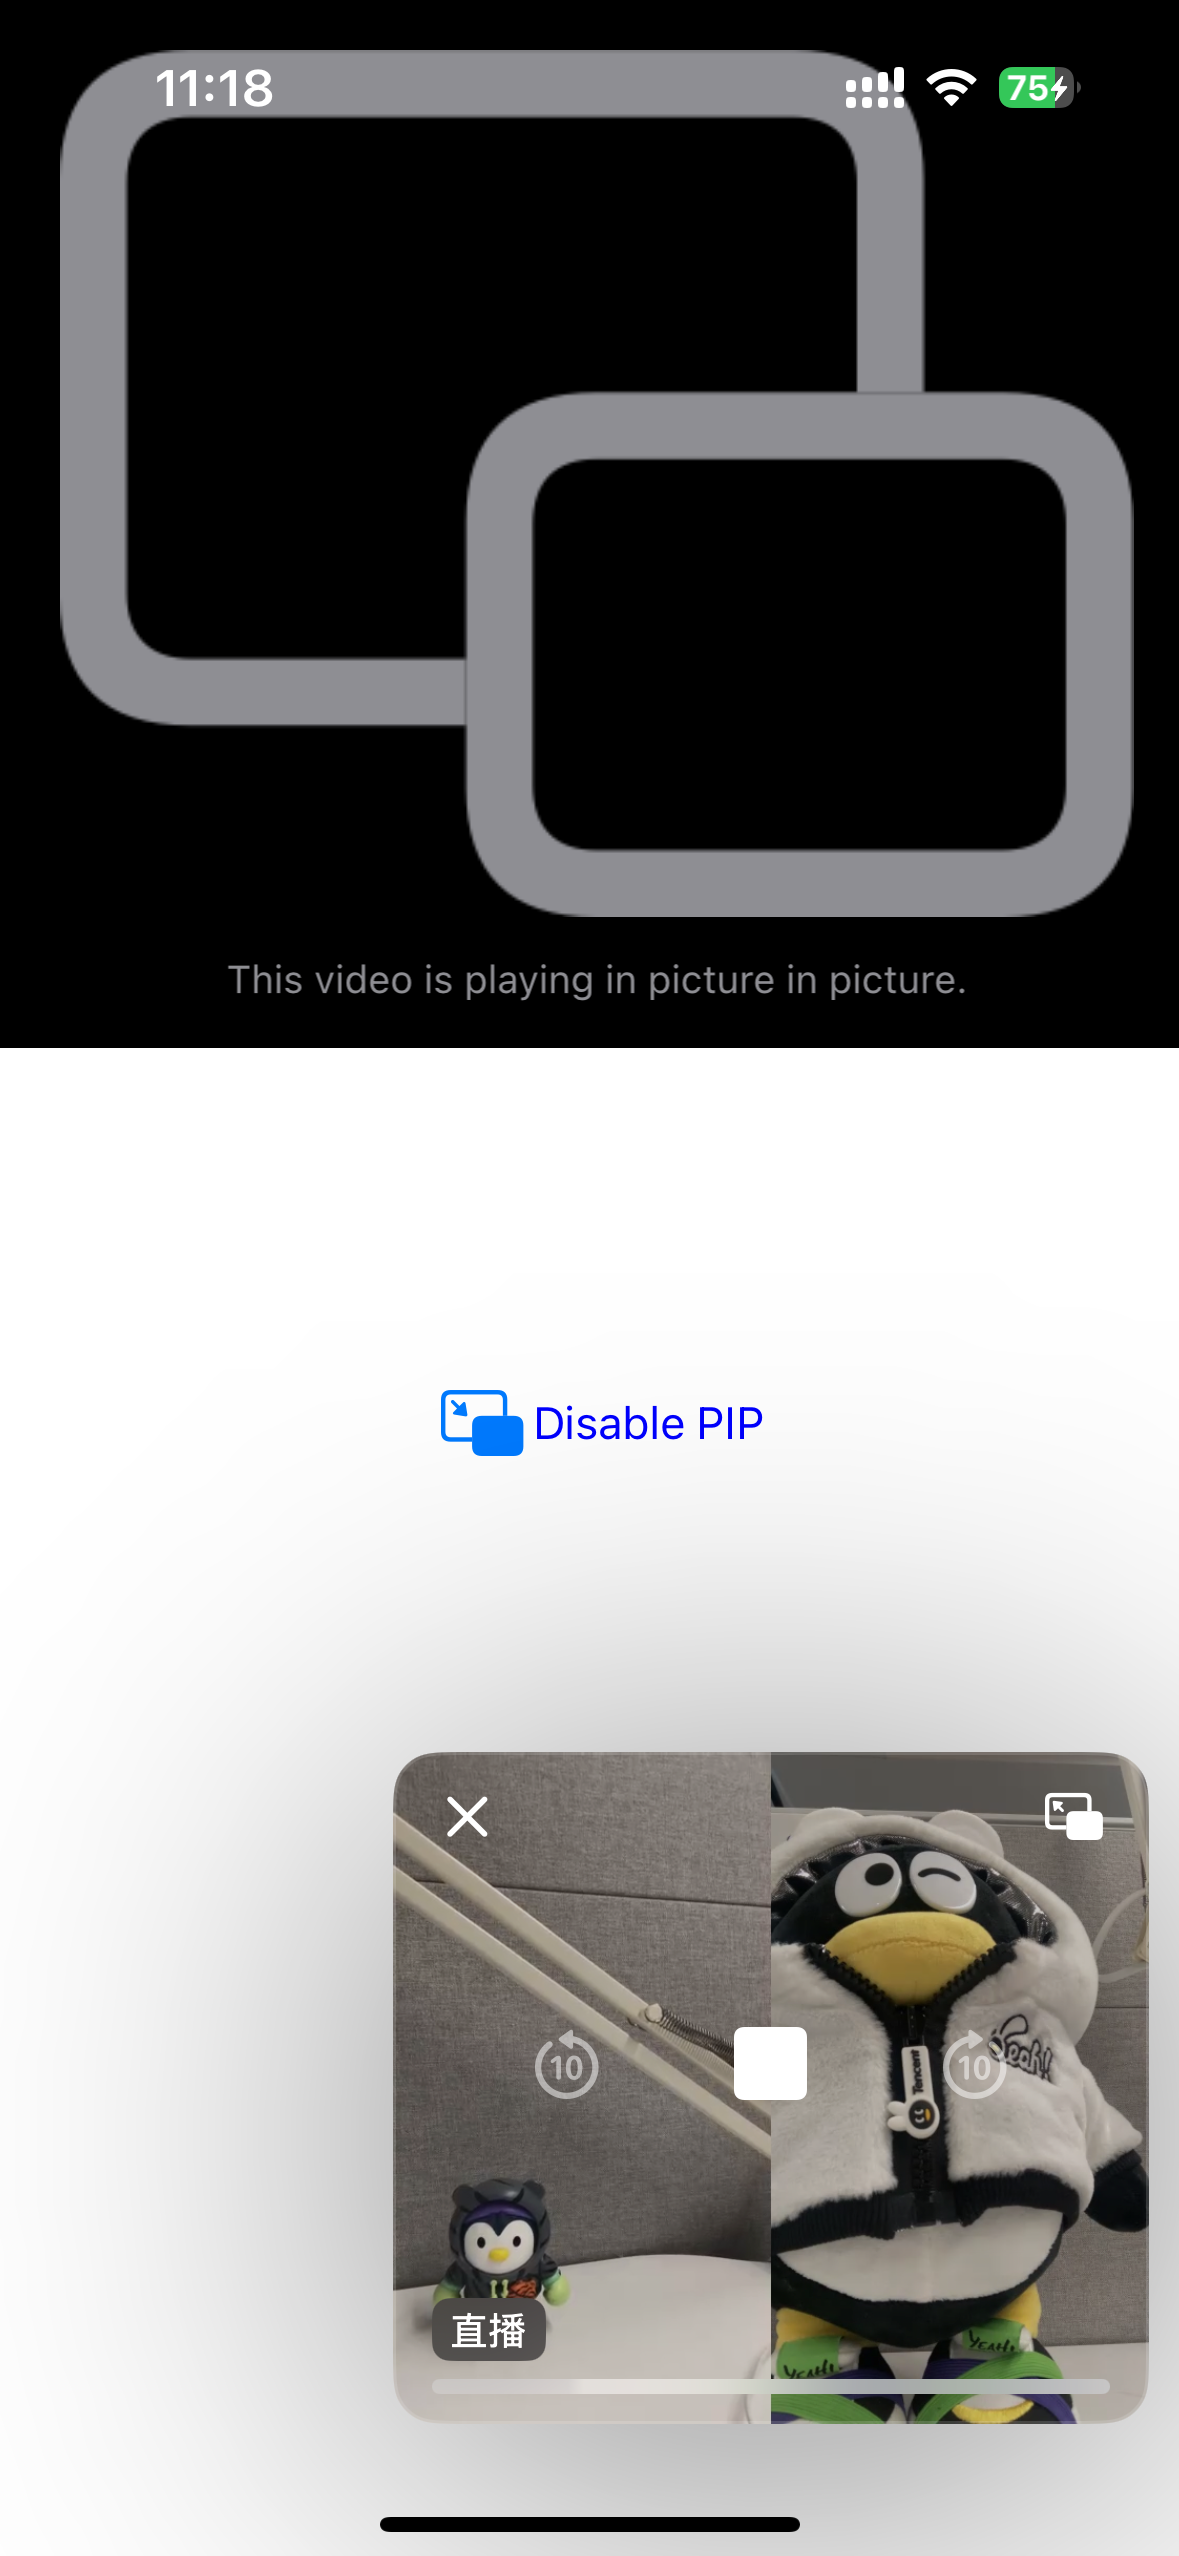
화면 속 화면은 iOS 시스템에서 제공하는 기능이고 시스템 API 호출을 통해 복잡한 시나리오의 화면 속 화면 기능을 구현할 수 있습니다. iOS는 화면 속 화면 기능을 지원하지만 이 기능에는 많은 제한이 있어서 렌더링 비디오의 UIView를 직접 사용하여 화면 속 화면을 구현할 수 없습니다. 대신 자체 정의 렌더링을 사용하여 화면 속 화면에 표시할 비디오를 요구 사항에 맞는 구성 요소에 렌더링해야 합니다. 아래에서는 2명의 스트리머 PK 화면 속 화면 시나리오를 예로 들어 시스템 API 호출을 통한 화면 속 화면 구현을 소개해줍니다.

설명:
단일 스트리머 또는 2명 이상의 스트리머 화면 속 화면 의구현도 다음과 같은 방안을 참고할 수 있으며, 여기서는 2명의 스트리머 PK 시나리오에 대해서만 설명합니다.
1. 화면 속 화면에 필요한 구성 요소를 정의합니다.
iOS 시스템에서는 특정 구성 요소만 화면 속 화면(PIP)로 렌더링할 수 있도록 요구하기 때문에 여기서는 AVSampleBufferDisplayLayer를 사용하며, 해당 구성 요소가 직접 해당 비디오를 렌더링해야 하므로 2명의 스트리머 비디오 데이터를 병합하기 위해 combinedPixelBuffer를 정의해야 합니다.
import UIKitimport AVKitimport CoreFoundationimport TXLiteAVSDK_Professionalclass PipVC: UIViewController {let trtcCloud = TRTCCloud()var pipController: AVPictureInPictureController?var combinedPixelBuffer: CVPixelBuffer?let pixelBufferLock = DispatchQueue(label: "com.demo.pip")var pipDisplayLayer: AVSampleBufferDisplayLayer!}
2. RTC Engine 방에 입장합니다.
func enterTrtcRoom() {let params = TRTCParams()params.sdkAppId = UInt32(SDKAppID)params.roomId = UInt32(roomId)params.userId = userIdparams.role = .audienceparams.userSig = GenerateTestUserSig.genTestUserSig(identifier: userId) as StringtrtcCloud.addDelegate(self)trtcCloud.enterRoom(params, appScene: .LIVE)}
3. 오디오 설정 및 백그라운드 디코딩의 활성화
func setupAudioSession() {do {try AVAudioSession.sharedInstance().setCategory(.playback)} catch let error {print("+> error: \(error)")return}do {try AVAudioSession.sharedInstance().setActive(true)} catch let error {print("+> error: \(error)")return}}func enableBGDecode() {let param: [String : Any] = ["api": "enableBackgroundDecoding","params": ["enable":true]]if let jsonData = try? JSONSerialization.data(withJSONObject: param, options: .fragmentsAllowed) {let paramJsonString = String.init(data: jsonData, encoding: .utf8) ?? ""trtcCloud.callExperimentalAPI(paramJsonString)}}
4. 화면 속 화면의 구성 요소를 초기화합니다.
func setupPipController() {let screenWidth = UIScreen.main.bounds.widthlet videoHeight = screenWidth / 2 / 9 * 16pipDisplayLayer = AVSampleBufferDisplayLayer()pipDisplayLayer.frame = CGRect(x: 0, y: 0, width: screenWidth, height: videoHeight) // Adjust size as neededpipDisplayLayer.videoGravity = .resizeAspectpipDisplayLayer.isOpaque = truepipDisplayLayer.backgroundColor = CGColor(red: 0, green: 0, blue: 0, alpha: 1)view.layer.addSublayer(pipDisplayLayer)if AVPictureInPictureController.isPictureInPictureSupported() {let contentSource = AVPictureInPictureController.ContentSource(sampleBufferDisplayLayer: pipDisplayLayer,playbackDelegate: self)pipController = AVPictureInPictureController(contentSource: contentSource)pipController?.delegate = selfpipController?.canStartPictureInPictureAutomaticallyFromInline = true} else {print("+> error")}}
5. 자체 정의 렌더링을 활성화합니다.
주의:
자체 정의 렌더링을 활성화할 때 지정한 형식
._NV12과 단계6: 좌우 2개 화면 결합의 방법은 관련이 있으며, 다른 형식은 다른 결합 방법이 필요합니다. 이 예제는 ._NV12 형식의 좌우 결합만 보여줍니다.extension PipVC: TRTCCloudDelegate {func onUserVideoAvailable(_ userId: String, available: Bool) {if available {trtcCloud.startRemoteView(userId, streamType: .big, view: nil)trtcCloud.setRemoteVideoRenderDelegate(userId, delegate: self, pixelFormat: ._NV12, bufferType: .pixelBuffer);}else{trtcCloud.stopRemoteView(userId, streamType: .big)}}}
6. 좌우 2개 화면의 연결.
2명의 스트리머 비디오 데이터를 결합할 때, SDK가 비디오 데이터를 콜백하는 시간이 동기화되지 않으므로, 개별 스트리머의 비디오 데이터를 수신할 때마다 해당 데이터를 업데이트하고 잠금을 걸어야 합니다. 여러 스트리머를 구현해야 하는 경우에도 유사한 방법으로 처리해야 합니다. 아래 코드는 좌우 2명의 스트리머가 각각 절반씩 차지하는 레이아웃을 기준으로 합니다. 다른 레이아웃이 필요한 경우, 업무 필요에 따라 구현해야 하며, 여기서는 SDK와 관련이 없습니다.
func createCombinedPixelBuffer(from sourceBuffer: CVPixelBuffer) {let width = CVPixelBufferGetWidth(sourceBuffer) * 2let height = CVPixelBufferGetHeight(sourceBuffer)let pixelFormat = CVPixelBufferGetPixelFormatType(sourceBuffer)let attributes: [CFString: Any] = [kCVPixelBufferWidthKey: width,kCVPixelBufferHeightKey: height,kCVPixelBufferPixelFormatTypeKey: pixelFormat,kCVPixelBufferIOSurfacePropertiesKey: [:]]CVPixelBufferCreate(kCFAllocatorDefault, width, height, pixelFormat, attributes as CFDictionary, &combinedPixelBuffer)}func updateCombinedPixelBuffer(with sourceBuffer: CVPixelBuffer, forLeft: Bool) {guard let combinedBuffer = combinedPixelBuffer else { print("+> error"); return}CVPixelBufferLockBaseAddress(combinedBuffer, [])CVPixelBufferLockBaseAddress(sourceBuffer, [])// Plane 0: Y/luma planelet combinedLumaBaseAddress = CVPixelBufferGetBaseAddressOfPlane(combinedBuffer, 0)!let sourceLumaBaseAddress = CVPixelBufferGetBaseAddressOfPlane(sourceBuffer, 0)!let combinedLumaBytesPerRow = CVPixelBufferGetBytesPerRowOfPlane(combinedBuffer, 0)let sourceLumaBytesPerRow = CVPixelBufferGetBytesPerRowOfPlane(sourceBuffer, 0)let widthLuma = CVPixelBufferGetWidthOfPlane(sourceBuffer, 0)let heightLuma = CVPixelBufferGetHeightOfPlane(sourceBuffer, 0)// Plane 1: UV/chroma planelet combinedChromaBaseAddress = CVPixelBufferGetBaseAddressOfPlane(combinedBuffer, 1)!let sourceChromaBaseAddress = CVPixelBufferGetBaseAddressOfPlane(sourceBuffer, 1)!let combinedChromaBytesPerRow = CVPixelBufferGetBytesPerRowOfPlane(combinedBuffer, 1)let sourceChromaBytesPerRow = CVPixelBufferGetBytesPerRowOfPlane(sourceBuffer, 1)let widthChroma = CVPixelBufferGetWidthOfPlane(sourceBuffer, 1)let heightChroma = CVPixelBufferGetHeightOfPlane(sourceBuffer, 1)for row in 0..<heightLuma {let combinedRow = combinedLumaBaseAddress.advanced(by: row * combinedLumaBytesPerRow + (forLeft ? 0 : widthLuma))let sourceRow = sourceLumaBaseAddress.advanced(by: row * sourceLumaBytesPerRow)memcpy(combinedRow, sourceRow, widthLuma)}// ._nv12 the chroma plane is subsampled 2:1 horizontally and verticallyfor row in 0..<heightChroma {let combinedRow = combinedChromaBaseAddress.advanced(by: row * combinedChromaBytesPerRow + (forLeft ? 0 : 2 * widthChroma))let sourceRow = sourceChromaBaseAddress.advanced(by: row * sourceChromaBytesPerRow)memcpy(combinedRow, sourceRow, 2 * widthChroma)}CVPixelBufferUnlockBaseAddress(sourceBuffer, [])CVPixelBufferUnlockBaseAddress(combinedBuffer, [])}
7. 병합된 화면을 해당 컴포넌트에 렌더링합니다.
func displayPixelBuffer(_ pixelBuffer: CVPixelBuffer, in layer: AVSampleBufferDisplayLayer) {var timing = CMSampleTimingInfo.init(duration: .invalid,presentationTimeStamp: .invalid,decodeTimeStamp: .invalid)var videoInfo: CMVideoFormatDescription? = nilvar result = CMVideoFormatDescriptionCreateForImageBuffer(allocator: nil,imageBuffer: pixelBuffer,formatDescriptionOut: &videoInfo)if result != 0 {return}guard let videoInfo = videoInfo else {return}var sampleBuffer: CMSampleBuffer? = nilresult = CMSampleBufferCreateForImageBuffer(allocator: kCFAllocatorDefault,imageBuffer: pixelBuffer,dataReady: true,makeDataReadyCallback: nil,refcon: nil,formatDescription: videoInfo,sampleTiming: &timing,sampleBufferOut: &sampleBuffer)if result != 0 {return}guard let sampleBuffer = sampleBuffer else {return}guard let attachments = CMSampleBufferGetSampleAttachmentsArray(sampleBuffer,createIfNecessary: true) else {return}CFDictionarySetValue(unsafeBitCast(CFArrayGetValueAtIndex(attachments, 0), to: CFMutableDictionary.self),Unmanaged.passUnretained(kCMSampleAttachmentKey_DisplayImmediately).toOpaque(),Unmanaged.passUnretained(kCFBooleanTrue).toOpaque())layer.enqueue(sampleBuffer)if layer.status == .failed {if let error = layer.error as? NSError {if error.code == -11847 {print("+> error")}}}}
8. 원격 사용자의 비디오 데이터를 가져와 병합한 후 지정된 컴포넌트에 렌더링합니다.
예시에서 left는 왼쪽에 표시되는 스트리머 ID를 나타내며, 실제 업무에서는 업무 필요에 따라 수정해야 합니다.
extension PipVC: TRTCVideoRenderDelegate {func onRenderVideoFrame(_ frame: TRTCVideoFrame, userId: String?, streamType: TRTCVideoStreamType) {guard let newPixelBuffer = frame.pixelBuffer else { print("+> error"); return}pixelBufferLock.sync {if combinedPixelBuffer == nil {createCombinedPixelBuffer(from: newPixelBuffer)}if userId == "left" {updateCombinedPixelBuffer(with: newPixelBuffer, forLeft: true)} else {updateCombinedPixelBuffer(with: newPixelBuffer, forLeft: false)}}if let combinedBuffer = combinedPixelBuffer {DispatchQueue.main.async {self.displayPixelBuffer(combinedBuffer, in: self.pipDisplayLayer)}}}}
9. 관련 프로토콜을 구현합니다.
extension PipVC: AVPictureInPictureControllerDelegate {func pictureInPictureControllerWillStartPictureInPicture(_ pictureInPictureController: AVPictureInPictureController) {}func pictureInPictureControllerDidStartPictureInPicture(_ pictureInPictureController: AVPictureInPictureController) {}func pictureInPictureControllerDidStopPictureInPicture(_ pictureInPictureController: AVPictureInPictureController) {}func pictureInPictureController(_ pictureInPictureController: AVPictureInPictureController, restoreUserInterfaceForPictureInPictureStopWithCompletionHandler completionHandler: @escaping (Bool) -> Void) {completionHandler(true)}func pictureInPictureController(_ pictureInPictureController: AVPictureInPictureController, failedToStartPictureInPictureWithError error: any Error) {}}extension PipVC: AVPictureInPictureSampleBufferPlaybackDelegate {func pictureInPictureControllerTimeRangeForPlayback(_ pictureInPictureController: AVPictureInPictureController) -> CMTimeRange {return CMTimeRange.init(start: .zero, duration: .positiveInfinity)}func pictureInPictureControllerIsPlaybackPaused(_ pictureInPictureController: AVPictureInPictureController) -> Bool {return false}func pictureInPictureController(_ pictureInPictureController: AVPictureInPictureController, setPlaying playing: Bool) {}func pictureInPictureController(_ pictureInPictureController: AVPictureInPictureController, didTransitionToRenderSize newRenderSize: CMVideoDimensions) {}func pictureInPictureController(_ pictureInPictureController: AVPictureInPictureController, skipByInterval skipInterval: CMTime) async {}}
10. 화면 속 화면의 켜기/끄기.
// 화면 속 화면의 끄기pipController?.stopPictureInPicture()// 화면 속 화면의 켜기pipController?.startPictureInPicture()
주의:
여기서는 구현 방안에 대해서만 설명하며 실제 업무에서는 다양한 예외 상황에 대한 처리가 필요합니다.
화면 속 화면 상단 제어 버튼의 처리는 iOS 시스템 관련 기능이고 SDK와는 무관하며 여기서는 설명하지 않습니다. 업무에서는 실제 필요에 따라 처리해야 합니다.
Android에서 화면 속 화면의 구현
Android 8.0(API 레벨 26)부터 Android는 액티비티를 화면 속 화면(PIP)모드로 시작할 수 있습니다. PIP는 특수한 유형의 멀티 윈도우 모드이고 주로 비디오 재생에 사용됩니다. 이 모드를 사용하면 사용자는 화면의 한 구석에 고정된 작은 창에서 비디오를 시청하면서 앱 간에 이동하거나 홈 화면의 콘텐츠를 탐색할 수 있습니다. RTC Engine SDK는 Android PIP API를 추가로 캡슐화하지 않으며, PIP 기능은 Android API를 직접 호출하여 구현됩니다. 자세한 내용은 Android 문서 화면 속 화면(PIP) 기능으로 비디오 추가를 참조하십시오.
Android에서 화면 속 화면으로 진입할 때, xml의 레이아웃 규칙에 따라 화면 속 화면 창 크기로 measure 및 layout을 다시 수행합니다. 따라서 스트리머와 시청자 모두 이 규칙에 따라 화면 속 화면을 구현할 수 있습니다.
화면 속 화면의 구현
1. AndroidManifest.xml에서 <activity>에 PIP 속성을 선언합니다.
<activityandroid:name="com.tencent.trtc.pictureinpicture.PictureInPictureActivity"android:theme="@style/Theme.AppCompat.Light.NoActionBar"android:configChanges="screenSize|smallestScreenSize|screenLayout|orientation"android:supportsPictureInPicture="true"
android:supportsPictureInPicture="true"는 PIP 지원을 선언함을 나타냅니다.화면 속 화면 모드 전환 중 레이아웃 변경이 발생하며, activity 재시작을 원하지 않을 경우 android:configChanges 속성의 해당 값을 구성해야 합니다.
2. 화면 속 화면으로 진입합니다.
private void startPictureInPicture() {if (Build.VERSION.SDK_INT >= Build.VERSION_CODES.O) {PictureInPictureParams.Builder pictureInPictureBuilder = new PictureInPictureParams.Builder();Rational aspectRatio = new Rational(mVideoView.getWidth(), mVideoView.getHeight());pictureInPictureBuilder.setAspectRatio(aspectRatio);화면 속 화면에 진입합니다enterPictureInPictureMode(pictureInPictureBuilder.build());} else {Toast.makeText(this, R.string.picture_in_picture_not_supported, Toast.LENGTH_SHORT).show();}}
pictureInPictureBuilder.setAspectRatio(aspectRatio); 화면 속 화면의 가로세로 비율을 설정하며, 여기서는 재생 중인 비디오 View의 가로및 세로 비율로 설정합니다.enterPictureInPictureMode(pictureInPictureBuilder.build()); 화면 속 화면으로 진입합니다.3. 화면 속 화면 진입 및 퇴출의 콜백.
@Overridepublic void onPictureInPictureModeChanged(boolean isInPictureInPictureMode, Configuration configuration) {super.onPictureInPictureModeChanged(isInPictureInPictureMode, configuration);if (isInPictureInPictureMode) {//화면 속 화면으로 진입한 후, 숨겨야 할 뷰} else{//화면 속 화면에서 퇴출 후 표시해야 할 뷰}}
화면 속 화면에 여러 비디오 화면가 표시됩니다
여러 비디오 화면을 표시하려면 화면 속 화면으로 들어갈 때 View A에 고정된 너비와 높이를 설정하고 다른 View는 레이아웃 규칙에 따라 표시되거나 백분율 레이아웃을 설정할 수 있습니다.
설명:
화면 속 화면에 여러 비디오 화면을 표시하는 방식은 Android의 규정된 사용법이 아니며 현재 Android 12에서 사용할 수 있습니다. 이후 Android 시스템 업데이트에 따라 변경될 수 있으므로 출시 전 각 버전 시스템의 호환성을 테스트해야 합니다.
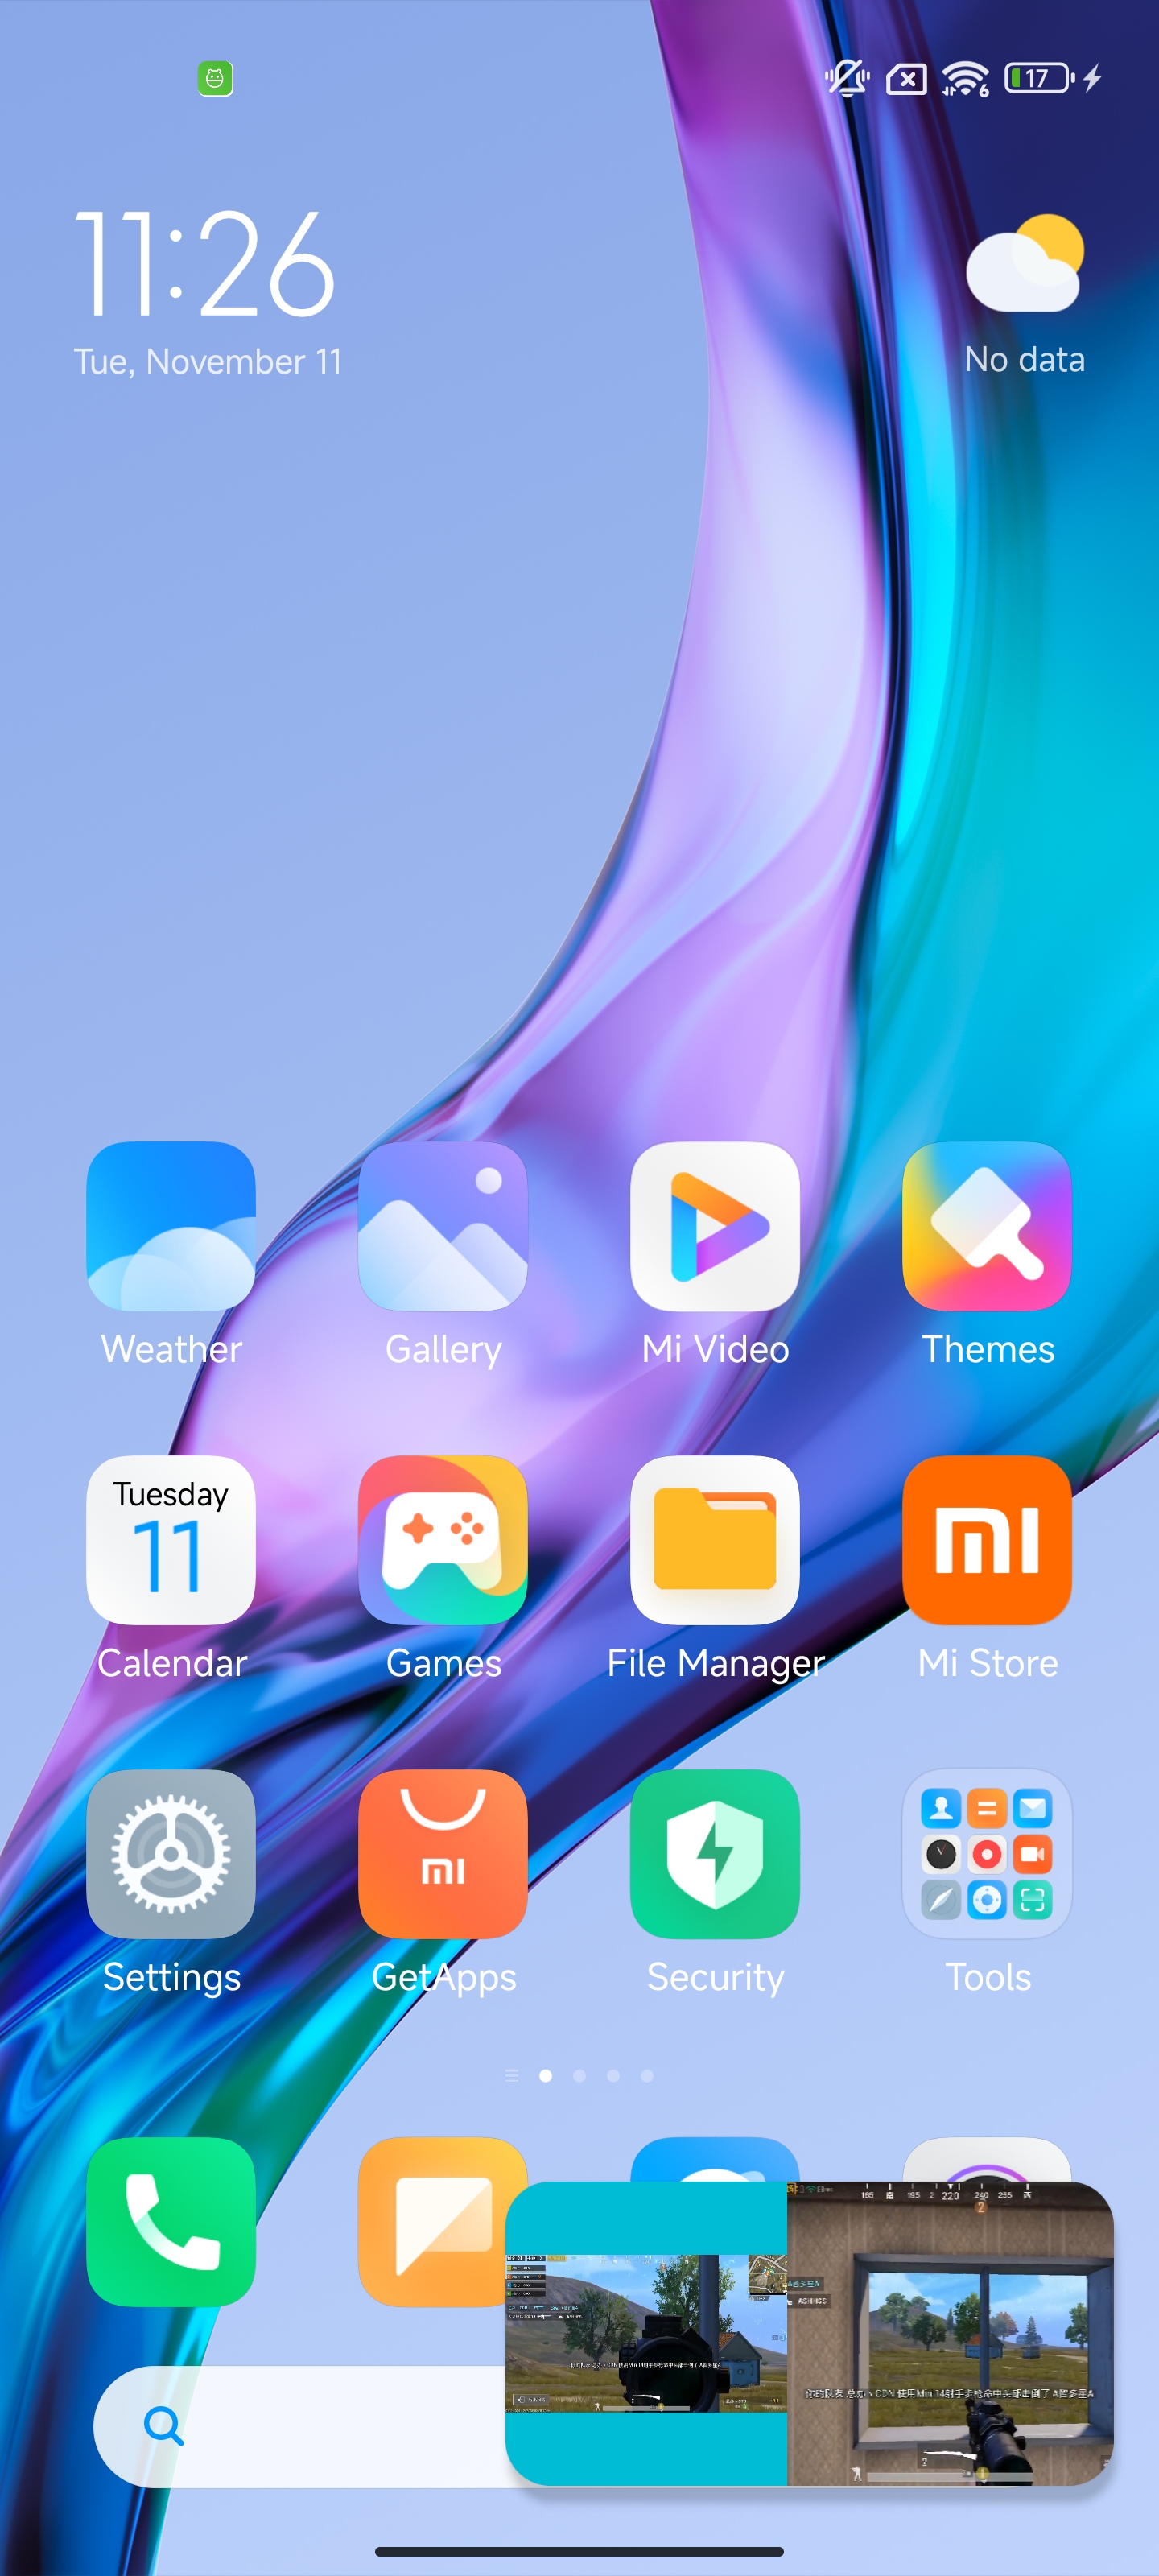
효과 보기
// mTRTCCloud은 왼쪽의 비디오 View(TXCloudVideoView)에 해당하며, Real-Time Communication Engine_VIDEO_RENDER_MODE_FIT를 설정했습니다TRTCCloudDef.TRTCRenderParams param = new TRTCCloudDef.TRTCRenderParams();param.fillMode = TRTCCloudDef.TRTC_VIDEO_RENDER_MODE_FIT;mTRTCCloud.setRemoteRenderParams(remoteUserIdA,TRTCCloudDef.TRTC_VIDEO_STREAM_TYPE_BIG, param);mTRTCCloud.startRemoteView(remoteUserIdA, TRTCCloudDef.TRTC_VIDEO_STREAM_TYPE_BIG, mTXCloudRemoteView);// mTRTCCloud는 오른쪽의 비디오 뷰(TXCloudVideoView)에 해당합니다mTRTCCloud.startRemoteView(remoteUserIdB, TRTCCloudDef.TRTC_VIDEO_STREAM_TYPE_BIG, mTXCloudRemoteView);
화면 속 화면에 진입 후 레이아웃에서 TXCloudVideoView의 너비와 높이를 계산하여 수동으로 설정하거나 채우기 방식을 설정하여 비디오 화면의 완전한 표시를 보장할 수 있습니다. mTRTCCloud(TRTCCloud 객체)의 setRemoteRenderParams 메서드를 호출하여 비디오 화면의 채우기 방식을 설정할 수 있습니다.
화면 속 화면의 왼쪽 TXCloudVideoView는 RTC Engine_VIDEO_RENDER_MODE_FIT이 설정된 효과입니다.
화면 속 화면의 오른쪽 TXCloudVideoView는 RTC Engine_VIDEO_RENDER_MODE_FILL이 설정된 효과입니다.
이 예시에서는 두 개의 비디오 화면(TXCloudVideoView)만 있으며, 왼쪽 TXCloudVideoView에는 너비와 높이가 설정되고 오른쪽 TXCloudVideoView는 레이아웃 규칙에 따라 표시됩니다. 여러 개의 TXCloudVideoView가 있는 경우 레이아웃을 합리적으로 설계하여 목표 효과를 달성할 수 있습니다.
구현 단계
1. activity_picture_in_picture.xml에 두 개의 TXCloudVideoView를 나란히 표시하도록 추가합니다.
<com.tencent.rtmp.ui.TXCloudVideoViewandroid:id="@+id/video_view"android:layout_width="192dp"android:layout_height="108dp"android:layout_alignParentStart="true"android:background="#00BCD4"/><com.tencent.rtmp.ui.TXCloudVideoViewandroid:id="@+id/video_view2"android:layout_width="192dp"android:layout_height="108dp"android:layout_alignTop="@+id/video_view"android:layout_toEndOf="@+id/video_view"android:background="#3F51B5"/>
2. 화면 속 화면으로 들어가고 나올 때 video_view의 너비와 높이를 설정합니다.
@Overridepublic void onPictureInPictureModeChanged(boolean isInPictureInPictureMode, Configuration configuration) {super.onPictureInPictureModeChanged(isInPictureInPictureMode, configuration);if (isInPictureInPictureMode) {// mVideoView의 너비를 100dp로 설정합니다RelativeLayout.LayoutParams layoutParams = (RelativeLayout.LayoutParams) mVideoView.getLayoutParams();layoutParams.width = (int) TypedValue.applyDimension(TypedValue.COMPLEX_UNIT_DIP, 100, getResources().getDisplayMetrics());} else {// 화면 속 화면을 나가면 video_view의 너비를 복원합니다.RelativeLayout.LayoutParams layoutParams = (RelativeLayout.LayoutParams) mVideoView.getLayoutParams();layoutParams.width = (int) TypedValue.applyDimension(TypedValue.COMPLEX_UNIT_DIP, 192, getResources().getDisplayMetrics());}}
Flutter에서 시청자 화면 속 화면의 구현
Flutter에서 화면 속 화면을 활성화하는 것은 플랫폼마다 구현 방식이 다르며, 아래에서 iOS와 Android 플랫폼에 대해 각각 설명합니다.
iOS 기기에 게시합니다
SDK 호출로 구현하기
Flutter에서도 SDK가 제공하는 API를 호출하여 화면 속 화면을 편리하게 활성화할 수 있으며, 네이티브 iOS와 마찬가지로 SDK는 단일 스트리머의 화면 속 화면 기능만 제공합니다. 화면 속 화면에 여러 스트리머의 비디오를 표시해야 하는 경우 시스템 API 호출 구현을 참조하십시오.
주의:
RTC Engine의 재생
Flutter SDK는 2.9.1및 그의 이상 비전이 필요하며, 시청자 측에서 다음 인터페이스를 호출하여 구현합니다.
trtcCloud.callExperimentalAPI(jsonEncode({"api": "enablePictureInPictureFloatingWindow","params": {"enable": true}}));
필요한 경우 해당 파라미터 위치에 false을 전달하면 됩니다.
라이브 방송의 재생
시청자 측에서 다음 인터페이스를 호출하여 활성화합니다.
var pipCode = await _livePlayer!.enablePictureInPicture(true);if (pipCode != V2TXLIVE_OK) {print("error: $pipCode");}
끄기 필요한 경우 해당 파라미터 위치에 false을 전달하면 됩니다.
시스템 API 호출로 구현하기
복잡한 화면 속 화면 기능(예: 화면 속 화면에 여러 스트리머의 비디오 표시)을 구현해야 하는 경우 iOS 시스템에서 제공하는 API를 호출하여 구현해야 하며, iOS에서 시청자 화면 속 화면 구현-시스템 API 호출 구현 부분을 참조하십시오. 아래에서는 Flutter에서 iOS 시스템 API 호출 부분에 대해 설명합니다.
1. Flutter 측에서 MethodChannel을 사용하여 iOS 네이티브 측으로 메시지를 보냅니다.
final channel = MethodChannel('flutter_ios_pip_demo');await channel.invokeMethod('enablePip', {'marginTop': appBarHeight + topSafeAreaHeight,'pkLeft': pkLeftUserId,'pkRight': pkRightUserId,});
2. Flutter로 패키징된 iOS 프로젝트에서 해당 메시지를 수신하고 적절한 처리를 수행합니다.
Flutter에서 시스템 API를 호출하여 여러명 스트리머 PK 화면 속 화면을 구현할 때, 실제로는 iOS 시스템 API를 호출하여 자체 정의 캡처로 두 스트리머 PK 화면을 다시 그린 후 Flutter 레이어 위에 표시합니다. 따라서 iOS 시스템 API를 호출하여 그린 창의 크기와 위치가 Flutter 측과 일치해야 하며, MethodChannel에서 해당 레이아웃 파라미터와 스트리머 ID를 전달할 수 있습니다.
var channel: FlutterMethodChannel?let pipListener = PipRender()guard let controller = window?.rootViewController as? FlutterViewController else {fatalError("Invalid root view controller")}channel = FlutterMethodChannel(name: "flutter_ios_pip_demo", binaryMessenger: controller.binaryMessenger)channel?.setMethodCallHandler({ [weak self] call, result inguard let self = self else { return }switch (call.method) {case "enablePip":if let arg = call.arguments as? [String: Any] {let marginTop = arg["marginTop"] as? CGFloat ?? 0let pkLeft = arg["pkLeft"] as? String ?? ""let pkRight = arg["pkRight"] as? String ?? ""pipListener.enablePip(mainView: vc.view, mt: mt, pkLeft: pkLeft, pkRight: pkRight)}result(nil)breakcase "disablePip":pipListener.disablePip()result(nil)breakdefault:break}})
3. 화면 속 화면을 처리하는 클래스를 정의합니다.
화면 속 화면을 활성화할 때 해당 스트리머의 스트림을 자체 정의 렌더링으로 변경하고 렌더링된 화면을 루트 뷰에 삽입하여 표시합니다.
import UIKitimport AVKitimport TXLiteAVSDK_Professionalclass PipRender: NSObject {// 나머지 변수는 네이티브 iOS에서 시스템 API를 호출해 구현한 부분을 참고하세요.var mainView: UIView?var mt: CGFloat?// trtcCloud는 단일 인스턴스이므로 코드에서 다음과 같이 가져올 수 있습니다.let trtcCloud = TRTCCloud.sharedInstance()func disablePip() {pipDisplayLayer?.removeFromSuperlayer()pipController?.stopPictureInPicture()}func enablePip(mainView: UIView, mt: CGFloat, pkLeft: String, pkRight: String) {self.mainView = mainViewself.mt = mttrtcCloud.addDelegate(self)enableBGDecode()setupAudioSession()setupPipController()pipController?.startPictureInPicture()if pkLeft.count > 0 {trtcCloud.startRemoteView(pkLeft, streamType: .big, view: nil)trtcCloud.setRemoteVideoRenderDelegate(pkLeft, delegate: self, pixelFormat: ._NV12, bufferType: .pixelBuffer);}if pkRight.count > 0 {trtcCloud.startRemoteView(pkRight, streamType: .big, view: nil)trtcCloud.setRemoteVideoRenderDelegate(pkRight, delegate: self, pixelFormat: ._NV12, bufferType: .pixelBuffer);}}// 해당 방법은 업무 요구에 따라 화면 속 화면의 표시 위치를 조정하여 Flutter 측과 일치하게 표시되도록 해야 합니다.func setupPipController() {let screenWidth = UIScreen.main.bounds.widthlet videoHeight = screenWidth / 2 / 9 * 16pipDisplayLayer = AVSampleBufferDisplayLayer()// 여기서 실제 필요에 따라 화면 속 화면의 표시 위치를 조정합니다.let tsa = self.mainView?.safeAreaInsets.top ??let vmt = tsa + (self.mt ?? 0)pipDisplayLayer.frame = CGRect(x: 0, y: vmt, width: screenWidth, height: videoHeight) // Adjust size as neededpipDisplayLayer.videoGravity = .resizeAspectpipDisplayLayer.isOpaque = truepipDisplayLayer.backgroundColor = CGColor(red: 0, green: 0, blue: 0, alpha: 1)// 여기서 enablePip로 전달된 mainView를 사용하여 PIP 화면을 추가합니다mainView?.layer.addSublayer(pipDisplayLayer)if AVPictureInPictureController.isPictureInPictureSupported() {let contentSource = AVPictureInPictureController.ContentSource(sampleBufferDisplayLayer: pipDisplayLayer,playbackDelegate: self)pipController = AVPictureInPictureController(contentSource: contentSource)pipController?.delegate = selfpipController?.canStartPictureInPictureAutomaticallyFromInline = true} else {print("+> PiP not supported")}}// 나머지 메서드는 네이티브 iOS 측에서 시스템 API를 호출해 구현한 부분과 동일합니다}
4. Flutter 측에서 화면 속 화면을 중지할 때 해당 스트리머의 스트림을 다시 가져와 Flutter 측 렌더링을 복원해야 합니다.
// 업무 측에서 화면 속 화면 중지를 트리거할 때trtcCloud.startRemoteView(pkLeftUserId, TRTCCloudDef.TRTC_VIDEO_STREAM_TYPE_BIG, pkLeftId);trtcCloud.startRemoteView(pkRightUserId, TRTCCloudDef.TRTC_VIDEO_STREAM_TYPE_BIG, pkRightId);await channel.invokeMethod('disablePip');
5. Flutter 측에서 현재 페이지를 파기할 때 화면 속 화면을 중지해야 합니다.
화면 속 화면을 시작한 후에는 실제로 iOS 시스템 API를 호출하여 Flutter 뷰 위에 새로운 뷰를 다시 그리기 때문에 현재 페이지를 파기할 때 화면 속 화면을 중지하고 해당 뷰를 루트 뷰에서 제거해야 합니다.
@overridedispose() {channel.invokeMethod('disablePip');super.dispose();}
Android에서 Flutter를 통해 화면 속 화면을 구현합니다
Flutter에서 화면 속 화면을 구현하려면 Android PIP API를 호출해야 합니다. 화면 속 화면 모드에 진입 후 Flutter UI는 기존 Widget 레이아웃 규칙에 따라 표시되며, 화면 속 화면 모드 진입 시 일부 Widget을 숨기고 비디오 Widget의 너비와 높이를 적절히 설정할 수 있습니다.
플랫폼 채널을 사용하여 Android 코드 호출하며, 채널은 클라이언트(Flutter)와 호스트(Android)로 구분되며, 아래에서 화면 속 화면의 구체적인 구현을 보여드리겠습니다:
1. Flutter 클라이언트의 코드: 이름이"samples.flutter.dev" 로 된 채널을 사용하여 "pictureInPicture" 메서드를 호출하며, 이 메서드의 구체적인 구현은 Android 호스트 측에 있습니다.
MethodChannel _channel = MethodChannel('samples.flutter.dev');final int? result = await _channel.invokeMethod('pictureInPicture');
2. Android 호스트의 코드.
2.1 FlutterActivity를 상속한 Activity에서 구현합니다
private void startPictureInPicture() {if (Build.VERSION.SDK_INT >= Build.VERSION_CODES.O) {PictureInPictureParams.Builder pictureInPictureBuilder = new PictureInPictureParams.Builder();// 구체적인 업무 요구 사항에 따라 지정된 화면 속 화면의 크기를 설정합니다.Rational aspectRatio = new Rational(100, 100);pictureInPictureBuilder.setAspectRatio(aspectRatio);//화면 속 화면로 진입하기enterPictureInPictureMode(pictureInPictureBuilder.build());} else {Toast.makeText(this, R.string.picture_in_picture_not_supported, Toast.LENGTH_SHORT).show();}}@Overridepublic void configureFlutterEngine(@NonNull FlutterEngine flutterEngine) {super.configureFlutterEngine(flutterEngine);MethodChannel channel = new MethodChannel(flutterEngine.getDartExecutor().getBinaryMessenger(), "samples.flutter.dev");channel.setMethodCallHandler((call, result) -> {if (call.method.equals("pictureInPicture")) {startPictureInPicture();} else {result.notImplemented();}});}
2.2 AndroidManifest.xml에서 activity에 화면 속 화면의 파라미터
android:supportsPictureInPicture="true"을 구성합니다. 다음과 같습니다.<activityandroid:name="example.android.app.src.main.java.com.tencent.live.example.MainActivity"android:supportsPictureInPicture="true"android:configChanges="orientation|keyboardHidden|keyboard|screenSize|smallestScreenSize|locale|layoutDirection|fontScale|screenLayout|density|uiMode">...</activity>
화면 속 화면에서 두 개의 비디오 화면(예: 스트리머 PK)을 표시하려면 레이아웃 규칙과 크기를 적절히 설정하면 됩니다.

