This guide shows you how to use the AtomicXCore SDK components—DeviceStore, CallStore, and CallCoreView—to quickly implement an audio/video call feature.
Core Features
To build multi-party audio/video call scenarios with AtomicXCore, you’ll need these three modules:
Manages the call lifecycle: make, answer, reject, hang up. Provides real-time status for participants’ audio/video, call duration, call history, and more.
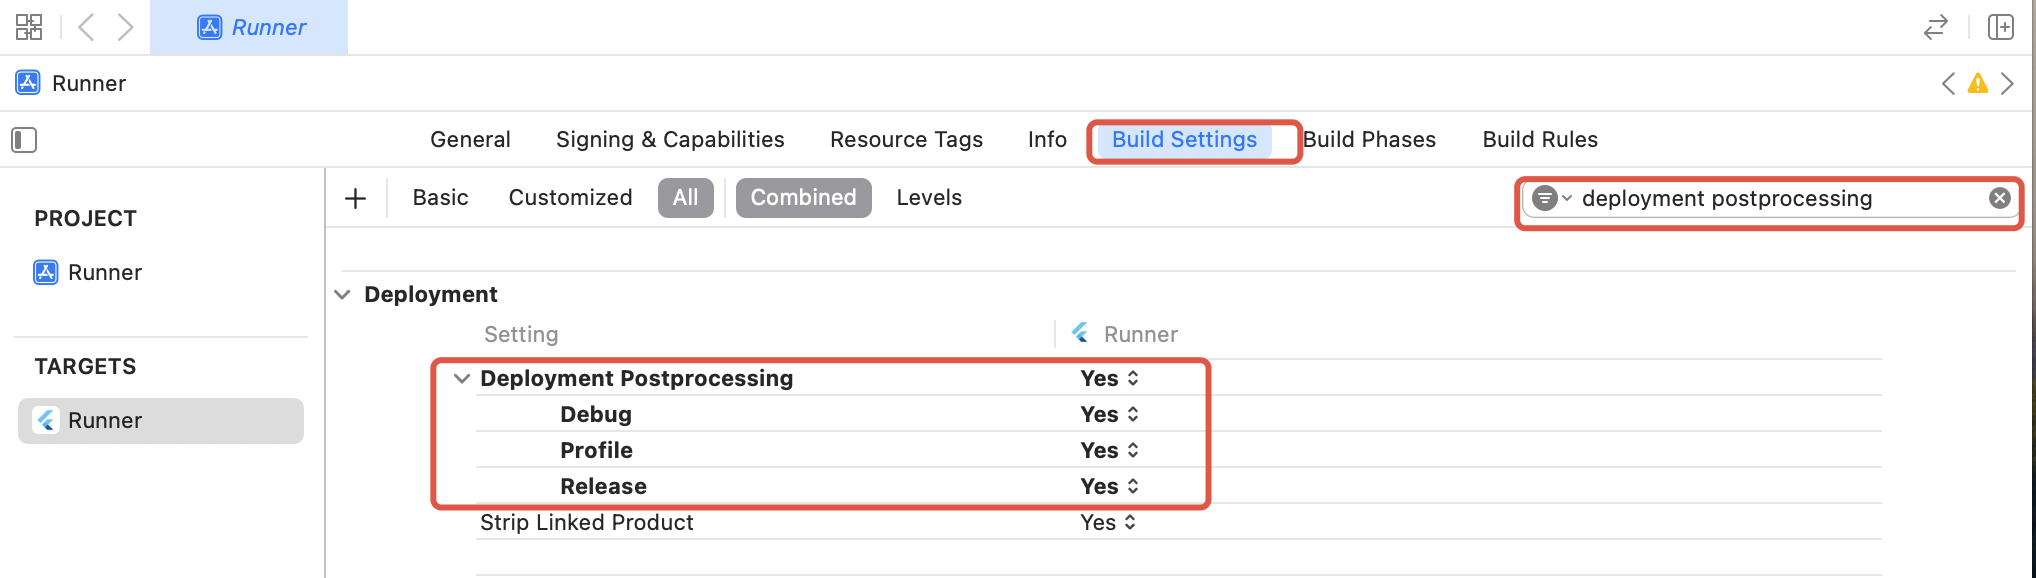
If you encounter a symbol not found error in Release on iOS (due to Flutter FFI symbol stripping), do the following:
1. In Xcode Build Settings, set Deployment Postprocessing to Yes.
2. Set Strip Style for Release to Non-Global Symbols.
Flutter Initialization & Login Process
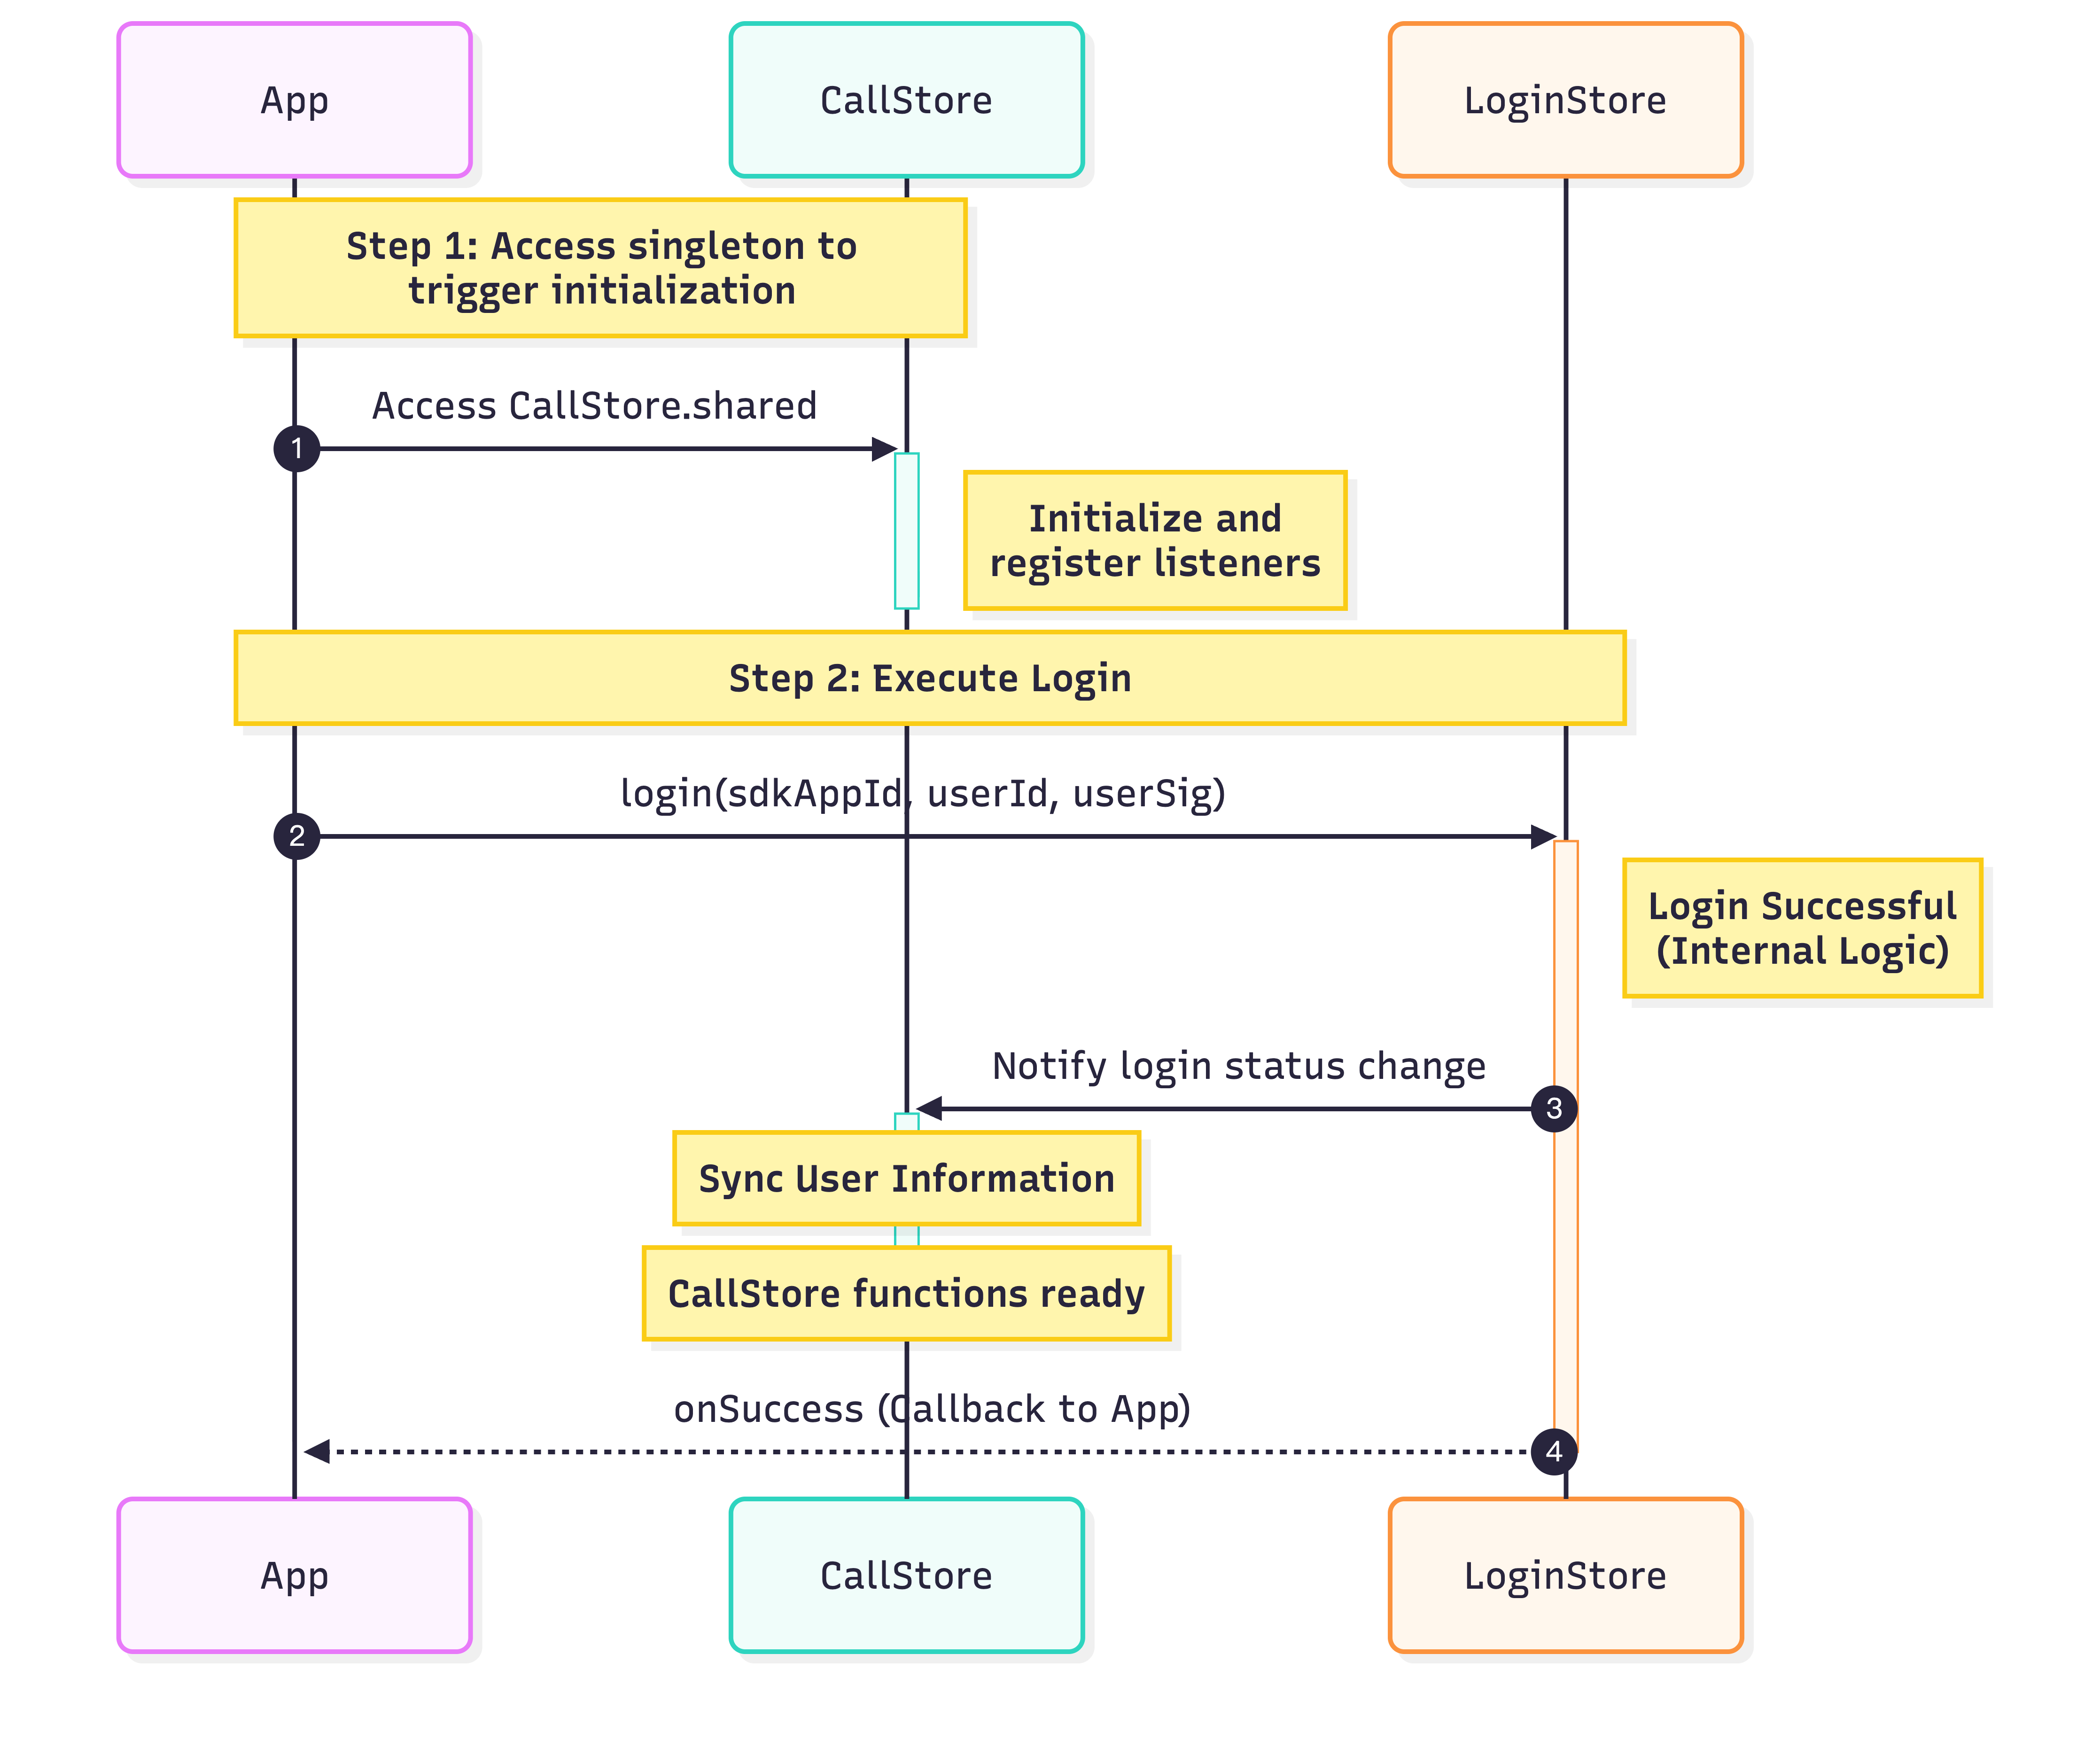
Initialize CallStore and log in the user before starting a call. CallStore will sync user info automatically and enter the ready state after a successful login. See flowchart and sample code:
Unique identifier for the current user; use only letters, numbers, hyphens, and underscores. Avoid simple IDs like 1 or 123 to prevent multi-device login conflicts.
sdkAppId
int
Get this from the console, usually a 10-digit integer starting with 140 or 160.
Make sure you have logged in before initiating a call. Service is unavailable until login is complete. Follow these 5 steps to implement the "make a call" feature.
Step 1: Create the Call Interface
You need a dedicated call page to display when a call is active.
1. Create the call page: Implement a StatefulWidget for your call host page, which will be used for navigation on incoming calls.
2. Add CallCoreView to the call page: CallCoreView takes a controller parameter, observes CallStore data, and automatically adjusts the layout for 1v1 or multi-party calls.
import 'package:flutter/material.dart';
import 'package:atomic_x_core/atomicxcore.dart';
// 1. Create call page Widget
classCallPageextendsStatefulWidget{
constCallPage({super.key});
@override
State<CallPage>createState()=>_CallPageState();
}
class _CallPageState extendsState<CallPage>{
late CallCoreController controller;
@override
voidinitState(){
super.initState();
controller =CallCoreController.create();
}
@override
Widgetbuild(BuildContext context){
// 2. Use CallCoreView Widget on the call page
returnCallCoreView(controller: controller);
}
}
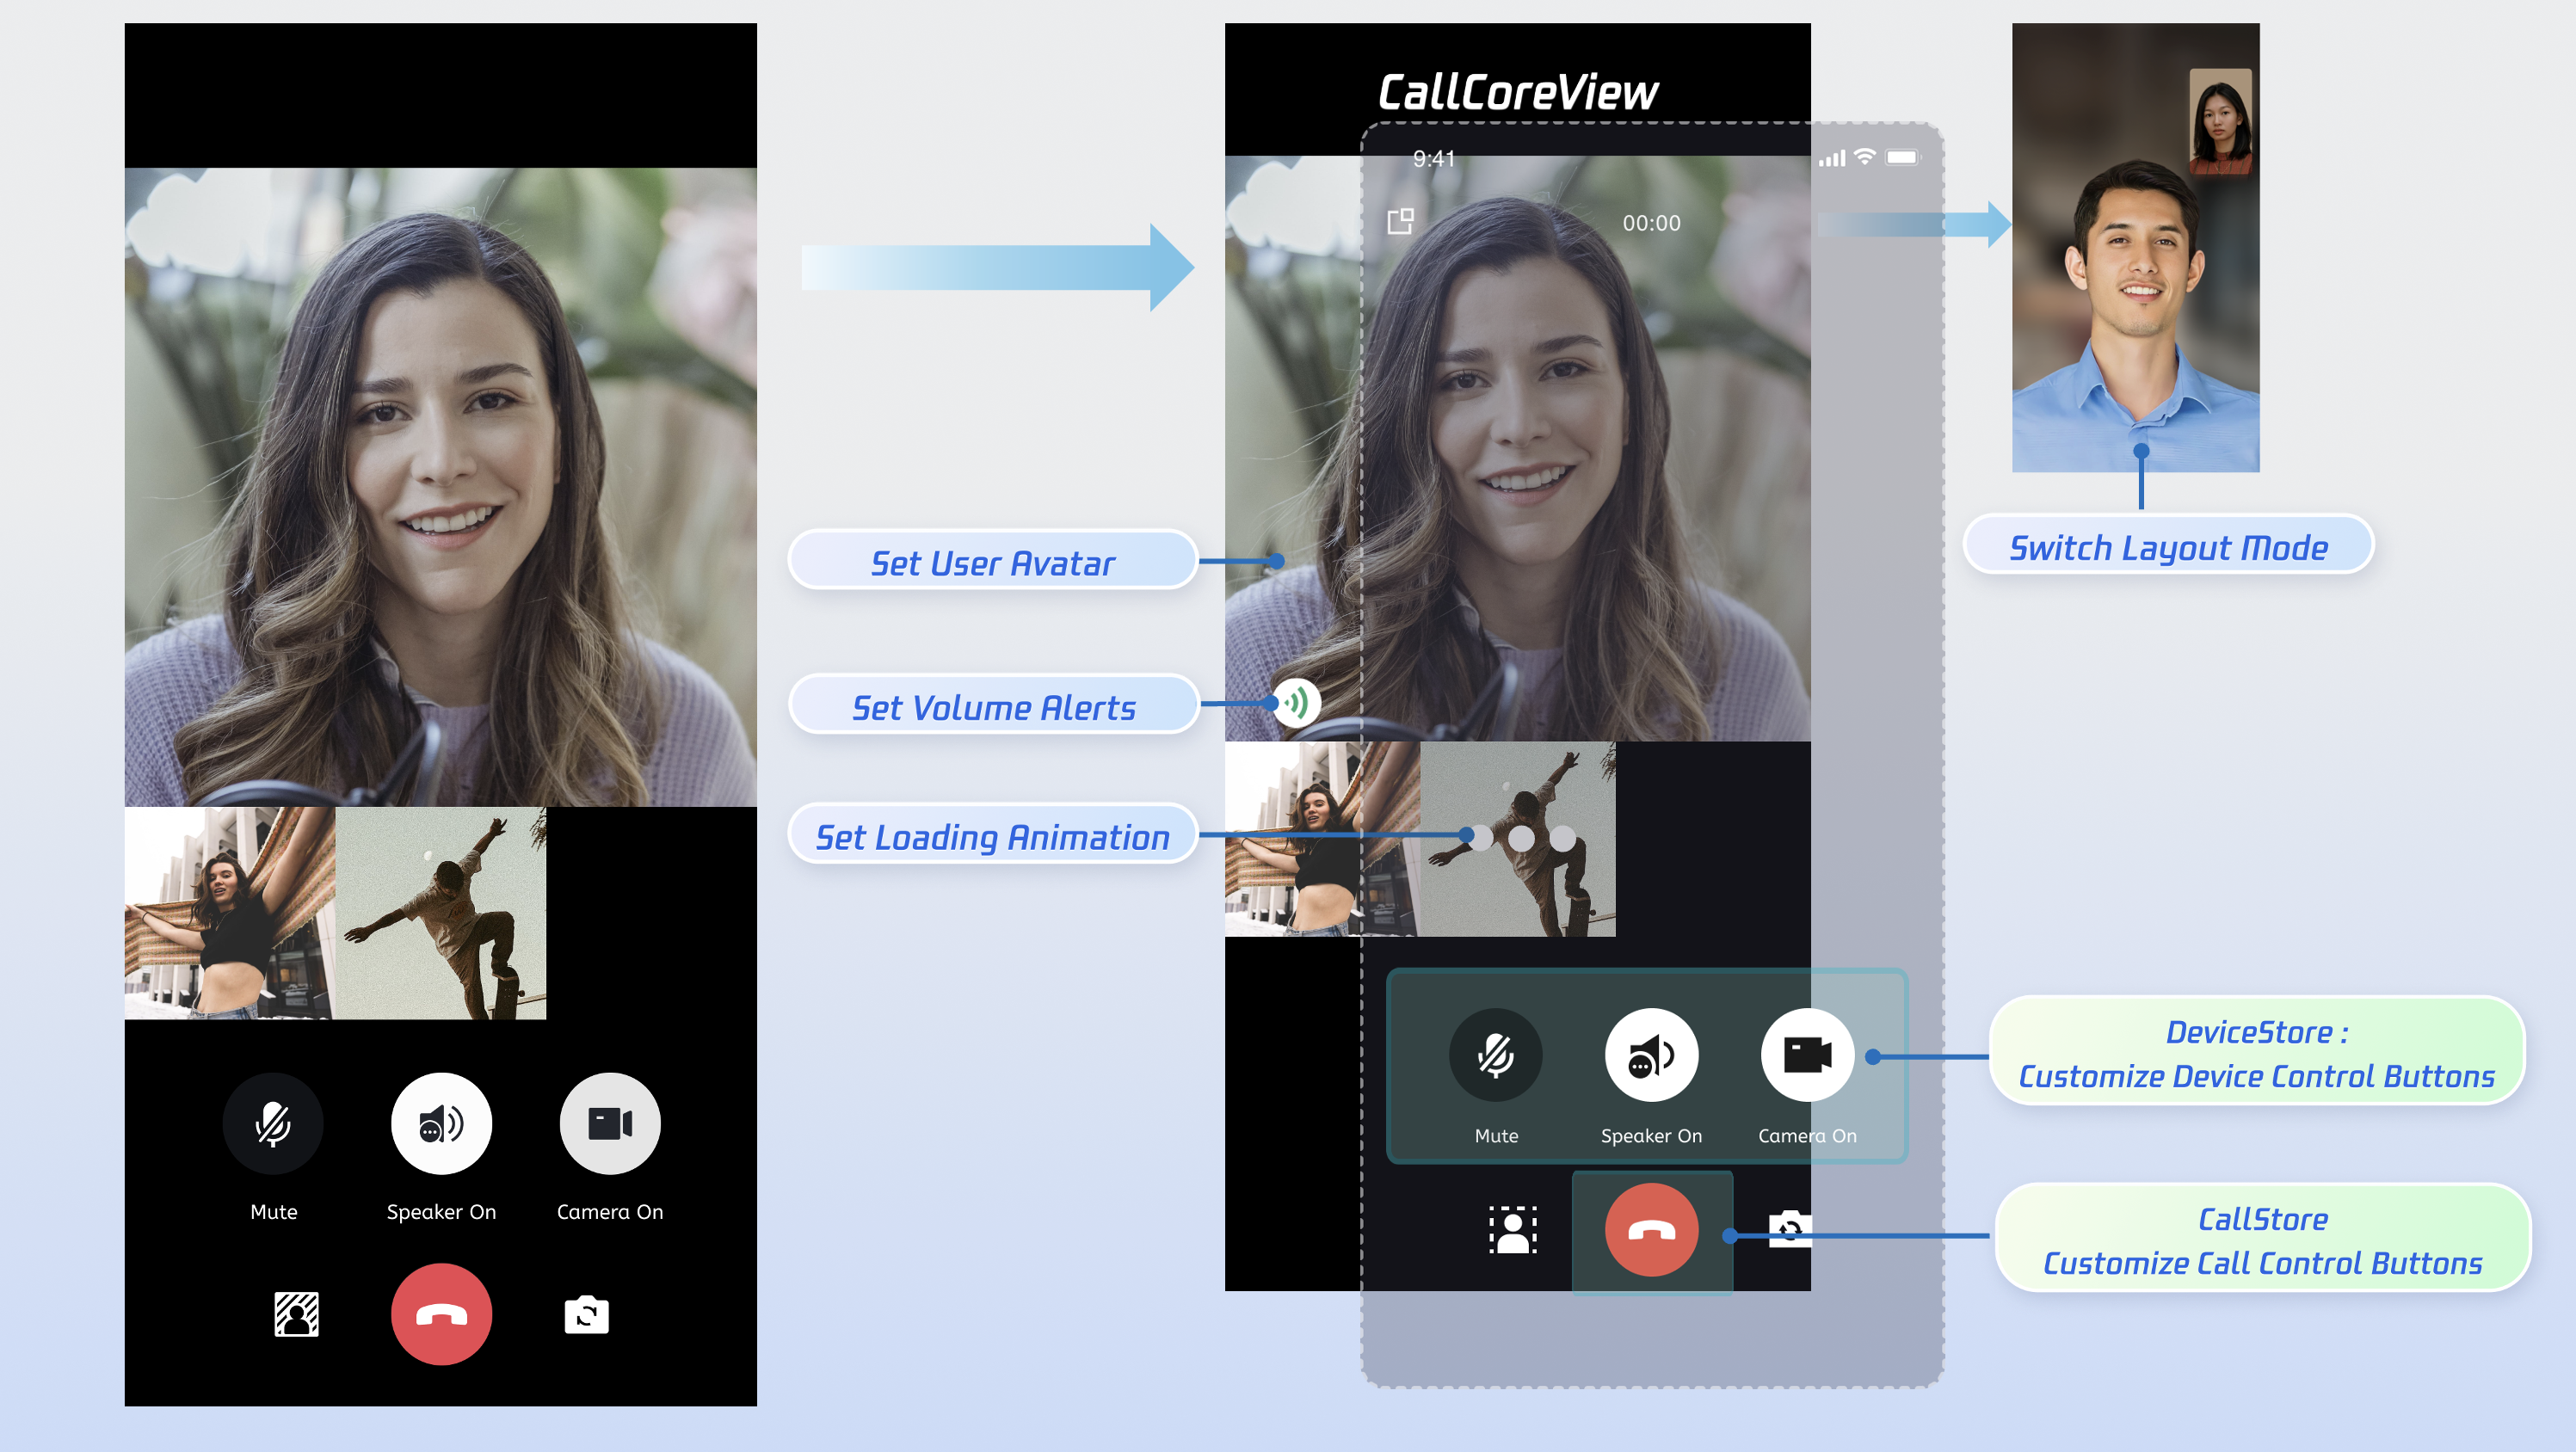
CallCoreView Widget Features:
Feature
Description
Reference
Set layout mode
Supports dynamic layout mode switching. If not set, layout auto-adapts by participant count.
DeviceStore: Controls microphone (toggle/volume), camera (toggle/switch/quality), screen sharing, and monitors device status. Bind button actions to these methods and listen for status changes to update UI in real time.
CallStore: Handles answering, hanging up, and rejecting calls. Bind these methods to button actions and listen for call status changes to sync UI accordingly.
Button icon resources: Download the TUICallKit button icons from GitHub. These are copyright-free.
Icons:
Example: Adding hang up, microphone, and camera buttons
1. Create a container for control buttons: Place hang up, microphone, and camera buttons at the bottom of your call page.
import 'package:flutter/material.dart';
import 'package:atomic_x_core/atomicxcore.dart';
// Bottom control button container Widget
classControlsContainerextendsStatelessWidget{
constControlsContainer({super.key});
@override
Widgetbuild(BuildContext context){
returnRow(
mainAxisAlignment:MainAxisAlignment.spaceEvenly,
children:[
// Add control buttons here
],
);
}
}
2. Add hang up button: Call hangup to end the call and close the page.
import 'package:atomic_x_core/atomicxcore.dart';
import 'package:flutter/material.dart';
// Hang up button Widget
WidgetbuildHangupButton(){
returnGestureDetector(
onTap:(){
// Call hangup API to end the call
CallStore.shared.hangup();
},
child:Container(
width:60,
height:60,
decoration:constBoxDecoration(
color:Colors.red,
shape:BoxShape.circle,
),
child:constIcon(
Icons.call_end,
color:Colors.white,
size:30,
),
),
);
}
3. Add microphone toggle button: Use openLocalMicrophone and closeLocalMicrophone to toggle the mic.
import 'package:atomic_x_core/atomicxcore.dart';
import 'package:flutter/material.dart';
// Microphone toggle button Widget
// Use ValueListenableBuilder to listen for microphone status changes
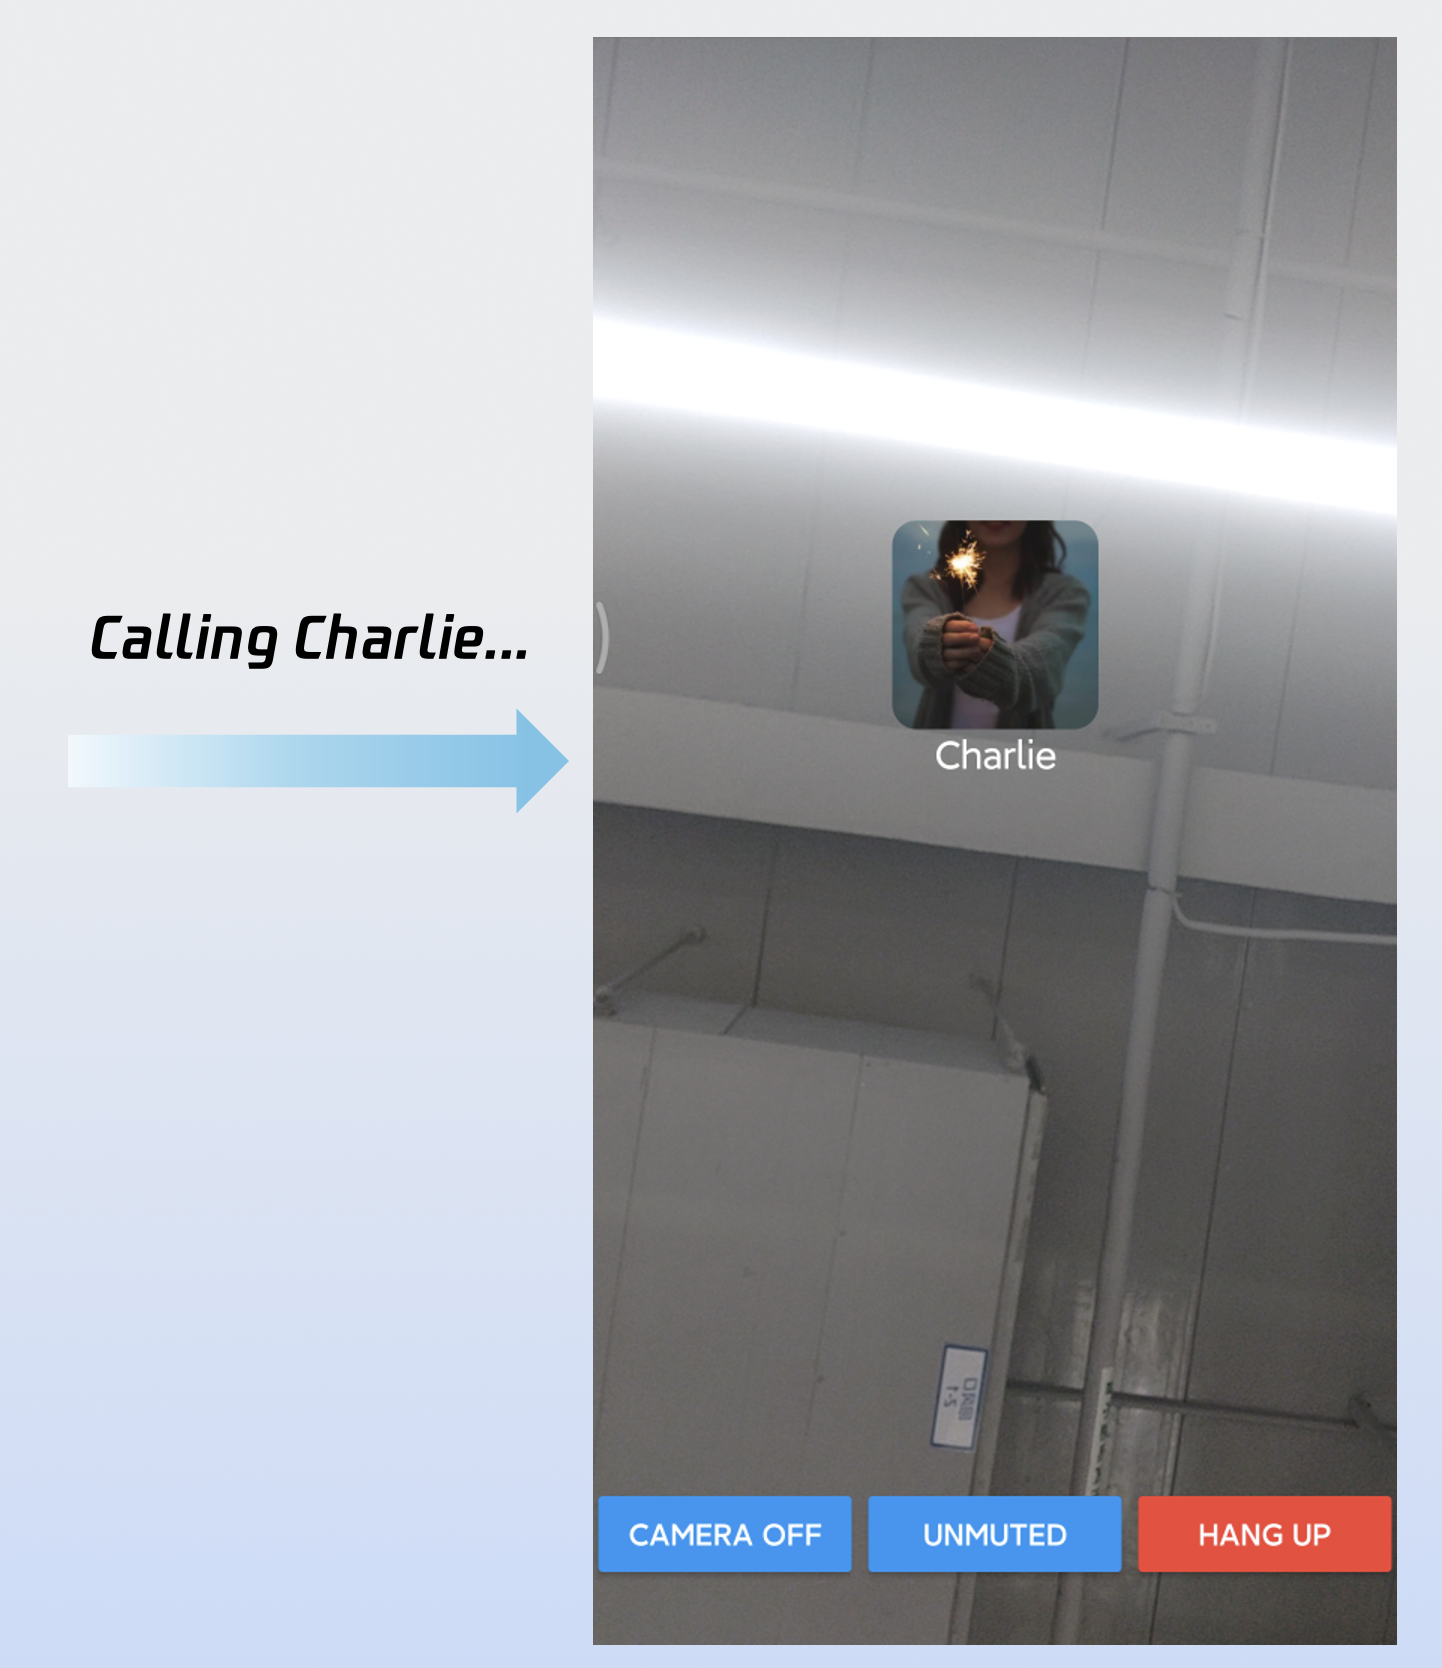
After completing these 5 steps, your "make a call" feature will run as shown:
Customizing the Interface
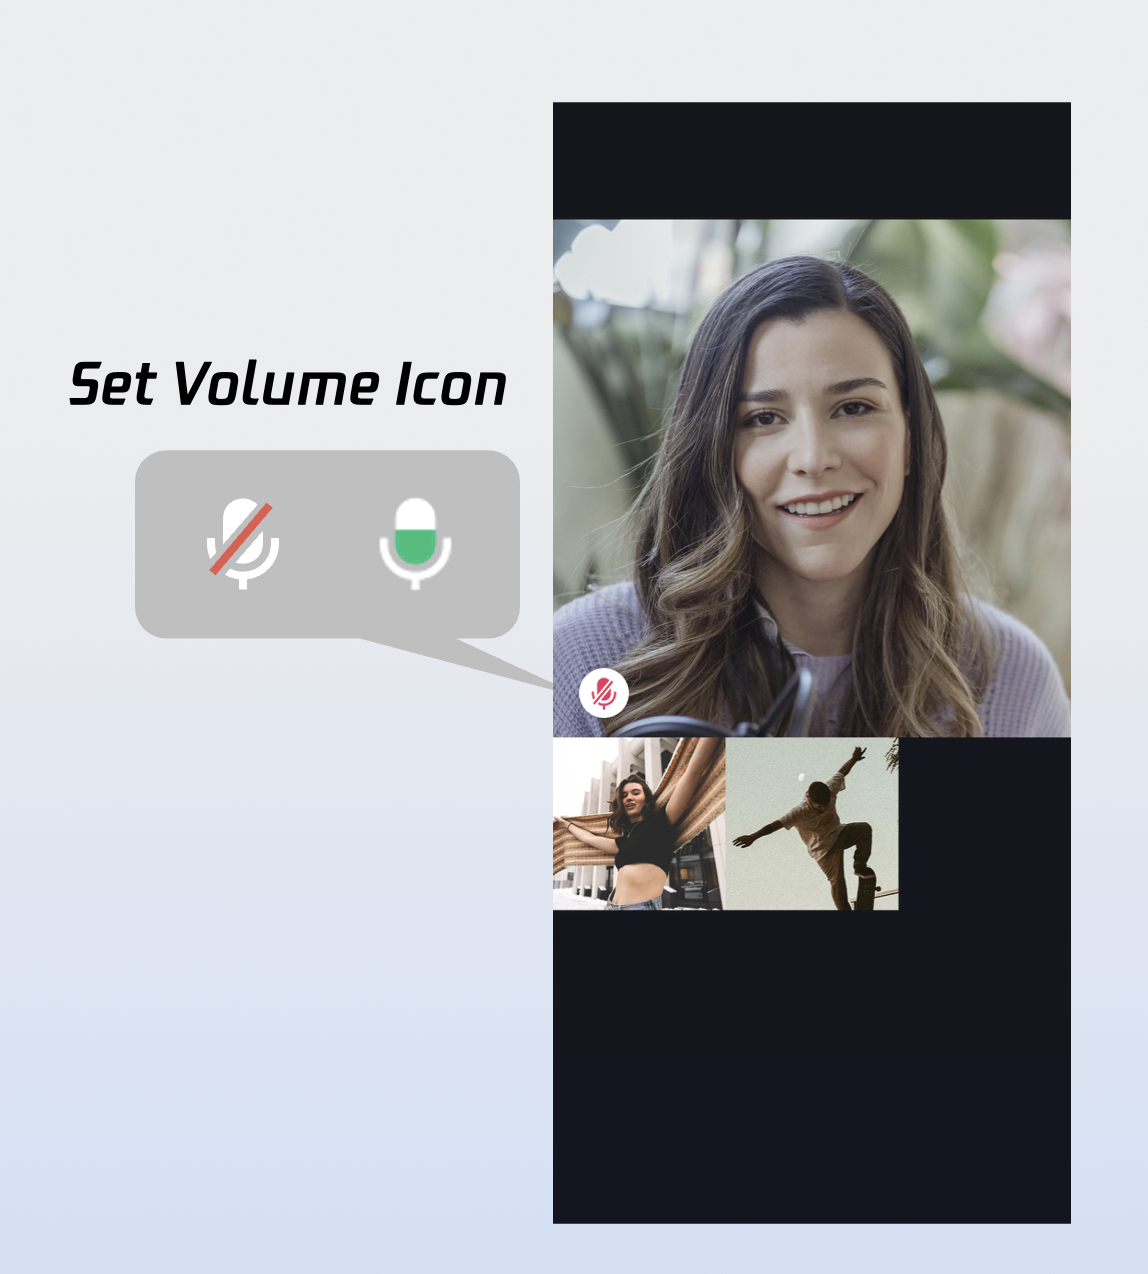
CallCoreView supports extensive UI customization, including avatars and volume indicator icons. For fast integration, download TUICallKit icons from GitHub. All icons are copyright-free.
Custom Volume Indicator Icons
Use the volumeIcons parameter in CallCoreView to assign icons for each volume level.
Sample usage:
Widget_buildCallCoreView(){
Map<VolumeLevel, Image> volumeIcons ={
VolumeLevel.mute :Image.asset(''),// Icon for mute
};
returnCallCoreView(
controller:CallCoreController.create(),
volumeIcons: volumeIcons,
);
}
Parameter
Type
Required
Description
volumeIcons
Map
No
Maps volume levels to icons.
VolumeLevel.mute: Muted
VolumeLevel.low: 0-25
VolumeLevel.medium: 25-50
VolumeLevel.high: 50-75
VolumeLevel.peak: 75-100
Icon
Description
Volume indicator icon; use for VolumeLevel.low or VolumeLevel.medium.
Mute icon; use for VolumeLevel.mute.
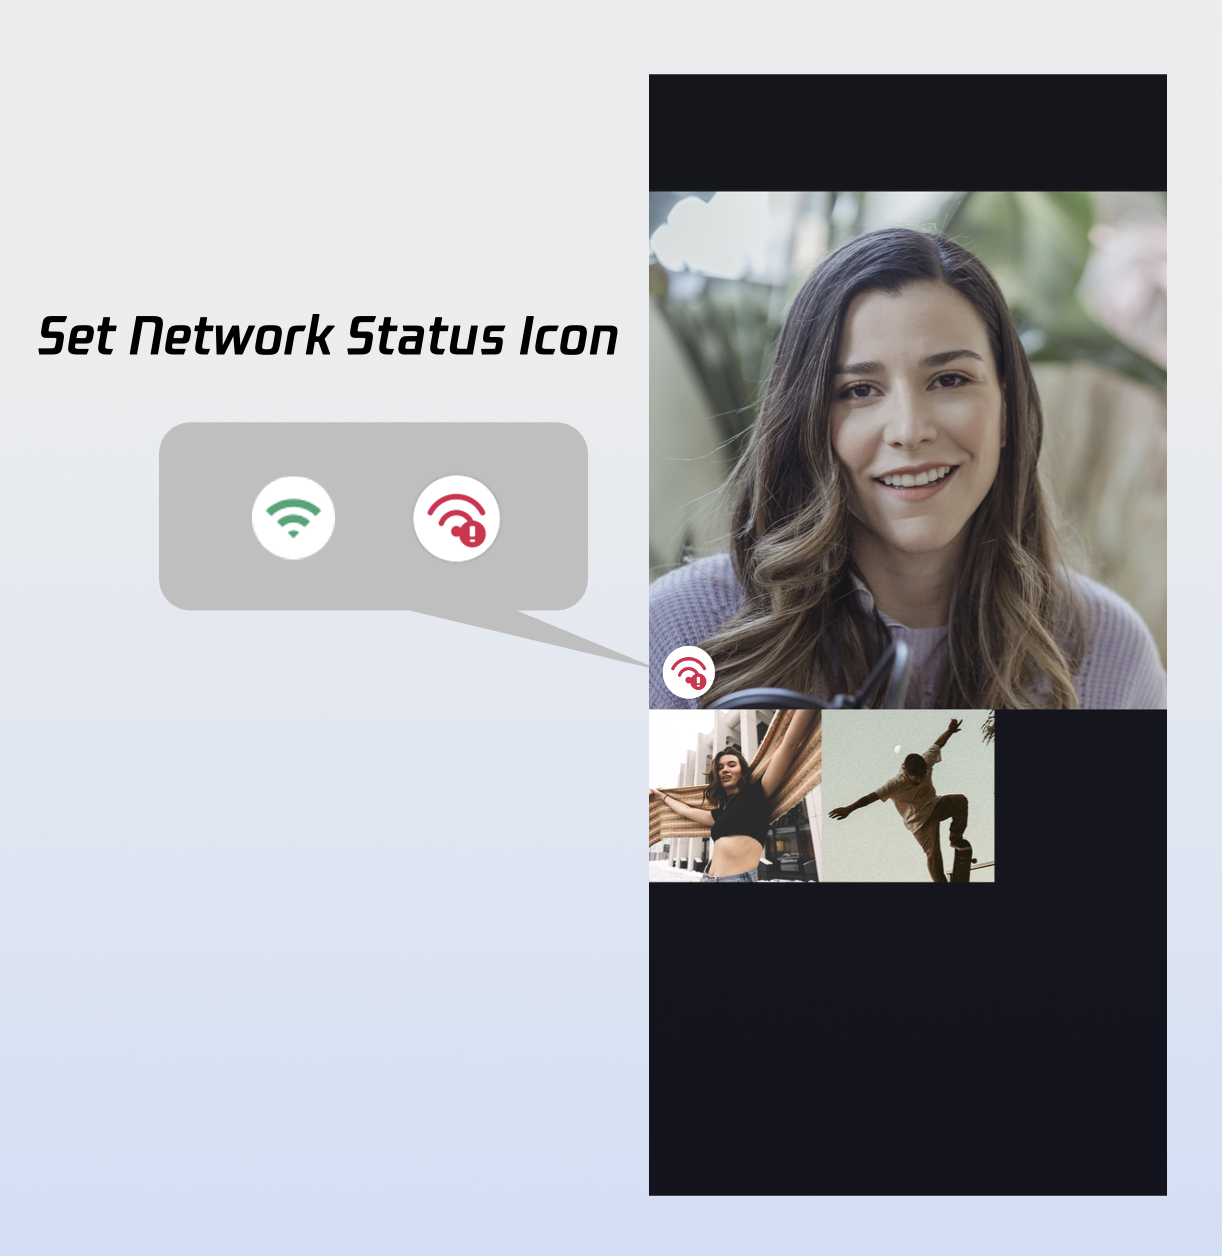
Custom Network Indicator Icons
Use networkQualityIcons in CallCoreView to set icons for different network states.
Sample usage:
Widget_buildCallCoreView(){
Map<NetworkQuality, Image> networkQualityIcons ={
NetworkQuality.bad :Image.asset(''),// Icon for poor network
};
returnCallCoreView(
controller:CallCoreController.create(),
networkQualityIcons: networkQualityIcons,
);
}
Parameter
Type
Required
Description
networkQualityIcons
Map
No
Maps network quality to icons.
Keys:
NetworkQuality.unknown
NetworkQuality.excellent
NetworkQuality.good
NetworkQuality.poor
NetworkQuality.bad
NetworkQuality.veryBad
NetworkQuality.down
Icon
Description
Poor network indicator; use for NetworkQuality.bad, NetworkQuality.veryBad, or NetworkQuality.down.
Custom Default Avatar
Use defaultAvatar in CallCoreView to specify a fallback user avatar. Monitor allParticipants for custom avatars; show the default avatar if none is set or loading fails.
When the call interface is covered (e.g., by navigation), display an in-app floating window that shows key call status (such as duration and participant info) and provides one-tap return to the full call view.
_buildPipWindowWidget(){
final pipWidth =MediaQuery.of(context).size.width;
final pipHeight =MediaQuery.of(context).size.height;
final result = await _channel.invokeMethod<bool>('enablePictureInPicture', {'enable': enable});
return result ??false;
}catch(e){
returnfalse;
}
}
/// Enter PiP mode immediately
staticFuture<bool>enterPictureInPicture() async {
try{
final result = await _channel.invokeMethod<bool>('enterPictureInPicture');
return result ??false;
}catch(e){
returnfalse;
}
}
}
Enable PiP before the call starts, and disable it after the call ends.
Implement iOS Picture-in-Picture Outside App
iOS supports Picture-in-Picture outside the app using the underlying TRTC engine. When the app goes to background, the call interface floats over other apps as a system PiP window.
Note:
In Xcode, add Background Modes under Signing & Capabilities and check Audio, AirPlay, and Picture in Picture.
Requires iOS 15.0 or above.
1. Enable PiP:
import 'package:tencent_rtc_sdk/trtc_cloud.dart';
TRTCCloud.sharedInstance().then((trtcCloud){
trtcCloud.callExperimentalAPI('''
{
"api":"configPictureInPicture",
"params":{
"enable":true,
"cameraBackgroundCapture":true,
"canvas":{
"width":720,
"height":1280,
"backgroundColor":"#111111"
},
"regions":[
{
"userId":"remoteUserId",
"userName":"",
"width":1.0,
"height":1.0,
"x":0.0,
"y":0.0,
"fillMode":0,
"streamType":"high",
"backgroundColor":"#111111",
"backgroundImage":"file:///path/to/avatar.png"
},
{
"userId":"localUserId",
"userName":"",
"width":0.333,
"height":0.333,
"x":0.65,
"y":0.05,
"fillMode":0,
"streamType":"high",
"backgroundColor":"#111111"
}
]
}
}
''');
});
2. Disable PiP:
import 'package:tencent_rtc_sdk/trtc_cloud.dart';
TRTCCloud.sharedInstance().then((trtcCloud){
trtcCloud.callExperimentalAPI('''
{
"api":"configPictureInPicture",
"params":{
"enable":false
}
}
''');
});
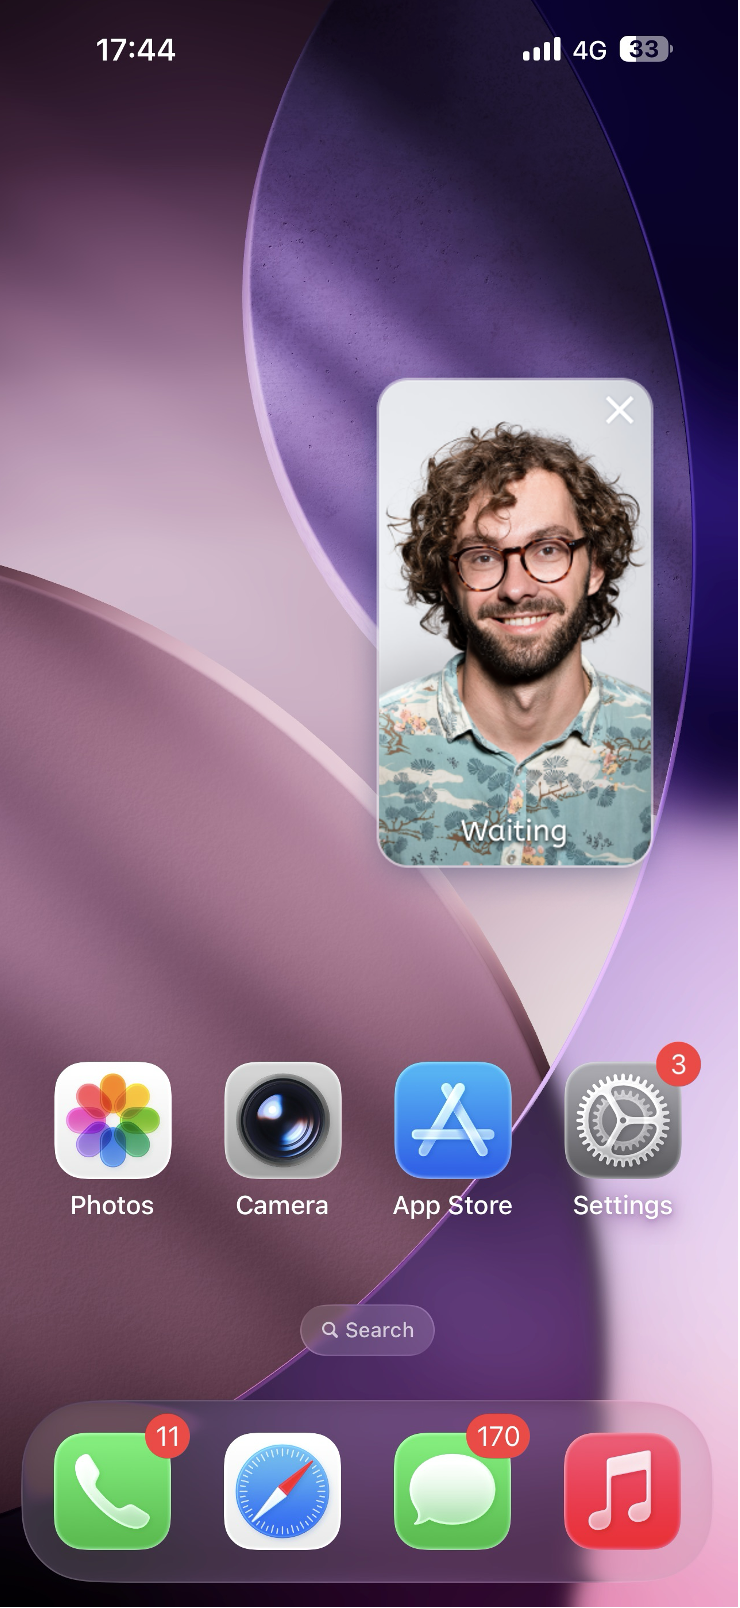
Play Waiting Ringtone
Monitor call status, play ringtone while waiting for an answer, and stop it when the call is accepted or ends.
CallStore.shared.state.selfInfo.addListener((){
CallParticipantInfo info =CallStore.shared.state.selfInfo.value;
To ensure call audio/video capture continues when the app goes to background, configure Android and iOS as follows.
Android Configuration
1. Permissions and service in AndroidManifest.xml: Starting from Android 9.0 (API 28), foreground service permission is required. Android 14 (API 34) requires specifying service type.
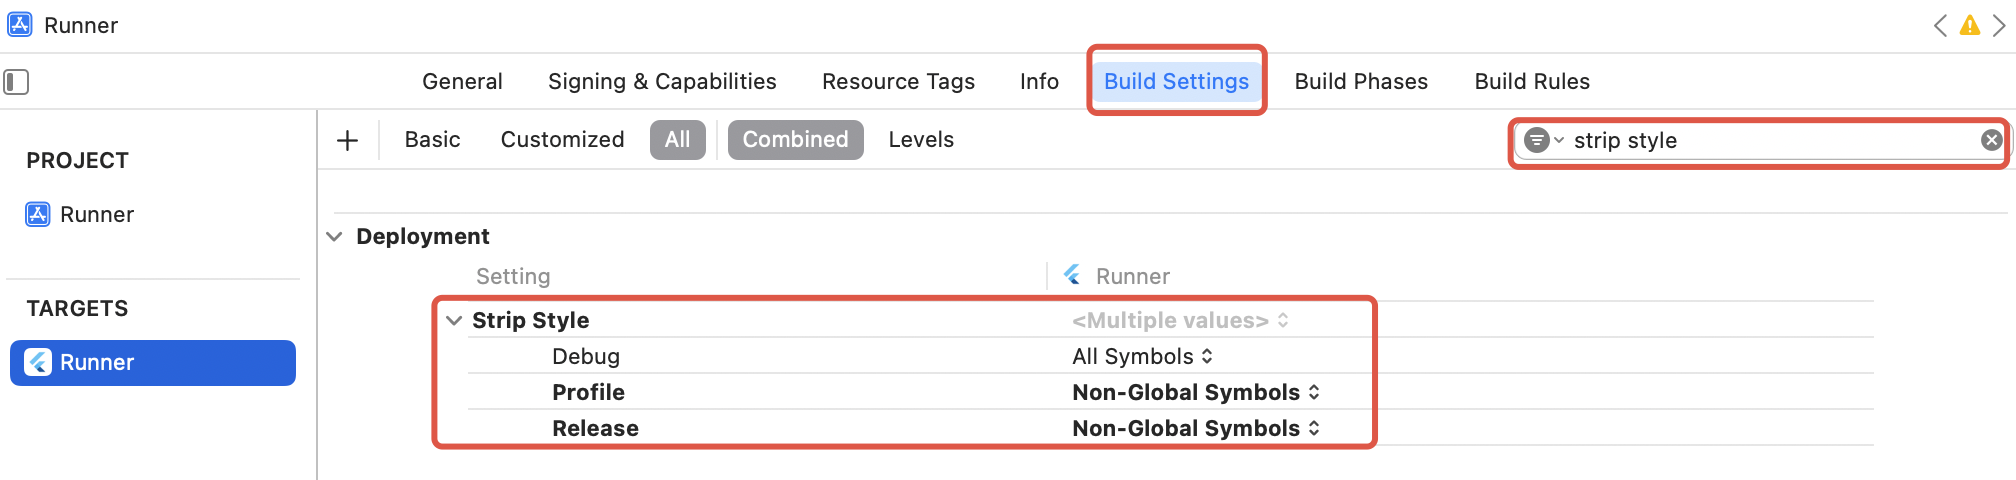
Why does my iOS Release build show [symbol not found] at runtime?
If you see symbol not found errors in your iOS Release build, it’s likely because Xcode’s symbol stripping removed TRTC C symbols used by tencent_rtc_sdk (via Flutter FFI). To fix:
1. In Build Settings, set Deployment Postprocessing to Yes.
2. In Build Settings, set Strip Style for Release to Non-Global Symbols.
If the callee goes offline and returns within the call invite timeout, will they still get the incoming call event?
For single calls: If the callee comes online within the timeout period, they will receive the incoming call invite.
For group calls: If the callee returns within the timeout, up to 20 unprocessed group messages will be pulled; if there is a call invite, the incoming call event will be triggered.
Contact Us
If you have any questions or suggestions during integration or use, join our Telegram technical group or Contact Us for support.