
Live Streaming Widget Customization (Android)
LiveCoreView is a cross-platform core component for video live streaming that provides essential features such as starting a stream, watching, co-hosting, and host PK. With its widget mechanism, you can display real-time custom information—like username, level, and PK progress bar—directly in the video area. This guide shows you how to quickly customize video widget UIs on Android by implementing the required interfaces.Effect Preview
Co-hosting Video Widget | PK Video Widget |
 |  |
Prerequisites
Before customizing video widgets, complete the main workflow setup by following Host Start Streaming and Audience Watching.
Key Concepts
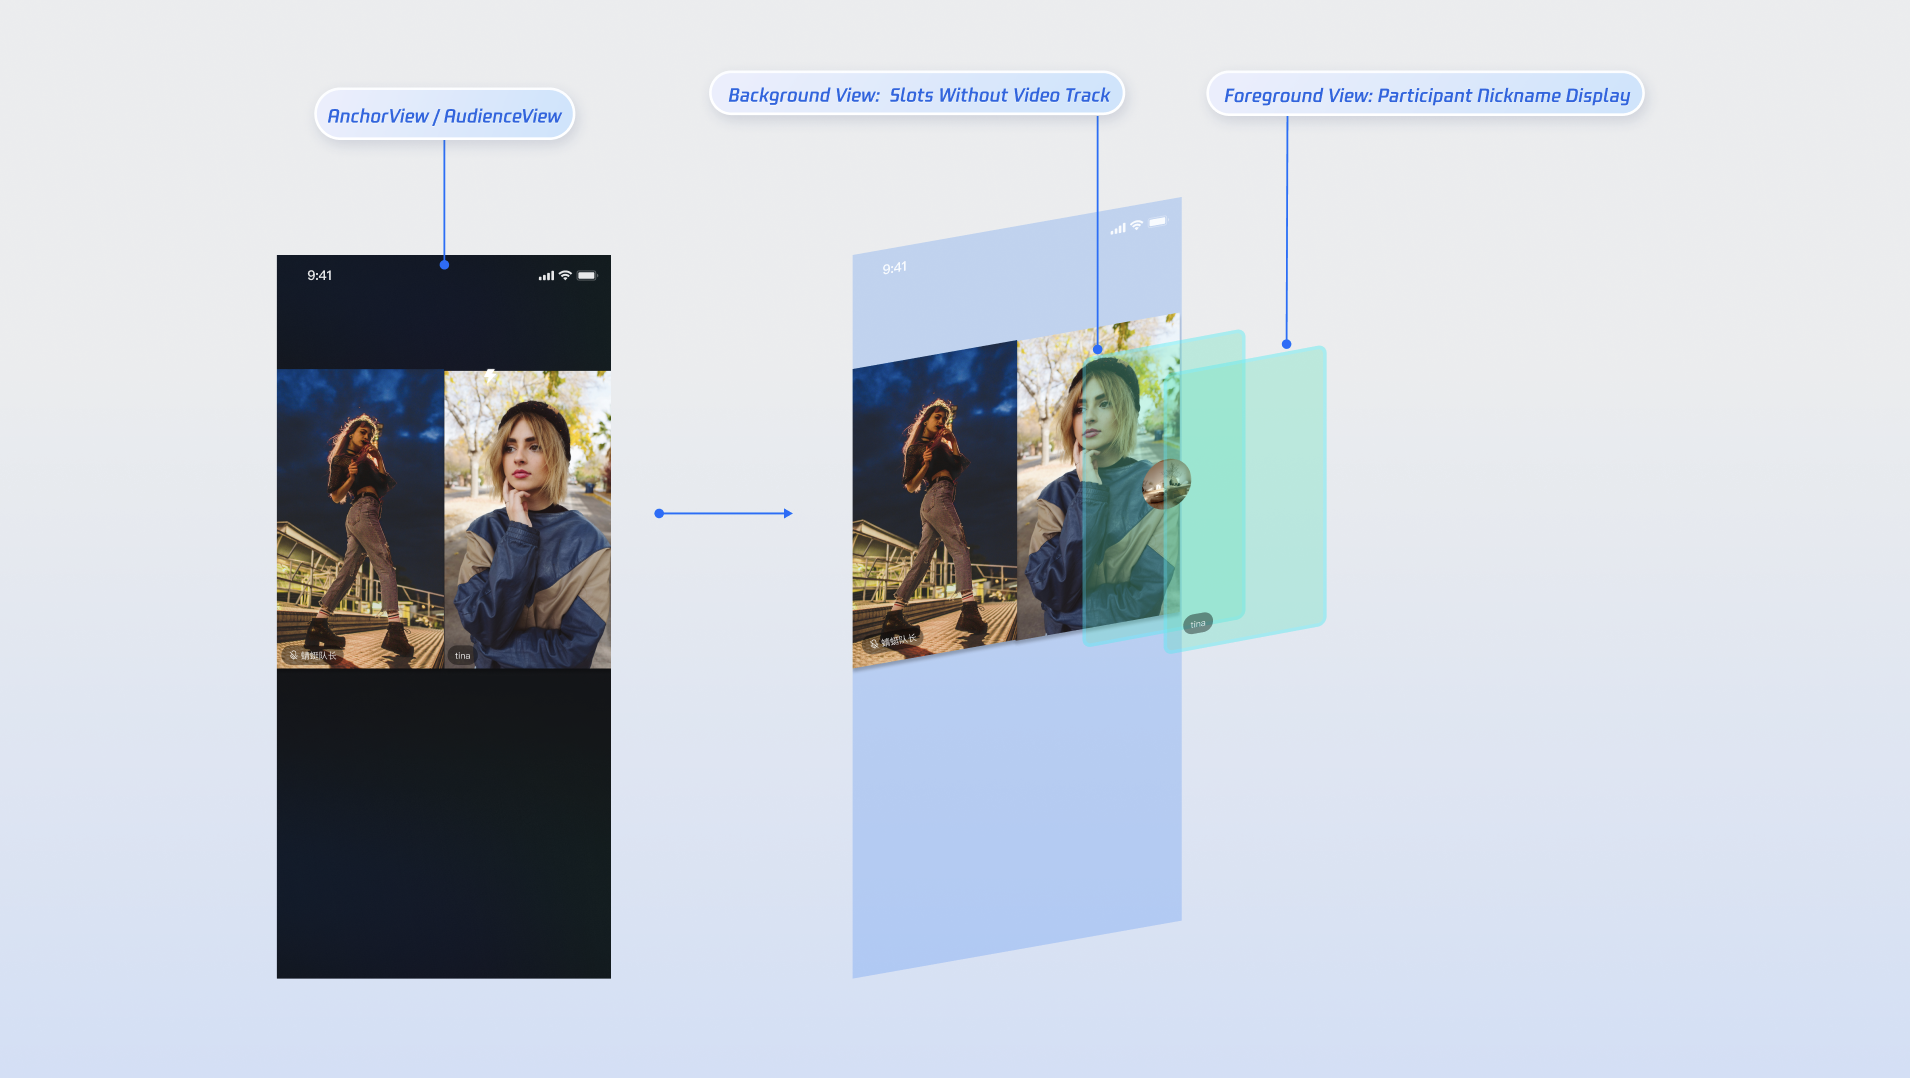
LiveCoreView enables custom view rendering through the VideoViewAdapter delegate. When the live streaming scenario changes (for example, when a user joins the stream or starts a PK), LiveCoreView invokes delegate methods to determine which view to display. Implement the corresponding interface methods and return your custom View instances.Method | Description | Business Scenario |
createCoGuestView | Creates the widget view for audience co-hosting. | Audience co-hosting, invite to co-hosting. |
createCoHostView | Creates the widget view for cross-room co-hosting (host co-hosting). | Host co-hosting |
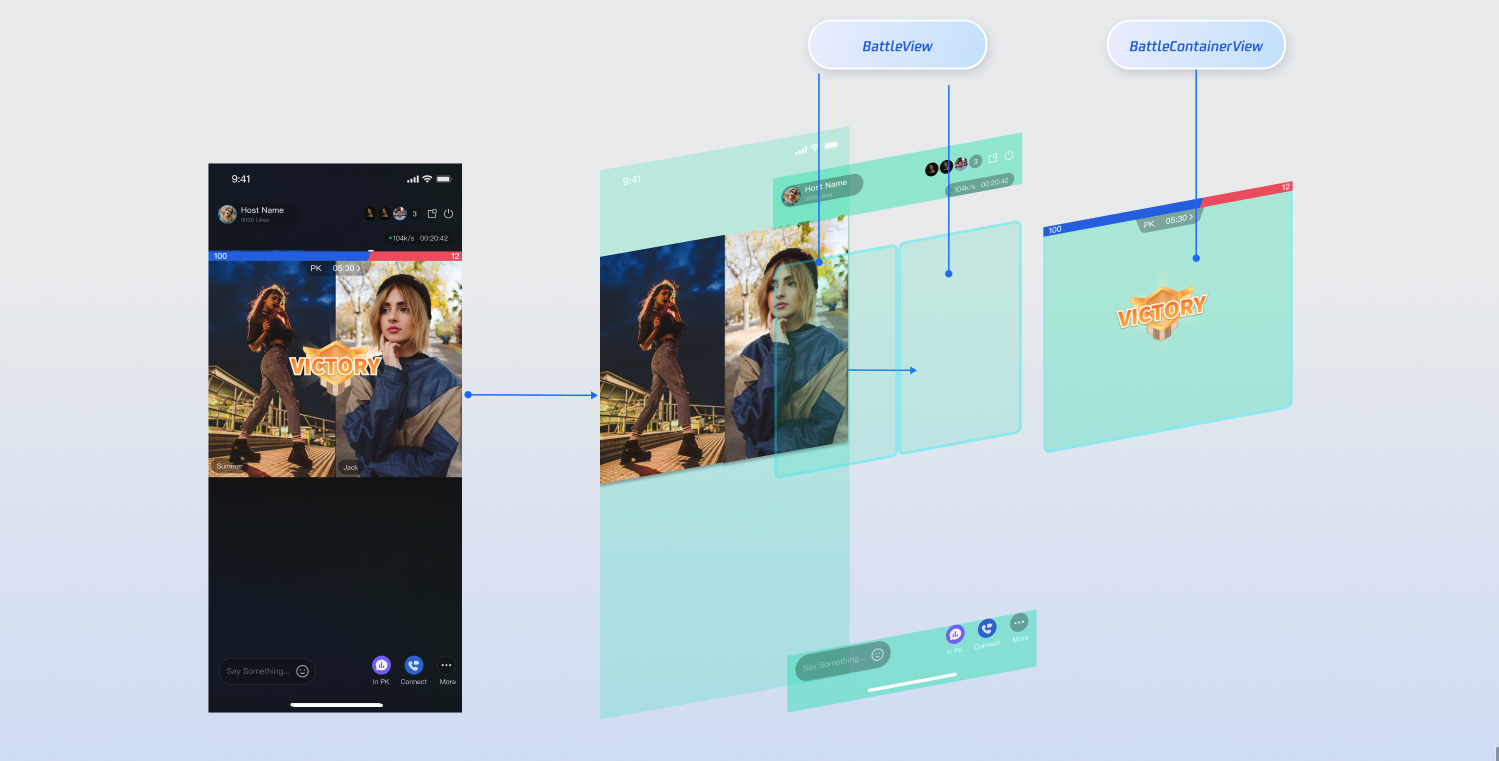
createBattleView | Creates the widget view for a single user in the PK scenario (e.g., avatar, score). | Host PK |
createBattleContainerView | Creates the overall container view for the PK scenario (e.g., background, PK score bar). | Host PK |
Customize Co-hosting Widgets
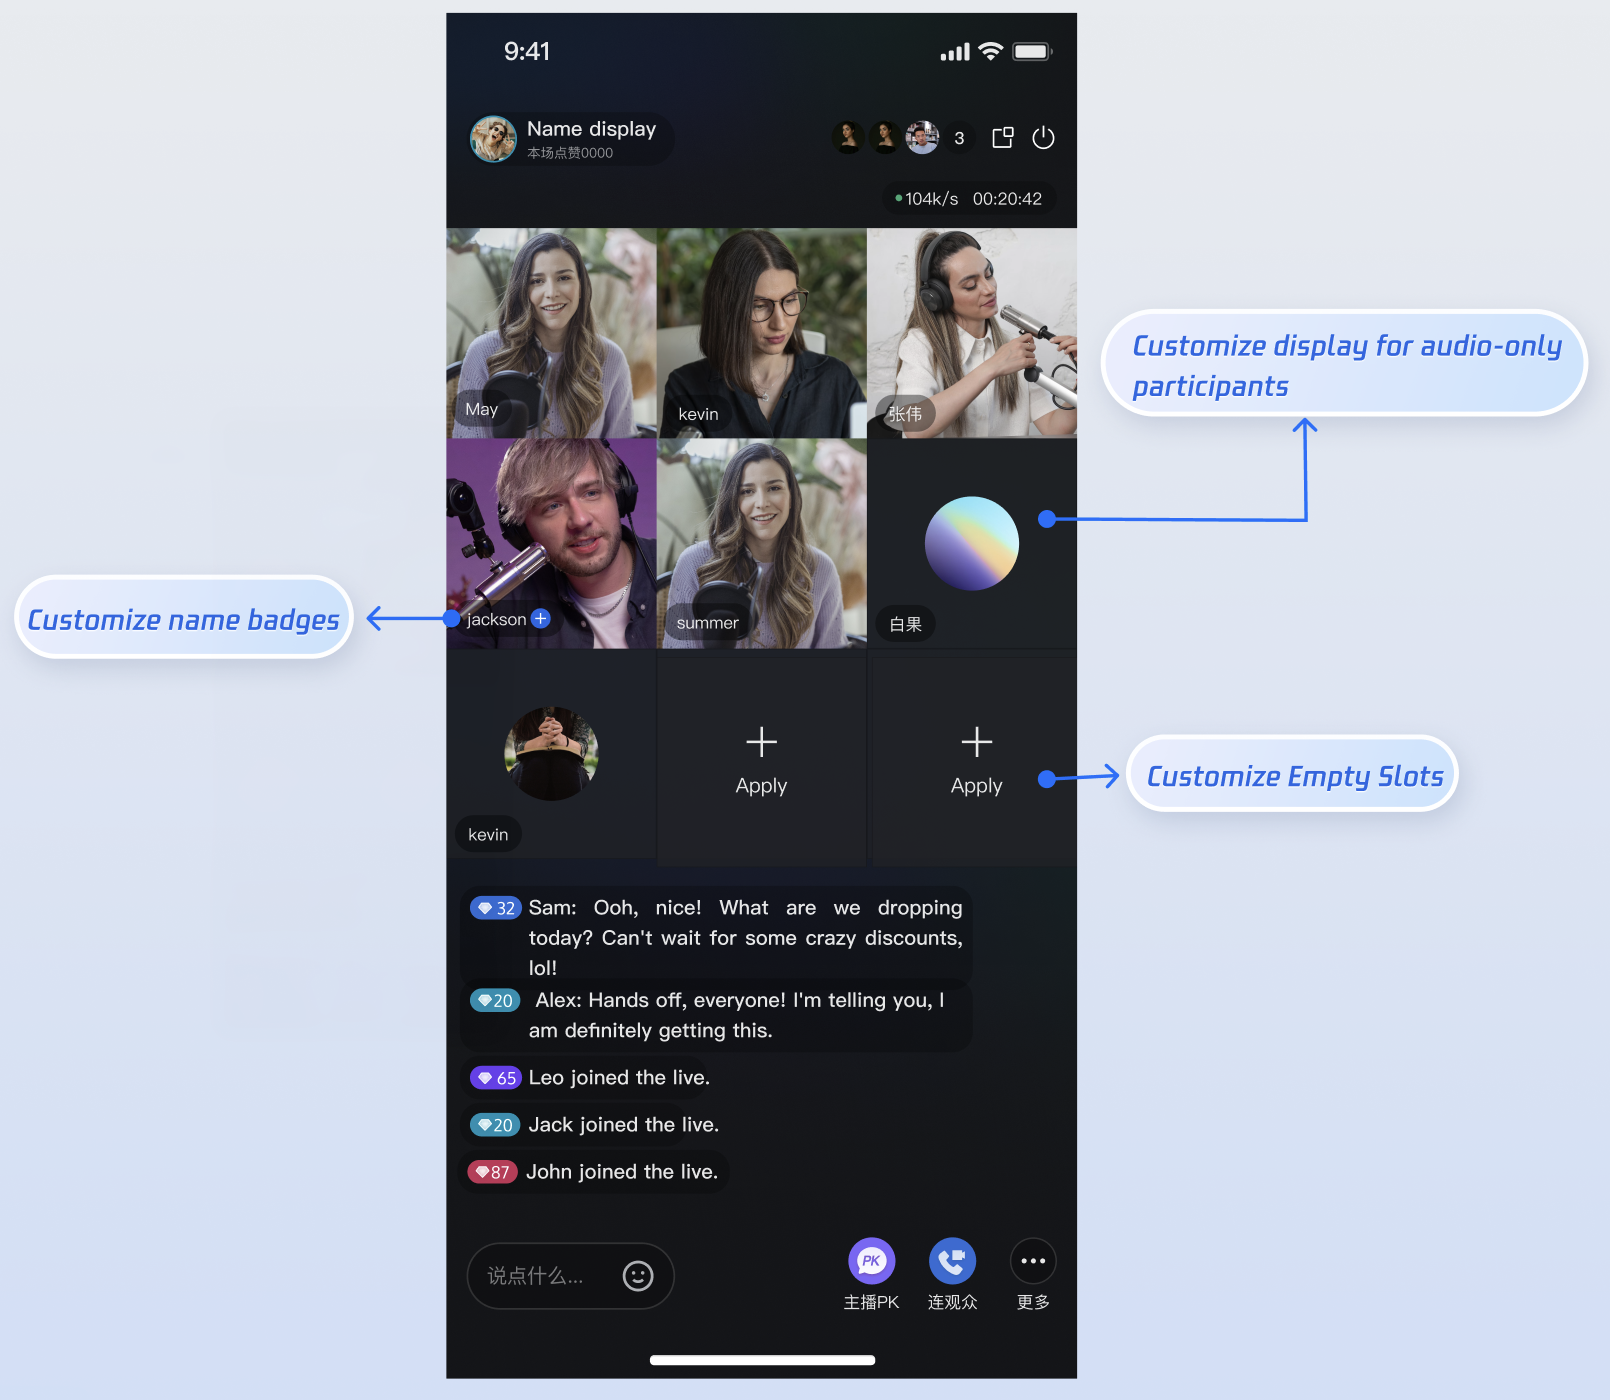
When an audience member connects with the host(co-guest) or hosts connect across rooms(co-host), the live room UI switches from a single-user layout to a multi-user layout. At this point, you need to display user-specific information—such as nickname, level, or mute status—on each connecting video window to distinguish between seats.
Applicable Scenarios
When hosts and audience connect via video, customize the user info displayed on each seat (e.g., nickname, level, mute icon).
When hosts connect across rooms, customize the other host's display style (e.g., nickname, level, mute icon).
Change the default background when there is no video (e.g., show a placeholder avatar).
Customize the view for empty seats.
Implementation Steps
Note:
For complete implementation logic, see the CoGuestWidgets and CoHostWidgets directories in the TUILiveKit open source project.
Step 1. Prepare Custom Widget Views
Define three basic view classes to display user information, empty seat prompts, and backgrounds for when there is no video stream.
Create a custom user info view:
import android.content.Contextimport android.view.Viewimport android.widget.FrameLayoutimport android.widget.ImageViewimport android.widget.TextViewclass CustomInfoView(context: Context, name: String, isMuted: Boolean) : FrameLayout(context) {private val nameTextView = TextView(context)private val muteIcon = ImageView(context)init {nameTextView.text = namemuteIcon.visibility = if (isMuted) View.VISIBLE else View.GONEaddView(nameTextView)addView(muteIcon)// Layout parameter setup code omitted here}}
Create a custom empty seat view:
import android.content.Contextimport android.widget.FrameLayoutimport android.widget.ImageViewimport android.widget.TextViewclass EmptySeatView(context: Context) : FrameLayout(context) {private val addIcon = ImageView(context)private val addLabel = TextView(context)init {addLabel.text = "Invite to co-host"// Image resource loading and layout parameter setup code omitted here}}
Create a custom avatar placeholder view for when there is no video stream:
import android.content.Contextimport android.widget.FrameLayoutimport android.widget.ImageViewclass CustomAvatarView(context: Context, avatarURL: String) : FrameLayout(context) {private val avatarImageView = ImageView(context)init {// In actual projects, use an image loading library like Glide to load avatarURLaddView(avatarImageView)// Layout parameter setup code omitted here}}
Step 2. Implement Adapter Logic
Create an adapter class that implements the
VideoViewAdapter interface methods createCoGuestView (for audience connecting) and createCoHostView (for host connecting), returning your custom views.Implement the
createCoGuestView method in VideoViewAdapter to return the audience connecting video widget.import android.content.Contextimport android.view.Viewimport io.trtc.tuikit.atomicxcore.api.device.DeviceStatusimport io.trtc.tuikit.atomicxcore.api.live.SeatInfoimport io.trtc.tuikit.atomicxcore.api.view.VideoViewAdapterimport io.trtc.tuikit.atomicxcore.api.view.ViewLayerclass VideoWidgetAdapter(private val context: Context) : VideoViewAdapter {override fun createCoGuestView(seatInfo: SeatInfo, viewLayer: ViewLayer): View? {val isUserOnSeat = seatInfo.userInfo.userID.isNotEmpty()return when (viewLayer) {ViewLayer.FOREGROUND -> {if (isUserOnSeat) {// Non-empty seat: return custom foreground viewCustomInfoView(context, seatInfo.userInfo.userName, seatInfo.userInfo.microphoneStatus == DeviceStatus.OFF)} else {// Empty seat: return custom empty seat viewEmptySeatView(context)}}ViewLayer.BACKGROUND -> {if (isUserOnSeat) {// Return custom background view (shown when camera is off)CustomAvatarView(context, seatInfo.userInfo.avatarURL)} else {null}}}}}
Implement the
createCoHostView method in VideoViewAdapter to return the host connecting video widget.import android.content.Contextimport android.view.Viewimport io.trtc.tuikit.atomicxcore.api.device.DeviceStatusimport io.trtc.tuikit.atomicxcore.api.live.SeatInfoimport io.trtc.tuikit.atomicxcore.api.view.VideoViewAdapterimport io.trtc.tuikit.atomicxcore.api.view.ViewLayerclass VideoWidgetAdapter(private val context: Context) : VideoViewAdapter {override fun createCoHostView(seatInfo: SeatInfo, viewLayer: ViewLayer): View? {val isUserOnSeat = seatInfo.userInfo.userID.isNotEmpty()return when (viewLayer) {ViewLayer.FOREGROUND -> {if (isUserOnSeat) {// Return custom foreground view; you can use a different style from audience connectingCustomInfoView(context, seatInfo.userInfo.userName, seatInfo.userInfo.microphoneStatus == DeviceStatus.OFF)} else {// Return custom empty seat view; you can use a different style from audience connectingEmptySeatView(context)}}ViewLayer.BACKGROUND -> {if (isUserOnSeat) {// Return custom background view (shown when camera is off); you can use a different style from audience connectCustomAvatarView(context, seatInfo.userInfo.avatarURL)} else {null}}}}}
Parameter Description
Parameter | Type | Description |
seatInfo | SeatInfo | Seat information object containing detailed info about the user on the seat. |
seatInfo.userInfo.userName | String | Nickname of the user on the seat. |
seatInfo.userInfo.avatarURL | String | Avatar URL of the user on the seat. |
seatInfo.userInfo.microphoneStatus | DeviceStatus | Microphone status of the user on the seat. |
seatInfo.userInfo.cameraStatus | DeviceStatus | Camera status of the user on the seat. |
viewLayer | ViewLayer | View layer enum. .foreground indicates the foreground widget view, always displayed on top of the video..background indicates the background widget view, located beneath the foreground view, only shown when the user has no video stream (e.g., camera is off), typically used to display the user's default avatar or placeholder image. |
Customize Host PK Widgets
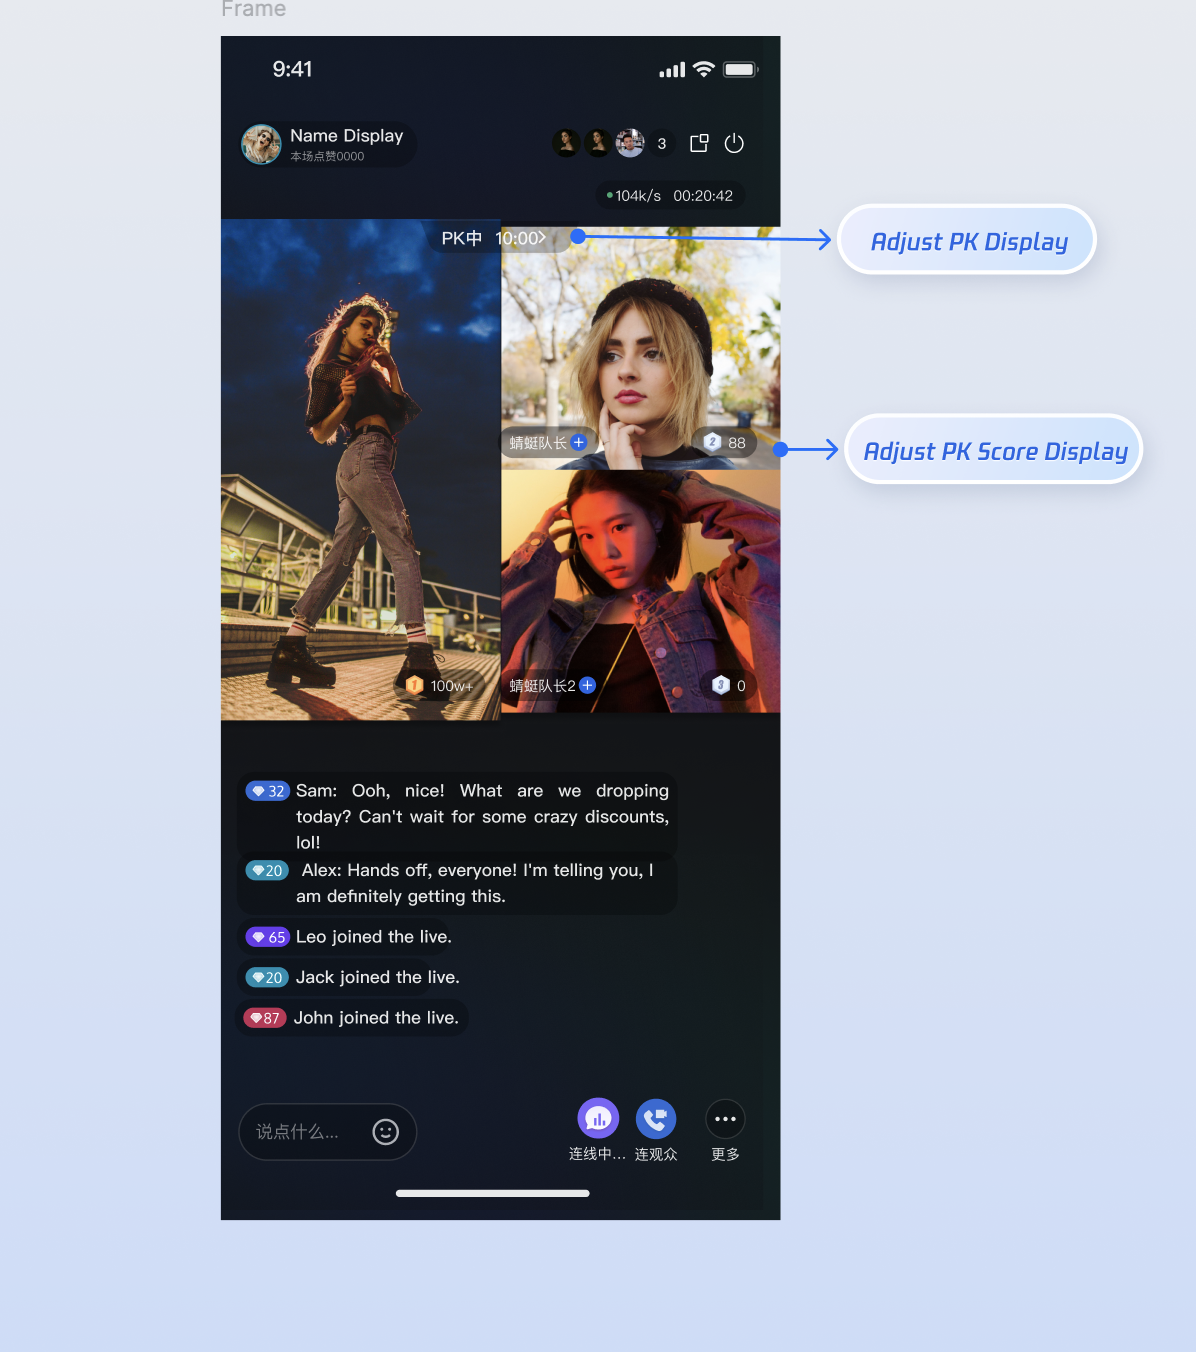
PK is the most interactive segment in live streaming. During PK, the screen is typically split according to the number of participants. You need to add PK-specific UI elements to the top or center of the screen—such as PK score bars, seat score displays, countdown animations, or "VS" effect icons—to create an intense competitive atmosphere.
Note:
PK functionality depends on co-hosting. Only initiate a PK request after hosts are co-hosted.
Implementation Steps
Step 1. Prepare Custom UI Components
The PK scenario usually requires two types of views:
Single User Widget: Displayed on each host's window (e.g., score capsule).
Global Container: Overlays the entire screen (e.g., VS animation, countdown).
Note:
For complete implementation logic, refer to the BattleWidgets directory in the TUILiveKit open source project.
import android.content.Contextimport android.widget.FrameLayoutimport android.widget.ImageView// Example: Single user score barclass MyBattleScoreView(context: Context) : FrameLayout(context) {// Internal score display logic}// Example: Global VS panelclass MyBattleContainer(context: Context) : FrameLayout(context) {private val battleTimeView = ImageView(context)// Internal countdown and VS animation logic}
Step 2. Implement Adapter Logic
In your
VideoWidgetAdapter, implement the remaining PK view methods.class VideoWidgetAdapter(private val context: Context) : VideoViewAdapter {// createCoGuestView / createCoHostView implementation omitted...// 1. Create PK single user info widget (displayed above each host's video)override fun createBattleView(seatInfo: SeatInfo): View? {return MyBattleScoreView(context)}// 2. Create PK global container widget (displayed above the entire video area)override fun createBattleContainerView(): View? {return MyBattleContainer(context)}}
Integration and Activation
This is the most critical step. Inject your
VideoWidgetAdapter with delegate logic into the core live streaming workflow.Host Side Integration: Before initializing the outer container, initialize
LiveCoreView and set the adapter using setVideoViewAdapter.import android.os.Bundleimport androidx.appcompat.app.AppCompatActivityimport android.view.ViewGroupimport com.trtc.uikit.livekit.features.anchorview.AnchorViewimport io.trtc.tuikit.atomicxcore.api.live.LiveInfoimport io.trtc.tuikit.atomicxcore.api.view.LiveCoreViewclass AnchorActivity : AppCompatActivity() {private lateinit var anchorView: AnchorViewprivate lateinit var widgetAdapter: VideoWidgetAdapteroverride fun onCreate(savedInstanceState: Bundle?) {super.onCreate(savedInstanceState)// Initialize adapter objectwidgetAdapter = VideoWidgetAdapter(this)// Assume liveInfo is obtained hereval liveInfo = LiveInfo()// 1. Initialize LiveCoreView with Context onlyval videoView = LiveCoreView(this)// 2. Set the custom adaptervideoView.setVideoViewAdapter(widgetAdapter)// 3. Pass the core video component into the outer containeranchorView = AnchorView(this, liveInfo, videoView)setContentView(anchorView, ViewGroup.LayoutParams(ViewGroup.LayoutParams.MATCH_PARENT,ViewGroup.LayoutParams.MATCH_PARENT))}}
Audience Side Integration: On the audience side, use
AudienceContainerViewDelegate to handle the timing for creating the core view.import android.os.Bundleimport androidx.appcompat.app.AppCompatActivityimport io.trtc.tuikit.atomicxcore.api.live.LiveInfoimport io.trtc.tuikit.atomicxcore.api.view.LiveCoreViewclass AudienceActivity : AppCompatActivity(), AudienceContainerViewDelegate {private lateinit var audienceView: AudienceContainerViewprivate lateinit var widgetAdapter: VideoWidgetAdapteroverride fun onCreate(savedInstanceState: Bundle?) {super.onCreate(savedInstanceState)widgetAdapter = VideoWidgetAdapter(this)val roomId = "your_room_id"audienceView = AudienceContainerView(this, roomId)audienceView.setDelegate(this)setContentView(audienceView)}override fun onCreateCoreView(liveInfo: LiveInfo): LiveCoreView? {val view = LiveCoreView(this)// Inject adapterview.setVideoViewAdapter(widgetAdapter)return view}}
Advanced: Access Real-Time Business Data
When building advanced features like PK, you may find that
SeatInfo only provides basic seat information. To access real-time countdowns, PK scores, and other business data, connect your custom views to the core data in AtomicXCore.Store/Component | Function Description | API Documentation |
CoGuestStore | Audience connecting data: list of co-guested users, invite list, application list, etc. | |
CoHostStore | Host connecting data: list of co-hosted users, invite list, application list, etc. | |
BattleStore | PK data: current PK info, PK user list, PK score list. |
FAQs
Adapter is set, but custom views are not displayed?
Check whether the adapter is set too late. In Android's component initialization sequence, you must assign the adapter for
LiveCoreView before passing it into AnchorView. If AnchorView is already initialized, it will load the SDK's default widget views internally.Solution: Follow the correct initialization order: first create
LiveCoreView, then call setVideoViewAdapter to inject your custom UI, and finally instantiate AnchorView and pass in the configured CoreView.I only want to modify the co-guesting views and keep the default PK views. What should I do?
VideoViewAdapter operates in full takeover mode. Once you set a custom delegate, the SDK's default delegate logic inside AnchorView/AudienceView is completely overridden.Solution: Implement all relevant methods in your delegate class. For parts you don't want to change (such as PK views), you can:
1. Copy source code: Locate the default implementation classes in the LiveKit source code and return instances of these classes in your delegate.
2. Manual implementation: Refer to the default style and quickly write a similar simple view to return.
Custom widgets are displayed, but cannot be clicked?
This is a common Android event dispatch conflict. Because foreground views (
.FOREGROUND) are layered above the video rendering layer:1. Ensure your returned
CustomView has isClickable = true or a registered setOnClickListener.2. If your widget is a nested
ViewGroup (such as FrameLayout), check whether its parent container is incorrectly intercepting touch events (for example, the outer control triggers onInterceptTouchEvent and returns true).

