
视频组件
组件概述
视频直播的核心控件(LiveCoreView)提供了 开播前画面预览、开启视频直播、关闭视频直播,观众观看直播、停止观看直播、主播和观众在直播间内连线,主播跨房和其他主播连线等丰富的 API。您可以使用我们的核心控件半小时内快速搭建视频直播的主流程。然后在其之上添加我们别的直播类组件或者添加您自己的业务 UI 视图。
环境准备
Android 5.0(SDK API Level 21)及以上版本。
Gradle 7.0 及以上的版本。
Android 5.0 及以上的手机设备。
平台 | 版本 |
Flutter | Flutter 3.27.4 及更高版本。 Dart 3.6.2 或更高的版本。 |
Android | Android Studio 3.5及以上版本。 Android 5.0 及以上版本的 Android 设备。 |
iOS | Xcode 15.0及以上版本。 请确保您的项目已设置有效的开发者签名。 |
步骤1:开通服务
步骤2:集成与配置
1. 在 app 目录下找到
build.gradle.kts(或build.gradle)文件,并在其中增加如下代码,加入对 LiveCoreView 组件的依赖:api("io.trtc.uikit:live-stream-core:latest.release")
api 'io.trtc.uikit:live-stream-core:latest.release'
2. 由于我们在 SDK 内部使用了Java 的反射特性,需要将 SDK 中的部分类加入不混淆名单,因此需要您在
proguard-rules.pro文件中添加如下代码:-keep class com.tencent.** { *; }-keep class com.trtc.uikit.livekit.livestreamcore.** { *; }-keep class com.google.gson.** { *;}
3. 在 app 目录下找到
AndroidManifest.xml 文件,在 application 节点中添加 tools:replace="android:allowBackup" 和android:allowBackup="false",覆盖组件内的设置,使用自己的设置。// app/src/main/AndroidManifest.xml<application...// 添加如下配置覆盖 依赖的 sdk 中的配置android:allowBackup="false"tools:replace="android:allowBackup">=
1. 请在您的
Podfile 文件中添加 pod 'LiveStreamCore' 依赖。target 'xxxx' do......pod 'LiveStreamCore'end
如果您没有
Podfile 文件,首先终端cd 到xxxx.xcodeproj目录,然后通过以下命令创建:pod init
2. 在终端中,首先
cd到Podfile目录下,然后执行以下命令,安装组件。pod install
如果无法安装 SeatGridView 最新版本,可以先删除Podfile.lock和Pods。然后执行以下命令更新本地的 CocoaPods 仓库列表。
pod repo update
之后执行以下命令,更新组件库的 Pod 版本。
pod update
flutter pubaddlive_stream_core
步骤3:登录
在您的项目中添加如下代码,它的作用是通过调用 TUICore 中的相关接口完成 TUI 组件的登录。这一步骤至关重要,只有在成功登录之后,您才能正常使用 LiveCoreView 提供的各项功能。
TUIRoomEngine.login(applicationContext,1400000001, // 请替换为步骤一取到的 SDKAppID"denny", // 请替换为您的 UserID"xxxxxxxxxxx", // 您可以在控制台中计算一个 UserSig 并填在这个位置object : TUIRoomDefine.ActionCallback() {override fun onSuccess() {Log.i(TAG, "login success")}override fun onError(errorCode: Int, errorMessage: String) {Log.e(TAG, "login failed, errorCode: $errorCode msg:$errorMessage")}})
TUIRoomEngine.login(context,1400000001, // 请替换为步骤一取到的 SDKAppID"denny", // 请替换为您的 UserID"xxxxxxxxxxx", // 您可以在控制台中计算一个 UserSig 并填在这个位置new TUIRoomDefine.ActionCallback() {@Overridepublic void onSuccess() {Log.i(TAG, "login success");}@Overridepublic void onError(TUICommonDefine.Error error, String message) {Log.e(TAG, "login failed, errorCode: " + errorCode + " msg:" + errorMessage);}});
在您的项目中添加如下代码,它的作用是通过调用 RTCRoomEngine 中的登录相关接口完成 TUI 组件的登录。这一步骤至关重要,只有在成功登录之后,您才能正常使用 SeatGridView 提供的各项功能。
//// AppDelegate.swift//import RTCRoomEnginefunc application(_ application: UIApplication, didFinishLaunchingWithOptions launchOptions: [UIApplication.LaunchOptionsKey: Any]?) -> Bool {TUIRoomEngine.login(sdkAppId: 1400000001, // 请替换为步骤一取到的 SDKAppIDuserId: "denny", // 请替换为您的 UserIDuserSig: "xxxxxxxxxxx") { // 您可以在控制台中计算一个 UserSig 并填在这个位置print("login success")} onError: { code, message inprint("login failed, code: \(code), error: \(message ?? "nil")")}return true}
在您的项目中添加如下代码,它的作用是通过调用
RTCRoomEngine 中的登录相关接口完成 TUI 组件的登录。这一步骤至关重要,只有在成功登录之后,您才能正常使用 LiveStreamCore 提供的各项功能。final result = await TUIRoomEngine.login('Replace with your activated SDKAppID','Replace with your userId','Replace with your userSig');
参数说明
这里详细介绍一下 login 函数中所需要用到的几个关键参数:
参数 | 类型 | 说明 |
SDKAppID | int | |
UserID | String | 当前用户的 ID,字符串类型,只允许包含英文字母(a-z 和 A-Z)、数字(0-9)、连词符和下划线。 |
userSig | String | 使用 步骤1 的第3步中获取的 SecretKey 对 SDKAppID、UserID 等信息进行加密,就可以得到 UserSig,它是一个鉴权用的票据,用于腾讯云识别当前用户是否能够使用 TRTC 的服务。您可以通过控制台中的 辅助工具 生成一个临时可用的 UserSig。更多信息请参见 如何计算及使用 UserSig。 |
说明:
开发环境:如果您正在本地开发调试阶段,可以采用本地
GenerateTestUserSig.genTestSig函数生成 userSig。该方法中 SDKSecretKey 很容易被反编译逆向破解,一旦您的密钥泄露,攻击者就可以盗用您的腾讯云流量。生产环境:如果您的项目要发布上线,请采用 服务端生成 UserSig 的方式。
步骤4:使用核心控件实现直播功能
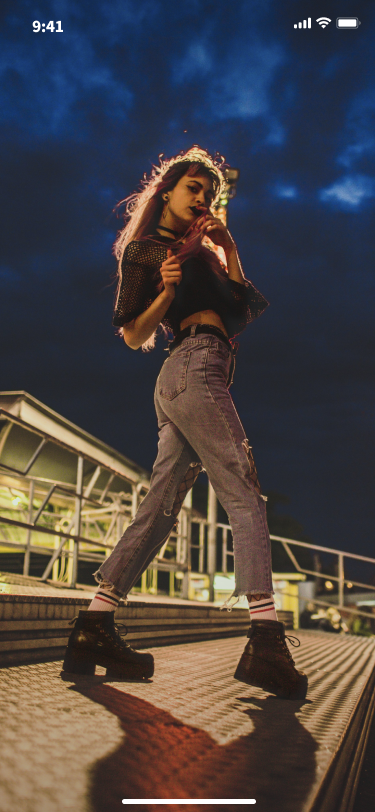
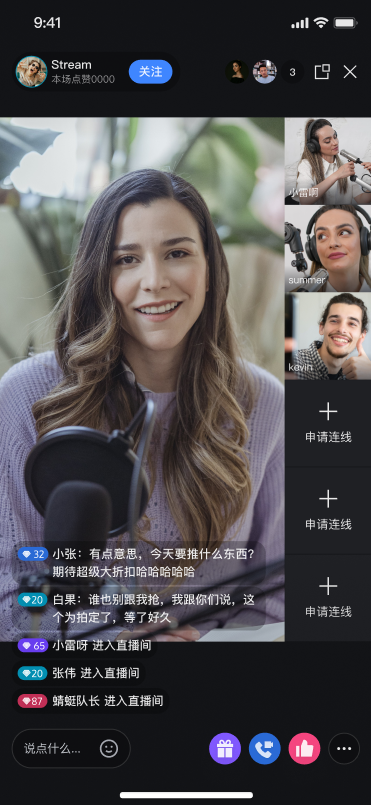
主播开始直播和观众观看直播效果预览:
主播开启直播 | 观众观看直播 |
 |
 |
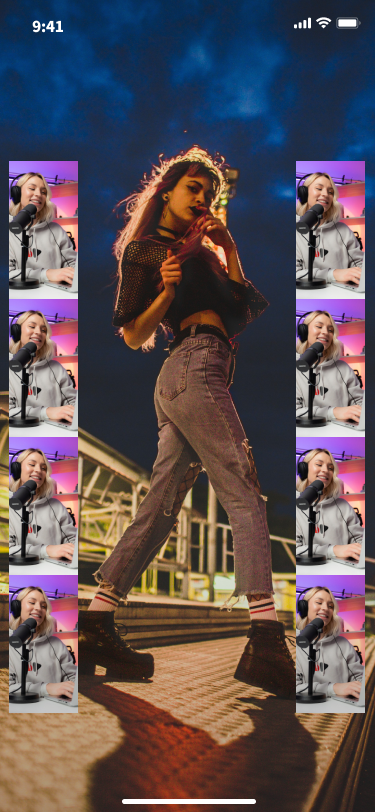
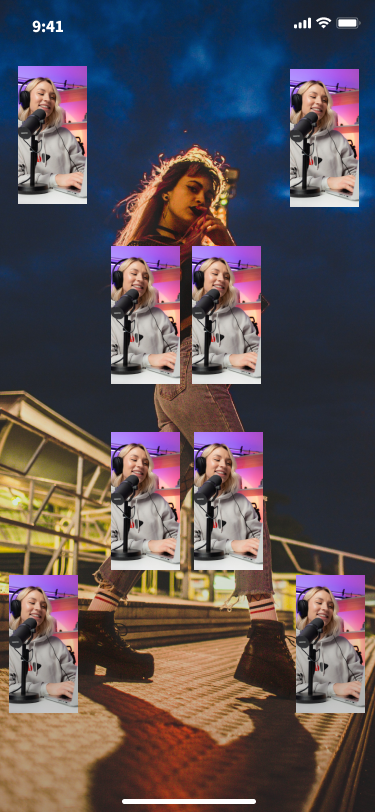
不同布局样式
动态宫格布局 | 浮动小窗布局 | 静态宫格布局 | 固定小窗布局 |
 |  |  |  |
主播预览和开播
创建核心控件:
您可以在您实现推流的 Activity 中通过 java 代码或者 xml 方式加载我们的核心控件,其中代码方式示例如下(XML 方式也类似):
val livecoreView = LiveCoreView(this)
LiveCoreView liveCoreView = new LiveCoreView(this);
import LiveStreamCorelet liveCoreView = LiveCoreView()
您需要先创建一个控制器
LiveCoreController ,然后再将其赋值给视频直播核心部件 LiveCoreWidget 。LiveCoreController 负责提供API, LiveCoreWidget 用于展示麦位UI。您可将 LiveCoreWidget 添加在您需要展示麦位 UI 的任何地方。import 'package:live_stream_core/live_core_widget/live_core_widget.dart';final controller =LiveCoreController();LiveCoreWidget(controller: controller);
开启直播预览:本地摄像头预览,并未真正开启直播间。
livecoreView.startCamera(true, null)
liveCoreView.startCamera(true, null);
import LiveStreamCoreliveCoreView.startCamera(useFrontCamera: true) {} onError: { code, message in}
import 'package:live_stream_core/live_core_widget/live_core_widget.dart';import 'package:rtc_room_engine/rtc_room_engine.dart';final startCameraResult = await controller.startCamera(true);
主播开启直播间:开启一个直播间,并将本地摄像头采集的数据和麦克风采集的数据推流到直播间。
val liveInfo = TUILiveListManager.LiveInfo()liveInfo.roomId = "123456"/**选择布局:如果要选择其他布局开播,设置 liveInfo.seatLayoutTemplateId = 600600: 动态宫格布局(默认)601: 浮动小窗布局800: 固定宫格布局801: 固定小窗布局*/liveInfo.seatLayoutTemplateId = 600livecoreView.startLiveStream(liveInfo, null)livecoreView.startMicrophone(null)
TUILiveListManager.LiveInfo liveInfo = new TUILiveListManager.LiveInfo();liveInfo.roomId = "roomId_123456";/**选择布局:如果要选择其他布局开播,设置 liveInfo.seatLayoutTemplateId = 600600: 动态宫格布局(默认)601: 浮动小窗布局800: 固定宫格布局801: 固定小窗布局*/liveInfo.seatLayoutTemplateId = 600livecoreView.startLiveStream(liveInfo, null);livecoreView.startMicrophone(null);
import LiveStreamCoreimport RTCRoomEnginelet liveInfo = TUILiveInfo()liveInfo.roomId = "123456"liveInfo.seatMode = .applyToTake/**选择布局:如果要选择其他布局开播,设置 liveInfo.seatLayoutTemplateId = 600600: 动态宫格布局(默认)601: 浮动小窗布局800: 固定宫格布局801: 固定小窗布局*/liveInfo.seatLayoutTemplateId = 600liveCoreView.startLiveStream(liveInfo: liveInfo) { roomInfo in} onError: { code, message in}liveCoreView.startMicrophone {} onError: { code, message in}
import 'package:live_stream_core/live_core_widget/live_core_widget.dart';import 'package:rtc_room_engine/rtc_room_engine.dart';final roomInfo = TUIRoomInfo(roomId: '123456');roomInfo.name = 'replace with your roomName'roomInfo.isSeatEnabled = true;roomInfo.roomType = TUIRoomType.livingRoom;roomInfo.seatMode = TUISeatMode.applyToTake;final startLiveStreamResult = await controller.startLiveStream(roomInfo);final startMicrophoneResult = await controller.startMicrophone();
观众观看
创建核心控件:
您可以在您实现推流的 Activity 中通过 java 代码或者 xml 方式加载我们的核心控件,其中代码方式示例如下(XML 方式也类似):
val livecoreView = LiveCoreView(this)
LiveCoreView liveCoreView = new LiveCoreView(this);
import LiveStreamCorelet liveCoreView = LiveCoreView()
import 'package:live_stream_core/live_core_widget/live_core_widget.dart';final controller =LiveCoreController();LiveCoreWidget(controller: controller);
观众加入直播间:观众进入直播间,并拉取直播间主播的视频流和音频流。
livecoreView.joinLiveStream("roomId_123456", null)
livecoreView.joinLiveStream("roomId_123456", null);
import LiveStreamCoreliveCoreView.joinLiveStream(roomId: "roomId_123456") { roomInfo in} onError: { code, message in}
import 'package:live_stream_core/live_core_widget/live_core_widget.dart';var result = await controller.joinLiveStream('replace with your roomId');
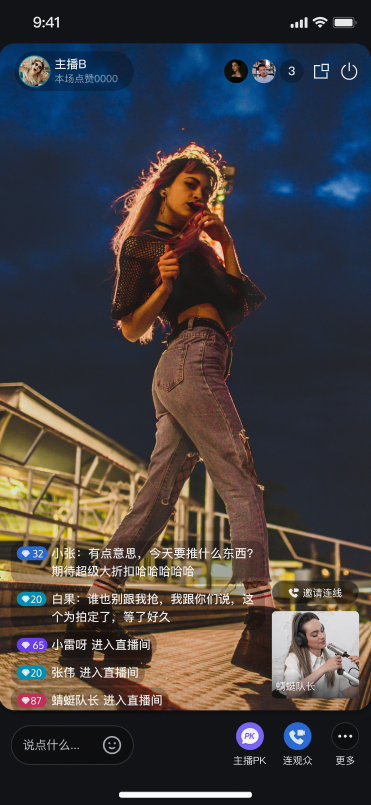
观众连麦
观众连麦效果预览:
单人连麦 | 多人连麦 |
 |  |
您可以调用如下 API 函数,实现观众连麦功能。以观众 B 申请和主播 A 连麦为例实现如下。
说明:
以下是由 LiveCoreView 提供的主动调用方法。
所有的回调方法是指 LiveCoreView 设置的 ConnectionObserver 对象中的回调方法。
观众发送连麦请求
观众 B 给主播 A 发送连麦请求。
val userId = "anchorUserId"; // 修改为房主的UserId,传入空字符串时默认为房主UserIdval timeout = 60;liveCoreView.requestIntraRoomConnection(userId, 10, null)
String userId = "anchorUserId"; // 修改为房主的UserId,传入空字符串时默认为房主UserIdint timeout = 60;liveCoreView.requestIntraRoomConnection(userId, timeout, true, null);
let timeout = 60let userId = "anchorUserId" // 修改为房主的UserId,传入空字符串时默认为房主UserIdliveCoreView.requestIntraRoomConnection(userId: userId, timeOut: timeOut, openCamera: true) {} onError: { code, message in}
NSInteger timeout = 60;NSString userId = "anchorUserId" // 修改为房主的UserId,传入空字符串时默认为房主UserId[liveCoreView requestIntraRoomConnection:""timeOut:timeoutonSuccess:^(void) {} onError:^(NSInteger code, NSString * _Nonnull message) {}];
import 'package:live_stream_core/live_core_widget/live_core_widget.dart';final timeout = 60;final userId = 'anchorUserId'; // 修改为房主的UserId,传入空字符串时默认为房主UserIdfinal openCamera = true;final result = await controller.requestIntraRoomConnection(userId,timeout,openCamera);
主播端收到连麦请求
主播 A 会在 onUserConnectionRequest 回调方法中收到观众 B 的连麦请求。
override fun onUserConnectionRequest(inviterUser: UserInfo) {Log.i(TAG, "收到观众连线请求:${inviterUser.userId}")}
@Overridepublic void onUserConnectionRequest(LiveStreamDefine.LiveUser inviterUser) {Log.i(TAG, "收到观众连线请求:" + inviterUser.userId);}
func onUserConnectionRequest(inviterUser: TUIUserInfo) {print("收到观众连线请求:\(inviterUser.userId)")}
- (void)onUserConnectionRequest:(TUIUserInfo *)inviterUser {NSLog(@"收到观众连线请求:%@", hostUser.userId);}
import 'package:live_stream_core/live_core_widget/live_core_widget.dart';import 'package:rtc_room_engine/rtc_room_engine.dart';// 创建监听Observer实例final controller =LiveCoreController();final exampleObserver = ExampleObserver();// 添加观察者controller.addObserver(exampleObserver);class ExampleObserver extends ConnectionObserver {ExampleObserver() {super.onUserConnectionRequest = (inviterUser) {debugPrint('收到观众连线请求:${inviterUser.userId}') ;};}}
主播响应连麦请求
主播 A 收到观众的连麦请求后,可以调用 respondIntraRoomConnection 响应观众 B 是否同意连麦。
// 主播同意连麦liveCoreView.respondIntraRoomConnection(audienceBUserId, true, null)
// 主播同意连麦liveCoreView.respondIntraRoomConnection(userId, true, null);// 主播拒绝连麦liveCoreView.respondIntraRoomConnection(userId, false, null);
// 主播同意连麦liveCoreView.respondIntraRoomConnection(userId: audienceBUserId, isAccepted: true) {} onError: { code, message in}
// 主播同意连麦[liveCoreView respondIntraRoomConnection:audienceBUserIdisAccepted:YESonSuccess:^(void) {} onError:^(NSInteger code, NSString * _Nonnull message) {}];
import 'package:live_stream_core/live_core_widget/live_core_widget.dart';// 主播同意连麦final result = await controller.respondIntraRoomConnection('audienceBUserId',true);
观众收到主播响应回调
主播 A 同意观众 B 连麦请求后, 观众 B 会通过 onUserConnectionAccepted 回调收到主播 A 同意连麦的回调。
override fun onUserConnectionAccepted(inviterUser: UserInfo) {Log.i(TAG, "观众同意连线:${inviterUser.userId}")}
@Overridepublic void onUserConnectionAccepted(LiveStreamDefine.LiveUser liveUser) {Log.i(TAG, "观众同意连线:" + liveUser.userId);}@Overridepublic void onUserConnectionRejected(LiveStreamDefine.LiveUser liveUser) {Log.i(TAG, "观众拒绝连线:" + liveUser.userId);}
func onUserConnectionAccepted(userId: String) {print("观众同意连线:\(userId)")}
- (void)onUserConnectionAccepted:(NSString *)userId {NSLog(@"观众同意连线:%@", userId);}
import 'package:live_stream_core/live_core_widget/live_core_widget.dart';import 'package:rtc_room_engine/rtc_room_engine.dart';// 创建监听Observer实例final controller = LiveCoreController();final exampleObserver = ExampleObserver();// 添加观察者controller.addObserver(exampleObserver);class ExampleObserver extends ConnectionObserver {ExampleObserver() {super.onUserConnectionAccepted = (user) {debugPrint('主播同意连线:${user.userId}') ;};}}
连麦用户列表发生变化的回调
主播 A 同意观众 B 连麦请求后, LiveCoreView 会同时给主播 A 和观众 B 发送连麦用户发生变化。
override fun onConnectedUsersUpdated(inviterUser: UserInfo) {Log.i(TAG, "连麦用户列表发生变化")}
@Overridepublic void onConnectedUsersUpdated(List<UserInfo> userList, List<UserInfo> joinList, List<UserInfo> leaveList) {Log.i(TAG, "连麦用户列表发生变化");}
func onConnectedUsersUpdated(userList: [TUIUserInfo], joinList: [TUIUserInfo], leaveList: [TUIUserInfo]) {print("连麦用户列表发生变化")}
- (void)onConnectedUsersUpdated:(NSArray<TUIUserInfo *> *)userListjoinList:(NSArray<TUIUserInfo *> *)joinListleaveList:(NSArray<TUIUserInfo *> *)leaveList {NSLog(@"连麦用户列表发生变化"); // 如果需要,您可以在这里处理 userList、joinList 和 leaveList}
import 'package:live_stream_core/live_core_widget/live_core_widget.dart';import 'package:rtc_room_engine/rtc_room_engine.dart';// 创建监听Observer实例final controller = LiveCoreController();final exampleObserver = ExampleObserver();// 添加观察者controller.addObserver(exampleObserver);class ExampleObserver extends ConnectionObserver {ExampleObserver() {super.OnConnectedUsersUpdated = (userList, joinList, leaveList) {debugPrint('连麦用户列表发生变化') ;};}}
当连麦过程中,需要断开连麦,可调用如下 API。
观众连麦成功后,主播挂断观众的连麦
观众 B 和主播 A 连麦成功后,主播 A 断开和观众 B 的连麦。
val userId = "audienceBUserId"liveCoreView.disconnectUser(userId, null)
String userId = "audienceUserId";liveCoreView.disconnectUser(userId, null);
let userId = "audienceBUserId"liveCoreView.disconnectUser(userId: userId) {} onError: { code, message in}
NSString *userId = @"audienceBUserId";[liveCoreView disconnectUser:userIdonSuccess:^{} onError:^(NSInteger code, NSString * _Nonnull message) {}];
import 'package:live_stream_core/live_core_widget/live_core_widget.dart';import 'package:rtc_room_engine/rtc_room_engine.dart';final userId = 'audienceBUserId';final result = await controller.disconnectUser(userId);
观众收到主播断开连麦的回调
主播 A 断开和观众 B 的连麦请求后,观众 B 会收到 onUserConnectionTerminated 回调。
override fun onUserConnectionTerminated(inviterUser: UserInfo) {Log.i(TAG, "主播关闭连线")}
@Overridepublic void onUserConnectionTerminated() {Log.i(TAG, "主播关闭连线");}
func onUserConnectionTerminated() {print("主播关闭连线")}
- (void)onUserConnectionTerminated {NSLog(@"主播关闭连线");}
import 'package:live_stream_core/live_core_widget/live_core_widget.dart';import 'package:rtc_room_engine/rtc_room_engine.dart';// 创建监听Observer实例final controller = LiveCoreController();final exampleObserver = ExampleObserver();// 添加观察者controller.addObserver(exampleObserver);class ExampleObserver extends ConnectionObserver {ExampleObserver() {super.onUserConnectionTerminated = (user) {debugPrint('主播关闭连线') ;};}}
观众连麦成功后,观众结束连麦
观众 B 和主播 A 连麦成功后,观众 B 主动断开连麦可以调用 terminateIntraRoomConnection。
liveCoreView.terminateIntraRoomConnection()
liveCoreView.terminateIntraRoomConnection();
liveCoreView.terminateIntraRoomConnection()
[liveCoreView terminateIntraRoomConnection]
import 'package:live_stream_core/live_core_widget/live_core_widget.dart';final result = await controller.terminateIntraRoomConnection();
主播收到观众断开连麦的回调
当观众 B 主动断开连麦时,主播会收到 onUserConnectionExited 回调。
override fun onUserConnectionExited(inviterUser: LiveStreamDefine.LiveUser) {Log.i(TAG, "观众退出连线")}
@Overridepublic void onUserConnectionExited(UserInfo liveUser) {Log.i(TAG, "观众退出连线:${liveUser.userId}");}
func onUserConnectionExited(userInfo: TUIUserInfo) {print("观众退出连线")}
- (void)onUserConnectionExited:(TUIUserInfo *)userInfo {NSLog(@"观众退出连线");}
import 'package:live_stream_core/live_core_widget/live_core_widget.dart';import 'package:rtc_room_engine/rtc_room_engine.dart';// 创建监听Observer实例final controller = LiveCoreController();final exampleObserver = ExampleObserver();// 添加观察者controller.addObserver(exampleObserver);class ExampleObserver extends ConnectionObserver {ExampleObserver() {super.onUserConnectionExited = (user) {debugPrint('观众退出连线') ;};}}
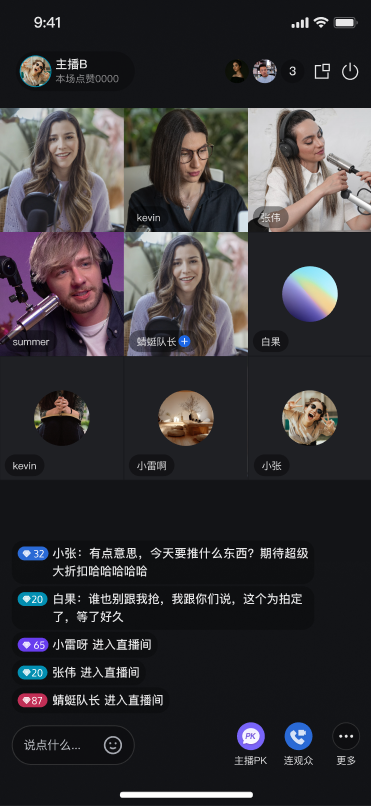
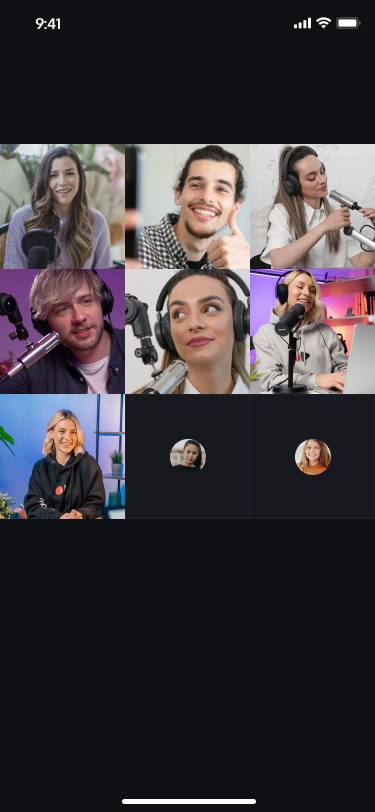
主播连线
主播连线效果预览:
双主播连线 | 多主播连线 |
 |  |
您可以按如下 API 来完成主播连线功能。这里以主播 A 与主播 B 连线为例实现如下。
说明:
以下是由 LiveCoreView 提供的主动调用方法。
所有的回调方法是指 LiveCoreView 设置的 ConnectionObserver 对象中的回调方法。
主播 A 发起连线
主播 A 通过调用
requestCrossRoomConnection 发起连线,在参数 roomId 中传入需要连线的主播 B 房间 id。val roomId = "anchorBRoomId"mLiveViewList.requestCrossRoomConnection(roomId, 10, null)
String roomId = "anchorBRoomId";mLiveViewList.requestCrossRoomConnection(roomId, 10, null);
let roomId = "anchorRoomId"liveCoreView.requestCrossRoomConnection(roomId: roomId, timeOut: 60) {} onError: { code, message in}
NSString *roomId = @"anchorRoomId";[liveCoreView requestCrossRoomConnection:roomIdtimeOut:60onSuccess:^(void) {} onError:^(NSInteger code, NSString * _Nonnull message) {}];
import 'package:live_stream_core/live_core_widget/live_core_widget.dart';final roomId = 'anchorBRoomId';final result = await controller.requestCrossRoomConnection(roomId);
主播 A 可通过
onCrossRoomConnectionAccepted 接收请求同意回调。主播 B 收到连线请求
主播 B 通过
onCrossRoomConnectionRequest 接收连线请求回调。override fun onCrossRoomConnectionRequest(inviterUser: UserInfo) {Log.i(TAG, "收到主播A连线房间请求:${inviterUser.userId}")}
@Overridepublic void onCrossRoomConnectionRequest(LiveStreamDefine.RoomInfo roomInfo) {Log.i(TAG, "收到主播A连线房间请求:" + roomInfo.roomId);}
func onCrossRoomConnectionRequest(hostUser: TUIConnectionUser) {print("收到主播A连线房间请求:\(hostUser.userId)")}
- (void)onCrossRoomConnectionRequest:(TUIConnectionUser *)hostUser {NSLog(@"收到主播A连线房间请求:%@", hostUser.userId);}
import 'package:live_stream_core/live_core_widget/live_core_widget.dart';import 'package:rtc_room_engine/rtc_room_engine.dart';// 创建监听Observer实例final controller = LiveCoreController();final exampleObserver = ExampleObserver();// 添加观察者controller.addObserver(exampleObserver);class ExampleObserver extends ConnectionObserver {ExampleObserver() {super.onCrossRoomConnectionRequest = (user) {debugPrint('收到主播A连线房间请求:${user.userId}') ;};}}
主播 B 通过调用
respondToCrossRoomConnection 响应连线请求。liveCoreView.respondToCrossRoomConnection(roomId, true, null)
// 同意连线请求liveCoreView.respondToCrossRoomConnection(roomId, true, null);
liveCoreView.respondToCrossRoomConnection(roomId: roomId, isAccepted: true) {} onError: { code, message in}
[liveCoreView respondToCrossRoomConnection:roomIdisAccepted:trueonSuccess:^(void) {} onError:^(NSInteger code, NSString * _Nonnull message) {}];
import 'package:live_stream_core/live_core_widget/live_core_widget.dart';final roomId = 'anchorBRoomId';final isAccpeted = true;final result = await controller.respondToCrossRoomConnection(roomId, isAccpeted);
主播 A, B以及房间内观众收到
onConnectedRoomsUpdated 回调,收到接收连线列表发生变化通知。 override fun onConnectedRoomsUpdated(inviterUser: UserInfo) {Log.i(TAG, "主播连线房间列表更新")}
@Overridepublic void onConnectedRoomsUpdated(List<LiveStreamDefine.RoomInfo> roomList) {Log.i(TAG, "主播连线房间列表更新");}
func onConnectedRoomsUpdated(hostUserList: [TUIConnectionUser]) {print("主播连线房间列表更新")}
- (void)onConnectedRoomsUpdated:(NSArray<TUIConnectionUser *> *)hostUserList {NSLog(@"主播连线房间列表更新");}
import 'package:live_stream_core/live_core_widget/live_core_widget.dart';import 'package:rtc_room_engine/rtc_room_engine.dart';// 创建监听Observer实例final controller = LiveCoreController();final exampleObserver = ExampleObserver();// 添加观察者controller.addObserver(exampleObserver);class ExampleObserver extends ConnectionObserver {ExampleObserver() {super.onConnectedRoomsUpdated= (user) {debugPrint('主播连线房间列表更新') ;};}}
退出连线流程
主播 B 调用
terminateIntraRoomConnection 退出连线。public void disconnect(TUIRoomDefine.ActionCallback callback) {mTUILiveConnectionManager.disconnect(callback);}
liveCoreView.terminateIntraRoomConnection()
liveCoreView.terminateCrossRoomConnection()
[liveCoreView terminateCrossRoomConnection];
import 'package:live_stream_core/live_core_widget/live_core_widget.dart';final result = await controller.terminateIntraRoomConnection();
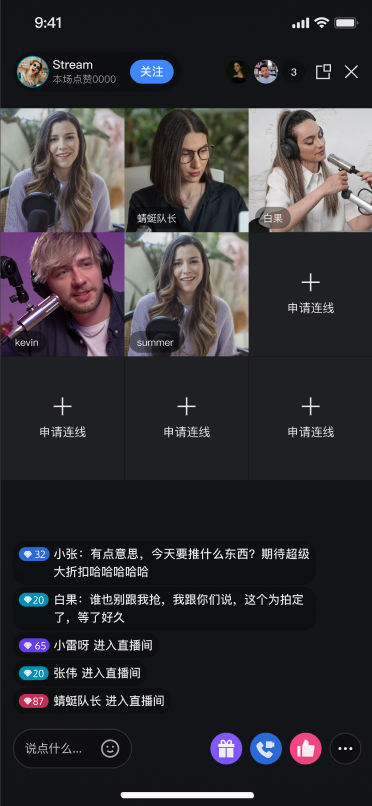
设置连线布局
自定义布局连线效果预览
主播连线中-九宫格布局 | 主播连线中-浮窗布局 | 主播连线中-自定义布局 |
 |  |
 |
您可以通过以下方式快速设置您与连线主播或您与连麦观众的布局。
// 设置宫格布局mLiveStreamListView.setLayoutMode(LiveCoreViewDefine.LayoutMode.GRID_LAYOUT, "")// 设置浮窗布局mLiveStreamListView.setLayoutMode(LiveCoreViewDefine.LayoutMode.FLOAT_LAYOUT, "")// 设置自定义布局var layoutJson = ""mLiveStreamListView.setLayoutMode(LiveCoreViewDefine.LayoutMode.FREE_LAYOUT, layoutJson)
// 设置宫格布局mLiveStreamListView.setLayoutMode(LiveCoreViewDefine.LayoutMode.GRID_LAYOUT, "");// 设置浮窗布局mLiveStreamListView.setLayoutMode(LiveCoreViewDefine.LayoutMode.FLOAT_LAYOUT, "");// 设置自定义布局String layoutJson = "";mLiveStreamListView.setLayoutMode(LiveCoreViewDefine.LayoutMode.FREE_LAYOUT, layoutJson);
import LiveStreamCore// 设置宫格布局liveCoreView.setLayoutMode(layoutMode: .gridLayout)// 设置浮窗布局liveCoreView.setLayoutMode(layoutMode: .floatLayout)// 设置自定义布局let layoutJson = ""liveCoreView.setLayoutMode(layoutMode: .freeLayout, layoutJson: layoutJson)
import 'package:live_stream_core/live_core_widget/live_core_widget.dart';// 设置宫格布局controller.setLayoutMode(LayoutMode.gridLayout);// 设置浮窗布局controller.setLayoutMode(LayoutMode.floatLayout);// 设置自定义布局final layoutJson = '';controller.setLayoutMode(LayoutMode.freeLayout, layoutJson);
说明:
自定义布局 JSON
自定义布局的 JSON 结构说明如下:
{"1": { // 视频视图的数量"backgroundColor": "#000000", // 画布的背景颜色,采用 RGB 十六进制格式"viewInfoList": [{ // 每个视频视图的布局信息和背景颜色"x": 0, // 水平偏移与屏幕宽度的比例,取值范围 [0, 1]"y": 0, // 垂直偏移与屏幕宽度的比例,取值范围 [0, 1]"width": 1, // 视频视图的宽度与屏幕宽度的比例,取值范围 [0, 1]"height": -1, // 视频视图的高度与屏幕宽度的比例,取值范围 [0, 1] 或 -1;-1 表示视图高度与屏幕高度相同"zOrder": 0, // 视频视图的层级顺序,数值越大,视图越靠上"backgroundColor": "#000000" // 当前视频视图的背景颜色,采用 RGB 十六进制格式}]}}
主播 PK
LiveCoreView 提供了主播 PK 相关的 API , 由于每种 PK 玩法的 UI 都不一样,所以LiveCoreView 只提供 API ,您需要自己完成 UI 效果的实现。
主播 PK 效果预览:
双主播PK | 多主播PK |
 |  |
说明:
PK 功能依赖于连线功能,所以您需要在主播连线的情况下才能发起 PK请求。
以下主动调用 API 是由
LiveCoreView 提供。所有的回调方法是指
LiveCoreView 设置的 BattleObserver 对象中的回调方法。您可以按如下 API 来完成主播PK功能。这里以主播 A 与主播 B PK为例实现如下。
主播 A 发起 PK
主播 A 通过调用
requestBattle 发起PK。val BATTLE_DURATION = 30val battleConfig = BattleConfig()battleConfig.duration = BATTLE_DURATIONbattleConfig.needResponse = truebattleConfig.extensionInfo = ""val list: MutableList<String> = ArrayList()list.add("anchorBUserId")val BATTLE_REQUEST_TIMEOUT = 10liveCoreView.requestBattle(battleConfig, list, BATTLE_REQUEST_TIMEOUT,object : LiveCoreViewDefine.BattleRequestCallback {override fun onSuccess(battleId: String, requestedUserIdList: List<String>) {}override fun onError(error: TUICommonDefine.Error, message: String) {}})
final int BATTLE_DURATION = 30;TUILiveBattleManager.BattleConfig battleConfig = new TUILiveBattleManager.BattleConfig();battleConfig.duration = BATTLE_DURATION;battleConfig.needResponse = true;battleConfig.extensionInfo = "";List<String> list = new ArrayList<>();list.add("anchorBUserId");final int BATTLE_REQUEST_TIMEOUT = 10;liveCoreView.requestBattle(battleConfig, list, BATTLE_REQUEST_TIMEOUT,new LiveCoreViewDefine.BattleRequestCallback() {@Overridepublic void onSuccess(String battleId, List<String> requestedUserIdList) {}@Overridepublic void onError(TUICommonDefine.Error error, String message) {}});
let roomId = "anchorRoomId"let config = TUIBattleConfig()config.duration = battleDurationconfig.needResponse = trueconfig.extensionInfo = ""let userIdList: [String] = []let timeout: TimeInterval = 10liveCoreView.requestBattle(config: config, userIdList: userIdList, timeout: timeout) {[weak self] (battleId, battleUserList) in} onError: { _, _ in}
import 'package:live_stream_core/live_core_widget/live_core_widget.dart';import 'package:rtc_room_engine/rtc_room_engine.dart';final roomId = 'anchorRoomId';final config = TUIBattleConfig();config.duration = 30;final result = await controller.requestBattle(config, [roomId], 10);
主播 A 可通过
onBattleRequestAccept 接收 PK 同意回调。主播 B 收到 PK 请求
主播 B 通过
onBattleRequestReceived 接收 PK 请求回调。override fun onBattleRequestReceived(battleId: String, inviterUser: BattleUser, invitee: BattleUser) {Log.i(TAG, "收到主播 A 的 PK 请求::$battleId")}
@Overridepublic void onBattleRequestReceived(String battleId, BattleUser inviter, BattleUser invitee) {Log.i(TAG, "收到主播 A 的 PK 请求:" + battleId);}
extension ViewContrller: BattleObserver { //替换为您真实的类名func onBattleRequestReceived(battleId: String, inviter: TUIBattleUser, invitee: TUIBattleUser) {}}
import 'package:live_stream_core/live_core_widget/live_core_widget.dart';import 'package:rtc_room_engine/rtc_room_engine.dart';// 创建监听Observer实例final controller = LiveCoreController();final exampleObserver = ExampleObserver();// 添加观察者controller.addObserver(exampleObserver);class ExampleObserver extends BattleObserver {ExampleObserver() {super.onBattleRequestReceived= (battleId, inviter, invitee) {debugPrint('收到主播 A 的 PK 请求') ;};}}
主播 B 通过调用
respondToBattle 响应 PK 请求。// 同意 PK 请求val battleId = "battleId"liveCoreView.respondToBattle(battleId, true, null)
// 同意 PK 请求String battleId = "battleId";liveCoreView.respondToBattle(battleId, true, null);
liveCoreView.respondToBattle(battleId: manager.battleState.battleId, isAccepted: false, onSuccess: { [weak self] in}, onError: { _, _ in})
import 'package:live_stream_core/live_core_widget/live_core_widget.dart';import 'package:rtc_room_engine/rtc_room_engine.dart';// 同意 PK 请求final battleId = '';final result = await controller.respondToBattle(battleId, true);
主播 A、B 以及房间内观众收到
onBattleStarted,收到 PK 开始通知。 override fun onBattleStarted(battleInfo: BattleInfo) {Log.i(TAG, "PK 开始回调")}
@Overridepublic void onBattleStarted(BattleInfo battleInfo) {Log.i(TAG, "主播连线房间列表更新");}
extension ViewContrller: BattleObserver { //替换为您真实的类名func onBattleStarted(battleInfo: TUIBattleInfo)) {}}
import 'package:live_stream_core/live_core_widget/live_core_widget.dart';import 'package:rtc_room_engine/rtc_room_engine.dart';// 创建监听Observer实例final controller = LiveCoreController();final exampleObserver = ExampleObserver();// 添加观察者controller.addObserver(exampleObserver);class ExampleObserver extends BattleObserver {ExampleObserver() {super.onBattleStarted = (battleInfo) {debugPrint('PK 开始回调') ;};}}
退出 PK 流程
自然结束:当 PK 时间截止时,会收到
onBattleEnded 回调。主动停止:主播 B 调用
terminateBattle 自己会退出 PK, 主播 A 会收到 onUserExitBattle。mLiveCoreView.terminateBattle(battleId, null)
mLiveCoreView.terminateBattle(battleId, null);
liveCoreView.terminateBattle(battleId: manager.battleState.battleId) {} onError: { _, _ in}
import 'package:live_stream_core/live_core_widget/live_core_widget.dart';import 'package:rtc_room_engine/rtc_room_engine.dart';final battleId = '';final result = await controller.terminateBattle(battleId);

