This document describes how to quickly integrate the Chat SDK into your Android project.
Environment Requirements
JDK 1.6.
Android 4.1 (SDK API level 16) or above
Integrating SDK (AAR)
You can use Gradle to automatically load the AAR file or manually download the AAR file and import it into your project.
Method 1: Automatic Loading (AAR)
You can configure Gradle to automatically download the latest Chat SDK that has been released in the Maven Central library.
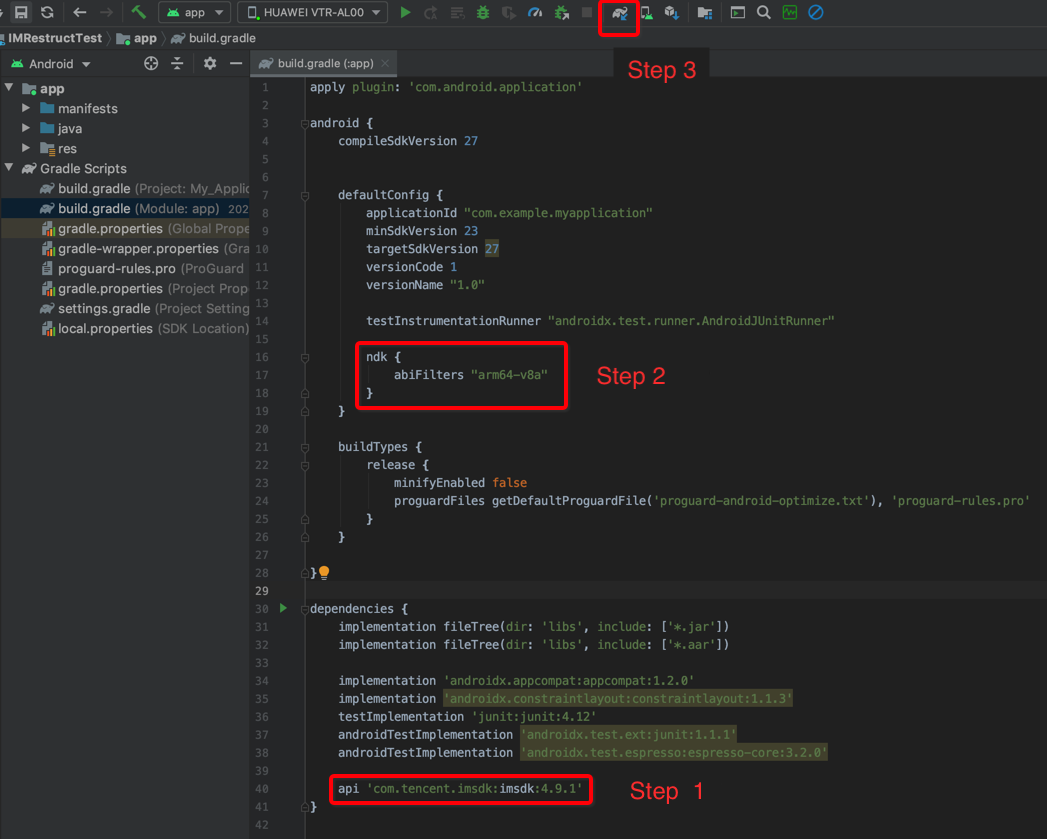
Use Android Studio to open your project and modify the app/build.gradle file in three simple steps to integrate the SDK to your project, as shown below:
Step 1. Add SDK Dependencies
1. Find build.gradle of the app and add mavenCentral() dependencies to repositories.
repositories {
google()
jcenter()
// Add the `mavenCentral` repository.
mavenCentral()
}
2. Add the Chat SDK dependencies to dependencies.
dependencies {
// Add the SDK and use the latest version number as recommended
api 'com.tencent.imsdk:imsdk-plus:Version number'
// If you need to add the Quic plugin, please uncomment the next line (Note: the plugin version number must match the Chat SDK version number)
// api "com.tencent.imsdk:timquic-plugin:Version number"
}
Replace Version number with the actual version number of the SDK. We recommend you use the latest version.Take the version number 5.4.666 as an example:
dependencies {
api 'com.tencent.imsdk:imsdk-plus:5.4.666'
}
Note
Quic plugin provides axp-quic multiplexing protocol, which has better weak network resistance and can still provide services even when the network packet loss rate reaches 70%. This plugin is only available on the Chat Pro edition、Pro Plus edition、Enterprise edition, purchase the Pro edition、Pro Plus edition、Enterprise edition to use it. To ensure proper functionality, please update the client SDK to version 7.7.5282 or higer.
Step 2. Specify the App Architecture
In defaultConfig, specify the CPU architecture used by the app (armeabi-v7a, arm64-v8a, x86, and x86_64 are supported starting from Chat SDK v4.3.118).
defaultConfig {
ndk {
abiFilters "arm64-v8a"
}
}
Step 3. Sync the SDK
Click the Sync icon. If the connection to JCenter is normal, the SDK will be automatically downloaded and integrated to your project.
Method 2: Manual Download (AAR)
If JCenter cannot be accessed, you can manually download the SDK and integrate it into your project:
Step 1. Download SDK
Download the latest version of the Chat SDK from GitHub.
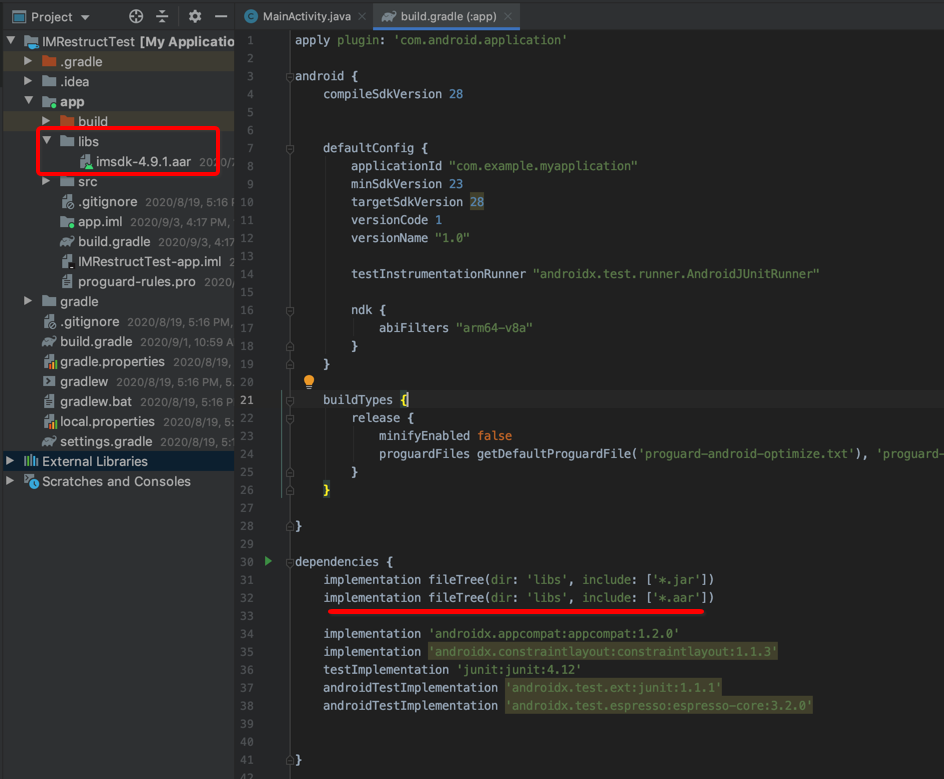
Step 2. Copy SDK to the Project Directory
Copy the downloaded AAR file to the /libs directory of the project.
Step 3. Specify, Compile, and Run
In the defaultConfig of app/build.gradle, specify the CPU architecture used by the app (armeabi-v7a, arm64-v8a, x86, and x86_64 are supported starting from SDK v4.3.118).
defaultConfig {
ndk {
abiFilters "arm64-v8a"
}
}
Note:
If you need to add a Quic plugin, please refer to the previous steps and manually download the integrated Quic plugin.
Integrating SDK
If you do not want to integrate the AAR library, you can integrate the Chat SDK by importing the JAR and SO libraries.
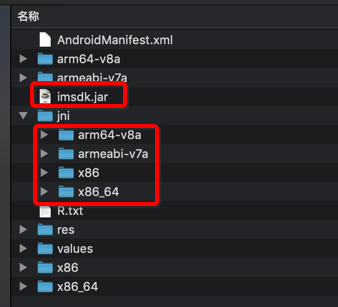
Step 1. Download and Decompress SDK
Download the latest version of the AAR file from GitHub and decompress it. The extracted folder contains a JAR file and an SO subfolder. Rename classes.jar to imsdk.jar.
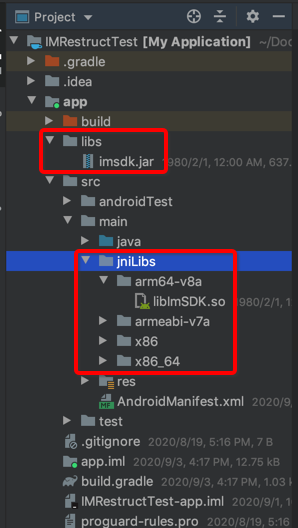
Step 2. Copy SDK to the Project Directory
Copy the renamed JAR file and SO files of different architectures to the default loading directories of Android Studio.
Step 3. Specify, Compile, and Run
In the defaultConfig of app/build.gradle, specify the CPU architecture used by the app (armeabi-v7a, arm64-v8a, x86, and x86_64 are supported starting from Chat SDK v4.3.118).
defaultConfig {
ndk {
abiFilters "arm64-v8a"
}
}
Configuring Permissions
To configure app permissions in `AndroidManifest.xml`, the Chat SDK requires the following permissions: