You can download and install the demo app we provide to try out TRTC's group audio/video room features, including screen sharing, beauty filters, and low-latency conferencing.
Note
All TUIKit components are based on Tencent Cloud's TRTC and Chat. When you activate TRTC, Chat and the trial edition of the Chat SDK (which supports up to 100 DAUs) will also be activated automatically. For Chat billing details, see Pricing.
Using the App’s UI
Step 1. Create an application
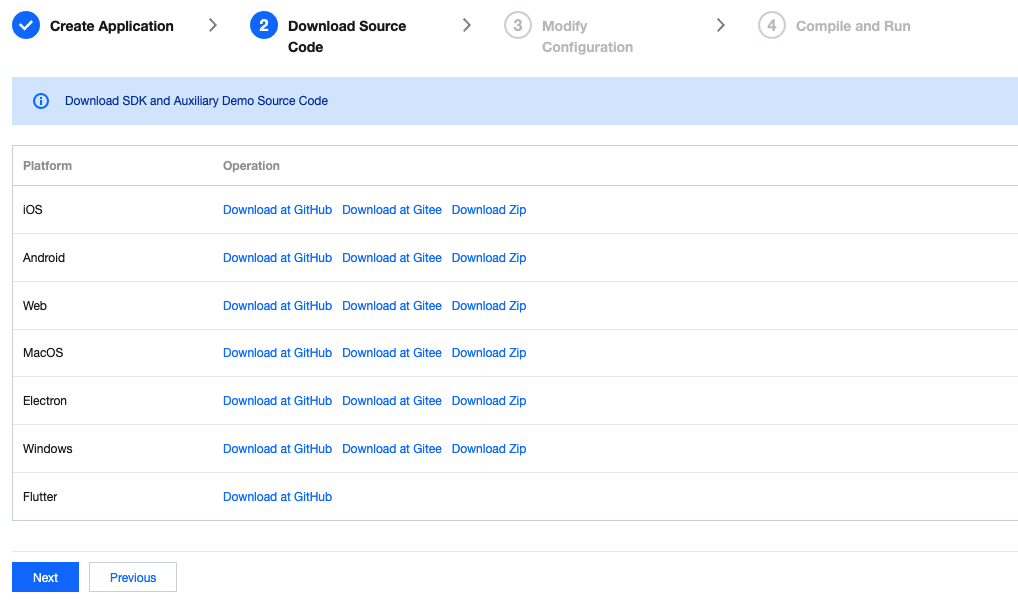
1. In the TRTC console, click Development Assistance > Demo Quick Run.
2. Enter an application name such as TestMeetingRoom and click Create.
3. Click Next.
Note
This feature relies on Tencent Cloud's TRTC and Chat services. When you activate TRTC, Chat will be activated automatically. For Chat billing details, see Pricing.
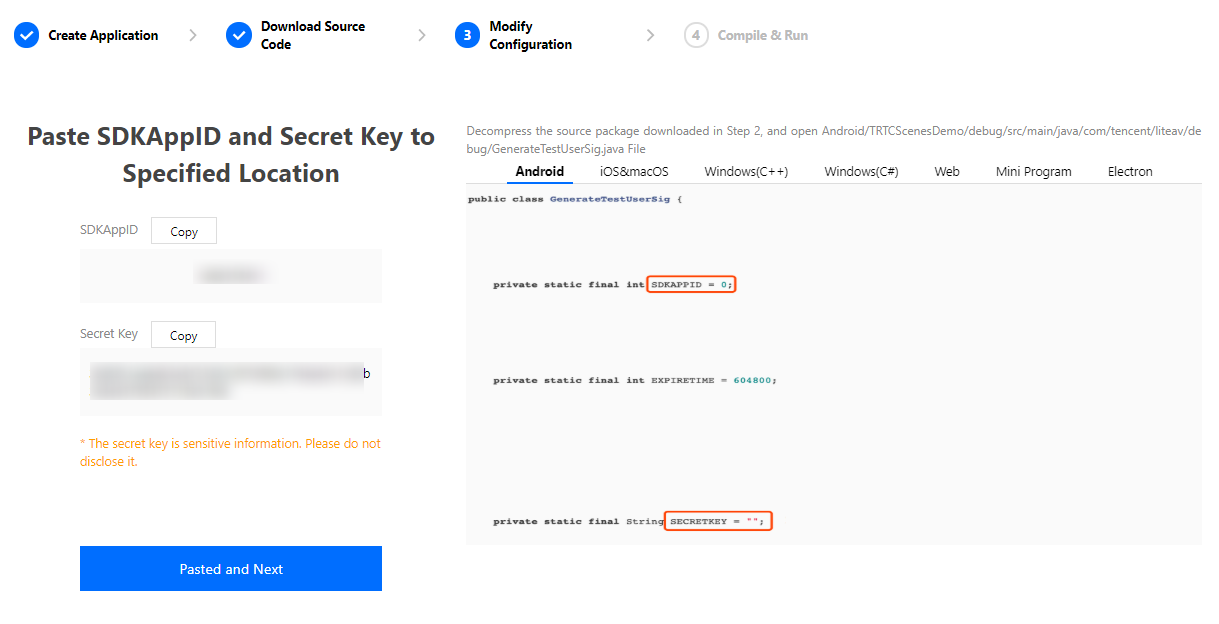
1. In the Modify Configuration step, select your platform.
2. Find and open /lib/debug/GenerateTestUserSig.dart.
3. Set parameters in GenerateTestUserSig.dart as follows.
SDKAPPID: A placeholder by default. Set it to the actual `SDKAppID`.
SECRETKEY: A placeholder by default. Set it to the actual secret key.
4. Click Next to complete the creation.
5. After compilation, click Return to Overview Page.
Note
In this document, the method to obtain UserSig is to configure the secret key in the client code. In this method, the secret key is vulnerable to decompilation and reverse engineering. Once your secret key is leaked, attackers can steal your Tencent Cloud traffic. Therefore, this method is only suitable for locally running a demo project and debugging.
The best practice is to integrate the calculation code of UserSig into your server and provide an application-oriented API. When UserSig is needed, your application can send a request to your server for a dynamic UserSig. For more information, see How do I calculate UserSig during production?.
Step 4. Compile and run the demo
Caution
An Android project must be run on a real device rather than a simulator.
1. Run flutter pub get.
2. Compile, run, and test the project.
iOS
Android
1. Open \ios project in the source code directory with Xcode (11.0 or above).
2. Compile and run the demo project.
1. Run flutter run.
2. Open the demo project with Android Studio (3.5 or later), and click Run.
Step 5. Modify the demo source code
The TRTCMeetingDemo folder in the source code contains two subfolders: ui and model. The ui subfolder contains UI code. The table below lists the files (folders) and the UI views they represent. You can refer to it when making UI changes.
File or Folder
Description
TRTCMeetingIndex.dart
The view for meeting creation or join
TRTCMeetingRoom.dart
The main view for video conferencing
TRTCMeetingMemberList.dart
The view for the participant list
TRTCMeetingSetting.dart
The view for video conferencing parameter settings
Customizing UI
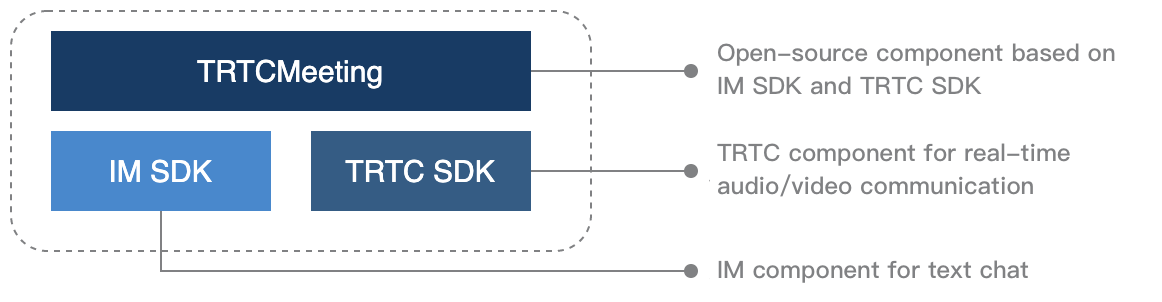
The TRTCMeetingDemo folder in the source code contains two subfolders: ui and model. The model subfolder contains the reusable open-source component TRTCMeeting. You can find the component's APIs in TRTCMeeting.dart and use them to customize your own UI.
Step 1. Integrate the SDK
The interactive live streaming component TRTCMeeting depends on the TRTC SDK and Chat SDK. You can configure pubspec.yaml to download their updates automatically.
Add the following dependencies to pubspec.yaml of your project.
dependencies:
tencent_trtc_cloud: latest version number
tencent_im_sdk_plugin: latest version number
Step 2. Configure permission requests and obfuscation rules
iOS
Android
Add request for mic permission in Info.plist:
<key>NSMicrophoneUsageDescription</key>
<string>Audio calls are possible only with mic access.</string>
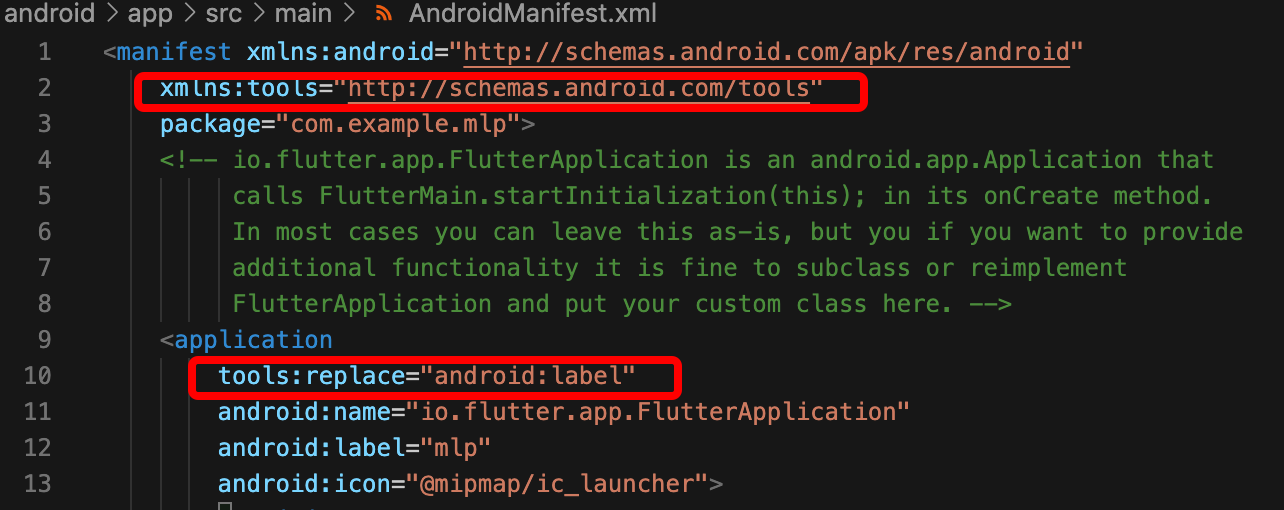
1. Open /android/app/src/main/AndroidManifest.xml.
2. Add xmlns:tools="http://schemas.android.com/tools" to manifest.
3. Add tools:replace="android:label" to application.
ID of the current user, which is a string that can contain letters (a-z and A-Z), digits (0-9), hyphens (-), and underscores (_). We recommend you set it based on your business account system.
userSig
Tencent Cloud's proprietary security signature. To obtain one, see UserSig.
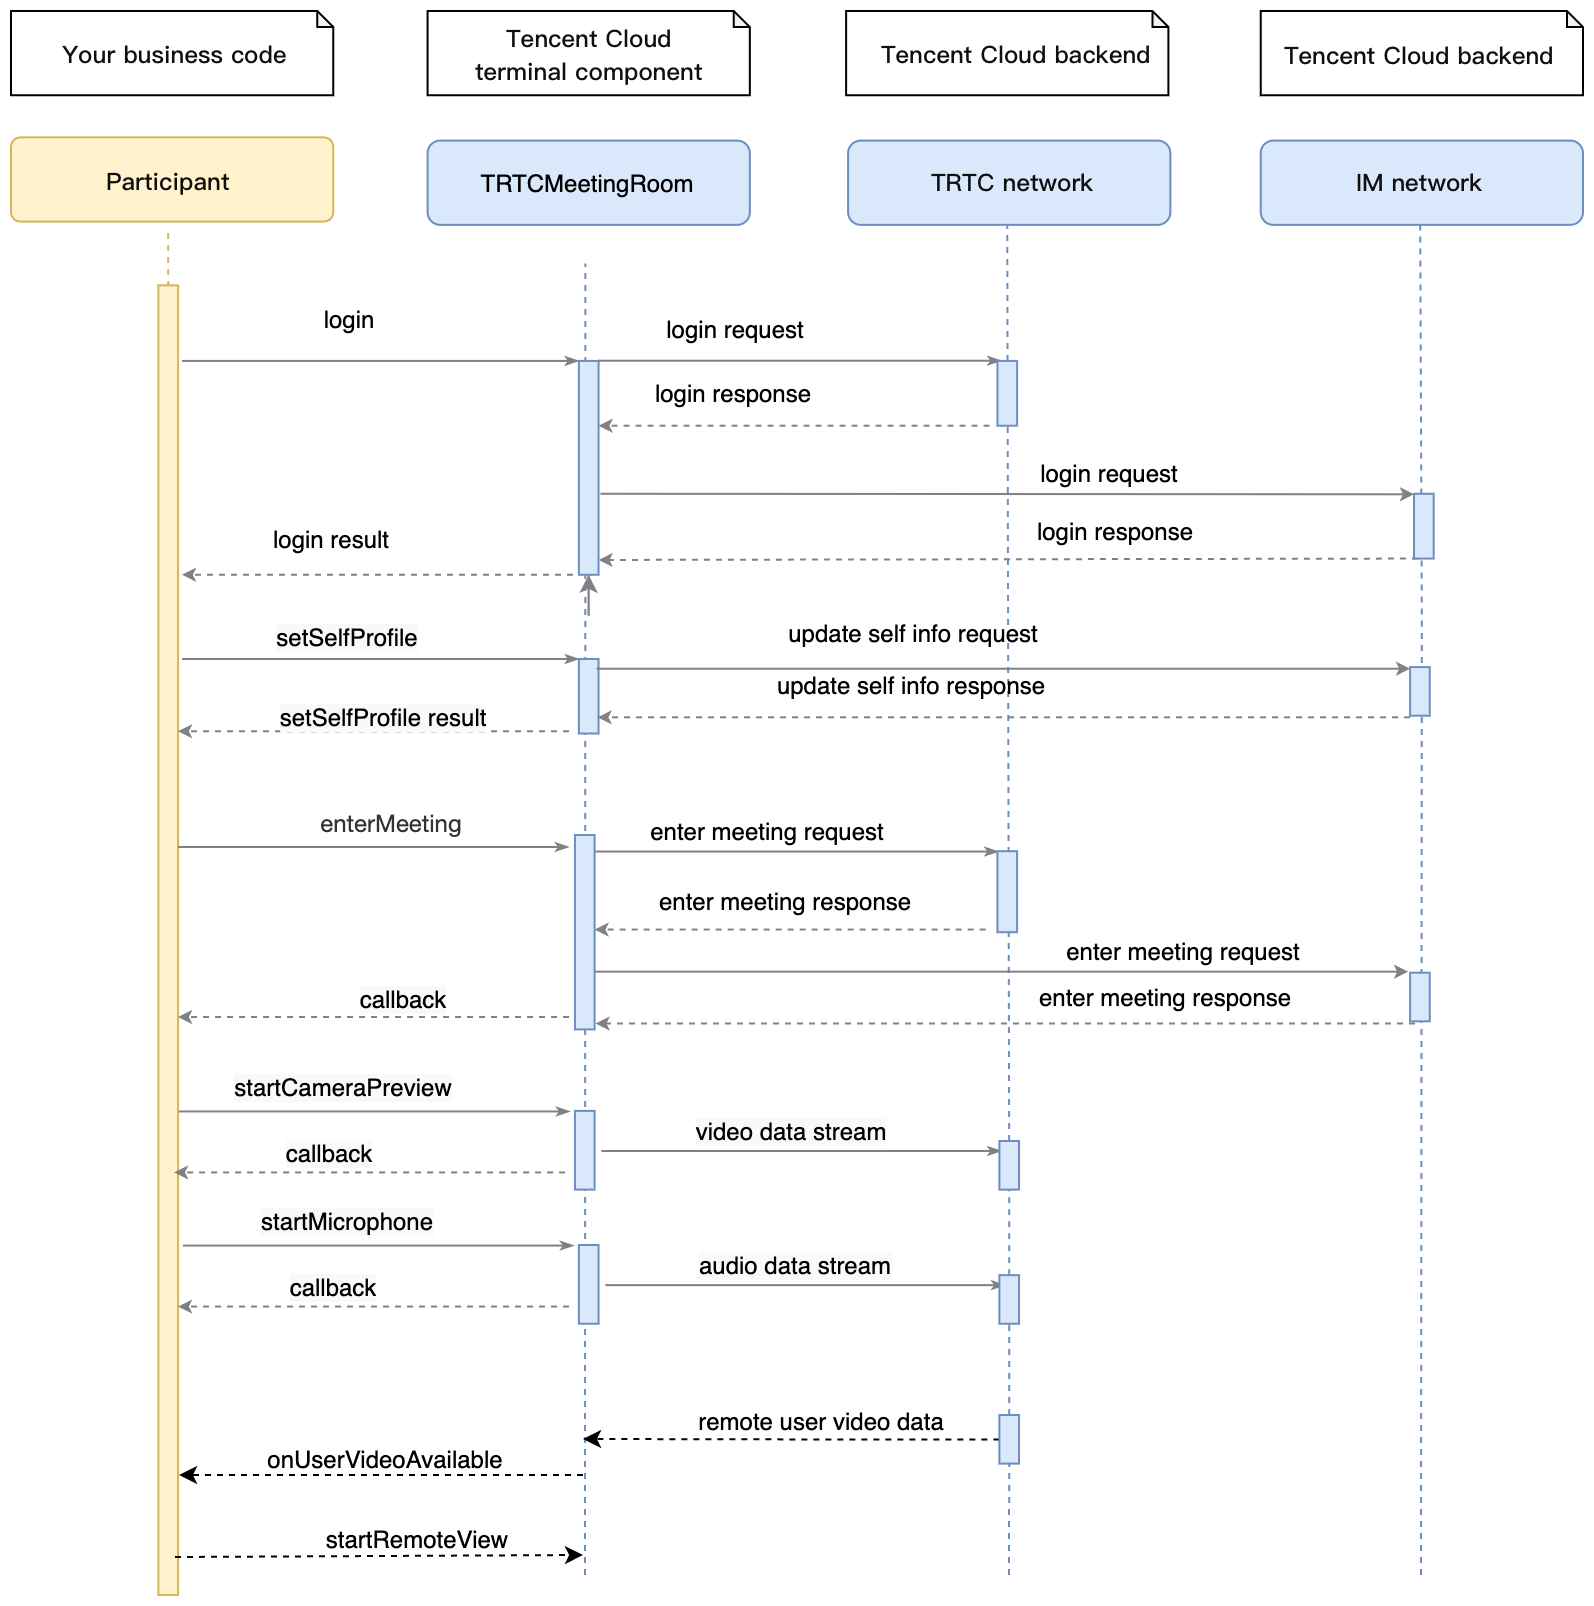
1. After performing step 4 to log in, call setSelfProfile to set your username and profile photo as a participant.
2. Call enterMeeting, passing in the conference room ID to enter the room.
3. Call startCameraPreview to capture video and startMicrophone to capture audio.
4. If another participant turns the camera on, you will receive the onUserVideoAvailable notification, and can call startRemoteView and pass in the userId to play the attendee’s video.
// 1. Set your username and profile photo as a participant.
// 5. Receive the notification that another member enabled the camera and start playback.
trtcMeeting.registerListener(onListener);
onListener(TRTCMeetingDelegate type, param) {
switch (type) {
case TRTCMeetingDelegate.onUserVideoAvailable:
if (param['available']) {
trtcMeeting.startCameraPreview(
param['userId'],
TRTCCloudDef.TRTC_VIDEO_STREAM_TYPE_BIG,
TRTCCloudVideoViewId
);
} else {
trtcMeeting.stopRemoteView(
param['userId'],
TRTCCloudDef.TRTC_VIDEO_STREAM_TYPE_BIG
);
}
break;
}
}
Step 7. Share the screen
1. The screen sharing feature requires the floating window permission, so you need to include the permission requesting logic in your UI.
2. Call startScreenCapture and pass in encoding parameters and the floating window during screen recording to start screen sharing. For more information, see TRTC SDK.
3. Other members in the room will receive the onUserVideoAvailable event notification.
Note
Screen sharing and camera capturing are mutually exclusive. Before enabling screen sharing, you need to call stopCameraPreview to disable camera capturing. For more information, please see TRTC SDK.
Step 8. Implement text chat and muting notifications
Call sendRoomTextMsg to send text messages. All participants in the meeting will receive the onRecvRoomTextMsg callback. Chat has its default content moderation rules. Text chat messages that contain restricted terms will not be forwarded by the cloud.
// Sender: Sends text chat messages
trtcMeeting.sendRoomTextMsg('Hello Word!');
// Receiver: Listens for text chat messages
trtcMeeting.registerListener(onListener);
onListener(TRTCMeetingDelegate type, param) {
switch (type) {
case TRTCMeetingDelegate.onRecvRoomTextMsg:
print('Received a message from' + param['userName'] + ':' + param['message']);
break;
}
}
Call sendRoomCustomMsg to send custom (signaling) messages, and all participants in the meeting will receive the onRecvRoomCustomMsg callback. Custom messages are often used to transfer custom signals, such as muting notifications and notifications about other meeting controls.
// Sender: Customize CMD to distinguish a muting notification
// For example, use "CMD_MUTE_AUDIO" to indicate muting notifications