
Integration
This document describes how to rapidly integrate the TUICallKit component. You can complete the following key steps within 10 minutes and obtain a complete audio and video call interface.
Preparations
Environmental Requirements
Android Version Requirements: Android 5.0 (SDK API Level 21) and above.
Gradle Version Requirements: Gradle 4.2.1 and above.
Device Requirements: Mobile devices running Android 5.0 or higher.
Networking Requirements: The device must be able to connect to the public network.
Service Activation
Please refer to the Service Activation documentation to obtain your SDKAppID and SDKSecretKey. These credentials will be required in the subsequent login step.
Implementation
Step 1.Importing Components
Clone or download the code from GitHub. Then, copy the
atomic_x directory (under TUIKit_Android) and the tuicallkit-kt subdirectory (under call) to the directory at the same level as your project's app directory, as shown below.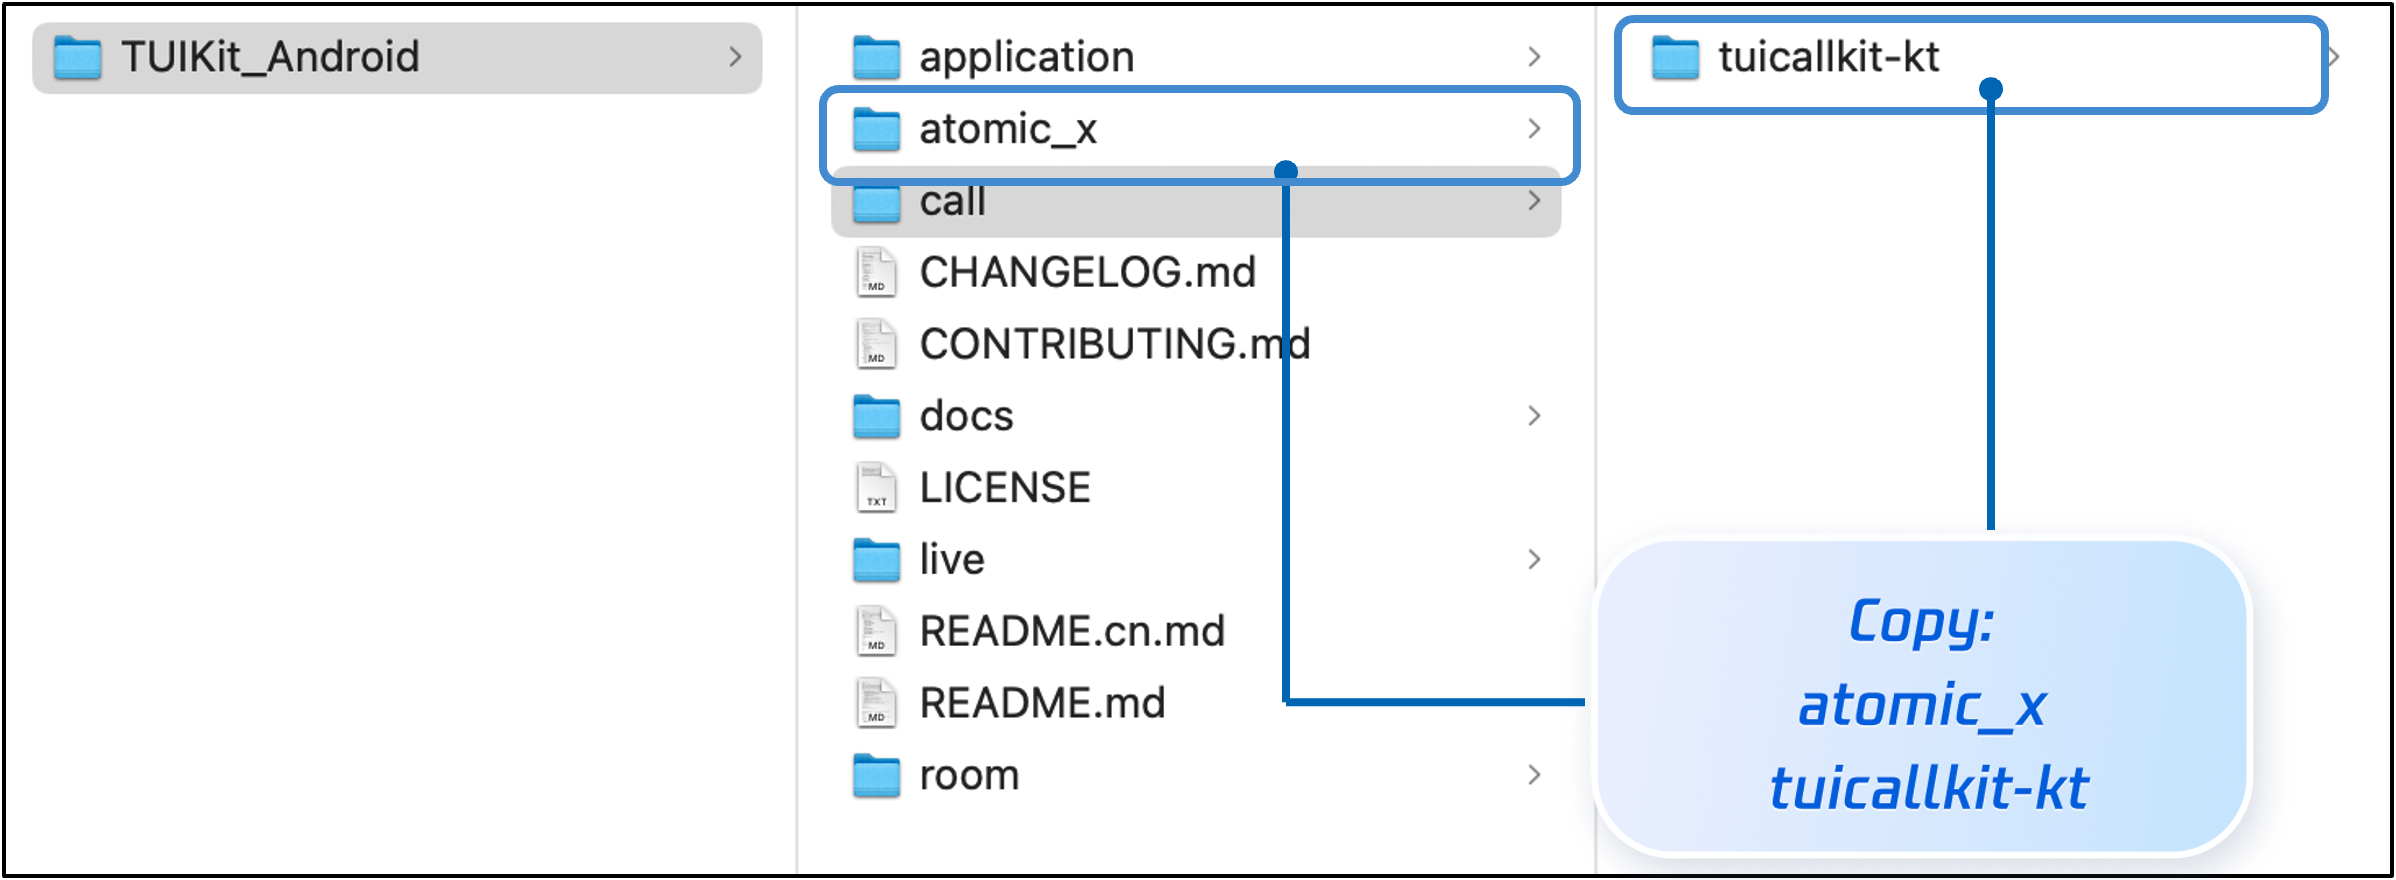
Step 2.Project Configuration
1. Locate the
settings.gradle.kts (or settings.gradle) file in the project root directory. Add the following code to import the tuicallkit-kt and atomic_x components into your project.include(":tuicallkit-kt")include(":atomic_x")
include ':tuicallkit-kt'include ':atomic_x'
2. Locate the
build.gradle.kts (or build.gradle) file under the app directory, and add the following code in dependencies to declare the app's dependency on the component.dependencies {api(project(":tuicallkit-kt"))}
dependencies {api project(':tuicallkit-kt')}
Note:
The TUICallKit project internally depends on
TRTC SDK,IM SDK,tuicallengine and public library tuicore by default. Developers do not need to configure them separately. If needed, just modify the version number in tuicallkit-kt/build.gradle file to upgrade.3.
proguard-rules.pro Configuration:Since the SDK internally uses Java reflection, certain classes must be added to the non-obfuscation list (ProGuard exclusion list). Please add the following configuration to the end of the proguard-rules.pro file:-keep class com.tencent.** { *; }
4.
AndroidManifest.xml Configuration:In the AndroidManifest.xml file within the app directory, add tools:replace="android:allowBackup" within the <application> node to overwrite the component's default settings and apply your own configuration.// app/src/main/AndroidManifest.xml<applicationandroid:name=".BaseApplication"android:allowBackup="false"android:icon="@drawable/app_ic_launcher"android:label="@string/app_name"android:largeHeap="true"android:theme="@style/AppTheme"tools:replace="android:allowBackup">
Step 3.Login
Add the following code in your project. It enables logging in to the TUI component by calling the relevant APIs in TUICore. This procedure is critical. Only after a successful login can you properly use the features provided by TUICallKit.
login
import com.tencent.qcloud.tuicore.TUILoginimport com.tencent.qcloud.tuicore.interfaces.TUICallbackimport com.tencent.qcloud.tuikit.tuicallkit.debug.GenerateTestUserSigclass MainActivity : ComponentActivity() {override fun onCreate(savedInstanceState: Bundle?) {super.onCreate(savedInstanceState)val userId = "denny" // replace with your UserIdval sdkAppId = 0 // replace with the SDKAppID obtained from the consoleval secretKey = "****" // replace with the SecretKey obtained from the consoleval userSig = GenerateTestUserSig.genTestUserSig(userId, sdkAppId, secretKey)TUILogin.login(this, sdkAppId, userId, userSig, object : TUICallback() {override fun onSuccess() {}override fun onError(errorCode: Int, errorMessage: String) {}})}}
import com.tencent.qcloud.tuicore.TUILogin;import com.tencent.qcloud.tuicore.interfaces.TUICallback;import com.tencent.qcloud.tuikit.tuicallkit.debug.GenerateTestUserSig;public class MainActivity extends AppCompatActivity {@Overridepublic void onCreate(Bundle savedInstanceState) {super.onCreate(savedInstanceState);String userId = "denny"; // replace with your UserIdint sdkAppId = 0; // replace with the SDKAppID obtained in step 1 on the consoleString secretKey = "****"; // replace with the SecretKey obtained in step 1 on the consoleString userSig = GenerateTestUserSig.genTestUserSig(userId, sdkAppId, secretKey);TUILogin.login(this, sdkAppId, userId, userSig, new TUICallback() {@Overridepublic void onSuccess() {}@Overridepublic void onError(int errorCode, String errorMessage) {}});}}
Parameter | Type | Description |
userId | String | Only allowing a combination of uppercase and lowercase letters (a-z A-Z), numbers (0-9), hyphens, and underscores. |
sdkAppId | int | The unique identifier SDKAppID of the audio and video application created in the Tencent Real-Time Communication (TRTC) Console. |
secretKey | String | The SDKSecretKey of the audio/video application created in the Tencent Real-Time Communication (TRTC) Console. |
userSig | String | A security protection signature used to authenticate user login, confirm whether the user is genuine, and prevent malicious attackers from misappropriating your cloud service usage rights. |
Note :
Development environment: If you are in the local development and debugging stage, you can adopt the local GenerateTestUserSig.genTestUserSig function to generate userSig. In this method, the SDKSecretKey is very easy to decompile and reverse engineer. Once your key is leaked, attackers can steal your Tencent Cloud traffic.
Production environment: If your project is ready to launch, use server-side generation of UserSig.
Step 4.Set Nickname and Avatar [Optional]
After a successful login, you can call the
setSelfInfo function to set your nickname and avatar. The set nickname and avatar will be displayed on the caller/callee interface.setSelfInfo
import com.tencent.qcloud.tuikit.tuicallkit.TUICallKitval nickname = "jack"val avatar = "https:/****/user_avatar.png"TUICallKit.createInstance(context).setSelfInfo(nickname, avatar, null)
import com.tencent.qcloud.tuikit.tuicallkit.TUICallKit;String nickname = "jack";String avatar = "https:/****/user_avatar.png";TUICallKit.createInstance(context).setSelfInfo(nickname, avatar, null);
Parameter | Type | Description |
nickname | String | Target user's nickname |
avatar | String | Target user's avatar |
Step 5.Initiating a Call
The caller initiates a call by invoking the
calls function and specifying the media type (voice or video) and the callee's User ID list (userIdList). The calls interface supports both one-to-one and group calls. A one-to-one call is initiated when the userIDList contains only a single User ID; a group call is initiated when it contains multiple User IDs.calls
import com.tencent.qcloud.tuikit.tuicallkit.TUICallKitimport io.trtc.tuikit.atomicxcore.api.call.CallMediaTypeimport io.trtc.tuikit.atomicxcore.api.call.CallParamsval userIdList = mutableListOf<String>()userIdList.add("mike")val mediaType = CallMediaType.Audioval callParams = CallParams()TUICallKit.createInstance(context).calls(userIdList, mediaType, params, null)
import com.tencent.qcloud.tuikit.tuicallkit.TUICallKit;import io.trtc.tuikit.atomicxcore.api.call.CallMediaType;import io.trtc.tuikit.atomicxcore.api.call.CallParams;List<String> userIdList = new ArrayList<>();userIdList.add("mike");CallMediaType mediaType = CallMediaType.Audio;CallParams params = new CallParams();TUICallKit.createInstance(this).calls(userIdList, mediaType, params, null);
Parameter | Type | Description |
userIdList | List<String> | Target user ID list |
mediaType | Media type of the call, such as video call, voice call | |
params | Call extension parameters, such as room number, call invitation timeout. |
Step 6.Answering a Call
Once the callee successfully logs in, the caller can initiate a call, and the callee will receive the call invitation, accompanied by a ringtone and vibration.
More Features
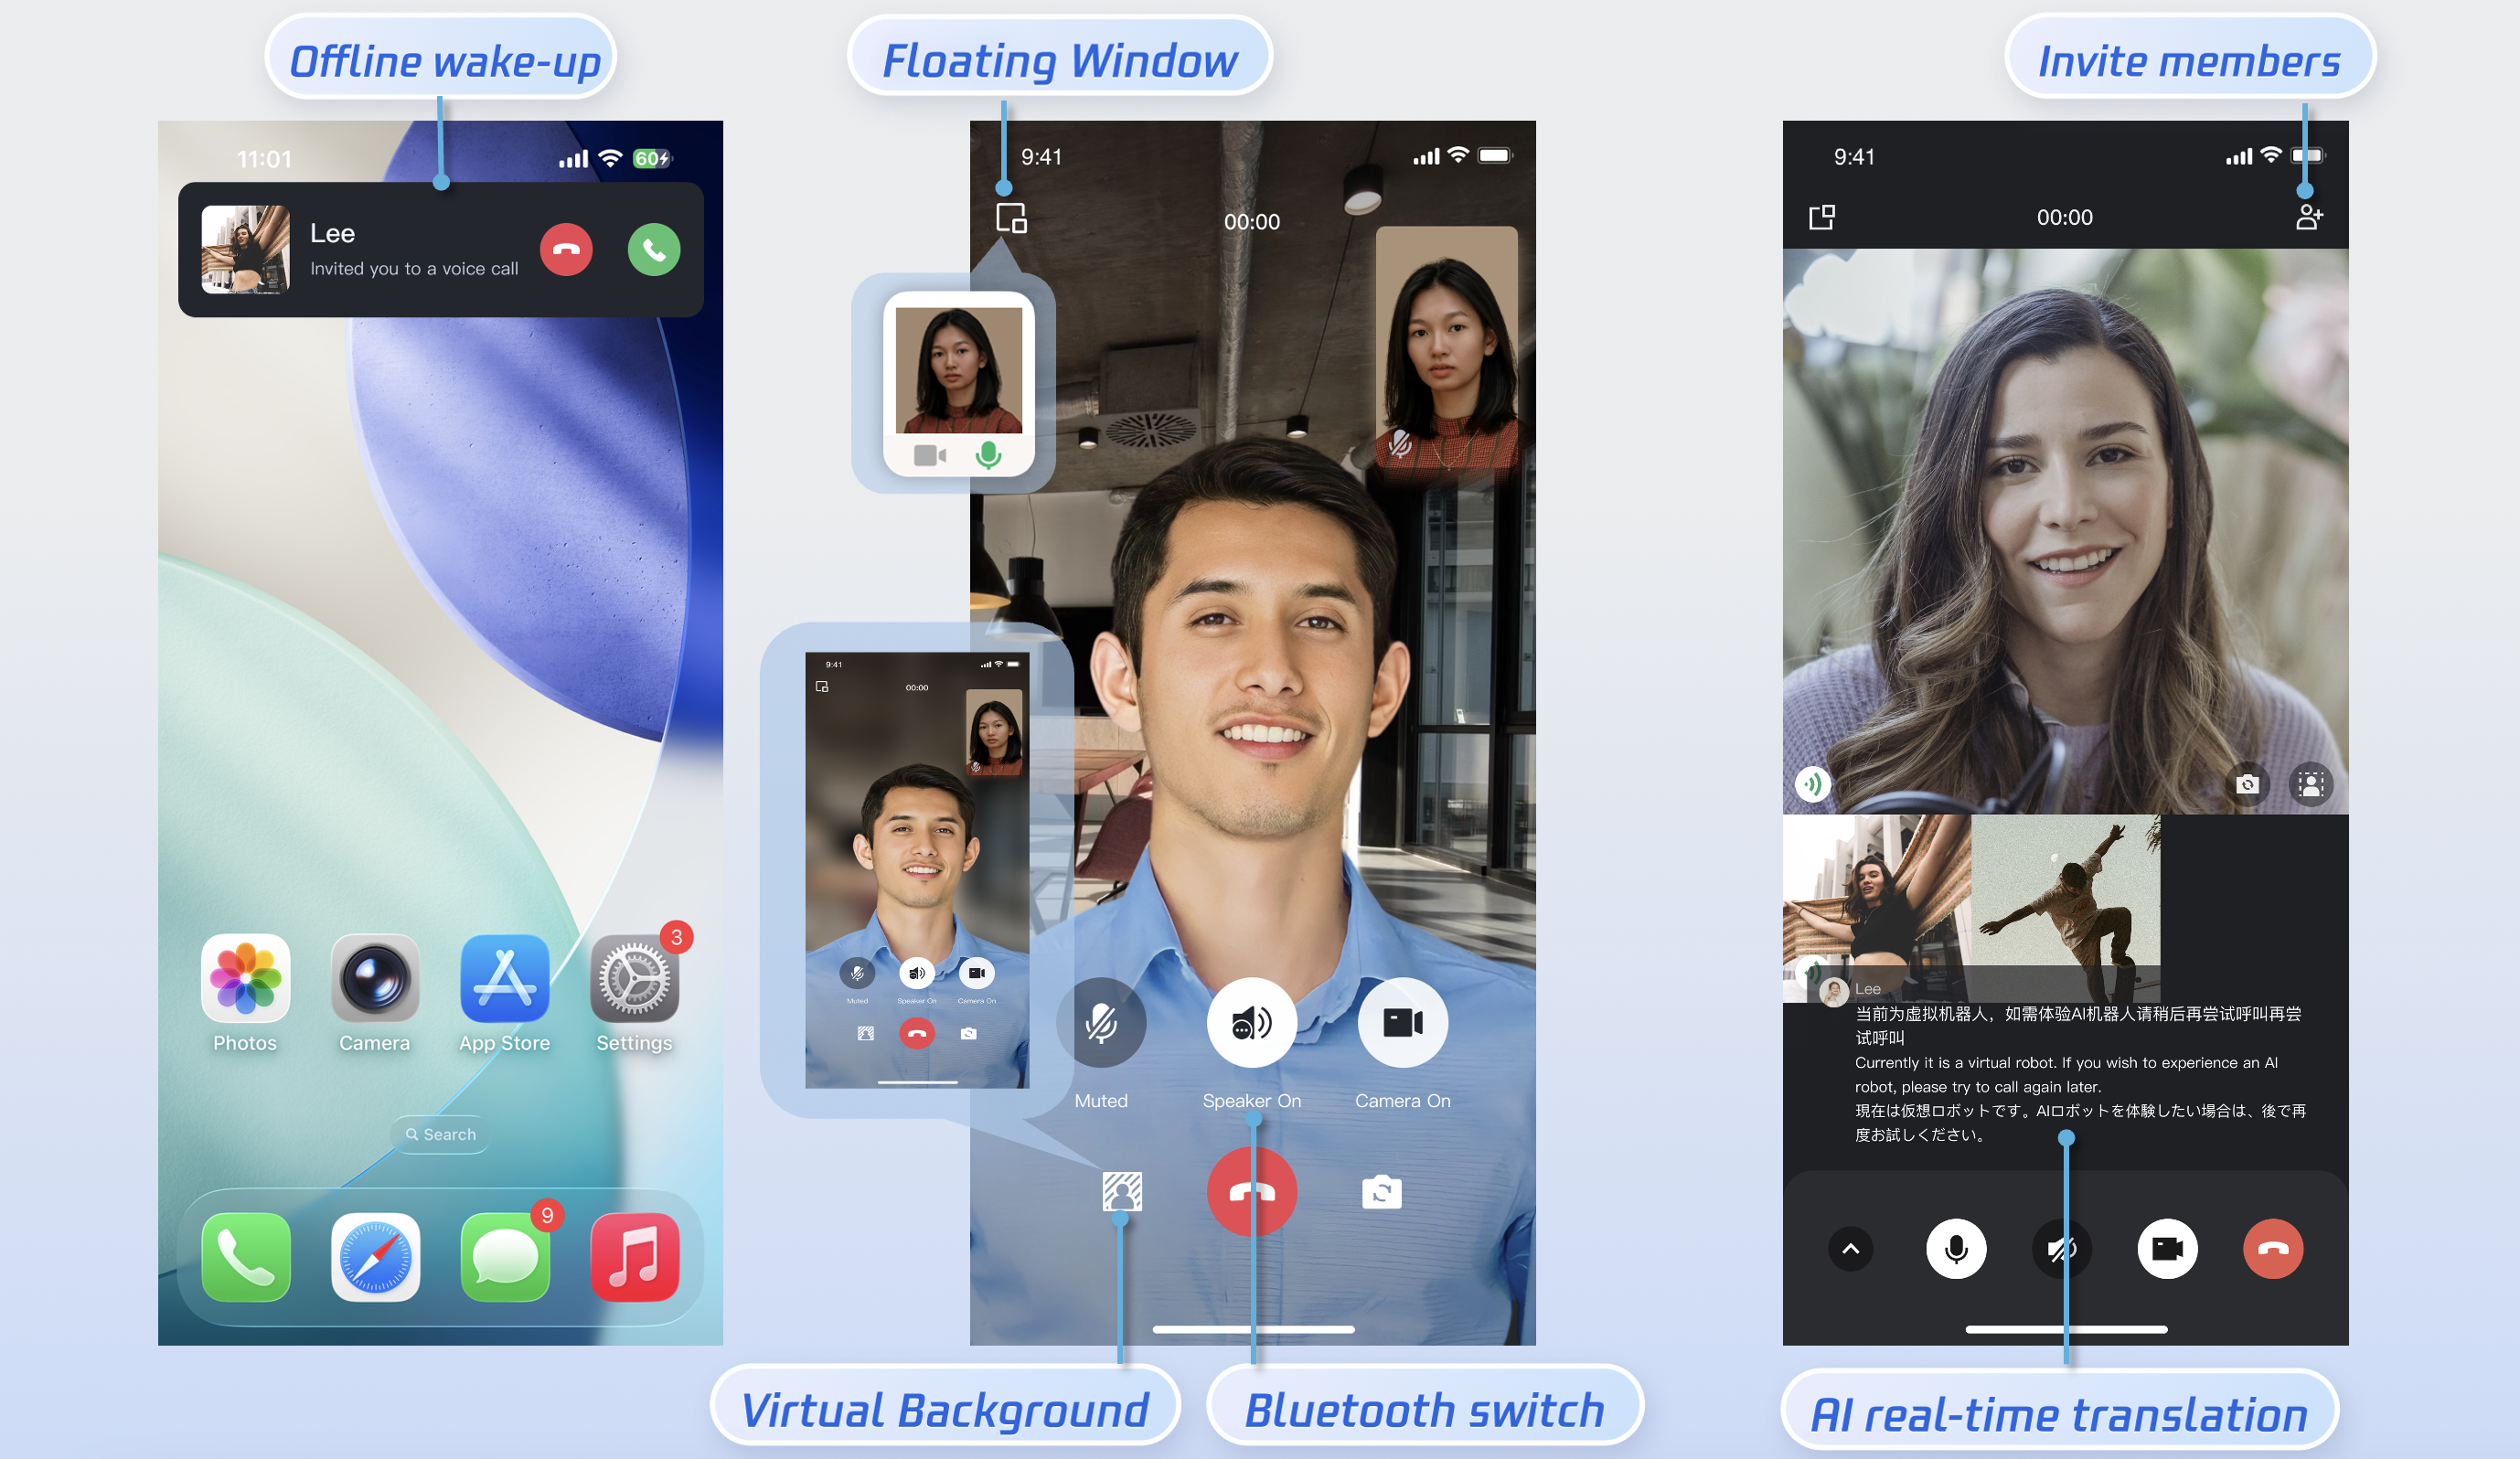
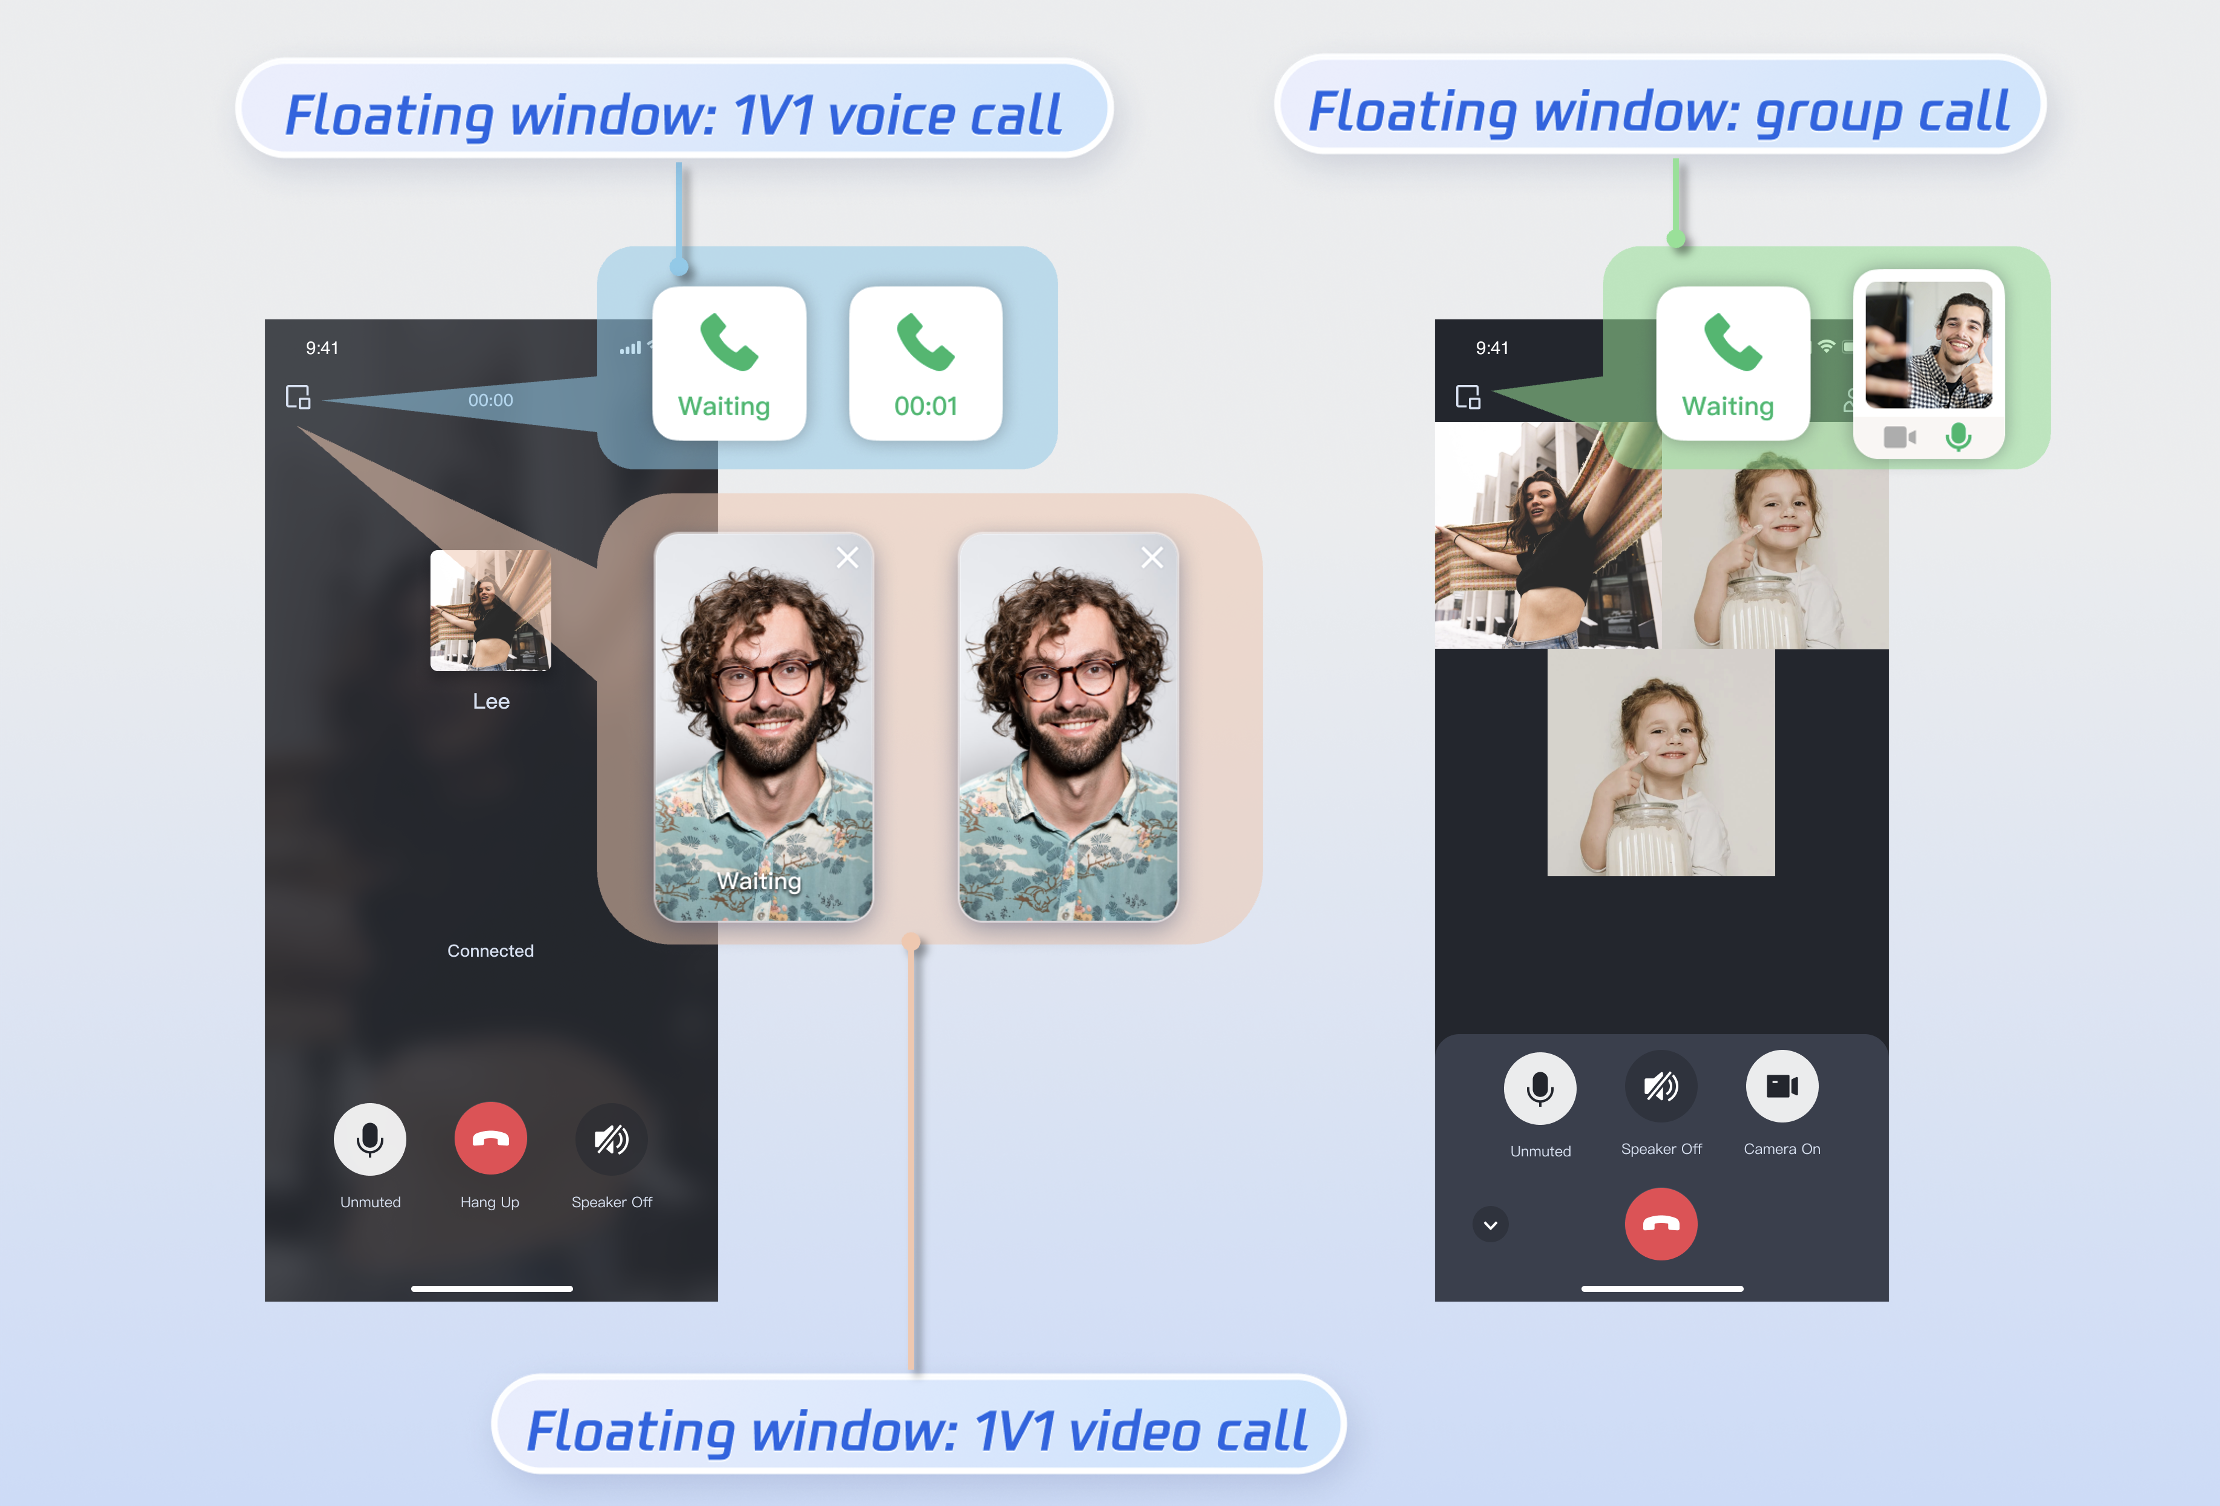
Enabling Floating Window
You can enable/disable the floating window feature by calling enableFloatWindow. This feature should be enabled when initializing the TUICallKit component, with the default status being Off (false).
enableFloatWindow
import com.tencent.qcloud.tuikit.tuicallkit.TUICallKitTUICallKit.createInstance(this).enableFloatWindow(true)
import com.tencent.qcloud.tuikit.tuicallkit.TUICallKit;TUICallKit.createInstance(this).enableFloatWindow(true);
Details: Default false, the floating window button in the top-left corner of the call interface is hidden. Set to true to display.
Enabling Banner
You can enable or disable the incoming call banner display by calling
enableIncomingBanner. By default, this feature is disabled (false). When the callee receives an inbound call, the full-screen call waiting interface is shown first. When the banner is enabled, a notification banner will display initially, switching to the full-screen view as required. Note that displaying the banner requires floating window permission. The exact display behavior depends on permission settings and whether the app is running in the foreground or background. For details, refer to the incoming call display policy for the callee.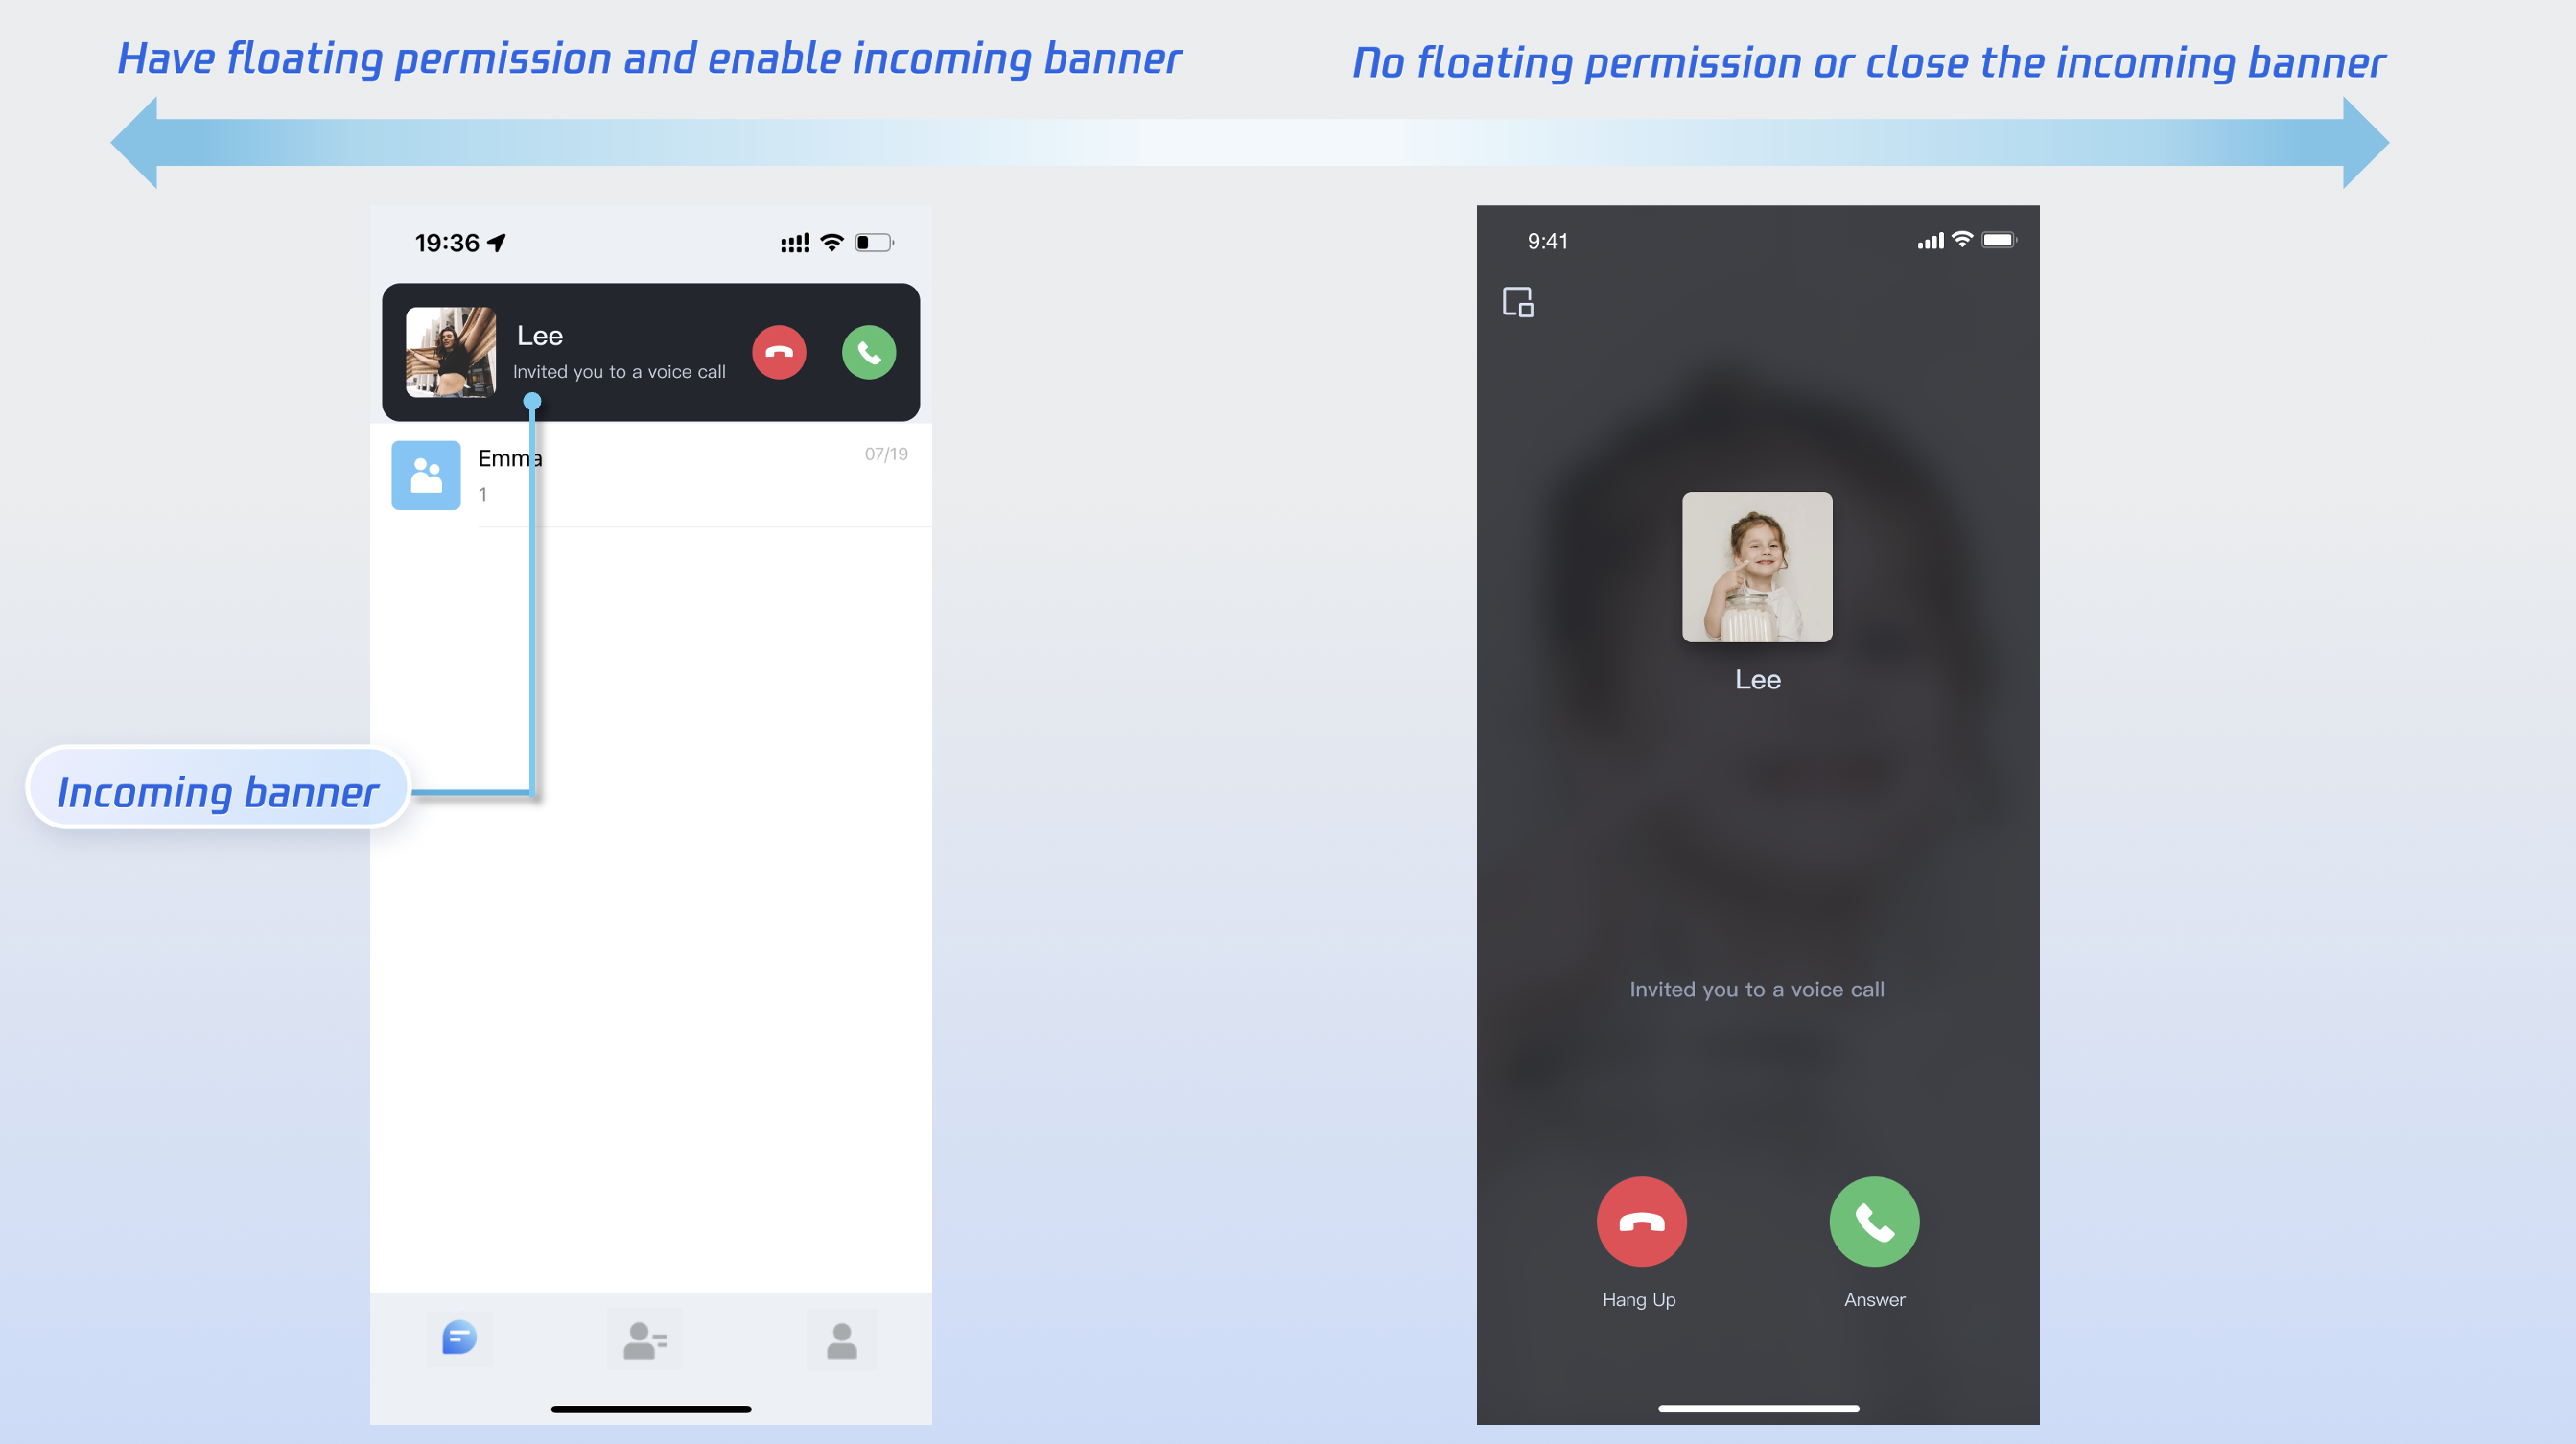
enbaleIncomingBanner
import com.tencent.qcloud.tuikit.tuicallkit.TUICallKitTUICallKit.createInstance(context).enableIncomingBanner(true)
import com.tencent.qcloud.tuikit.tuicallkit.TUICallKit;TUICallKit.createInstance(context).enableIncomingBanner(true);
Details: Default false. The callee side pops up the full-screen call waiting interface by default when receiving an invitation. When enabled, a banner is displayed first, then the full-screen call interface is pulled up as needed.
Multi-Person Calling
When the caller uses the
calls method to initiate a call, if the list of called users exceeds one person, it is automatically recognized as a multi-person call. Other members can then join this multi-person call using the join method.Initiating a Multi-person Call: When the
calls method is used to initiate a call, if the callee User ID list (userIdList) contains more than one user, it will be automatically deemed a multi-person call.calls
import com.tencent.cloud.tuikit.engine.call.TUICallDefineimport com.tencent.qcloud.tuikit.tuicallkit.TUICallKitimport io.trtc.tuikit.atomicxcore.api.call.CallMediaTypeimport io.trtc.tuikit.atomicxcore.api.call.CallParamsval userIdList = mutableListOf<String>()userIdList.add("mike")userIdList.add("tate")val mediaType = CallMediaType.Audioval params = CallParams()TUICallKit.createInstance(context).calls(userIdList, mediaType, params, null)
import com.tencent.cloud.tuikit.engine.call.TUICallDefine;import com.tencent.qcloud.tuikit.tuicallkit.TUICallKit;import io.trtc.tuikit.atomicxcore.api.call.CallMediaType;import io.trtc.tuikit.atomicxcore.api.call.CallParams;List<String> userIdList = new ArrayList<>();userIdList.add("mike");userIdList.add("tate");CallMediaType mediaType = CallMediaType.Audio;CallParams params = new CallParams();TUICallKit.createInstance(context).calls(userIdList, mediaType, params, null);
Parameter | Type | Description |
userIdList | List<String> | Target user ID list |
mediaType | Media type of the call, such as video call, voice call | |
params | Call extension parameters, such as room number, call invitation timeout. |
Joining a Multi-person Call: You can use the
join method to enter the specified multi-person call.join
import com.tencent.qcloud.tuikit.tuicallkit.TUICallKitval callId = "123456"TUICallKit.createInstance(this).join(callId, null)
import com.tencent.qcloud.tuikit.tuicallkit.TUICallKit;String callId = "123456";TUICallKit.createInstance(this).join(callId, null);
Parameter | Type | Description |
callId | String | The unique ID for this call. |
Language Settings
Supported Languages: We currently support Simplified Chinese, Traditional Chinese, English, Japanese, and Arabic.
Switching Languages: By default, the language of TUICallKit is consistent with the mobile operating system's language setting. To switch the language, you can use the
TUIThemeManager.getInstance().changeLanguage method.changeLanguage
import com.tencent.qcloud.tuicore.TUIThemeManager;public class MainActivity extends BaseActivity {@Overridepublic void onCreate(Bundle savedInstanceState) {super.onCreate(savedInstanceState)val language = TUIThemeManager.LANGUAGE_ZH_CNTUIThemeManager.getInstance().changeLanguage(applicationContext, language)}}
import com.tencent.qcloud.tuicore.TUIThemeManager;public class MainActivity extends BaseActivity {@Overridepublic void onCreate(Bundle savedInstanceState) {super.onCreate(savedInstanceState);String language = TUIThemeManager.LANGUAGE_EN;TUIThemeManager.getInstance().changeLanguage(getApplicationContext(), language);}}
Parameter | Type | Description |
language | String | TUIThemeManager.LANGUAGE_EN: English. TUIThemeManager.LANGUAGE_AR: Arabic. TUIThemeManager.LANGUAGE_ZH_HK: Traditional Chinese. TUIThemeManager.LANGUAGE_ZH_CN: Simplified Chinese. |
Note:
If you need to set up other languages, please contact us at info_rtc@tencent.com for assistance.
Ringtone Setting
You can set the default ringtone, incoming call silent mode, and Offline Push Ringtone in the following ways:
Setting Default Ringtone (Method 1): If you include TUICallKit component via source code, you can replace the resource file (ringtone when initiating a call, ringtone when receiving a call) to set a custom default ringtone.
Setting Default Ringtone (Method 2): Use the
setCallingBell interface to set the incoming call ringtone received by the callee.setCallingBell
import com.tencent.qcloud.tuikit.tuicallkit.TUICallKitval filePath = "***/callingBell.mp3"TUICallKit.createInstance(context).setCallingBell(filePath)
import com.tencent.qcloud.tuikit.tuicallkit.TUICallKit;String filePath = "***/callingBell.mp3";TUICallKit.createInstance(context).setCallingBell(filePath);
Details:The local file path of the ringtone. Only local file paths can be imported here. Ensure the file directory is accessible to the app. The ringtone setting is bound to the device. Replacing the user will not affect the ringtone. To restore the default ringtone, pass an empty string ("") as the filePath.
Parameter | Type | Description |
filePath | String | ringtone file path |
Incoming call silent mode: You can set mute mode through
enableMuteMode.enableMuteMode
import com.tencent.qcloud.tuikit.tuicallkit.TUICallKitTUICallKit.createInstance(context).enableMuteMode(true)
import com.tencent.qcloud.tuikit.tuicallkit.TUICallKit;TUICallKit.createInstance(context).enableMuteMode(true);
Details: When set to true, incoming call requests will not trigger ringtone playback (silent mode).
Custom offline push ringtone: Please refer to: FCM Offline Push customizes incoming call ringtone.
Customizing Your UI
Replacing Icon Button
You can directly replace the icons under the res\drawable-xxhdpi folder to ensure the icon color and style remain consistent throughout the entire App. The following list shows basic feature buttons. You can replace the corresponding icons to fit your own business scenario.
Commonly Used Icon File Name List
Icon | File name | Description |
 | callview_ic_dialing.png | Answer incoming call icon |
 | callview_ic_hangup.png | Hang Up Call icon |
 | callview_ic_mic_unmute.png | Turn off the mic icon |
 | callview_ic_handsfree_disable.png | Turn off the speaker icon |
 | callview_ic_camera_disable.png | Camera Off icon |
 | callview_ic_add_user_black.png | Invite user icon during call |
FAQs
Contact Us
If you have any questions or suggestions during integration or usage, feel free to join our Telegram group or contact us for support.

