
Integration
TUIRoomKit is a comprehensive multi-party audio and video conferencing solution powered by TRTC. It provides a full suite of UI components and essential features out of the box. This guide walks developers through integrating TUIRoomKit into their projects to enable robust multi-party audio and video conferencing. It also covers how to quickly customize image assets, localize UI text, and configure other settings, empowering you to build branded audio and video applications.
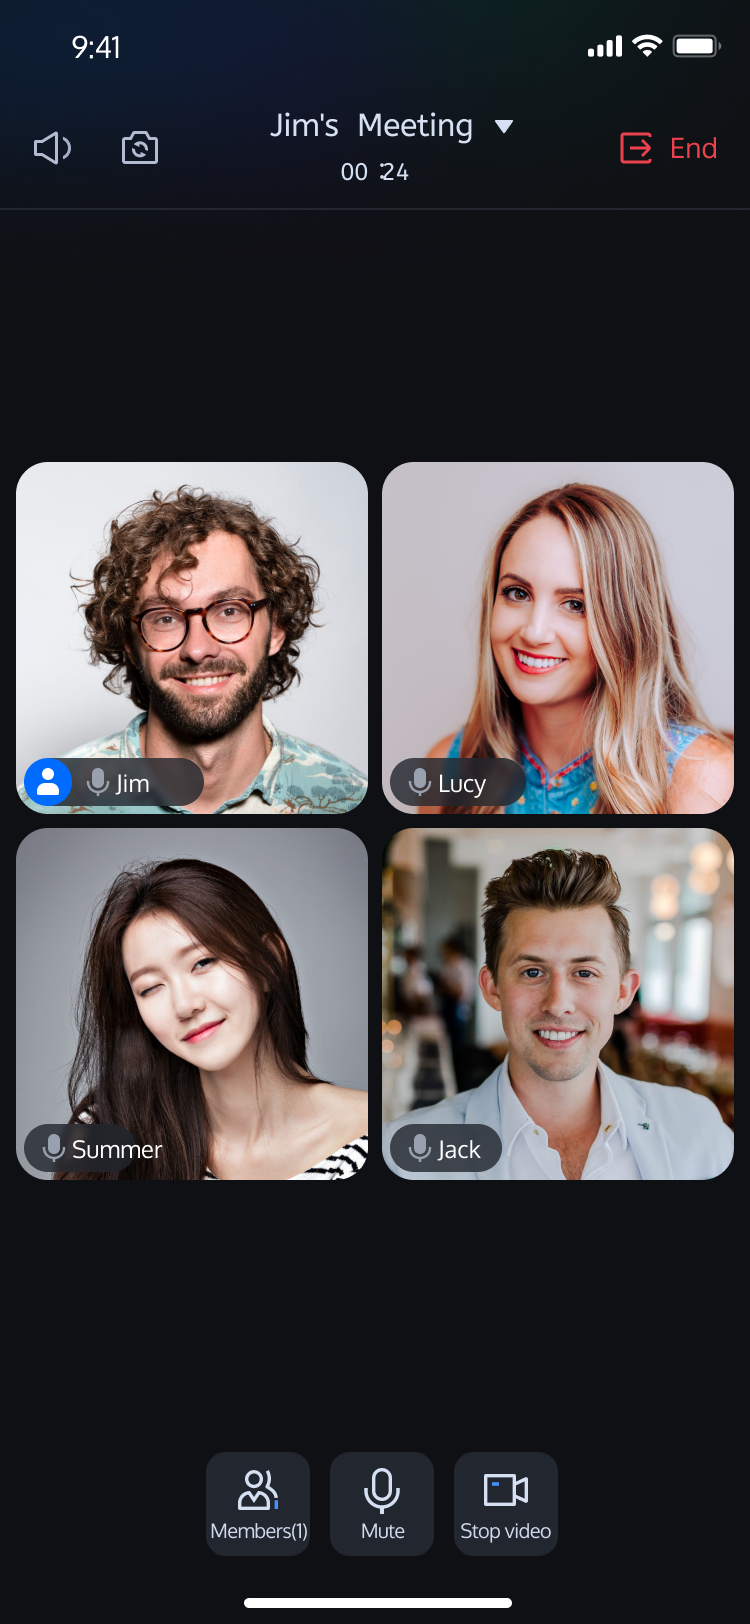
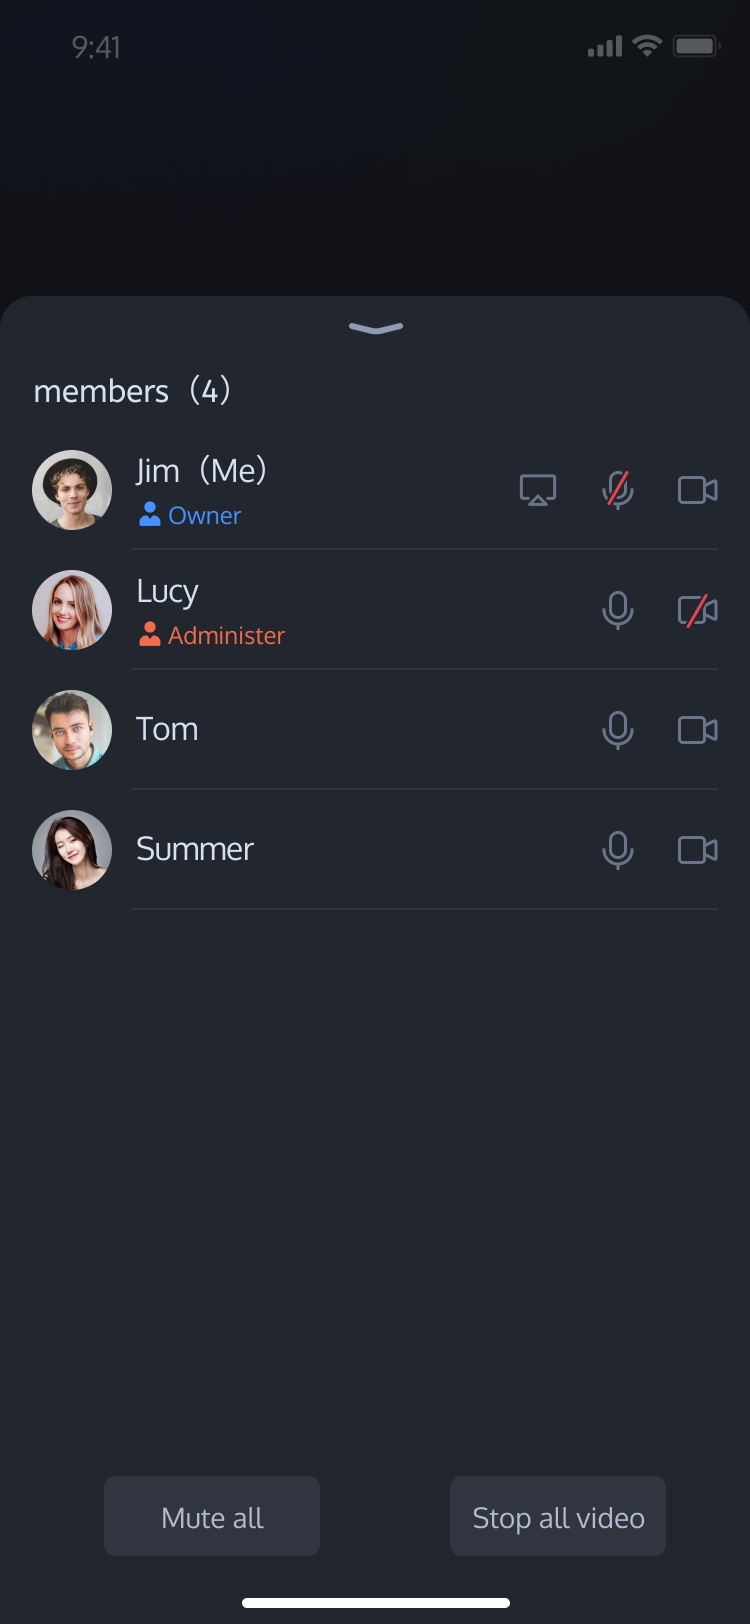
Room Preparation Page | Standard Room Home | Large Webinar Room Home | Member Management |
 |  |  |  |
Prerequisites
Activate the Service
Follow the instructions in Activate the Service to obtain a TUIRoomKit trial. Then, go to the Application Management page to retrieve the following information:
SDKAppID: Required application identifier. TRTC uses SDKAppID for billing and analytics.
SDKSecretKey: Application SecretKey used to initialize configuration files with sensitive information.
Environment Requirements
Platform | Version |
Flutter | 3.29.3 or later |
Android | Android 5.0 (SDK API Level 21) or later |
iOS | iOS 14.0 or later |
Quick Integration
Step 1: Integrate TUIRoomKit Component
dependencies:tencent_conference_uikit: Latest version
Install the component by running:
flutter pub get
Step 2: Configure Project Settings
Open your project in Xcode, navigate to Project > Build Settings > Deployment, and set Strip Style to
Non-Global Symbols to preserve required global symbol information.To enable audio and video features on iOS, grant microphone and camera permissions. (On
Android, required permissions are already declared in the SDK; no manual configuration needed.) Add the following entries to your app's
Info.plist (ios/Runner/Info.plist) for system permission prompts:<key>NSCameraUsageDescription</key><string>TUIRoomKit needs access to your camera</string><key>NSMicrophoneUsageDescription</key><string>TUIRoomKit needs access to your microphone</string>
Next, add these preprocessor definitions to your ios/Podfile to enable camera and microphone permissions:
post_install do |installer|installer.pods_project.targets.each do |target|flutter_additional_ios_build_settings(target)target.build_configurations.each do |config|config.build_settings['GCC_PREPROCESSOR_DEFINITIONS'] ||= ['$(inherited)','PERMISSION_MICROPHONE=1','PERMISSION_CAMERA=1',]endendend
Step 3: Configure Page Navigation and Localization
To enable proper page navigation and multilingual UI, update your Flutter app as follows:
Add
RoomNavigatorObserver.instance to navigatorObservers to monitor route changes and manage component lifecycle.Add localization delegates to
localizationsDelegates to display UI text according to the system language.Wrap your
MaterialApp with ComponentTheme so all RoomKit components inherit the theme configuration. Example using MaterialApp:
import 'package:tencent_conference_uikit/tencent_conference_uikit.dart';// Main app classclass XXX extends StatelessWidget {const XXX({super.key});@overrideWidget build(BuildContext context) {return ComponentTheme( // Wrap MaterialApp with ComponentTheme for theme accesschild: MaterialApp(// Add RoomKit navigation observer for route and lifecycle managementnavigatorObservers: [RoomNavigatorObserver.instance],// Add localization delegates for multilingual UIlocalizationsDelegates: [...RoomLocalizations.localizationsDelegates,...BarrageLocalizations.localizationsDelegates,],supportedLocales: const [Locale('en'), Locale('zh')],// Other app configurations......),);}}
After setup, components will support multiple languages and handle navigation correctly.
Step 4: Login
After integration, complete the login process—a critical step for using TUIRoomKit. You must log in successfully before accessing TUIRoomKit features. Ensure all parameters are configured correctly:
Note:
The sample code calls the login interface directly. In production, always call TUIRoomKit's login service after your own user authentication and login logic. This prevents business logic confusion and data inconsistencies, and ensures seamless integration with your user management and permission system.
import 'package:atomic_x_core/atomicxcore.dart'; // TUIRoomKit uses atomic_x_core internally; import it here.var loginResult = await LoginStore.shared.login(sdkAppID: 1400000001, // Replace with your SDKAppIDuserID: 'userID', // Replace with your UserIDuserSig: 'userSig', // Replace with your UserSig);if (loginResult.isSuccess) {// login success} else {// login error}
Login API Parameter Descriptions:
Parameter | Type | Description |
sdkAppID | int | |
userID | String | Unique ID for the current user. Only letters, numbers, hyphens, and underscores are allowed. Do not use simple IDs like 1, 123, etc., to avoid multi-device login conflicts. |
userSig | String | 【Notes】 Development: Use the local GenerateTestUserSig.genTestSig function or the UserSig Assistant Tool to generate a temporary userSig. Production: To prevent SecretKey leaks, generate userSig on your server. See Server-side UserSig Generation. |
Step 5: Set Avatar and Nickname
For first-time users without avatar or nickname info, set personal details using the
setSelfInfo method in LoginStore:import 'package:atomic_x_core/atomicxcore.dart';final result = await LoginStore.shared.setSelfInfo(userInfo: UserProfile(userID: 'userID', nickname: 'userName', avatarURL: 'avatarURL'),);if (result.isSuccess) {debugPrint("setSelfInfo success");} else {debugPrint("setSelfInfo failed code:${result.errorCode}, message:${result.errorMessage}");}
setSelfInfo API Parameter and Return Value Descriptions:
Parameter/Return Value | Type | Description |
userProfile | UserProfile | Core user info model, includes: userID: User Unique ID. nickname: Nickname. avatarURL: Avatar URL. |
Return Value | Future | Callback for the result of setting personal info. Returns error code and message if failed. |
Step 6: Create Room
Within the
TUIRoomKit component, RoomMainWidget is the primary interface for multi-party audio and video conferencing. The example below shows how to embed RoomMainWidget in your app as a host.Implementation Steps:
1. Build Enter Room Configuration: Set whether to automatically enable audio/video devices after entering the room.
2. Configure Room Creation Options: Set the Room Name and other details.
3. Initialize Main Room Page: Set up the main room page as the host.
4. Navigate to Room Page: Push
RoomMainWidget onto the navigation stack.Note:
Mobile currently supports only standard rooms. To create a large webinar room, see Web Quick Integration for web-based creation.
Sample Code:
import 'package:tencent_conference_uikit/tencent_conference_uikit.dart';// YourMainPage is the page where you load the main room pageclass YourMainPage extends StatelessWidget {const YourMainPage({super.key});@overrideWidget build(BuildContext context) {return Scaffold(body: Center(child: ElevatedButton(onPressed: () => _createRoom(context),child: const Text('Create Room'),),),);}void _createRoom(BuildContext context) {// 1. Build enter room configurationconst config = ConnectConfig(autoEnableCamera: true, // Enable camera automaticallyautoEnableMicrophone: true, // Enable microphone automaticallyautoEnableSpeaker: true, // Enable speaker automatically);// 2. Configure room creation optionsfinal options = CreateRoomOptions(roomName: 'roomName', // Room Name);// 3. Initialize main room pagefinal behavior = RoomBehavior.create(options);// 4. Navigate to room pageNavigator.of(context).push(MaterialPageRoute(builder: (context) => RoomMainWidget(roomID: 'roomID',behavior: behavior,config: config,),),);}}
RoomMainWidget Constructor Parameter Descriptions:
Parameter | Type | Description |
roomID | String | Unique Room Identifier. Length: 0-48 bytes. Use only numbers, English letters (case-sensitive), underscores (_), and hyphens (-). Avoid spaces and Chinese characters. |
behavior | RoomBehavior | Main Room Page initialization source. Parameter options: create: Host creates the room (requires Room Creation Options). For detailed usage of CreateRoomOptions, please refer to: CreateRoomOptions Structure Specifications. enter: Participant joins the room. |
config | ConnectConfig | Controls audio/video device behavior after entering the room. |
ConnectConfig Parameter Descriptions:
Parameter | Type | Description |
autoEnableMicrophone | bool | Automatically enable microphone after entering the room. true: Enable automatically (default). false: Do not enable automatically. |
autoEnableCamera | bool | Automatically enable camera after entering the room. true: Enable automatically (default). false: Do not enable automatically. |
autoEnableSpeaker | bool | Automatically enable speaker after entering the room. true: Enable automatically (default). false: Do not enable automatically. |
CreateRoomOptions Structure Specifications
Parameter | Type | Required | Default Value | Description |
roomName | String | No | "" | The name of the room. If not specified, a default name may be assigned by the system. |
password | String | No | "" | The password for the room. Once set, other users must enter this password to join. |
isAllMicrophoneDisabled | bool | No | false | Determines whether to disable microphones for all participants. When enabled, all participants except the host/administrators are restricted from unmuting by default. |
isAllCameraDisabled | bool | No | false | Determines whether to disable cameras for all participants. When enabled, all participants except the host/administrators are restricted from turning on their cameras by default. |
isAllScreenShareDisabled | bool | No | false | Determines whether to prohibit screen sharing for all participants. When enabled, only the host/administrators are allowed to share their screens. |
isAllMessageDisabled | bool | No | false | Determines whether to prohibit sending chat messages. When enabled, regular participants will be unable to send text messages in the room. |
Step 7: Join Room
The following example shows how to embed
RoomMainWidget in your app as a participant.Implementation Steps:
1. Build Enter Room Configuration: Set whether to automatically enable audio/video devices after entering the room.
2. Initialize Main Room Page: Set up the main room page as a participant.
3. Navigate to Room Page: Push
RoomMainWidget onto the navigation stack.Sample Code:
import 'package:tencent_conference_uikit/tencent_conference_uikit.dart';// YourMainPage is the page where you load the main room pageclass YourMainPage extends StatelessWidget {const YourMainPage({super.key});@overrideWidget build(BuildContext context) {return Scaffold(body: Center(child: ElevatedButton(onPressed: () => _enterRoom(context),child: const Text('Join Room'),),),);}void _enterRoom(BuildContext context) {// 1. Build enter room configurationconst config = ConnectConfig(autoEnableCamera: true, // Enable camera automaticallyautoEnableMicrophone: true, // Enable microphone automaticallyautoEnableSpeaker: true, // Enable speaker automatically);// 2. Initialize main room pageconst behavior = RoomBehavior.enter();// 3. Navigate to room pageNavigator.of(context).push(MaterialPageRoute(builder: (context) => RoomMainWidget(roomID: 'roomID',behavior: behavior,config: config,),),);}}
For detailed parameter descriptions, see: RoomMainWidget Constructor Parameter Descriptions and ConnectConfig Parameter Descriptions.
Note:
When joining a large webinar room using TUIRoomKit, ensure the room ID created on the web starts with
webinar_.Core Features
Once
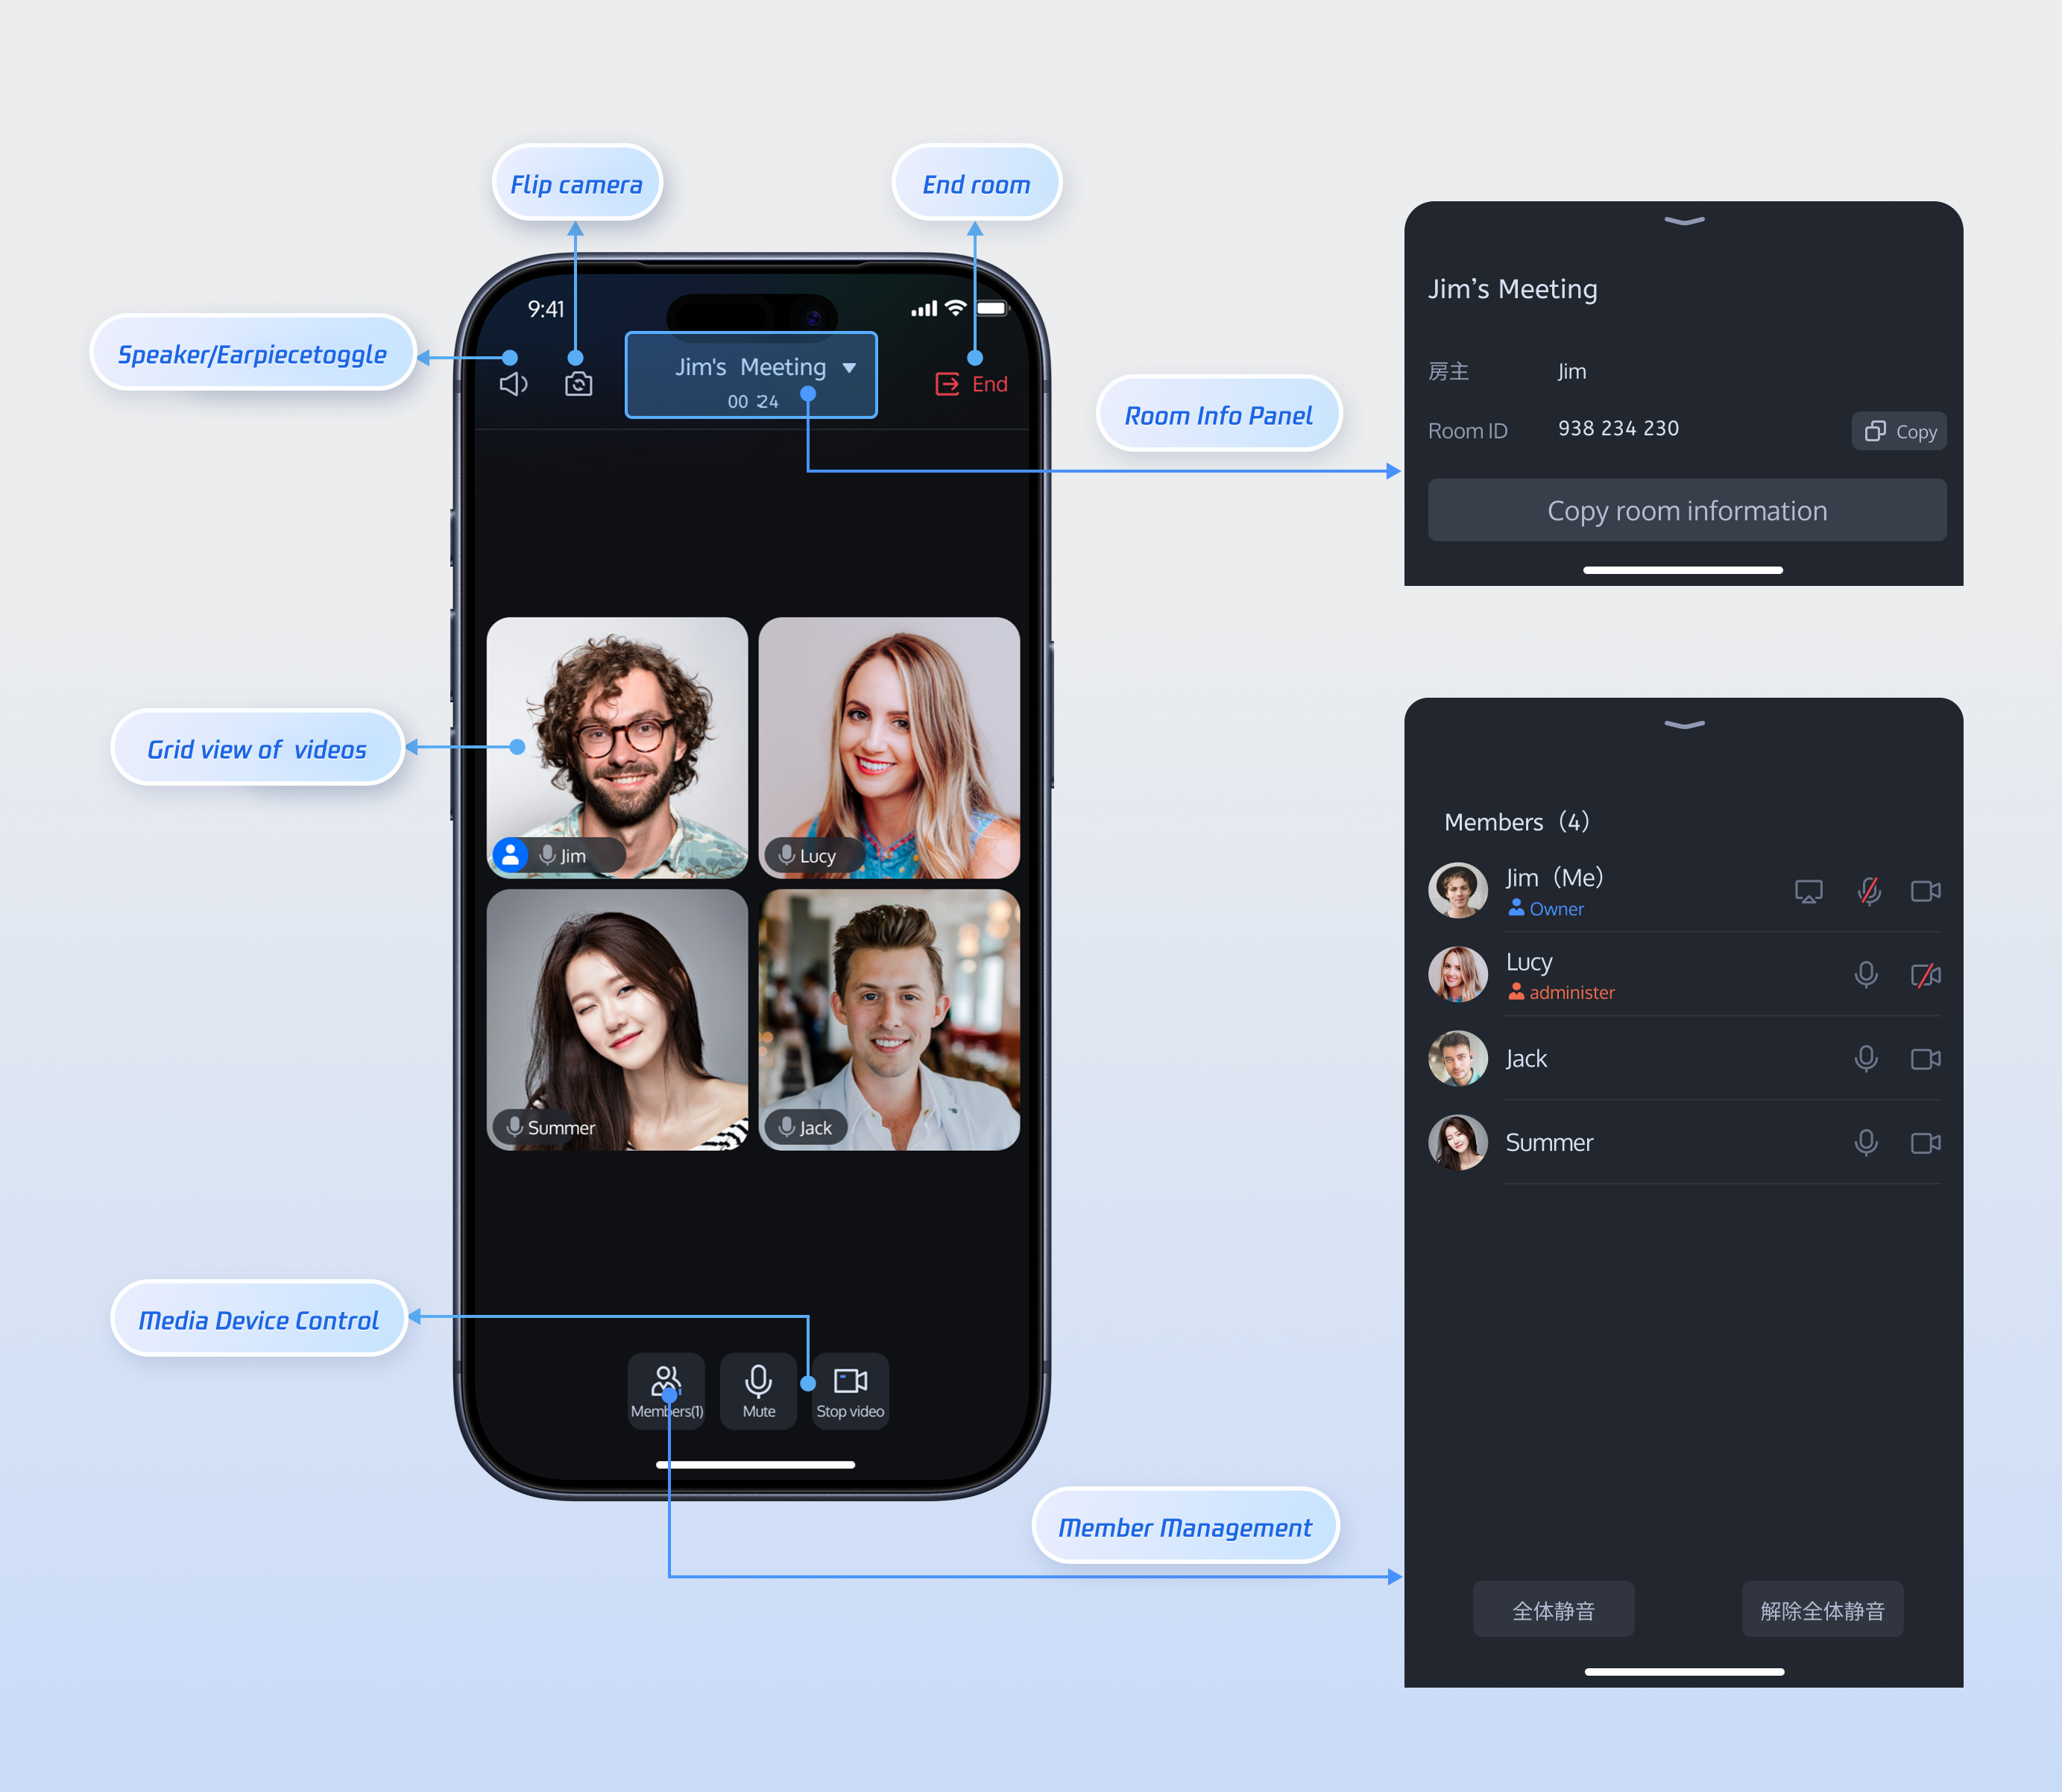
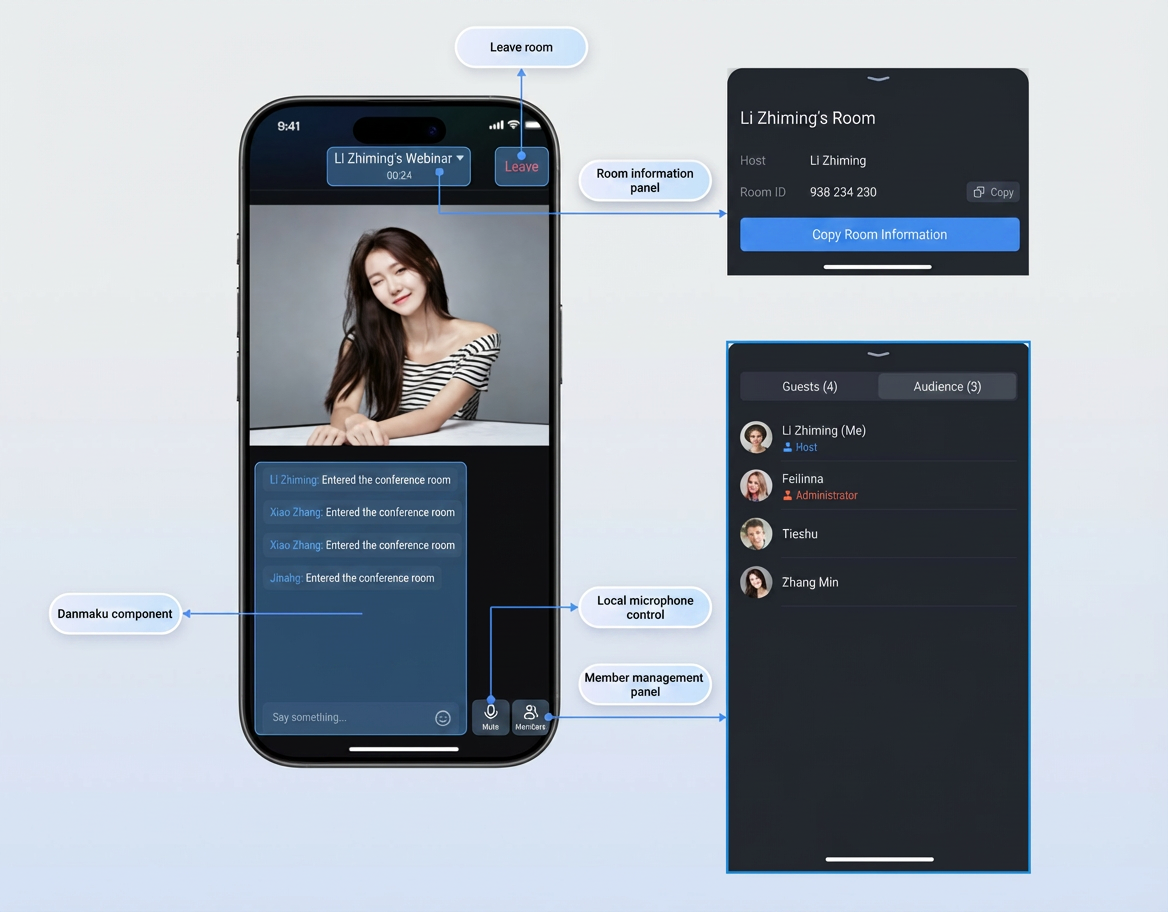
RoomMainWidget is integrated, you get a full-featured multi-party audio and video conferencing interface, including member management, device control, room information display, and more. This is the core of the TUIRoomKit component.Standard Room | Large Webinar Room |
 |  |
UI Customization
Note:
UI customization, icon customization, and text customization require modifying TUIRoomKit source code. When integrated via the pub Dependency Manager, TUIRoomKit is treated as an immutable dependency. Each time you run flutter pub get, Flutter:
1. Checks the version in pubspec.lock.
2. Downloads the corresponding version source code from the remote repository.
3. Overwrites files in the .pub-cache/ directory with the downloaded original code.
Any manual changes to the cache directory are temporary and will be reverted the next time you install dependencies.
Recommended Approach:
1. Fork the official TUIKit_Flutter repository.
2. Make and commit your changes in your fork.
3. Update pubspec.yaml to reference your custom repository and branch.
dependencies:tencent_conference_uikit:git:url: https://github.com/your-username/TUIKit_Flutter.gitref: your-branchpath: room
The
RoomMainWidget main room page is highly customizable and feature-rich. Developers can adapt the UI to fit their business requirements. Below are the main view components in RoomMainWidget for quick modification.Standard Room | Large Webinar Room |
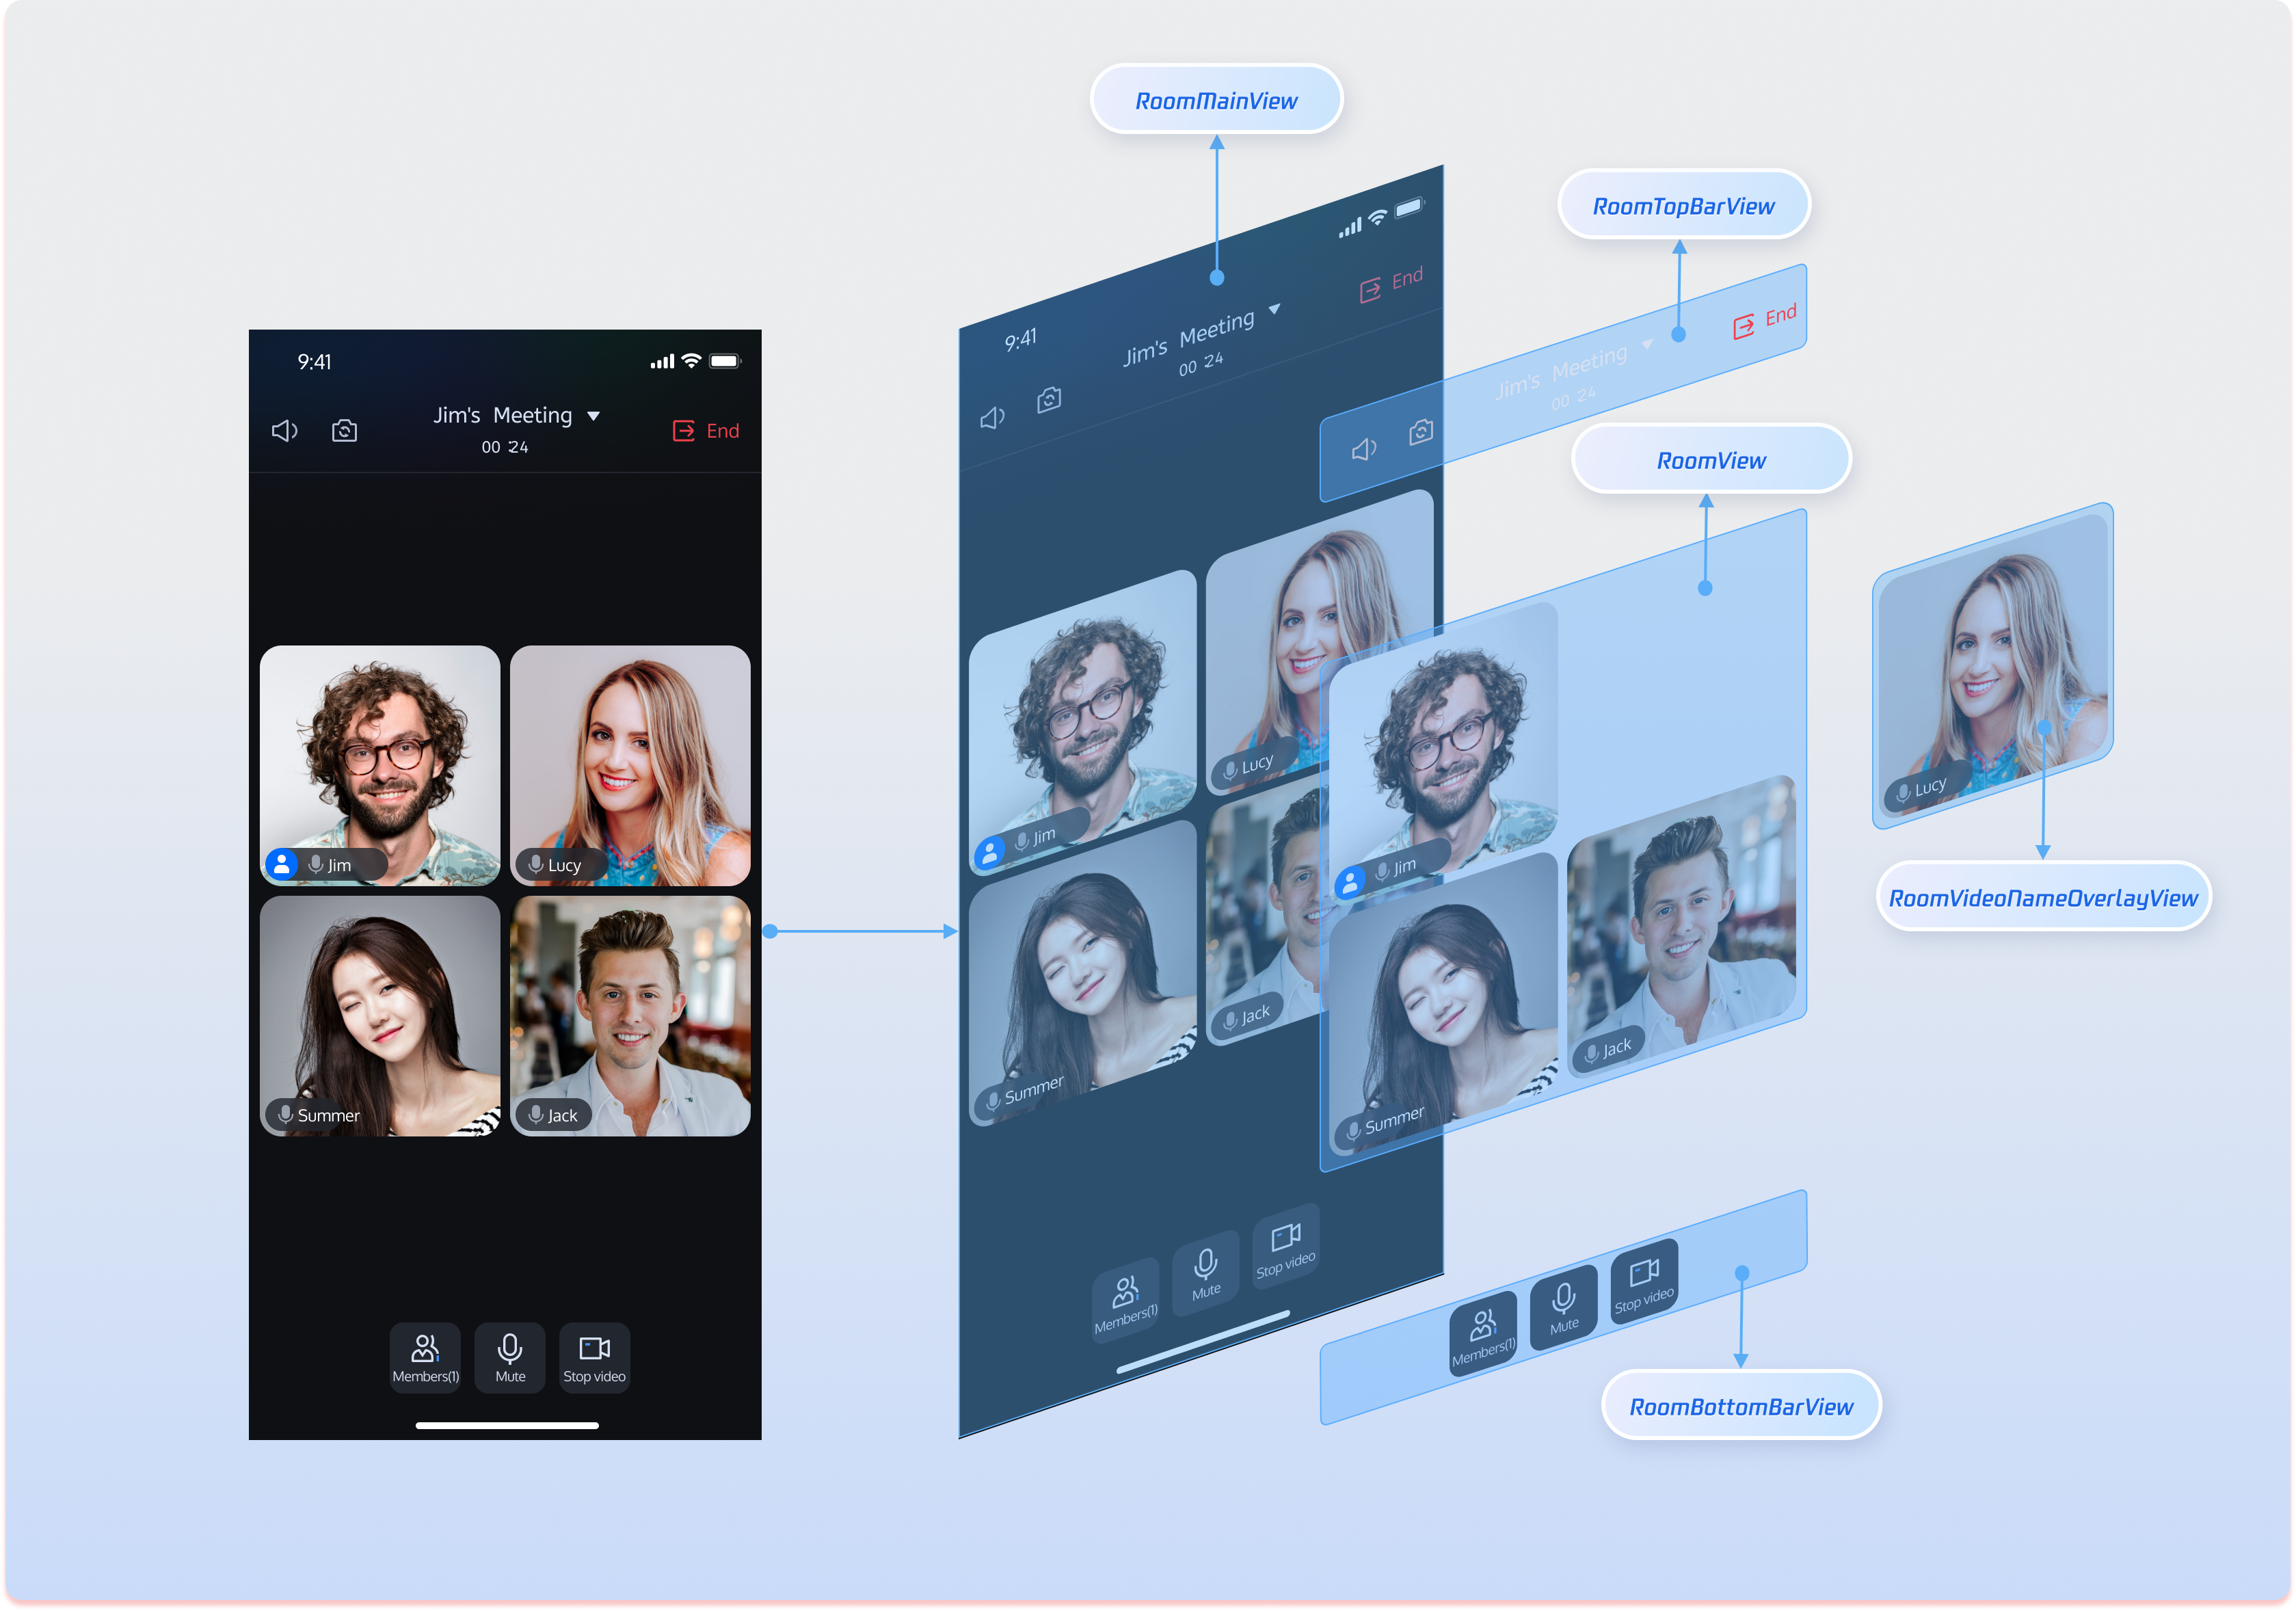 | 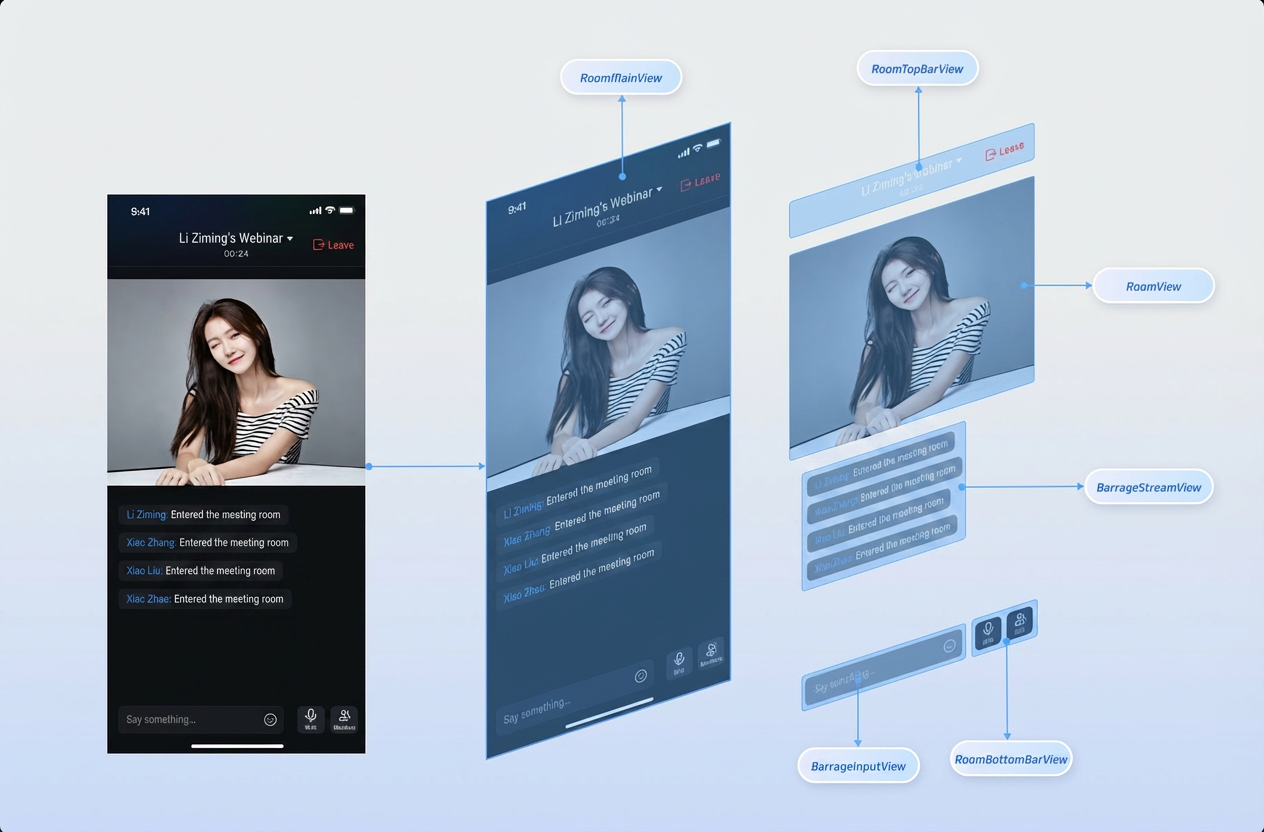 |
RoomMainWidget Component Details
Component | Description | Customization Suggestions |
Main Room View Container. Coordinates layout and data flow among subcomponents. | Adjust background, safe area adaptation, component visibility logic. | |
Top Navigation Bar. Includes room info, camera/audio controls, exit room button. | Replace icons, adjust background transparency, add custom buttons (e.g., recording, window mode). | |
Video Stream Display Area. Uses waterfall layout for multiple user video feeds. | Modify layout algorithm (row/column count, spacing), page indicator style, empty state view. | |
Single Video Stream Cell. Displays user video and basic info. | Customize video rendering layer, user info panel (avatar, badge), interaction controls (voice waveform). | |
Bottom Toolbar. Integrates microphone, camera, and member management buttons. | Rearrange button order, modify button style (color, size), add business-related features (screen sharing, in-meeting call, beauty filters). |
Icon Customization
After integrating TUIRoomKit, you can replace icon assets to match your UI requirements.
TUIRoomKit stores UI image assets in the
assets/images/ directory. Replace image files in this directory to customize icons.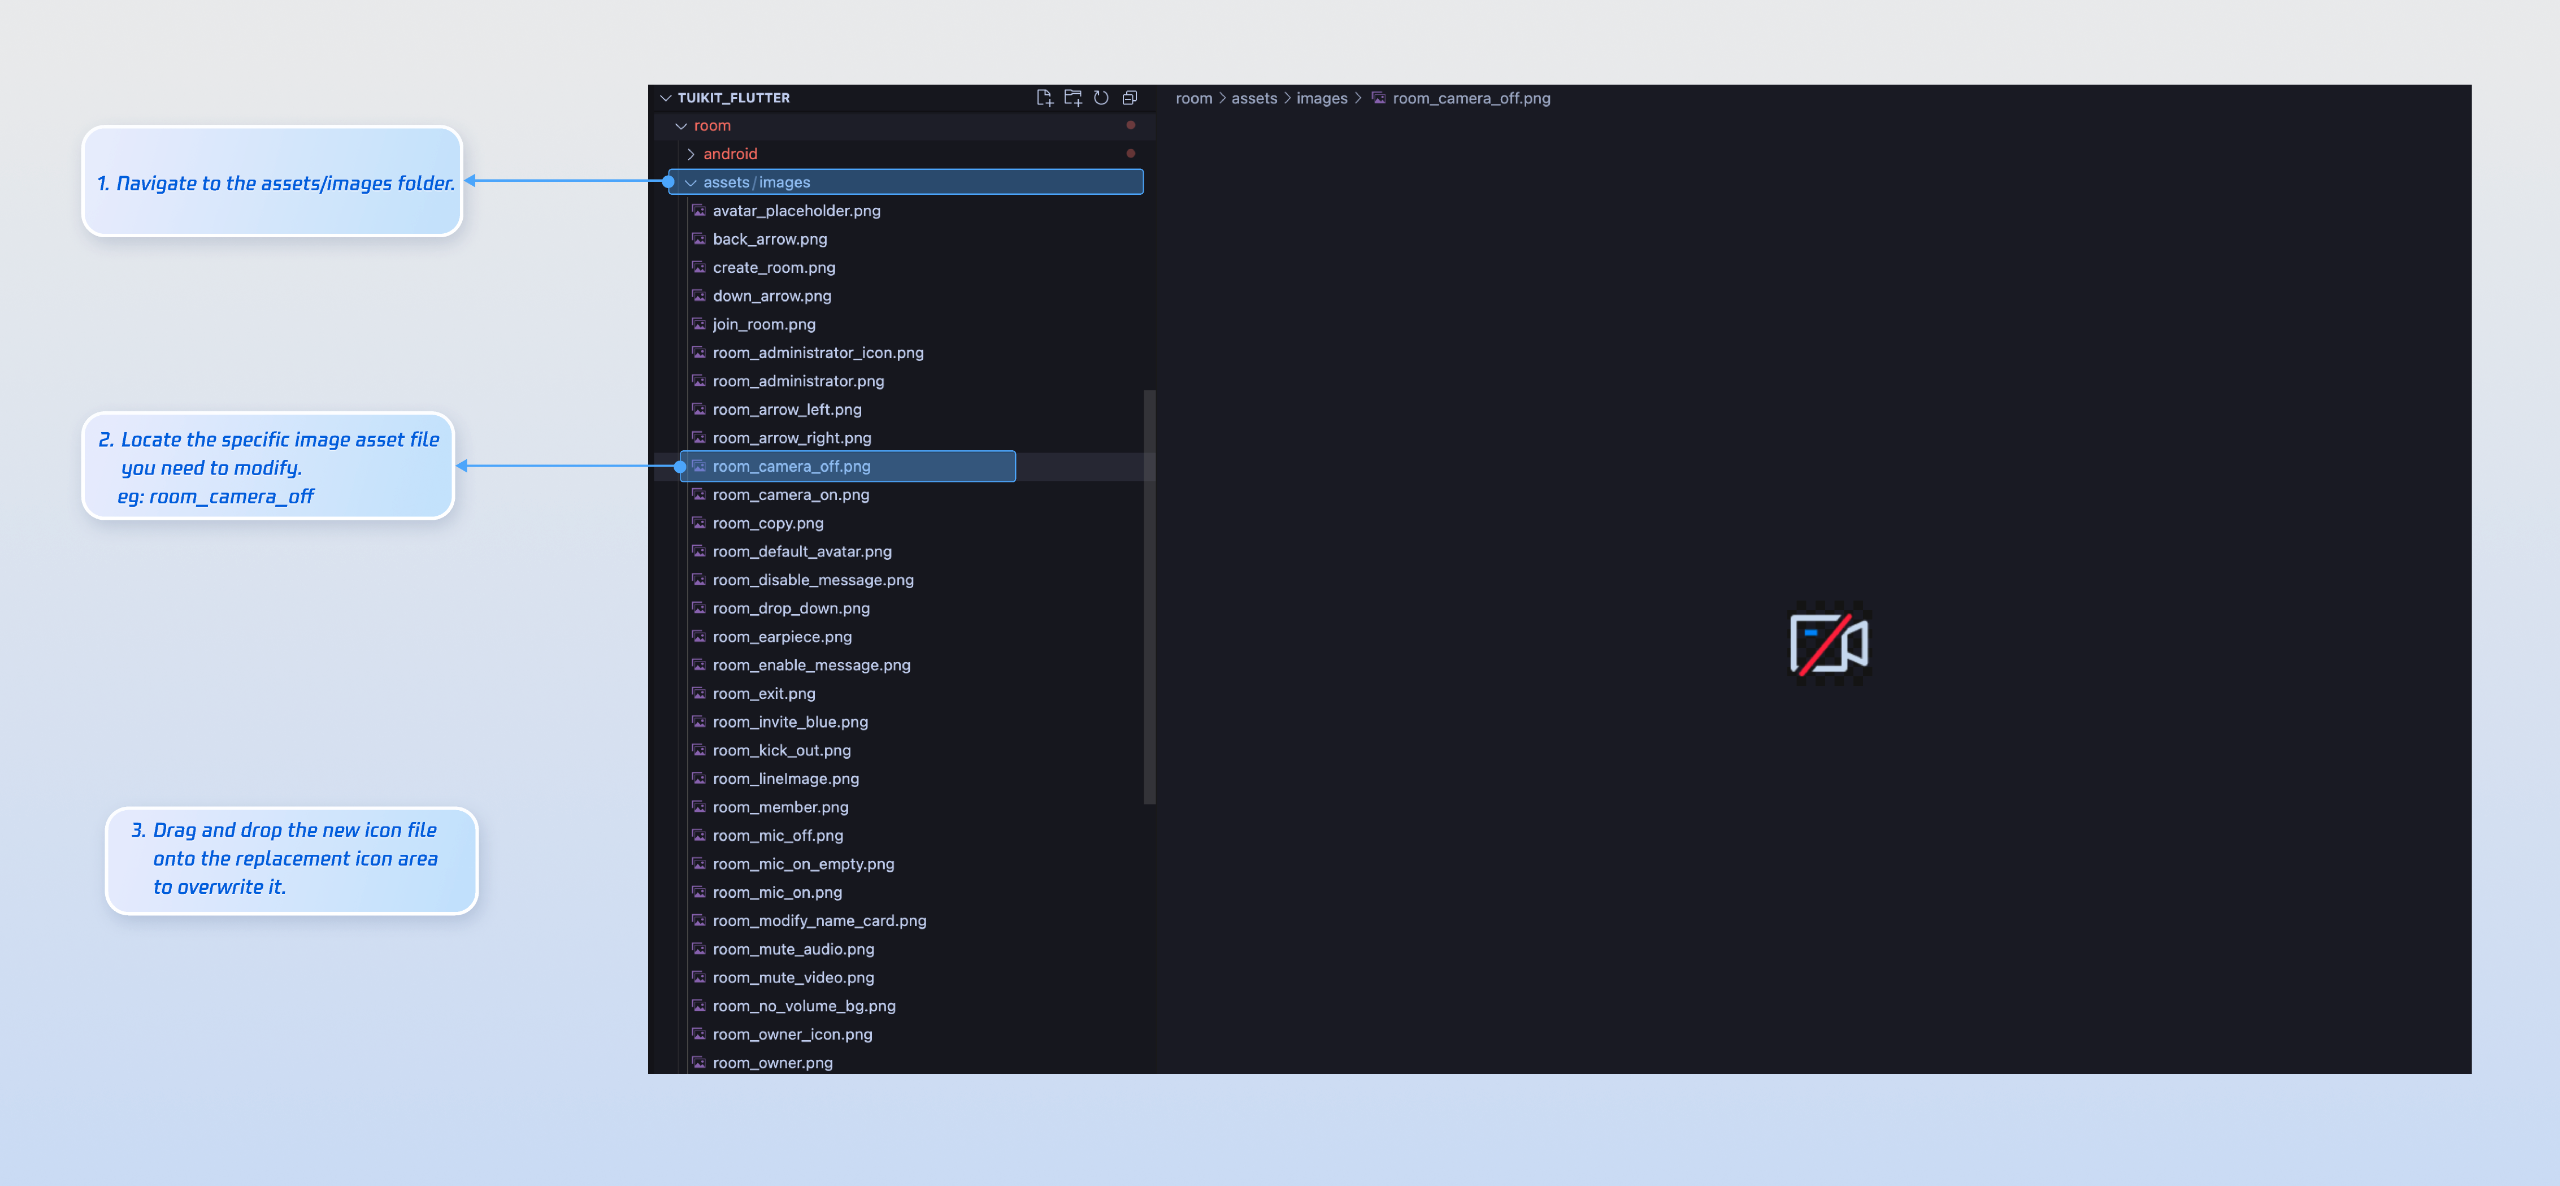
Common Image Files
Icon | File Name | Description |
 | room_camera_off.png | Camera off icon |
 | room_camera_on.png | Camera on icon |
 | room_mic_off.png | Microphone off icon |
 | room_mic_on_empty.png | Microphone on icon |
 | room_administrator_icon.png | Administrator badge icon |
 | room_owner_icon.png | Room owner badge icon |
Text Customization
TUIRoomKit uses standard Flutter ARB files to manage UI text. Edit the language files in the
lib/base/language/i10n/ directory to customize UI text: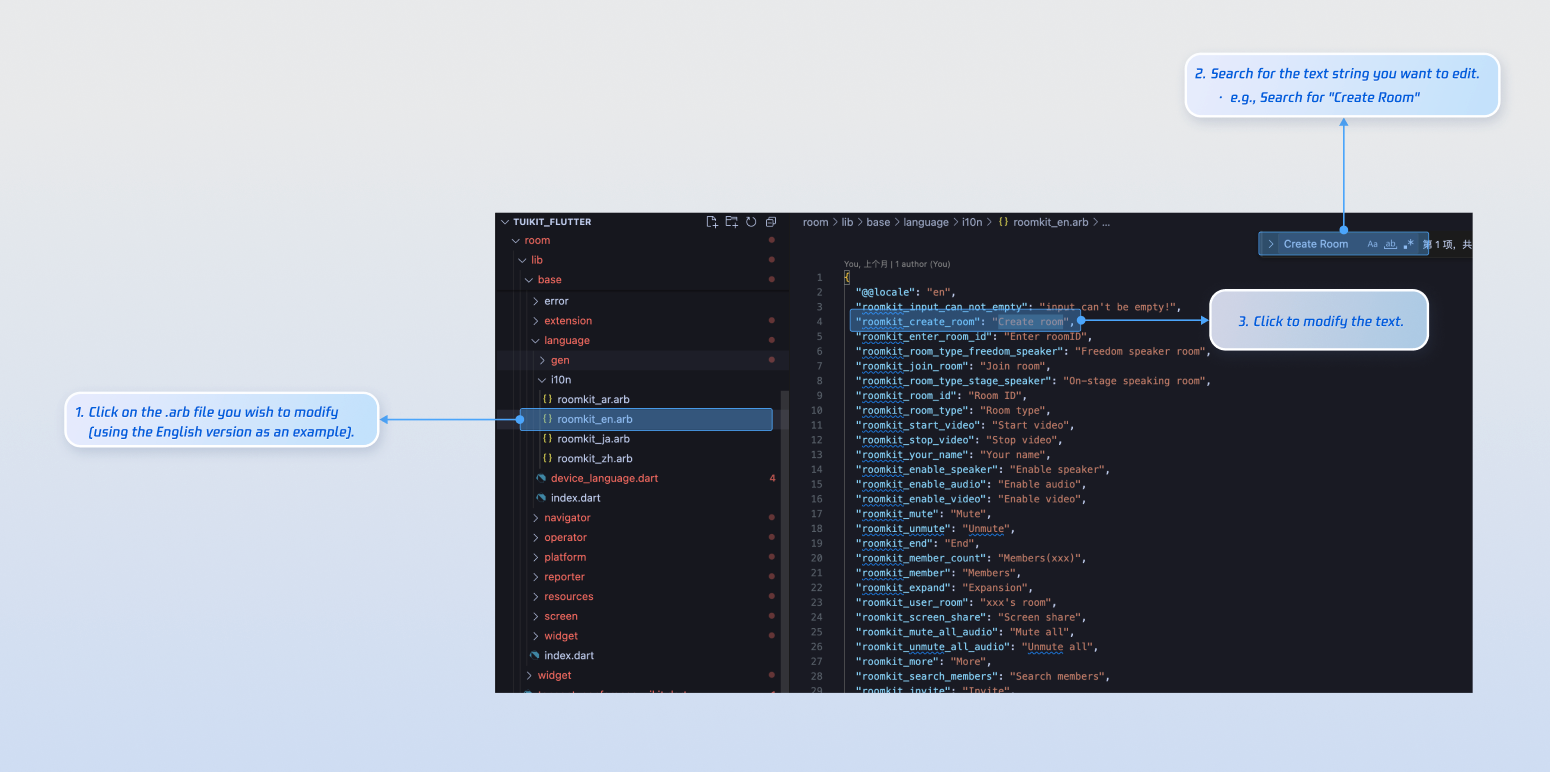
FAQs
Do I need to call login every time I enter a room?
No. Typically, you only need to call
LoginStore.shared.login once. We recommend linking LoginStore.shared.login and LoginStore.shared.logout to your own login logic.Unable to enter the room when running or packaging iOS in release mode?
Open your project in Xcode, go to Project > Build Settings > Deployment, and set Strip Style to
Non-Global Symbols to preserve required global symbol information.
