This section summarizes some common business processes in live showroom, helping you better understand the implementation process of the entire scenario.
Anchor Starting and Ending Live Streaming
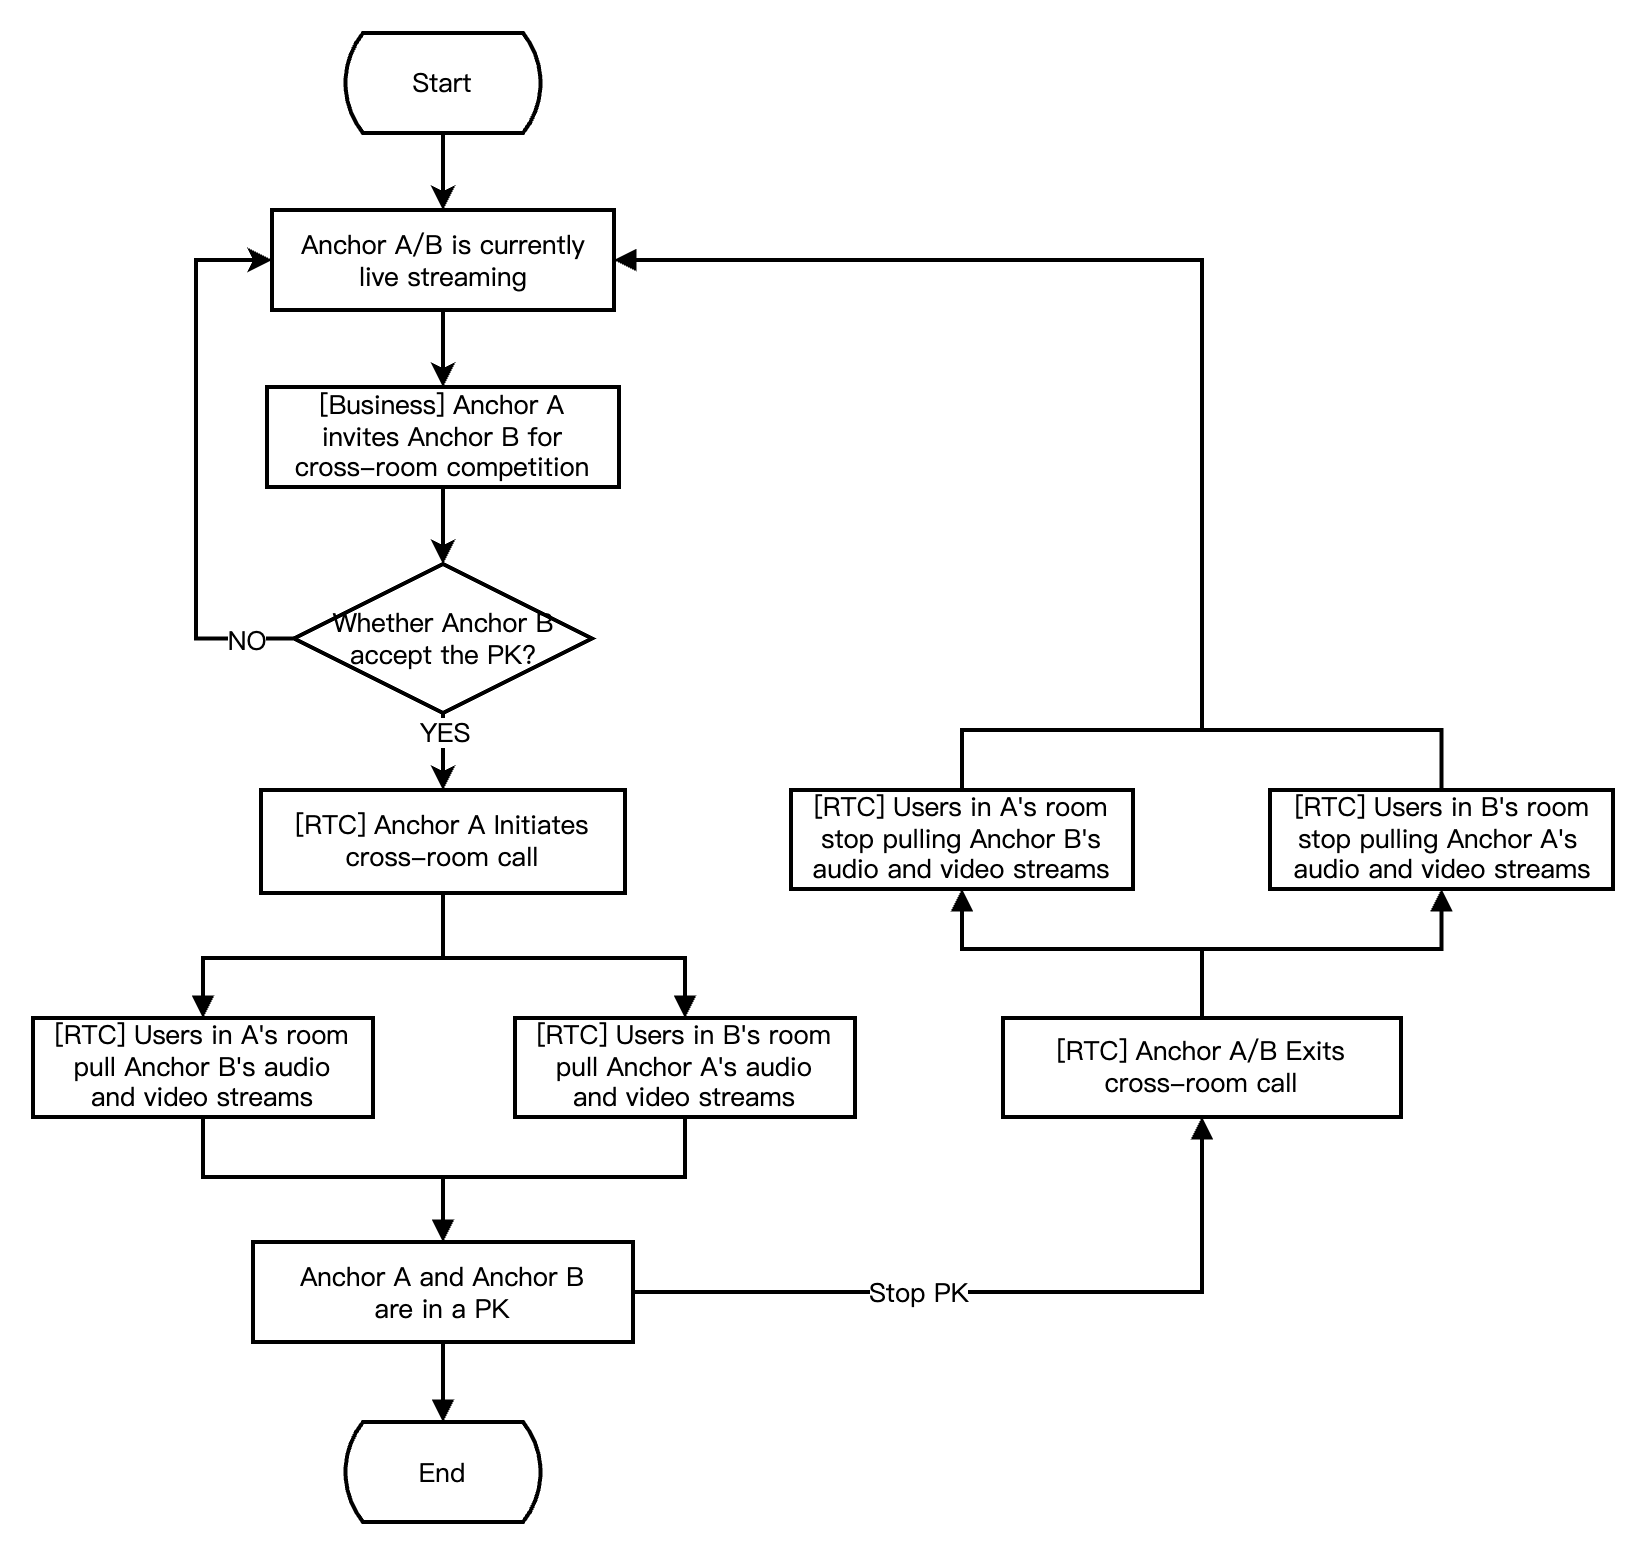
Anchor Initiating Cross-Room Mic-Connection PK
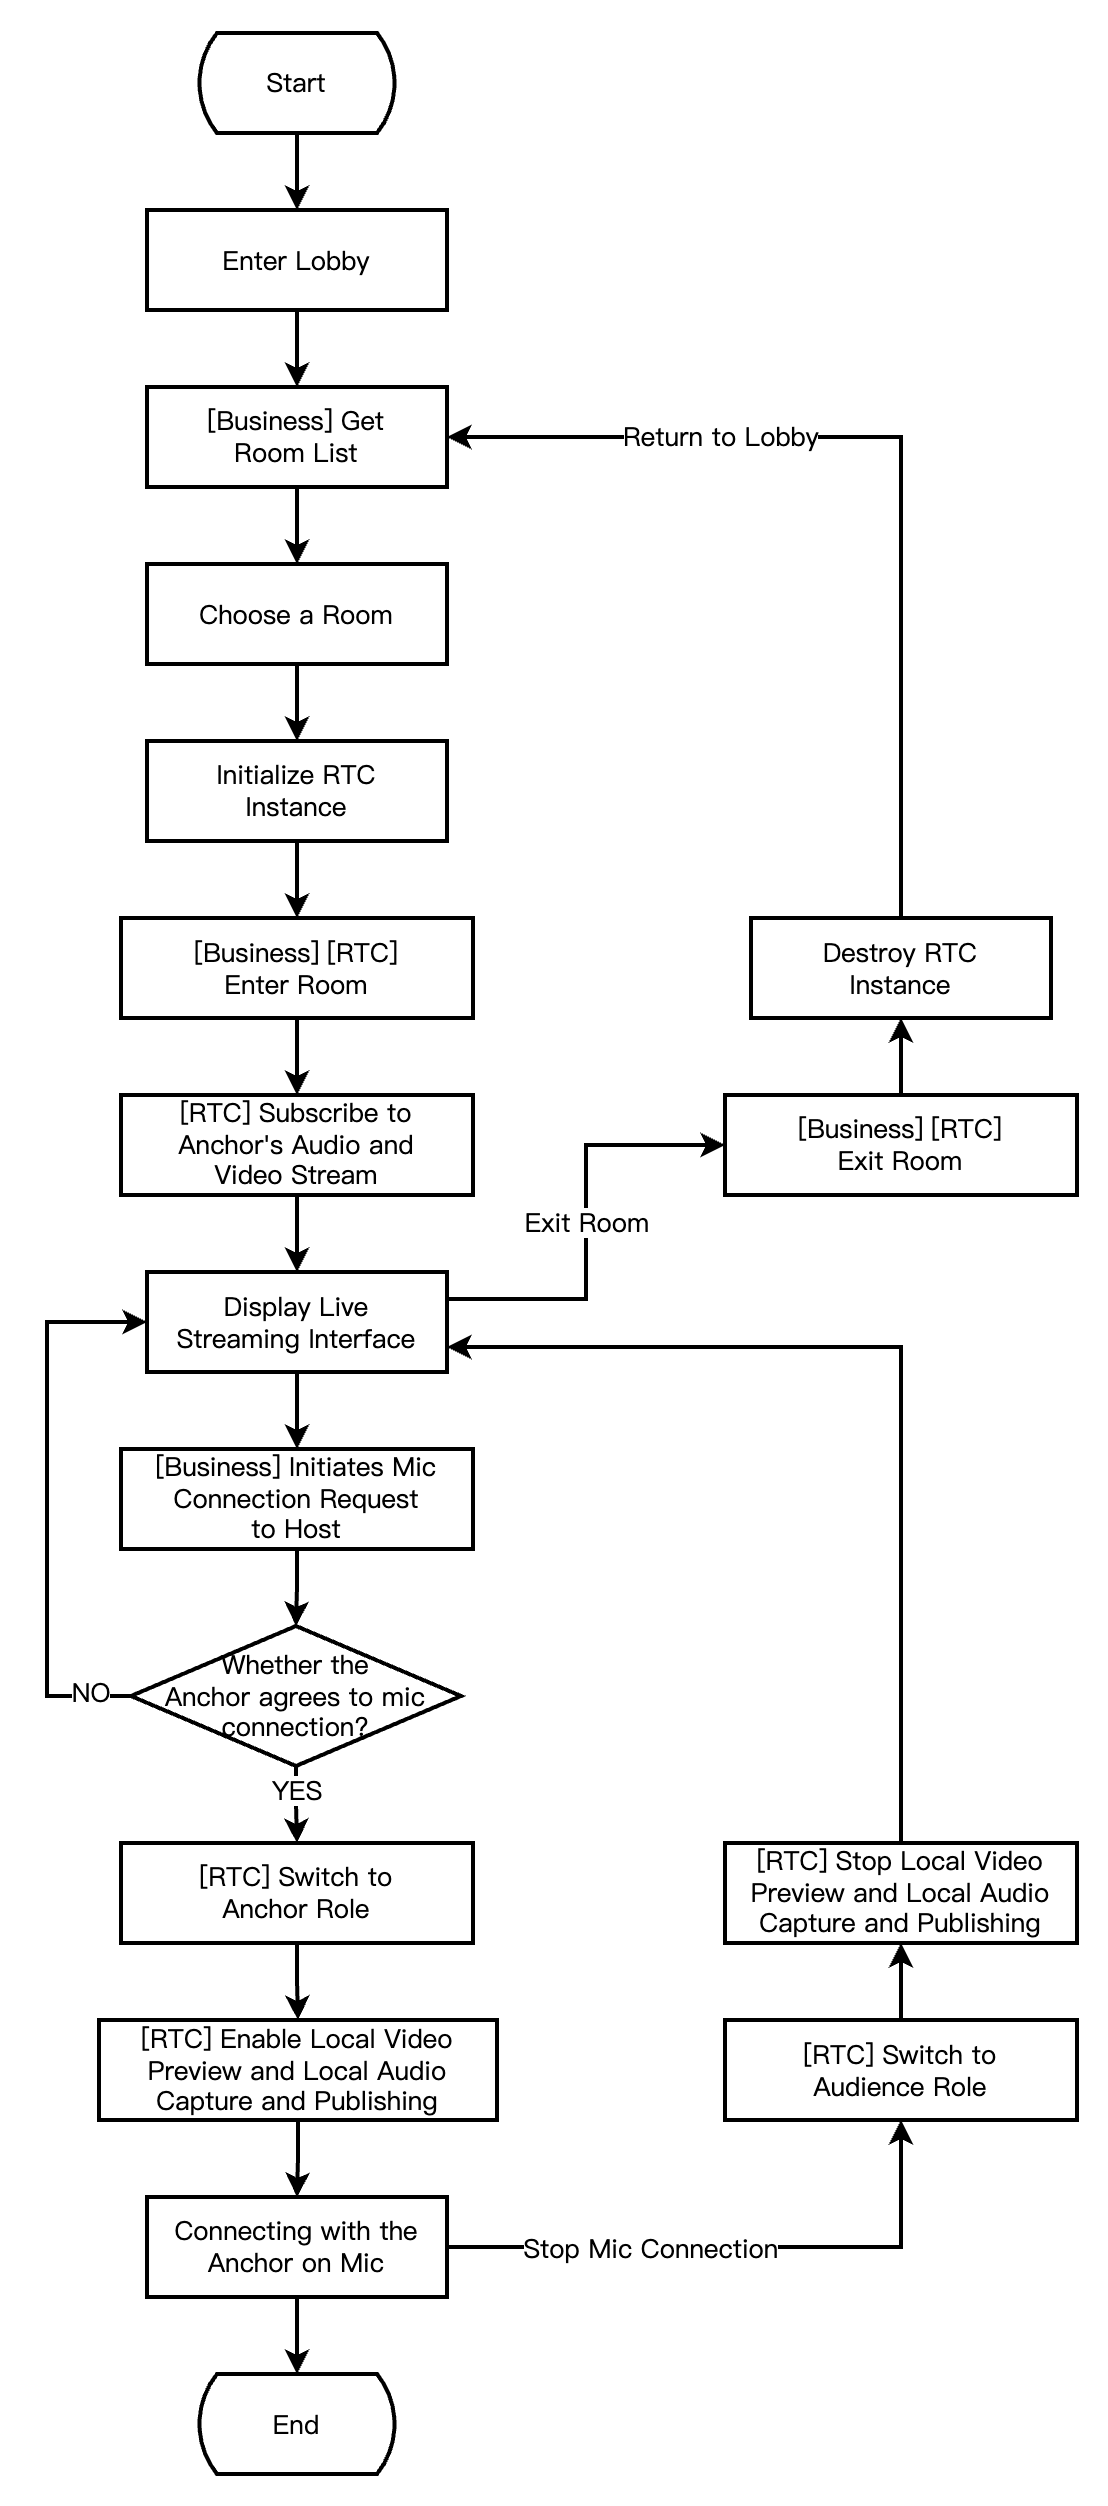
RTC Audience Entering the Room for Mic-Connection
The following figure shows the process of an anchor (room owner) local preview, creating a room, entering the room to start the live streaming, and leaving the room to end the live streaming.
The following figure shows the process of Anchor A inviting Anchor B for a cross-room mic-connection PK. During the cross-room mic-connection PK, the audiences in both rooms can see the PK mic-connection live streaming of the two room owners.
The following figure shows the process for RTC live interactive streaming audience to enter the room, apply for the mic-connection, end the mic-connection, and exit the room.
Integration Preparation
Step 1. Activating the Services
Live showroom scenarios usually require 2 paid PaaS services for construction, RTC Engine and Beauty AR. RTC Engine is responsible for providing real-time audio and video interaction capability, while Beauty AR is responsible for providing beauty effects capabilities. Beauty AR is responsible for providing beauty effect capabilities. If you use a third-party beauty effect product, you can disregard the Beauty AR integration part.
Activating RTC Engine Service
Activating Beauty AR Service
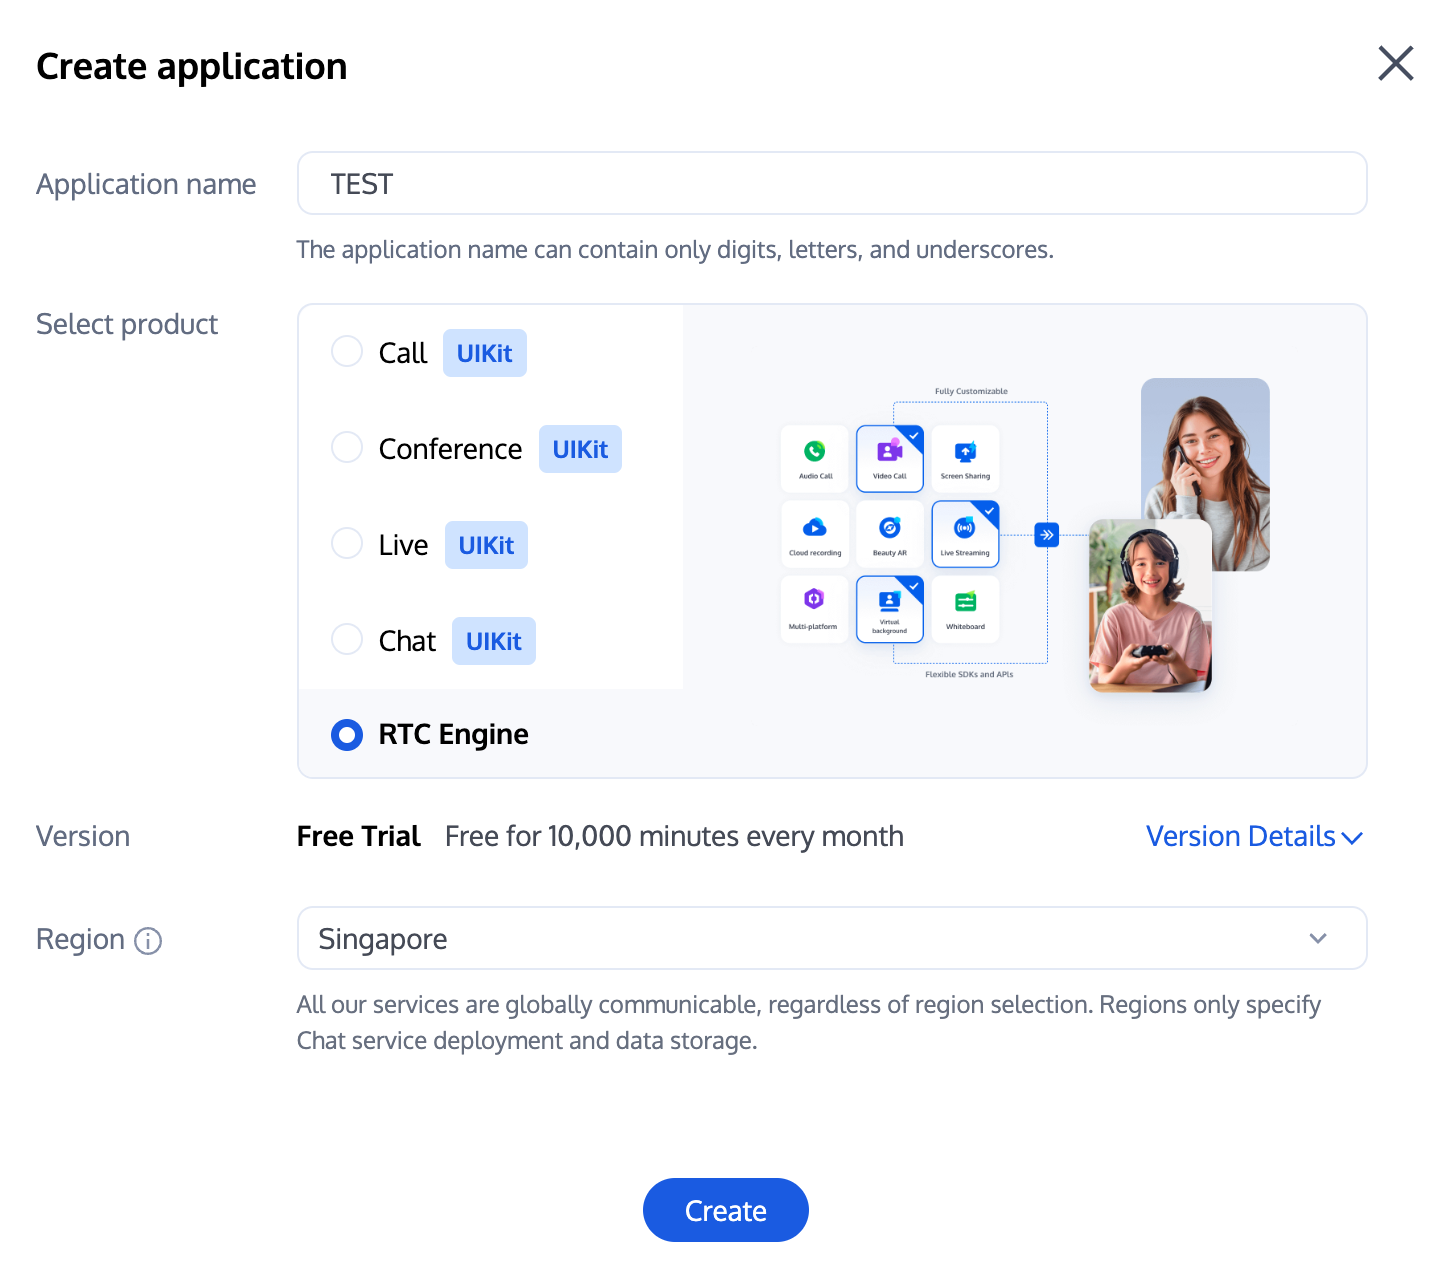
1. First, log in to the RTC Engine console to create an application. Based on your needs, you can upgrade the RTC Engine application version, such as the Professional Edition, which unlocks more value-added features and services.
Note:
It is recommended to create two applications for testing and production environments, respectively. Each Tencent Cloud account (UIN) is given 10,000 minutes of free duration every month for one year.
RTC Engine monthly packages are divided into Trial Edition (default), Lite Edition, Standard Edition, and Professional Edition, unlocking different value-added features and services. For details, see Version Features and Monthly Package Description.
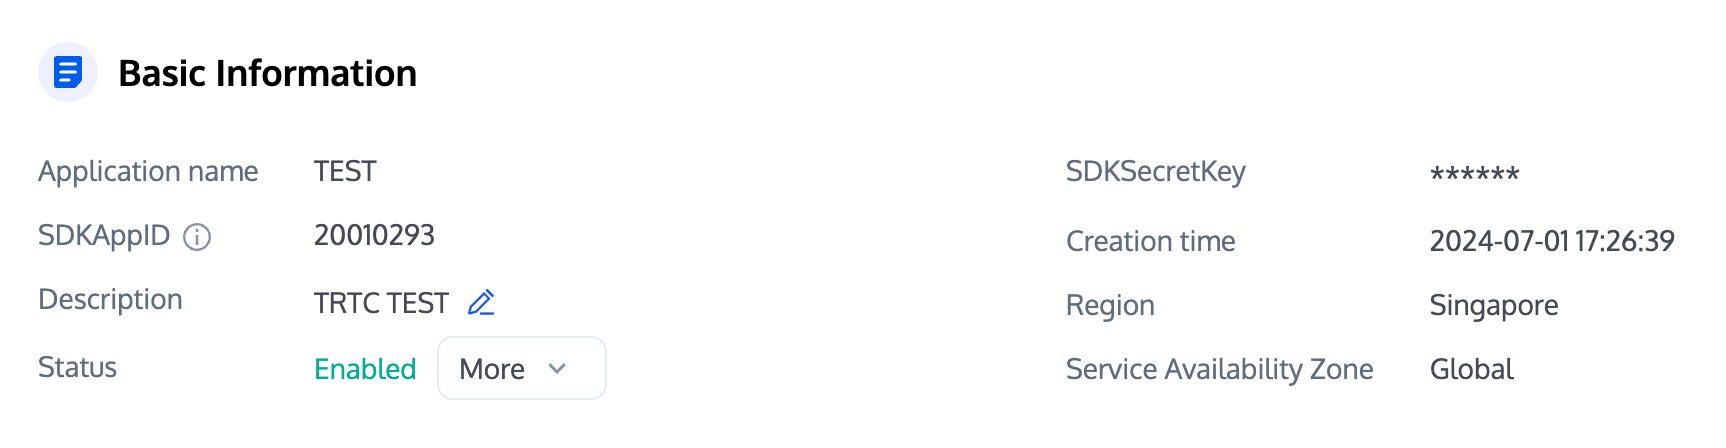
2. After an application is created, you can see the basic information of the application in the Application Management - Application Overview section. It is important to keep the SDKAppID and SDKSecretKey safe for later use and to avoid key leakage that could lead to traffic theft.
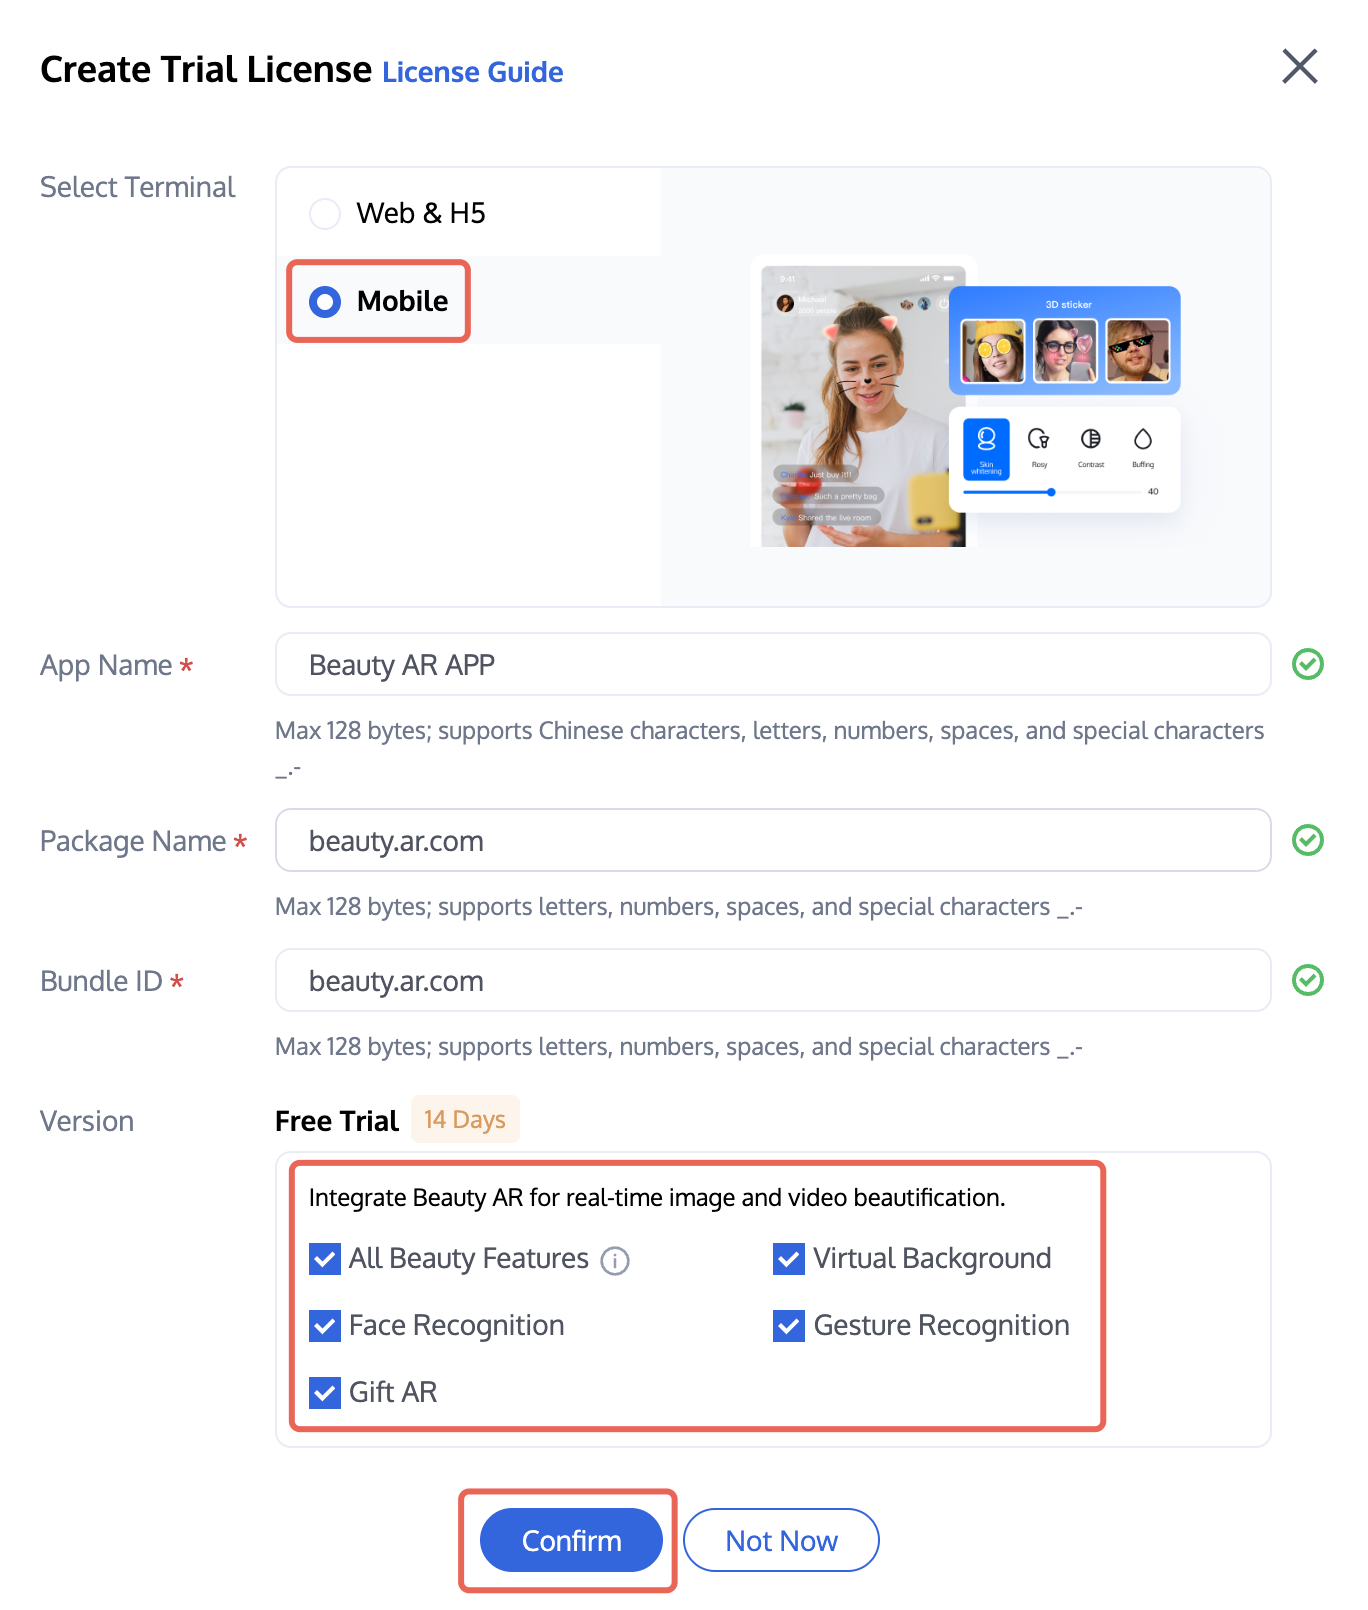
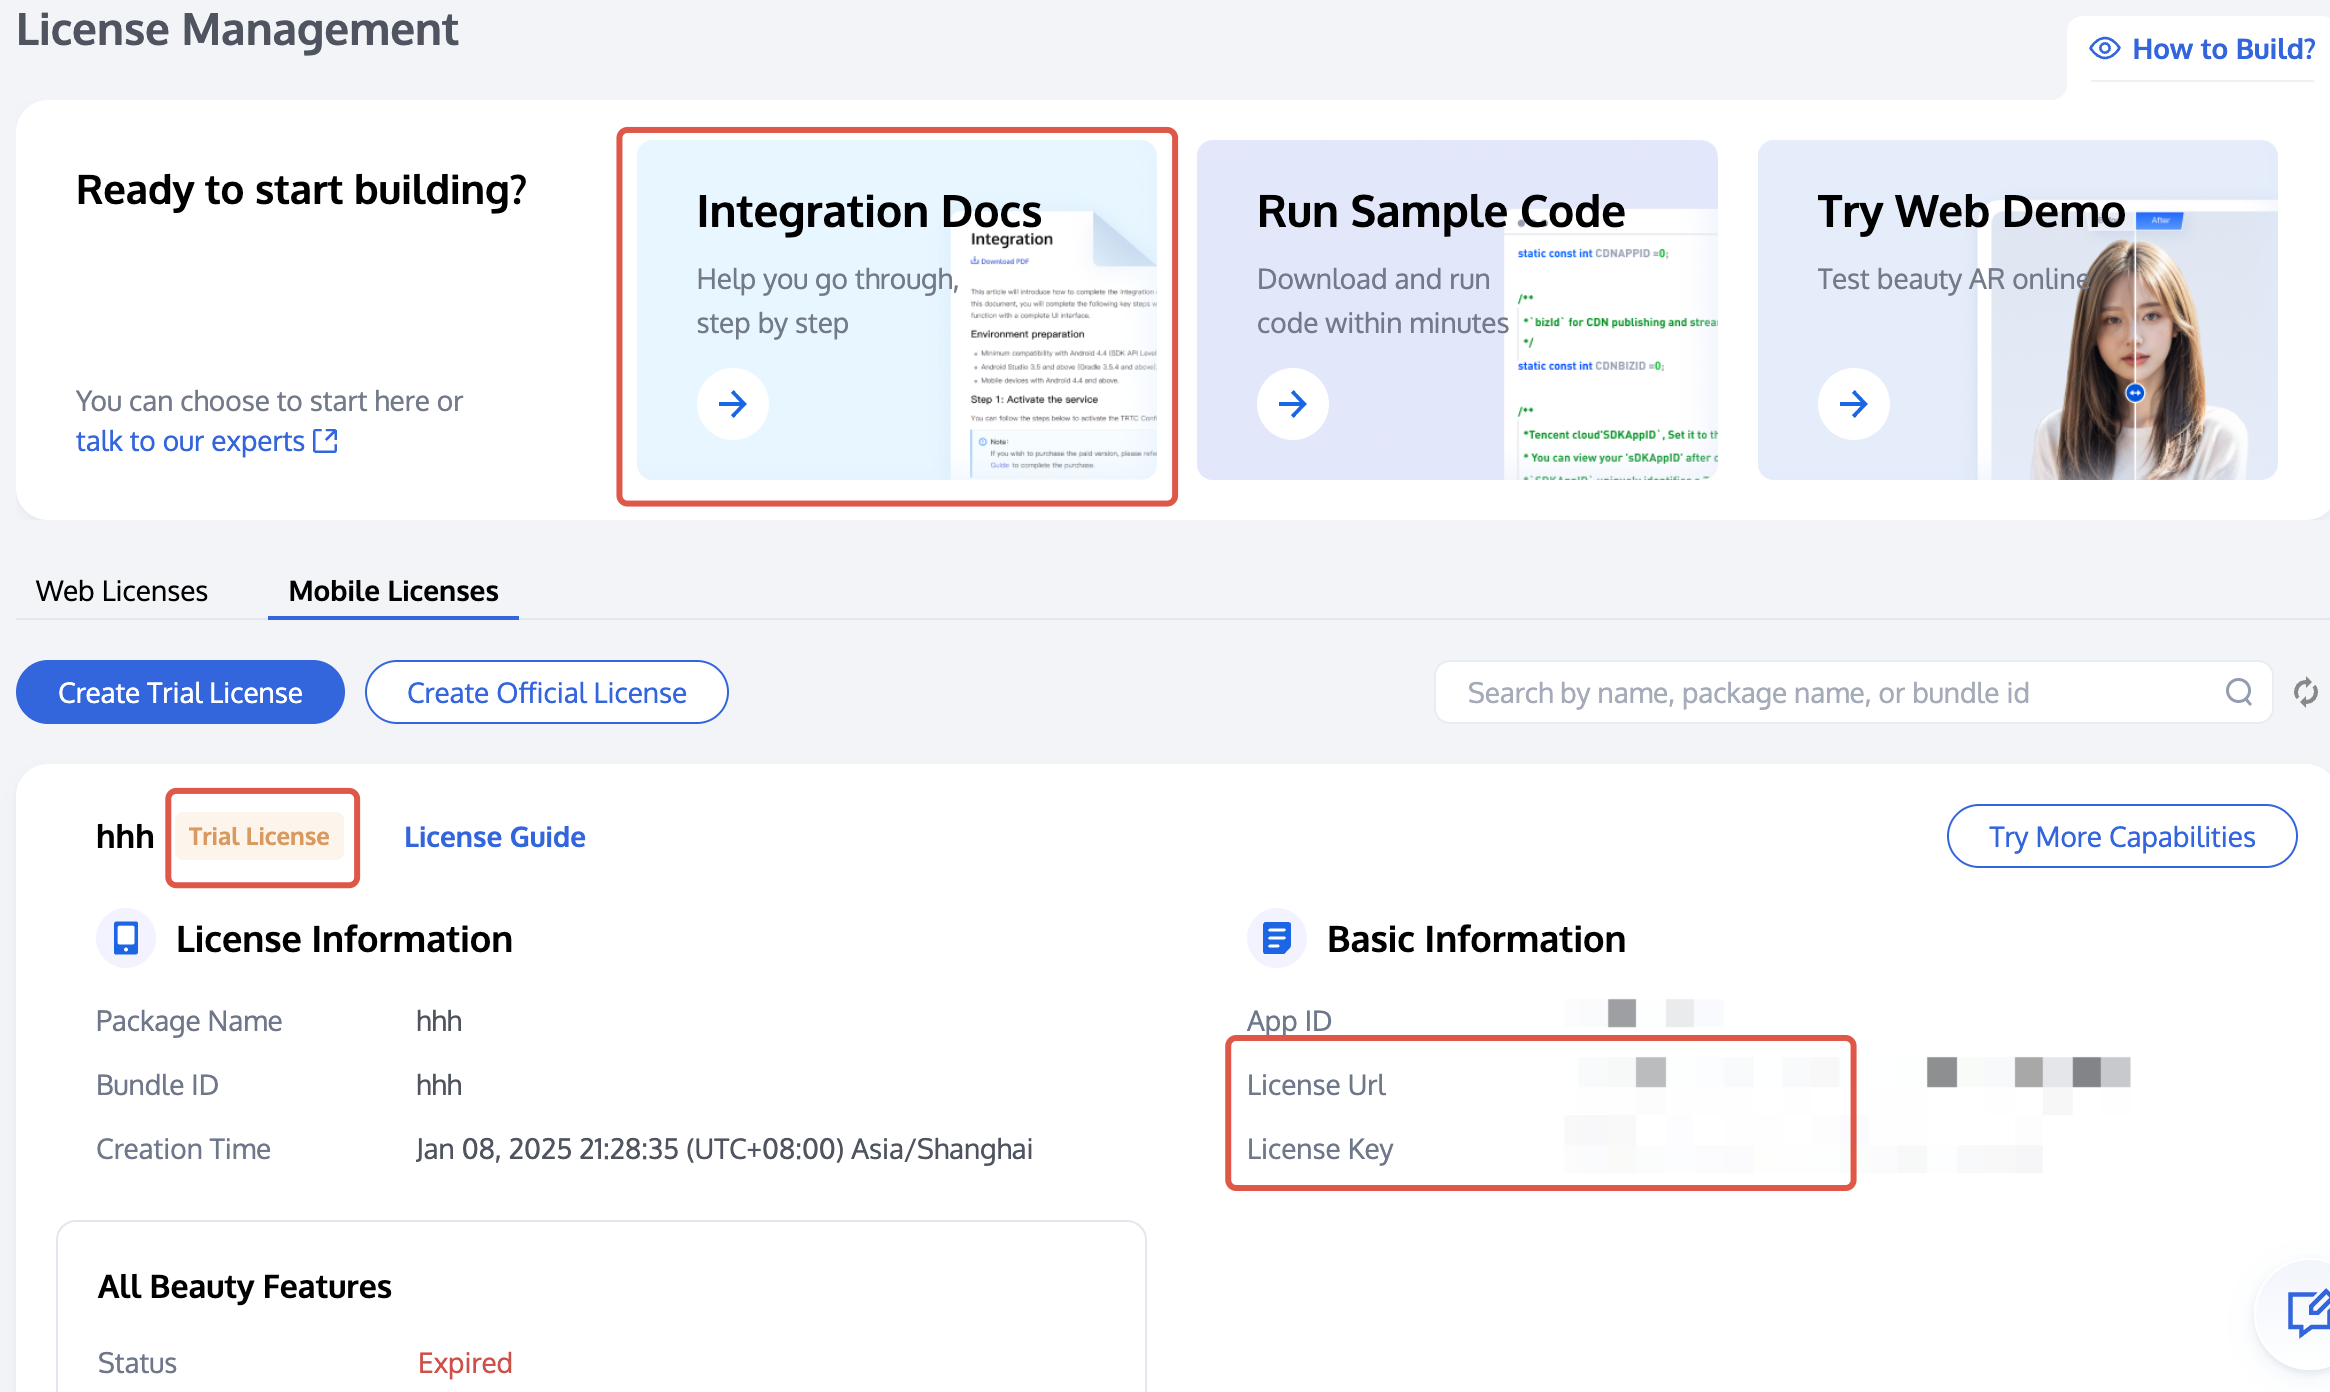
1. Log in to the Beauty AR console > Mobile Terminal License, and click Create Trial License (the trial license has a free trial period of 14 days and can be renewed once, totaling 28 days). Select Mobile, and enter App Name, Package Name, and Bundle ID based on your actual needs. Check the features you want to try: All Beauty Features, Virtual Background, Face Recognition, Gesture Recognition, and Gift AR, then click Confirm.
2. After activation, you can view your information on the current page and refer to the integration guide at the top for integration. You can see how to use the License Key and License URL in the Integration Guide.
Step 2: Importing the SDK
The RTC Engine SDK and Beauty AR SDK have been published to the mavenCentral repository. You can configure Gradle to download updates automatically.
1. Add the dependency for the appropriate version of the SDK in dependencies.
dependencies {
// RTC Engine Lite Edition SDK, including 2 features, RTC Engine and live streaming, and being compact in size
2. Specify the CPU architecture used by the app in defaultConfig.
defaultConfig {
ndk {
abiFilters "armeabi-v7a","arm64-v8a"
}
}
Note:
RTC Engine SDK supports armeabi-v7a/arm64-v8a architectures, and additionally supports x86/x86_64 architectures dedicated to simulators.
Beauty AR SDK currently only supports armeabi-v7a/arm64-v8a architectures.
3. Click Sync Now to automatically download SDK and integrate it into the project. If your beauty effect AR package includes dynamic effect and filter features, you need to download corresponding package on SDK Download Page, decompress the free filter materials (./assets/lut) and sticker animation dynamic effects (./MotionRes) in the package, and place them in your project under the following directory:
Dynamic Effect: ../assets/MotionRes.
Filter: ../assets/lut.
Step 3: Project Configuration
1. Configure permissions.
Configure App permissions in AndroidManifest.xml. In live showroom scenarios, the RTC Engine SDK and Beauty AR SDK require the following permissions:
Do not set android:hardwareAccelerated="false". Disabling hardware acceleration will result in failure to render the other party's video stream.
The RTC Engine SDK has no built-in permission request logic. You need to declare corresponding permissions and features. Some permissions (such as storage, recording, and camera) require dynamic requests during running.
If the Android project's targetSdkVersion is 31 or higher, or if the target device runs Android 12 or a newer version, the official requirement is to dynamically request android.permission.BLUETOOTH_CONNECT permission in the code to use the Bluetooth feature properly. For more information, see Bluetooth Permissions.
2. Obfuscation configuration.
Since we use Java's reflection features inside the SDK, you need to add the relevant SDK classes to the non-obfuscation list in the proguard-rules.pro file:
-keep class com.tencent.**{*;}
-keep class org.light.**{*;}
-keep class org.libpag.**{*;}
-keep class org.extra.**{*;}
-keep class com.gyailib.**{*;}
-keep class androidx.exifinterface.**{*;}
Step 4: Authentication and Authorization
RTC Engine Authentication Credential
Beauty AR Authentication Permission
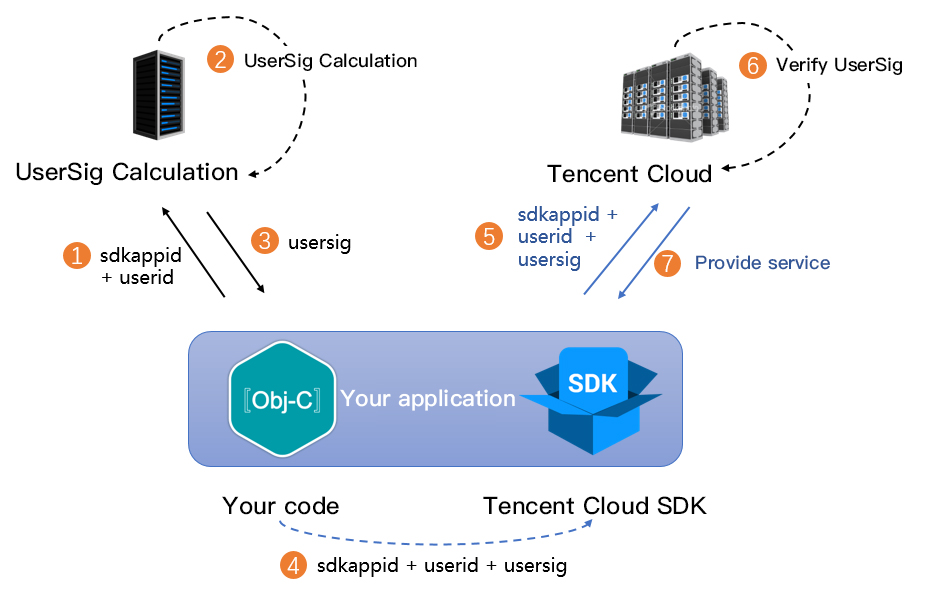
UserSig is a security signature designed by Tencent Cloud to prevent attackers from stealing your right of using cloud services. RTC Engine validates this authentication upon room entry.
Debugging Stage: UserSig can be generated through two methods for debugging and testing purposes only: client sample code and console access.
Formal Operation Stage: It is recommended to use a higher security level server computation for generating UserSig. This is to prevent key leakage due to client reverse engineering.
The specific implementation process is as follows:
1. Before calling the SDK's initialization function, your app must first request UserSig from your server.
2. Your server computes the UserSig based on the SDKAppID and UserID.
3. The server returns the computed UserSig to your app.
4. Your app passes the obtained UserSig into the SDK through a specific API.
5. The SDK submits the SDKAppID + UserID + UserSig to Tencent Cloud CVM for verification.
6. Tencent Cloud verifies the UserSig and confirms its validity.
7. After the verification passes, Tencent Real-Time Communication (TRTC) services will be provided for RTC Engine SDK.
Note:
The method of generating UserSig locally during the debugging and testing stage is not recommended for the online environment because it may be easily decompiled and reversed, causing key leakage.
We provide UserSig server-side computation source code in multiple languages (Java/GO/PHP/Node.js/Python/C#/C++). For details, see Server-Side Calculation of UserSig.
Before using effects of Beauty AR, you need to verify the license credential with Tencent Cloud. Configuring License requires License Key and License URL. The example code is as follows.
// If the purpose is just to trigger the download or update of the License, and not to care about the authentication result, then null is passed in for the fourth parameter.
// Note: This callback does not necessarily be called on the calling thread.
if(errorCode ==TELicenseCheck.ERROR_OK){
// Authentication successful.
}else{
// Authentication failed.
}
}
});
Note:
It is recommended to trigger the authentication permission in the initialization code of related business modules. Ensure to avoid having to download the License temporarily before use. Additionally, during authentication, network permissions must be ensured.
The actual application's Package Name must match exactly with the Package Name associated with the creation of License. Otherwise, it will lead to License verification failure. For details, see Authentication Error Code.
Step 5: Initializing the SDK
Initializing RTC Engine SDK
Initializing Beauty AR SDK
// Create an RTC Engine SDK instance (singleton mode)
// During development and debugging, you can set the log level to DEBUG. For release packages, set it to WARN to avoid impacting performance.
mXmagicApi.setXmagicLogLevel(Log.WARN);
// Release the beauty SDK. This method needs to be called on the GL thread.
mXmagicApi.onDestroy();
Note:
Before initializing the Beauty AR SDK, resource copying and other preparations are required. For detailed steps, see Process of Using the Beauty AR SDK.
Integration Process
API Sequence Diagram
Step 1: the Anchor Enters the Room to Push Streams
The control used by the RTC Engine SDK to handle video streams only supports passing in a TXCloudVideoView type. Therefore, you need to first define the view rendering control in the layout file.
<com.tencent.rtmp.ui.TXCloudVideoView
android:id="@+id/live_cloud_view_main"
android:layout_width="match_parent"
android:layout_height="match_parent"/>
Note:
If you need to specify the use of TextureView or SurfaceView as the view rendering control, please refer to Advanced Features - View Rendering.
1. The anchor activates local video preview and audio capture before entering the room.
// Obtain the video rendering control for displaying the anchor's local video preview.
Call the above API before enterRoom. The SDK will only start the camera preview and audio capture, and wait until you call enterRoom to start streaming.
Call the above API after enterRoom. The SDK will start the camera preview and audio capture and automatically start streaming.
2. The anchor sets rendering parameters for the local video, and the encoder output video mode (optional).
// Event callback for the result of entering the room.
@Override
publicvoidonEnterRoom(long result){
if(result >0){
// result indicates the time taken (in milliseconds) to join the room.
Log.d(TAG,"Enter room succeed");
}else{
// result indicates the error code when you fail to enter the room.
Log.d(TAG,"Enter room failed");
}
}
Note:
RTC Engine room IDs are divided into integer type roomId and string type strRoomId. Rooms of different types are not interconnected. It is advisable to unify the room ID type.
RTC Engine user roles include anchor and audience. Only hosts have permission to streaming. The user role should be specified upon room entry. If it's not specified, the default role is anchor.
In live showroom scenarios, it is recommended to choose TRTC_APP_SCENE_LIVE as the room entry mode.
Step 2: the Audience Enters the Room to Pull Streams
Log.d(TAG,"Actively call exitRoom to exit the room.");
}elseif(reason ==1){
Log.d(TAG,"Removed from the current room by the server.");
}elseif(reason ==2){
Log.d(TAG,"The current room has been dissolved.");
}
}
Note:
After all resources occupied by the SDK are released, the SDK will throw the onExitRoom callback notification to inform you.
If you want to call enterRoom again or switch to another audio/video SDK, wait for the onExitRoom callback before proceeding. Otherwise, you may encounter exceptions such as the camera or microphone being forcefully occupied.
2. Dissolve the room.
Serve-side dissolving: RTC Engine provides the server-side room dissolving API DismissRoom (distinguish between numeric room ID and string room ID). You can call this API to remove all users from the room and dissolve the room.
Client dissolving: Complete room exit for all anchors and audiences in the room via the room exit API exitRoom of each client. After room exit, the room will be automatically dissolved according to RTC Engine room lifecycle rules. For details, see Exit the Room.
Note:
It is recommended that after the end of live streaming, you call the room dissolvement API on the server to ensure the room is dissolved. This will prevent audiences from accidentally entering the room and incurring unexpected charges.
Advanced Features
Anchor Initiating Cross-Room Mic-Connection PK
1. Either party initiates the cross-room mic-connection PK.
// The user ID of the anchor in the other room you want to initiate the cross-room link-up.
// Error code. ERR_NULL indicates the request is successful.
// Error message.
}
Note:
Both local and remote users participating in the cross-room mic-connection PK must be in the anchor role and must have audio or video uplink capabilities.
2. All users in both rooms will receive a callback indicating that the audio and video streams from the PK anchor in the other room are available.
After calling DisconnectOtherRoom(), you may exit the cross-room mic-connection PK with all other room anchors.
Either the initiator or the receiver can call DisconnectOtherRoom() to exit the cross-room mic-connection PK.
Integrating the Third-Party Beauty Features
RTC Engine supports integrating third-party beauty effect products. The example of Beauty AR is used next to demonstrate the process of integrating the third-party beauty effects.
1. Integrate the Beauty AR SDK, and apply for authorization License. For details, see the Access Preparation step for implementation.
2. Resource copying (if any). If your resource files are built in the assets directory, you need to copy them to the App's private directory before use.
XmagicResParser.setResPath(local path of the downloaded resource file);
3. Set video data callback for third-party beauty effects by passing the results of the beauty effect SDK processing each frame of data into the RTC Engine SDK for rendering processing.
// The OpenGL environment has already been set up internally within the SDK. At this point, the initialization of third-party beauty features can be done.
// The internal OpenGL environment within the SDK has been terminated. At this point, proceed to clean up resources for third-party beauty features.
mXmagicApi.onDestroy();
}
});
Note:
Step 1 and Step 2 vary depending on differing implementation methods of third-party beauty effect products, and Step 3 is a universal and important step for RTC Engine's integration with third-party beauty effects.
Dual-Stream Encoding Mode
When the dual-stream encoding mode is enabled, the current user's encoder outputs two video streams, a high-definition large screen and a low-definition small screen, at the same time (but only one audio stream). In this way, other users in the room can choose to subscribe to the high-definition large screen or low-definition small screen based on their network conditions or screen sizes.
When the dual-stream encoding mode is enabled, it will consume more CPU and network bandwidth. Therefore, it may be considered for use on Mac, Windows, or high-performance Pads. It is not recommended for mobile devices.
2. Choose the type of remote user's video stream to pull.
// Optional video stream types when subscribing to a remote user's video stream.
When the dual-stream encoding mode is enabled, you can specify the video stream type as TRTC_VIDEO_STREAM_TYPE_SMALL with streamType to pull a low-quality small video for viewing.
View Rendering
RTC Engine has many APIs that require you to control the video screen. All these APIs require you to specify a video rendering control. On the Android platform, TXCloudVideoView is used as the video rendering control, and both SurfaceView and TextureView rendering solutions are supported. Below are the methods for specifying the type of the rendering control and updating the video rendering control.
1. If you want mandatory use of a certain scheme, or to convert the local video rendering control to TXCloudVideoView, you can code as follows.
2. If your business is involved in interaction scenarios that require switching display areas, you can use the RTC Engine SDK to update the local preview screen and the remote user's video rendering control feature.
// Update local preview screen rendering control.
mTRTCCloud.updateLocalView(videoView);
// Update the remote user's video rendering control.
1. The liker sends custom group messages related to likes through the client. After it is sended successfully, the business party renders the likes effect locally.
// Construct the like message body.
JSONObject jsonObject =newJSONObject();
try{
jsonObject.put("cmd","like_msg");
JSONObject msgJsonObject =newJSONObject();
msgJsonObject.put("type",1);// Likes type.
msgJsonObject.put("likeCount",10);// Number of likes.
jsonObject.put("msg", msgJsonObject);
}catch(JSONException e){
e.printStackTrace();
}
String data = jsonObject.toString();
// Send custom group messages (it is recommended that like messages should be set to low priority).
int type = messageJsonObject.getInt("type");// Likes type.
int likeCount = messageJsonObject.getInt("likeCount");// Number of likes.
// Render likes effect based on likes type and count.
}
}catch(JSONException e){
e.printStackTrace();
}
}
}
});
Gift Messages
1. The sender initiates a request to the business server. Upon completing the billing and settlement, the business server calls the REST API to send a custom message to the group.
int type = messageJsonObject.getInt("type");// Gift type.
int giftCount = messageJsonObject.getInt("giftCount");// Number of gifts.
String giftUrl = messageJsonObject.getString("giftUrl");// Gift resource URL.
String giftName = messageJsonObject.getString("giftName");// Gift name.
// Render gift effects based on gift type, count, resource URL, and name.
}
}catch(JSONException e){
e.printStackTrace();
}
}
}
});
Bullet Screen Messages
Live streaming rooms usually provide text-based bullet screen message interactions, which can be achieved by sending and receiving group chat plain text messages through Chat.
// Render bullet screen messages based on sender and message text.
}
});
Note:
The recommended priority setting is as follows. Gift messages should be set to high priority. Bullet screen messages should be set to medium priority. Like messages should be set to low priority.
Sending group chat messages from the client will not trigger the message reception callback. Only other users within the group can receive them.
Exception Handling
Exception Error Handling
When the RTC Engine SDK encounters an unrecoverable error, the error is thrown in the onError callback. For details, see Error Code Table.
1. UserSig related. UserSig verification failed can cause room entry failure. You can use the UserSig tool for verification.
Enumeration
Value
Description
ERR_TRTC_INVALID_USER_SIG
-3320
Room entry parameter UserSig is incorrect. Check if TRTCParams.userSig is empty.
ERR_TRTC_USER_SIG_CHECK_FAILED
-100018
UserSig verification failed. Check if the parameter TRTCParams.userSig is filled in correctly or has expired.
2. Room entry and exit related. If failed to enter the room, you should first verify the correctness of the room entry parameters. It is essential that the room entry and exit APIs are called in a paired manner. This means that, even in the event of a failed room entry, the room exit API must still be called.
Enumeration
Value
Description
ERR_TRTC_CONNECT_SERVER_TIMEOUT
-3308
Room entry request timed out. Check if your internet connection is lost or if a VPN is enabled. You may also attempt to switch to 4G for testing.
ERR_TRTC_INVALID_SDK_APPID
-3317
Room entry parameter sdkAppId is incorrect. Check if TRTCParams.sdkAppId is empty.
ERR_TRTC_INVALID_ROOM_ID
-3318
Room entry parameter roomId is incorrect. Check if TRTCParams.roomId or TRTCParams.strRoomId is empty. Note that roomId and strRoomId cannot be used interchangeably.
ERR_TRTC_INVALID_USER_ID
-3319
Room entry parameter userId is incorrect. Check if TRTCParams.userId is empty.
ERR_TRTC_ENTER_ROOM_REFUSED
-3340
Room entry request denied. Check if enterRoom is called consecutively to enter a room with the same ID.
3. Device related. Errors for relevant monitoring devices. Prompt the user via UI in case of relevant errors.
Enumeration
Value
Description
ERR_CAMERA_START_FAIL
-1301
Failed to open the camera. For example, if there is an exception for the camera's configuration program (driver) on a Windows or macOS device, you should try disabling then re-enabling the device, restarting the machine, or updating the configuration program.
ERR_MIC_START_FAIL
-1302
Failed to open the mic. For example, if there is an exception for the mic's configuration program (driver) on a Windows or macOS device, you should try disabling then re-enabling the device, restarting the machine, or updating the configuration program.
ERR_CAMERA_NOT_AUTHORIZED
-1314
The device of camera is unauthorized. This typically occurs on mobile devices and may be due to the user having denied the permission.
ERR_MIC_NOT_AUTHORIZED
-1317
The device of mic is unauthorized. This typically occurs on mobile devices and may be due to the user having denied the permission.
ERR_CAMERA_OCCUPY
-1316
The camera is occupied. Try a different camera.
ERR_MIC_OCCUPY
-1319
The mic is occupied. This occurs when, for example, the user is currently having a call on the mobile device.
Remote Mirror Mode Not Functioning Properly
In RTC Engine, video mirrors are set to be divided into local preview mirror setLocalRenderParams and video encoding mirror setVideoEncoderMirror. These mirrors separately affect the mirror effect of the local preview video and that of the video encoding output video (the mirror mode for remote audiences and on-cloud recordings). If you expect the mirror effect seen in the local preview to also take effect on the remote audiences' end, follow the following encoding procedures.
// Set the rendering parameters for the local video.
params.mirrorType =TRTCCloudDef.TRTC_VIDEO_MIRROR_TYPE_ENABLE;// Video mirror mode
params.fillMode =TRTCCloudDef.TRTC_VIDEO_RENDER_MODE_FILL;// Video fill mode
params.rotation =TRTCCloudDef.TRTC_VIDEO_ROTATION_0;// Video rotation angle
mTRTCCloud.setLocalRenderParams(params);
// Set the video mirror mode for the encoder output.
mTRTCCloud.setVideoEncoderMirror(true);
Adjustment of Camera Scale, Focus, and Switch
In live showroom scenarios, the anchor may need custom adjustment of the camera. The RTC Engine SDK's device management class provides APIs for such needs.
1. Query and set the zoom factor for the camera.
// Get the maximum zoom factor for the camera (only for mobile devices).
// Set the zoom factor for the camera (only for mobile devices).
// Value range is 1 - 5. 1 means the furthest field of view (normal lens), and 5 means the closest field of view (zoom lens). The maximum recommended value is 5, exceeding this may result in blurry video.