This document provides a comprehensive guide to the viewer page in the TUILiveKit Demo. Use this documentation to quickly integrate the pre-built viewer page into your project, or customize the page’s style, layout, and features to fit your requirements.
Feature Overview
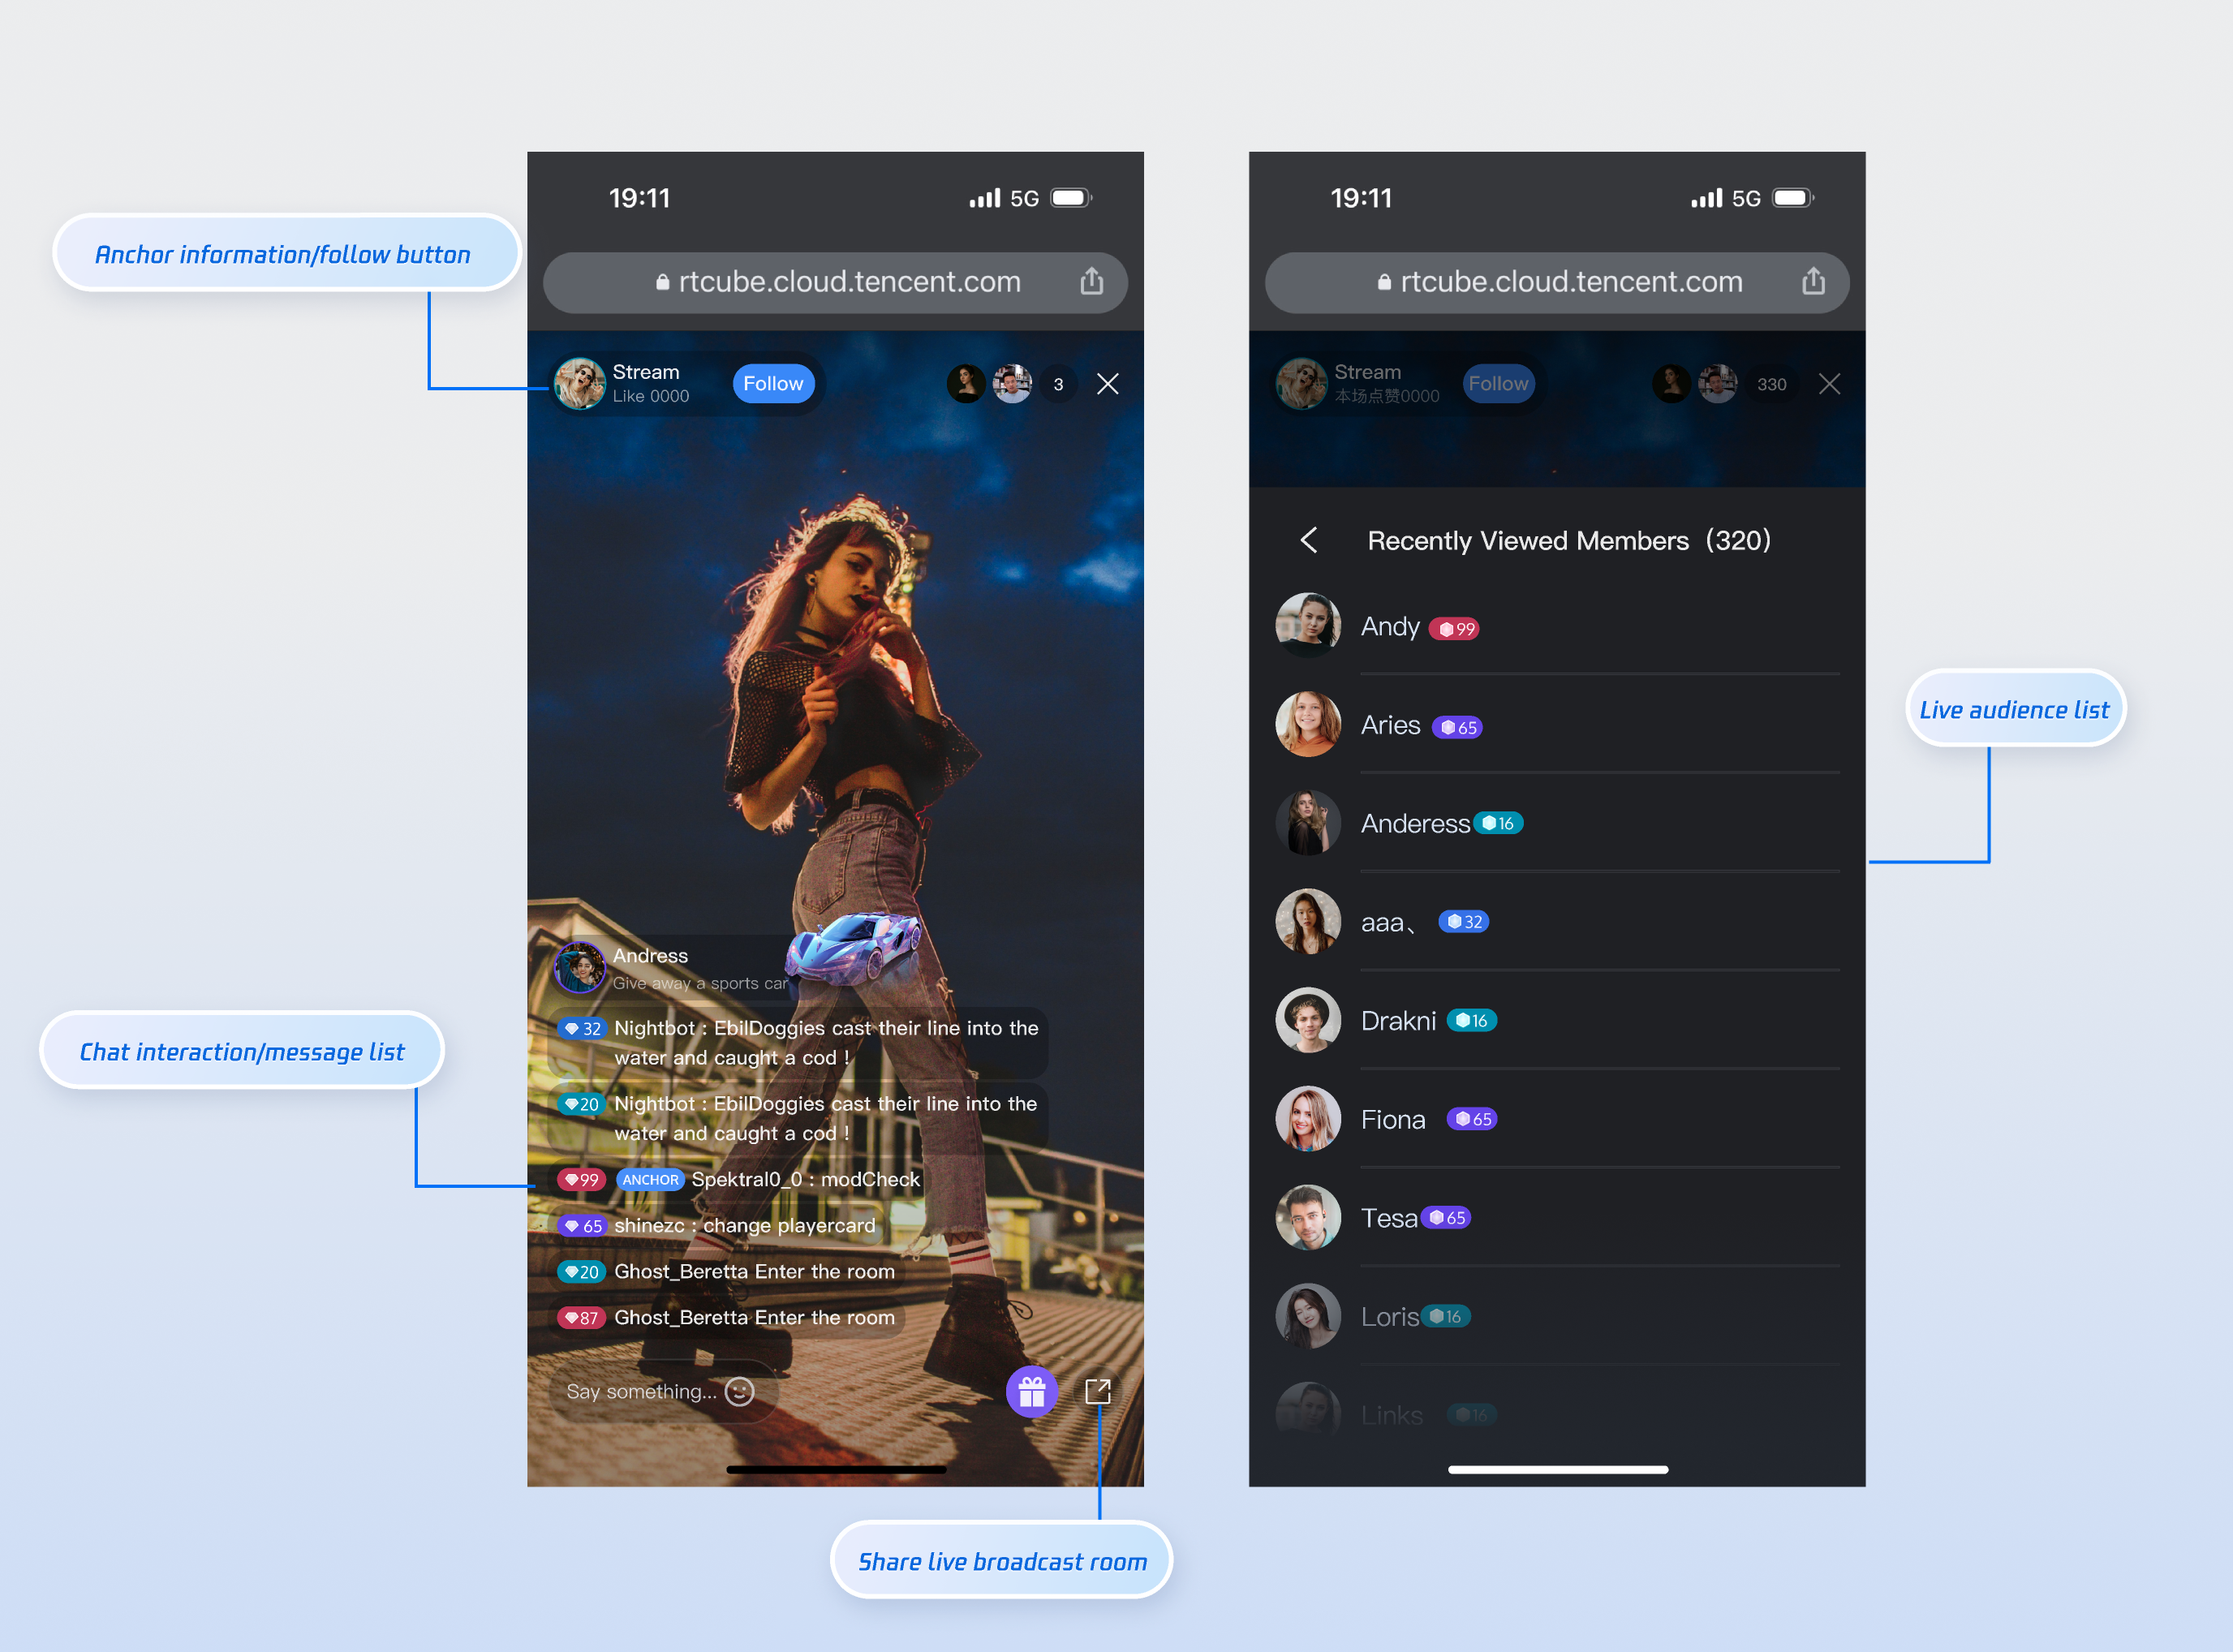
The viewer page includes default behaviors and styles. If the defaults don’t fully meet your needs, you can customize the UI. The numbers in the image below correspond to feature categories. Key features include live information display, video streaming area, online audience, audio/video controls, live duration, resolution switching, fullscreen functionality, chat interaction, and message list.
Live Video Playback: Delivers high-definition, smooth live streaming.
Live Comments Interaction: Enables real-time live comments.
Audience List: Displays information about online audience.
Fullscreen Playback: Provides an immersive viewing experience.
H5 Mobile Platform Support: Ensures cross-platform compatibility.
Quick Integration
Step 1: Environment Setup and Activate Service
Before starting integration, review the Prerequisites to set up components and implement login.
Step 2: Install Dependencies
Install dependencies using one of the following methods:
User nickname, displayed in the live room and chat area.
avatarUrl
String
No
URL address of the user's avatar.
Step 4: Start Project
Open your terminal, navigate to your project directory, and run the following command to start the project. You can then watch the live stream.
Note:
After running the command, enter the local access address in your browser’s address bar (refer to your project configuration, for example http://localhost:5173/live-player; the actual port may vary) to view the viewer page.
npm run dev
Play Live Stream
Step 1: Start Live Stream
Method 1 (Recommended):
Use the Online Hosting Site to start a live stream. After starting, obtain the live stream ID.
Use different User IDs for hosting and viewing. Otherwise, the device that logs in later will forcibly log out the device that logged in first (i.e., "kicked offline").
Step 2: Watch Live Stream
Refer to Step 3 in the quick integration above. Enter the corresponding liveId to join the live room and watch the stream:
Note:
To update your personal information, use the setSelfInfo method in the sample code from Step 3.
Step 3: Router Configuration
To enable navigation from the live stream list (or homepage) to the live room, configure Vue Router. Create a router folder in your project's src directory and add an index.ts file. Import and use the router in your main file (such as main.ts or index.ts). See the GitHub code sample. For the live stream list, refer to Live Stream List.
Note:
The live-player.vue file in the following code sample corresponds to the sample file created in Step 3.
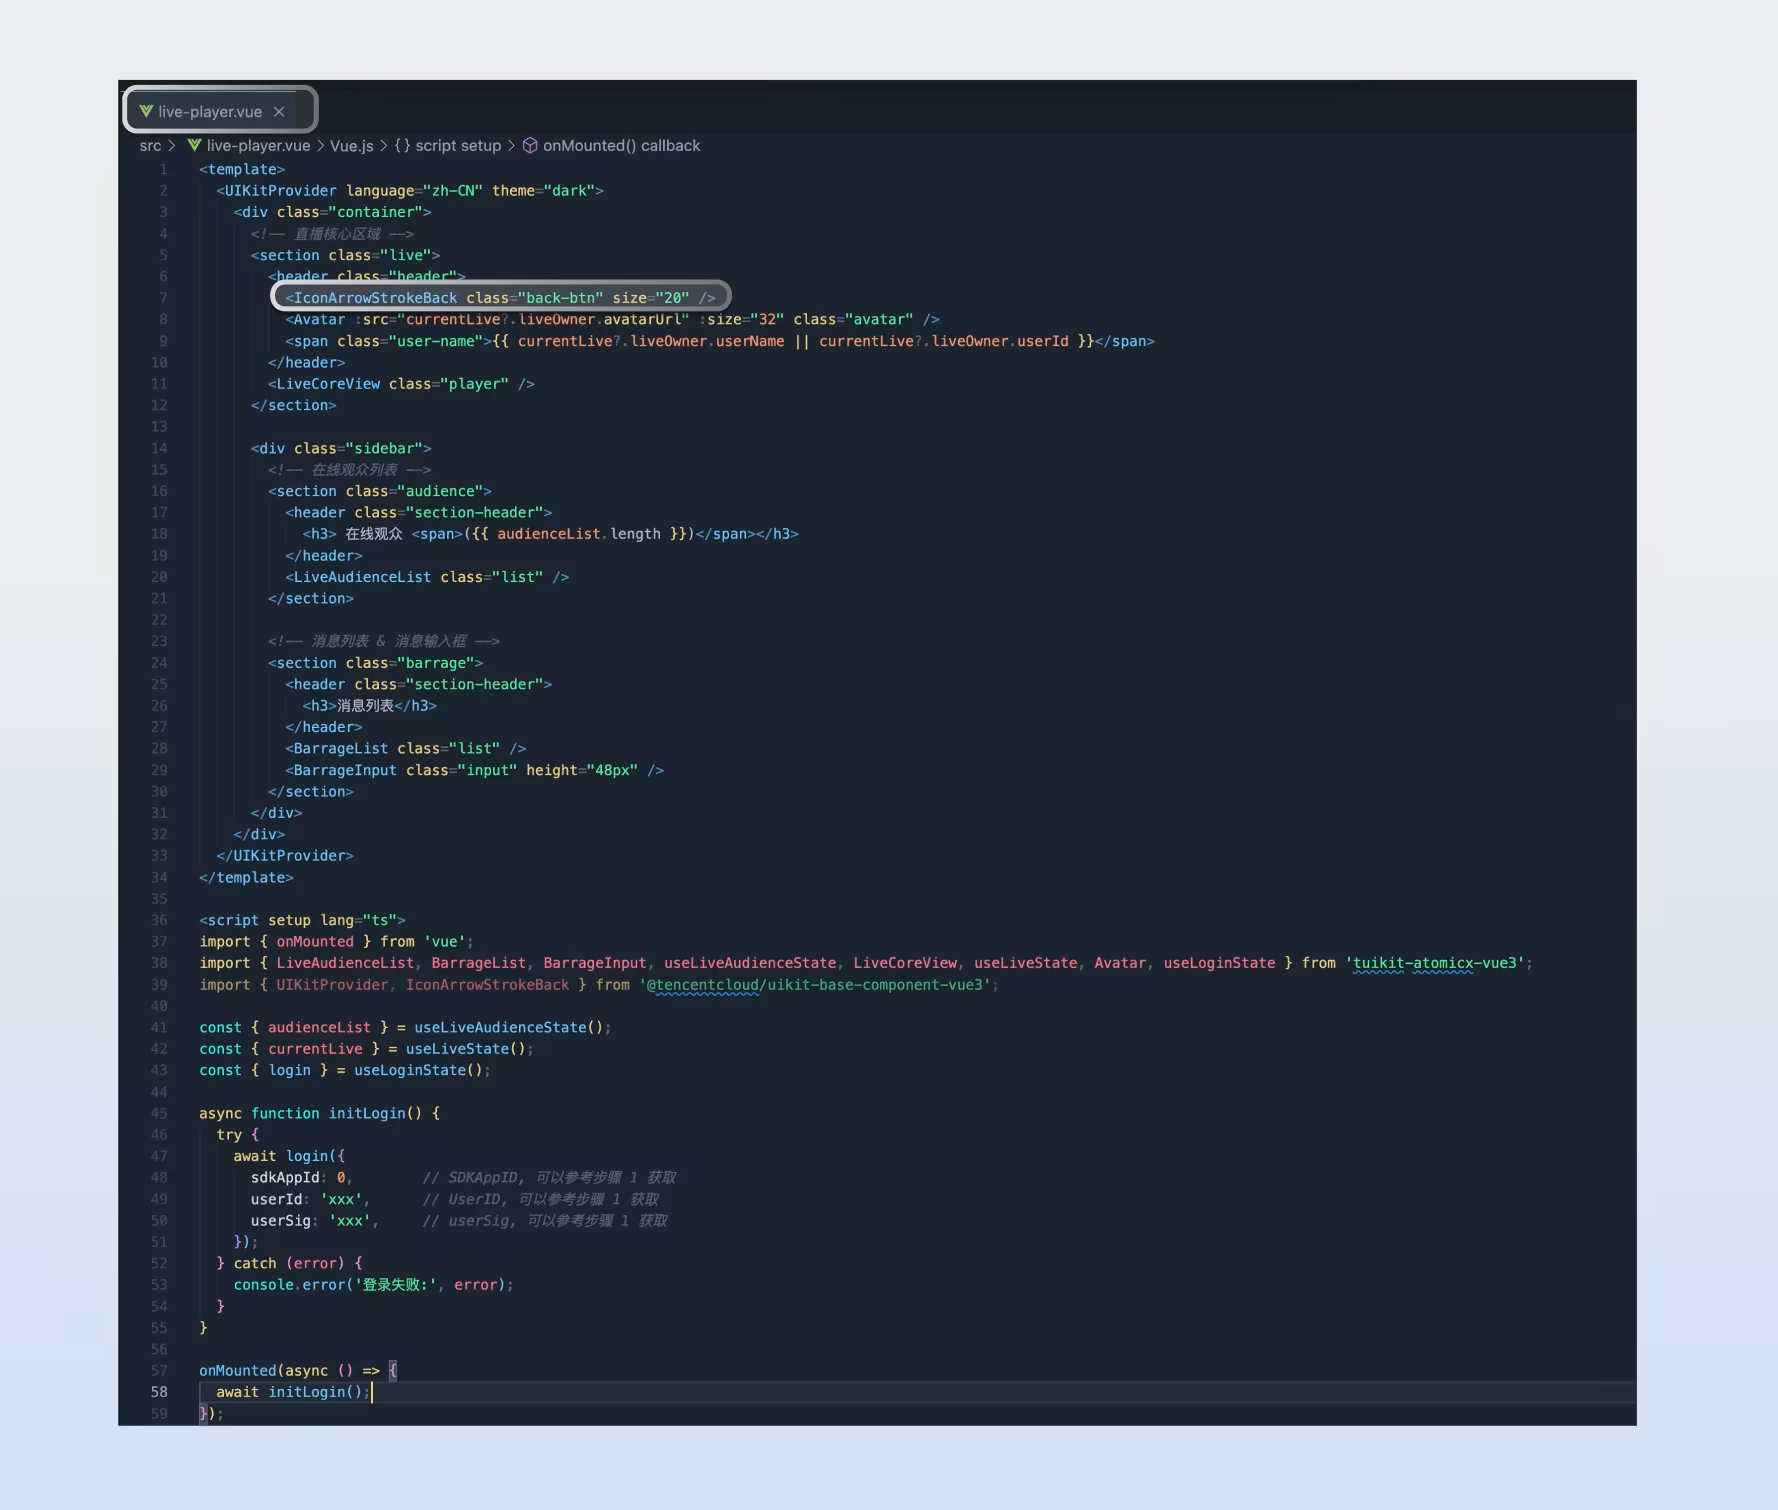
To customize buttons, icons, or other controls, modify the relevant code in live-player.vue. Refer to the image below to locate the source code for each button or icon and perform add, delete, or replace operations as needed.
You can also customize the audience viewer page to match your project requirements. In addition to layout adjustments, you can modify the color theme, font, border radius, buttons, icons, input boxes, dialogs, and more. Add, delete, or update these elements to achieve your desired UI.
Category
Feature
Description
Asset Management
Custom asset management area display
Supports adjusting icon size, color, or replacing icons.
Live Tools
Custom live tools information display
Supports adjusting icon size, color, or replacing icons.
Online Audience
Custom audience information display
Supports:
Show/hide audience level.
Customize audience information font and color.
Replace with your preferred icon style.
Message List
Custom live comments area display
Supports:
Show/hide chat input area.
Customize chat bubble style, audience level, and other content.
FAQs
Browser Autoplay Restrictions
To improve user experience, modern browsers restrict autoplay of media with sound. Audio playback must be triggered by user interaction (such as a click or touch). This prevents websites from unexpectedly playing audio. Most browsers allow autoplay of muted videos, but in low power mode on iOS Safari or in iOS WKWebView with custom autoplay restrictions (such as iOS WeChat browser), muted video autoplay may also be blocked.
Autoplay Failure Manifestation
If the site's Media Engagement Index (MEI) does not meet the required threshold, autoplay attempts will fail. By default, when the SDK detects autoplay failure, a popup prompts the user to interact with the page (such as clicking the Confirm button). After interaction, browser policy is satisfied and audio playback resumes.
Custom Handling of Autoplay Failure
To customize the user experience when autoplay fails (for example, replacing the default popup UI), listen for the SDK's onAutoplayFailed callback. The following Vue3 code sample shows how to handle this event and display a custom dialog:
importTUIRoomEngine,{TUIRoomEvents} from '@tencentcloud/tuiroom-engine-js';
import{ useUIKit,TUIMessageBox} from '@tencentcloud/uikit-base-component-vue3';
import{ useRoomEngine } from 'tuikit-atomicx-vue3';
const roomEngine =useRoomEngine();
let isShowAutoPlayDialog =false;
export default function useCustomizedAutoPlayDialog(){