
Start Broadcasting and Listen
適用シーン
当社のホストの配信開始と視聴者の視聴機能は主に当社の音声チャットルームのコアコントロール(SeatGridView)に依存しています。このコアコントロールは、音声チャットルームの開始、音声チャットルームの終了、ライブルーム内のマイクポジション管理(マイクオン申請、マイクオン招待、マイクポジションの移動、マイクオフなど)の豊富な API を提供します。
クイック導入 を通じて音声チャットルーム UIKit を導入した後、UI スタイルが理想の UI スタイルと一致しない場合は、当社のコアコントロールを使用して 30 分間以内に音声チャットルームのメインプロセスを迅速に構築し、その上に自分の業務 UI ビューを追加することができます。
環境準備
Xcode 15 以上。
iOS 13.0 以上。
CocoaPods 環境のインストール。詳細情報。
導入や使用中に問題が発生した場合は、よくある質問を参照してください。
ステップ 1:サービスをアクテイブ化する
ステップ 2:SeatGridView コンポーネントの導入
1.
Podfile ファイルに pod 'SeatGridView' 依存を追加してください。target 'xxxx' do......pod 'SeatGridView'end
Podfile ファイルがない場合は、まず端末で cd を使って xxxx.xcodeproj ディレクトリに移動し、以下のコマンドで作成してください。pod init
2. 端末でまず
cd コマンドを使って Podfile ディレクトリに移動し、その後以下のコマンドを実行してコンポーネントをインストールします。pod install
最新バージョンの SeatGridView をインストールできない場合は、Podfile.lock と Pods を削除してから、以下のコマンドを実行してローカルの CocoaPods リポジトリリストを更新してください。
pod repo update
その後、以下のコマンドを実行してコンポーネントリポジトリの Pod バージョンを更新します。
pod update
3. まずコンパイルして実行してみてください。問題が発生した場合はよくある質問をご参照ください。それでも問題がある場合は、まずExampleプロジェクトを実行してみてください。導入や使用中の問題が発生した場合は、フィードバックをお寄せください。
ステップ 3:ログイン
プロジェクトに以下のコードを追加します。これは、TUICore の関連インターフェースを呼び出して TUI コンポーネントのログインを完了するためのものです。このステップは非常に重要です。ログインに成功した場合のみ、SeatGridView の各機能を正常に使用できます。
//// AppDelegate.swift//import TUICorefunc application(_ application: UIApplication, didFinishLaunchingWithOptions launchOptions: [UIApplication.LaunchOptionsKey: Any]?) -> Bool {TUILogin.login(1400000001, // ステップ 1 で取得した SDKAppID に置き換えてくださいuserID: "denny", // お客様の UserID に置き換えてくださいuserSig: "xxxxxxxxxxx") { // コンソールで UserSig を計算し、ここに入力してくださいprint("login success")} fail: { (code, message) inprint("login failed, code: \(code), error: \(message ?? "nil")")}return true}
パラメータ説明
ここでは、login 関数に必要ないくつかの重要なパラメータについて詳しく紹介します。
パラメータ | タイプ | 説明 |
SDKAppID | int | ステップ 1 の最後のステップで取得しましたので、ここでは繰り返し説明しません。 |
UserID | String | 現在のユーザーのID。文字列タイプで、英字(a-z と A-Z)、数字(0-9)、ハイフン、アンダースコアのみを含めることができます。 |
userSig | String | ステップ 1 の第 3 ステップで取得した SecretKey を使用して SDKAppID、UserID などの情報を暗号化すると UserSig を得ることができます。これは現在のユーザーが TRTC サービスを利用できるかどうかを識別するための認証用トークンです。コンソールの 補助ツール で一時的に利用可能な UserSig を生成できます。詳細については UserSig の計算と使用方法 を参照してください。 |
説明:
開発環境:ローカル開発・デバッグ段階では、ローカルの
GenerateTestUserSig.genTestSig関数を使用して userSig を生成することができます。この方法では SDKSecretKey が逆コンパイル・逆クラックされやすく、キーが漏洩した場合、攻撃者は Tencent Cloud のトラフィックを盗用する可能性があります。本番環境:プロジェクトを立ち上げる場合は、サーバー側で UserSig を生成する方法を採用してください。
ステップ 4:コアコントロールを使用してライブ配信機能を実現する
コアコントロールの作成とプレビューの開始
コアコントロールの作成:Java コードまたは XML 方式で、プッシュを実現する Activity 内に当社のコアコントロールを読み込むことができます。そのうち、コード方式の例は以下のとおりです(XML 方式も類似している)。
let seatGridView = SeatGridView(this)
ホストがライブルームを開始し、視聴者がライブルームに参加する
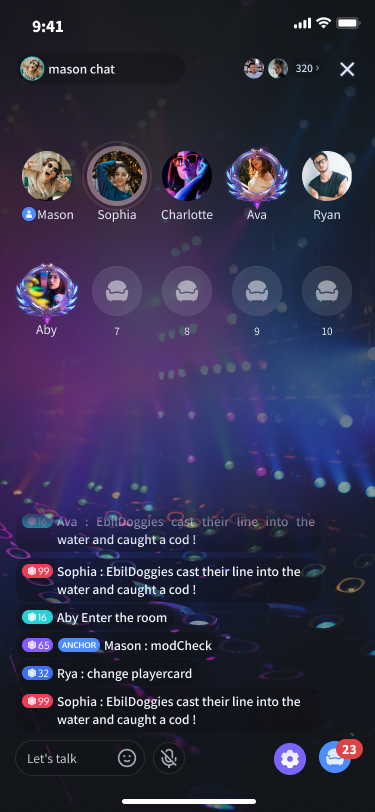
ホストがライブルームを開始:ライブルームを開始し、ローカルマイクで収集したデータをライブルームにプッシュします。
let roomInfo = TUIRoomInfo()roomInfo.roomId = "123456"seatGridView.startVoiceRoom(roomInfo) { roomInfo in} onError: { code, message in}seatGridView.startMicrophone() {} onError: { code,message in}
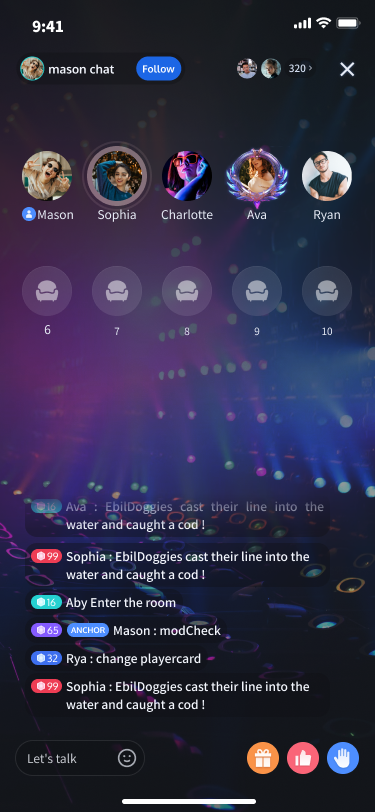
視聴者がライブルームに参加する。
seatGridView.joinVoiceRoom("roomId_123456") { roomInfo in} onError: { code, message in}
ホストがライブルームを開始し、ライブ配信を開始する | 視聴者がライブルームに参加し、ライブ配信を視聴する |
 |
 |
マイクポジション管理
マイクポジションリストの配置レイアウトの設定
以下の方法でマイクポジションリストのレイアウトを迅速に設定できます。
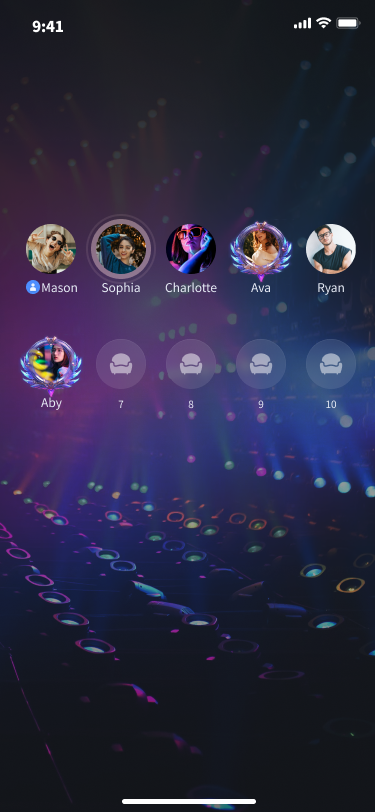
// グリッドレイアウトを設定するseatGridView.setLayoutMode(layoutMode: .grid)// 要素レイアウトを設定するseatGridView.setLayoutMode(layoutMode: .focus)// 縦方向レイアウトを設定するseatGridView.setLayoutMode(layoutMode: .vertical)// カスタムレイアウトを設定する// 第一行の設定let rowConfig1 = SGSeatViewLayoutRowConfig(count: 3, //第一行に表示される数seatSpacing: 10, //第一行の各マイクポジションの水平感覚seatSize: CGSize(width: 50, height: 50), //第一行の各マイクポジションビューのサイズalignment: .center) //第一行マイクポジションの位置合わせ方式// 第二行の設定let rowConfig1 = SGSeatViewLayoutRowConfig(count: 3, //第二行に表示される数seatSpacing: 10, //第二行の各マイクポジションの水平間隔seatSize: CGSize(width: 50, height: 50), //第二行の各マイクポジションビューのサイズalignment: .spaceAround) //第二行マイクポジションの位置合わせ方式let layoutConfig = SGSeatViewLayoutConfig(rowConfigs: [rowConfig1, rowConfig2],rowSpacing: 10)seatGirdView.setLayoutMode(.free, layoutConfig)
説明:
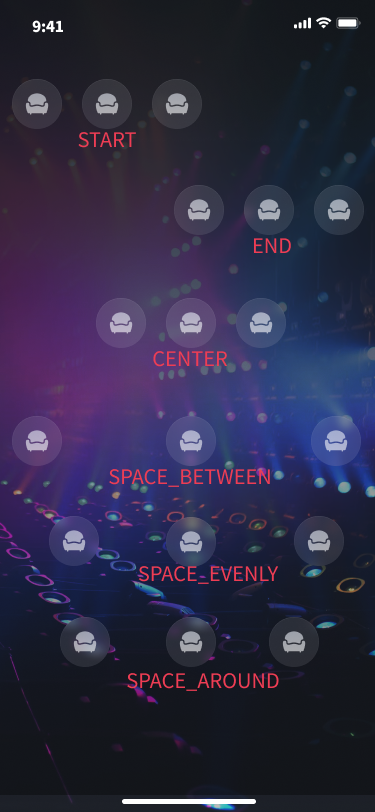
カスタムレイアウトのパラメータ設定は、SGSeatViewLayoutRowConfig のパラメータ説明を参照してください。位置合わせ方式の alignment については、SGSeatViewLayoutRowAlignment の説明を参照してください。位置合わせ方式の効果は、概略図 を参照してください。
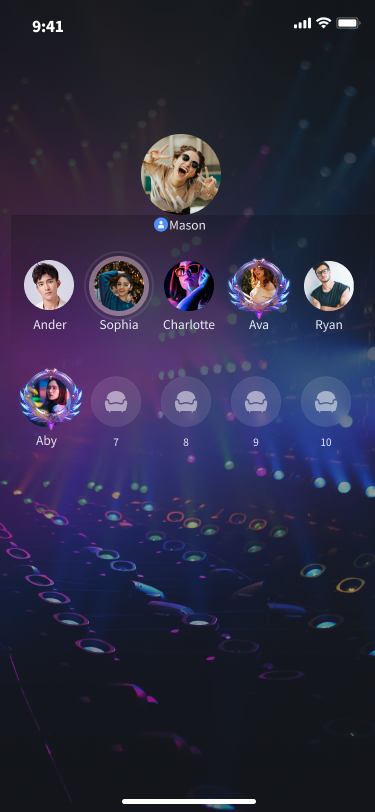
グリッドレイアウト | 要素レイアウト | 縦方向レイアウト | カスタムレイアウト |
 |  |
 |
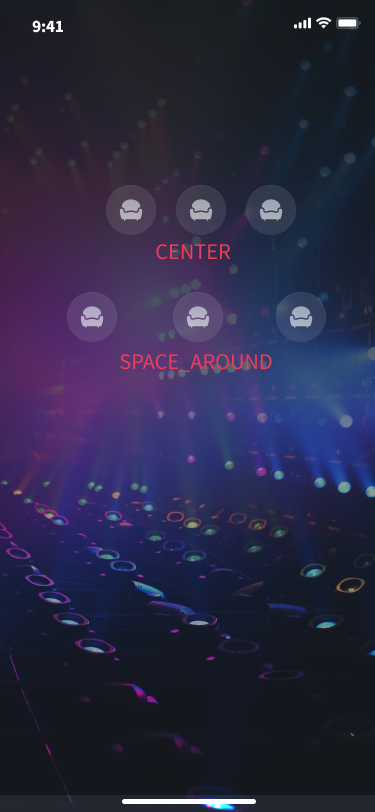 |
カスタムレイアウトの位置合わせ方法の概略図:
カスタムマイクポジションビュー
当社のデフォルト UI がお客様のニーズを満たさず、自分のカスタムマイクポジション UI を作成したい場合、以下の方法でマイクポジションレイアウトを迅速に設定できます。
class TestSeatViewDelegate: SGSeatViewDelegate {func seatGridView(_ view: SeatGridView, createSeatView seatInfo: TUISeatInfo) -> UIView? {return TestSeatInfoView(seatGridView: seatGridView, seatInfo: seatInfo)}func seatGridView(_ view: SeatGridView, updateSeatView seatInfo: TUISeatInfo, seatView: UIView) {if let seatView = seatView as? TestSeatInfoView {seatView.updateSeatView(seatGirdView: seatGridView, seatInfo: seatInfo)}}func seatGridView(_ view: SeatGridView, updateUserVolume volume: Int, seatView: UIView) {if let seatView = seatView as? TestSeatInfoView {seatView.updateUserVolume(seatGridView: seatGridView, volume: volume)}}}seatGridView.setSeatViewDelegate(TestSeatViewDelegate())class TestSeatInfoView: UIView {init(seatGridView: SeatGridView, seatInfo: TUISeatInfo) {super.init(frame: .zero)initView() //初期化 view}func updateSeatView(seatGridView: SeatGridView, seatInfo: TUISeatInfo) {updateView(seatInfo) //カスタムマイクポジションビュー UI を更新する}func updateUserVolume(seatGridView: SeatGridView, volume: Int) {updateUserVolume(volume) //音量変化 UI を更新する}}
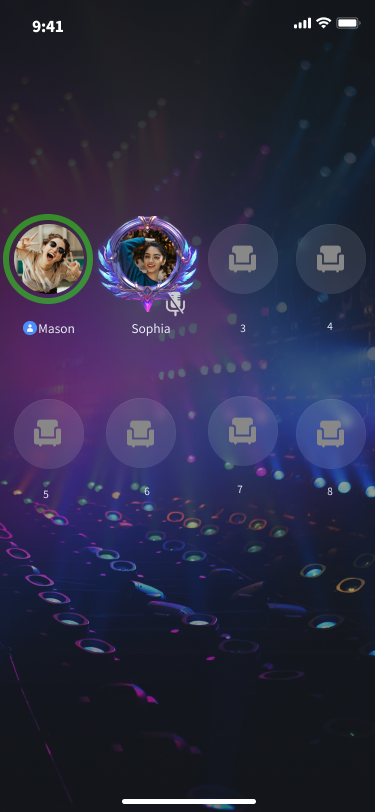
マイクポジションレイアウトをカスタマイズする前 | マイクポジションレイアウトをカスタマイズした後 |
 |
 |

