Seeking alternatives after Twilio video sunset?
Check our migration guide 
Only  $9.9! Get 50,000 minutes with our Starter Plan, perfect for your MVP project.
Only $9.9! Get 50,000 minutes with our Starter Plan, perfect for your MVP project.
Grab It Now 
Seeking alternatives after Twilio video sunset?
Check our migration guide 
Only  $9.9! Get 50,000 minutes with our Starter Plan, perfect for your MVP project.
Only $9.9! Get 50,000 minutes with our Starter Plan, perfect for your MVP project.
Grab It Now 
Menu

Integrating TUIVoiceRoom (iOS)

Overview

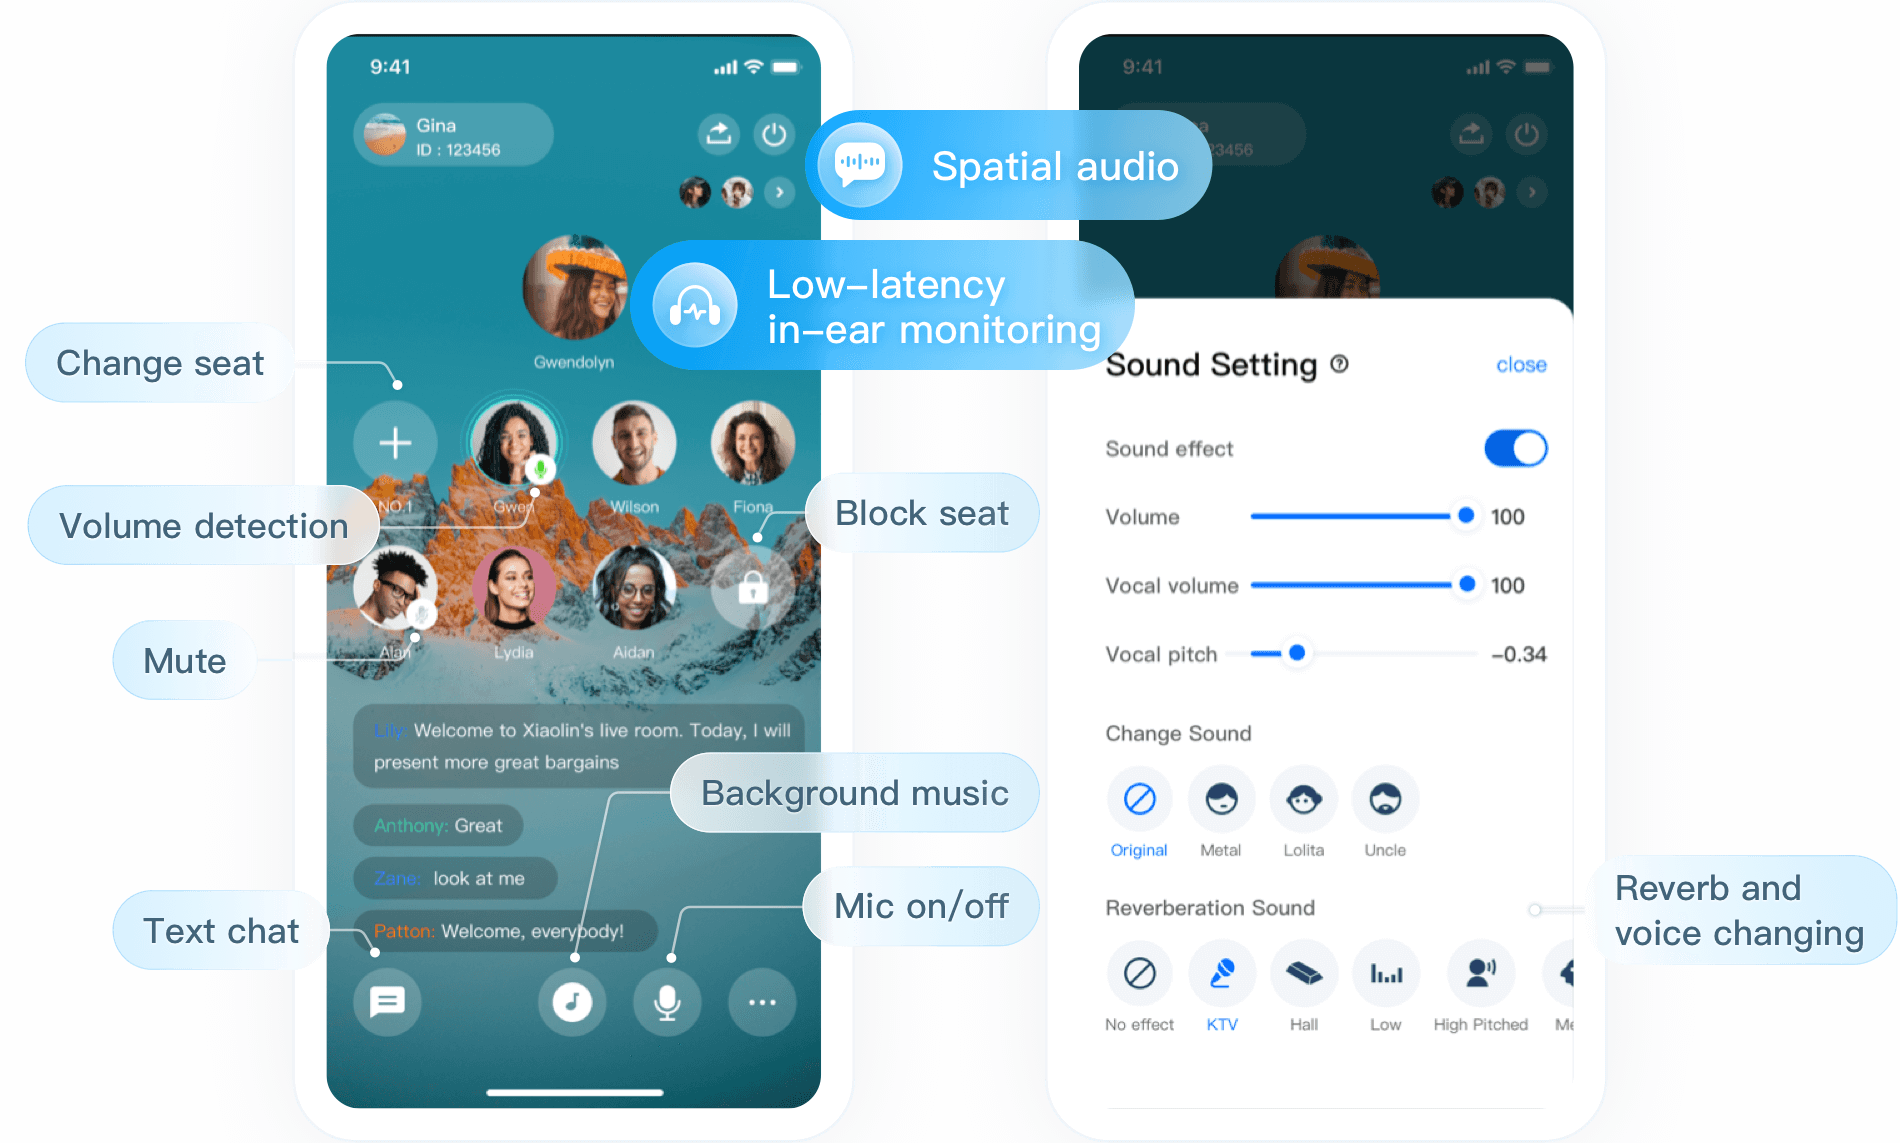
TUIVoiceRoom is an open-source audio/video UI component. After integrating it into your project, you can make your application support the group audio chat scenario simply by writing a few lines of code. It also supports the Android platform. Its basic features are as shown below:
Note
All TUIKit components are based on two PaaS services of Tencent Cloud, namely TRTC and Chat. When you activate TRTC, the Chat SDK trial edition (which supports up to 100 DAUs) will be activated automatically. For billing details of Chat, see Pricing.


Integration

Step 1. Download and import the TUIVoiceRoom component

Create the TUIVoiceRoom folder at the same level as the Podfile in your Xcode project, copy TXAppBasic, Resources, Source, and TUIVoiceRoom.podspec files from the iOS directory in the GitHub repository to the folder, and complete the following import operations:
Open the project's Podfile and import TUIVocieRoom.podspec as follows:
# `path` is the path of `TXAppBasic.podspec` relative to the `Podfile`
pod 'TXAppBasic', :path => "TUIVoiceRoom/TXAppBasic/"
# `path` is the path of `TUIVoiceRoom.podspec` relative to the `Podfile`
pod 'TUIVoiceRoom', :path => "TUIVoiceRoom/", :subspecs => ["TRTC"]
Open Terminal, enter the directory of Podfile, and run pod install.
pod install

Step 2. Configure permission requests and obfuscation rules

In info.plist, add Privacy > Microphone Usage Description to request mic access.
<key>NSMicrophoneUsageDescription</key>
<string>`VoiceRoomApp` needs to access your mic to be able to shoot videos with audio.</string>

Step 3. Initialize and log in to the component

// Initialize TUIKit
let mTRTCVoiceRoom = TRTCVoiceRoom.shared()
// Log in
mTRTCVoiceRoom.login(sdkAppID: SDKAppID, userId: userId, userSig: userSig) { code, message in
if code == 0 {
// Logged in
}
}
Parameter description:
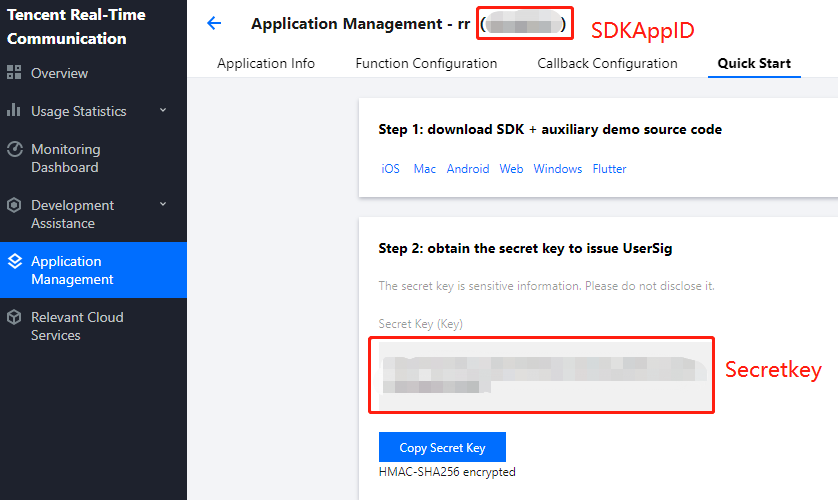
SDKAppID: The TRTC application ID. If you haven't activated TRTC, log in to the TRTC console, create a TRTC application, click Application Info, and select the Quick Start tab to view its SDKAppID.


Secretkey: The TRTC application key. Each secret key corresponds to a SDKAppID. You can view your application’s secret key on the Application Management page of the TRTC console.
userId: The ID of the current user, which is a string that can contain only letters (a-z and A-Z), digits (0-9), hyphens (-), and underscores (_). We recommend that you keep it consistent with your user account system.
UserSig: The security signature calculated based on SDKAppID, userId, and Secretkey. You can click here to quickly generate a UserSig for testing. For more information, see UserSig.

Step 4. Implement the audio chat room

1. The room owner creates an audio chat room through TRTCVoiceRoom#createRoom.
// Initialize the audio chat room parameters
let roomParam = VoiceRoomParam()
roomParam.roomName = "Room name"
roomParam.needRequest = false // Whether the room owner’s permission is required for listeners to speak
roomParam.coverUrl = "URL of room cover image"
roomParam.seatCount = 7 // Number of room seats. In this example, the number is 7. 6 seats are available after you take one.
roomParam.seatInfoList = []
// Initialize the seat information
for _ in 0..< param.seatCount {
let seatInfo = VoiceRoomSeatInfo()
param.seatInfoList.append(seatInfo)
}
// Create a room
mTRTCVoiceRoom.createRoom(roomID: yourRoomID, roomParam: roomParam) { (code, message) in
if code == 0 {
// Group created successfully
}
}
2. A listener enters the audio chat room through TRTCVoiceRoom#enterRoom.
// 1. A listener calls an API to enter the room
mTRTCVoiceRoom.enterRoom(roomID: roomID) { (code, message) in
// Callback of the room entry result
if code == 0 {
// Entered room successfully
}
}
3. A listener mics on through TRTCVoiceRoom#enterSeat.
// 1. A listener calls an API to mic on
let seatIndex = 2; // Seat index
mTRTCVoiceRoom.enterSeat(seatIndex: 2) { (code, message) in
if code == 0 {
// Mic turned on successfully
}
}

// 2. The `onSeatListChange` callback is received, and the seat list is refreshed
@Override
func onSeatListChange(seatInfoList: [VoiceRoomSeatInfo]) {
// Refreshed seat list
}
4. The room owner makes a listener speaker through TRTCVoiceRoom#pickSeat.
// 1. The room owner makes a listener a speaker
let seatIndex = 2; // Seat index
let userId = "123"; // ID of the user to speak
mTRTCVoiceRoom.pickSeat(seatIndex: 1, userId: "123") { (code, message) in
if code == 0 {
}
}

// 2. The `onSeatListChange` callback is received, and the seat list is refreshed
func onSeatListChange(seatInfoList: [VoiceRoomSeatInfo]) {
// Refreshed seat list
}
5. A listener requests to speak through TRTCVoiceRoom#sendInvitation.
// Listener
// 1. A listener calls an API to request to speak
let seatIndex = "1"; // Seat index
let userId = "123"; // User ID
let inviteId = mTRTCVoiceRoom.sendInvitation(cmd: "takeSeat", userId: ownerUserId, content: "1") { (code, message) in
// Callback of the result
}

// 2. Place the user in the seat after the invitation is accepted
func onInviteeAccepted(identifier: String, invitee: String) {
if identifier == selfID {
self.mTRTCVoiceRoom.enterSeat(seatIndex: ) { (code, message) in
// Callback of the result
}
}
}

// Room owner
// 1. The room owner receives the request
func onReceiveNewInvitation(identifier: String, inviter: String, cmd: String, content: String) {
if cmd == "takeSeat" {
// 2. The room owner accepts the request
self.mTRTCVoiceRoom.acceptInvitation(identifier: identifier, callback: nil)
}
}
6. The room owner invites a listener to speak through TRTCVoiceRoom#sendInvitation.
// Room owner
// 1. Call `sendInvitation` to invite user `123` to take seat 2
let inviteId = self.mTRTCVoiceRoom.sendInvitation(cmd: "pickSeat", userId: ownerUserId, content: "2") { (code, message) in
// Callback of the result
}

// 2. Place the user in the seat after the invitation is accepted
func onInviteeAccepted(identifier: String, invitee: String) {
if identifier == selfID {
self.mTRTCVoiceRoom.pickSeat(seatIndex: ) { (code, message) in
// Callback of the result
}
}
}

// Listener
// 1. The listener receives the invitation
func onReceiveNewInvitation(identifier: String, inviter: String, cmd: String, content: String) {
if cmd == "pickSeat" {
// 2. The listener accepts the invitation
self.mTRTCVoiceRoom.acceptInvitation(identifier: identifier, callback: nil)
}
}
7. Implement text chat through TRTCVoiceRoom#sendRoomTextMsg.
// Sender: Sends text chat messages
self.mTRTCVoiceRoom.sendRoomTextMsg(message: message) { (code, message) in

}

// Receiver: Listens for text chat messages
func onRecvRoomTextMsg(message: String, userInfo: VoiceRoomUserInfo) {
// Handling of the messages received
}
8. Implement on-screen commenting through TRTCVoiceRoom#sendRoomCustomMsg.
// For example, a sender can customize commands to distinguish on-screen comments and likes.
// For example, use "CMD_DANMU" to indicate on-screen comments and "CMD_LIKE" to indicate likes.
self.mTRTCVoiceRoom.sendRoomCustomMsg(cmd: "CMD_DANMU", message: "hello world", callback: nil)
self.mTRTCVoiceRoom.sendRoomCustomMsg(cmd: "CMD_LIKE", message: "", callback: nil)

// Receiver: Listens for custom messages
func onRecvRoomCustomMsg(cmd: String, message: String, userInfo: VoiceRoomUserInfo) {
if cmd == "CMD_DANMU" {
// An on-screen comment is received
}
if cmd == "CMD_LIKE" {
// A like is received
}
}

Suggestions and Feedback

If you have any suggestions or feedback, please contact colleenyu@tencent.com.