This document describes how to rapidly integrate the TUICallKit component. You can complete the following key steps within 10 minutes and obtain a complete audio and video call interface.
Preparations
Environment Requirements
iOS system version requirements:iOS 13.0 and above.
Development tool version requirements:Xcode 13.0 and above,Xcode 15 and above may encounter Sandbox errors. Please refer to [Sandbox Issue Solutions] for fixes.
Device requirements: Apple mobile devices such as iPhone and iPad with iOS 13.0 or later (ensure the app can be properly installed and run).
Service Activation
Please refer to the Service Activation documentation to obtain your SDKAppID and SDKSecretKey. These credentials will be required in the subsequent Login steps.
Implementation
Step 1.Importing Components
1. Add Pod dependency:
If the project has an existing Podfile file.
Add the pod 'TUICallKit_Swift' dependency in your project's Podfile file. For example:
  target 'YourProjectTarget' do      pod 'TUICallKit_Swift'
  end
If the project has no Podfile file.
Enter your .xcodeproj directory in the terminal, then execute the pod init command to create a Podfile file. After creation, add the pod 'TUICallKit_Swift' dependency in your Podfile file. For example:
// 1
cd /Users/yourusername/Projects/YourProject
// 2
pod init
// 3 In the generated Podfile file
target 'YourProjectTarget' do
pod 'TUICallKit_Swift'
end
2. Install components:
Enter the directory where the Podfile file is located in the terminal, then run the following command to install components.
pod update
Step 2.Project Configuration
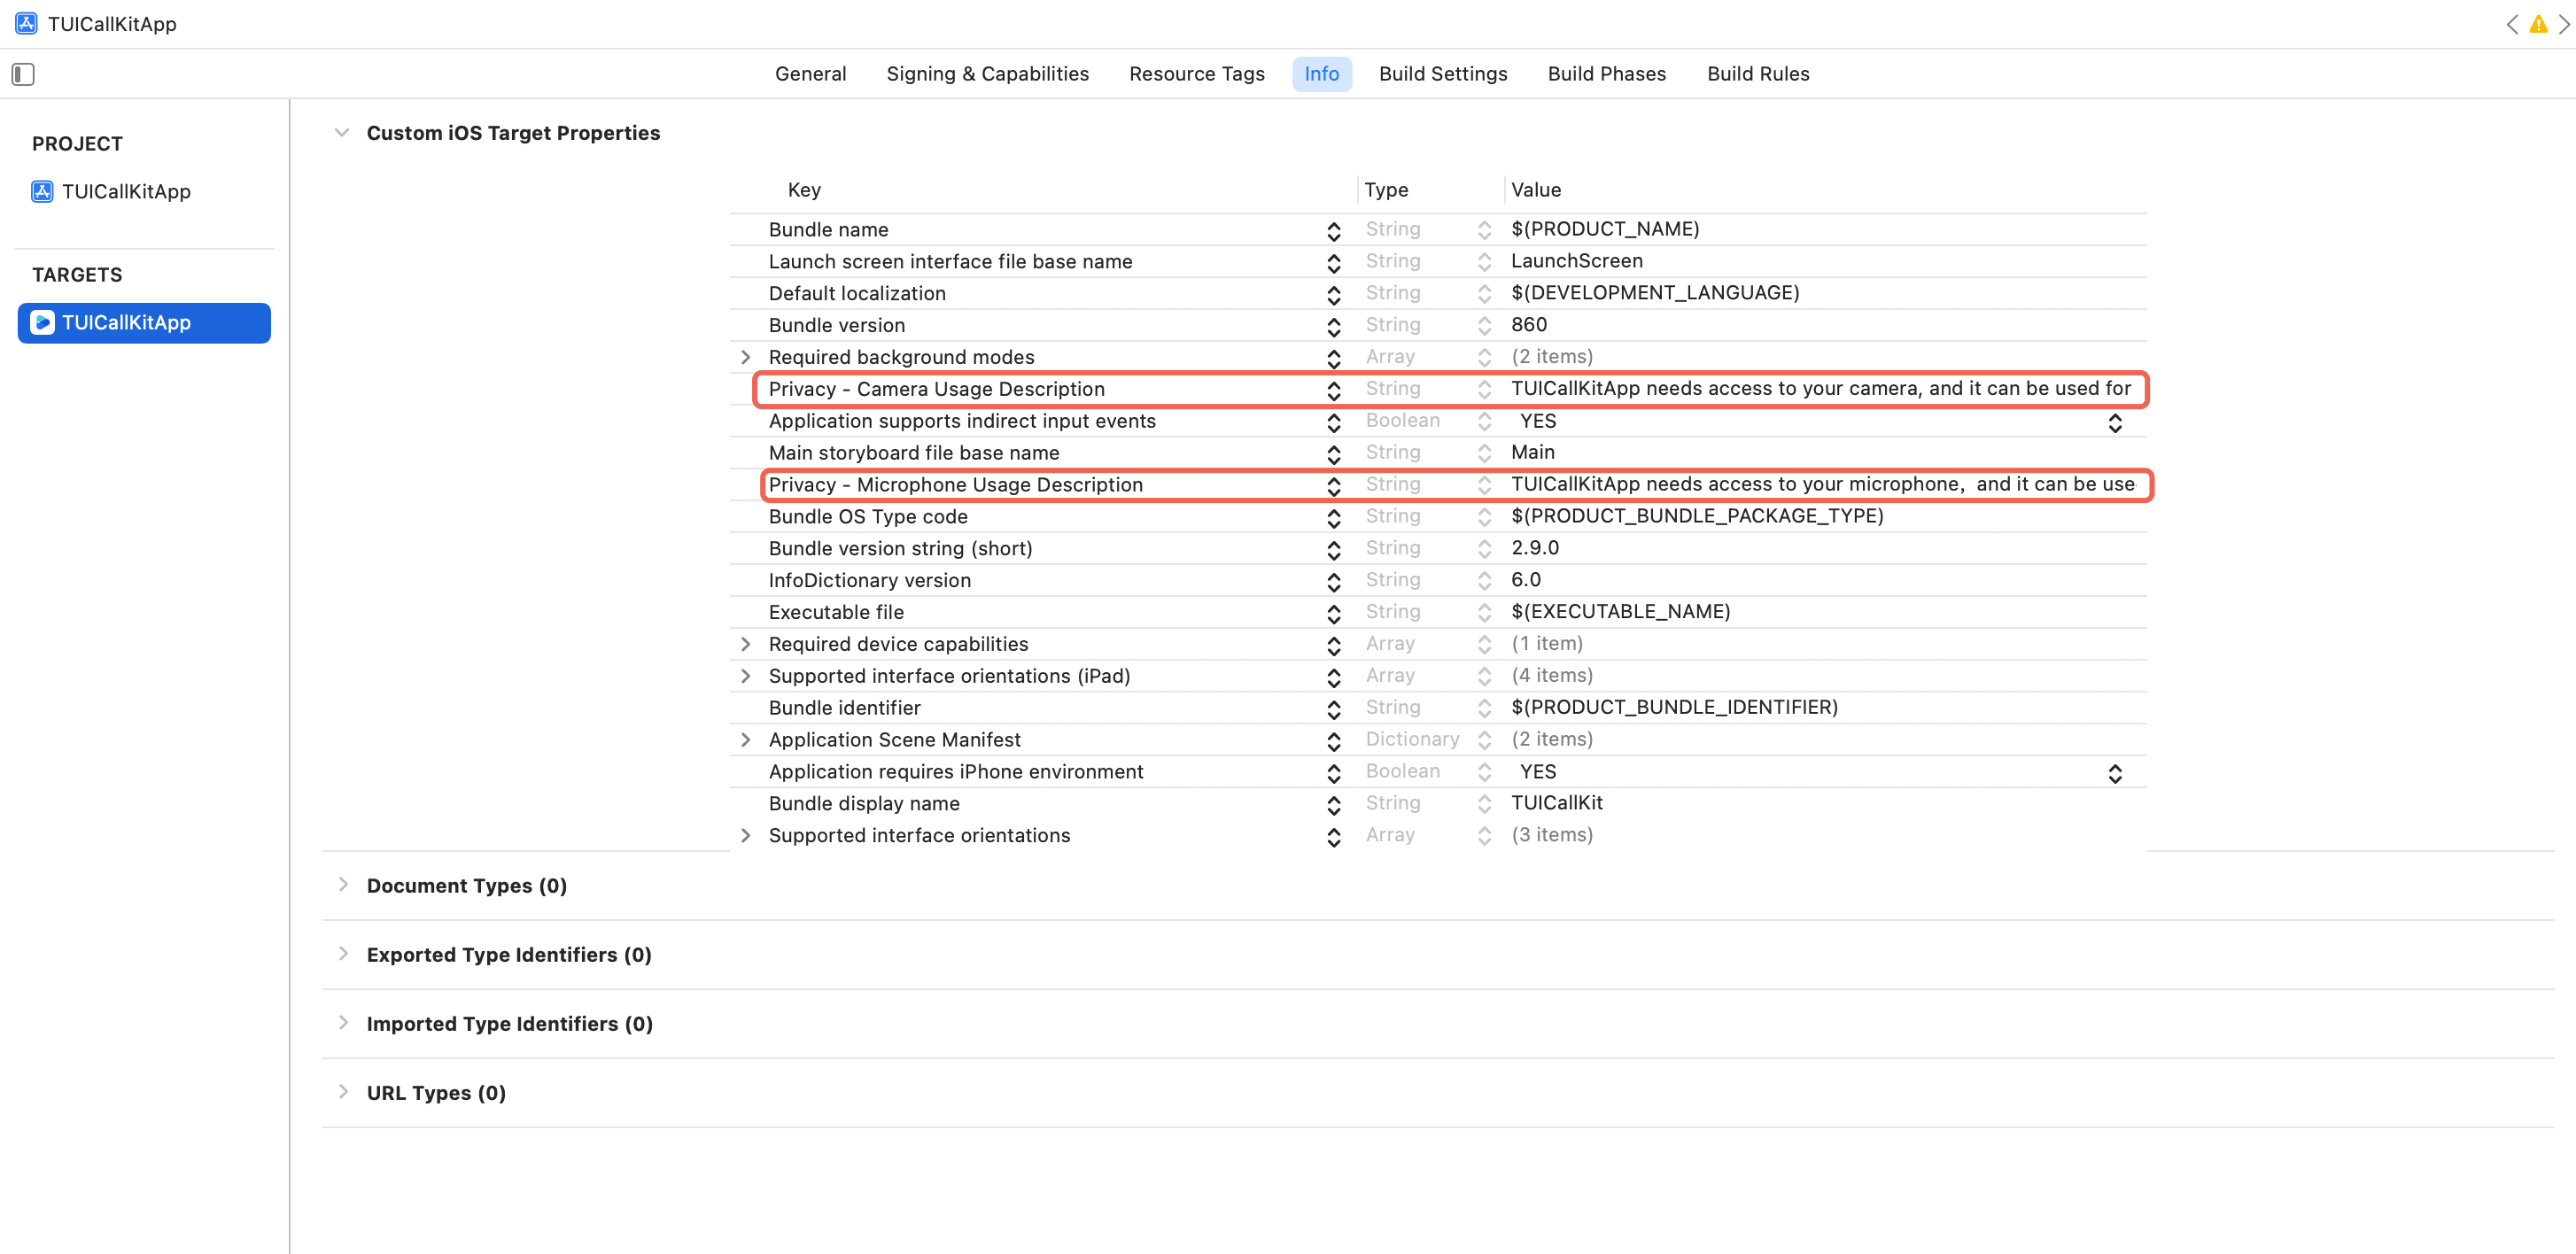
To ensure the audio and video features function correctly, your application needs to request access to the microphone and camera. Please add the following two privacy usage descriptions to your project's Info.plist file,these descriptions will be displayed to the user when the system initially prompts for permission.
<key>NSCameraUsageDescription</key>
<string>TUICallKitApp needs access to your camera, and it can be used for functions such asVideoCall,GroupVideoCall.</string>
<key>NSMicrophoneUsageDescription</key>
<string>TUICallKitApp needs access to your microphone,and it can be used for functions such asAudioCall,GroupAudioCall,VideoCall,GroupVideoCall.</string>
Step 3.Login
Add the following code in your project. It enables logging in to the TUI component by calling relevant APIs in TUICore. This step is critical. Only after logging in successfully can you use the features provided by TUICallKit properly.
A security signature used for user login authentication, confirming user authenticity and preventing malicious attacks from stealing your cloud service usage rights.
Note:
Development environment: If you are in the local development and debugging stage, you can adopt the local GenerateTestUserSig.genTestSig function to generate userSig. In this method, the secretKey is very easy to decompile and reverse. Once your key is leaked, attackers can steal your Tencent Cloud traffic.
After a successful login, you can call the setSelfInfo function to set your nickname and avatar. The set nickname and avatar will be displayed on the caller/callee interface.
The caller initiates a call by invoking the calls function and specifying the media type (voice or video) and the callee's User ID list (userIdList). The calls interface supports both one-to-one and group calls. A one-to-one call is initiated when the userIDList contains only a single User ID; a group call is initiated when it contains multiple User IDs.
Note: The calls interface cannot be written in the viewDidLoad method; it should be called in the button's click event or other user interaction response methods.
Call extension parameters, such as room number, call invitation timeout, offline push custom content
Step 6.Answering a Call
Once the callee successfully logs in, the caller can initiate a call, and the callee will receive the call invitation, accompanied by a ringtone and vibration.
More Features
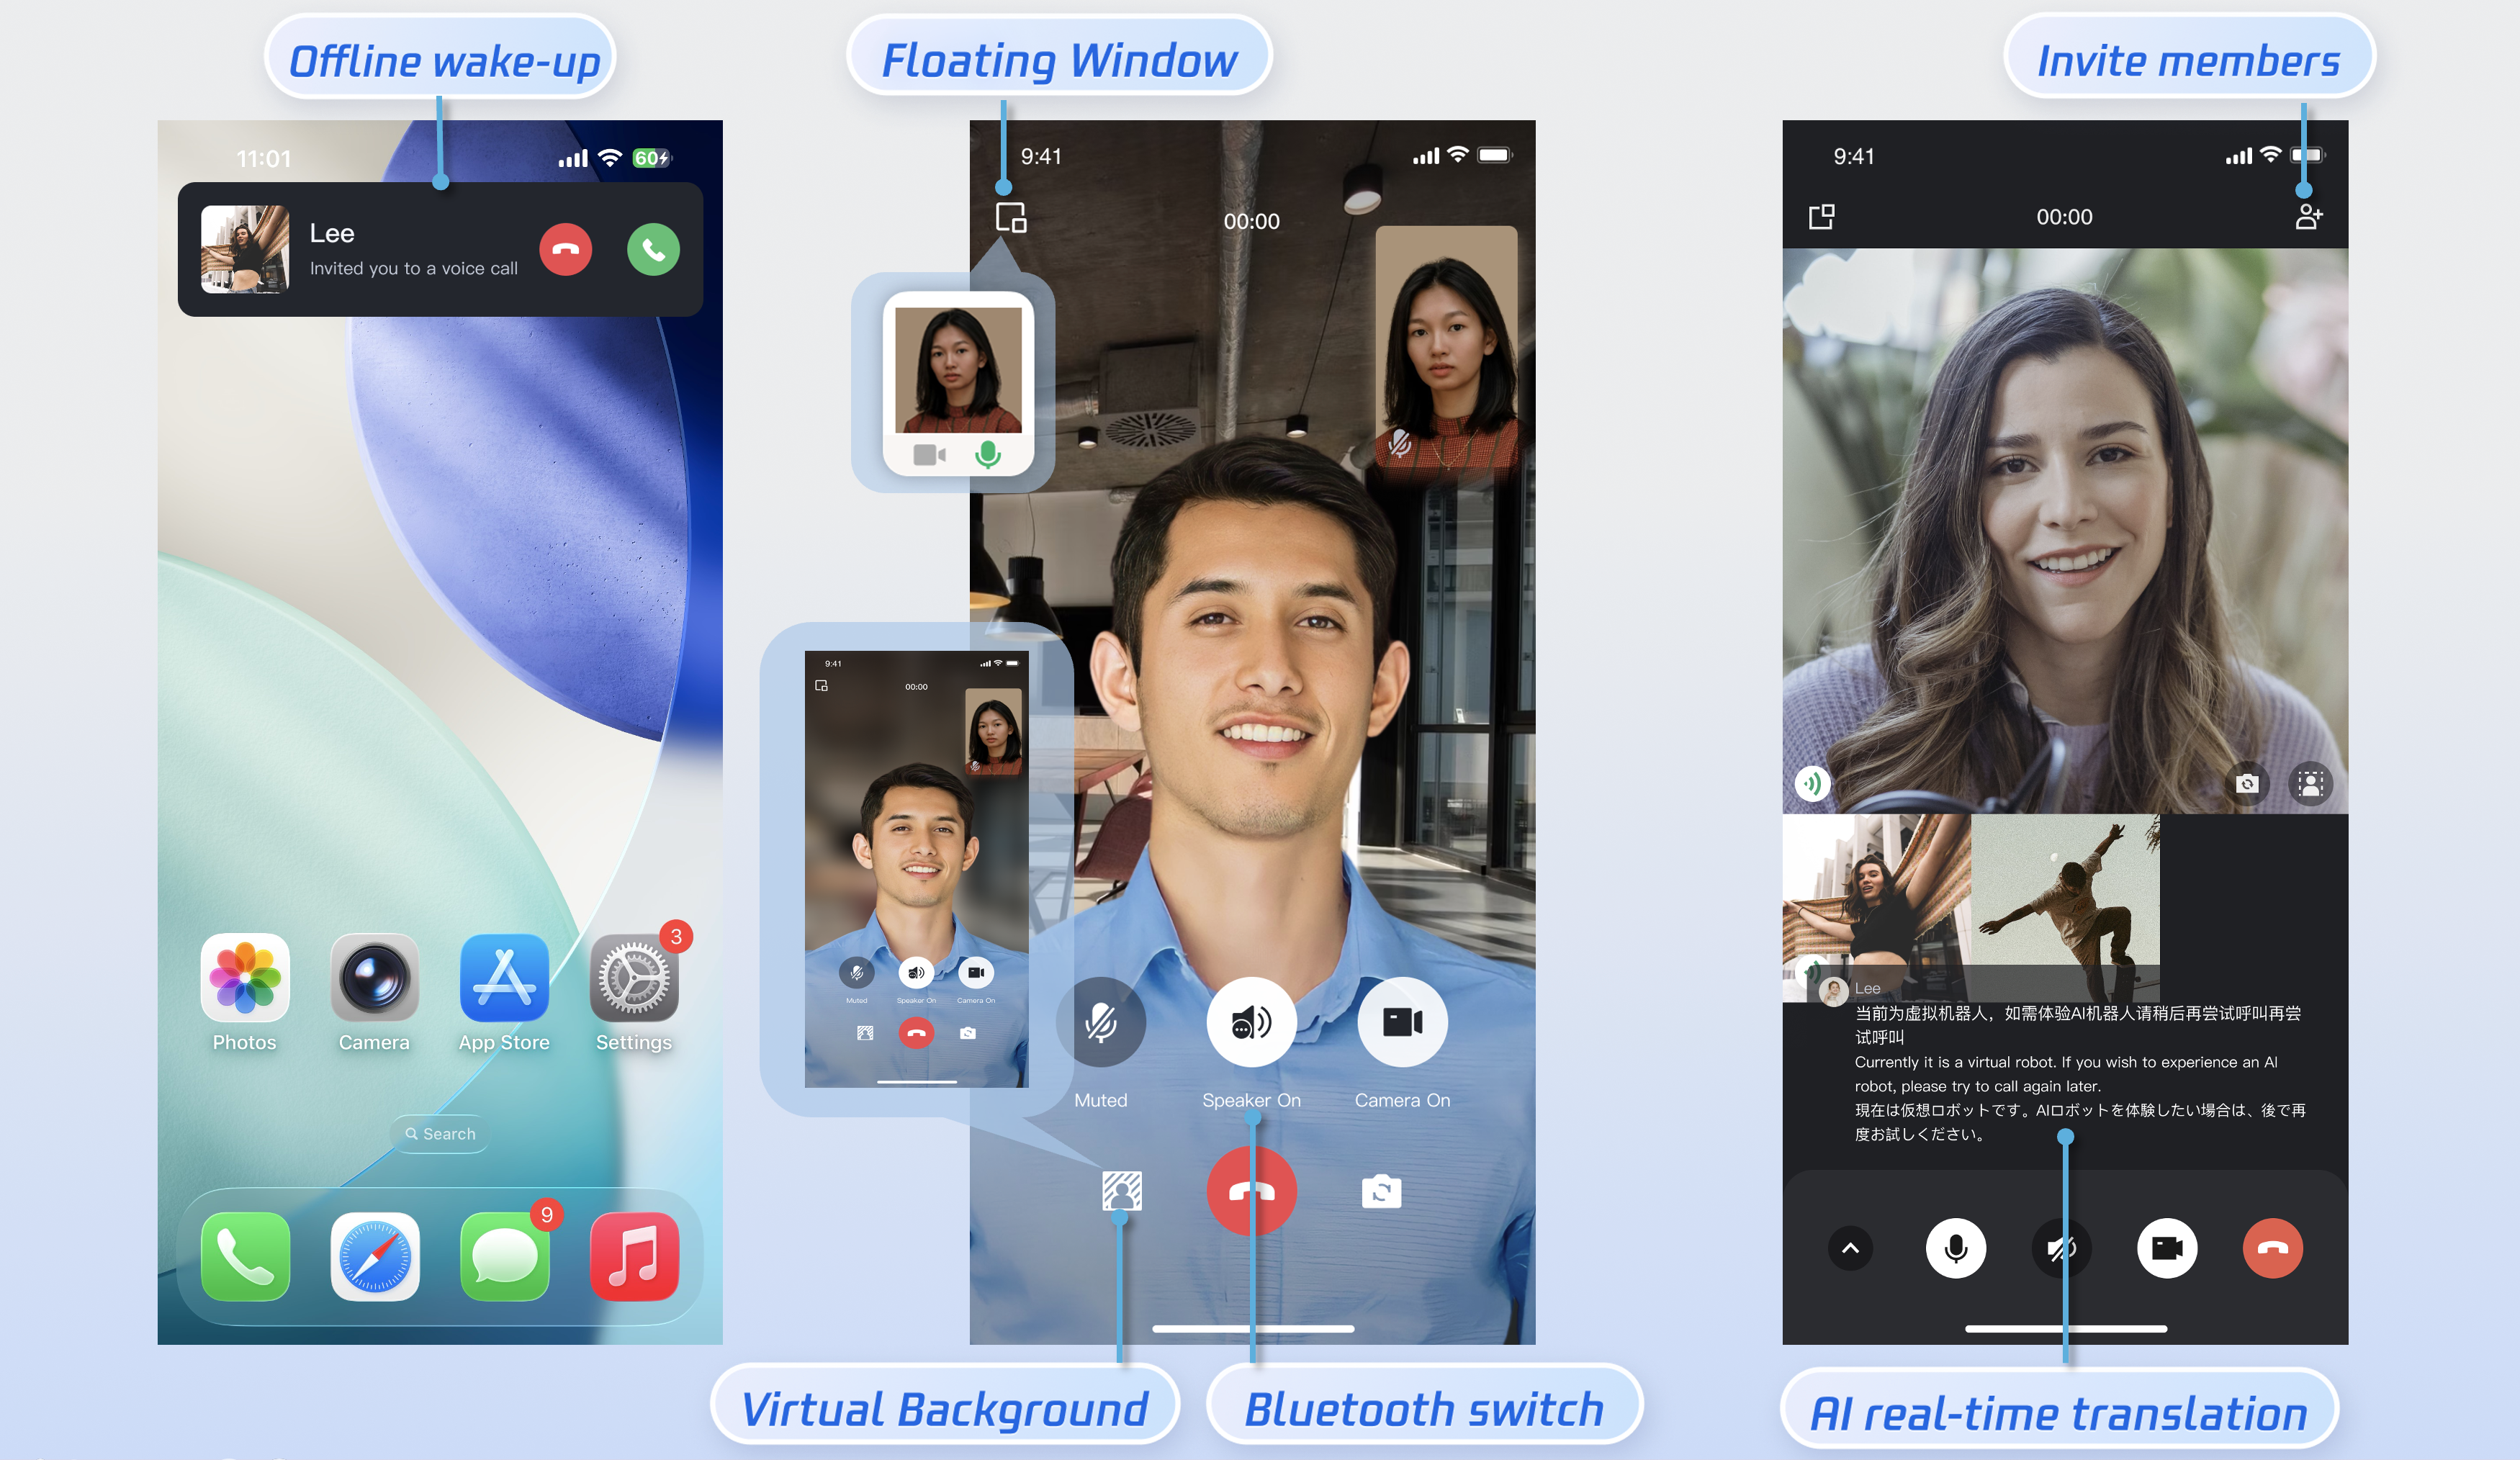
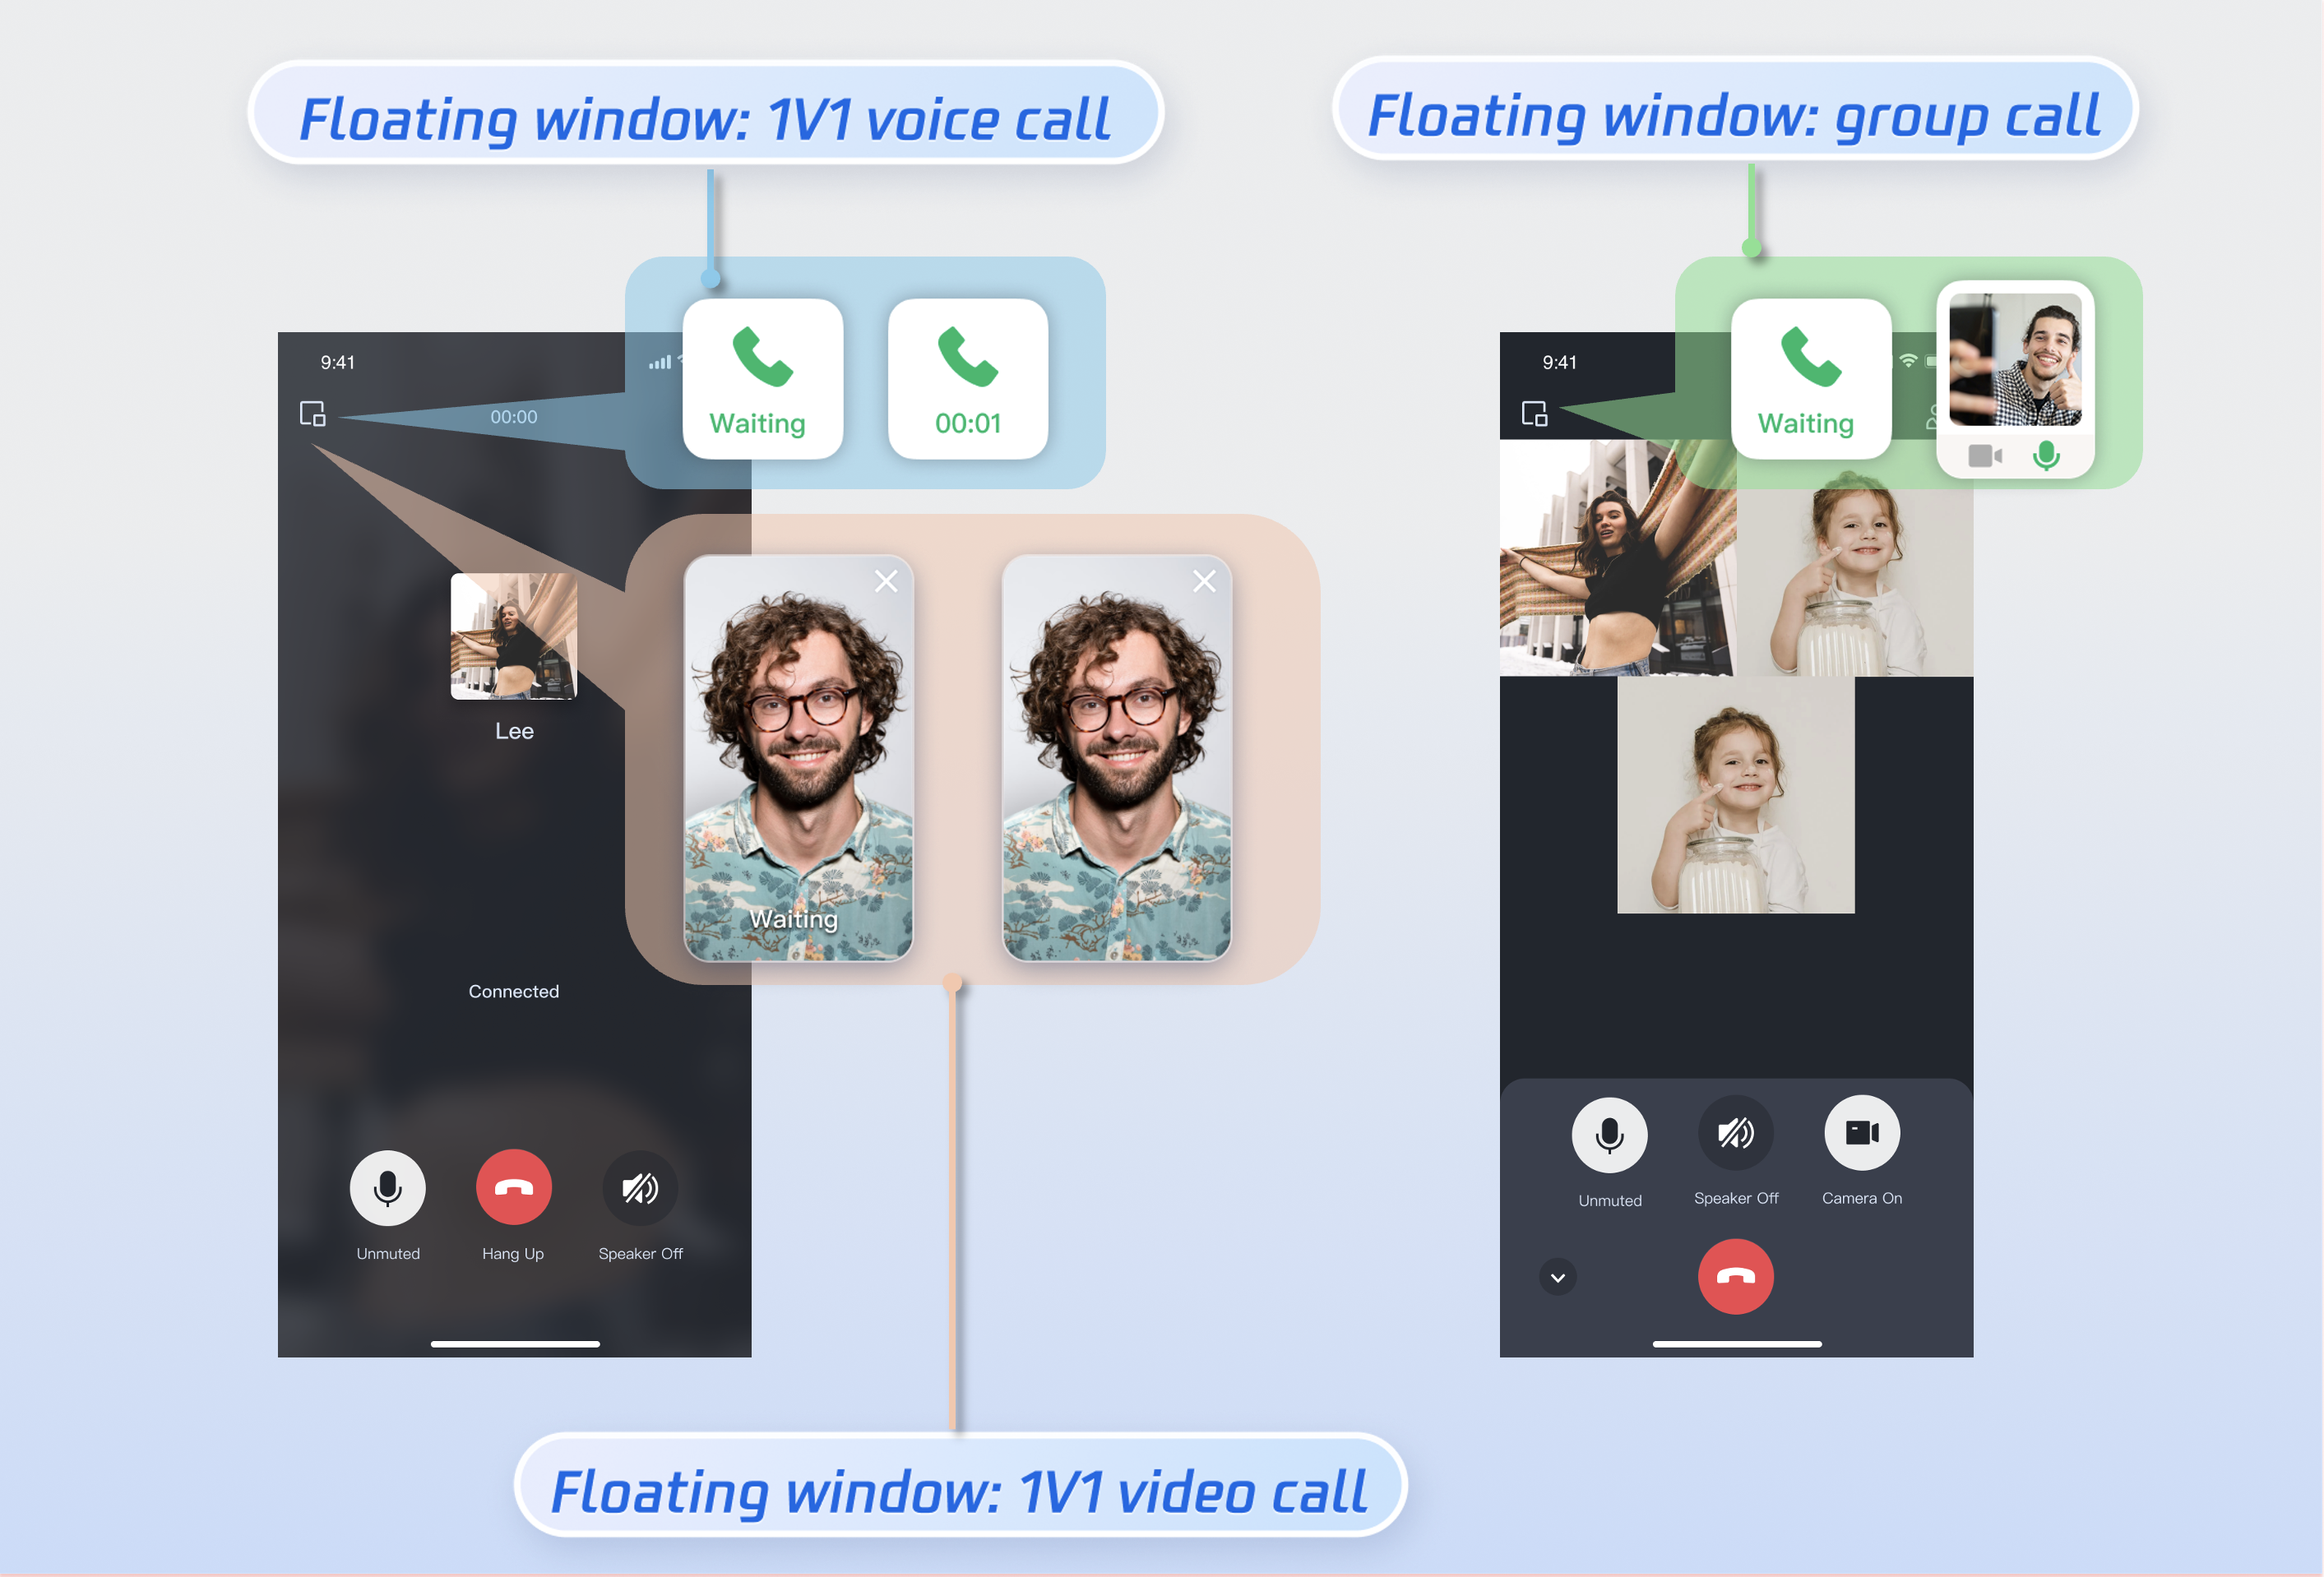
Enabling Floating Window
You can enable/disable the floating window feature by calling enableFloatWindow. This feature should be enabled when initializing the TUICallKit component, with the default status being Off (false).
Details: false by default, the floating window button in the top-left corner of the call interface is hidden. Set to true to display the button and enable the feature.
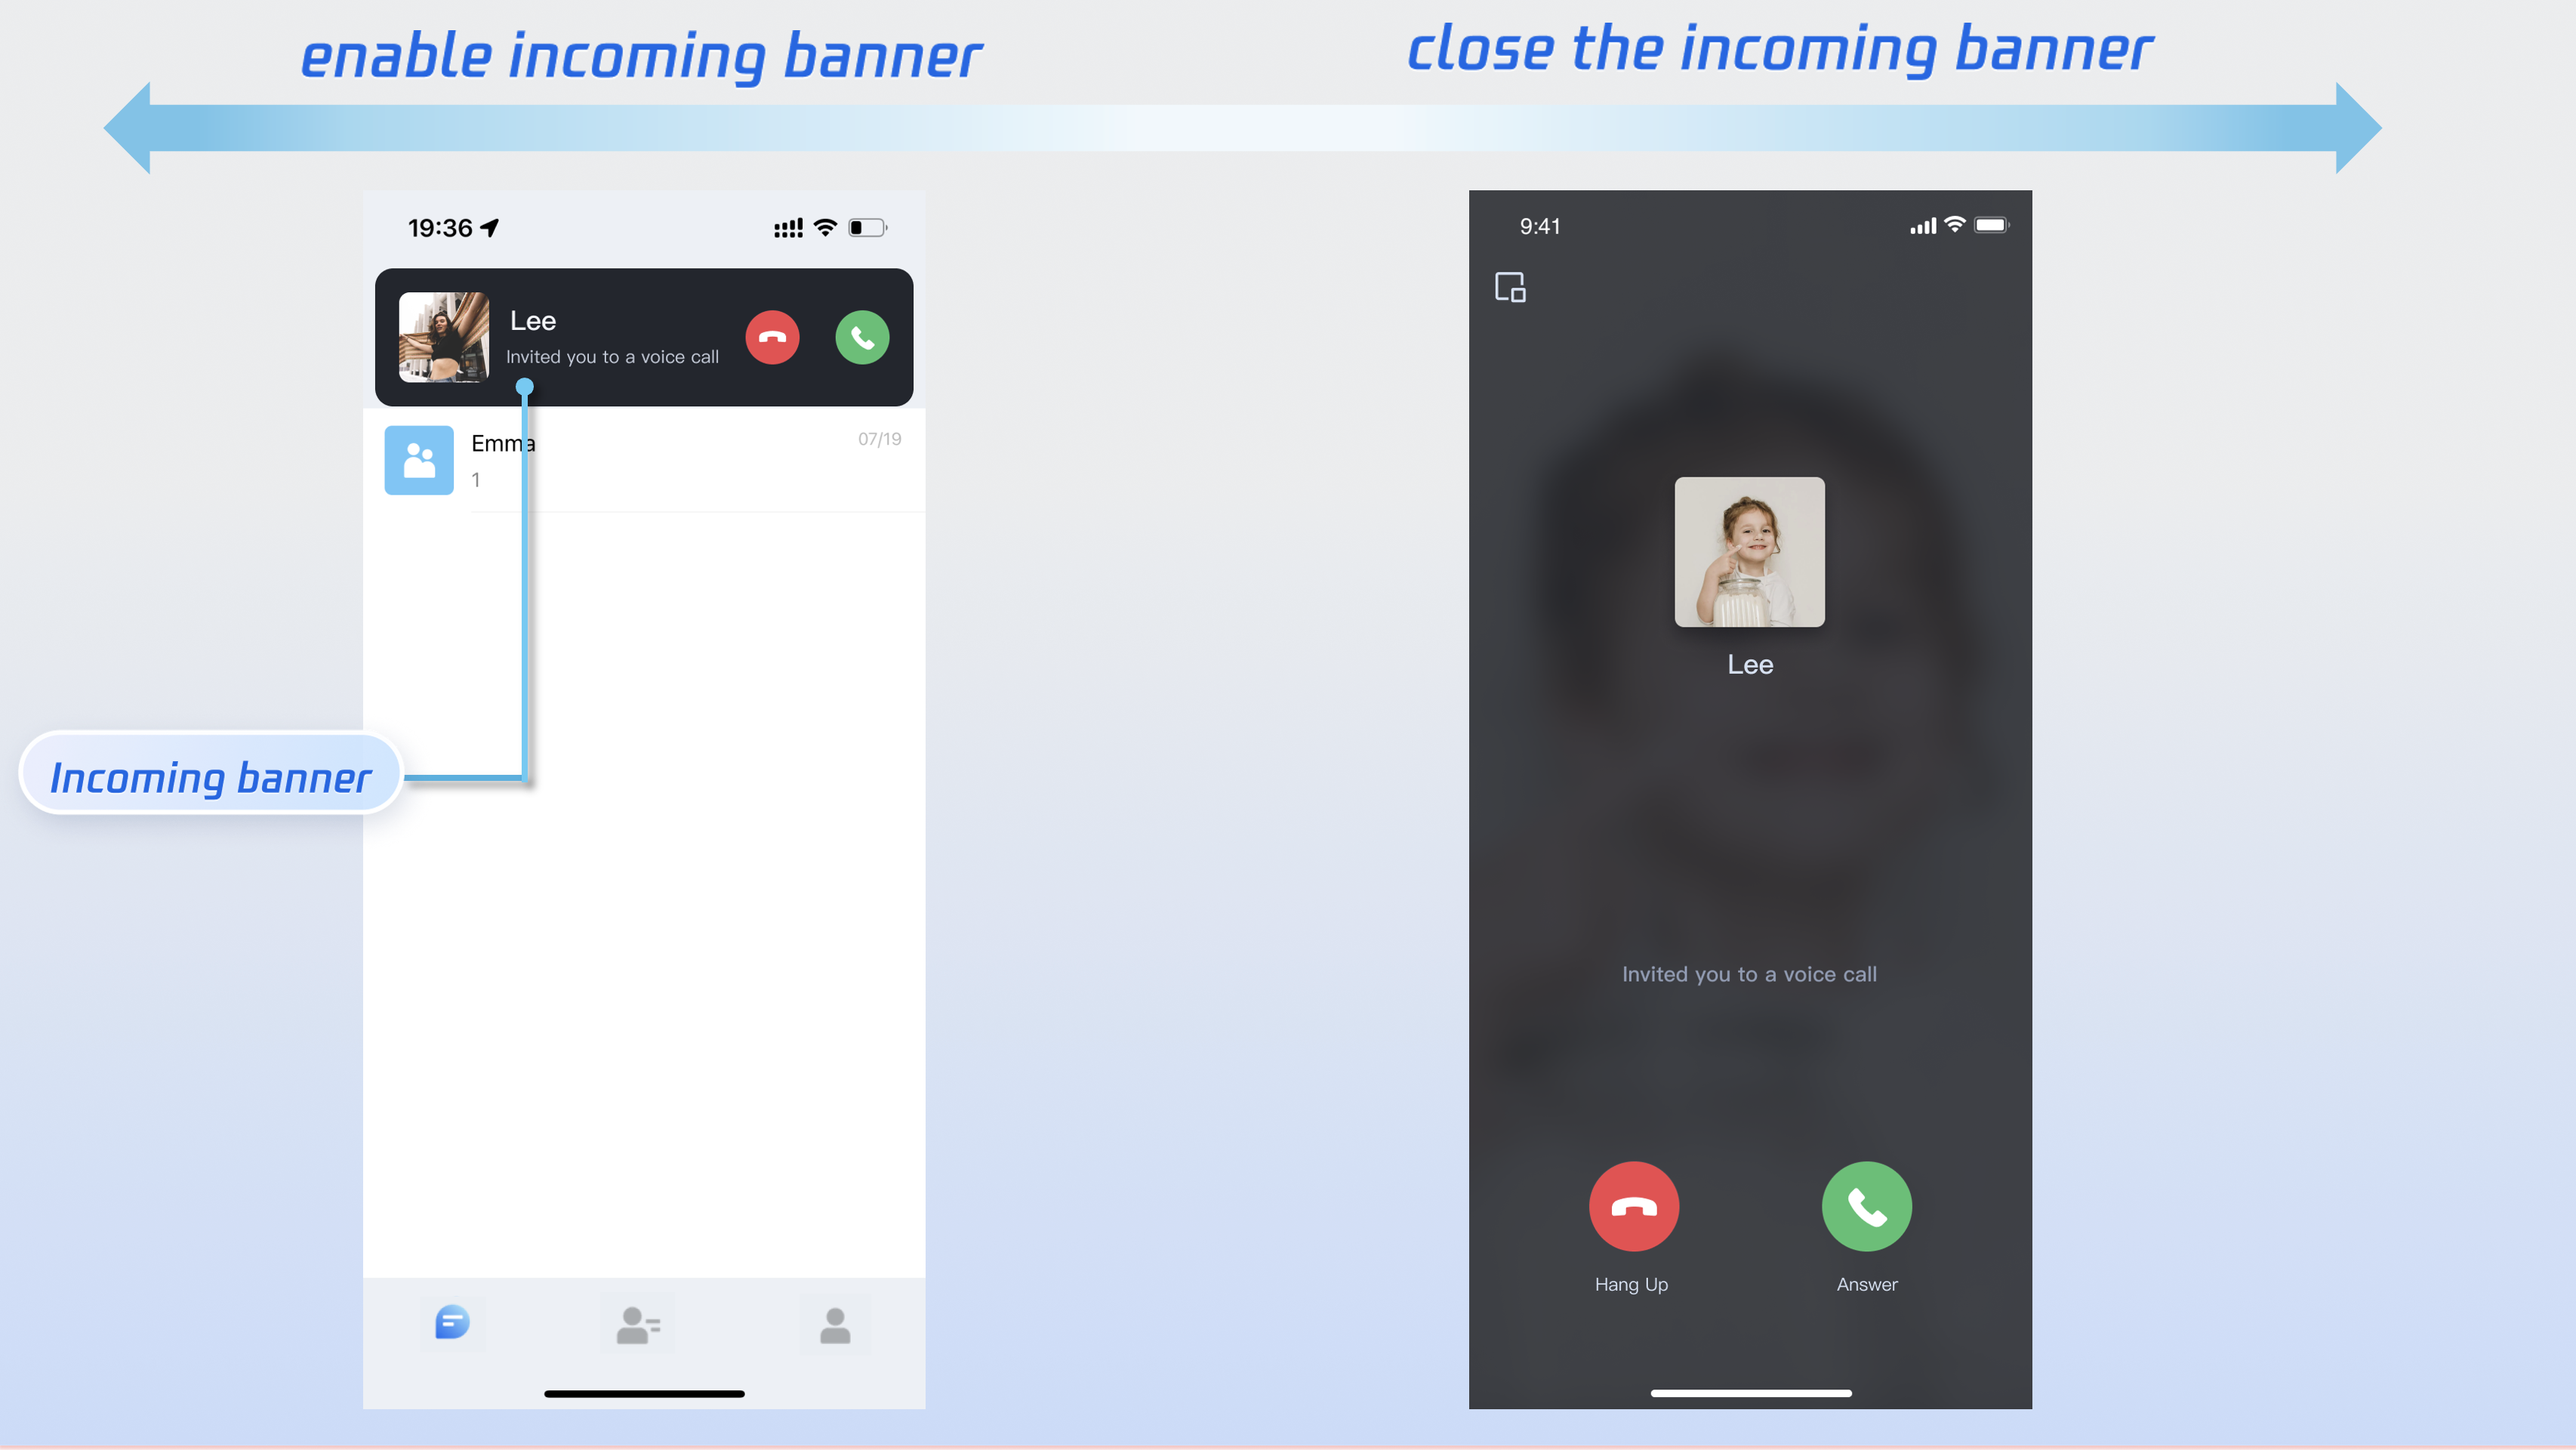
Enabling Banner
You can enable or disable the incoming call banner functionality by calling the enableIncomingBanner API: by default (disabled), the callee will immediately display the full-screen call interface upon receiving an invitation, while enabling it will show a notification banner first, followed by launching the full-screen call interface as required.
Details: Default false. When the callee receives an invitation, the full-screen call waiting interface pops up by default. When enabled, a banner is shown first, then the full-screen call interface is pulled up as needed.
Multi-Person Calling
When the caller uses the calls method to initiate a call, if the list of called users exceeds one person, it is automatically recognized as a multi-person call. Other members can then join this multi-person call using the join method.
Initiating a Multi-person Call: When the calls method is used to initiate a call, if the callee User ID list (userIdList) contains more than one user, it will be automatically deemed a multi-person call.
Supported Languages: We currently support Simplified Chinese, Traditional Chinese, English, Japanese, and Arabic.
Switching Languages: By default, the language of TUICallKit is consistent with the mobile operating system's language setting. To switch the language, you can use the TUIGlobalization.setPreferredLanguage method.
setLanguage
iOS (Swift)
importTUICore
funcsteLanguage(){
TUIGlobalization.setPreferredLanguage("en")
}
Parameter
Type
Description
language
String
"zh-Hans": Simplified Chinese.
"zh-Hant": Traditional Chinese.
"en": English.
"ar" : Arabic.
Note:
If you need to set up other languages, please contact us at info_rtc@tencent.com for assistance.
Ringtone Setting
You can configure the default ringtone, incoming call silent mode, and offline push ringtone using the following methods:
Details: Only local file paths can be imported here. You must ensure that the file directory is accessible to the application. The ringtone setting is bound to the device; therefore, replacing the user will not affect the ringtone. To restore the default ringtone, simply pass an empty filePath.
Parameter
Type
Description
filePath
String
Ringtone file path
Incoming call silent mode: You can set mute mode through enableMuteMode.
Details: VoIP push does not support custom push ringtones. APNs push allows setting the iOSSound field in the offlinePushInfo of params when calling the call interface during a phone call. iOSSound should be passed with the audio filename.
Note:
Offline Push Sound settings (only applicable to iOS). To customize iOSSound, first link the voice file to the Xcode project, then set the audio filename (with extension) to iOSSound.
Ringtone duration should be less than 30s.
Customizing Your UI
Replace Icon Button
You can directly replace the icons under the Resources\Assets.xcassets folder to ensure the icon color and style remain consistent across the entire App. Below lists the basic feature buttons. You can replace the corresponding icons to fit your own business scenario.
Commonly Used Icon File Name List
Icon
File name
Description
icon_dialing.png
Answer incoming call icon
icon_hangup.png
Hang Up Call icon
icon_mute_on.png
Turn off the mic icon
icon_handsfree.png
Turn off the speaker icon
icon_camera_off.png
Camera Off icon
icon_add_user.png
Invite user icon during call
FAQs
Due to business needs, we need the TUICallKit source code. However, every time we update the pod, it's overwritten, resulting in loss. How can we fix this?
2. Reference it in your project using the local pod method. The sample code is as follows:
pod 'TUICallKit_Swift',:path=>"your TUICallKit_Swift.podspec path"
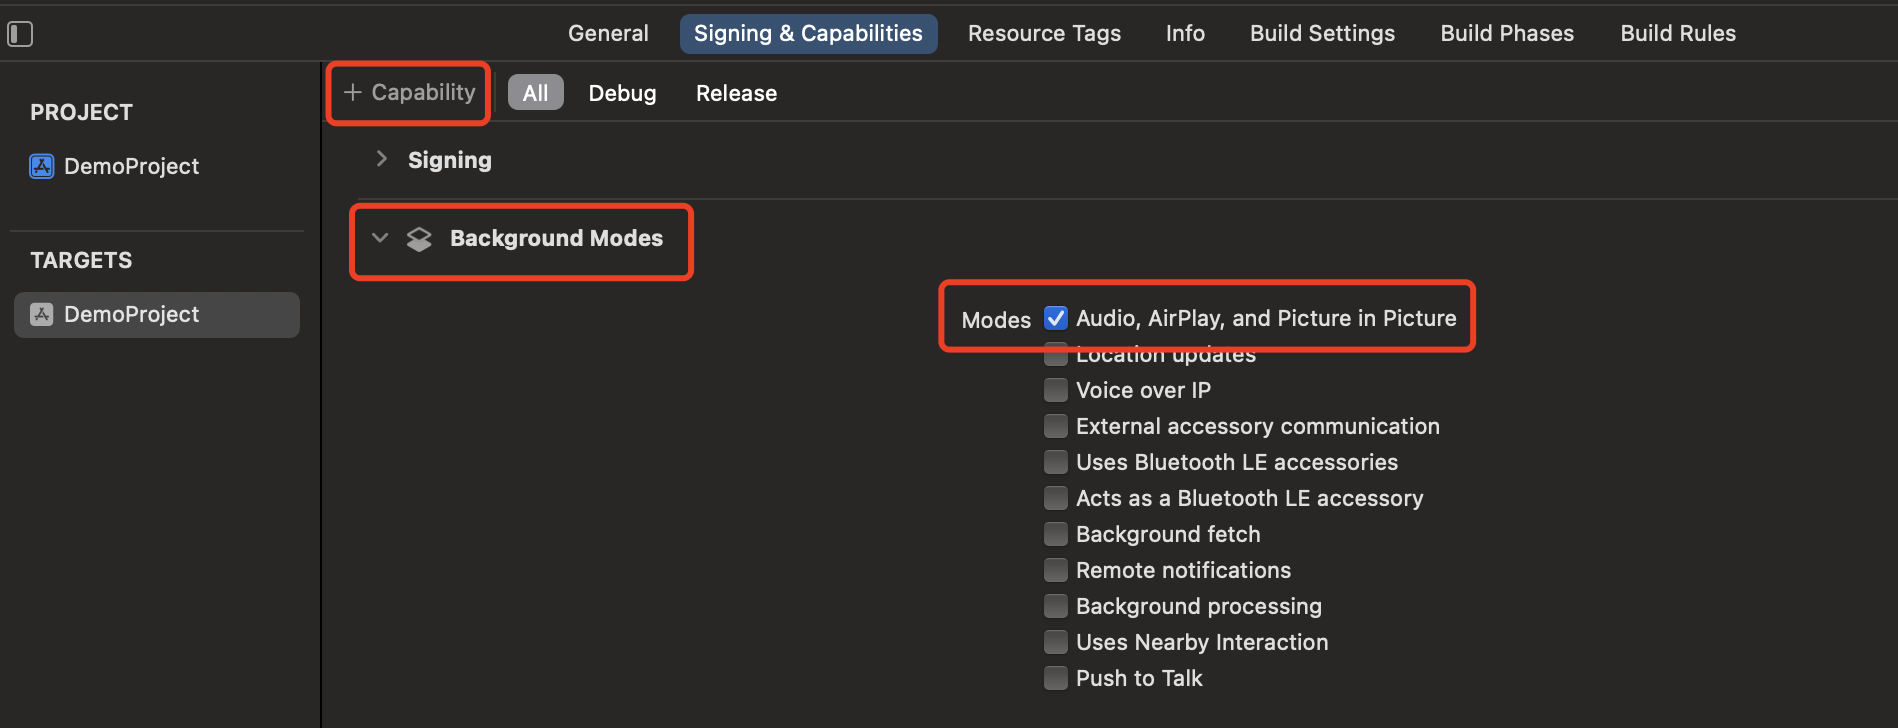
Does TUICallKit support running in the background?
Yes, if you need relevant functions to continue running when the application enters the background, select the current engineering project, go to the Capabilities tab, and under the Background Modes section, check Audio, AirPlay, and Picture in Picture, as shown below:
If you encounter problems during integration and use, see FAQs.
Contact Us
If you have any suggestions or feedback, please contact info_rtc@tencent.com.