Whether it’s for connecting remote teams, facilitating online classes, or enhancing customer support, video calling is an essential tool. However, developing a video call application from scratch can be time-consuming and complex. What if you could build a scalable and feature-rich video call application on the web in just 10 minutes? Using Vue 3, known for its efficiency and ease of use, this tutorial will guide you through creating a complete video call app in just 10 minutes!
Prerequisites
- Node.js version 16+.
- Modern browser, supporting WebRTC APIs.
Step 1. Activate the service
Refer to Activate the Service to obtain SDKAppID, SDKSecretKey, which will be used as Mandatory Parameters in Initialize the TUICallKit.
Step 2. Download TUICallKit
1. Download the @tencentcloud/call-uikit-vue component.
npm install @tencentcloud/call-uikit-vue2. Copy the debug directory to your project directory src/debug, it is necessary when generating userSig locally.
MacOS
cp -r node_modules/@tencentcloud/call-uikit-vue/debug ./srcWindows
xcopy node_modules\@tencentcloud\call-uikit-vue\debug .\src\debug /i /eStep 3. Initialize TUICallKit
You can choose to import the sample code in the src/App.vue file.The example code uses the Composition API approach.
1. using <TUICallKit />, which contains the complete UI interaction during a call.
<template>
  <span> caller's ID: </span>
  <input type="text" v-model="callerUserID">
  <button @click="init"> step1. init </button> <br>
  <span> callee's ID: </span>
  <input type="text" v-model="calleeUserID">
  <button @click="call"> step2. call </button>

  <!--【1】Import the TUICallKit component: Call interface UI -->
  <TUICallKit style="width: 650px; height: 500px " />
</template>
2. using the TUICallKitServer.init API to log in to the component, you need to fill in SDKAppID, SDKSecretKey as two parameters in the code.
<script setup> // lang='ts'
import { ref } from 'vue';
import { TUICallKit, TUICallKitServer, TUICallType } from "@tencentcloud/call-uikit-vue";
import * as GenerateTestUserSig from "./debug/GenerateTestUserSig-es"; // Refer to Step 2.3


const SDKAppID = 0;       // TODO: Replace with your SDKAppID (Notice: SDKAppID is of type number)
const SDKSecretKey = '';  // TODO: Replace with your SDKSecretKey


const callerUserID = ref('');
const calleeUserID = ref('');


//【2】Initialize the TUICallKit component
const init = async () => {
  const { userSig } = GenerateTestUserSig.genTestUserSig({
    userID: callerUserID.value,
    SDKAppID,

    SecretKey: SDKSecretKey

  });

  await TUICallKitServer.init({

    userID: callerUserID.value,

    userSig,

    SDKAppID,

  });

  alert('TUICallKit init succeed');

}

</script>| Parameter | Type | Note |
| userID | String | Unique identifier of the user, defined by you, it is allowed to contain only upper and lower case letters (a-z, A-Z), numbers (0-9), underscores, and hyphens. |
| SDKAppID | Number | The unique identifier for the audio and video application created in the Tencent RTC Console. |
| SDKSecretKey | String | The SDKSecretKey of the audio and video application created in the Tencent RTC Console. |
| userSig | String | A security protection signature used for user log in authentication to confirm the user's identity and prevent malicious attackers from stealing your cloud service usage rights. |
Step 4. Make the first call
1. using the TUICallKitServer.call API to make a call.
//【3】Make a 1v1 video call
const call = async () => {
  await TUICallKitServer.call({
    userID: calleeUserID.value,
    type: TUICallType.VIDEO_CALL,
  });
};
2. Run the project.
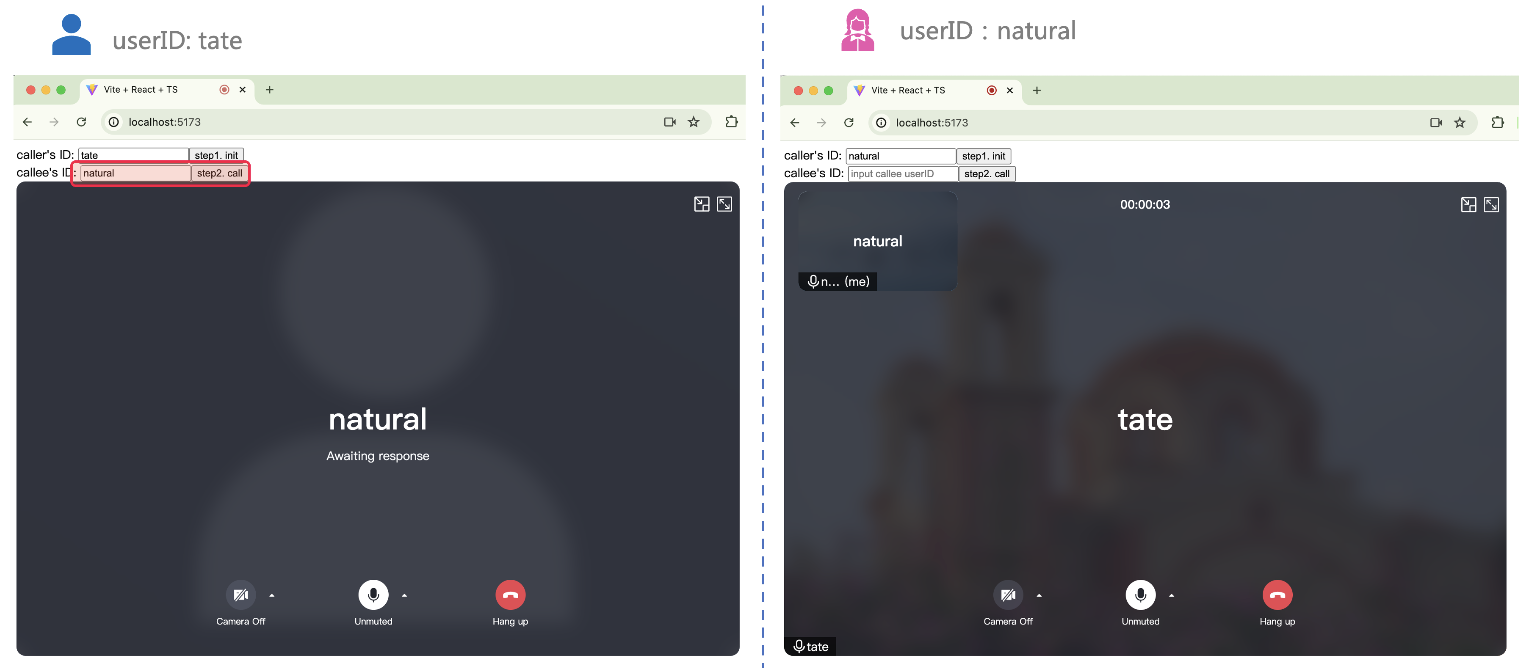
3. Open two browser pages, enter different userID(defined by you) click step1. init to login (caller and callee).

4. After both userID init to successfully, click on step2. callto make a call. If you have a call problem, refer to FAQs.

If you have any requirements or feedback, you can contact: info_rtc@tencent.com. Or Reach out via Telegram or Discord for advice on your implementation.


