
Scenario Overview
Zendesk, one of the most prevalent SaaS products in customer support, sales, and other customer communications. Meanwhile, according to Gartner, Tencent Chat made the champion in Chinese market and one of the most compotent providers in Communication Platform as a Service (CPaaS) in the global market. Naturally, it comes to us to bring you the solution of integrating Chat with Zendesk.
In this essay, we will discuss how to build an client-agent-real-time communication system that extends the boundary of support team in Zendesk and enables support team to chat with clients in any platforms. We have accomplished Chat App for Zendesk ticket bar and all you need to do is to install it as well as publish your own client side by the following instructions.
If that's not the integrate solution on your interest list, don't rush to the close button. Go through the essay and build your own private App for Zendesk by TUIKit, which is not a painstaking errand on your ticket list but instead a few man hours or days depending on the complexity of the App you want to build.
Products Applied
Basic Integration Guidelines
Prerequisites
If you haven't registered for Zendesk, try free trial.
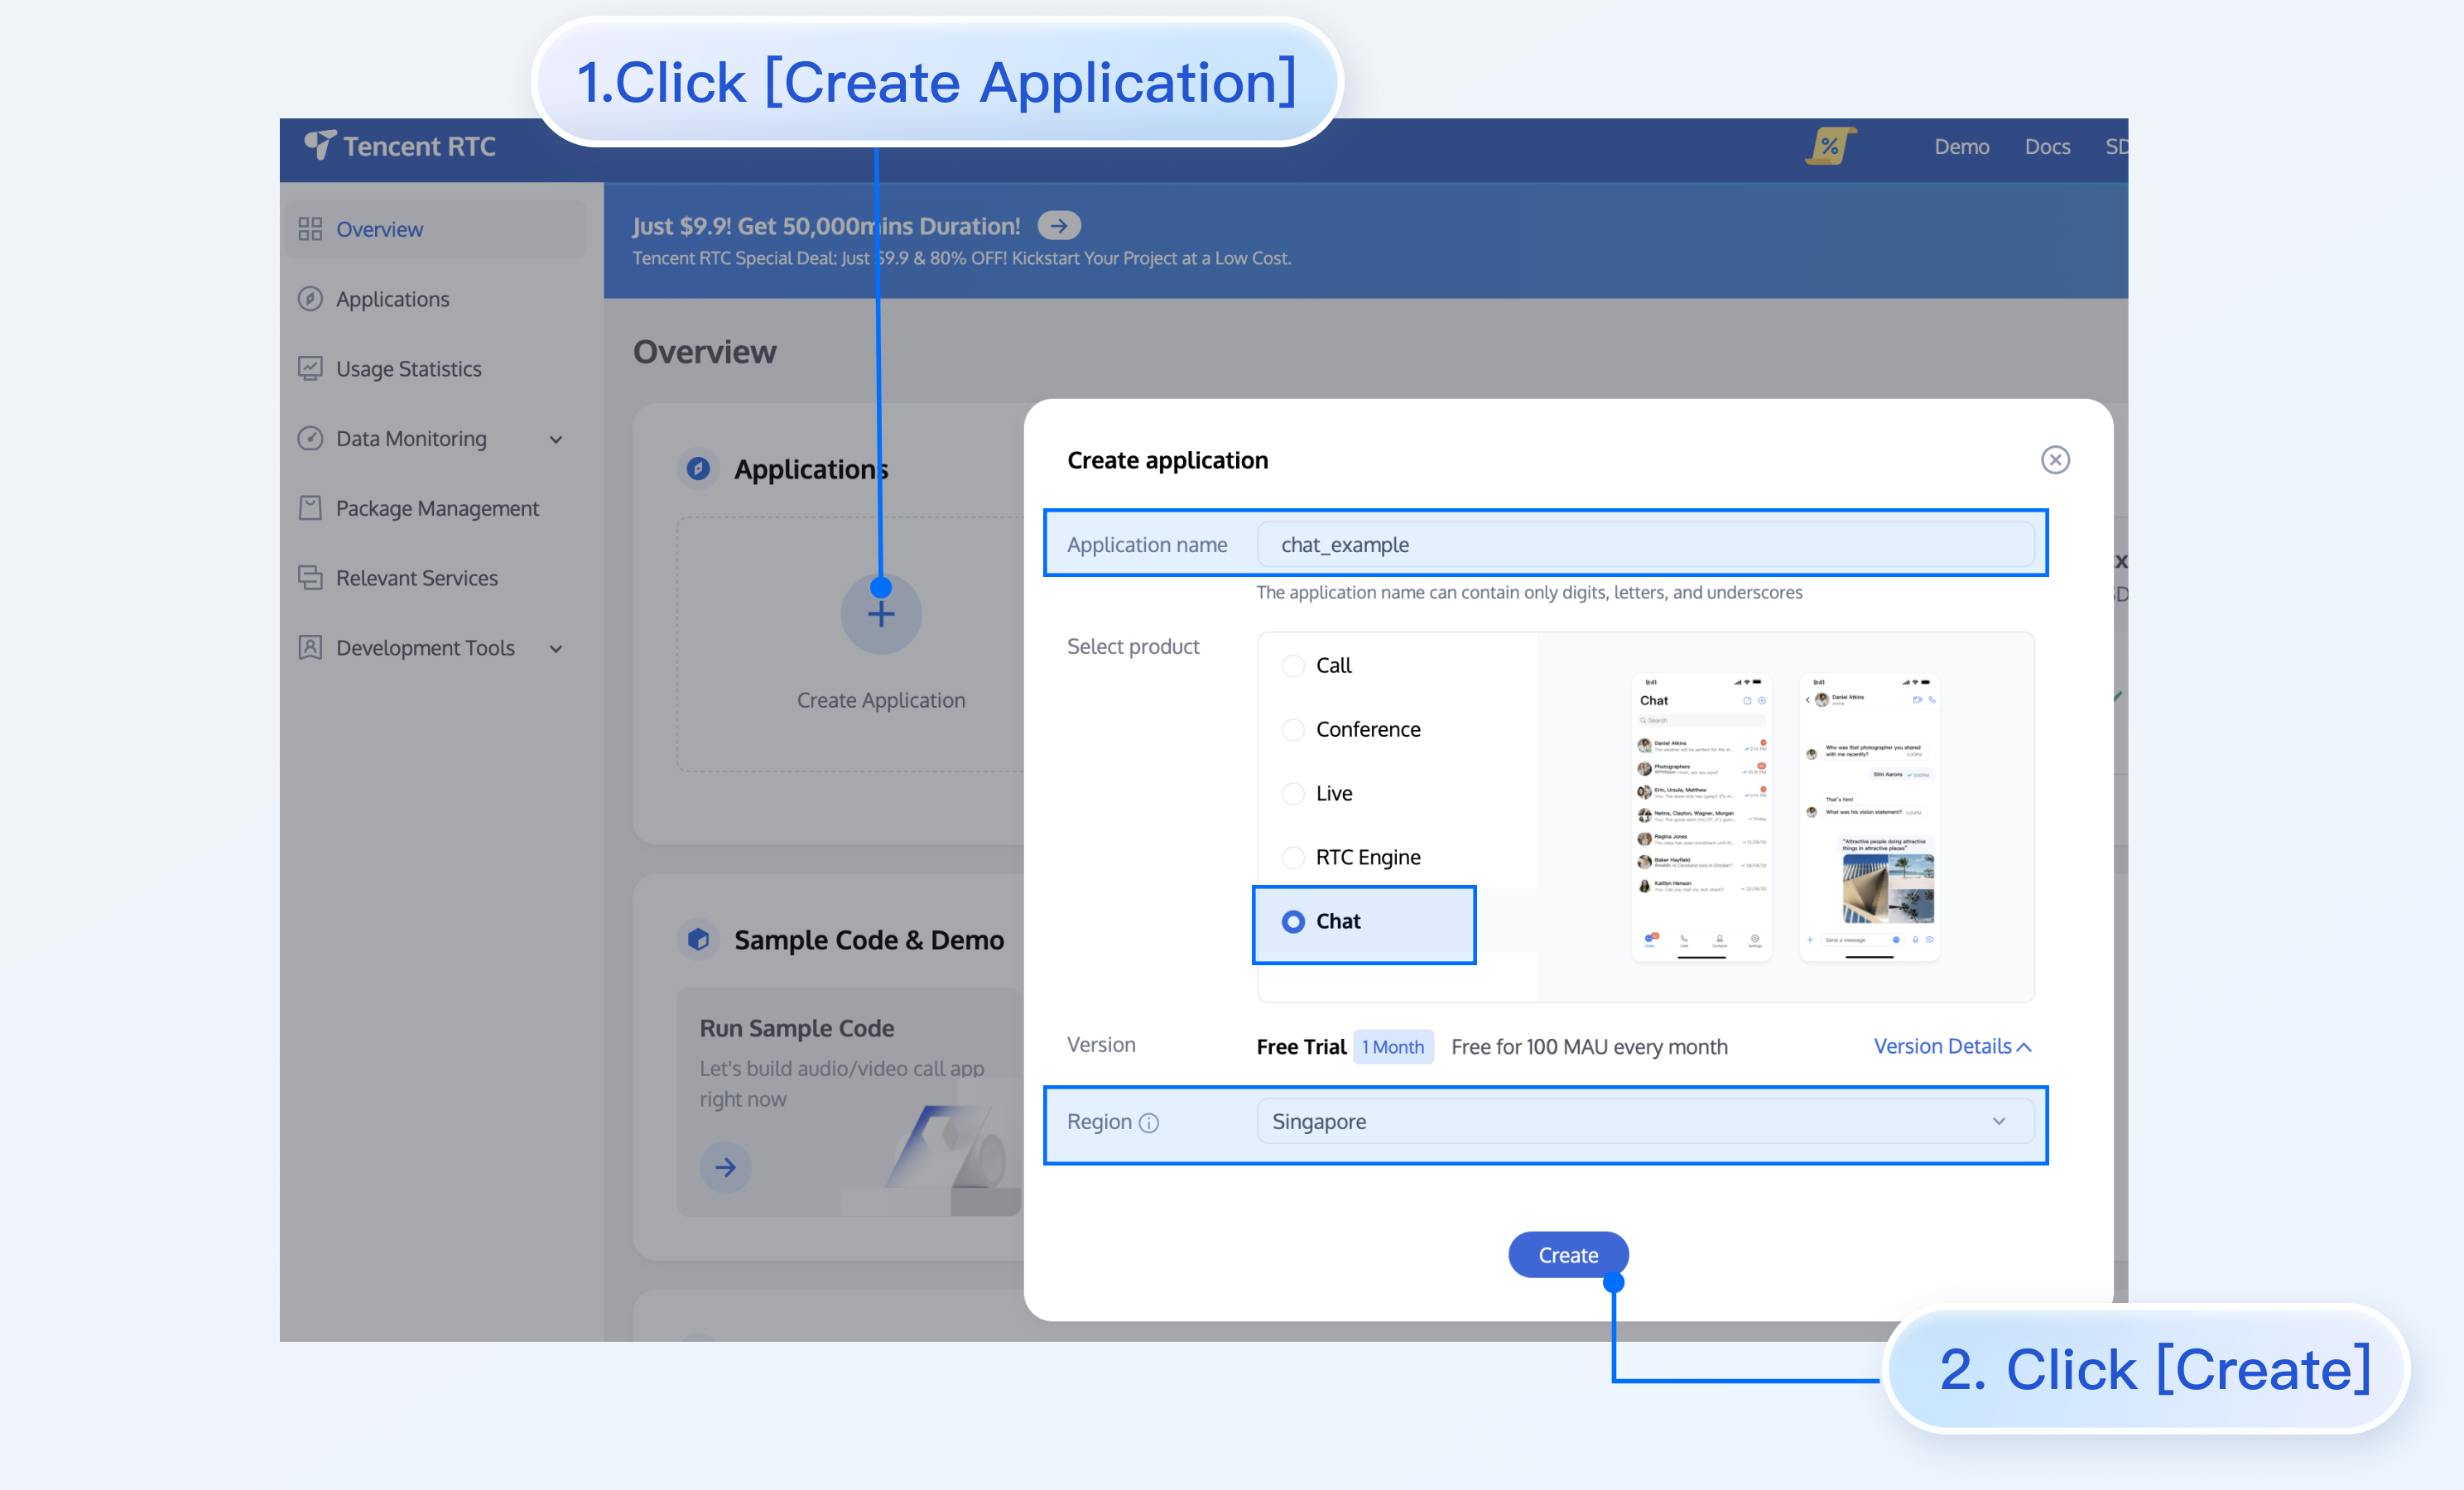
To use any service of Chat, you must register for Tencent RTC, which contains so many cloud-based services other than Chat. After that, click Create Application on the Console to get your SDKAppID, that's what you need to initiate an Chat service.
For client side construction, you'll need a web server as well, which will not be included in this article.
Integration Map
The goal of this integrate solution is straight and clear: listen to the assignment of agent and invite the agent to the conversation with the client outside Zendesk to discuss the issue or consultation in the ticket.
Here is the general integration map:
The general workflow is:
1. End user logs in to Chat.
1. End user submits a ticket to your backend server.
2. According to the submitted information, create the ticket for Zendesk.
3. Create a group in Chat, waiting for agent to join the group.
4. An agent takes the ticket or it is assigned to an agent.
5. The assignee joins the Chat group.
6. Now client and agent can chat freely.
The workflow for the client side is:
Before logged in, client may choose to reuse the ticket created last time. And for that, just login to Chat server.
Otherwise submit a new ticket to Zendesk.
Login to the server and use the returned ticket.id to create a group.
The process of Chat for Zendesk is:
The process of updating the ticket:
Scenario-specific implementation
Client Side Construction
You'll need to develop a frontend project to accomplish the chatting features, and a backend project to invoke Zendesk requests. Don't be panic about the works need to do, the frontend can be done smoothly with TUIKit like piling up blocks. TUIKit is a set of TUI components based on Chat SDKs, which provides independent components including conversation, chat, searching, relationship chain, group, and audio/video call. TUIKit currently covers platforms including iOS, Android, Web and Flutter, and we're working on React Native as well. Stay tuned on the channel to get the lastest status. By applying TUIKit, you just have to define your strategy to invoke the createTicket API.
Here's all the code to build the backend project:
const express = require('express');
const axios = require('axios').default;
var TLSSigAPIv2 = require('tls-sig-api-v2'); // Generate UserSig for TIM
require('dotenv').config();

const app = express();
app.use(express.json());

const port = process.env.PORT || 15000;
const YOUR_SDKAPPID = process.env.YOUR_SDKAPPID || 0;
const YOUR_SECRET = process.env.YOUR_SECRET || '';
const ADMIN_USERID = process.env.ADMIN_USERID || '';

const zendeskAxioInstance = axios.create({
  baseURL: `https://${process.env.SUB_DOMAIN}.zendesk.com/api/v2/`,
  auth: {
    username: process.env.EMAIL || '',
    password: process.env.TOKEN || ''
  },
  headers: {
    'Content-Type': 'application/json;charset=utf-8'
  },
  timeout: 35000
});

app.use(express.json());

app.use(function (req, res, next) {
  res.header('Access-Control-Allow-Origin', '*');
  res.header('Access-Control-Allow-Headers', '*');
  next();
});

app.post('/createticket', async (req, res) => {
  const { userId, caseInfo } = req.body;
  if (!userId) return res.status(500).send('Missing userId');

  const zendeskCase = await createTicket(caseInfo);
  if (!zendeskCase.success) return res.status(500).send('Case creation failed');

  const groupId = zendeskCase.id;
  const result = await createGroup(
    groupId,
    userId,
    caseInfo.subject || groupId
  );
  if (result.ErrorCode !== 0)
    return res.status(500).send('Group creation failed');
  sendGreeting(result.GroupId);

  res.status(200).send(result);
});

const createTicket = async function (caseInfo) {
  const { subject, desc, name, email } = caseInfo;
  const data = {
    request: {
      requester: {
        name: name || 'Anonymous customer',
        email: email
      },
      subject: subject,
      comment: {
        body: desc
      }
    }
  };
  try {
    const result = await zendeskAxioInstance({
      method: 'POST',
      url: '/requests.json',
      data: data
    });
    return {
      id: result.data.request.id,
      success: true
    };
  } catch (e) {
    return { id: undefined, success: false, error: e };
  }
};

const generateUserSig = function () {
  const expires = 600;
  const api = new TLSSigAPIv2.Api(YOUR_SDKAPPID, YOUR_SECRET);
  return api.genSig(ADMIN_USERID, expires);
};

const generateRandom = function () {
  return Math.floor(Math.random() * 4294967295);
};

const createGroup = async function (groupId, userId, groupName) {
  const sig = generateUserSig();
  const random = generateRandom();
  const data = {
    Type: 'Public',
    Name: groupName,
    GroupId: `ZENDESK#${groupId}`,
    ApplyJoinOption: 'FreeAccess',
    MemberList: [{ Member_Account: userId }]
  };
  const url = `https://console.tim.qq.com/v4/group_open_http_svc/create_group?sdkappid=${YOUR_SDKAPPID}&identifier=${ADMIN_USERID}&usersig=${sig}&random=${random}&contenttype=json`;
  try {
    const groupRes = await axios.post(url, data);
    return groupRes.data;
  } catch (e) {
    return { ErrorCode: -1, ErrorInfo: e };
  }
};

const sendGreeting = async function (groupId) {
  const sig = generateUserSig();
  const random = generateRandom();
  const data = {
    GroupId: groupId,
    Content: "We're assigning an agent to your subject, please wait..."
  };
  const url = `https://console.tim.qq.com/v4/group_open_http_svc/send_group_system_notification?sdkappid=${YOUR_SDKAPPID}&identifier=${ADMIN_USERID}&usersig=${sig}&random=${random}&contenttype=json`;
  try {
    const groupRes = await axios.post(url, data);
    return groupRes.data;
  } catch (e) {
    return { ErrorCode: -1, ErrorInfo: e };
  }
};

app.listen(process.env.PORT || port, () =>
  console.log(`Example app listening on port ${port}!`)
);
Let's break down the code.
const port = process.env.PORT || 15000;
const YOUR_SDKAPPID = process.env.YOUR_SDKAPPID || 0;
const YOUR_SECRET = process.env.YOUR_SECRET || '';
const ADMIN_USERID = process.env.ADMIN_USERID || '';
The first part requires you to set your Chat identification information as the environment variables. You can find all the information here. Caveat: Do not note down your Secret in your code for it might be leaked to the Internet.
const zendeskAxioInstance = axios.create({
  baseURL: `https://${process.env.SUB_DOMAIN}.zendesk.com/api/v2/`,
  auth: {
    username: process.env.EMAIL || '',
    password: process.env.TOKEN || ''
  },
  headers: {
    'Content-Type': 'application/json;charset=utf-8'
  },
  timeout: 35000
});
Secondly, config Zendesk request.
// Create zendesk ticket
const createTicket = async function (caseInfo) {
  const { subject, desc, name, email } = caseInfo;
  const data = {
    request: {
      requester: {
        name: name || 'Anonymous customer',
        email: email
      },
      subject: subject,
      comment: {
        body: desc
      }
    }
  };
  try {
    const result = await zendeskAxioInstance({
      method: 'POST',
      url: '/requests.json',
      data: data
    });
    return {
      id: result.data.request.id,
      success: true
    };
  } catch (e) {
    return { id: undefined, success: false, error: e };
  }
};

// Create Chat group
const createGroup = async function (groupId, userId, groupName) {
  const sig = generateUserSig();
  const random = generateRandom();
  const data = {
    Type: 'Public',
    Name: groupName,
    GroupId: `ZENDESK#${groupId}`,
    ApplyJoinOption: 'FreeAccess',
    MemberList: [{ Member_Account: userId }]
  };
  const url = `https://console.tim.qq.com/v4/group_open_http_svc/create_group?sdkappid=${YOUR_SDKAPPID}&identifier=${ADMIN_USERID}&usersig=${sig}&random=${random}&contenttype=json`;
  try {
    const groupRes = await axios.post(url, data);
    return groupRes.data;
  } catch (e) {
    return { ErrorCode: -1, ErrorInfo: e };
  }
};
Last, create the Zendesk ticket by the input parameters and create an Chat group with returned zendeskCase.id as the groupID, which uses ZENDESK# as the groupID prefix.
Test and publish the server code online for the client side.
TIM for Zendesk Installment
Install Chat for Zendesk by searching Chat for Zendesk on Zendesk marketplace.
Next, type your SDKAppId for the App to complete the installation.
The App will show on the ticket bar area.
It uses agent's ID as UserID for Chat, and you need to acquire UserSig for this UserID. See how to retrieve UserSig. Once logged in, the username in Chat is automatically updated by the agent's name, which can be updated with other profile information on the profile page. Once logged in, you'll stay logged in until UserSig is expired or log out triggered.
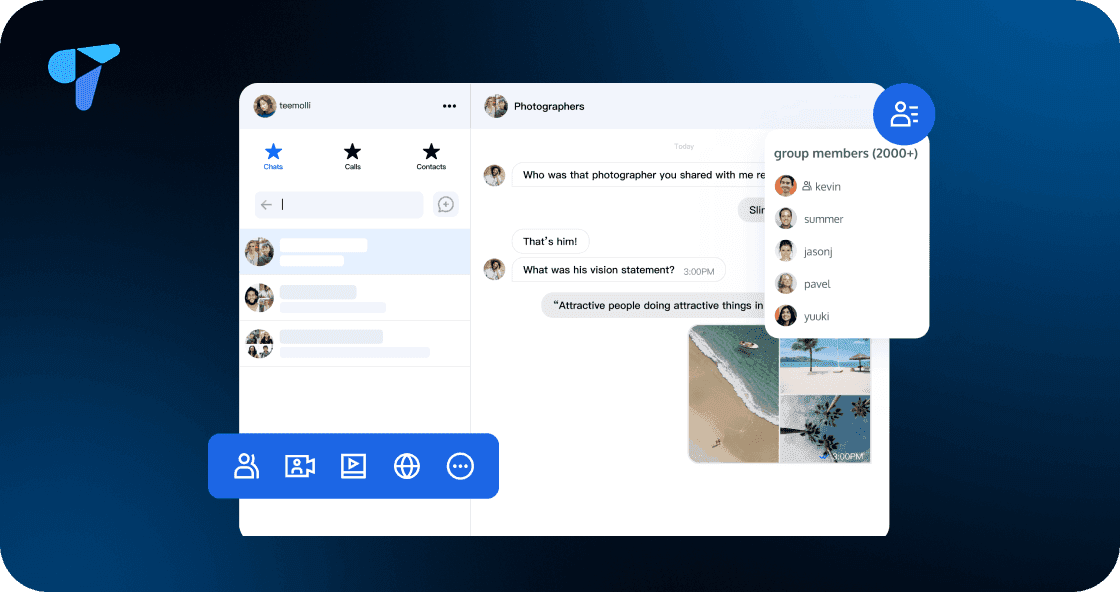
And when an agent is assigned to the ticket, he/she will be invited to the Chat group and chat with clients with various types of messages.
Also you can install the App privately, contact tencentcloud_im@tencent.com to get the lastest TIM package or the source code. Follow the instructions to upload private App here.
If the provided App is not what you expect, you may also develop your own private App. You may apply TUIKit to boost UI construction, and follow the instructions to create your own App. More Zendesk API References are listed here.
That's all you need to integrate Chat with Zendesk. By now, you may have apprehended the process of the integration and the workflow of Zendesk and established your own client-agent-real-time communication App for Zendesk. If there's anything unclear or you have more thinkings about the integration with Zendesk, feel free to contact us!
Order Now
Click here to quickly go to the purchase page to order.