
Implementing a Secure Online Exam Platform with RTC Engine: A Developer's Guide
Scenario Overview
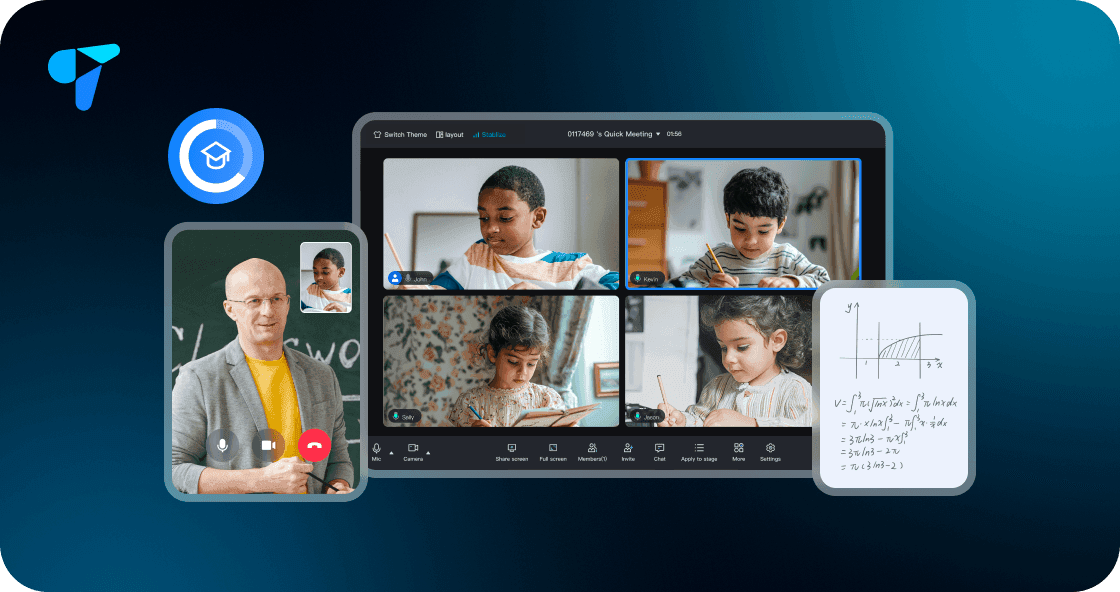
Online examination refers to a form of examination conducted through operating a computer over the network, separated from paper media, and could also be described as an examination conducted through online media.
- Online examinations encompass various paperless examination systems such as the National Computer Rank Examination, College English Test, postgraduate entrance examination, vocational examinations, financial examinations, engineering examinations, foreign trade examinations, examinations for upgrading from junior college to undergraduate, civil service examinations, and corporate written tests. After the examination is completed, operations such as automated scoring can be performed to obtain a final score report, which can be sent to an email for saving or printed online.
- Traditional examinations involve manual participation in the entire process from question setting, composition, and printing of test papers, to the distribution of test papers, submission of answers, collection and marking of test papers, announcement of results, and statistical analysis of examination outcomes. This process is lengthy, labor-intensive, prone to errors, and requires adequate confidentiality work, making the overall learning and examination costs high. Online examination learning systems can completely achieve a paperless, networked, and automated computer online learning and examination, which has profound practical significance and practical value for the informatization construction of units.
It should be noted that "online examinations" and "offline computer-based examinations" are not the same business model. Offline computer-based examination refers to carrying out exams in an online system in an offline IDC, and the difference between it and traditional examinations lies only in whether the test questions are completed on paper or in computer software.
Implementation Scheme
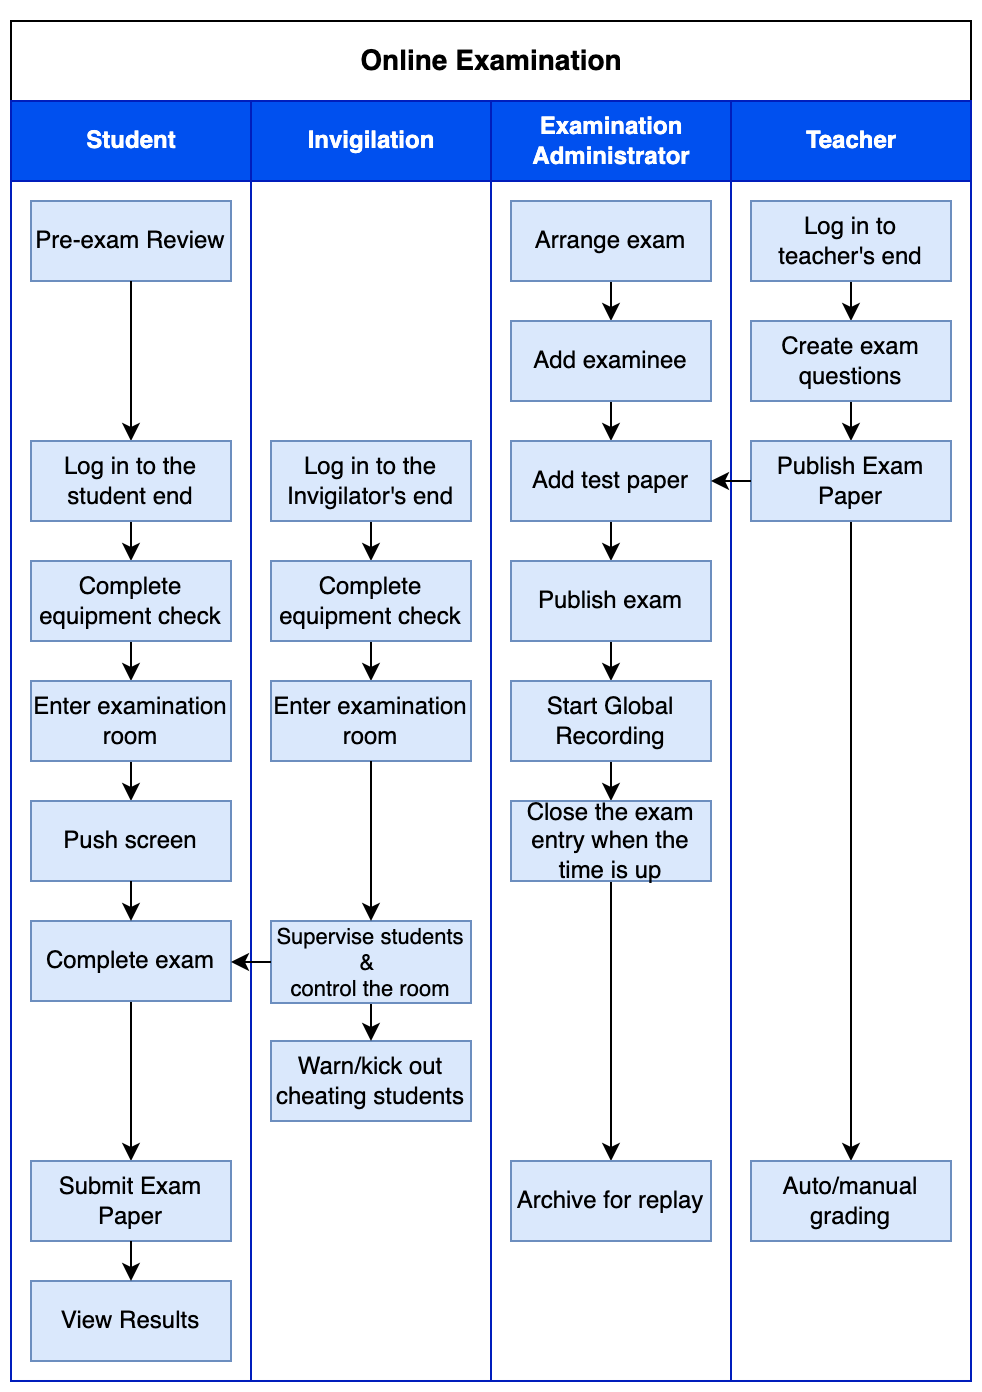
The overall reference business process for the online examination scene is shown in the figure. Users of the online examination system generally include examinees, invigilators, examination administrators, and question setters (markers).
- Examinees: Examinees need to log in to the examinee account to enter the examination room, activate the camera and screen sharing, and complete and submit the test paper under monitored conditions.
- Invigilators: Invigilators need to log in to the invigilator account, which allows them to view the camera feeds of all examinees participating in the examination to determine if there is any cheating. The system itself also has certain automatic monitoring capabilities, such as monitoring the number of times and duration the examination application is switched out. In some scenes, they also need to answer questions that examinees may have within the allowable range.
- Examination administrators: They need to create the examination rooms, upload test questions to the corresponding examination rooms, and control access to the examination rooms. Generally, one of the invigilators can also serve in this role.
- Teachers: Their main tasks involve setting questions before the exam and manually marking the test paper after the exam (if necessary).
Online Examination Business Flowchart:
Business Process
This document summarizes some common business processes to help you better understand the implementation flow of the entire scenario.
- Log In and Log Out
- Creating/Destroying a Room
- Audio and Video Streaming
- Audio and Video Pull Streaming
Products Applied
Basic Integration Guidelines
To ensure the smooth progress of online examinations, it is recommended that you submit a ticket through the console in advance, registering the number of exam takers, region distribution of personnel, resolution, bitrate, and other information used.
Activate the service
Voice chat room scenarios usually require dependencies on two paid PaaS services from the cloud platform, Chat and Real-Time Communication (TRTC) for construction. The interactive whiteboard is optional and can be either selected or self-hosted.
1. You need to log in to the Console to create an application. Choose the RTC Engine and Chat service. At this time, the SDKAppID will be automatically created in the Console. The accounts and authentication systems for both can be reused. Subsequently, you can choose to upgrade either the RTC or Chat application version as needed. For example, the advanced version can unlock more value-added features and services.
Note:
- It is recommended to create two separate applications for testing and production environments. Each account (UIN) is provided with 10,000 minutes of free usage per month within one year.
- The TRTC monthly package is divided into Trial Version, Basic Version, and Professional Version, which can unlock different value-added features and services. For details, see Version Features and Monthly Package Description.
2.Once the application is created, you can find basic information about it under the Application Management - Application Overview section. It is important to securely store the SDKAppID and SDKSecretKey for later use and to avoid leakage to prevent unauthorized traffic usage.
Import SDK
Download the zip compressed packages of TRTC SDK and Chat SDK for Windows to your local machine and extract them. You can create a directory named thirdparty in the root directory of your project to store all SDKs. Move the TRTC SDK and Chat SDK into the thirdparty directory for future use.
1. Integrating with QTCreator
// *.pro
INCLUDEPATH +=  $$PWD/thirdparty/TRTC_SDK/CPlusPlus/Win64/include \
              $$PWD/thirdparty/TRTC_SDK/CPlusPlus/Win64/include/TRTC \
              $$PWD/thirdparty/IM_SDK/include

LIBS += -L'$$PWD/thirdparty/TRTC_SDK/CPlusPlus/Win64/lib' -lliteav \
        -L'$$PWD/thirdparty/IM_SDK/lib/Win64' -lImSDK
2.Integrating with Visual Studio
- To add header file directories in Visual Studio, navigate to Configuration Properties > C/C++ > General > Additional Header Directories. Then, add the path to your header files.
$(SolutionDir)thirdparty/TRTC_SDK/CPlusPlus/Win64/include
$(SolutionDir)thirdparty/TRTC_SDK/CPlusPlus/Win64/include/TRTC
$(SolutionDir)thirdparty/IM_SDK/include
- To add library file directories, navigate to Configuration Properties > Link > General > Additional Library Directories.
$(SolutionDir)thirdparty/TRTC_SDK/CPlusPlus/Win64/lib$(SolutionDir)thirdparty/IM_SDK/lib/Win64
- Reference the library files.
#pragma comment(lib,"liteav.lib")
#pragma comment(lib,"ImSDK.lib")
Note:
- Depending on your specific business needs, if you need to integrate x86, use the header and library files under the Win32 directory.
- The DLL dynamic libraries need to be copied to the directory where the executable (exe) is located.
- LIB files and DLL files for x86 and x64 cannot be mixed and need to be consistent.
Scenario-specific implementation
Authentication credentials generation
UserSig is a security signature designed by Tencent Cloud to prevent attackers from accessing your cloud account. Cloud services such as Real-Time Communication (TRTC) and Chat both adopt this security protection mechanism. TRTC performs authentication when entering a room, while Chat performs authentication during login.
- Debugging and testing stage: UserSig can be generated through Client-side UserSig Generation and TRTC Console UserSig Generation, which are only used for debugging and testing.
- Production stage: It is recommended to use the server-side UserSig generation, which has a higher security level, and helps prevent the client from being decompiled and reversed, thus avoiding the risk of key leakage.
The specific implementation process is as follows:
1. Before your application calls the initialization API of the SDK, request UserSig from your server.
2. Your server will generate a UserSig based on the SDKAppID and UserID.
3. The server returns the UserSig to your application.
4. Your application sends the UserSig to the SDK through a specific API.
5. The SDK submits the SDKAppID, UserID and UserSig to the cloud server for verification.
6. The cloud platform verifies the validity of the UserSig.
7. If the UserSig is valid, services will be provided to the Chat SDK and TRTC SDK.
Note:
- The method of generating UserSig locally during the debugging and testing stage is not recommended for the online environment because it may be easily decompiled and reversed, causing key leakage.
- We provide UserSig generation source code in multiple languages (Java/GO/PHP/Nodejs/Python/C#/C++). For details, see UserSig Generation Source Code.
Initialization and listening
API Sequence Diagram
1.Chat SDK Initialization and Adding Event Listeners
The Chat SDK uses a functional callback approach. It can be encapsulated into a callback class to facilitate usage.
// IMWrapperCallback.h
class IMWrapperCallback
{
public:
    virtual void OnLogin(int errCode, const char* errMsg) = 0;
    virtual void OnLogout(int errCode, const char* errMsg) = 0;
    virtual void OnError(int code, const char* errMsg) = 0;
    virtual void OnCreateGroup(int errCode, const char* errMsg) = 0;
    virtual void OnJoinGroup(int errCode, const char* errMsg) = 0;
    virtual void OnRecvNewMsg(const char* msg) = 0;
    //…
};

// IMWrapper.h
class IMWrapper
{
public:
    IMWrapper();
    bool InitIM(const char* path);
    bool UnInitIM();
    void SetCallback(IMWrapperCallback* callback);

    bool LoginIM(const char* id, const char* sig);
    bool LogoutIM();

    bool CreateGroup(const char* group_name, const char* group_type, const char* group_id);
    bool JoinGroup(const char* group_id);

    bool SendGroupTextMsg(const char* group_id, const char* text);

private:
    IMWrapperCallback* m_callback;
    std::string m_userId;
};

// IMWrapper.cpp
bool IMWrapper::InitIM(const char* path)
{
    Json::Value json_value_init;
    json_value_init[kTIMSdkConfigLogFilePath] = path;
    int nRet = TIMInit(SDKAppID_IM, json_value_init.toStyledString().c_str());
    if(nRet != TIM_SUCC){
        return false;
    }

    TIMAddRecvNewMsgCallback([](const char* json_param, const void* user_data) {
        if(user_data != nullptr){
            IMWrapper* wrapper = (IMWrapper*)user_data;
            if(wrapper->m_callback != nullptr){
                wrapper->m_callback->OnRecvNewMsg(json_param);
            }
        }
    }, this);

    return true;
}
Note: If the lifecycle of your application is consistent with the SDK lifecycle, you do not need to deinitialize before exiting the application. However, if you only initialize the SDK when entering a specific interface and no longer use it after exiting that interface, you can deinitialize the SDK.
2.Instance Creation and Event Listener Setting in TRTC SDK
//OnlineExam.h
#include "ITRTCCloud.h"
class OnlineExam: public ITRTCCloudCallback
{
public:
    OnlineExam();
    ~OnlineExam();
    virtual void onWarning(TXLiteAVWarning warningCode, const char* warningMsg, void* extraInfo) override;
    virtual void onError(TXLiteAVError errCode, const char *errMsg, void *extraInfo) override;
    virtual void onEnterRoom(int result) override;
    virtual void onExitRoom(int reason) override;
    //…
}

OnlineExam::OnlineExam(){
    getTRTCShareInstance()->addCallback(this);// Create a singleton pattern, set event listening.
}

OnlineExam::~OnlineExam(){
    getTRTCShareInstance()->removeCallback(this);// Cancel event listening.
    destroyTRTCShareInstance();// Destroy the instance.
}
Note: It is recommended to listen to SDK event notifications. Perform log printing and handling for some common errors. For details, see Error Code Table.
Log in and log out
After initializing the Chat SDK, you need to call the SDK log-in API to authenticate your account identity and have permission to use features. Before using any other features, ensure you are successfully logged in, or you might encounter feature malfunctions or unavailability. If you only need to use TRTC's audio and video services, you can skip this step.
API Sequence Diagram
// Log in: userID can be customized, and userSig is obtained in step 1.
bool IMWrapper::LoginIM(const char* id, const char* sig){
    m_userId = id;
    int nRet = TIMLogin(id, sig, [](int32_t code, const char* desc, const char* json_param, const void* user_data) {
            if(user_data != nullptr){
                IMWrapper* wrapper = (IMWrapper*)user_data;
                if(wrapper->m_callback != nullptr){
                    wrapper->m_callback->OnLogin(code, desc);
                }
            }
    }, this);

    if(nRet != TIM_SUCC){
        return false;
    }
    return true;
}

// Log out
bool IMWrapper::LogoutIM(){
    int nRet = TIMLogout([](int32_t code, const char* desc, const char* json_param, const void* user_data) {
            if(user_data != nullptr){
                IMWrapper* wrapper = (IMWrapper*)user_data;
                if(wrapper->m_callback != nullptr){
                    wrapper->m_callback->OnLogout(code, desc);
                }
            }
    }, this);

    if(nRet != TIM_SUCC){
        return false;
    }
    return true;
}
Note: If the lifecycle of your application matches that of the Chat SDK, you do not need to log out before exiting the application. However, if you only use the Chat SDK after entering specific interfaces and no longer use it after exiting those interfaces, you can log out and deinitialize the Chat SDK.
Room management
API Sequence Diagram
- Creating a Room
When the anchor (room owner) starts live streaming, a room needs to be created. The concept of "room" here corresponds to "group" in Chat. This example shows how to create an Chat group on the client, but it is also possible to create a group on the server.
bool IMWrapper::CreateGroup(const char* name, const char* type, const char* id)
{
    Json::Value param;
    //Group ID
    param[kTIMCreateGroupParamGroupId] = id;
    //Group Type
    if (strcmp(type, "Public") == 0) {
        param[kTIMCreateGroupParamGroupType] = kTIMGroup_Public;
    }
    else if(strcmp(type, "Work") == 0) {
        param[kTIMCreateGroupParamGroupType] = kTIMGroup_Private;
    }
    else if(strcmp(type, "Meeting") == 0) {
        param[kTIMCreateGroupParamGroupType] = kTIMGroup_ChatRoom;
    }
    else if(strcmp(type, "AVChatRoom") == 0) {
        param[kTIMCreateGroupParamGroupType] = kTIMGroup_AVChatRoom;
        //Invitation Method to Join Group
        param[kTIMCreateGroupParamApproveOption] = kTIMGroupAddOpt_Forbid;//AnyJoin
    }
    //Group Name
    param[kTIMCreateGroupParamGroupName] = name;
    std::string createParams = param.toStyledString();
    int nRet = TIMGroupCreate(createParams.c_str(), [](int32_t code, const char* desc, const char* json_params, const void* user_data)  {
            if(user_data != nullptr){
                IMWrapper* wrapper = (IMWrapper*)user_data;
                if(wrapper->m_callback != nullptr){
                    wrapper->m_callback->OnCreateGroup(code, desc);
                }
            }
    }, this);

    if(nRet != TIM_SUCC){
        return false;
    }
    return true;
}
Note:
- For creating Chat groups for an online exam scenario, it is recommended to use the Meeting Group type: kTIMGroup_ChatRoom.
- TRTC does not have a separate step for creating a room. When you enter a room that does not exist, the room will be automatically created.
- Entering a Room
Join Chat group
bool IMWrapper::JoinGroup(const char* id)
{
    int nRet = TIMGroupJoin(id, "Want Join Group", [](int32_t code, const char* desc, const char* json_param, const void* user_data) {
            if(user_data != nullptr){
                IMWrapper* wrapper = (IMWrapper*)user_data;
                if(wrapper->m_callback != nullptr){
                    wrapper->m_callback->OnJoinGroup(code, desc);
                }
            }
    }, this);

    if(nRet != TIM_SUCC){
        return false;
    }
    return true;
}
Enter TRTC room
Note:
- TRTC room IDs are divided into integer type roomId and string type strRoomId. The rooms of these two types are not interconnected, and you only need to choose one. It is recommended to unify the room ID type.
- UserSig and SdkAppId are recommended to be generated and obtained from the business backend when initializing the SDK, where UserSig is only verified when entering a room. Expired UserSig after entering does not affect the experience.
- TRTC room entry scenarios can be divided into two main categories: real-time call (AudioCall, VideoCall) and Interactive live streaming (Live, VoiceChatRoom). For online examination scenarios, the VideoCall mode is selected.
- TRTC user roles only differ between anchors and audiences in the Interactive Live Streaming mode. In this mode, only anchors have permission to stream, and audiences need to switch to the anchor role if they want to stream. Since the online examination scenario uses the VideoCall mode and there is no distinction between anchors and audiences, the role parameter is not needed.
- In the event callback of entering the room, result > 0 represents the time taken to join the room (in milliseconds); result < 0 represents the error code for failing to enter the room, refer to Error Code Table.
// Enter a room.
void OnlineExam::EnterExamRoom(String roomId, String userId, String userName, int roleType, String userSig)
{
    TRTCParams param;
    param.sdkAppId = SDKAppID_TRTC;
    param.strRoomId = roomID.c_str();
    param.userId = userID.c_str();
    param.userSig = userSig.c_str();
    getTRTCShareInstance()->enterRoom(param, TRTCAppSceneVideoCall);
}

// Event callback for the result of entering the room.
void OnlineExam::onEnterRoom(int result)
{
    if (result > 0) {
        // Entered room successfully.
    } else {
        // Failed to enter the room.
    }
}- Exiting a Room
// Exit the room.
void OnlineExam::ExitExamRoom()
{
   getTRTCShareInstance()->exitRoom();
}

// Exit room event callback.
void OnlineExam::onExitRoom(int reason)
{
    // 0: Actively call exitRoom to exit the room; 1: Be removed from the current room by the server; 2: The current room is dissolved.
}
Audio stream management
The TRTC SDK defaults to automatic subscription of audio streams, meaning that when a user joins a room, the audio of remote users is automatically played. If manual subscription of audio streams is needed, see Setting Subscription Mode.
- Student-end Streaming
// After successfully entering the room, the student starts streaming audio and video.
void OnlineExam::onEnterRoom(int result){
    if (result > 0) {
        // Entered room successfully.
        getTRTCShareInstance()->startLocalAudio(TRTCAudioQualitySpeech);
        getTRTCShareInstance()->startLocalPreview(hwndView);
    } else {
        // Failed to enter the room.
    }
}

// Exam ended, stop streaming.
void OnlineExam::ExitExamRoom(){
    getTRTCShareInstance()->stopLocalAudio();
    getTRTCShareInstance()->stopLocalPreview();
    getTRTCShareInstance()->exitRoom();
}
- Monitoring-end Streaming Pulling
Since students have entered the room and started streaming in advance, invigilators can pull the stream immediately after successfully entering the room. After receiving the remote stream event callback, it can be determined whether it is the student on the current page. If so, you can re-call to start stream pulling without any impact.
void OnlineExam::onUserVideoAvailable(const char* userId, bool available){
    if(available){
        if(userId == student on the current page){
            getTRTCShareInstance()->startRemoteView(userId, TRTCVideoStreamTypeBig, hwndView);
        }
    }
}
Advanced Features
Examination Room Partitioning
In an online exam scenario, there may be thousands or even tens of thousands of students in one exam. However, TRTC rooms have a limit of 50 concurrent streamers per room. Therefore, students need to be divided into virtual examination rooms based on the number of students. If the exam is not very strict, students can use only one video stream, with one stream reserved for the invigilators. For each virtual examination room, it is recommended to assign 40-49 students to the same roomId. Upon entering the room, students only push streams without pulling streams.
For students taking the same exam at the same time, they can be divided into virtual exam rooms with less than 50 students per room in the business backend. Each virtual exam room should be mapped to a TRTC room ID (roomId). Before the exam, students should be guided to enter the examination room 30 minutes in advance and wait. Once in the room, students should be guided to complete the camera, microphone, and speaker tests. Streaming can start 5 minutes in advance, allowing for early detection of any issues with student streaming.
// Student end (using Web as an example).

/// Camera test.
TRTC.startLocalVideo({ view: 'camera-video', publish: false });
/// Microphone test.
TRTC.startLocalAudio({ publish: false });
// Speaker test, please prepare a playable mp3 url, <audio id='audio-player' src="mp3 url" controls></audio>
const audioPlayer = document.getElementById('audio-player');
if (!audioPlayer.paused) {
    audioPlayer.pause();
}
audioPlayer.currentTime = 0;

/// Only push streaming, do not pull streaming.
const localStream = TRTC.createStream({ userId, audio: true, video: true });
try {
  await localStream.initialize();
  console.log(Local stream initialized successfully);
} catch (error) {
  console.error(Failed to initialize local stream + error);
}
try {
  await client.publish(localStream);
  console.log(Local stream is published successfully);
} catch (error) {
  console.error(Fail to publish local stream + error);
}
TRTC provides a device detection React component, which is recommended for quickly integrating device detection features.
Video Pagination Management
In the invigilator end, it is not recommended to pull all students' videos at once, as this requires very high bandwidth. For example, a 360P video stream requires 400-600 kbps bandwidth, so for 40 students, it requires 16-24 Mbps bandwidth. If there are 10 invigilators pulling streams in the same office, it would require 160-240 Mbps bandwidth. Therefore, the exam monitoring terminal can implement a pagination display. For example, display 9 streams on one page, and when clicking the next page, stop pulling the current 9 streams and pull the next 9 streams.
// Invigilator-end (taking Windows as an example).
void OnlineExam::onClickNext(){
    getTRTCShareInstance()->stopAllRemoteView();
    getTRTCShareInstance()->muteAllRemoteAudio(true);

    for(int i = 0; i < m_curUserList.size()){
       getTRTCShareInstance()->startRemoteView(m_curUserList[i].userId, TRTCVideoStreamTypeBig, m_hwndList[i]);
    }
}
Note: Because the underlying streaming is an asynchronous operation, there may be a brief delay, so a click frequency limit needs to be implemented for pagination buttons, restricting them to around 1-2 seconds. If clicked too frequently, it can lead to delayed responses in the underlying system, resulting in unforeseen exceptions.
Split-Screen Display
In ordinary online examinations, the webcam generally uses the built-in webcam of a laptop, which can only capture the front side of the student. For more strict exams, this does not meet the needs. To prevent cheating during exams, it is necessary to also capture the student's rear side direction.
Unlike monitoring with a single stream, an additional side background video monitoring is added, which is usually done on mobile phones for easy movement and position adjustment. It's important to guide students on how to position their setup, such as providing a diagram of the setup. After positioning, it will capture a frame image of the frontal and side videos and send it to the business backend for judgment, automatically determining if the student's positioning is qualified.
For example, if the user ID is 1234, the side video userId can add a custom suffix as 1234_side.
// Student-end - Frontal video (taking Web as an example).
const trtc = TRTC.create();
await trtc.enterRoom({ roomId, sdkAppId, "1234", userSig });

const localStream = TRTC.createStream({ userId, audio: true, video: true });
try {
  await localStream.initialize();
  console.log(Local stream initialized successfully);
} catch (error) {
  console.error(Failed to initialize local stream + error);
}
try {
  await client.publish(localStream);
  console.log(Local stream is published successfully);
} catch (error) {
  console.error(Fail to publish local stream + error);
// Student-end - Profile video (taking Android as an example).
TRTCCloudDef.TRTCParams params = new TRTCCloudDef.TRTCParams();
params.sdkAppId = SDKAPPID;
params.userId = "1234_side";
params.roomId = roomId;
params.userSig = usersig;

mCloud.enterRoom(params, TRTCCloudDef.TRTC_APP_SCENE_VIDEOCALL);

mTRTCCloud.startLocalPreview(true, mTXCloudPreviewView);
mTRTCCloud.startLocalAudio(TRTCCloudDef.TRTC_AUDIO_QUALITY_DEFAULT);
Volume Detection
In stricter online exam scenarios, it is not only necessary to monitor the frontal and side views of the examinee to prevent them from accessing study materials during the exam, but sometimes it is also essential to detect ambient sounds in the examinee's surroundings. This is because examinees might attempt to cheat using sound, such as playing pre-recorded materials, communicating with others, or making phone calls.
The TRTC SDK provides the volume detection callback feature. This feature allows real-time monitoring of the sound levels of each user, helping us detect suspicious cheating behavior. For example, if an examinee's voice suddenly becomes louder, he may be playing pre-recorded answers or talking to someone else. At this point, the teacher can intervene by listening to the audio of this examinee.
API Sequence Diagram
// Disable automatic stream pulling.
void OnlineExam::enterExamRoom(){
    getTRTCShareInstance()->setDefaultStreamRecvMode(false, false);
    getTRTCShareInstance()->enterRoom(params);
    getTRTCShareInstance()->enableAudioVolumeEvaluation();
}

// Pull stream of current paginated users.
void OnlineExam::onEnterRoom(){
    for(int i = 0; i < m_curUserList.size()){
       getTRTCShareInstance()->muteRemoteAudio(m_curUserList[i].userId, false);
       getTRTCShareInstance()->startRemoteView(m_curUserList[i].userId, TRTCVideoStreamTypeBig, m_hwndList[i]);
    }
}

// Detect the volume level.
void OnlineExam::onUserVoiceVolume(TRTCVolumeInfo* userVolumes, uint32_t userVolumesCount, uint32_t totalVolume){
    int count = userVolumesCount;
    TRTCVolumeInfo* remoteUserVolumes = userVolumes;
    std::string userId;
    int userVolume = 0;
    for(int i = 0; i < count; i++){
        userId = remoteUserVolumes->userId;
        if(!userId.empty()){
            userVolume = remoteUserVolumes->volume;
            if(userVolume > m_maxVolume){
                // Mark the student on the interface.
            }
        }
        remoteUserVolumes++;
    }
}
Order Now
Click here to quickly go to the purchase page to order.