


Have you ever wondered how those cool face AR filters on Instagram or Snapchat are made? You know, the ones that give you 3D cat ears that move with you or add quirky effects that make your friends laugh. Well, here’s the good news: creating your own custom AR filters isn’t as hard as it sounds!
If you’ve been curious about how to add custom face filters to your social media or app, you’re in the right place. Whether you want to add some personality to your brand or develop an app that offers these cool features to engage your users, this guide will walk you through everything you need to know—step by step.
Why Customize Face Filters?
The face filter market has experienced explosive growth, with billions of users worldwide on platforms like Instagram, Snapchat, and TikTok embracing these immersive effects.
Customizing face filters, especially AR filters, is a creative and powerful tool that serves multiple purposes for developers, brands, and content creators alike:
For Brands
- Boost awareness: Reflect your values, products, or ideas with branded filters.
- Engage millennials: Reach mobile and social audiences with innovative AR experiences.
- Promote products: Allow users to try products virtually and reduce returns.
- Drive organic traffic: Inspire users to create and share branded photos and videos.
For Content Creators
- Self-expression: Stand out and showcase your personality on social media.
- Grow your following: Expand your audience quickly with engaging filters.
- Monetize your influence: Partner with brands to earn from your creativity.
For Developers
- Enhance engagement: Use animations, Face AR games, and interactive features.
- Increase retention: Keep users coming back with fresh filters.
- Inspire UGC: Drive user-generated content and organic traffic.
- Improve communication: Make video interactions more fun with AR features.
How to Create Face Filters?
Creating your own face filters might sound intimidating, but it’s easier than you think, thanks to the many tools and platforms available. Whether you’re a developer or content creator, here’s a step-by-step guide to get started:
For Content Creators or Brands: Snapchat Lens Studio
With Meta’s Spark AR operations ceasing as of January 14, 2025, Snapchat’s Lens Studio has become a leading platform for developing interactive AR experiences. If you’re a content creator or brand looking to craft custom face filters, here’s how to get started:
1. Download and Install Lens Studio
Visit the official Lens Studio website and download the application compatible with your operating system. After installation, open Lens Studio, sign up, and familiarize yourself with its interface.
2. Start a New Project
Begin by selecting “Create an Augmented Reality Lens.” Lens Studio makes it easy by offering pre-built templates for common effects, like face masks, makeup, 3D objects, and interactive games. Choose a Face Lens template that aligns with your vision or start from scratch.
3. Import and Design Assets
Now it’s time to bring your vision to life:
- Import Assets: Upload logos, images, 3D objects, or textures that you want to include. For example, if you’re a brand promoting a new product, upload the product model or your logo.
- Use the Face Tracker: Lens Studio uses AR face-tracking technology, which makes it easy to align your effects (like glasses, hats, or makeup) with the user’s face.
- Add Animations: Enhance your Lens with animations, particle effects, or interactive triggers. For example, you could create a Lens where confetti falls when a user raises their eyebrows.
4. Test Your Lens
Lens Studio allows you to preview and test your Lens in real-time. You can even scan a Snapcode to test the Lens on your phone and see how it performs on a real device. Use this step to refine any details and make sure everything works as intended.
5. Publish Your Lens
Once you’re happy with your creation:
- Submit it for Review: Upload your Lens to Snapchat’s approval system. The process is quick, and most lenses are approved within 24-48 hours.
- Generate a Snapcode: Once approved, your Lens will be assigned a Snapcode that users can scan to access it instantly.
For App Developers: TRTC Beauty AR SDK
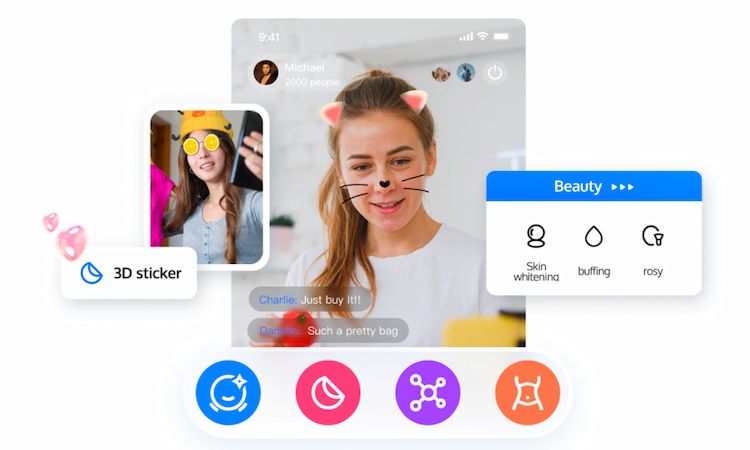
For app developers who want to integrate advanced AR beauty features into their applications, TRTC’s Beauty AR SDK is a powerful tool. With cutting-edge AR technology, this SDK enables features like skin smoothing, face shaping, virtual makeup, AR stickers, and more—all while delivering high performance and real-time processing.
Here’s why you should choose TRTC Beauty AR SDK:
- Professional Tools: Includes tools for material creation, AI configuration, process control, and special effects imports.
- High Quality: Outstanding image recognition and detection with real-time processing for up to five faces simultaneously.
- Advanced AI Recognition: Offers 468 facial detail adjustments for precise and realistic beauty enhancements.
- All-Platform Support: Compatible with iOS, Android, Windows, macOS, web, and more.
- High-Performance Mode: Optimized for low-end devices, running smoothly even on older models at an average of 30 FPS.
It offers a basic demo platform for beginners and enhanced AR materials creation tools for professionals. To get you started, let’s explore the demo platform in simple ways:
- Apply for License: To enable Beauty AR features, you first need to apply for a license from Tencent. Once authentication is successful, you’ll be able to access the beauty filters in your application.
- Run the Demo Project: Before starting the integration, try the demo projects available on TRTC’s platform. These demos are pre-configured scenarios designed to help you understand how the Beauty AR features work within different environments, such as video calls.
- Download and Integrate the SDK: After receiving your license, download the TRTC SDK, which includes the necessary Beauty AR components. Follow the official integration guides provided by Tencent to add the SDK to your app. This involves coding changes within your app’s backend to handle real-time video streaming and beauty effects.
- Access Beauty Features: Once the SDK is integrated, you can access Beauty AR features directly from the video call interface. This typically appears as a control panel or settings menu during the call. You can toggle between different beauty options or filters, such as skin smoothing, blemish removal, or eye enlargement.
- Select and Adjust Filters: Within the Beauty AR settings, you can choose from various pre-set filters designed to enhance your appearance, such as natural, dramatic, or subtle. Then you can adjust the intensity with a slider to control how strong the effect is.
- Apply to Your Apps: Finally, if you’re satisfied with the demo experience, you can integrate the TRTC SDK into your application directly. Once the integration is complete, you can simply start a video call within your app and access a variety of beauty filters to personalize your look in real time.
After exploring the demo platform, you can move on to the AR materials creation tools, where you can design and fine-tune custom beauty effects for your app.
- Download Templates: First, you may download the necessary templates for your effect, such as the human face model for makeup or the appropriate PSD template for other effects like stickers or filters. These templates to design your material in graphic design software can ensure proper alignment with the reference points.
- Design the Material: Then you can design your material in Photoshop or After Effects using the downloaded templates. For makeup effects, use 800x800 PNG images. For eye color effects, design at a 1:1 ratio. Stickers should not exceed 100 frames, and filters should use a 512x512 LUT file.
- Import the Material: After designing, upload it to the RT-Cube console according to different effect types (e.g., makeup should upload materials, filter should upload LUT file, and sticker should upload the sequential frame images), and import your material into the appropriate section. You need to adjust the material’s blending mode, transparency, and size as needed for a smooth effect.
- Preview and Adjust: Now, you can preview your material using the built-in camera or model to ensure proper alignment and function. Make any necessary adjustments to the material’s positioning, size, and animation properties to ensure a seamless and realistic effect.
- Export the Material: Once satisfied with your material, click “Export” and complete the necessary settings. Then add a thumbnail, name your material, and apply appropriate labels. After configuring these settings, click “Publish” to finalize the material and make it ready for use in your AR Filter projects.
Conclusion
And there you have it! By following these straightforward steps, you’ve learned how to add custom face filters to your social media toolkit. Not only does this allow you to showcase your creativity, but it also adds a unique flair to your online presence.
And for developers who want to integrate advanced AR beauty features into their apps, TRTC’s Beauty AR SDK offers a robust, real-time solution. With its AI-driven precision, platform compatibility, and user-friendly tools, you can create highly engaging and personalized beauty experiences for your users, all while maintaining high performance—even on low-end devices.
FAQs
Can you make your own face filter?
Yes, anyone with a creative idea and the right tools can design and customize their filters. There are tools like Lens Studio or Effect House that make it easy to design and publish custom filters for platforms like Snapchat, and TikTok. For developers looking to integrate beauty and AR filters into their apps, try TRTC Beauty AR SDK.
How do I add my own filter?
To add your own filter, you’ll need to use the AR designing tools provided by your intended platform, like Lens Studio for Snapchat or Effect House for TikTok. This typically involves designing your filter, uploading assets like images or 3D models, and integrating the filter into the platform. If you’re a developer, the TRTC Beauty AR SDK is a great option to create and integrate custom filters into your own app or project.
How do I import filters to Instagram?
First, you’ll need to create your filter using Spark AR Studio. After designing and testing it, you can upload it to the platform through the Spark AR Hub. Once your filter is approved, it will be available for you to use and share on Instagram through the effects section, where you can add it to your stories or posts.
If you have any questions or need assistance online, our support team is always ready to help. Please feel free to Contact us or join us on Telegram or Discord. For technical problems, you can also get help directly from developers on Stack Overflow.


