Introduction
In this tutorial, we will guide you through the process of creating a feature-rich group chat app using Xcode and SDK. Whether you're looking to build chatting app like WhatsApp or Telegram, or simply want to learn how to implement essential features such as 1v1 chatting, group chats, search functionality, and support for multiple message types, this tutorial has you covered. We'll also discuss how to leave a group chat and explore the benefits of 1v1 chat me and free chat room features.
Why Build Group Chat App?
1v1 or Group Chat applications have revolutionized communication in recent years, with real-time messaging becoming an integral part of our daily lives. From social interactions to workplace collaboration and customer engagement, chat apps have reshaped the way we connect with others. With 41 million messages sent every minute through messaging apps and WhatsApp boasting 2 billion monthly active users, the demand for chat apps is undeniable.
Businesses have also recognized the potential of chat apps to streamline operations, foster customer engagement, and strengthen their customer base through community building. Studies have shown that employees using chat applications save time, improve communication, and reduce the need for meetings. Additionally, 82% of consumers expect a response within 10 minutes when they have a marketing or sales question, and 80% believe that their experience communicating with a brand is as important as the brand's products.
Build 1v1 Chat App: Key Features
1. 1v1 Chatting
Implement one-on-one chat functionality to allow users to engage in private conversations. Discuss the importance of real-time messaging, message history, and user presence indicators.
2. Group Chats
Enable users to create and participate in group chats. Explain how to manage group members, handle group invitations, and facilitate group-wide communication.
3. Leaving a Group Chat
Provide users with the ability to easily leave a group chat when they no longer wish to participate. Outline the steps involved in leaving a group and discuss best practices for managing group membership.
4. Search Functionality
Implement a robust search feature that allows users to find specific conversations, messages, or contacts within the app. Discuss the importance of efficient search algorithms and user-friendly search interfaces.
5. Multiple Message Types
Support various message types, such as text, images, videos, and files. Explain how to handle different media formats and ensure a seamless user experience when sending and receiving diverse content.
6. 1v1 Chat Me
Highlight the benefits of a dedicated 1v1 chat me feature, which enables users to initiate private conversations with ease. Discuss how this feature enhances user engagement and fosters more intimate communication.
7. Free Chat Room
Explore the concept of free chat rooms, where users can join public or topic-based discussions. Explain how to create and manage chat rooms, moderate content, and encourage user participation.
The Benefits and drawbacks of Building Custom Group Chat Apps
Building your own custom 1 on 1 chat or group chat application offers several advantages:
1. Complete Customization
Create a fully tailored experience that caters to your users' needs and preferences while aligning perfectly with your brand identity.
2. Control Over Features
Decide which features to include, prioritize, or exclude, allowing you to build a 1v1 chatting app that aligns with your business objectives.
3. Intellectual Property Ownership
When you build your own 1v1 chat app, you own the intellectual property, which is a valuable asset for your company.
4. Independence
Developing your own group chat app means you're not reliant on third-party providers, giving you better control over the app's performance, security, and support.
However, custom 1v1 or group chat apps also come with some drawbacks:
1. Higher Development Costs
Building from scratch can be more expensive than using a white-label solution, especially when considering development, testing, and maintenance costs.
2. Longer Time-to-Market
Developing a custom app takes time, which may delay your ability to launch chat features and start realizing their benefits.
3. Resource Allocation
Launching your own solution may require you to allocate significant resources, including hiring or assigning developers, managing the project, and providing ongoing support and updates.
Cost Calculator Framework | ||||
Year1 | Monthly cost | Duration | Total Cost | |
Development team costs to build | 2 Front End Engineers | $20,000 | 0-6 months | $120,000 |
2 Back End Engineers | $20,000 | 0-6 months | $120,000 | |
Product Manager | $12,000 | 0-6 months | $72,000 | |
UI Designer | $10,000 | 0-6 months | $60,000 | |
Infrastructure costs | Data centers | $5,000 | 4-12 months | $40,000 |
Security tools | $200 | 4-12 months | $1,600 | |
Data & analytics | $500 | 4-12 months | $4,000 | |
Year1 Build Total | $417,600 | |||
Cost Calculator Framework | ||||
Year2 | Monthly cost | Duration | Total Cost | |
Development team costs to build | 2 Front End Engineers | $20,000 | 1 month | $20,000 |
2 Back End Engineers | $20,000 | 2 months | $40,000 | |
Product Manager | $12,000 | 1 month | $12,000 | |
Development team costs to update | 2 Front End Engineers | $20,000 | 3 months | $60,000 |
2 Back End Engineers | $20,000 | 3 months | $60,000 | |
Product Manager | $12,000 | 3 months | $36,000 | |
UI Designer | $10,000 | 3 months | $30,000 | |
Infrastructure costs | Data centers | $5,000 | 12 months | $60,000 |
Security tools | $200 | 12 months | $2,400 | |
Data & analytics | $500 | 12 months | $60,000 | |
Year2 Maintenance & Update Total | $380,400 | |||
Building with Existing Chat APIs
Ideally, you want the customization and control of building your own solution, but with lower development costs and shorter time-to-market. For many companies, the solution is to build custom 1v1 or group chat apps using existing chat APIs and SDKs.
When you build your app using chat APIs, your development team can focus on features and user experience without getting bogged down in messaging protocols and lower-level implementation details. Most companies don't have that level of engineering resources, so they need to hire help to fill those technical gaps. Building with real-time messaging APIs reduces development costs and helps you build your app faster.
1. Create an App
1. Log in to the Tencent RTC Console. If you already have an app, record its SDKAppID and SDKSecretKey and jump directly to the next section.
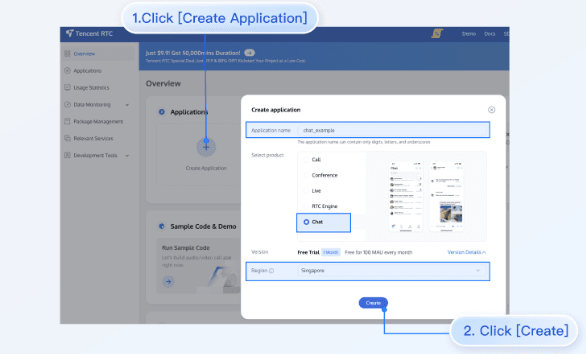
2. Click Create Application, enter your Application name, product, Region, and click Create.
2. Obtain SDKAppID and SDKSecretKey
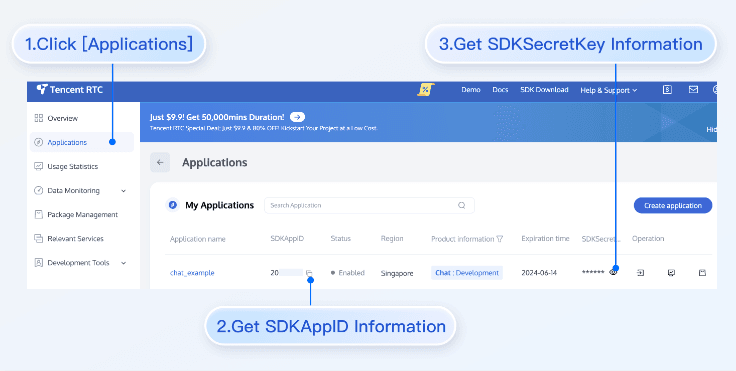
After creation, you can view the newly created app's Status, SDKAppID, Expiration time, etc., on the Applications page:

Record the SDKAppID and SDKSecretKey from the Application Information.
3. Download and Configure the Demo
1. Download the iOS demo project from Github.
2. Open the project in the terminal directory and find the GenerateTestUserSig.h file. The path is: chat-uikit-ios-main/Demo/TUIKitDemo/Private/GenerateTestUserSig.h
3. Set the relevant parameters:
SDKAPPID: set it to the SDKAppID obtained above.
SECRETKEY: set it to the SDKSecretKey obtained above.

Warning:
1. In this document, the method to obtain UserSig is to configure a SECRETKEY in the client code. In this method, the SECRETKEY is vulnerable to decompilation and reverse engineering. Once your SECRETKEY is disclosed, attackers can steal your Tencent Cloud traffic. Therefore, this method is only suitable for locally running a demo project and feature debugging.
2. The correct UserSig distribution method is to integrate the calculation code of UserSig into your server and provide an app-oriented API. When UserSig is needed, your app can send a request to the business server to obtain a dynamic UserSig. For more information, see How to Generate UserSig on the Server.
3. To respect the copyright of emoji design, the downloaded demo project does not contain sliced images of major emoji elements. You can use your local emoji packs to configure code. Unauthorized use of the emoji pack in the Chat demo may infringe on the design copyright.
4. Compile and Run the Demo
See the file README.md in the corresponding directory of the demo project cloned above.
1. Run the following command on the terminal to check the pod version:
pod --versionIf the system indicates that no pod exists or that the pod version is earlier than 1.7.5, run the following commands to install the latest pod.
//Change Gem Source
gem sources --remove https://rubygems.org/
gem sources --add https://gems.ruby-china.com/
//Install pod
sudo gem install cocoapods -n /usr/local/bin
// If multiple versions of Xcode are installed, run the following command to choose an Xcode version (usually the latest one):
sudo xcode-select -switch /Applications/Xcode.app/Contents/Developer
//Update Pod Local Repository
pod setup
2. Run the following commands on the terminal, and open the directory where Podfile is located to install dependent libraries:
cd chat-uikit-ios-main/Demo
pod install
If installation fails, run the following command to update the local CocoaPods repository list:
pod repo update3. Compile and run the demo: Go to the chat-uikit-ios-main/Demo folder, and open TUIKitDemo.xcworkspace to compile and run the demo.
Note:
The demo is integrated with the audio/video call feature by default. However, the TRTC SDK on which the audio/video call feature relies currently does not support simulators. Please use real devices for demo running or debugging.
Experience basic features
Create User Account
If you have successfully run the Demo by following the above steps, you can start experiencing the basic features.
First, you need to create a user account. There are many ways to do this, for example, by registering through log in to Demo on the client side or creating some in the console. You can choose any method that suits you.
Client Registration
Simply log in to the Demo with several different accounts.
Create in Console
The steps are as follows:
1. Click to enter the application you created above, and you will see the Chat product entry on the left sidebar, click to enter.
2. After entering the Chat Product subpage, click on Users to go to the User Management Page.
3. Click Create account, a pop-up will appear for you to fill in the account creation information. If you are just a regular member, we recommend you choose the General type. Although Nickname is not mandatory, we still suggest you set it. If it's inconvenient to display userID on the interface, you can identify different users through Nickname.
The details are as follows:
Note:
Sending messages involves at least two users, so at this step, you need to create at least 2 accounts. Please note down the userID of these 2 accounts for subsequent steps.
Add to Contacts
After switching to the Contacts interface:
1. Click the + button in the top right corner of the interface, and in the submenu, select Add to Contacts.
2. Enter a valid userID and search for the user. If you have already created an account in the console, you can go to the console Account Management page to get a valid userID. Page path: Applications > Your App > Chat > Users > Account Management.
3. Add user as contact.
The steps are shown below:
After successfully adding, the user will appear in the contact list:
Sending Messages
Select a user, click Message to enter the message interface:
Next, you can send messages, voice, images, and make audio/video calls with the user in the message interface:
Conclusion
Building a 1 on 1 chat app like WhatsApp or Telegram is an exciting project that can have a significant impact on user communication and engagement. By following this tutorial and leveraging Xcode and SDK, you can create a feature-rich chat app in just 5 minutes. Implementing essential features such as 1v1 chatting, group chats, search functionality, and support for multiple message types will ensure that your app stands out in the competitive landscape of chat applications.
If you have any questions or need assistance online, our support team is always ready to help. Please feel free to Contact us or join us on Telegram or Discord. For technical problems, you can also get help directly from developers on Stack Overflow.


